Licensee
Contents . . . .Page Gun safety warnings . . . .1 - 3 General description . . . .3 - 4
Terminology and descriptions . . . .5
Serial number . . . .8
Ammunition . . . .8
Magazine capacity . . . .8
General operation/special reminders . . . .9
Initial cleaning . . . .9
Oiling the action . . . .9
Operation of the safety . . . .10
Installing/removing the bolt . . . .12
Loading procedures — magazines . . . .14
Unloading procedures — magazines . . . .15 - 17 Firing procedures . . . .17
In the case of a misfire . . . .18
Bolt disassembly . . . .18
Sight adjustments . . . .20
Cleaning and maintenance suggestions . . . .22 - 24 Ordering parts / service or repair . . . .24
This manual covers current Model 70 versions with conventional magazine systems with enclosed floorplate and swing down-type floorplate design. This includes those with Classic Pre-’64 type action and push feed designs. This manual does not apply to Model 70’s containing a Detachable Box Magazine (DBM). Study these instructions carefully to be sure you have covered all information about your particular Model 70.
GUNSAFETYWARNINGS
IT IS ESSENTIAL THAT THESE OPERATING INSTRUCTIONS BE THOROUGHLY STUDIED BEFORE USING THIS FIREARM TO ASSURE PROPER AND SAFE GUN HANDLING. FAILURE TO FOLLOW THESE INSTRUCTIONS OR FAIL- URE TO OBEY ANY SAFETY WARNING MAY RESULT IN INJURY TO YOURSELF OR OTH- ERS, OR CAUSE DAMAGE TO YOUR GUN.
As a gun owner, you accept a set of demanding responsi- bilities. How seriously you take these responsibilities can be the difference between life and death. There is no excuse for careless or abusive handling of any firearm.
At all times handle your rifle and any other firearm with intense respect for its power and potential danger.
PLEASE READ AND UNDERSTAND ALL OF THE CAUTIONS, PROPER HANDLING PROCE- DURES AND INSTRUCTIONS OUTLINED IN THIS BOOKLET BEFORE USING YOUR NEW FIREARM.
1. Do not carry a loaded gun with a live round in the chamber while walking, running, climbing a tree, crossing a fence or anywhere you might slip or fall, drop the gun or otherwise bump or jar the gun. A gun that is dropped, bumped, or jarred with a chambered round might acciden- tally discharge even with the safety on, causing serious injury to you or someone else. When a round is cham- bered keep the safety on until you are ready to shoot.
2. Do not rely on the safety to prevent accidental dis- charge. Many safeties merely block the trigger and prevent firing by pulling the trigger. The safety may not prevent an accidental discharge due to dropping, jarring, or bump- ing a gun.
3. Use only ammunition for which the gun is chambered as indicated on the barrel, to prevent excessive pressure and possible serious personal injury.
4. Incorrectly reloaded ammunition can cause serious per- sonal injury and damage to the firearm due to excessive
pressure. Reload only after proper instruction and in strict compliance with instruction and data contained in cur- rent reloading manuals.
5. Never point a gun at anything you do not intend to shoot. Always keep it pointed in a safe direction in case of accidental discharge.
6. Always check to ensure that the barrel is free of obstructions before loading and using the gun. If you experience light recoil or off sound, check the barrel for obstruction.
7. Before firing, clean any grease or oil out of barrel with cleaning rod and patch. Grease or heavy accumulation of oil can cause excessive pressure and result in serious personal injury.
8. Keep barrel, chamber and action free of rust. Rust in the barrel and chamber can cause excessive pressures resulting in serious injury. A rusted, pitted or eroded bar- rel should be replaced.
9. Use hearing protection to prevent ear damage from repeated exposure to gunfire.
10. Always use proper shooting glasses to prevent eye injury from flying particles.
11. Never carry a loaded gun in a motor vehicle or carry
one into a dwelling. Always carefully unload the gun before entering a motor vehicle, a dwelling or an area such as a camp. Always point a gun in a safe direction while loading or unloading to prevent serious injury in case of an accidental discharge. Never load in the house or in your vehicle.
12. Never shoot at a hard, flat surface or at the surface of water to avoid a ricochet and possible serious personal injury to yourself or a bystander.
13. Store guns in a clean dry place out of reach of children and separated from stored ammunition.
14. Never alter any parts of your gun. Any alterations or adjustments that may become necessary to the operating mechanism should be performed by a qualified gunsmith.
GENERALDESCRIPTION
Your new Model 70 is one of a number of different ver- sions and configurations offered. The basic operating pro- cedures are the same for nearly all of them. Where there are differences they are pointed out for your convenience.
The Model 70 is a bolt action design that allows the shooter to load a round by cycling the action and moving a cartridge from a loaded magazine to the chamber.
This can be repeated until the magazine is empty. A single
round can also be inserted into the chamber manually.
There are many different versions of the Model 70.
A variety of calibers is offered. Each gun is designed to shoot a specific centerfire caliber.
Your Model 70 is made with one of the following bolt design configurations:
1) Pre-’64 type action with claw extractor and controlled round feed.
2) Push feed design with recessed bolt face and plunger style ejector.
Both designs are proven under real hunting and shooting conditions and offer excellent advantages to match your specific needs.
Every Model 70 has a three-position safety. This sets the Winchester Model 70 apart from other designs. With the safety in the middle position, the bolt can be opened and operated. In the middle position the safety remains “on safe.” Model 70s have hammer-forged rifling. This type of rifling is considered by many gun experts as the best rifling for accuracy. Your Model 70 may be equipped with the BOSS accuracy system (Ballistic Optimizing Shooting System, U.S. Patent #5,279,200). If so, it will have a full floating barrel. If you have the BOSS, be sure you thoroughly read and understand all instructions
concerning it supplied in a separate manual with your rifle. If your manual is missing contact us immediately.
The barrels on other non-BOSS models often utilize slight forearm pressure to maximize accuracy.
Magazine configurations vary. Yours has one of the follow- ing:
1) A hinged-type floorplate with a conventional spring and follower mechanism.
2) An enclosed floorplate.
DBM-type magazines (stands for Detachable Box
Magazine) are not covered in this manual. Please be aware
of which type of magazine you have and carefully read the instructions pertaining to it later in this manual.
If your Model 70 is one of the new Classic Pre-’64 type models you’ll notice the nearly identical likeness to the original Model 70s discontinued in 1963. You get all the classic design advantages of the originals, plus improve- ments in manufacturing and finish not possible decades ago.
IMPORTANT:Refer to Figures 1A-D for general part descriptions regarding your new rifle. You must become familiar with all part names listed before proceeding with the rest of the instructions in this manual.
FIGURE 1A
Recoil Pad (Butt Plate
Cocking Indicator Safety Action
Bolt
Loading/Ejection Port
Hinged Magazine Floorplate Bolt Handle
Trigger Guard Trigger
Stock
Fore-end
Optional BOSS Device
Muzzle
TERMINOLOGY ANDDESCRIPTIONS
Descriptions in this manual generally refer to the gun in the horizontal position. That is, in the normal firing position. For example, the muzzle is forward or front; the butt stock is rearward or rear; the trigger is downward or underneath; the sight is upward or on top. For general parts terminology, refer to Figure 1-A.
The Winchester Model 70 is also shown disassembled to the extent necessary in order to follow instructions con- tained in this book (See Figure 1-B through 1-D).
Figure 1-E covers the general features and benefits of the Model 70 design.
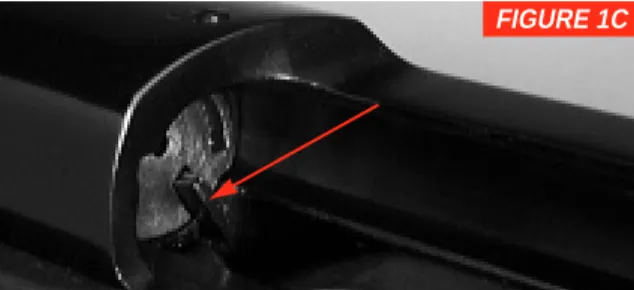
FIGURE 1B FIGURE 1C
FIGURE 1D
Manual ejector gives more control over the way a cartridge is ejected. Unlike plunger- style ejector, the Model 70’s Pre-‘64 type design uses a blade system that allows you to vary the amount of ejection. Pull sharply rearward and the cartridge ejects well clear of the rifle. Pull slowly and easily pluck the round from the action. The non-mechanical blade ejector is so reliable, it has long been the preference of those who hunt in Africa.
Cone-to-breech design protects bullet points for accuracy. All new Model 70s with Pre-’64 style actions have a precision machined coned breech. The proven cone design assists alignment of the cartridge point with the chamber — without marring the point of the bullet. You get smoother feeds, with no snags, as the cartridge neck and shoulder are guided into position.
Claw extractor
Locking Lugs
Ejector slot
Anti-bind slot
The original Model 70 three-position safety is still the preferred design of most gun experts — it actually blocks the firing pin and lets you open the bolt with the safety on.
The Model 70 offers our superb anti-bind bolt design — keeping bolt function smooth.
The innovative field-strippable firing pin mechanism is easy to inspect and service — even in the outdoors. It gives you spe- cial confidence in extremely cold or dirty conditions.
Most Model 70s feature the famous Pre-’64 type action with claw extrac- tion. For different needs, models are also available with our proven push-feed bolt design.
The heart of any rifle is its trigger.
The Model 70’s trigger system is repeatedly praised for its consistency, precision and incredible crispness.
FIGURE 1E
The optional BOSS accuracy device takes the famous Model 70 design into a new era of accuracy. This revolutionary, patented technology allows barrel vibrations to be tuned to maximize accura- cy with virtually any load. Available on many new Model 70s.
No other competitor’s rifle gives you the strength and accuracy of a forged, chrome molybdenum, machined steel receiver and barrel. (Of course on stainless models, these components are stainless steel.)
The Model 70 gives you the precision of hammer-forged rifling — the most accurate rifling made.
Free floating barrels on Super Grade, Sporter and synthetic- stocked models with the BOSS accuracy system.
Throughout this manual the “action” refers to the mecha- nism of this rifle which loads and secures the cartridge in the chamber.
SERIALNUMBER
The serial number is located on the right side of the receiver, just forward of the loading/ejection port. Record the serial number at the front of this book for future refer- ence.
AMMUNITION
The caliber of your Model 70 is inscribed on the left side of the barrel. As stated previously, use only ammunition for which your Model 70 is chambered — as indicated on the barrel — to prevent excessive pressure and possible serious personal injury.
The various Model 70 actions are able to handle a large variety of different centerfire cartridges. Many cartridges have similar sounding names.
MAKE SURE YOU USE ONLY THE EXACT AMMUNITION/CALIBER AS LISTED ON THE LEFT SIDE OF THE BARREL.
Incorrectly reloaded ammunition can cause serious per- sonal injury and damage to the firearm due to excessive
pressure. Reload only after proper instruction and in strict compliance with instructions and data contained in current reloading manuals.
DISCHARGING FIREARMS IN POORLY VENTILATED AREAS, CLEANING FIREARMS, OR HANDLING AMMUNITION MAY RESULT IN EXPOSURE TO LEAD AND OTHER
SUBSTANCES KNOWN TO CAUSE BIRTH DEFECTS, REPRODUCTIVE HARM AND OTHER SERIOUS PHYSICAL INJURY. HAVE
ADEQUATE VENTILATION AT ALL TIMES.
WASH HANDS THOROUGHLY AFTER EXPOSURE.
MAGAZINECAPACITY
It is extremely important that you know the magazine capacity of your Model 70. It is listed on the hang tag supplied with your Model 70. Under appropriate circumstances — at a range or other suitable shooting location — load your magazine to full capacity and make note of the number of cartridges. Remember, “total”
capacity includes an additional round which can be loaded manually in the chamber in addition to a full magazine.
GENERALOPERATION/SPECIALREMINDERS IMPORTANT: ALWAYS KEEP THE MUZZLE POINTED IN A SAFE DIRECTION.
Prior to using live ammunition, familiarize yourself thor- oughly with these operating instructions. Get accustomed to the feel of your new gun — know the forces required to operate the action. Learn how to pull the trigger and, above all, know the location and operation of the safety.
Procedures for disassembly and operation of various com- ponents are outlined in the sections below. Please read and study them thoroughly. In addition, always remember:
USE THE CORRECT AMMUNITION REFER- ENCED BY THE INSCRIPTION ON THE BAR- REL.
BEFORE LOADING YOUR GUN BE SURE ALL GREASE AND OIL HAVE BEEN REMOVED FROM THE BARREL AND CHAMBER, AND THERE ARE NO OBSTRUCTIONS.
INSTRUCTIONS IN THIS MANUAL ARE GIVEN FOR A RIGHT-HANDED GUN. MOST PROCE- DURES ARE THE SAME FOR RIGHT OR LEFT- HANDED RIFLES WITH THE EXCEPTION OF BOLT OPERATIONS.
INITIALCLEANING
Some metal parts of your new Model 70 have been coated at the factory with a rust preventative compound. Before using your Model 70, clean the anti-rust compound from the inside of the barrel, receiver, breech bolt mechanism and the action/chamber areas. A high quality, light gun oil should be used to remove this compound and to give your new gun its first lubrication. Clean the barrel using a cleaning rod and patch as explained under “Cleaning and Maintenance Suggestions” found later in this manual.
First lubrication suggestions are outlined below.
If your new Model 70 is to be stored for an extended peri- od of time, it is permissible to leave the rust preventative compound in place and keep your Model 70 in its box for maximum protection during long-term storage.
OILING THEACTION
Before the first firing of your Model 70 you should first wipe the mechanism completely clean, clean the bore and
apply a few drops of quality oil on the following surfaces (See Figure 2):
• Along the breech bolt surface and where the sleeve con- tacts the breech bolt.
• Along the breech bolt surfaces on the receiver where the bolt contacts the receiver as it is worked.
Avoid applying too much oil. Only a light film is neces- sary. Cleaning and Maintenance Suggestions should be followed before each oiling.
OPERATION OF THESAFETY
The safety can only be operated when the firing pin is cocked. To cock the firing pin, lift up on the bolt handle and then return it to the locked position. When the firing pin is cocked, an indicator is visible at the rear of the bolt (See Figure 3).
FIGURE 3
Cocked
Firing pin cocking indicator.
FIGURE 2
Lightly oil the action at these points.
1. Fully On — This is when the safety is drawn to the most rearward position and in line with the bolt. Both the firing pin and bolt are positively locked (See Figure 4).
Always maintain the safety in this position (fully on) when carrying a loaded (cartridge in chamber or magazine loaded) Model 70 rifle.
2. Intermediate Position — This is when the safety is in a midway position (visually at a right angle to the bolt).
This position locks the firing pin, but not the bolt.
The intermediate position also allows for safe removal of an unfired cartridge from the chamber or magazine (See Figure 5).
3. Firing Position — With the safety fully forward, the rifle is ready to fire (See Figure 6). For ease of operation, it is recommended that the safety be operated with the thumb.
Safety: Firing position.
Fully forward position.
FIGURE 5
Safety: Intermediate position.
Midway position.
FIGURE 6
Safety: Fully on.
Most rearward position.
FIGURE 4
The safety mechanism — when it is engaged — is designed to block the firing pin and disengage the sear to prevent firing. However, this mechanism will not neces- sarily prevent the accidental discharge of this firearm as a result of jarring or abuse such as occurs when a firearm is dropped.
INSTALLING/REMOVING THEBOLT
The bolt of your rifle may have been packed separately in the carton in which your rifle is shipped. You will need to
insert the bolt into the action. In addition, it is always a good idea to remove the bolt before cleaning.
Consequently, becoming familiar with removing and inserting the bolt assembly quickly and easily is absolutely essential.
MAKE SURE THE FIRING PIN IS COCKED (FIRST INSTALLATION) —
Before inserting the bolt for the first time, make sure the firing pin is cocked. Under most conditions it should be (and remain) cocked. When the firing pin is cocked, an indicator is visible at the rear of the bolt (Refer back to Figure 3). If the indicator is protruding from the bolt sleeve a minimum of 1/8", the firing pin is cocked. If the firing pin is not in the cocked position this means that the bolt has been partially disassembled. To remedy this sim- ply turn the rear section of the bolt — clockwise when viewed from the indicator end — until the breech bolt sleeve lock engages the notch in the breech bolt (See Figure 7). On a new gun where surfaces are not yet burnished from use, it may be difficult to rotate the bolt sleeve by hand. If so, carefully grasp the lower section of the firing pin in a padded vise, pull and turn.
IMPORTANT: FULLY UNLOAD YOUR RIFLE AS EXPLAINED PREVIOUSLY. BE CERTAIN FIGURE 7
Partially disassembled bolt.
Make sure the sleeve lock is engaged in the notch.
THERE ARE NO CARTRIDGES IN THE MAGA- ZINE OR CHAMBER.
INSTALL—
1. Make sure the claw extractor (if gun is so equipped) is perfectly lined up with the right hand locking lug.
2. Insert the bolt into the receiver with the lugs on the bolt aligned with the lug tracks in the receiver.
3. Push fully forward and lower the bolt handle down to a locked position. The safety can now be operated.
4. Again, make sure the safety is already in (or placed in) either the intermediate or rear safe positions.
REMOVE—
1. To remove the bolt the firing pin must be in the cocked position. If it already is, proceed to step 2. If not, first perform the following: With the rifle unloaded and the muzzle pointed in a safe direction, cock the firing pin by raising and lowering the bolt handle.
2. Place the safety in the intermediate position.
3. Again, raise bolt handle and draw the bolt fully to the rear.
4. Depress the bolt stop located at the left rear of the receiver and remove the bolt (See Figure 8).
The breech bolt has been carefully selected and fitted at the factory to assure correct head space. It is etched with the last four digits of your rifle’s serial number for identifi- cation purposes. To assure your safety, never interchange breech bolts. You will not have the proper head space. If the breech bolt is lost or damaged, return your rifle to the factory for replacement with a properly fitted bolt.
FIGURE 8
Removing the bolt.
Push on bolt stop.
LOADINGPROCEDURES— CONVENTIONALMAGAZINES
These instructions apply to Model 70s with conventional hinged magazine covers or enclosed magazine designs.
Use the correct ammunition referenced by the inscription on the barrel. Before loading your gun be sure all grease
and oil has been removed from the barrel and chamber, and there are no obstructions.
1. With the safety in the intermediate position lift the bolt handle and pull the bolt back all the way (See Figure 9). Lay a cartridge in the receiver just forward of the bolt. Press the cartridge down with your thumb until it snaps into the magazine (See Figure 10).
FIGURE 10
Press the cartridge down until it snaps into the magazine.
FIGURE 9
Pull bolt fully rearward.
2. Press each succeeding cartridge similarly into the maga- zine (See Figure 11).
3. With the magazine loaded to capacity, an additional cartridge may be placed directly into the chamber only when you are ready to fire. This is done by opening the action, inserting a round in the chamber, and pressing down on the top cartridge in the magazine as the bolt is closed (See Figure 12).
DO NOT CARRY A GUN WITH A CARTRIDGE IN THE CHAMBER TO AVOID ACCIDENTAL DISCHARGE.
Special Note: When loading a cartridge directly into the chamber (bypassing the magazine) you will experience a
slight increase in resistance as the bolt is rotated to the locked position, and the extractor clears the cartridge rim.
UNLOADINGPROCEDURES— CONVENTIONALMAGAZINES
UNLOADING THROUGH THEHINGEDFLOORPLATE— Perform the following to remove cartridges from the chamber and magazine on all firearms with a convention- al hinged magazine cover.
FIGURE 12
Hold down the top cartridge and close the bolt.
FIGURE 11
Place the next cartridge on top and push into magazine.
1. With the safety in the intermediate position, open the magazine cover by pressing back the magazine cover catch in front of the trigger guard (See Figure 13).
2. Allow the magazine cover to swing open (downward).
Allow the magazine follower to lower until it is out of the magazine opening. This will allow any cartridges to fall into your hand (See Figure 14).
3. Lift bolt handle up and pull the bolt fully back to remove the cartridge from the chamber.
4. Carefully reposition the magazine follower and maga- zine spring back into the magazine opening. Close the hinged magazine cover and make sure it snaps into place.
5. Recheck the chamber to assure it contains no cartridge.
If it does, cycle the action (as explained earlier) to eject the loaded round.
UNLOADING BY CYCLING THE ACTION—
This unloading method can be used for any Model 70, but is the procedure required for any model with an enclosed magazine.
FIGURE 14
Catch the cartridges with your hand.
FIGURE 13
Magazine cover latch.
1. Place the safety in the intermediate position.
2. With the rifle pointed in a safe direction and your fin- ger off the trigger, operate the action (See Figure 15), extracting and ejecting each loaded round from the cham- ber. Work the action very slowly in order to easily capture the loaded cartridges with your free hand as they are ejected. Do not eject them onto the ground. This risks damaging them and affecting accuracy.
IMPORTANT— ALWAYS VISUALLY CHECK AND KNOW FOR SURE THAT YOUR RIFLE IS NOT LOADED. DO THIS BY LOOKING DIRECTLY INTO THE CHAMBER AND MAGAZINE WITH THE ACTION OPEN AND BOLT FULLY TO THE REAR.
FIRINGPROCEDURES
1. When ready to shoot, and with a loaded cartridge in the chamber, the safety on, and your finger off the trigger, push the safety fully forward. Your rifle is now ready to fire with a pull of the trigger.
REMEMBER, THE RECOIL FROM A CENTERFIRE RIFLE, ESPECIALLY MAGNUM CALIBERS, WILL BE SOMEWHAT HEAVIER THAN MOST OTHER GUNS, SO FIRMLY SHOULDER YOUR GUN, TAKE AIM, AND — WHEN ON TARGET — SQUEEZE THE TRIGGER.
2. Pull the bolt handle up and fully rearward until the fired cartridge is ejected.
FIGURE 15
Place the safety in intermediate position.
Open action.
3. Push the bolt fully forward, positioning a new cartridge from the magazine into the chamber. Lock the bolt by moving the bolt handle (knob) fully down. Your rifle is again cocked and ready to fire. Immediately put the safety in the middle or rear “on safe” positions until you are ready to fire again (See Figure 16).
IN THE CASE OF A MISFIRE
Only rarely will modern factory ammunition experience a misfire. If this ever happens to you when shooting your Model 70 please follow these instructions carefully.
CAUTION: IN CASE OF MISFIRE, KEEP THE BARREL POINTED IN A SAFE DIRECTION, CAREFULLY OPEN THE ACTION WHILE
AVOIDING DIRECT EXPOSURE TO THE BREECH BY YOURSELF AND OTHERS.
REMOVE THE CARTRIDGE FROM THE CHAMBER. LEAVE THE ACTION OPEN AND FULLY UNLOAD YOUR RIFLE, REMOVING ALL CARTRIDGES FROM THE MAGAZINE.
Carefully inspect the ejected cartridge. If the primer is indented, the cartridge should be disposed of in a manner that would prevent accidental injury to you or others. If there is no indentation, your gun has malfunctioned and should be serviced by a qualified gunsmith, or by the U. S.
Repeating Arms Company Service Center in New Haven, Connecticut, or by an Authorized U.S. Repeating Arms Company Repair Station.
BOLT DISASSEMBLY
One of the unique advantages of a Model 70 is the ability to “field strip” the bolt for cleaning the firing pin mecha- nism. Under very harsh weather conditions and in dirty environments just knowing that all firing pin parts are clean and lightly oiled can add an extra measure of confi- dence to your hunt.
Make sure you have a clean place to work and a good place to put the bolt components as they are disassem- FIGURE 16
Immediately move the safety to one of the “safe” positions.
bled. Disassembling the bolt can be done in the field, but remember, there are small parts involved, some of which are under spring tension.
BE CERTAIN THERE ARE NO CARTRIDGES IN THE MAGAZINE OR CHAMBER.
DISASSEMBLY —
1. To remove the bolt the firing pin must be in the cocked position. If it already is, proceed to step 2. If not, first perform the following: With the rifle unloaded and the muzzle pointed in a safe direction, cock the firing pin by raising and lowering the bolt handle.
2. Place the safety in the intermediate position.
3. Raise the bolt and remove it from the rifle as explained previously.
4. Depress the small breech bolt sleeve lock with your thumb (See Figure 17) and turn the breech bolt sleeve to the left (counterclockwise looking from the rear of the bolt). It takes about six turns for the breech bolt sleeve (and the connected firing pin assembly) to unscrew from the breech bolt. Carefully pull the entire assembly out of the breech bolt.
FIGURE 17
Press on the breech bolt sleeve lock with your finger.
Unscrew the breech bolt sleeve.
5. Be extremely careful to leave the safety in the interme- diate position.
6. It is not necessary or recommended that you disassem- ble the firing pin assembly further than this
(See Figure 18).
7. Carefully wipe clean and very lightly oil the assembly.
Aerosol lubricants are excellent for forcing out any dirt, grit or moisture.
REASSEMBLY —
1. Screw the firing pin assembly back into the breech bolt until the breech bolt sleeve lock engages the notch in the breech bolt.
2. Reinsert the bolt into the receiver as explained previ- ously.
IMPORTANT:Should the safety be inadvertently put in the forward (fire) position with the firing pin removed, the firing pin will be released forward and locked in the forward position. This makes reassembling the firing pin into the breech bolt somewhat more difficult.
As the breech bolt sleeve/firing pin assembly is screwed back into the breech bolt the cocking ramp of the firing pin must compress then uncompress several times before the assembly is fully screwed in. Place the breech bolt on a flat hard surface and using the breech bolt handle and the head of the bolt as a support, firmly turn the breech bolt sleeve clockwise until it snaps into position. Once the bolt assembly is installed in the action and the bolt closed and cycled, the firing pin will recock, and the safe- ty can be moved back to the intermediate or rear position.
SIGHT ADJUSTMENTS
Some Model 70 rifles are fitted with open sights. The style and adjustment system may vary between models and grades. The proper procedure is to shoot a group with the sights set as they come from the factory (intermediate position on both elevation and windage), and then make FIGURE 18
Disassembled bolt.
Firing pin.
incremental adjustments to move the sight blade and blade holder to position the group on your target. The procedures below are for the most common type of open sights found on Model 70 rifles.
BEFORE MAKING ANY SIGHT ADJUSTMENTS, MAKE SURE YOUR RIFLE IS FULLY
UNLOADED AND THE MUZZLE IS POINTED IN A SAFE DIRECTION. PLACE THE SAFETY IN EITHER THE INTERMEDIATE OR REAR SAFE POSITION.
UP OR DOWN ELEVATION ADJUSTMENTS.
Adjusting your rifle to shoot higher requires you to raise the rear notch on your rifle’s elevation adjustment. With most Model 70 sights this is accomplished by first loosen- ing the screw on the elevation adjustment and then mov- ing the rear sight blade (the part with rear notch) upward.
Use your fingers to lift it up. Then retighten the screw.
Marked index lines give you a reference as you adjust the sight. Adjusting the sight to make your rifle shoot lower is just the opposite — move the sight blade down.
Remember:
• Move the blade up to shoot higher.
• Move the blade down to shoot lower.
RIGHT OR LEFT WINDAGE ADJUSTMENTS.
On most Model 70 sights, the entire rear sight blade hold- er is dove-tailed in the rear sight base. To adjust for windage, first loosen the rear sight windage screw which secures the rear sight blade holder in the dove-tail on the base. Gently move the rear sight blade holder to the right with your fingers. Your gun will now shoot more to the right. Moving the blade holder to the left is just as easily done. The position of the rear sight base with respect to the sight mount on the barrel is marked with index lines.
Note how much you adjust the sight as you sight in your rifle. Remember:
• Move the rear sight to the right to shoot farther to the right on the target.
• Move the rear sight to the left to shoot farther to the left on the target.
After each adjustment, and before shooting, tighten the rear sight windage screw.
On some sights the front sight blade (base) is dove-tailed in the front sight ramp. The blade can be tapped right or left to attain additional windage adjustment or to replace a damaged front sight. Under most circumstances this is never necessary. Adjusting sights is a matter of trial and
error. Make incremental adjustments then check the result.
Care should be taken not to mar the finish or bend sights when adjustments are made. The rear sight blade can be folded down and the front hood removed for storage or when a scope is used.
CLEANING ANDMAINTENANCESUGGESTIONS The Model 70 will function better and more reliably over a longer period of time if it is properly maintained and kept clean.
BEFORE PERFORMING ANY CLEANING PRO- CEDURES, ALWAYS MAKE CERTAIN THERE ARE NO CARTRIDGES IN THE CHAMBER, MAGAZINE OR ACTION/FEED AREAS.
You should clean your Model 70 after every day of shooting and more often if it becomes excessively dirty.
If shooting for extreme accuracy your Model 70 should be cleaned after every 50 shots or even as few as every 25 shots under competitive conditions.
A minimum cleaning includes wiping down the action and oiling key parts. Most regular maintenance will also include cleaning the barrel. If you encounter a function problem (tight action when working the bolt), be sure to
give your gun a thorough cleaning to see if it solves the problem before seeking the services of our service facility or a competent gunsmith.
To clean your firearm, follow the general outline below:
CLEANING PROCEDURES —
BE CERTAIN YOUR GUN’S CHAMBER AND MAGAZINE ARE UNLOADED. ALWAYS WEAR PROTECTIVE SAFETY GLASSES DURING ALL CLEANING PROCEDURES. KEEP AMMUNITION AWAY FROM THE CLEANING AREA. DO NOT TEST THE FUNCTION OF YOUR FIREARM WITH LIVE AMMUNITION.
Always place the safety in the intermediate “on” (safe) position before beginning any cleaning procedure.
Remove the bolt from your rifle as explained previously.
1. Use a cleaning rod with a tip and patch suitable for the caliber of your Model 70’s bore. Make sure the patch is large enough for a snug fit in the bore. Insert the rod and patch into the barrel at the receiver end and run it back and forth several times. Use a crown protector if you are cleaning from the muzzle end of the barrel. Damage to the crown of a barrel can affect the accuracy of your rifle.
If your Model 70 is equipped with the BOSS accuracy device please refer to special instructions on cleaning found in the BOSS special supplement manual. If your special BOSS manual is missing, write or call our Customer Service department for a free copy.
2. Inspect the chamber and bore for brass, copper and powder fouling. A normal amount of powder residue can be expected and is not serious. It can usually be removed by repeating step one, using a patch saturated with sol- vent. If or when fouling should become heavy, it can be removed with a brass bore brush. Dip or spray the brush with solvent and scrub the chamber and bore until the fouling is removed. To prevent brass bristles from breaking off, the brush should be pushed completely through the bore before being withdrawn.
3. After fouling has been removed the bore should be wiped dry. Then pass a slightly oiled patch through the bore, for preservation. A fine, light gun oil is recommended.
4. Wipe all exposed metal surfaces of the receiver, forearm and barrel with a clean rag. Finger marks should be removed because they provide a place where moisture can accumulate. Any dried oil in the receiver area should also be removed.
5. Lightly oil your gun at the points described under
“Oiling the Action” explained earlier in this manual.
Ordinary good judgment will, of course, indicate that the metal of the gun should receive a light film of oil any time the rifle has been exposed to weather or handling. This is very important and must be done with every rifle — even stainless steel models. Remember, the polished, finely fitted surfaces of the receiver and action mechanisms must always have a thin film of oil. Make sure that the surfaces of the breech bolt are especially clean and lightly oiled with a high quality gun oil. Do not use pure silicone or lanolin.
6. Inspect the barrel and chamber. Make certain that no patches have been inadvertently left in them. Remove any that remain.
7. Wipe all wood surfaces.
8. When transporting only, store your Model 70 in a quality protective case to prevent scratches and dents.
Store in a dry place to prevent corrosion. Store away from children.
MAKE SURE YOUR RIFLE IS UNLOADED AND ALWAYS STORE AMMUNITION SEPARATELY.
OTHER CLEANING SUGGESTIONS —
• Never pour large quantities of oil into the receiver or other parts. It can drain down to the wood and soften it
— and cause permanent damage and loosening of the stock.
• After extended periods of heavy use, your gun should be taken to a qualified gunsmith to have the action disassembled for professional cleaning and lubrication.
NEVER ATTEMPT TO TAKE YOUR MODEL 70 APART FURTHER THAN EXPLAINED IN THIS MANUAL.
This is a specialized, finely fitted mechanism. You may permanently mar it by attempting to disassemble the inner mechanism assemblies. If further disassembly for service or cleaning is required, take your gun to a U. S.
Repeating Arms Company recommended Service Center or a competent gunsmith as explained under “Service or Repair.”
ORDERINGPARTS
To order parts, please write our parts department and furnish the following: your name, address, and telephone number. Also specify the caliber, model, serial number and grade of your Winchester Model 70. When we receive your request, we will send an order form and a parts breakdown with prices.
Write to:
Parts Department
U.S. Repeating Arms Company, Inc.
275 Winchester Avenue
New Haven, Connecticut 06511-1970 CAUTION: PARTS ARE MADE FOR
WINCHESTER BRAND GUNS MANUFACTURED BY U.S. REPEATING ARMS COMPANY, INC., AND SHOULD NOT BE USED IN OTHER GUNS EVEN THOUGH MODELS MAY BE SIMILAR.
IMPROPERLY FITTED PARTS MAY BE DANGEROUS.
SERVICE ORREPAIR
If your Winchester Model 70 rifle should ever need repair or service we suggest you utilize one of the world-wide network of U.S. Repeating Arms Company Authorized Service Centers for Winchester firearms. A special service center for your Model 70 also provides the full scope of service for your rifle. If you have any questions about how to obtain service for your Winchester Model 70 rifle, call or write our Firearms Service Center:
Firearms Service Center
U.S. Repeating Arms Company, Inc.
275 Winchester Avenue
New Haven, Connecticut 06511-1970 Phone: (203) 789-5008 or
1-800-945-1392
When returning your firearm for servicing you must.
1. Make sure it is completely unloaded.
2. Package the firearm securely. Wrap the rifle in paper or other protective packaging and place gun in the original box, including a note of explanation. (The box supplied with your rifle will protect the gun, but is not designed for
shipping.) Place inside a cardboard box approved for strength in interstate shipping.
U.S. REPEATING ARMS COMPANY IS NOT RESPONSIBLE FOR DAMAGE INCURRED DURING SHIPPING.
3. Ensure that a letter is enclosed with your firearm (attached to it in some way) describing the trouble experienced and the repairs or alterations desired.
Include your complete address and both work and home phone numbers.
4. Remember, never return ammunition with your firearm. It is against postal and most commerce regulations.
If you have other questions about Winchester rifles and shotguns, call or write our Customer Service department:
Customer Service
U. S. Repeating Arms Company, Inc.
275 Winchester Avenue Morgan, Utah 84050-9333 Phone: 1-800-945-5237
U.S. Repeating Arms Company, Inc.
275 Winchester Avenue
New Haven, Connecticut, U.S.A. 06511-1970 Administrative Offices:
275 Winchester Avenue, Morgan, Utah 84050-9333