©1988 AT&T
©1985, 1986 Systems Strategies Inc. All Rights Reserved
Printed in USA NOTICE
The information in this document is subject to change without notice. AT&T assumes no responsibility for any errors that may appear in this document. DEC is a registered trademark of Digital Equipment Corporation.
IBM and SNA are registered trademarks of International Business Machines Corporation.
i
1
2
3
4
Table of Contents
About This Guide
About This. GuideSNA Operation
Configuring the Environment for SNA
Creating an SNA Controller Configuration File Running the SNA Controller
BSC Operation
IntroductionConfiguring the Environment for BSC Creating a BSC Controller Configuration File Running the BSC Controller
Running the 3287 Printer Emulator
IntroductionStarting the Printer Emulator Stopping the Printer Emulator Error Messages
Setting Up the User's Environment
Introductioni-1
1-1 1-4 1-17
2-1 2-2 2-5 2-15
3-1
3-2
3-4
3-5
4-1
Table of Contents
5
A
B
c
D
E
Additional Considerations Programming ConsiderationsTerminal Customization
OverviewKeyboard Customization Screen Customization
Documentation
DocumentationIBM 3270 and SNA Documentation Ordering AT&T Documentation
Variables
Environment Variables SN A -Specific Variables BSC-Specific Variables
Sample Keyboard Source File
Sample Keyboard Source FileSample Screen Control Source File
Sample Screen Control Source FileKey Sequences
Key Sequences for Standard ASCII Terminals
F
G
H
Table of Contents
Key Sequences for AT&T 4410 and Teletype 5410
Terminals E-3
Key Sequences for AT&T 4418 and Teletype 5418
Terminals E-5
Key Sequences for AT&T 4425 and Teletype 5425
Terminals E-7
Key Sequences for AT&T 605 Business
Communications Terminal with 102-Key Keyboard E-9 Key Sequences for AT&T 610, 615, 620, and 630
Terminals with 98-Key Keyboard E-11
Sample kyinit Report File
Sample kyinit Report FileNon-supportable Terminal Messages
Non-Supportable Terminal MessagesThe te3279 Command
The te3279 CommandIndex
F-1
G-1
H-1
Index 1-1
List of Figures
Figure 1-1: SNA Configuration Source File Options 1-7
Figure 1-2: Sample SNA Configuration Source File 1-13
Figure 1-3: Arguments to snopts 1-14
Figure 1-4: Sample snopts Configuration Screen 1-16
Figure 1-5: SNA Process Initiation Error Messages 1-19
Figure 2-1: BSC Configuration Source File Options 2-8
Figure 2-2: Sample BSC Configuration Source File 2-11
Figure 2-3: Arguments to bsopts 2-12
Figure 2-4: Sample bsopts Configuration Screen 2-14
Figure 2-5: BSC Process Initiation Error Messages 2-17
Figure 4-1: Sample LUTABLE 4-7
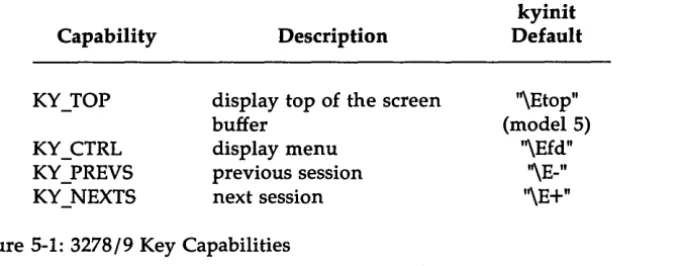
Figure 5-1: 3278/9 Key Capabilities 5-10
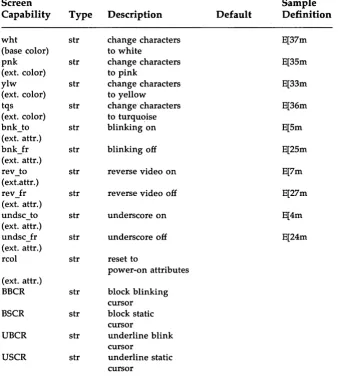
Figure 5-2: 3278/9 Screen Capabilities 5-24
Figure E-1: AT&T 3278/9 Key Sequences For Standard ASCII
Terminals (using KY.std). E-2
Figure E-2: AT&T 3278/9 Key Sequences for AT&T 4410 arid
Teletype 5410 Terminals E-4
Figure E-3: AT&T 3278/9 Key Sequences for AT&T 4418 and
Teletype 5418 Terminals E-6
List of Figures
Figure E-4: AT&T 3278/9 Key Sequences for AT&T 4425 and
Teletype 5425 Terminals E-8
Figure E-5: AT&T 3278/9 Key Sequences for AT&T 605 Business Communications Terminal with 102-Key
Key-board E-10
Figure E-6: AT&T 3278/9 Key Sequences for AT&T 610, 615, 620
About This Guide
This book describes the procedures required to customize, administer, and run the AT&T 3270 Emulator+ software.
The AT&T 3270 Emulator+ can operate using either Binary Synchronous Communications (BSC) protocols or Systems Network Architecture (SNA) protocols (SDLC). Depending on the mode of operation, the environment and the controller configuration file must be set up for either SNA or BSC operation before running the emulator. Set-up procedures for each mode of operation are similar, but certain parameters, filenames, and environment variables that are used differ.
This guide is divided into five chapters:
1. "SN A Operation" provides instructions for configuring and running the software in an SNA environment. The AT&T SNA/3270 Emula-tor+ software must be installed on your 3B Computer before you use these procedures.
2. "BSC Operation" provides instructions for configuring and running the software in a BSC environment. The AT&T BSC/3270 Emula-tor+ software must be installed on your 3B Computer before you use these procedures.
3. "Running the 3287 Printer Emulator" explains how to invoke the pe3287 process.
4. "Setting Up the User's Environment" describes how to set up the user's environment so that the user need not enter most te3279 com-mand options when starting the 3278/9 Terminal Emulator. It also explains what information the System Administrator must give to each terminal user.
5. "Terminal Customization" provides instructions for customizing the keyboard and screen files provided with the AT&T 3270 Emulator+ software and creating new files for terminals not currently sup-ported.
Before running the SNA Controller, the System Administrator must configure the environment and create a controller configuration file according to local and host requirements.
About This Guide
Configuring the Environment
The AT&T 3270 Emulator+ uses environment variables as pre-defined defaults for command options. This means that when an option to a 3270 Emulator+ command is omitted, the list of environment variables is searched for a specific variable associated with that option. If that variable is set, its value is used as the option to the command. Therefore, if the appropriate environment variables are set, the user need not specify most options when issuing a command, unless the user chooses to override the defaults.
Configuring the environment involves setting the environment vari-ables used by the 3270 Emulator+. For convenience, two shell scripts, snaenvset and snaenvcust, are provided to set these variables to default values.
Creating a Controller Configuration File
The controller configuration file contains the parameters the controller processes need to communicate properly with a particular host. When the SNA Controller is started, the configuration file is used as input to custom-ize the controller processes with the options specified in the file.
1
SNA Operation
Configuring the Environment for SNA
1-1Invoking snaenvset 1-1
Changing Environment Variable Defaults 1-2
Temporary Changes 1-3
Permanent Changes 1-3
Creating an SNA Controller
Configuration File
1-4SNA Configuration Options 1-4
Support for an 8100 Controller 1-7
Source File Options 1-8
• Line Options 1-8
• Controller Options 1-9
Creating a Configuration Source File 1-12 Creating a Configuration Object File 1-14
• Using snopts Interactively 1-15
• Displaying an Existing Object File 1-15
Running the SNA Controller
1-17Starting the SNA Controller 1-17
Error Messages 1-18
SNA System Shutdown 1-19
Configuring the Environment for SNA
The AT&T SNA/3270 Emulator+ processes refer to various environment varia,bles during execution. These variables are used to provide information to the processes, such as default values for command options and specific system start-up information.
You must configure the environment for SNA/3270:
• Each time you log in, before you begin to use the SNA/3270 software • Before starting or stopping an SNA Controller
Two shell scripts, snaenvset and snaenvcust, both in the
/usr/snaadm/runtime directory, may be used to configure the environment for SNA operation. (Note that snaenvset calls the snaenvcust script.) Appendix B lists and describes the environment variables set by these scripts. It also provides the initial default values that the scripts assign to the variables.
Invoking
snaenvset
Before configuring the environment, you should check that the default values set by the scripts are appropriate. If you must change any of these values, refer to the section Changing Environment Variable Defaults.
If the default values set by the scripts are appropriate, you can configure the environment for SNA operation by executing snaenvset as follows: Step 1.
Step 2. Step 3.
Step 4.
Log in as root.
Change directory to "/usr/snaadm/runtime. Enter
. . /snaenvset
Use the UNIX system commands env(1) and set(see sh(1» to check your environment. (See the UNIX System V User's
Refer-ence Manual for information about these commands.)
Configuring the Environment for SNA
The snaenvset script has to be executed only once per log in. To have snaenvset execute automatically when you log in, add the following entry to your . profile file:
• .1
usr1
snaadm1
runtime1
snaenvsetChanging Environment Variable Defaults
If the local configuration makes it necessary for you to change the values of any of the environment variables, you should be aware of the fol-lowing:
• PCD specifies the communications port number that the SNA Con-troller is to use. You must change this variable if you want the con-troller to use a port other than that provided by the snaenvset script.
o On a 3B2 Computer, the port denoted by PCD is the slot number
that the ISC card is in. For example, if the ISC card you want to use is in slot 4, set PCD=4.
o On a 3B5 or 3B15 Computer, PCD denotes the path to the SDLI
port. For example, to use the third SDLI port on the second lOA, set PCD=203.
o On a 3B4000 Computer, PCD is a combination of the pe and ISC slot number (e.g., 120.6 for pe 120, slot 6).
The default value for PCD, as set by snaenvset, is stored in a file called PCD.file in the snaadm directory.
• SNAHOST is used to change the CONFIG variable, which specifies the fuil pathname of the controller configuration object file to be used when the SNA Controller is started. Configuration object files are named with the prefix CSNA., for example, CSNA.hostx.
SNAHOST indicates which "CSNA." file is to be used. For example, if CSNA.hostx (located in lusrlsnaadm/runtime) is to be used, SNAHOST should be set equal to hostx. Then, when the snaenvcust script is executed, CONFIG will be set to
1
usr1
snaadm1
runtime1
CSN A.hostx.Configuring the Environment for SNA
Temporary Changes
To change the value of an environment variable temporarily: Step 1.
Step 2.
Step 3.
Execute snaenvset, as described in the section Invoking snaenvset. (This has to be done only once per log in.) Reset the environment variable(s) that must be changed. For example, to specify that the controller should use the
configuration object file named CSNA.hostb (instead of the default CSNA.teke), you would enter:
SNAHOST=hostb
Execute snaenvcust by entering: . ./snaenvcust
The snaenvcust shell script will re-customize the environment using the new values.
Permanent Changes
To change the value of an environment variable permanently: Step 1.
Step 2.
Use a text editor such as vi to edit the snaenvset shell script, changing the setting of the environment variables as necessary. Execute snaenvset as described in the section Invoking
snaenvset.
Creating an SNA Controller Configuration File
You must create a configuration file for each different host and local configuration an SNA Controller may use.
It takes three steps to create an SNA Controller configuration file. You must:
Step 1.
Step 2.
Step 3.
Determine the configuration options needed to customize the SNA Controller for your particular site and host.
In the lusrlsnaadm/cust/snaoptions directory, create an SNA configuration source file in which each option is defined as required.
Create an SNA configuration object file. This involves processing the configuration source file through the snopts utility. When the snopts utility is executed from the lusrlsnaadm/runtime directory, it creates an object file from your source file and displays the completed configuration, including the values for any defaulted options.
You can also invoke snopts interactively, in which case you do not use a source file as input. Instead, you enter the
configuration options directly into the snopts program. How-ever, using a source file allows you to retain the exact
configuration for later use.
SNA Configuration Options
To determine the options required for the SNA Controller configuration file, consult the Network Administrator at your host site for precise infor-mation regarding your configuration. The options you define in the configuration source file should coincide with your host configuration.
Configuration options for the SNA Controller are categorized as follows: Line Options: These options are used to ensure
Creating an SNA Controller Configuration File
Controller Options: These options define the controller (PU) type and its associated devices (LUs). There must be agreement between the host and the con-troller concerning the identity and nature of all the devices (terminals and printers) asso-ciated with the controller.
Dual-identity SDLC: The AT&T SNA/3270 Emulator+ software is designed to run concurrently with the AT&T 3770 Emulator+ (Release 2.0.0 and later releases). Assuming the AT&T 3770 Emula-tor+ has been installed on your 3B Com-puter, the dual-identity SDLC feature of the SNA Controller (which is a component of both software packages) allows a 3770 SNA/RJE workstation and a 3270 worksta-tion to operate simultaneously using one SOLC link to the host.
To implement dual-identity SOLC, the SNA Controller must be configured with one 3770 type PU, and one 3270 type PU. Two separate sets of controller options must be defined in the configuration file, one set for each controller (PU) type. It is necessary for the 3770 PU definitions to occur first in the file. However, only one set of line options is needed-both PUs use the same SOLC link. In addition, the line must be defined at the host as a multi-drop line with a station address for each PU.
For information on SNA/RJE operation and on configuring the con-troller options for a 3770 concon-troller (PU) type, refer to the AT&T SNA/RJE Emulator+ System Administrator's Guide.
The AT&T SNA/3270 Emulator+ and the AT&T SNA/RJE software can also be run independently, using separate SDLe links.
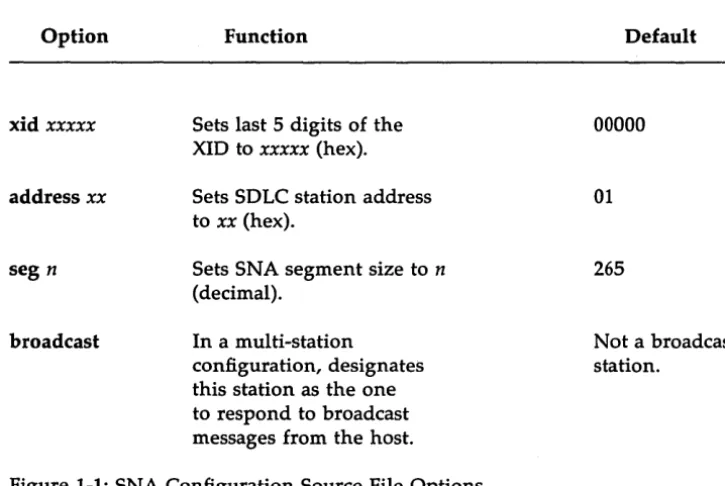
Figure 1-1 lists the valid SNA configuration source file options and their corresponding defaults.
Creating an SNA Controller Configuration File Option Line-Options fdx multipoint nrzi Con troller-Options
controller aaaa
luxx t [termselfJ
Function
Sets full-duplex mode.
Sets multi-point operation.
Sets NRZI mode of transmission.
Sets controller (PU) type
to aaaa, where aaaa is 3270.
Assigns the LU numbered xx
to device type t
valid values for xx are 0-31
valid values for tare
1 - Printer (SCS or DSC) 2 - Display Station
Default
hdx
pt-to-pt
nrz
(See option description. )
LU is not defined.
(SNA distinguished between SCS and DSC printers dynamically, by means of the session parameters in the BIND command.)
termself is an optional parameter.
Specifies that a TERM_SELF be sent to the host whenever the LU session is terminated. (Provides high security for the LU session.)
Creating an SNA Controller Configuration File
Option
xid xxxxx
address xx
seg n
broadcast
Function
Sets last 5 digits of the XID to xxxxx (hex).
Sets SOLC station address to xx (hex).
Sets SNA segment size to n
(decimal).
In a multi-station
configuration, designates this station as the one to respond to broadcast messages from the host.
Figure 1-1: SNA Configuration Source File Options
Support for an 8100 Controller
Default
00000
01
265
Not a broadcast station.
In order to emulate an 8100 controller, the dual identity feature of the SOLC must be used along with the following configuration information: Line options: fdx
Controller options: pt-to-pt nrz controller 8100 xid020000600000 seg 265 address C3 lu23 lu33 lu43 IuS 3
[image:19.455.56.419.65.308.2]Creating an SNA Controller Configuration File lu63
lu7 I IuS I lu92 lulO 2 lull 2 lul22 lul32 lul42 luiS 2 lul62 lul72
Source File Options
The following is a functional description of each of the options listed in Figure 1-1.
Line Options
fdx/hdx Full-duplex (four-wire) operation allows two stations to transmit and receive at the same time. In half-duplex (two-wire) operation, the stations take turns transmitting, using pin-level (RTS, CTS) controls. (Dial-up lines are half-duplex.) SDLC is strictly a half-duplex protocol, so full-duplex traffic cannot occur even with four wires. However, when full-duplex is specified in a point-to-point configuration, even though true four-wire traffic is not possible, modem line turnaround delays are eliminated because RTS is always kept high. The default is hdx (half-duplex).
nrzi/nrz
Creating an SNA Controller Configuration File
feature is to be implemented. (Dual-identity SDLC allows two controller types to operate concurrently using one SDLC link. See the controller option below.) The default value is pt-to-pt (point-to-point operation).
Non-Return To Zero Inverted (NRZI) transmission is used to reduce the probability of losing bit syn-chronization. Because bit synchronization is main-tained by the pace of the bit stream itself, periodic signal polarity transitions are necessary. In NRZI transmission a polarity change occurs whenever a binary zero appears in the message. Since "bit stuffing" ensures that there will never be more than six contiguous bits with values of one, there must be a zero, and hence a polarity change, at least every six bits. Because it may be prohibited by specific hardware limitations on some data communications equipment, NRZI transmission is optional. The default value is nrz (NRZ transmission).
Only one set of line options should be defined in each source file. With dual-identity SDLC, the SNA Controller is configured with two controller types, but only one set of line options is used, since both controller types use the same SDLC link.
Controller Options
controller aaaa The controller type (specified by aaaa) denotes the
physical unit (PU) type of the SNA product being emulated. Certain aspects of the controller's opera-tion and the types of devices that can be attached to the controller are determined by the controller type. Up to two controller types (PUs) can be defined in the source file.
For 3270 emulation, the controller type 3270 should be specified.
Creating an SNA Controller Configuration File
luxx t ltermselfl
If a controller type is not specified, snopts will check the lu device type definitions (see the lu option below). If an lu device type 1 or 2 is defined, 3270 is assumed as the controller type. An error message is given if there are any errors in the lu definitions, such as an illegal device type.
When implementing dual-identity SDLC, each con-troller type defined requires its own lu, xid, address, and seg definitions. Two sets of controller options, defining two PUs-one 3270 workstation and one 3770 SNA/RJE workstation-can be defined in a source file. The PU definitions for 3770 must occur prior to the 3270 PU definitons. Refer to your AT&T SNA/ RJE Emulator+ System Administrator's Guide for
information on defining 3770 controller options. A maximum of 32 logical units (LUs) can be assigned to a 3270 controller type.
xx denotes the LU number being assigned. Valid
values for this parameter are 0 - 31.
t denotes the device type assigned to this LU. For controller type 3270, only two device types are valid:
1 - Specifies the device is a printer. (SCS or DSC)
2 - Specifies the device is a terminal.
termself is an optional LU parameter. If termself is
specified, when the LU session ends the terminal is powered off, or an xlu2clos for this LU is issued from an API program (see the AT&T 3270 Emulator+ HLLAPI Programmer's Guide), and a TERM_SELF is
sent to the host. Another session cannot be opened on this LU until an UNBIND has been received from the host for this LU. When termself is specified, the
LU is considered to be a "high security" LU.
When termself is not specified for the LU, when the
xid xxxxx
address xx
seg n
broadcast
Creating an SNA Controller Configuration File
is considered to be a "low security" LU.
The SOLe XIO (eXchange station IDentification) is used mainly in dial-up configurations to identify the calling station to the host. If the controller receives the XIO command, it must identify itself to the pri-mary SOLe station using a 6-byte (12 hex digits) sequence number. The first 7 digits are coded automatically, and are dependent on the controller type specified.
For controller type 3270 the first 7 digits will automatically default to 0200017. The last 5 digits are specified by the user using the xid option. This 5-digit number is an identification number that must be obtained from the Network Administrator at the host site.
The default value is 00000.
The SOLe station address. Each SOLe secondary station is distinguished by a I-byte (2 hex digits) sta-tion address. This is the first byte after the flag in an SOLe frame.
The default value is 01.
Segment size refers to the maximum (decimal) size of the Path Information Unit (TH
+
RH+
RU) sent from or to the controller.The default value is 265.
In the SOLe protocol all stations will accept a frame with the broadcast address. In a multi-station configuration, or with dual-identity SOLe, the user can designate which station will reply to the broad-cast message by specifying the broadbroad-cast option.
If the option is not specified, the station will not be· a broadcast station.
Creating an SNA Controller Configuration File
Creating a Configuration Source File
The configuration source file is a standard text file that can be created in the lusrlsnaadm/cust/snaoptions directory using a text editor such as vi.
It has the following characteristics:
• Configuration options may be specified in any order, one per line. • The option must be the first item on the line.
• Extra text following each option specification is ignored, allowing the user to insert comments after each option.
• If the first character on a line is the # sign, the entire line is treated as a comment and ignored.
• If an option is not specified in the source file, its default value will be used.
• Invalid options may be ignored. (Error messages are not always given.) For example, if an option is misspelled or is not the first item on the line, it is ignored. (You should check the completed
configuration displayed by snopts to verify that each option has been
properly defined.)
Creating an SNA Controller Configuration File
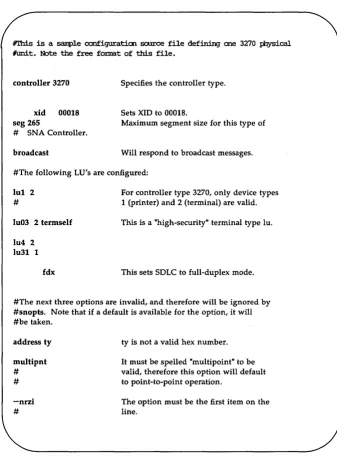
#rhi.s is a sanple cx:mfiguraticn soorce file def:in:in:J one 3270 IiIYsical #l.mi.t. Note the free fox:mat of this file.
controller 3270
xid 00018 seg 265
# SNA Controller.
broadcast
Specifies the controller type.
Sets XID to 00018.
Maximum segment size for this type of
Will respond to broadcast messages.
#The following LU's are configured:
luI 2 #
lu03 2 termself
lu4 2 lu31 1
fdx
For controller type 3270, only device types 1 (printer) and 2 (terminal) are valid.
This is a "high-security" terminal type lu.
This sets SOLC to full-duplex mode.
#The next three options are invalid, and therefore will be ignored by #snopts. Note that if a default is available for the option, it will #be taken. address ty multipnt # # -nrzi #
ty is not a valid hex number.
It must be spelled "multipoint" to be valid, therefore this option will default to point-to-point operation.
[image:25.452.70.408.59.523.2]The option must be the first item on the line.
Figure 1-2: Sample SNA Configuration Source File
Creating an SNA Controller Configuration File
Creating a Configuration Object File
To create an SNA configuration object file, invoke snopts from the /usr/snaadm/runtime directory using the command format:
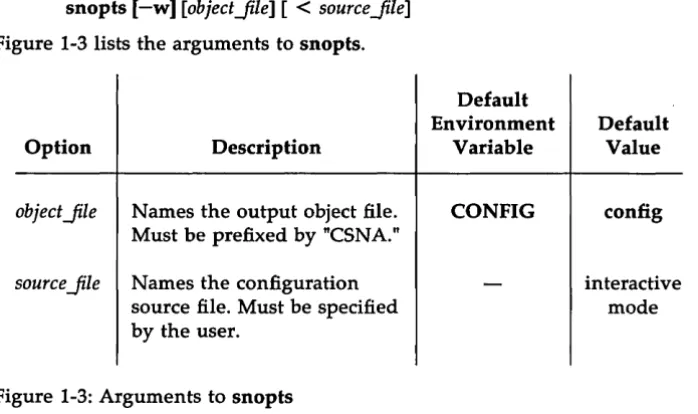
[image:26.452.42.391.134.341.2]snopts [-w] [objectJile] [
<
sourceJile]Figure 1-3 lists the arguments to snopts.
Default Environment
Option Description Variable
objectJile Names the output object file. CONFIG
Must be prefixed by "CSNA."
source Jile Names the configuration
source file. Must be specified by the user.
Figure 1-3: Arguments to snopts
Default Value
config
interactive mode
If the object Jile is specified on the command line, the file name must
have the prefix CSNA., for example, CSNA.hostx.
If object Jile is not specified, the environment list will be searched for
the variable CONFIG. If CONFIG has been set, its value will be used as the name of the output object file. If CONFIG has not been set, then snopts will use the default name config for the object file.
If
<
source Jile is not specified on the command line, snopts executesinteractively. (See the section "Using snopts Interactively.") The snopts utility creates the configuration object file from the
Creating an SNA Controller Configuration File
v
You should check that all the options specified in the source file match the displayed configuration.If an option is not displayed or is incorrectly set, check your configuration source file for invalid options.
Example:
snopts -w
<
lusrlsnaadm/cust/snaoptions/configl snopts will use the configuration source file configl to create aconfiguration object file. The name of the object file will default to the value of the CON FIG environment variable, if it has been set. If CONFIG has not been set, the object file will be named config and placed in the run-time directory.
Using
snopts
InteractivelyThe snopts utility can also be used interactively to create a
configuration object file. When you do this you do not have to create a configuration source file; snopts accepts input from your terminal as the source to create the object file. To use snopts interactively enter:
snopts -w object Jile
The snopts utility will accept whatever you enter from your terminal as the configuration source options to be processed. You simply enter
configuration options as required. When you have entered all the options you need, enter Ctrl-d to end the session. snopts will create the SNA configuration object file and display the completed configuration. You should check this display to make sure all the required options have been properly defined.
Displaying an Existing Object File
To display an existing configuration object file, execute snopts without the -w flag.
snopts [object Jile]
Creating an SNA Controller Configuration File
As in the example above, if objectJile is not specified on the command line,
snopts will use the object file named by the CONFIG variable if that vari-able is set. If CON FIG is not set, snopts will use a file in the runtime
directory with the default name config.
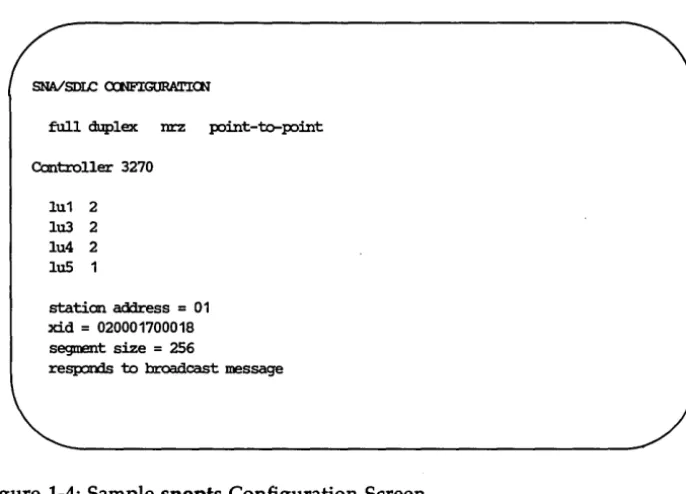
Figure 1-4 shows a sample snopts configuration screen.
SNAlSDLC cx:NFIGURATICN
full duplex nrz point-'brpoint
Cantroller 3270
lu1 2 lu3 2 lu4 2 IuS 1
station address = 01 xid
=
020001700018 segment size=
256resp::mds to broadcast message
[image:28.456.48.391.152.399.2]Running the SNA Controller
After you have configured the controller and the environment for your site and for the host, you can start running the AT&T SNA/3270 Emulator+.
The System Administrator may designate one terminal as the master minal for the AT&T SNA/3270 Emulator+. The shell that"runs on this ter-minal must have root privileges to start the SNA Controller processes. All status and error messages from the SNA Controller will be displayed on this terminal.
Starting the SNA Controller
The SNA Controller is started by the shell script startsna in
/usr/snaadm/runtime. The startsna script checks to see that no other con-troller processes are running on the communications port to be used by this SNA Controller. (The communications port number is obtained from the PCD environment variable.) startsna then executes the commands to start the SNA process and the sdlc program.
At the start of execution, the SNA process reads the object file contain-ing the configuration options for the controller. (The name of the object file is obtained from the CONFIG environment variable.) Configuration infor-mation is passed to the sdlc program, which is downloaded and started on the communications board. (Note that you will not see sdlc running on the UNIX operating system if you execute the ps command, because sdlc is run-ning on a separate processor.) Then the SNA process enables and estab-lishes communication paths to and from the sdlc program. As soon as sdlc and SNA are running, the SNA Controller is ready to communicate with the host. (Communication with the host is possible even if no terminal emulator is active.)
To start the SNA Controller, you must: Step 1.
Step 2. Step 3.
Log in as root.
Change directory to /usr/snaadm/runtime.
Check that the environment is properly set. Be sure that PCD is set to the communications port the SNA Controller is using, and P3274 is set to the named pipe for this controller. See the sec-tion Configuring the Environment for SNA if these variables must be changed. Setting variables properly is especially
Running the SNA Controller
Step 4. Step 5.
Step 6.
important if more than one SNA Controller is running. Execute the shell script startsna.
When the SNA Controller has been started successfully, a copy-right message and controller ready message are displayed. If you are running on a 3B2 Computer, the following message is also displayed:
ISC NUMBER n IS USED EOR THE SNA OONTROLLER
If you are on a 3B5 or 3B15 Computer, no such message is displayed.
If connection to the host is via a dial-up line, you shoulc in at this point.
The printer and terminal emulators can now be started.
Error Messages
Figure 1-5 contains a list of error messages displayed if the SNA process fails during initialization. Failures may result from incorrect or incomplete setup procedures. When these error messages are displayed, the SNA pro-cess is aborted and must be restarted after you correct the problem. The error messages are listed in the order that the SNA process generates them. Some error messages are followed by a number. This number is the errno value returned by the failed system call and may provide more specific information about the cause of the error. For information about errno, con-sult intro(2) in the UNIX System V Programmer's Reference Manual.
Error Message
sdlc open error
Explanation/Possible Cause
name too long
path from devices open error configuration file not found configuration file open error configuration file read error
error in configuration file
too many lu's configured
Running the SNA Controller
Pipe prefix specification is too long (must be less than 100 characters).
Inbound SNA-to-devices pipe does not exist.
Named configuration object file does not exist.
Permission bits incorrect for configuration file (should be readable).
Permission bits incorrect for configuration file (should be readable).
Configuration file is not the result of a successful execution of snopts.
More than 32 LU's are defined.
Figure 1-5: SNA Process Initiation Error Messages
SNA System Shutdown
You should stop the SNA Controller only after all device emulators have been powered down. Use the stopsna shell script to stop the SNA process and the sdlc program.
The following steps will stop the SNA Controller: Step 1.
Step 2. Step 3.
Log in as root.
Change directory to /usr/snaadm/runtime.
Check that the environment is properly set. Be sure that PCD is set to the communications port the SNA Controller is using, and P3274 is set to the named pipe for this controller. See the sec-tion Configuring the Environment for SNA if these variables must be changed. Setting variables properly is especially
Running the SNA Controller
Step 4.
important if more than one SNA Controller is running. Enter the command
stopsna
2
esc
Operation
Introduction
2-1Configuring the Environment 2-1
Creating a Controller Configuration File 2-1
Configuring the Environment for BSC
2-2Invoking bscenvset 2-2
Changing Environment Variable Defaults 2-3
Temporary Changes 2-4
Permanent Changes 2-4
Creating a BSC Controller Configuration
File
2-5BSC Configuration Options 2-5
Source File Options 2-8
• Line Options 2-8
• Error Retry Counts 2-9
• Time-Out Values 2-10
• ASCII/EBCDIC Line Control Options 2-10 Creating a Configuration Source File 2-10 Creating a Configuration Object File 2-12
• Using bsopts Interactively 2-13
• Displaying an Existing Object File 2-13
Running the BSC Controller
2-15Starting the BSC Controller 2-15
Error Messages 2-16
BSC Operation
Introduction
Before running the BSC Controller, the System Administrator must configure the environment and create a controller configuration file accord-ing to local and host requirements.
Configuring the Environment
The AT&T 3270 Emulator+ uses environment variables as pre-defined defaults for command options. This means that when an option to a 3270 Emulator+ command is omitted, the list of environment variables is searched for a specific variable associated with that option. If that variable is set, its value is used as the option to the command. Therefore, if the appropriate environment variables are set, the user need not specify most options when issuing a command, unless the user chooses to override the defaults.
Configuring the environment involves setting the environment vari-ables used by the 3270 Emulator+. For convenience, two shell scripts, bscenvset and bscenvcust, are provided to set these variables to default values.
Creating a Controller Configuration File
The controller configuration file contains the parameters the controller processes need to communicate properly with a particular host. When the BSC Controller is started, the configuration file is used as input to customize the controller processes with the options specified in the file.
Alternate configuration files can be created for different remote host and local configurations.
Configuring the Environment for BSC
The AT&T BSC/3270 Emulator+ processes refer to various environment variables during execution. These variables are used to provide information to the processes, such as default values for command options and specific system start-up information.
You must configure the environment for BSC/3270:
• Each time you log in, before you begin to use the BSC / 3270 software • Before starting or stopping a BSC Controller
Two shell scripts, bscenvset and bscenvcust, both in the
/usr/bscadm/runtime directory, can be used to configure the environment for BSC operation. (Note that bscenvset calls bscenvcust.) Appendix B lists and describes the environment variables set by these scripts. It also pro-vides the initial default values that the scripts assign to the variables.
Invoking
bscenvset
Before configuring the environment, you should check that the default values set by the scripts are appropriate. If you must change any of these values, refer to the section Changing Environment Variable Defaults below.
If the default values set by the scripts are appropriate, you can configure the environment for BSC operation by executing bscenvset as follows: Step 1.
Step.2. Step 3.
Step 4.
Log in as root.
Change directory to /usr/bscadm/runtime. Enter
•. /bscenvset
Use the UNIX system commands env(l) and set(see sh(l) to check your environment. (See the UNIX System V User's
Refer-ence Manual for information about these commands.)
The bscenvset script has to be executed only once per log in. To have bscenvset execute automatically when you log in, add the following entry to your .profile file: (lusr /bscadm/.profile):
Configuring the Environment for
esc
Changing Environment Variable Defaults
If the local configuration makes it necessary for you to change the values of any of the environment variables, you should be aware of the fol-lowing:
• PCD specifies the communications port that the BSt Controller is to use. You must change this variable if you want the controller to use a port other than that provided by the bscenvset script.
o On a 3B2 Computer, the port denoted by PCD is the slot number that the ISC card is in. For example, if the ISC card you want to use is in slot 4, set PCD=4.
o On a 3B5 or 3B15 Computer, PCD denotes the lOA device to be used. For example, to use the third SOLI port on the second lOA, set PCD=203.
o On a 3B4000 Computer, PCD is a combination of the pe and ISC slot number (e.g., 120.6 for pe 120, slot 6).
The default value for PCD as set by bscenvset is stored in a file called PCD.file in the bscadm directory.
• BSCHOST is used to change the BS3274 variable, which specifies the full pathname of the controller configuration object file to be used when the BSC Controller is started. Configuration object files are named with the prefix BS3274., for example, BS3274.hostx.
BSCHOST indicates which BS3274.file is to be used. For example, if BS3274.hostx (located in lusr/bscadm/runtime) is to be used, BSCHOST should be set equal to hostx. Then, when the bscenvcust script is executed, BS3274 will be set to
I
usr Ibscadml runtime IBS327 4.hostx.• P3274 specifies the named pipe the terminal and printer devices use to communicate with the controller. This pipe must have a unique name for each controller running on the system.
Configuring the Environment for BSC
Temporary Changes
To change the value of an environment 'variable temporarily: Step 1.
Step 2.
Step 3.
Execute bscenvset, as described in the section Invoking bscenvset. (This has to be done only once per log in.) Reset the environment variable(s) that must be changed. For example, to specify that the controller should use the
configuration object file named BS3274.hostb, you would enter: BSCHOST=hostb
Execute bscenvcust by entering: . ./bscenvcust
The bscenvcust shell script will re-customize the environment using the new values.
Permanent Changes
To change the value of an environment variable permanently: Step 1.
Step 2.
Use a text editor such as vi to edit the bscenvset shell script, changing the setting of the environment variables as necessary. Execute bscenvset as described in the section Invoking
Creating a BSC Controller Configuration File
You must create a configuration file for each different host and local configuration a BSC Controller may use.
It takes three steps to create a BSC Controller configuration file. You must:
Step 1.
Step 2.
Step 3.
Determine the configuration options needed to customize the BSC Controller for your particular site and host.
In the lusr/bscadm/cust/bscoptions directory, create an BSC configuration source file in which each option is defined as required.
Create an BSC configuration object file. This involves processing the configuration source file through the bsopts utility. When the bsopts utility is executed from the lusr/bscadm/runtime directory, it creates an object file from your source file and displays the completed configuration, including values for any defaulted options.
You can also invoke bsopts interactively, in which case you do not use a source file as input. Instead, you enter the
configuration options directly into the bsopts program. How-ever, using a source file allows you to retain the exact
configuration for later use.
BSC Configuration Options
To determine the options required for the BSC Controller configuration file, consult the Network Administrator at your host site for precise infor-mation regarding your configuration. The options you define in the configuration source file should coincide with your host configuration.
Figure 2-1 lists the valid BSC configuration source file options and their corresponding defaults.
Creating a SSC Controller Configuration File
Option Function Default
Line Options:
xx yy Poll and select addresses of the None: poll
controller where: and select
addresses
xx == poll address (hex) must be
yy
==
select address (hex). explicitly defined. No keyword is specified forthis option. This must be the first option specified.
syns n The number of leading SYN 2
(synchronization) characters preceding each transmission.
hdx Indicates half-duplex (2-wire) fdx
mode. (4-wire)
port n Selects communications port 1
number n.
max_blk n Maximum inbound block size. 256
The valid values for n are 0, 1, 2, and 3, corresponding to block sizes of 256, 512, 768, and 1024 bytes, respectively.
no status Suppresses the reporting status
of status error messages. Error Retry Counts:
bcc n n is the maximum number of 12
Option naks n acks n enqs n buffers n Time-Out Values: idle s cntr s data s sync s
Creating a esc Controller Configuration File
Function
n is the maximum consecutive NAK errors.
n is the maximum consecutive wrong ACK.
n is the maximum consecutive ENQ.
n is the maximum number of consecutive buffer overruns allowed before an error occurs.
s is the time-out in seconds waiting for synchronization while the line is idle.
s is the time-out in seconds waiting for a control sequence.
s is the time-out in seconds waiting for a data block.
s is the time-out in seconds waiting for synchronization within a data block.
Default
12
12
12
3
20 seconds
3 seconds
45 seconds
2 seconds
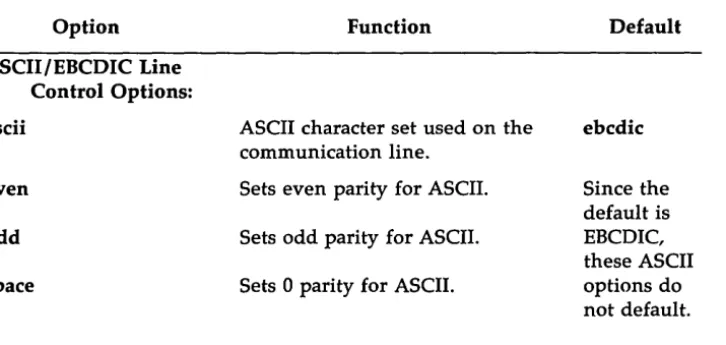
Creating a BSC Controller Configuration File Option ASCII/EBCDIC Line Control Options: ascii even odd space Function
ASCII character set used on the communication line.
Sets even parity for ASCII.
Sets odd parity for ASCII.
Sets 0 parity for ASCII.
[image:42.457.45.408.73.245.2]Default ebcdic Since the default is EBCDIC, these ASCII options do not default.
Figure 2-1: BSC Configuration Source File Options
Source File Options
The following is a functional description of the options listed in Figure 2-1.
Line Options
xx yy
syns n
Each BSC 3274 controller has two distinct addresses, a poll address and a select address. The host uses the poll address to transmit a general poll or specific poll sequence; the controller uses it in the header of the first (or only) block of any device-specific inbound data message. The host uses the select address when transmitting a device selection
sequence. The poll and select addresses must be the first option specified in the controller configuration. (There is no keyword for this option.)
fdx/hdx
port n
max blk n
no_status/status
Error Retry Counts
Creating a BSC Controller Configuration File
Full-duplex (four-wire) operation allows two stations to transmit and receive at the same time. In half-duplex (two-wire) operation, the stations take turns transmitting, using pin-level (RTS, CTS) controls. (Dial-up lines are half-duplex.) BiSync is strictly a half-duplex protocol, so full-duplex traffic cannot occur even with four wires. However, when full-duplex is specified in a point-to-point configuration, even though true four-wire traffic is not possible modem line turnaround delays are eliminated because RTS is always kept high. The default is fdx (full-duplex).
This option specifies the communications board port number to be used by the controller.
On a 3B2, port 1 must always be specified.
On a 3B5 or 3B15, the exact port number to be used on the SOLI board should be specified.
This option specifies the maximum size of inbound blocks transmitted to the host. Valid values for n are 0, 1, 2, and 3, corresponding to block sizes of 256, 512, 768, or 1024 bytes, respectively. True IBM-configured hosts expect blocks of 256 bytes.
If desired, the BSC Controller can be configured to suppress its status messages by specifying the no_status option. True IBM-configured hosts expect status messages.
A number of different conditions may occur that cause the BSC Con-troller to retry an operation in an attempt to recover. The bcc, acks, naks, enqs, and buffers parameters specify the maximum number of retries allowed for each operation. If the number of consecutive errors exceeds the specified maximum, the controller will transmit EOT to terminate the opera-tion.
Creating a BSC Controller Configuration File
Time-Out Values
The BSC Controller starts timers appropriate to each state of the BiSync protocol to determine whether the maximum time has elapsed without a response from the host system. The time allowed for the host to respond depends on the state of the protocol and the device. The idle, cnt!, data, and sync parameters allow the user to specify the number of seconds that must elapse before a time-out is declared.
ASCII/EBCDIC Line Control Options
The ascii option is used to specify ASCII line control. (The default is ebcdic.) A parity option (even, odd, or space) can be specified for ascii line control.
Creating a Configuration Source File
The configuration source file is a standard text file that can be created in the lusr/bscadm/cust/bscoptions directory using a text editor such as vi. It has the following characteristics:
• Configuration options may be specified in any order, one per line. • The option must be the first item on the line.
• Extra text following each option specification is ignored, allowing the user to insert comments after each option.
• If the first character on a line is the # sign, the entire line is treated as a comment and ignored.
• If an option is not specified in the source file, its default value will be used.
• Invalid options may be ignored. (Error messages are not always given.) For example, if an option is misspelled or is not the first item on the line, it is ignored. (You should check the completed
Creating a
esc
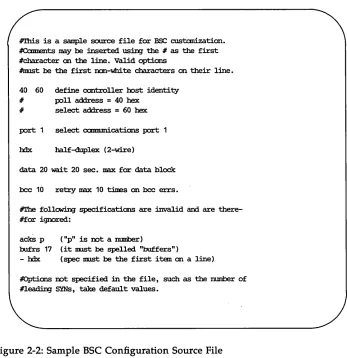
Controller Configuration FileFigure 2-2 is an example of a BSC configuration source file, illustrating the characteristics noted above. A sample configuration source file is pro-vided in the /usr/bscadm/cust/bscoptions directory.
#'Ibis is a saIIple source file for ESC custanizatian. #Ccmnents may be :inserted usin;J the # as the first #character an the line. Valid options
#trust be the first IXln-white characters an their line.
40 60 define oon1:l:oller lx>st identity # poll address
=
40 hex# select address = 60 hex
port 1 select ccmmmications port 1
hdx half-duplex (2-wire)
data 20 wait 20 sec. IIBX for data block
bee 10 retzy max 10 times an bee errs.
#The followiDJ specifications are invalid and are there-#for ignored:
acks p ("p" is not a IlllIIOOr)
bufrs 17 (it nust be spelled "buffers")
- hdx (spec ImJSt be the first i tan an a line)
[image:45.450.63.410.110.468.2]#Options not specified in the file, such as the rmmber of #1eadin;J SYNs, take default values.
Figure 2-2: Sample BSC Configuration Source File
Creating a BSC Controller Configuration File
Creating a Configuration Object File
To create a BSC configuration object file, invoke bsopts from the /usr/bscadm/runtime directory using the command format:
[image:46.451.39.392.164.370.2]bsopts [-w] [objectJile] [
<
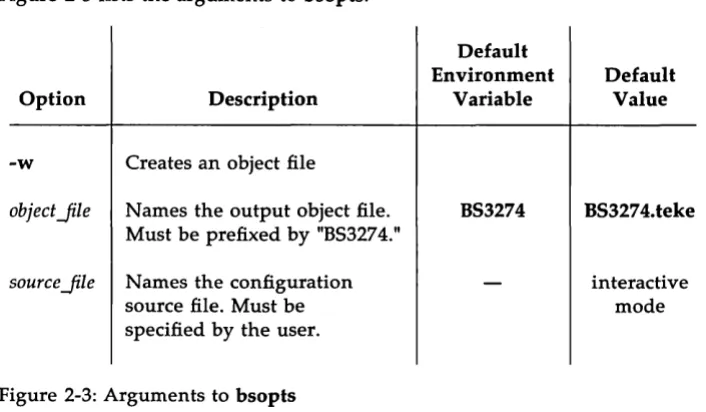
sourceJile]Figure 2-3 lists the arguments to bsopts.
Option
-w
objectJile
Description
Creates an object file
Names the output object file. Must be prefixed by "BS3274."
source Jile N ames the configuration source file. Must be specified by the user.
Figure 2-3: Arguments to bsopts
Default Environment
Variable
B53274
Default Value
B53274.teke
interactive mode
If the objectJile is specified on the command line, the file name must
have the prefix B53274., for example, B53274.hostx.
If object Jile is not specified, the environment list will be searched for
the variable B53274. If B53274 has been set, its value will be used as the name of the output object file. If B53274 has not been set, then bsopts will use the default name B53274.teke for the object file.
If
<
source Jile is not specified on the command line, bsopts executesCreating a BSC Controller Configuration File
The bsopts utility creates the configuration object file from the
configuration source file and displays a screen showing the configuration as bsopts processed it.
V
You should check that all the options specified in the source filematch the displayed configuration.
If an option is not displayed or is incorrectly set, check your configuration source file for invalid options.
Example:
bsopts -w
<
lusr/bscadm/cust/bscoptions/configl bsopts will use the configuration source file configl to create aconfiguration object file. The name of the object file will default to the value of the BS3274 environment variable, if it has been set. If BS3274 has not been set, the object file will be named BS3274.teke and placed in the run time directory.
Using
bsopts
InteractivelyThe bsopts utility can also be used interactively to create a configuration object file. When you do this, you do not have to create a configuration source file; bsopts accepts input from your terminal as the source to create the object file. To use bsopts interactively enter:
bsopts -w object Jile
The bsopts utility will accept whatever you enter from your terminal as the configuration source options to be processed. You simply enter the
configuration options as required. When you have entered all the options you need, enter Ctrl-d to end the session. bsopts will create the BSC configuration object file and display the completed configuration. You should check this display to make sure all the required options have been properly defined.
Displaying an Existing Object File
To display an existing configuration object file, execute bsopts without the -w flag.
bsopts [object Jile]
Creating a BSC Controller Configuration File
As in the example above, if objectJile is not specified on the command line bsopts will use the object file named by the BS3274 variable if that variable is set. If BS3274 is not set, bsopts will use a file in the runtime directory with the default name BS3274.teke.
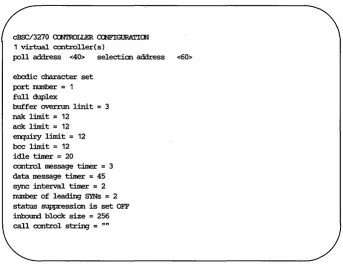
Figure 2-4 shows a sample bsopts configuration screen.
cBSC/3270 <XN1'ROLLER a:::NFIGURATICN
1 virtual controller ( s)
poll address <40> selection address <60>
ebcdic character set port rmmber = 1
full duplex
buffer overnm linit = 3 nak l:im:i. t
=
12ack l:im:i. t = 12
en:piry l:im:i. t = 12 bee l:im:i.t
=
12 idle timer = 20control message timer = 3 data message timer = 45 sync :interval timer = 2
number of leading SYNs = 2
[image:48.451.50.393.146.420.2]status suppression is set OFF i.nlx:mIrl block size = 256 call control strin:J = ""
Running the BSC Controller
After you have configured the controller and the environment for your site and for the host, you can start running the AT&T BSC/3270 Emulator+.
The System Administrator may designate one terminal as the master minal for the AT&T BSC/3270 Emulator+. The shell that runs on this ter-minal must have root privileges to start the BSC Controller processes. All status and error messages from the BSC Controller will be displayed on this terminal.
Starting the BSC Controller
The BSC Controller is started by the shell script startbsc in
lusr/bscadm/runtime. The startbsc script checks to see that no other con-troller processes are running on the communications port to be used by this BSC Controller. (The communications port number is obtained from the PCD environment variable.) startbsc then executes the commands to start the TM3274 process and the b3274 program.
At the start of execution, the TM3274 process reads the object file co~
taining the configuration options for the controller. (The name of the object file is obtained from the BS3274 environment variable.) Configuration information is passed to the b3274 program, which is downloaded and started on the communications board. (Note that you will not see b3274 running on the UNIX operating system if you execute the ps command, because b3274 is running on a separate processor.) Then the TM3274 pro-cess enables and establishes communication paths to and from b3274 and the devices. As soon as b3274 and TM3274 are running, the BSC Controller is ready to communicate with the host. (Communication with the host is possib_le even if no terminal emulator is active.)
To start the BSC Controller you must: Step 1.
Step 2. Step 3.
Log in as root.
Change directory to lusr/bscsadm/runtime.
Check that the environment is properly set. Be sure that PCD is set to the communications port the BSC Controller is using, and P3274 is set to the named pipe for this controller. See the sec-tion Configuring the Environment for BSC if these variables must be changed. Setting variables properly is especially impor-tant if more than one BSC Controller is running.
Running the BSC Controller
Step 4. Step 5.
Step 6.
Execute the shell script startbsc.
When the BSC Controller has been started successfully, a
copyright/release number message and controller ready message are displayed. If you are on a 3B2 Computer, the following mes-sage is also displayed:
ISC NUMBER n IS USED FOR THE BSC ()')N'IR()LLER
If you are on a 3B5 or 3B15 Computer, no such message is displayed.
If connection to the host is via a dial-up line, you should dial in at this point.
The printer and terminal emulators can now be started.
Error Messages
Error Message
bsc open error
name too long
path from devices
Running the asc Controller
Explanation/Possible Cause
AT&T BSC/3270 controller has not been started or dev-ice driver pathname for controller is incorrect.
Pipe prefix specification is too long (must be less than 100 characters).
Inbound TM3274-to-devices pipe does not exist. open error
initialization file Named configuration object file does not exist. not found
initialization file Permission bits incorrect for configuration file open error (should be readable).
initialization file Permission bits incorrect for configuration file. read error (should be readable).
error in initialization file Initialization file is not the result of a successful execu-tion of bsopts.
Figure 2-5: BSC Process Initiation Error Messages
Running the BSC Controller
sse
System Shutdown
You should stop the BSC Controller only after all device emulators have been powered down. Use the stopbsc shell script to stop the TM3274 pro-cess and the b3274 program.
The following steps will stop the BSC Controller: Step 1.
Step 2. Step 3.
Step 4.
Log in as root.
Change directory to lusr/bscadm/runtime.
Check that the environment is properly set. Be sure that
pen
is set to the communications port the BSC Controller is using. and P3274 is set to the named pipe for this controller. See the sec-tion Configuring the Environment for BSC if these variables must be changed. Setting variables properly is especially impor-tant if more than one BSC Controller is running.Enter the command stopbsc
3
Running the 3287 Printer Emulator
Introduction
3-1Starting the Printer Emulator
3-2Stopping the Printer Emulator
·3-4Error Messages
3-5Introduction
The 3287 Printer Emulator process, PE3287, does not require customiza-tion. You may use the regular UNIX operating system utilities such as the line printer spooler to print files. 3B printers are generally accessed through spoolers and filter programs. The filter programs are written for a specific printer (or class of printe"rs) and perform all necessary
configurations.
The procedures in this section are based on a printer with the following characteristics: .
• a Carriage Return to change the current print position to column 1 of the current line
• a Line Feed (LF) to change the current print position to the current column of the next line
• backspace capability • formfeed capability
Backspace and RETURN are often used by a filter program to move the cursor to characters to be underscored.
Starting the Printer Emulator
To invoke the Printer Emulator, use the command format: pe3287 [-t termno] [-f printer yath] [-x process_name]
[-u] [-p controlleryath] [-F] [-M msgJile]
You should run this command as a background task, i.e., use an & at the end of the command line so your terminal remains available for use. For example:
pe8387 -t 7 &
The following list describes the options in detail:
-t termno
-f printer yath
-x process_name
termno specifies acceptable printer device numbers.
The controller selects a device number for this printer from those specified. The valid range of device numbers is 0-31. You may specify a range of device numbers such as 10-15, or a mix of specific numbers and ranges such as 1,5,7,10-15,18,20~24. The device numbers must be defined at the host as printers. If this option is omitted, the environment' variable D3274 is sought. If D3274 is not defined, a default range of 0-31 is used.
printer yath specifies a file or named pipe for print
output. If this option is omitted, the environment variable PF3274 is sought. If the printer output path does not exist when the printer process is started, the path created is a file. Use the -f option only if the print path is a file; otherwise, use the -x option.
process_name is a process for print output. If this
Starting the Printer Emulator
-u Indicates that the data sent to the printer will not be formatted for printing. This option is useful if the physical printer is not a standard ASCII printer and special formatting is required.
-p controller yath controller yath is a path (named pipe) to the controller
process. If this option is omitted, the environment variable P3274 is used to obtain the path to the proto-col emulation process.
- F According to BSC protocol, upon receipt of a start print command from the host system to an enabled printer, the controller will always respond with a WACK as a positive acknowledgemen.t. (W ACK implies a temporary device busy condition; the host must wait for an ACK from the controller before it can transmit any more data to that printer. In response to a WACK, the host normally sends an ENQ (enquiry) and will continue to send ENQs until either the controller responds with an ACK or until the host sends its maximum number of ENQ's. When the -F option is specified, instead of sending a WACK as a positive acknowledgement, the controller sends an ACK. This decreases response times by eliminating the WACK-ENQ-ACK sequence that normally takes place. (Note that this option bypasses normal BSC protocol procedures.)
-M msgJile msgJile is the file containing the error messages that
will be used by the printer process. The default is pe3287.msg.
Stopping the Printer Emulator
Error Messages
The following are some of the error messages that may appear when starting the Printer Emulator:
Error Message
can't specify both the -x and -f options
incorrect terminal number
start
>
end of termno rangeopen controller pipe fails
INSUFFICIENT RESOURCES
EMULATOR TERMINATED
Explanation
Specify either -x or -£, but not both.
An invalid device number was used to specify a printer number.
Check the 03274 environment variable.
The device number specified at the beginning of the range was greater than the number specified at the end of the range. For
example, 10-7 is an invalid range specification.
Check the 03274 environment variable.
The controller pipe cannot be opened. Check to see that the specified pipe name is current.
Check the P3274 environment variable.
The controller
cannot handle another terminal or printer process.
A serious error has occurred or the printer process has stopped.
Stopping the printer process generates a power off notification to the con-troller.
4
Setting Up the User's Environment
Introduction
Additional Considerations
Programming Considerations
Environment Variables LUTABLE File
SETTING UP THE USER'S ENVIRONMENT 4-1
4-3
Introduction
Each time a user starts a 3278/9 Terminal Emulator process, there are certain options for which te3279 requires values. (See Appendix H for a complete list of the options to the te3279 command.) If these options are not specified on the command line, te3279 looks for a specific environment variable associated with each missing option. If the environment variable is set, te3279 uses its value as the option default. Therefore, if the user's environment is set up properly, the user does not have to specify any options when starting the emulator. (The -e option is an exception.)
To ensure that this will be the case, the System Administrator should configure the user's environment with appropriate values for each of the environment variable defaults. This must be done before the user invokes te3279. One way to do it is to set and export the required environment variables in each user's login .profile. Another is to add snaenvset (or bscenvset) to each user's .profile. In the latter case you must specify the full pathname of the script and precede the script name with a period and space, for example, . . /usr/snaadm/runtime/snaenvset (see the Additional Considerations section, later in this chapter).
te3279 uses the following environment variables: D3274
SC3279
Corresponds to the -t termno option. This provides te3279 with the device number(s) it is allowed to use. It allows the System Administrator to control the use of the available devices by only allowing certain users access to particular devices.
Example: D3274=0,1,3,5,10-14
This would allow the user to access only the devices numbered 0, 1, 3, 5, and 10 through 14. If one of these devices is already connected to a host, the controller will select the next available device from the list.
Corresponds to the -s screenJile option. te3279 uses the screen control file named by this option or variable to emulate the 3278/9 display capabilities on the user's ter-minal.
Example: SC3279= / usr / snaadm/ runtime /SC.5425
Introduction
KY3279
P3274
PF3274
TM3279
PATH
Corresponds to the -k keyJile option. te3279 uses the keyboard mapping file named by this option or variable to emulate the 3278/9 key functions on the user's termi-nal.
Example: KY3279= / usr / snaadm/ runtime /KY .5425 Corresponds to the -p pipe option. This provides te3279 with the exact name of the pipe for the controller it will be using. (te3279 and the controller will communicate via this pipe.)
Example: P3274=/usr/snaadm/runtime/P3274.1 Corresponds to the -£ printer yath option. Specifies the printer pathname to be used for local print functions.
Example: PF3274=/usr/snaadm/runtime/filename Corresponds to the -m model option. If a model 5 (132 column mode) is to be invoked, TM3279 should be set equal to 5.
Exam pIe: TM3279=5
Each user must add the runtime directory to their PATH.
Additional Considerations
The following environment variables are used by the snaenvset and bscenvset scripts.
TERM The scripts use the value of the user's TERM environ-ment variable to set the SC3279 variable. Thus if the user enters a value for TERM that does not
correspond to the name of the screen file in the
run-o time directory for that terminal type, te3279 will not
execute. For example, if a user logs in and sets
TERM=hp2621, the script will set SC3279=SC.hp2621. te3279 will not find the right screen file because the file for the hp2621 that is provided with the software is named SC.2621. There are three possible solutions to this problem:
1. Have the user log in using t