TECHNICAL INSTALLATION PROCEDURE
Iwatsu
®Edition Note
This is the first edition of the Iwatsu® ADIX Technical Installation Procedure. Information
in this document applies to CallXpress3® systems with software Version 3.20F or higher
installed.
This document was produced by AVT Technical Services.
Writer: Daniel Brooks Editor: Pamela Johnson
Copyright Notice
Copyright © June 1994 Applied Voice Technology, Inc. All rights reserved
Printed in the United States of America P/N 081-00514-00
Disclaimer
Applied Voice Technology, Inc., reserves the right to revise this publication and to make changes from time to time in the content hereof without obligation of Applied Voice Technology, Inc., to notify any person of such revisions or changes.
Applied Voice Technology, Inc., exercises care in researching other manufacturers’ specifications but disclaims all responsibility for their accuracy. All specifications shown here are subject to change without notice.
Trademarks
AVT, the AVT logo, CallServer, CallXpress, CallXpress3, “Changing the Way the World Communicates,” and PhoneXpress are registered trademarks of Applied Voice Technology, Inc.
All other products, brand names, or companies mentioned in this document may be trademarks or registered trademarks of their respective companies.
AVT Technical Publications Hotline
If you have any comments on the accuracy of this document or general suggestions about how it can be improved, let us know by leaving a message at (206) 820-6000, extension 3900.
Applied Voice Technology, Inc. P.O. Box 97025
Table of Contents
Preface ...1
Integration Overview ...3
Theory of Operation ...4
Critical Application Considerations ...6
Installation Requirements ...9
Telephone System Requirements ...9
CallXpress Requirements...9
Programming the Telephone System ... 11
Telephone Programming for CallXpress Ports ... 11
Programming Subscriber Extensions for Voice Mail ... 14
Configuring CallXpress... 15
Configuring CallXpress Screens ... 16
Testing the Integration... 19
Preparing CallXpress for Testing... 20
MWI Set/Cancel Test ... 21
Direct Subscriber Logon Test... 22
Call Forward to Personal Greeting Test... 23
Troubleshooting the Integration... 25
Viewing Inband Packets With a Digit Grabber... 25
Appendix A. Standard Application for Integrations... A-1
List of Figures and Tables
Figure Title Page
1 Overview of the integration ...4
Table Title Page
1 System compatibility information...7
2 Programming information for packet codes...13
3 Iwatsu ADIX inband packets ... 26
Preface
This Technical Installation Procedure describes how to integrate CallXpress3®
with a specific telephone system. Use this document in conjunction with the CallXpress3 Installation and Applications Guide (P/N 081-05320-XX) to install and configure CallXpress® for the application.
This document is written for dealers who are experienced with CallXpress and who are familiar with CallXpress procedures and terminology. It also assumes that you are familiar with the features and programming of the telephone system.
The information in this document pertains to CallXpress3 systems with software Version 3.20F or higher, and PhoneXpress® systems with Version 1.00A or
higher. The terms CallXpress, CallXpress3, and PhoneXpress are used interchangeably.
To make our documents clearer and easier to read, AVT® uses the pronoun he
Integration Overview
This document describes how to integrate CallXpress3with an Iwatsu® ADIX
telephone system, hereafter called ADIX. Information contained in this document applies to ADIX Versions 4.2 and 5.2 only.
Some of the features provided by this CallXpress integration include:
• Automatic logon, in which CallXpress identifies the internal caller’s extension number, then asks the caller for the security code of the associated subscriber mailbox.
• If an extension is busy or not answered, both internal and external callers can be forwarded to the subscriber’s pre-recorded personal greeting. Callers can then leave detailed messages in the subscriber’s mailbox.
• The message waiting indicator (MWI) can be automatically set when new messages are sent by callers and cancelled when new messages have been accessed by the subscriber.
Technical Installation Procedure
Theory of Operation
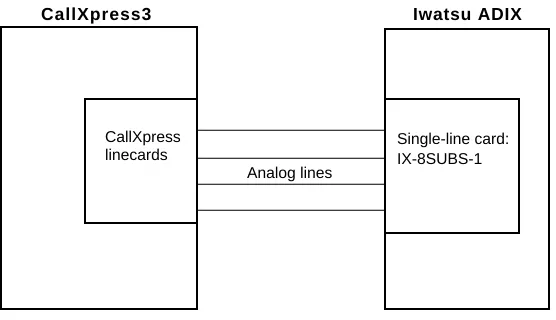
CallXpress integrates with the Iwatsu ADIX through analog station ports that are programmed for voice mail. The ADIX uses DTMF digits to send information about calls forwarded to CallXpress and about direct calls to CallXpress from an extension. When a call is sent to CallXpress, CallXpress goes offhook and receives the digits sent by the ADIX. It then either routes the call through a call processor mailbox to the forwarded subscriber’s personal greeting or Extension Specific Processing (ESP) announcement, or logs the caller on to a mailbox and prompts for the security code. If CallXpress does not receive digits, it routes the caller to a call processor mailbox and presents the caller with a list of other call processing options, typically the automated attendant.
This integration supports MWI set and clear functions. CallXpress sets and clears MWI by dialing a feature code followed by the subscriber’s telephone extension.
The Iwatsu ADIX has 20 programmable packets available. Not all of these packets are required to integrate with CallXpress. Specific information on the packets provided by the Iwatsu ADIX can be found in Troubleshooting the Integration, later in this document. For information on the call processors required for this integration, refer to Appendix A.
Figure 1 shows an overview of an ADIX integration.
Iwatsu ADIX CallXpress3
Analog lines CallXpress
linecards
Single-line card: IX-8SUBS-1
Iwatsu ADIX
Recognized Call Types
Before processing a call, CallXpress must first identify it as a specific call type. Four different call types are recognized by CallXpress. After the call type is determined, CallXpress uses the information you specify on the Switch Protocol Configuration screen to process the call. Each call type is processed differently, as described below.
• Direct Station Call (with Calling Party ID)—CallXpress automatically logs an internal caller on to a mailbox and prompts for the security code. The caller has the options of entering the security code, logging on to a different mailbox, or accessing another feature in the system.
• Direct Trunk Call (with Trunk Number ID)—CallXpress plays the main announcement. It can optionally present distinct menu options based on the trunk number to an outside caller on a direct trunk call. An integrated port can service a direct trunk call with specific options, depending on the time of day and the day of the week. This call type is not used in the application provided in Appendix A.
• Forwarded Station Call (with Called Party ID)—CallXpress plays the personal greeting of the associated subscriber mailbox to internal callers that are forwarded to CallXpress.
• Forwarded Trunk Call (with Called Party ID)—CallXpress presents menu options that might be different from a forwarded station call to trunk callers forwarded to CallXpress.
Technical Installation Procedure
Critical Application Considerations
Listed below are known limitations and conditions within the telephone system and CallXpress that affect the integration’s performance. General recommendations are provided when ways to avoid these limitations exist.
• You must use CPU version IX-CPUL-1 or IX-CPU32 for the integration to function.
• Information contained in this document applies to Iwatsu ADIX Versions 4.2 and 5.2. The DTMF packets and programming information given here are not compatible with earlier versions.
• ADIX Versions 4.2 and 5.2 have many enhancements over earlier versions. Both versions provide 20 definable call progress packets to assist in
identifying the type of calls coming to CallXpress. However, this document does not cover the packets that apply to automated attendant only, because AVT does not recommend flagging the ports for CallXpress as automated attendant only.
• AVT recommends using ground-start trunks and the IX-8SUBS-1 station card to provide a loop-current pulse for disconnect supervision.
If you do not provide loop-current pulse for disconnect, when a caller hangs up, the Iwatsu ADIX may send the disconnect code 55✳✳ to CallXpress, which can cause problems for subscribers when listening to new messages. If a subscriber does not press the ✳ key to stop listening to new messages, this code can cause the current new message and the next new message to be moved to the saved message queue. Also, this code does not allow you to use the 5 key as a valid action in any call processor mailboxes.
• Subscriber mailbox numbers must match extension numbers.
• If the application will use monitored or T-type transfers, do not allow DND at the extensions of subscribers who want to use caller queuing. The call progress pattern for DND is the same as station busy.
• If the application will use blind transfers, caller queuing and call screening will not be available.
Iwatsu ADIX
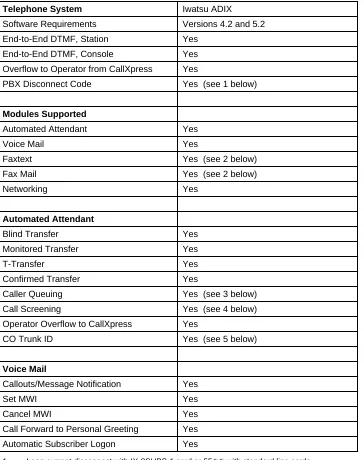
Table 1 quickly outlines the features and limitations of this integration.
Table 1. System compatibility information
Telephone System Iwatsu ADIX
Software Requirements Versions 4.2 and 5.2
End-to-End DTMF, Station Yes
End-to-End DTMF, Console Yes
Overflow to Operator from CallXpress Yes
PBX Disconnect Code Yes (see 1 below)
Modules Supported
Automated Attendant Yes
Voice Mail Yes
Faxtext Yes (see 2 below)
Fax Mail Yes (see 2 below)
Networking Yes
Automated Attendant
Blind Transfer Yes
Monitored Transfer Yes
T-Transfer Yes
Confirmed Transfer Yes
Caller Queuing Yes (see 3 below)
Call Screening Yes (see 4 below)
Operator Overflow to CallXpress Yes
CO Trunk ID Yes (see 5 below)
Voice Mail
Callouts/Message Notification Yes
Set MWI Yes
Cancel MWI Yes
Call Forward to Personal Greeting Yes
Automatic Subscriber Logon Yes
1 Loop current disconnect with IX-8SUBS-1 card or 55✳✳ with standard line cards. 2 This feature requires separate analog lines; not available with PhoneXpress. 3 Caller queuing is not compatible with blind transfers.
Installation Requirements
Review this section before performing any of the procedures in this document. To successfully install this integration, you must meet the installation
requirements listed below for the telephone system and CallXpress.
Telephone System Requirements
The following lists the requirements for the ADIX telephone system.
• One CPU card—for Version 4.2, use IX-CPUL-1; for Version 5.2 and later, use IX-CPUL32 5
• One single-line (2500-type) card; the latest versions of this card are the IX-8SUBS or IX-8SUBS-1. AVT recommends using the IX-8SUBS-1 card (the “-1” indicates that the card will provide a loop-current pulse for disconnect signaling)
Both IX-8SUBS and IX-8SUBS-1 are 8-circuit cards with one circuit required per CallXpress port. These cards should come equipped with two IX-4RCVS daughter boards for DTMF receivers.
• One RNGU ring generator
CallXpress Requirements
The following lists the requirements for CallXpress.
• CallXpress3 hardware platform
• CallXpress3 software Version 3.20F or higher, or PhoneXpress Version 1.00A or higher
Programming the Telephone System
This section explains how to program an Iwatsu ADIX telephone system to integrate with CallXpress. The installing technician should be familiar with programming this telephone system.
For detailed information on programming and installing the Iwatsu ADIX telephone system, refer to the appropriate Iwatsu ADIX document:
• Engineering Bulletin EBA 91010, ADIX System Voice Mail Integration, Version 4.2 or 5.2, October 1991, Iwatsu Electric Co. Ltd.
• Iwatsu ADIX Technical Manual, Iwatsu Electric Co. Ltd.
Telephone Programming for CallXpress Ports
Follow these steps to program the ADIX for integration with CallXpress. The bracketed numbers represent the class, item, and element to be programmed. Areas that are not listed here are not important for programming the ADIX telephone system for CallXpress.
1. Set Port Definition: Voice Mail (VM) ports to [01.03 = 0-4-1-nnn, 01.04 = 0], where nnn = station logical port.
2. Set DTMF Packet Speed to 100ms on / 50ms off,[04.71.10 = 2].
3. Set In-band Pause Time to 0 seconds [04.71.11 = 0].
Technical Installation Procedure
5. Set the disconnect signal based on your application. Using an IX-8SUBS-1 linecard, AVT recommends setting it to loop open.
For an IX-8SUBS-1 linecard, set the disconnect signal to loop open [04.71.13=1], with the loop open duration of 700 msec [04.71.15=70].
For an IX-8SUBS, you will use a DTMF string as the disconnect signal. Disable the setting for loop open [04.71.13=0] and set the disconnect string to
55 [04.77.19=55✳✳].
Note If you use the IX-8SUBS-1 linecard with loop-current disconnect signaling, do not program the system to use packet 19.
6. Disable trunk packets [04.71.14=0].
If you change this value, the sample application given in Appendix A will not work; you will need to create a custom CallXpress application for the site.
7. Assign the VM Hunt Group Access Number; for example[07.02.47 = 700], assigns an access number of 700.
8. Assign the VM Mailbox Access Number; for example [07.06.48 = 500], assigns an access number of 500.
9. Assign the voice mail logical ports to Hunt Group 47 [08.02.47]. Test these ports to make sure that they hunt when busy.
10. Deny Dial on Conversation for voice mail ports [10.28 = 0].
11. Set the MSG Waiting Code to [07.06.19 = 519]; the configuration shown here allows multiple ports to set and cancel MWI.
12. Set the cancel code to [07.06.01 = 501].
Note This setting affects other codes in the telephone system besides the clearing of MWI in voice mail. If a cancel code has already been programmed, use the existing code and modify the Cancel MWI field on the Switch Protocol Configuration screen to match (see Configuring CallXpress, later in this document, for details about this configuration screen).
13. Assign the Mailbox Access Key to key patterns for the digital telephones [14.01 = 11-47] and for the console [15.01 = 11-47].
Iwatsu ADIX
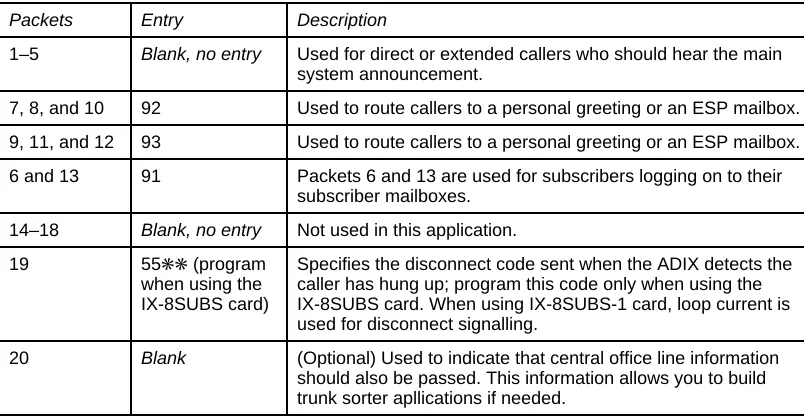
15. Set up the Automated Attendant/Voice Mail Packet codes [04.77.01-20] as shown in Table 2. At this time, you can program up to twenty of the call packets that will be sent. Refer to your ADIX mannual for detailed programming information.
Table 2. Programming information for packet codes
Packets Entry Description
1–5 Blank, no entry Used for direct or extended callers who should hear the main system announcement.
7, 8, and 10 92 Used to route callers to a personal greeting or an ESP mailbox.
9, 11, and 12 93 Used to route callers to a personal greeting or an ESP mailbox.
6 and 13 91 Packets 6 and 13 are used for subscribers logging on to their subscriber mailboxes.
14–18 Blank, no entry Not used in this application.
19 55✳✳ (program
when using the IX-8SUBS card)
Specifies the disconnect code sent when the ADIX detects the caller has hung up; program this code only when using the IX-8SUBS card. When using IX-8SUBS-1 card, loop current is used for disconnect signalling.
Technical Installation Procedure
Programming Subscriber Extensions for Voice Mail
Follow this information to program subscriber extensions for voice mail.
Program a MSG key for all subscribers on their telephones; otherwise, the FEAT key will flash when CallXpress has set the message waiting indicator (MWI) at extensions. If necessary, refer to the Iwatsu ADIX manuals for programming flex keys.
Program a VM button for any subscriber who will be transferring callers into CallXpress on a regular basis, such as the receptionist.
Call forward to personal greetings can be controlled by the following station programming:
• Station camp-on recall from a call transferred by CallXpress
• System call forwarding
• Station call forwarding as programmed by the individual subscriber
Configuring CallXpress
After you have programmed the telephone system, you must configure
CallXpress for the integration. Follow these procedures to configure CallXpress:
1. Specify IWAADIX file as the telephone system in SETUP.
Press F5 and select the IWAADIX file from the list of telephone systems. For more information, refer to Chapter 5 of the CallXpress3 Installation and Applications Guide.
Note If using CallXpress Version 3.20E or earlier, you should choose Generic as the telephone system, then train call progress. You can also download the
IWAADIX.SSF and IWAADIX.CPF files from the AVT bulletin board system (BBS) by calling (206) 820-4069.
2. Configure CallXpress screens.
To set up the configuration screens, refer to Configuring CallXpress Screens, later in this section.
3. For an existing system, modify mailboxes. For a new system, install the standard integration application diskette.
Refer to Appendix A for mailbox information and installation instructions.
4. If necessary, open all CallXpress lines.
When a new system starts, CallXpress lines are closed. To answer calls, you must open all CallXpress lines.
5. Test the integration.
Technical Installation Procedure
Configuring CallXpress Screens
The configuration fields important to this integration are listed on the following pages. Be sure to follow the information provided here to ensure a successful integration with CallXpress and the telephone system.
Follow the instructions in the CallXpress3 Installation and Applications Guide for fields not specified here. In most cases, you can accept the default setting. Refer to the CallXpress3 Installation and Applications Guide if you need general screen and mailbox information.
• Environment Configuration screen (option A)
Answer telephone on ring # 1
Play audio trademark No
Set MWI mode First
• Line Configuration screen (option B)
# Extension Callout MWI Outband Net Desktop Type
1 XXX – – – – – Loop start
2 XXX – – – – – Loop start
3 XXX – – – – – Loop start
4 XXX – – – – – Loop start
5 XXX – – – – – Loop start
6 XXX – – – – – Loop start
7 XXX X X – – – Loop start
8 XXX – X – – – Loop start
Enter the appropriate extension numbers for CallXpress lines in the Extension column.
Callouts can be assigned to any port. However, AVT recommends that you do not configure all ports for callouts.
Iwatsu ADIX
• Switch Protocol Configuration screen (option C)
Inband Inband Code Outband Code
Line ringing Yes No
Transfer init Yes FP No
Transfer abort Yes FP No
Transfer abort RNA No No
Transfer complete No No
Reject call transfer No No
Set MWI Yes 519X No
Cancel MWI Yes 501519X No
Onhook Yes No
Offhook Yes No
MWI confirmation tone: Ignore
Offhook before packet: No
• Voice Message Configuration screen (option D)
Extension calls template X
Local calls template 90X (Using least-cost routing)
Long distance calls template 90X (Using least-cost routing)
Technical Installation Procedure
• VIOS Configuration screen (option E)
Record DTMF detect time 70
Prompt playback DTMF detect time 50
Playback DTMF detect time 60
Length of dial tone for disconnect 10
Number of repetitions to recognize reorder tone 0
Length of reorder tone silence 250
Length of reorder tone noise 250
Variation allowed in noise/silence 70
Length of loop current drop for disconnect 500
Length of hook-flash 500
Answer on leading or trailing edge of ring Trailing
• Answer Mode Configuration screen (option F)
The following shows a sample configuration based on the sample mailboxes given in Appendix A. These mailboxes are set up for a system with both voice mail and automated attendant installed.
First line Last line Days/Date Time Mailbox Name
1 8 MO-FR 08:00 000 Day Main Menu
1 8 MO-FR 17:00 002 Night Main Menu
Testing the Integration
After programming the ADIX and configuring CallXpress, you should test the installation to make sure that it runs smoothly. The tests in this section will help you determine if the integration functions properly.
Before you proceed with the tests in this section, it is imperative that you have already determined that CallXpress correctly provides basic telephone functions (2500-type). Follow the procedures in Testing the Telephone System Interface in Chapter 3 of the CallXpress3 Installation and Applications Guide.
The tests in this section allow you to verify CallXpress’s ability to integrate with the ADIX telephone system. These tests cover the three basic integration schemes that are provided by the integration:
• MWI set and cancel
• Direct subscriber logon to a mailbox
• Call forward to a personal greeting
Technical Installation Procedure
To facilitate testing and problem resolution, you will need the following items:
• Two working DTMF test telephone extensions within visual range of the CallXpress console.
• A telephone test set capable of monitoring calls. A test set with signal detection and measurement capabilities (digit grabber), such as the ZIAD PhD, is required to fully test all of the integration functions.
• Six unassigned mailbox numbers. The integration testing procedure requires three call processor mailboxes, one message center mailbox, and two subscriber mailboxes. If you installed the preconfigured database as described in Appendix A, the call processor and message center mailboxes exist already. However, you must create the subscriber mailboxes.
Before you begin the integration tests, verify the telephone system programming. For programming specifics, refer to Programming the Telephone System, earlier in this Technical Installation Procedure.
Preparing CallXpress for Testing
Follow these steps to prepare CallXpress for testing:
1. Create two subscriber mailboxes, one for each test telephone station.
a. Make sure that the Telephone ext field matches the actual extension number.
b. Make sure that the Set message-waiting light field is set to Yes.
c. Make sure that the Clear MWImode field is set to First.
2. Record a personal greeting and a name for both mailboxes and verify that the recordings are present.
3. Verify that message center mailbox 070 exists. If not, create message center mailbox 070 as shown in Appendix A.
4. Verify that call processor mailboxes 000, 001, and 010 exist. If not, create these call processor mailboxes as shown in Appendix A.
Iwatsu ADIX
6. At the Line Configuration screen, verify that only one port has been designated for MWI callouts, preferably the last available port.
7. At the Answer Mode Configuration screen, verify that call processor 010 has been designated as the answer mode for all lines.
If any call fails the following tests, refer to Troubleshooting the Integration, later in this document.
MWI Set/Cancel Test
Follow these steps to test the MWI set and cancel functions.
Should you experience any problems with this test, use the digit grabber to monitor the call into CallXpress. This procedure allows you to hear and see the DTMF digits that the telephone system sends to CallXpress, helping you to diagnose the problem and make the appropriate changes.
1. Make sure that the test station being used has MWI capabilities and that the MWI is currently not set.
2. Place a call to CallXpress from the second test station and do the following:
a. Log on to the second test subscriber mailbox and record a message to send to the first test mailbox.
b. Press 5 to send the message.
c. Log off and hang up.
d. Observe the CallXpress Default screen. The MWI port will display Set MWI XXX.
Technical Installation Procedure
3. From the first test station, call CallXpress.
a. After CallXpress answers, enter your security code and listen to the test message.
b. Save or discard the message as desired.
c. Log off and hang up.
d. Observe the CallXpress Default screen. The MWI port will display Clr MWI XXX.
e. Check the test station to confirm that the MWI has been cancelled.
Direct Subscriber Logon Test
Follow these steps to test the direct subscriber logon. Again, if problems occur while performing this test, use the digit grabber to monitor another test call and help determine where the problem lies.
1. Verify that the telephone system is programmed appropriately.
2. From the test station, place a call to the pilot number of CallXpress and do the following:
a. Monitor the CallXpress Default screen to verify which mailbox is accessed when CallXpress answers.
b. When you hear “Please enter your security code,” enter the appropriate security code and make sure that you are in the correct mailbox.
Iwatsu ADIX
Call Forward to Personal Greeting Test
This test explains how to test call forward to a personal greeting. Again, if problems occur while performing this test, use the digit grabber to monitor another test call and help determine where the problem lies.
1. Set a test station so it call forwards on ring-no-answer (RNA) and busy to CallXpress.
Call Forward on Ring-No-Answer
2. From another test station that has a subscriber mailbox in CallXpress, place an internal call to the forwarded station.
After the designated number of rings at the station, the call should forward to CallXpress.
3. Observe the CallXpress Default screen to make sure that CallXpress answers the forwarded call with the appropriate subscriber’s mailbox.
After CallXpress answers the call, you should immediately hear the personal greeting of the called station.
4. After the personal greeting ends, leave the subscriber a short message, then hang up (just like a non-subscriber would do).
5. Repeat Steps 2 through 4, but call into CallXpress using an outside line (this tests DID or DIT functionality).
Again, the call should forward to CallXpress and to the personal greeting of the called station.
If Used, Call Forward on Busy
6. Make the station busy and place an internal call to the busy station.
The call should immediately forward to CallXpress.
7. Observe the CallXpress Default screen to make sure that CallXpress answers the forwarded call with the appropriate subscriber’s mailbox.
Technical Installation Procedure
8. Log off CallXpress at the personal greeting and hang up.
9. Repeat Steps 7 through 8, but call into CallXpress using an outside line.
Again, the call should forward to CallXpress and to the personal greeting of the called station.
Troubleshooting the Integration
This section provides information to help you troubleshoot an Iwatsu ADIX integration. To make sure that CallXpress responds appropriately to the infor-mation it receives from the telephone system, see Viewing Inband Packets with a Digit Grabber for details. You should also refer to If You Have Problems—Common Integration Mistakes, later in this section, for additional troubleshooting tips.
Viewing Inband Packets With a Digit Grabber
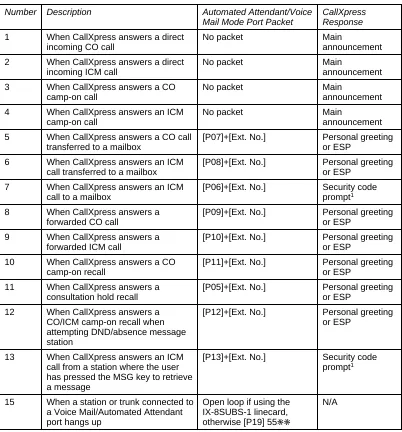
If you experience problems while testing the integration, use a digit grabber (such as a ZIAD PhD) to view the inband packets sent by the Iwatsu ADIX. Attach the ZIAD to the appropriate telephone line to view the communications between CallXpress and the Iwatsu ADIX.
Technical Installation Procedure
Table 3. Iwatsu ADIX inband packets
Number Description Automated Attendant/Voice
Mail Mode Port Packet
CallXpress Response 1 When CallXpress answers a direct
incoming CO call
No packet Main
announcement
2 When CallXpress answers a direct incoming ICM call
No packet Main
announcement
3 When CallXpress answers a CO
camp-on call
No packet Main
announcement
4 When CallXpress answers an ICM
camp-on call
No packet Main
announcement
5 When CallXpress answers a CO call transferred to a mailbox
[P07]+[Ext. No.] Personal greeting
or ESP
6 When CallXpress answers an ICM
call transferred to a mailbox
[P08]+[Ext. No.] Personal greeting
or ESP
7 When CallXpress answers an ICM
call to a mailbox
[P06]+[Ext. No.] Security code
prompt1
8 When CallXpress answers a
forwarded CO call
[P09]+[Ext. No.] Personal greeting
or ESP
9 When CallXpress answers a
forwarded ICM call
[P10]+[Ext. No.] Personal greeting
or ESP
10 When CallXpress answers a CO
camp-on recall
[P11]+[Ext. No.] Personal greeting
or ESP
11 When CallXpress answers a consultation hold recall
[P05]+[Ext. No.] Personal greeting
or ESP
12 When CallXpress answers a CO/ICM camp-on recall when attempting DND/absence message station
[P12]+[Ext. No.] Personal greeting
or ESP
13 When CallXpress answers an ICM call from a station where the user has pressed the MSG key to retrieve a message
[P13]+[Ext. No.] Security code
prompt1
15 When a station or trunk connected to a Voice Mail/Automated Attendant port hangs up
Open loop if using the IX-8SUBS-1 linecard, otherwise [P19] 55✳✳
N/A
Iwatsu ADIX
If You Have Problems—Common Integration Mistakes
If the integration does not function properly after you install and configure it, review the following items before calling AVT Technical Support.
CallXpress
• Check your call processors to ensure that you have configured the proper numbering plan.
• Make sure that the configuration screens have the proper settings.
• If you see 55✳ or 5✳✳ on the CallXpress Default screen, you have a call processor configured for transfer on the 5 key and CallXpress is reacting to the IX-8SUBS linecard disconnect string. You should either convert to IX-8SUBS-1 linecards and use loop open for disconnect, or make sure that all call processors are configured for hangup on 5 and ✳ keys.
• If subscribers complain that messages are unintendedly disappearing from their mailboxes and reappearing in the saved messages queue, you need to train subscribers on how to exit their mailboxes properly. When this situation occurs, CallXpress is reacting to the IX-8SUBS linecard disconnect string (55✳✳), which is causing it to save messages. You can also resolve this problem by converting to IX-8SUBS-1 linecards and using loop open for disconnect.
ADIX
• If users are not forwarding to voice mail after system forwarding has been set, you must either reset the ADIX after programming system forwarding, or set and cancel station forwarding from each user’s telephone at least once before system forwarding will occur.
Appendix A. Standard Application
for Integrations
This appendix describes the standard application for all CallXpress3Version 3.20 integrations with both voice mail and automated attendant. The accompanying CallXpress3 Standard Database diskette contains databases for 2-, 3-, and 4-digit mailbox configurations. The diskette also includes pre-recorded announcements for the mailboxes so the application can be used immediately.
Installing the Standard Application
This section explains how to install the CallXpress3 standard application. Installation of the standard application from diskette is to be performed only on new CallXpresssystems with both voice mail and automated attendant.
To convert an existing application to the application described in this appendix, change the existing mailboxes individually as needed; refer to Application Mailboxes, later in this appendix for mailbox information.
Before installing the standard database diskette, you must first have completed the tasks described in Configuring CallXpress. Then, follow the steps on the next page to install the standard application.
Do not install the CallXpress3 Standard Database diskette on a system with an existing application, or you will overwrite and destroy the data-bases and all existing voice files (names, announcements, and personal greetings) on the system.
1. Shut down CallXpress by selecting option A, Shut system down, from the CallXpress Main menu.
2. Place the CallXpress3 Standard Database diskette in drive A.
3. At the system prompt, type A:INSTALL and press ENTER.
Technical Installation Procedure
A for 2-digit mailboxes (00–99)
B for 3-digit mailboxes (000–999)
C for 4-digit mailboxes (0000–9999)
5. At the confirmation prompt, type Y to verify your selection or N to cancel.
CallXpress copies the database files and announcements.
6. When finished, remove the diskette from the drive.
Do not use the CallXpress3 Standard Database diskette to restore the CallXpress databases, or you will overwrite and destroy the databases and all existing voice files on the system. The CallXpress3 Standard Database diskette is to be used only for the initial installation. If you need to restore the database after you have created subscriber mailboxes, use the current mailbox backup.
7. Start CallXpress by typing CX at the system prompt and pressing ENTER.
The CallXpress Logo screen appears.
8. Open CallXpress lines. To answer calls, you must open all lines because they are closed when a new system starts initially.
Customizing the Application for the Telephone System
The integration template can be used with the Iwatsu ADIX without change.
If the IX-8SUBS-1 card is not used in the application, you will need to change the 5 and ✳ keys on all call processors to Hangup or Undefined. (Changes to the template are shown in boldface on the screens in this appendix.)
Iwatsu ADIX
Application Mailboxes
This section lists the standard mailboxes in numerical order. To help you understand how the mailboxes are configured, an explanation follows each mailbox. Please note that the mailboxes shown here are configured for a system with 3-digit mailboxes.
The CallXpress3 Standard Database diskette contains pre-recorded announce-ments. If you want to customize the announcements, refer to the text shown here for sample wording. For example, you may want to add your company name and business hours where indicated.
When customizing the announcements, AVT recommends that you re-record all announcements for consistency throughout the application.
The standard mailboxes in the application are listed in Table A-1. For 4-digit mailbox numbers, append a zero to the beginning of the 3-digit mailbox number.
Table A-1. Standard application mailboxes
2-Digit 3-Digit Name Type
00 000 Day Main Menu call processor
01 001 Day Secondary Menu call processor
02 002 Night Main Menu call processor
03 003 Night Secondary Menu call processor
04 004 Holiday Main Menu call processor
10 010 Day Integration Sorter call processor
12 012 Night Integration Sorter call processor
70 070 Day Integrated Messages message center
72 072 Night Integrated Messages message center
09 099 ESP for 199/No Operator call processor
19 199 Night Message/No Operator subscriber
21 221 Doe John subscriber
Technical Installation Procedure
Monitored transfers are recommended if you want to use the caller queuing feature of CallXpress. To do so, it will be necessary to disable call forwarding busy at the telephone stations.
The application contains mailboxes for day, night, and holiday modes. The answer mode contains call processor mailboxes 000, 002, and 004. The company announcements are recorded in these mailboxes.
Two message center mailboxes can be used: 070 for day mode and 072 for night and holiday mode. Message center mailboxes 070 and 072 are used for integrated access to subscriber personal greetings. In this mode, no delay is encountered in the transfer process and, therefore, personal greetings are played immediately.
The integration sorter call processor mailboxes (010 and 012) provide the following functions:
• Send a forwarded outside caller directly to a subscriber’s personal greeting or ESP mailbox.
• Send a forwarded internal caller directly to a subscriber’s personal greeting.
• Allow subscribers to log on automatically to their mailboxes.
Iwatsu ADIX
Call Processor Mailbox Configuration
Mailbox number: 000 Name: DAY MAIN MENU
Timeout: 4 Sponsor:
Max msg length: 2700 Next CP: 001 DAY SECONDARY MENU Log usage in SPU file: No Language: Default
Key Action Number Key Action Number
--- --- --- --- --- TO Blind xfr 0 8 Undefined
0 Blind xfr 0 9 Goto cp 010
1 Directory * Hangup
2 Monitor xfr XXX # Access msgs 3 Monitor xfr XXX A Undefined 4 Monitor xfr XXX B Undefined
5 Undefined C Undefined
6 Undefined D Undefined
7 Undefined
000—Day main menu. “Thank you for calling [company]. If you know your party’s extension number, you may dial it at any time. For a directory of extensions, press 1, or stay on the line and the operator will assist you.”
Call Processor Mailbox Configuration
Mailbox number: 001 Name: DAY SECONDARY MENU
Timeout: 4 Sponsor: Max msg length: 2700 Next CP:
Log usage in SPU file: No Language: Default
Key Action Number Key Action Number
--- --- --- --- ---
TO Hangup 8 Undefined
0 Blind xfr 0 9 Goto cp 010
1 Directory * Hangup
2 Monitor xfr XXX # Access msgs 3 Monitor xfr XXX A Undefined 4 Monitor xfr XXX B Undefined
5 Undefined C Undefined
6 Undefined D Undefined
7 Undefined
Technical Installation Procedure
Call Processor Mailbox Configuration
Mailbox number: 002 Name: NIGHT MAIN MENU
Timeout: 3 Sponsor:
Max msg length: 2700 Next CP: 003 NIGHT SECONDARY MENU
Log usage in SPU file: No Language: Default
Key Action Number Key Action Number
--- --- --- --- --- TO Access msgs 072199 8 Undefined
0 Blind xfr 199 9 Goto cp 012
1 Directory * Hangup
2 Monitor xfr XXX # Access msgs 3 Monitor xfr XXX A Undefined 4 Monitor xfr XXX B Undefined
5 Undefined C Undefined
6 Undefined D Undefined
7 Undefined
002—Night main menu. “Thank you for calling [company]. [Business hours are 8:00 a.m. to 5:00 p.m., Monday through Friday.] If you know your party’s extension number, you may dial it at any time. For a directory of extensions, press 1, or stay on the line for instructions on leaving a general message.”
Rotary callers time out to hear the personal greeting recorded in mailbox 199. When a caller presses 0, he hears the announcement in call processor 099 (Extension Specific Processing for 199).
Call Processor Mailbox Configuration
Mailbox number: 003 Name: NIGHT SECONDARY MENU
Timeout: 4 Sponsor: Max msg length: 2700 Next CP:
Log usage in SPU file: No Language: Default
Key Action Number Key Action Number
--- --- --- --- ---
TO Hangup 8 Undefined
0 Blind xfr 199 9 Goto cp 012
1 Directory * Hangup
2 Monitor xfr XXX # Access msgs 3 Monitor xfr XXX A Undefined 4 Monitor xfr XXX B Undefined
5 Undefined C Undefined
6 Undefined D Undefined
7 Undefined
Iwatsu ADIX
Call Processor Mailbox Configuration
Mailbox number: 004 Name: HOLIDAY MAIN MENU
Timeout: 4 Sponsor:
Max msg length: 2700 Next CP: 003 NIGHT SECONDARY MENU
Log usage in SPU file: No Language: Default
Key Action Number Key Action Number
--- --- --- --- --- TO Access msgs 072199 8 Undefined
0 Blind xfr 199 9 Goto cp 012
1 Directory * Hangup
2 Monitor xfr XXX # Access msgs 3 Monitor xfr XXX A Undefined 4 Monitor xfr XXX B Undefined
5 Undefined C Undefined
6 Undefined D Undefined
7 Undefined
004—Holiday main menu. “Thank you for calling [company]. We are closed [for the holiday]. If you know your party’s extension number, you may dial it at any time. For a directory of extensions, press 1, or stay on the line for instructions on leaving a general message."
Technical Installation Procedure
Call Processor Mailbox Configuration
Mailbox number: 010 Name: DAY INTEGRATION SORTER
Timeout: 2 Sponsor:
Max msg length: 2700 Next CP: 001 DAY SECONDARY MENU Log usage in SPU file: No Language: Default
Key Action Number Key Action Number
--- --- --- --- --- TO Goto cp 000 8 Undefined
0 Blind xfr 0 9 Undefined 1 Access msgs * Hangup 2 Access msgs 070 # Access msgs 3 Subscr msg IXXX A Undefined 4 Undefined B Undefined 5 Undefined C Undefined 6 Undefined D Undefined 7 Undefined
010—Day integration sorter. “To transfer a caller to a subscriber’s personal greeting, press 3 and enter the subscriber’s mailbox number, then hang up.” This mailbox may
or may not have an announcement, depending on the integration.
The 0 key is defined as a transfer to allow a caller to reach an operator if the caller does not want to leave a message. The access messages action at the 1 key routes subscribers to CallXpress, where they are prompted to “Enter your security code.” The 2 key routes internal callers to subscribers’ personal greetings. The subscriber message action at the 3 key routes forwarded outside callers to Extension Specific Processing, if used, or to subscribers’ personal greetings.
Call Processor Mailbox Configuration
Mailbox number: 012 Name: NIGHT INTEGRATION SORTER
Timeout: 2 Sponsor:
Max msg length: 2700 Next CP: 003 NIGHT SECONDARY MENU
Log usage in SPU file: No Language: Default
Key Action Number Key Action Number
--- --- --- --- --- TO Goto cp 002 8 Undefined
0 Blind xfr 199 9 Undefined 1 Access msgs * Hangup 2 Access msgs 072 # Access msgs 3 Subscr msg IXXX A Undefined 4 Undefined B Undefined 5 Undefined C Undefined 6 Undefined D Undefined 7 Undefined
Iwatsu ADIX
Message Center Mailbox Configuration
Mailbox number: 070 Name: DAY INTEGRATED MESSAGES
Sponsor:
Language: Default
Pause after mailbox entry: 1
Action to take on timeout: Record message Length of timeout before action: 0
Maximum message length: 999
Operator available: Yes Number to dial for operator: 0 Wait for operator on transfer: No Rings to wait for operator: 5
Use recipient's language: No
070—Day integrated messages; message center for internally forwarded callers.
Message Center Mailbox Configuration
Mailbox number: 072 Name: NIGHT INTEGRATED MESSAGES
Sponsor:
Language: Default
Pause after mailbox entry: 1
Action to take on timeout: Record message Length of timeout before action: 0
Maximum message length: 999
Operator available: No Number to dial for operator:
Wait for operator on transfer: No Rings to wait for operator: 5
Use recipient's language: No
Technical Installation Procedure
Call Processor Mailbox Configuration
Mailbox number: 099 Name: ESP FOR 199/NO OPERATOR
Timeout: 4 Sponsor:
Max msg length: 2700 Next CP: 003 NIGHT SECONDARY MENU
Log usage in SPU file: No Language: Default
Key Action Number Key Action Number
--- --- --- --- ---
TO Hangup 8 Undefined
0 Blind xfr 199 9 Goto cp 012
1 Directory * Hangup
2 Monitor xfr XXX # Access msgs 3 Monitor xfr XXX A Undefined 4 Monitor xfr XXX B Undefined
5 Undefined C Undefined
6 Undefined D Undefined
7 Undefined
099—ESP for 199/no operator call processor. “No operator is available at this time. If you know your party’s extension number, you may dial it at any time. For a directory of extensions, press 1.”
Subscriber Mailbox Configuration
Mailbox number: 199 Name: NIGHT MESSAGE/NO OPERATOR
Security code: 0000 Language: Default
Department: Network priority: Regular Message retention: 10 SA functions:
Telephone ext: 199 Allow screen editing: No Set message-waiting light: No
Extension callouts allowed: Yes Local callouts allowed: No Long dist callouts allowed: No Specific area codes (1): Hold retry interval: 15 (2):
Hold retry attempts: 4 (3):
Rings to wait for transfer: 3 Operator number: Incomplete xfer CP: 099 ESP FOR 199/NO OPERATOR Hold annc:
Clear MWI mode: First Play recording help prompt: No Subscriber directory: Yes Auto Attendant directory: No Action to take on busy: None Auto Attendant announcement:
Short
199—Night message/no operator general delivery mailbox. “Please specify who your message is for, your name, and a short message. Your message will be delivered at the start of the next business day. Please begin speaking after the tone.”
This mailbox must have call blocking and Extension Specific Processing turned ON to route the people who press 0 to mailbox 099. It also takes messages from rotary callers routed to it by the night main menu (002).
Iwatsu ADIX
Subscriber Mailbox Configuration
Mailbox number: 221 Name: DOE JOHN
Security code: 0000 Language: Default
Department: Network priority: Regular Message retention: 10 SA functions:
Telephone ext: 221 Allow screen editing: No Set message-waiting light: Yes
Extension callouts allowed: Yes Local callouts allowed: Yes Long dist callouts allowed: No Specific area codes (1): Hold retry interval: 15 (2):
Hold retry attempts: 4 (3):
Rings to wait for transfer: 3 Operator number: Incomplete xfer CP:
Hold annc:
Clear MWI mode: First Play recording help prompt: No Subscriber directory: Yes Auto Attendant directory: Yes Action to take on busy: None Auto Attendant announcement:
Short
221—Sample subscriber mailbox.
Although the standard database diskette does not include any subscriber mailboxes, you can use this mailbox as an example.
Subscriber Mailbox Configuration
Mailbox number: 999 Name: SYSTEM ADMINISTRATOR
Security code: 0000 Language: Default
Department: Network priority: Regular Message retention: 10 SA functions: 2,5,6 Telephone ext: 999 Allow screen editing: Yes Set message-waiting light: No
Extension callouts allowed: Yes Local callouts allowed: Yes Long dist callouts allowed: No Specific area codes (1): Hold retry interval: 15 (2):
Hold retry attempts: 4 (3):
Rings to wait for transfer: 3 Operator number: Incomplete xfer CP:
Hold annc:
Clear MWI mode: First Play recording help prompt: No Subscriber directory: Yes Auto Attendant directory: No Action to take on busy: None Auto Attendant announcement:
Short
999—System administrator mailbox.
Glossary
The following terms are used throughout this document.
ADIX Advanced Digital Information Exchange.
CO Central Office.
COS Class-of-Service.
DTMF Dual-tone multifrequency. A generic term used to describe the signaling from a touch-tone telephone to the central switching equipment. A method of dialing using combinations of two tones from a group of eight.
ESP Extension Specific Processing; also known as the incomplete transfer call processor. When enabled, incomplete transfers as well as forwarded callers will be provided with a menu of options specific to the subscriber. CallXpress plays this announcement instead of the subscriber’s personal greeting.
IX-8SUBS Analog station card with eight circuits; DTMF receivers should be mounted as daughter boards.
IX-8SUBS-1 Analog station card with eight circuits recommended by AVT for this integration; DTMF receivers should be mounted as daughter boards.
IX-CPUL-1 System CPU (16-BIT) that supports up to 224 ports.
IX-CPUL32 System CPU (32-BIT) that supports up to 448 ports.
Technical Installation Procedure
PBX Private Branch Exchange. A telephone exchange system that provides telephone switching in an office or building. Can also be a large, computerized telephone system with pooled access to available lines.
RNA Ring-No-Answer.