Juniper Networks ScreenOS Release Notes
Products: NetScreen Hardware Security Client (HSC), NetScreen-5GT Series, NetScreen-25, NetScreen-50, NetScreen-200 Series, NetScreen-500, Integrated Security Gateway (ISG) 1000, ISG 1000-IDP, ISG 2000, ISG 2000-IDP, Secure Services Gateway (SSG) 5, SSG 20, SSG 140, SSG 500 Series, andNetScreen-5000 Series. Version: ScreenOS 5.4.0r3 Revision: Rev 03 Part Number: 093-1867-000 Date: February 01, 2007 Version Summary ... 3 Documentation Changes ... 3
New Features and Enhancements ... 4
Four-Port Mini-GBIC ... 4
Jumbo Frames ... 4
DSCP... 5
DSCP Support for Tunnels ... 5
NSRD Support ... 5
External Antivirus... 5
Internal AV Extended to the SSG Platforms ... 5
Integrated Web Filtering and Anti-Spam Extended Support... 5
DI Signature-Pack Selection Enhancement ... 6
DHCP Packets Relay Enhancement... 6
Configuring Next-Server-IP... 6
Get Tech Feature... 6
ICMP Unreachable Handling... 6
Source Interface Option for DNS Servers ... 7
GPRS... 7
Router Discovery Protocol... 8
IPv6 ... 8
Password Policy Support ... 8
Policy-Based Routing ... 8
Service Timeout ... 9
SNMP Enhancements ... 9
Virtual Systems Enhancements... 9
SCCP Support ... 9
Wide Area Network Support ... 9
XAuth with Internet Key Exchange Mode Enhancements ... 10
Any modification Internal Policy Representation Changes... 10
Changes to Default Behavior ... 10
FIPS... 11
Global-Pro command change... 11
Interface limit change ... 11
Log buffer full handling... 11
MAC address handling ... 11
Multicast-route handling... 11
Multilink Bundle interface configuration ... 11
Root/VSYS profile configuration ... 11
Saved log information handling... 12
WAN interface configuration ... 12
Migration Procedures... 12
Requirements for Upgrading and Downgrading Device Firmware ... 16
Special Boot-ROM or Boot-Loader Requirements... 17
NetScreen-500 Boot-ROM ... 18
ISG 2000 Boot Loader ... 18
Downloading New Firmware... 19
Upgrading to the New Firmware ... 20
Upgrading Using the WebUI ... 20
Upgrading Using the CLI... 22
Upgrading Using the Boot/OS Loader... 23
Saving Multiple Firmware Images with the Boot Loader ... 24
Downgrading the NetScreen-500 Device ... 24
Upgrading Devices in an NSRP Configuration ... 25
Upgrading Devices in an NSRP Active/Passive Configuration ... 26
Upgrading Devices in an NSRP Active/Active Configuration... 29
Upgrading or Migrating the Antivirus Scanner (NetScreen-5GT) ... 33
Scan Manager Profile... 34
AV Pattern Update URL ... 35
Addressed Issues in ScreenOS 5.4.0r3 ... 36
Addressed Issues from ScreenOS 5.4.0r2... 42
Known Issues ... 42
Limitations of Features in ScreenOS 5.4.0 ... 42
Compatibility Issues in ScreenOS 5.4.0 ... 45
Known Issues in ScreenOS 5.4.0r3... 46
Known Issues from ScreenOS 5.4.0r2... 48
Administration ... 48 CLI ... 48 HA and NSRP ... 48 Management... 48 Other ... 49 Performance ... 49 Routing... 49 Security ... 50
VoIP/H.323 ... 50
VPN... 50
WebUI... 50
Known Issues From ScreenOS 5.4.0r1 ... 50
Getting Help... 55
Version Summary
ScreenOS 5.4.0 is the latest version of ScreenOS firmware for the following products: NetScreen-5GT Series, NetScreen Hardware Security Client (HSC), NetScreen-25, NetScreen-50, NetScreen-204, NetScreen-208, NetScreen-500, Secure Services Gateway (SSG) 5, SSG 20, SSG 140, SSG 520, SSG 550, Integrated Services Gateway (ISG) 1000, ISG 1000-IDP, ISG 2000, ISG 2000-IDP, NetScreen-5200, and NetScreen-5400 security devices.
This release incorporates ScreenOS maintenance releases 5.3r5, 5.2r3, 5.1r4b, and 5.0r9.
The ScreenOS 5.4.0 release is interoperable with and provides basic support for all versions of NetScreen Remote and ScreenOS 2.6.1 and later versions.
Note: When using an SSG 500 Series device and an SSG 500M Series device in an NSRP environment, both devices must be running ScreenOS 5.4r2 or later. Both devices must be one of the following clusters: SSG 520 and SSG 520M NSRP cluster or SSG 550 and SSG 550M NSRP cluster.
Note: NetScreen-Security Manager, version 2005.3 and earlier, does not support ScreenOS 5.4.0. You can use NetScreen-Security Manager, version 2006 to manage devices running ScreenOS 5.4.0. To do this, install a schema upgrade on the management server and user interface. The upgrade is available at the ScreenOS Customer Download page at
http://www.juniper.net/spgdownloads. Refer to the NetScreen-Security Manager Release Notes for installation instructions and the features supported with this schema upgrade.
Documentation Changes
• Some device messages text is changed. Refer to the ScreenOS Messages Log Reference Guide for ScreenOS 5.4 for details.
• The ScreenOS Concepts & Examples (C&E) Guide volume 5 chapter 2 section “Configuring CRL Settings” incorrectly stated that the “default” system setting on the CRL server URL is used if the setting is not specified in the configuration for the particular CA. The revised documentation now correctly states that the “default” system CRL server URL setting is used only when the (CA) certificate of the CA is not loaded in the device. If a CA certificate is
loaded in the device, the device looks for the CRL server URL information in the following order:
1. The CRL server URL in the CRL Distribution Point (CDP) embedded end-entity certificate
2. The CRL server URL in the particular CA setting
Note: This document update is related to bug Cs12624
New Features and Enhancements
The following sections describe new features and enhancements. These features do not affect migration.
Note: You must register your product at http://support.juniper.net so that
licensed features, such as antivirus, deep inspection, and virtual systems, can be activated on the device. To register your product, you need the model and serial number of the device. At the support page:
• If you already have an account, enter your user ID and password.
• If you are a new Juniper Networks customer, first create an account, then enter your ID and password.
After registering your product, confirm that the device has Internet connectivity. Use the exec license-key update all command to make the device connect to the Juniper Networks server to activate the feature.
Four-Port Mini-GBIC
The 4-port mini-GBIC (GB4) interface module is supported on the Integrated Services Gateway (ISG) 1000 and ISG 2000 and provides connectivity to fiber-based and copper-fiber-based, gigabit Ethernet LANs only. Connect the module using the appropriate cable type depending on the specific media used: single-mode or multimode optical cable for SX and LX, and CAT-5 cable for the copper
transceiver.
Jumbo Frames
Jumbo frames are supported on the ISG 2000 supports. To enable jumbo frames, use the set envar CLI command and set max-frame-size to any value from 1515 through 9830 inclusive; for example, set envar
max-frame-size=7500. In this release, Jumbo frames are supported only on the 4-port mini-GBIC IO card. When you enable jumbo frames and restart the security device, only interfaces on the 4-port mini-GBIC IO card, plus the management Ethernet interface, become active. Use the get envar command to show the max-frame-size setting. Use the unset envar max-frame-max-frame-size command to disable jumbo frames support and return the device to the normal maximum frame size (1514 bytes).
DSCP
Differentiated Services Code Point (DSCP) marking is now supported on the Integrated Services Gateway (ISG) 1000 and ISG 2000.
DSCP Support for Tunnels
Differentiated Services Code Point (DSCP) marking is now supported in VPN tunnels on the Integrated Services Gateway (ISG) 1000 and ISG 2000.
NSRD Support
Netscreen Rapid Deployment (NSRD) now supports configuration of T1/E1 interfaces.
External Antivirus
Note: In ScreenOS 5.4.0, ICAP AV scanning is supported on ISG 1000 and ISG 2000 devices only.
External AV scanning including the following features:
• Supports ICAP v1.0 and is fully compliant with RFC 3507 • Supports Symantec scan engine version 5.0 ICAP server
For more information, refer to the Concepts & Examples ScreenOS Reference Guide, Volume 4, Chapter 4, “Content Monitoring and Filtering.”
Internal AV Extended to the SSG Platforms
The integrated Juniper/Kaspersky antivirus (AV) scan engine is supported on the SSG products with high memory. To activate this feature you must obtain a license, and upgrade your device to high memory if you have purchased a base memory device. The following table lists devices and associated memory
capacity
Device Base Memory High Memory
SSG-5 128MB 256MB
SSG-20 128MB 256MB
SSG-140 128MB 256MB
SSG-520 256MB 1GB
SSG-550 256MB 1GB
Integrated Web Filtering and Anti-Spam Extended Support
Integrated web filtering and anti-spam support is now available on the following platforms:• NetScreen-Hardware Security Client • NetScreen-5GT Series
• NetScreen-25 • NetScreen-50 • ISG 1000 • ISG 2000 • SSG 500 Series
For more information, refer to the Concepts & Examples ScreenOS Reference Guide, Volume 4, Chapter 4, “Content Monitoring and Filtering.”
DI Signature-Pack Selection Enhancement
A dropdown menu in the WebUI indicates the DI signature packs available. Also, the CLI command is simplified to specify the signature pack name instead of typing the URL.
DHCP Packets Relay Enhancement
You can configure a security device to relay all Dynamic Host Control Protocol (DHCP) responses from multiple servers to a client.
For more information, refer to the Concepts & Examples ScreenOS Reference Guide, Volume 2, Chapter 8, “System Parameters.”
Configuring Next-Server-IP
The Next-Server-IP field is a DHCP configuration parameter that has traditionally been used as the address of the TFTP server in the bootstrap process. This Next-Server-IP information is returned in the siaddr field of the DHCP header and is used to chain several bootstrap servers together, with each serving a specific function. ScreenOS 5.4 supports Next-Server-IP to be configured for Option66 (siaddr=Option66), which identifies the TFTP server for supporting diskless PCs.
Get Tech Feature
The Get Tech feature on the Web UI (Help > Ask Support) helps Juniper
Networks troubleshoot ScreenOS issues. This feature (available to read-only and read-write admins) allows you to save the complete configuration of your device to a text file on your local drive.
Note: This command produces the same output as the get tech CLI command.
ICMP Unreachable Handling
For different levels of security, the default behavior for Internet Control Message Protocol (ICMP) unreachable errors from downstream routers is as follows: • Sessions do not close for ICMP type 3 code 4 messages.
• Sessions store ICMP unreachable messages, thereby restricting the number of messages flowing through to 1.
For more information, refer to the Concepts & Examples ScreenOS Reference Guide, Volume 2, Chapter 5, “Building Blocks for Policies.”
Source Interface Option for DNS Servers
You can now use the src-interface option to specify the source interface used when querying each defined Domain Name System (DNS) server. By default, this is set to none, which means the device will choose the interface closest to the DNS server.
GPRS
The General Packet Radio Service (GPRS) is enhanced in ScreenOS as follows:
• Support for the following 3GPP R6 Information Elements: Radio Access Technology (RAT), Routing Area Identity (RAI), User Location Information (ULI), Access Point Name (APN) Restriction, International Mobile Equipment ID-Software Version (IMEI-SV).
• GPRS support on the ISG 1000 platform, as well as on the ISG 2000.
• GTP-aware security devices now allow Stream Control Transmission Protocol (SCTP) messages to pass through the firewall.
Combination Support for IE Filtering
ScreenOS is enhanced to concurrently support R6 filtering on Information Elements (IEs), as follows.
• By default, the security device does not perform IE filtering on GTP packets. • In each command line, attributes are anded in the following order of
precedence: • RAT • RAI • ULI • IMEI • MCC-MNC
• Whenever you set an attribute restriction, you must also specify an APN. For example, if you want the security device to pass GTP messages containing RAT 1 and RAI 567* and MCC-MNC 56789, or to pass messages with RAI 123*, butto default to drop packets with any APN value, the following configuration will accomplish this:
set rai 123* apn * pass set apn * drop
The first line of the configuration causes the security device to pass GTP messages containing RAT 1, RAI 567*, MCC-MNC 56789, and any APNs. The second line of the configuration causes the device to pass messages containing RAI 123* and any APNS. The third line causes the device to drop any APNs. For more information, refer to the Concepts & Examples ScreenOS Reference Guide, Volume 13: General Packet Radio Service.
Router Discovery Protocol
Internet Control Message Protocol Router Discovery Protocol (IRDP) is an ICMP message exchange between a host and a router (refer to RFC 1256). The
security device is the router and advertises the IP address of a specified interface periodically or on demand.
For more information, refer to the Concepts & Examples ScreenOS Reference Guide, Volume 7, Chapter 10, “Internet Control Message Protocol Router Discovery Protocol.”
IPv6
ScreenOS 5.4.0 introduces dual-stack architecture for Internet Protocol Version 6 (IPv6) on the ISG 2000 device only. IPv6 is not available for the ISG 2000 device with Intrusion Detection and Prevention (IDP).
For more information, refer to the Concepts & Examples ScreenOS Reference Guide, Volume 14: Dual-Stack Architecture with IPv6.
Password Policy Support
The password policy feature allows you to enforce a minimum length and complexity scheme for administrator (admin) and authenticated (auth) user passwords. The password policy feature is intended for use in a local database, and therefore is useful in environments where the Windows directory or RADIUS are not available to provide centralized password policy enforcement.
For more information, refer to the Concepts & Examples ScreenOS Reference Guide, Volume 3, Chapter 1, “Administration.”
Policy-Based Routing
With Policy-Based Routing (PBR), you can implement policies that selectively cause packets to take different paths. PBR is the first item checked as part of the route lookup process and is transparent to all non-PBR traffic. PBR is configured at the interface level, but you can bind PBR policies to the interface, zone, virtual router (VR) or a combination of interface, zone, or VRs.
For more information, refer to the Concepts & Examples ScreenOS Reference Guide, Volume 7, Chapter 6, “Policy-Based Routing.”
Service Timeout
ScreenOS does not use the port-based service timeout table when the
destination port is overloaded with multiple services that have different timeout values set. Instead, to derive the correct service timeout value, ScreenOS does a service lookup within the service group based on the destination port.
SNMP Enhancements
New MIBs are available to permit polling of fault and health status of Security Modules within ISG 1000 and ISG 2000.
For more information, refer to the Concepts & Examples ScreenOS Reference Guide, Volume 3, Chapter 2, “Monitoring Security Devices.”
Virtual Systems Enhancements
Enhancements have been made to vsys in the following areas:
• Virtual private networking (VPN): You can now view IPSec security
associations (SAs) and IKE cookies either at the root level for details from all vsys on a security device or within a vsys context for details from a particular vsys. You can also use the policy scheduler within a vsys.
• Vsys management:
• Robust vsys profiles to allow for service differentiation • CPU session limits, reserves, and alarms for each vsys
• CPU overutilization protection in the form of enforceable quotas for CPU load caused by individual vsys
• DHCP: ScreenOS now fully supports DHCP relay for vsys. You can configure DHCP relay for a specific vsys and relay all packets from multiple DHCP servers to a client.
For more information, refer to the Concepts & Examples ScreenOS Reference Guide, Volume 10, Chapter 1, “Virtual Systems,” and Volume 2, Chapter 8, “System Parameters.”
SCCP Support
The Skinny Client Control Protocol (SCCP) is supported on security devices in Route, Transparent, and Network Address Translation (NAT) modes.
For more information, refer to the Concepts & Examples ScreenOS Reference Guide, Volume 6, Chapter 4, “Skinny Client Control Protocol Application Layer Gateway.”
Wide Area Network Support
On some security devices, ScreenOS supports wide area network (WAN) interfaces such as Serial, T1, E1, T3, ADSL, ISDN, and V.92.
Refer to the Concepts & Examples ScreenOS Reference Guide, Volume 12: WAN, ADSL, Dial, and Wireless.
Wireless Enhancements
The following wireless enhancements enable you to better manage and secure a wireless local area network (WLAN):
• WPA2
• Wi-Fi Multimedia (WMM) Quality of Service feature • eXtended Range™
• 802.11a/b/g • Super A/G
XAuth with Internet Key Exchange Mode Enhancements
You can now monitor the IP address the security device allocates to the client when a remote user accesses the network through Internet Key Exchange (IKE) mode, ScreenOS authenticates the user with XAuth, and records the event details in the traffic log. Allocated IP addresses can come from the local IP pool or a RADIUS server.
Any modification Internal Policy Representation Changes
After upgrading the ISG 1000 or ISG 2000 with security modules to ScreenOS 5.4.0, users must install the 5.4.0 zero day patch upgrade to NSM and re-push the IDP policy to the device.To obtain the zero day patch, go to the Juniper Support site at
http://www.juniper.net/customers/support/ and, after logging in, scroll down to the Download Software section and click on the ScreenOS link. When the Customer Support Center page displays, click on the ScreenOS Software Downloads (including NSM/Global Pro and IDP link, scroll down to the 5.4 section and click the NS-ISG 1000-IDP or NS-ISG 1000-IDP link. The schema updates and instructions for installing them are in the ScreenOS Version 5.4.0r1 Upgrade section, near the bottom.
Changes to Default Behavior
This section lists changes to default behavior in ScreenOS 5.4.0 from previous ScreenOS firmware releases.
File copy admin restriction change (NSCos67009)
“save config” to/from tftp server is now restricted to root user only.“save software” transferring to tftp server is now restricted to root user only. “save file” is now restricted to root user only.
FIPS
In the past, releases that were not FIPS certified did not allow FIPS mode to be enabled. R3 will allow FIPS mode to be enabled, even though it will not be FIPS certified.
Global-Pro command change
CLI “set global-pro policy-manager primary outgoing-interface” is no longer supported
Interface limit change (NSCos65098)
Hard limits (enforced in the code) were removed for “max interfaces per area” and “max interfaces per routing-instance” and made them soft limits instead. i.e. they are only recommended values and not enforced in the code. The device may not function correctly if these limits are exceeded.
Log buffer full handling (NSCos68000/NSCos67431)
After modification: when the log buffer is full and traffic passing through is
stopped, the system will wait until the log buffer is empty before resuming traffic, the result is, wait a longer time to resume the traffic.
MAC address handling (NSCos65912)
Previously, for ASIC based platforms, when MAC cache is used, if the peers change their source MAC without sending any gratuitous ARP out, we could not update our hardware L2 table. In this case, when we want to send packets to the peer, the old MAC will be used. With this release, new session will use a new MAC address to send packets to the peer even without gratuitous ARP received. Old session will not be affected.
Multicast-route handling (NSCos65082)
Previous behavior: In IGMP proxy, when an admin clears multicast-route(mroute) by CLI(clear vr vr-name mroute ), it can’t rebuild the mroute even when the new igmp report packet arrived.
New behavior: Every time the system receives a new IGMP report, the system will update the mroute created by the IGMP proxy. If the admin deletes the mroute by CLI, the system can rebuild it when it receives the next IGMP report packet.
Multilink Bundle interface configuration (NSCos67022)
No longer allow adding an ADSL interface into a multilink bundle interface with MLFR encapsulation
Previously, the RootProfile can be bound to a nonRoot VSYS, while a non-RootProfile can be bound to Root. Now the non-RootProfile can only be bound to Root VSYS while non-RootProfile can only be bound to nonRoot VSYS.
Previously, get config always has "set vsys-profile RootProfile xxx" even if the value is the same as the default value; now this line will be shown only when the value is changed, i.e., it is different from the default value.
Saved log information handling (NSCos62846)
"Clear log sys saved" was not clearing the saved information on the SSG5 and SSG20 devices in previous versions. The function is now implemented on these devices in 5.4 R3.
WAN interface configuration (NSCos66426)
In "set/unset interface serialx/0 phy link-donw" CLI, link-down option is disabled for wan interfaces
Migration Procedures
This section contains procedures to upgrade existing firmware to ScreenOS 5.4.0.
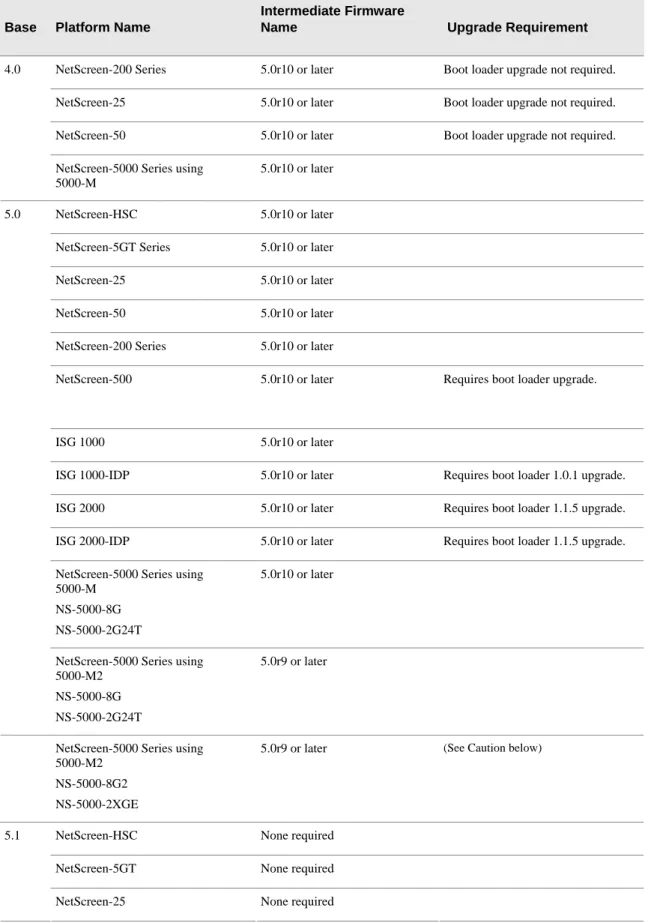
Before you upgrade a security device, you must have the most recent ScreenOS firmware stored on your local drive. Depending on the platform and the firmware your security device is currently running, you also might need intermediate (or step-up) firmware and/or new bootloader firmware. Firmware Upgrade Path illustrates the various firmware upgrade paths to ScreenOS 5.4.0.
Figure 1. Firmware Upgrade Path 4.XXrx 5.0.0rx 5.0.0rx 5.1.0rx 5.2.0r1 5.2.0r2 5.2.0r3 or 5.3-up 5.3.0r1 5.4.0 5.4.0 5.4.0 5.4.0 5.4.0
For NetScreen-500 and ISG 2000 device users: You must upgrade the boot loader/OS loader before proceeding to ScreenOS 5.2.0 or above.
Figure 1 lists the recommended upgrade path to ScreenOS 5.4.0 based on device model and firmware version. For example, if you are running ScreenOS 4.0 on a NetScreen-204, you need to upgrade to ScreenOS 5.0r10 or later before
upgrading to ScreenOS 5.4.0. If you are running ScreenOS 5.1 on a NetScreen-204, however, you can upgrade directly to 5.4.0. Upgrade Paths to ScreenOS 5.4.0 also lists memory and boot loader upgrade requirements for each
Table 1: Upgrade Paths to ScreenOS 5.4.0 Base Platform Name
Intermediate Firmware
Name Upgrade Requirement
NetScreen-200 Series 5.0r10 or later Boot loader upgrade not required.
NetScreen-25 5.0r10 or later Boot loader upgrade not required.
NetScreen-50 5.0r10 or later Boot loader upgrade not required. 4.0
NetScreen-5000 Series using 5000-M
5.0r10 or later
NetScreen-HSC 5.0r10 or later
NetScreen-5GT Series 5.0r10 or later
NetScreen-25 5.0r10 or later
NetScreen-50 5.0r10 or later
NetScreen-200 Series 5.0r10 or later
NetScreen-500 5.0r10 or later Requires boot loader upgrade.
ISG 1000 5.0r10 or later
ISG 1000-IDP 5.0r10 or later Requires boot loader 1.0.1 upgrade.
ISG 2000 5.0r10 or later Requires boot loader 1.1.5 upgrade.
ISG 2000-IDP 5.0r10 or later Requires boot loader 1.1.5 upgrade.
NetScreen-5000 Series using 5000-M
NS-5000-8G NS-5000-2G24T
5.0r10 or later 5.0
NetScreen-5000 Series using 5000-M2
NS-5000-8G NS-5000-2G24T
5.0r9 or later
NetScreen-5000 Series using 5000-M2
NS-5000-8G2 NS-5000-2XGE
5.0r9 or later (See Caution below)
NetScreen-HSC None required
NetScreen-5GT None required 5.1
NetScreen-50 None required
NetScreen-200 Series None required
SSG 500 Series Factory installed with 5.1r4
NetScreen-500 None required Requires boot loader upgrade
NetScreen-5000 Series using 5000-M
None required
NetScreen-HSC 5.2r3 or later
NetScreen-5GT 5.2r3 or later
NetScreen-5GT ADSL 5.2r3 or later
NetScreen-25 5.2r3 or later
NetScreen-50 5.2r3 or later
NetScreen-200 Series 5.2r3 or later
NetScreen-500 5.2r3 or later
ISG 2000 5.2r3 or later Requires boot loader 1.1.5 upgrade
NetScreen-5000 Series using 5000-M
NS-5000-8G NS-5000-2G24T
5.2r3 or later 5.2
NetScreen-5000 Series using 5000-M2
NS-5000-8G NS-5000-2G24T
5.2r3 or later
5.3 NetScreen-HSC None required
NetScreen-5GT Series None required
NetScreen-25 None required
NetScreen-50 None required
NetScreen-200 Series None required
NetScreen-500 None required
ISG 1000 None required
ISG 2000 None required Requires boot loader 1.1.5 upgrade
NetScreen-5000 Series using 5000-M
NS-5000-8G NS-5000-2G24T
NetScreen-5000 Series using 5000-M2
NS-5000-8G NS-5000-2G24T
None required (See Caution below)
Caution: This release requires the SIMM DRAM upgrade to 1GB on the
NetScreen-5000 Series devices. Secure Port Modules (SPMs) affected are 5000-8G2 and 5000-2XGE manufactured before 2/1/2006. If your NS-5000 modules qualify for a memory upgrade, contact Juniper Networks at 1-866-369-5418 or email mailto:[email protected] for a memory-upgrade kit. The memory upgrade is free for qualified users.
Caution: Before upgrading or downgrading a security device, save the existing configuration file to avoid losing any data. During the upgrade/downgrade process, the device might remove part or all of the configuration file.
Requirements for Upgrading and Downgrading Device Firmware
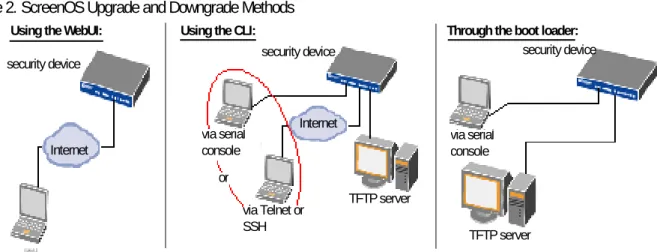
This section lists what is required to perform the upgrade or downgrade ofsecurity device firmware. You can use any of the following methods to upgrade or downgrade a security device:
• WebUI • CLI
• Through the boot loader or ScreenOS Loader
Note: You can upgrade or downgrade some security devices locally or remotely, but we recommend that you perform the upgrade or downgrade of a security device at the device location. For NetScreen-500 and ISG 2000 devices, both of these operations require console access, therefore you must be at the device location.
To use the WebUI, you must have the following:
• Root privilege to the security device
• Network access to the security device from a computer that has a browser • New ScreenOS firmware (downloaded from the Juniper Networks website
and saved locally)
To use the CLI, you must have the following:
• Console connection or Telnet access to the security device from a computer • TFTP server installed locally and to which the security device has access • New ScreenOS firmware (downloaded from the Juniper Networks website
and saved to a local TFTP server directory)
To upgrade or downgrade through the boot loader, you must have the following: • Root or read-write privileges to the security device
• TFTP server installed locally that has an IP address in the same subnet as the security device (255.255.255.0)
• Ethernet connection from a computer to the security device (to transfer data, namely from a local TFTP server)
• Console connection from the computer to the security device (to manage the security device)
• New ScreenOS firmware saved to a local TFTP server directory
ScreenOS Upgrade and Downgrade Methods illustrates the three different ways by which you can upgrade or downgrade a security device.
Figure 2. ScreenOS Upgrade and Downgrade Methods
.
via the WebUI using a browser
via serial console via Telnet or SSH TFTP server or TFTP server via serial console
security device security device security device
Internet
Internet
Using the WebUI: Using the CLI: Through the boot loader:
Note: For NetScreen-500 and ISG 2000 devices, if a bootloader upgrade is required, you must upgrade using the boot loader.
To upgrade or downgrade a security device, see the step-by-step procedures in Upgrading to the New Firmware or Upgrading Devices in an NSRP
Configuration.
Special Boot-ROM or Boot-Loader Requirements
Some devices require upgrade of the boot-ROM or boot-loader before or during upgrade.
NetScreen-500 Boot-ROM
Installation of this release on a NetScreen-500 device running ScreenOS 5.0 or 5.1 requires the new boot-ROM (ns500.upgrade6M). This makes the upgrade a two-step process. In the first step you install the boot ROM, in the second step you actually install the new image. See Upgrade Paths to ScreenOS 5.4.0.
Note: You can upgrade or downgrade some security devices locally or remotely, but we recommend that you perform the upgrade or downgrade of a security device at the device location. For NetScreen-500 and ISG 2000 devices, both of these operations require console access, therefore you must be at the device location.
ISG 2000 Boot Loader
Before upgrading an ISG 2000 device from ScreenOS 5.0 to ScreenOS 5.4.0 firmware, you must upgrade the OS loader to v1.1.5. You can view the OS loader version during the startup process or by entering the get envar command. To upgrade the OS loader, perform the following steps:
1. Download the OS loader from the Juniper Networks support site to the root directory of your TFTP server.
2. Log into http://www.juniper.net/support.
3. In the Download Software section, click ScreenOS Software.
4. Download the latest OS loader and save it to the root directory of your TFTP server.
5. If necessary, start the TFTP server.
6. Make an Ethernet connection from the device hosting the TFTP server to the MGT port on the ISG 2000 and a serial connection from your workstation to the console port on the ISG 2000.
7. Restart the ISG 2000 by entering the reset command. When prompted to confirm the command—System reset, are you sure? y/[n]—press the Y key. The following device output appears:
NetScreen NS-ISG 2000 BootROM V0.9.0 (Checksum: 8796E2F3) Copyright (c) 1997-2004 NetScreen Technologies, Inc. Total physical memory: 1024MB
Test - Pass
Initialization... Done
8. Press the X and A keys sequentially to update the OS loader.
9. Enter the filename for the OS loader software you want to load (for example, load2000v115.d.S), the IP address of the ISG 2000, and the IP address of your TFTP server. The following system output appears:
Serial Number [0079112003000031]: READ ONLY BOM Version [C06]: READ ONLY
Self MAC Address [0010-db58-c900]: READ ONLY
OS Loader File Name [boot2000v090.ld.S]: load2000v115.d.S Self IP Address [10.150.65.152]:
TFTP IP Address [10.150.65.151]:
Press the Enter key, and the file loads. Save loader config (112 bytes)... Done Loading file "load2000v115.d.S"... rtatatatatata ...
Loaded successfully! (size = 383,222 bytes) Ignore image authentication!
Program OS Loader to on-board flash memory... ++++++++++++++++++++++++Done!
Start loading...
...
Done.
You have completed the upgrade of the OS loader, and can now proceed to section, Downloading New Firmware.
Downloading New Firmware
You can obtain the ScreenOS firmware from the Juniper Networks website. To access firmware downloads, you must be a registered customer with an active user ID and password. If you have not yet registered your Juniper Networks product, then you must do so at the Juniper Networks website before proceeding.
Note: Before you begin a security device upgrade, you must have the most recent ScreenOS firmware. Check Upgrade Paths to ScreenOS 5.4.0 to make sure you have the required intermediate software, if any.
1. To get the latest ScreenOS firmware, enter http://www.juniper.net/support in your browser. Click Support > Customer Support Center, then perform the following steps:
a) Log in by entering your user ID and password, then click LOGIN. b) Select Download Software or pick the actual product you want to
download from the Quicklink picker. A list of available downloads appears. c) Click Continue.
The File Download page appears.
d) Click the product link for the firmware you want to download. The Upgrades page appears.
e) Click the link for the ScreenOS version you want to download. The Upgrades page appears.
f) Click the upgrade link.
2. Click Save and then navigate to the location where you want to save the firmware zip file.
Note: Before loading the firmware, you must unzip the file.
You must save the firmware onto the computer from which you want to perform the upgrade.
If you want to upgrade the security device using the WebUI, save the firmware anywhere on the computer.
If you want to upgrade the security devices using the CLI, save the firmware to the root TFTP server directory on the computer. If you do not have a TFTP server installed on your computer, then you can download one from the Internet. If no TFTP server is available, you must use the WebUI to load the new firmware onto the security device.
Upgrading to the New Firmware
This section provides instructions on how to upgrade firmware on the security device using the WebUI, the CLI, and the Boot/OS loader. This section also describes how to save multiple firmware images with the boot loader.
Caution: Before upgrading a security device, save the existing configuration file to avoid losing any data.
Check Upgrade Paths to ScreenOS 5.4.0 to determine whether you need to install intermediate firmware or a bootloader upgrade before installing ScreenOS 5.4.0. Use either the WebUI or CLI procedure to first install intermediate firmware (if required), then install ScreenOS 5.4.0 firmware.
Upgrading Using the WebUI
This section describes how to upgrade the firmware on the security device using the WebUI. Instructions include upgrading to an intermediate version of firmware, if required, and upgrading to ScreenOS 5.4.0.
To upgrade firmware using the WebUI, perform the following steps:
1. Log into the security device by opening a browser.
a) Enter the Management IP address in the Address field.
b) Log in as the root admin or an admin with read-write privileges. 2. Save the existing configuration:
a) Go to Configuration->Update->Config File, and click Save to File. b) In the File Download dialog box, click Save.
c) Navigate to the location where you want to save the configuration file (cfg.txt), and click Save.
3. Upgrade to intermediate firmware, if required.
See Upgrade Paths to ScreenOS 5.4.0 to determine if intermediate firmware is required. If intermediate firmware is required, follow this procedure.
Otherwise, proceed to Step Upgrade to the new ScreenOS firmware:
a) Go to Configuration->Update->ScreenOS/Keys and select Firmware Update.
b) Click Browse to navigate to the location of the intermediate firmware. For example, if you upgrade a NetScreen-5GT running ScreenOS 5.2r1, you must upgrade to ScreenOS 5.2r3 or later, then continue this
procedure. c) Click Apply.
Note: This process takes some time. DO NOT click Cancel or the upgrade will fail. If you click Cancel and the upgrade fails, power off the device and then power it on again. Restart the upgrade procedure beginning with step 3.
d) Click OK to continue.
The security device restarts automatically. The upgrade is complete when the device displays the login page in the browser.
e) Log into the security device. You can verify the version of the security device ScreenOS firmware in the Device Information section of the WebUI homepage.
4. Upgrade to the new ScreenOS firmware:
a) Go to Configuration->Update->ScreenOS/Keys and select Firmware Update.
b) Click Browse to navigate to the location of the new ScreenOS firmware or enter the path to its location in the Load File field.
c) Click Apply.
A message box appears with information on the upgrade time. d) Click OK to continue.
The security device restarts automatically. The upgrade is complete when the device displays the login page in the browser.
5. Log into the security device. You can verify the version of the security device ScreenOS firmware in the Device Information section of the WebUI
Upgrading Using the CLI
This section describes how to upgrade the firmware on the security device using the CLI. Instructions include upgrading to an intermediate version of the
firmware, if required, and upgrading to ScreenOS 5.4.0.
To upgrade firmware using the CLI, perform the following steps:
1. Make sure you have the new ScreenOS firmware, or the intermediate firmware if required, in the TFTP root directory. For information on obtaining the new firmware, see the section Downloading New Firmware.
2. Run the TFTP server on your computer by double clicking on the TFTP server application. You can minimize this window, but it must be active in the
background.
3. Log into the security device using an application such as Telnet or SSH, (or HyperTerminal if connected directly through the console port). Log in as the root admin or an admin with read-write privileges.
4. Save the existing configuration by executing the command:
save config to { flash | slot1 | tftp }...
5. On the security device, enter the following command and specify the filename of the firmware (if you are installing intermediate firmware, specify the
filename of the intermediate firmware):
save soft from tftp ip_addr_your_computer screenos_filename to flash
Note: If this upgrade requires intermediate firmware and you have not already upgraded to that firmware, enter the intermediate firmware filename when entering this command.
6. When the upgrade is complete, you must reset the security device. Execute the reset command and enter y at the prompt to reset the device.
7. Wait a few minutes, and then log into the security device again.
8. Use the get system command to verify the version of the security device ScreenOS firmware.
If you upgraded to intermediate firmware in step 1, on the security device enter the following command and specify the filename of the firmware, repeat steps 5 through 8 to install the ScreenOS 5.4.0 firmware.
9. If necessary, upload the configuration file that you saved in step 4 by executing the following command:
Upgrading Using the Boot/OS Loader
The Boot/OS Loader brings up the hardware system, performs basic and sometimes critical hardware configurations, and loads system software used to run a security device.
Note: On the NetScreen-500 device, you cannot use this process to save
ScreenOS 5.1.0 or previous versions of firmware to flash memory. You must use the WebUI or CLI to save ScreenOS 5.1.0 firmware to flash memory.
To upgrade firmware using the Boot/OS Loader, perform the following steps:
1. Connect your computer to the security device.
a) Using a serial cable, connect the serial port on your computer to the console port on the security device (refer to your hardware manual for console settings). This connection, in combination with a terminal application, enables you to manage the security device.
b) Using an Ethernet cable, connect the network port on your computer to port 1 or to the management port on the security device. This connection enables the transfer of data among the computer, the TFTP server, and the security device.
2. Make sure that you have the new ScreenOS firmware stored in the TFTP server directory on your computer. For information on obtaining the new firmware, see section Downloading New Firmware.
3. Run the TFTP server on your computer by double clicking on the TFTP server application. You can minimize this window but it must be active in the
background.
4. Log into the security device using a terminal emulator such as HyperTerminal. Log in as the root admin or an admin with read-write privileges.
5. Restart the security device.
6. When you see “Hit any key to run loader” or “Hit any key to load new
firmware” on the console display, press any key on your computer keyboard to interrupt the startup process.
Note: If you do not interrupt the security device in time, it loads the firmware saved in flash memory.
7. At the Boot File Name prompt, enter the filename of the ScreenOS firmware that you want to load.
Note: If Upgrade Paths to ScreenOS 5.4.0 lists an intermediate firmware requirement, enter that filename at this step.
If you enter slot1: before the specified filename, then the loader reads the specified file from the external compact flash or memory card. If you do not enter slot1: before the filename, then the file is instead downloaded from the TFTP server. If the security device does not support a compact flash card, then an error message is displayed and the console prompts you to reenter the filename.
8. At the Self IP Address prompt, enter an IP address that is on the same subnet as the TFTP server.
9. At the TFTP IP Address prompt, enter the IP address of the TFTP server. Note: The Self IP address and TFTP IP address must be in the same subnet; otherwise, the TFTP loader rejects the Self IP address and then prompts you to re-enter it.
An indication that the firmware is loading successfully is the display of a series of “rtatatatatatata...” running on the terminal emulator screen and a series of
symbols running on the TFTP server window. When the firmware installation is complete, a message informs you that the installation was successful. Repeat these steps if your first firmware upgrade was to an intermediate version.
Saving Multiple Firmware Images with the Boot Loader
After the firmware is downloaded successfully, the console prompts you:
Save to on-board flash disk? (y/[n]/m)
Entering y (yes) saves the file as the default firmware. This image runs automatically if you do not interrupt the startup process.
On some security devices, you can enter m (multiple) to save multiple firmware. You must select a filename at the following prompt:
Please input multiple firmware file name [BIMINITE.D]: test.d
The name in brackets is the recommended name automatically generated after you enter the name in the TFTP server. If you do not enter a name, the
recommended name is used.
Note: You must enter a name that is DOS 8.3-compatible. The maximum length of the boot filename used by the Loader cannot exceed 63 characters.
Downgrading the NetScreen-500 Device
Caution: Before downgrading a security device, back up the existing
configuration file. The current configuration file will be lost when downgrading the device.
Perform the following steps to downgrade the NetScreen-500 device from
ScreenOS 5.4.0 to ScreenOS 5.0.0 or later. If you need to downgrade the device to a version prior to ScreenOS 5.0.0, downgrade using the boot/OS loader (see Using the Boot/OS Loader).
Using the CLI
To downgrade using the CLI, perform the following steps:
1. Download the firmware from the Juniper Networks website and save it to the root TFTP server directory on the computer.
For information on downloading the firmware, see section Downloading New Firmware.
2. Load the firmware with the CLI. For information on using the CLI to load firmware, see section Upgrading Using the CLI.
3. Enter the exec downgrade command if you are downgraded to 4.x releases. The security device automatically restarts with the firmware you loaded.
Using the Boot/OS Loader
To downgrade using the boot/OS loader, perform the following steps:
1. Download the firmware from the Juniper Networks website, and save it to the root TFTP server directory on the computer.
For information on downloading the firmware, see section Downloading New Firmware.
2. Enter the exec downgrade command. The security device automatically restarts.
3. Load the firmware using the boot/OS loader. For information on using the boot/OS loader, see section Upgrading Using the Boot/OS Loader. The following system output appears:
Serial Number [0079112003000031]: READ ONLY BOM Version [C06]: READ ONLY
Self MAC Address [0010-db58-c900]: READ ONLY
OS Loader File Name [boot2000v090.ld.S]: load2000v115.d.S Self IP Address [10.150.65.152]:
TFTP IP Address [10.150.65.151]:
4. Press the Enter key to load the file. The following system output appears:
Save loader config (112 bytes)... Done Loading file "load2000v115.d.S"...
Upgrading Devices in an NSRP Configuration
For security devices in a NetScreen Redundancy Protocol (NSRP) configuration, you must upgrade each device individually. This section describes two different
upgrade procedures addressing two different NSRP configurations: NSRP active/passive and NSRP active/active.
Note: For upgrading NetScreen-500 and ISG 2000 devices, you must follow the version-specific upgrade sequence (see section Upgrading to the New
Firmware).
Caution: When upgrading, you risk losing part of the configuration that existed before the upgrade. Before upgrading a security device, we strongly recommend that you back up the existing configuration file to avoid losing any data.
Upgrading Devices in an NSRP Active/Passive Configuration The following explains the steps to upgrade a basic NSRP active/passive configuration where device A is the primary and device B is the backup. Before you begin, read the section Requirements for Upgrading and Downgrading Device Firmware. Also, make sure that you download the ScreenOS firmware to which you are upgrading each device.
Caution: Do not power off your security device while it is upgrading to new firmware. Doing so could result in permanently damaging the device.
To upgrade two devices in an NSRP active/passive configuration, perform the following steps (some steps require CLI use).
1. Upgrade device B to ScreenOS 5.4.0.
WebUI
a) Make sure that you have the new ScreenOS firmware (and the intermediate firmware if required). For information on obtaining the firmware, see section Downloading New Firmware.
b) Log into device B by opening a browser and entering the management IP address in the Address field. Log in as the root admin or an admin with read-write privileges.
c) Save the existing configuration:
1. Go to Configuration->Update->Config File, and then click Save to File.
2. In the File Download dialog box, click Save.
3. Navigate to the location where you want to save the configuration file (cfg.txt), then click Save.
d) Go to Configuration->Update->ScreenOS/Keys and select Firmware Update.
e) Click Browse to navigate to the location of the ScreenOS 5.4.0 firmware, or enter the path to its location in the Load File field.
f) Click Apply.
A message box appears with information on the upgrade time. g) Click OK to continue.
The security device restarts automatically. The upgrade is complete when the device displays the login page in the browser.
h) To verify the version of the ScreenOS firmware, log into the security device and go to the Device Information section of the WebUI homepage.
CLI
a) Make sure you have the ScreenOS 5.4.0 firmware (and the intermediate firmware, if required). For information on obtaining the firmware, see section Downloading New Firmware.
b) Log into device B using an application such as Telnet, or SSH (or Hyper Terminal if directly connected through the console port). Log in as the root admin or an admin with read-write privileges.
c) Save the existing configuration by executing the following command:
save config to { flash | slot1 | tftp }...
d) Run the TFTP server on your computer by doubleclicking on the TFTP server application.
e) On the security device, enter the following command:
save soft from tftp ip_addr filename to flash
where ip_addr isthe IP address of your computer and filename is the filename of the ScreenOS 5.4.0 firmware
f) When the upgrade is complete, enter the reset command and then enter y at the prompt to reset the device.
g) Wait a few minutes, then log into the security device.
h) Enter the get system command to verify the version of the security device ScreenOS firmware.
2. Manually fail over the primary device to the backup device (CLI only). a) Log into the primary device (device A).
b) Issue one of the following CLI commands. The command that you need to execute depends on whether or not the preempt option is enabled on the primary device.
• If the preempt option is enabled:
• If the preempt option is not enabled:
exec nsrp vsd-group 0 mode backup
Either command forces the primary device to step down and the backup device to immediately assume the primary device role.
3. Upgrade the primary device (device A) to ScreenOS 5.4.0.
WebUI
a) Make sure that you have the ScreenOS 5.4.0 firmware. For information on obtaining the firmware, see section Downloading Neew Firmeware.
b) Log into security device A. c) Save the existing configuration:
1. Configuration->Update->Config File, and then click Save to File. 2. In the File Download dialog box, click Save.
3. Navigate to the location where you want to save the configuration file (cfg.txt), then click Save.
d) Go to Configuration->Update->ScreenOS/Keys and select Firmware Update.
e) Click Browse to navigate to the location of the ScreenOS 5.4.0 firmware or enter the path to its location in the Load File field.
f) Click Apply.
A message box appears with information on the upgrade time. g) Click OK to continue.
The security device restarts automatically. The upgrade is complete when the device displays the login page in the browser.
h) To verify the version of the ScreenOS firmware, log into the security
device and go to the Device Information section of the WebUI Home page.
CLI
a) Make sure you have the ScreenOS 5.4.0 firmware. For information on obtaining the firmware, see section Downloading New Firmware. b) Log into security device A.
c) Save the existing configuration by executing the following command:
save config to { flash | slot1 | tftp }...
d) Run the TFTP server on your computer by double clicking on the TFTP server application.
save soft from tftp ip_addr_your_computer screenos_filename to
flash
f) When the upgrade is complete, you must reset the security device.
Execute the reset command and enter y at the prompt to reset the device. g) Wait a few minutes, and then log into the security device again. You can
verify the security device ScreenOS firmware version by using the get system command.
4. Synchronize device A (CLI only).
After you complete the upgrade of device A to ScreenOS 5.4.0, manually synchronize the two devices. On device A (backup), issue the exec nsrp sync rto all command from the peer CLI to synchronize the RTOs from device B (primary device).
5. Manually fail over the primary device to the backup device (CLI only). a) Log into the primary device (device B).
b) If pre-empt is enabled on device A, no action is needed. If pre-empt is not enabled on device A, issue the following command:
exec nsrp vsd-group 0 mode backup
Either command forces the primary device to step down and the backup device to immediately assume the primary device role.
Upgrading Devices in an NSRP Active/Active Configuration
This upgrade section applies to an NSRP configuration where you paired two security devices into two virtual security devices (VSD) groups, with each physical device being the primary in one group and the backup in the other. To upgrade, you first have to fail over one of the devices so that only one physical device is the primary of both VSD groups. You then upgrade the backup device first and the primary device second.The following illustrates a typical NSRP active/active configuration where device A is the primary device for VSD 0 and the backup for VSD 1, and device B is the primary device for VSD 1 and the backup for VSD 0.
Before you begin, see section Requirements for Upgrading and Downgrading Device Firmware. Also, make sure you download the ScreenOS 5.4.0 firmware (and intermediate firmware, if required).
Warning: Do not power off your security device while it is upgrading to new firmware. Doing so could permanently damage the device.
To upgrade two devices in an NSRP active/active configuration, perform the following steps (some steps require CLI use).
1. Manually fail over the master device B in VSD group 1 to the backup device A in VSD group 1. (CLI only)
a) Log into device B using an application such as Telnet or SSH (or Hyper Terminal if directly connected through the console port). Log in as the root admin or an admin with read-write privileges.
b) Issue one of the following CLI commands. The command you need to execute depends on whether or not the preempt option is enabled on the master device.
• If the preempt option is enabled:
exec nsrp vsd-group 1 mode ineligible
• If the preempt option is not enabled:
exec nsrp vsd-group 1 mode backup
Either command forces device B to step down and device A to immediately assume the primary role of VSD 1. At this point, device A is the primary of both VSD 0 and 1 and device B is the backup for both VSD 0 and 1.
2. Upgrade Device B to the ScreenOS 5.4.0 firmware.
WebUI
a) Make sure that you have the 5.4.0 ScreenOS firmware (and the
intermediate firmware, if required). Check Upgrade Paths to ScreenOS 5.4.0 for details. For information on obtaining the firmware, see section Downloading New Firmware.
b) Log into security device B by opening a browser and entering the
management IP address in the Address field. Log in as the root admin or an admin with read-write privileges.
c) Save the existing configuration:
1. Go to Configuration >Update >Config File, and then click Save to File.
2. In the File Download dialog box, click Save.
3. Navigate to the location where you want to save the configuration file (cfg.txt), then click Save.
d) Go to Configuration->Update->ScreenOS/Keys, and select Firmware Update.
e) Click Browse to navigate to the location of the ScreenOS 5.4.0 firmware or enter the path to its location in the Load File field.
f) Click Apply.
g) Click OK to continue.
The security device restarts automatically. The upgrade is complete when the device displays the login page in the browser.
h) To verify the version of the ScreenOS firmware, log into the security device and go to the Device Information section of the WebUI homepage.
CLI
a) Make sure that you have the ScreenOS 5.4.0 firmware. For information on obtaining the firmware, see section Downloading New Firmware.
b) Log into device B.
c) Save the existing configuration by executing the following command:
save config to { flash | slot1 | tftp }...
d) Run the TFTP server on your computer by double-clicking on the TFTP server application.
e) On the security device, enter the following command:
save soft from tftp ip_addr_your_computer screenos_filename to
flash
where ip_addr is the IP address of your computer and screenos_filename
is the ScreenOS 5.4.0 firmware.
f) When the upgrade is complete, you must reset the security device.
Execute the reset command and enter y at the prompt to reset the device. g) Wait a few minutes, and then log into the security device again. You can
verify the security device ScreenOS firmware version by using the get system command.
3. Manually fail over device A completely to device B (CLI only). a) Log into device A.
b) Fail over primary device A in VSD 0 to backup device B in VSD 0 by issuing one of the following CLI commands. The command you need to execute depends on whether or not the preempt option is enabled on the primary device.
• If the preempt option is enabled:
exec nsrp vsd-group 0 mode ineligible
• If the preempt option is not enabled:
exec nsrp vsd-group 0 mode backup
c) If pre-empt is enabled on device A, no action is needed. If pre-empt is not enabled on device A, issue the following command
exec nsrp vsd-group 1 mode backup
At this point, device B is the primary device for both VSD 0 and 1, and device A is backup for both VSD 0 and 1.
4. Upgrade device A to ScreenOS 5.4.0.
WebUI
a) Make sure that you have the 5.4.0 ScreenOS firmware (and the
intermediate firmware, if required). Check Upgrade Paths to ScreenOS 5.4.0 for software details. For information on obtaining the firmware, see section Downloading New Firmware.
b) Log into security device A. c) Save the existing configuration:
1. Go to Configuration->Update->Config File, and then click Save to File.
2. In the File Download dialog box, click Save.
3. Navigate to the location where you want to save the configuration file (cfg.txt), then click Save.
d) Go to Configuration->Update->ScreenOS/Keys, and select Firmware Update.
e) Click Browse to navigate to the location of the ScreenOS 5.4.0 firmware, or enter the path to its location in the Load File field.
f) Click Apply.
A message box appears with information on the upgrade time.
g) Click OK to continue.
The security device restarts automatically. The upgrade is complete when the device displays the login page in the browser.
h) To verify the version of the ScreenOS firmware, log into the security device and go to the Device Information section of the WebUI homepage.
CLI
a) Make sure that you have the ScreenOS 5.4.0 firmware. For information on obtaining the firmware, see section Downloading New Firmware.
b) Log into device A.
c) Save the existing configuration by executing the following command:
d) Run the TFTP server on your computer by double clicking on the TFTP server application.
e) On the security device, enter the following command:
save soft from tftp ip_addr_your_computer screenos_filename to flash
f) When the upgrade is complete, you must reset the security device. Execute the reset command, then enter y at the prompt to reset the device.
g) Wait a few minutes, then log into the security device again. You can verify the security device ScreenOS firmware version by using the get system command.
5. Synchronize device A (CLI only).
After you complete the upgrade of device A to ScreenOS 5.4.0, manually synchronize the two devices. On device A, issue the exec nsrp sync rto all command from peer CLI to synchronize the RTOs from device B.
6. Fail over Device B in VSD 0 to Device A in VSD 0 (CLI only). As the final step, return the devices to an active/active configuration.
h) Log into device A.
• If pre-empt is enabled on device A, no action is needed. If pre-empt is not enabled on device A, issue the following command:
exec nsrp vsd-group 1 mode backup
Now device A is the primary device for VSD 0 and the backup for VSD 1, and device B is the primary device for VSD 1 and the backup for VSD 0.
Upgrading or Migrating the Antivirus Scanner (NetScreen-5GT)
Note: For the NetScreen-5GT platform only, two antivirus scan engines are available, as shown in AV Scan Engines.To migrate to a new antivirus (AV) scanner, follow this procedure:
Note: For a new AV installation, you can first upgrade the security device to run ScreenOS 5.4.0, and then install the AV license, or you can install the AV license first and then upgrade the security device to ScreenOS 5.4.0.
1. Save your current configuration. 2. Install your AV license key.
To access an AV license key, refer to the Concepts & Examples ScreenOS Reference Guide. You must install the license key before you upgrade to ScreenOS 5.4.0, or you might lose some of your current configuration.
ScreenOS 5.3.0 and later support two scan engines, Juniper-Kaspersky and Trend Micro. Make sure you have the correct AV license key for your scan engine. The two license keys, however, can coexist on your security device.
AV Scan Engines
AV Scan Engine License Key ScreenOS version
Trend Micro av_key ns5gttmav.5.4.0x Juniper-Kaspersky av_v2_key ns5gt.5.4.0x
3. Upgrade to ScreenOS 5.4.0.
There are two versions of ScreenOS 5.4.0, as shown in AV Scan Engines. A single version of ScreenOS does not support both scan engines, however.
Make sure you select the ScreenOS version that supports the AV scan engine that was installed in Step 2.
4. Check the configuration file (especially policies) to ensure it is intact.
Scan Manager Profile
The global scan-mgr command controls the embedded scan manager, which is the AV component that interacts with the scan engine. For example, the set or get av scan-mgr CLI command sets the global commands that control
parameters, such as max-content-size, max-msgs, pattern-type, pattern-update, and queue-size.
In ScreenOS 5.3.0 and later, some of the previously global settings are now configured from within a profile context. For example, global commands such as timeout and max-decompress-layer are no longer global; they are now set within the profile for each protocol. Commands such as max-content-size and max-msgs, which configure the embedded scan manager, are global and are now set using the set av scan-mgr command.
When you upgrade to ScreenOS 5.3.0 or later, a scan manager profile named scan-mgr is automatically generated to migrate the global scan-mgr commands. The scan-mgr profile executes the following commands:
set ftp decompress-layer 2 set http decompress-layer 2 set imap decompress-layer 2 set pop3 decompress-layer 2 set smtp decompress-layer 2 set http skipmime enable
Command Updates shows the updated commands in ScreenOS 5.4.0. Updated commands are now entered from within a policy context.
(3)Command Updates
Commands previous to ScreenOS 5.3.0
Commands for ScreenOS 5.3.0 and Later Within a Profile Context
set av http skipmime set av profile scan-mgr
set http skipmime mime-list ns-skip-mime-list set http skipmime enable
exit
unset av http skipmime set av profile scan-mgr unset http skipmime enable exit
set av scan-mgr content
{ FTP | HTTP | IMAP | POP3 | SMTP } [timeout number] }
set av profile scan-mgr
set { FTP | HTTP | IMAP | POP3 | SMTP { enable | timeout number } }
exit unset av scan-mgr content
{ FTP | HTTP | IMAP | POP3 | SMTP }
set av profile scan-mgr
unset { FTP | HTTP | IMAP | POP3 | SMTP } enable exit
AV Pattern Update URL
Trend Micro Inc. no longer hosts AV pattern file updates at http://5gt-t.activeupdate.trendmicro.com/activeupdate/server.ini. The new pattern update can be found at:
http://5gt-p.activeupdate.trendmicro.com/activeupdate/server.ini.
After you upgrade the ScreenOS image, the new image automatically uses the new server URL for AV pattern-update operations; however, the URL in the saved configuration will not change unless you explicitly issued the save command.
When you upgrade to a newer release or manually change the AV pattern update URL to the new location, you can verify the pattern update URL is modified
during the upgrade process by entering the following command:
5gt1-> get av scan-mgr
Embedded AV Management Info: Pattern Management:
AV Key Expire Date: 12/31/2005 00:00:00
Update Server:
Addressed Issues in ScreenOS 5.4.0r3
The following major bugs have been fixed in this release:
• Cs04112—In an NSRP environment, sometimes the interfaces used the
physical MAC address instead of the virtual MAC address.
• Cs04801—The device could fail when a VPN tunnel is removed in an NSRP
environment.
• Cs04844—When passing heavy VPN traffic in Active/Active mode, the device
dropped all fragmented packets.
• Cs04960—A burst of logs events sent from a device running ScreenOS to the
NetScreen-Security Manager server sometimes creates memory corruption, causing the device to fail.
• Cs04993—After a device is restarted, the OCSP configuration for a
CA-certificate could change to use CRL; resulting in the VPN failing to establish. When this happens, the error message PKI object store not correctly loaded <-1> is posted to the console display.
• Cs05200—When configured as route based VPN hub and spoke, packets
from NetScreen device contained incorrect ESP sequence numbers.
• Cs05474— Manually setting the GE copper interface to 1000/full did not
save.
• Cs06031—PPPoE does not insert default routes into the routing table.
• Cs06223—With TCP_SYN_Check disabled, and a large number of TCP RST
packets received the device experienced periods of high CPU and Telnet access was unavailable.
• Cs06358— Large packets going into a policy based VPN tunnel were first
fragmented and then encapsulated.
• Cs07003—In some configurations, sessions could be dropped if there is no
policy in the direction of the session.
• Cs07029—The device had high CPU usage when syslog and policy logging
were enabled.
• Cs07048—Syn-flood protection double counts the number of proxy sessions
causing false alarms at times
• Cs07098—Message guide error “Error(00034) Message: SSH: Maximum
number of SSH sessions () exceeded” is incorrectly documented. The error “SSH: Max number () of session reached.” is posted to the system log.
• Cs07627—In a route based VPN multi-VR environment, the security device
• Cs07702—(ISG 1000 and ISG 2000) The MGT interface reports up and down status changes even though there is no physical connection, which is caused by noise. W/A: Physically connect the MGT interface.
• Cs07816—In some cases, CPU utilization may show a spike due to ARP not
aging out correctly.
• Cs07887— ns25 sometimes fails to ping to local interface. It might also cause a failure in getting ICMP response from local subnets.
• Cs08109— Firewall (Swift) accepts the default route on the serial interface through the ppp connection made and might result in leaking of data through this default route if no other route is available to traffic on firewall.
• Cs08488—Serial failover can cause ISP's dns injected into his internal DHCP
scope.
• Cs08494—ISG with a Security Module could encounter performance
problems when a policy is pushed. This happens when CPU0 is made unavailable while a policy is being installed. Device performance remains stable if the Security Module is disabled. W/A : Contact JTAC for a patch.
• Cs08570—SQLv2 traffic did not pass through the device when ALG was
enabled.
• Cs08754—In Transparent mode, the Syn Cookie feature worked incorrectly.
• Cs08776—Slow performance occurs when media files are transferred using
HTTP from an Apple Mac client.
• Cs08779—Event log does not show the IP address of the Radius Server
• Cs08853—In an NSRP environment, configuring Radius auth-server from
CLI, WebUI, or NSM and executing "exec nsrp sync global config check-sum" results in the error "Warning: configuration out of sync".
• Cs08870—In some cases the NSM agent would fail to upgrade a device to
5.2r3
• Cs08895—Routes were improperly removed from vsys sub-interfaces, until
the device was rebooted.
• Cs08905—Memory resources were improperly reclaimed after VPN phase2
negotiations.
• Cs08940—The get vr mroute CLI command would sometimes incorrectly
display the same source for multiple interfaces.
• Cs09081—Changing the tunnel binding for multiple tunnels through the
WebUI may cause the device to reset with an error.
• Cs09123—Dial-up VPN peers with Source Interface-Based Routing (SIBR)