Installation & Administration Operation
Maintenance & Troubleshooting Concepts & Planning
M6
™Communication Applications Server
SoftPhone User Guide
Provides operating procedures for the M6 SoftPhone
The GENBAND 3-rings logo, DCO, G6, and the G6 logo are registered trademarks of GENBAND™ Inc. in the U.S.A. and are registered trademarks or trademarks of
GENBAND™ Inc. in other countries. The GENBAND, GenView, C2, C3, G8, M5, and M6 names and logos are trademarks of GENBAND™ Inc. in the U.S.A. and other countries. All other trademarks are owned by their respective companies.
© 2000-2007 GENBAND™ Inc.
All rights, including translation into other languages, reserved under the Universal Copyright Convention and other related instruments. Any use of this documentation and/or its associated software, including reproduction, modification, distribution, republication, transmission, re-transmission, or public showing, without the prior written permission of an authorized GENBAND representative, is prohibited.
This document and any software and programs mentioned in this document, whether delivered electronically or via other media, are the sole property of GENBAND™ Inc. and are sold under a license agreement. Reproduction or modification of the software or documentation by any means is prohibited without the express written consent of an authorized GENBAND representative.
• • • • • •
Table of Contents
1
About the SoftPhone
System Requirements ... 2
SoftPhone Installation ... 2
SoftPhone Uninstall ... 5
Starting the SoftPhone ... 5
Configuring the SoftPhone ... 6
Exiting the SoftPhone ... 10
SoftPhone Description ... 11
SoftPhone Features Table ... 12
Options Menu ... 14
Other Login Detected ... 15
Download Manager ... 16
2
Basic Phone Operation
Answering a Call without Video ... 22
Answering a Call with Video ... 22
Answer Using the New Call Pop-up ... 23
Answering a Second Call ... 24
Adjusting the Volume ... 25
Hanging Up (End Call) ... 25
Making a Call ... 25
Making a Call with Video ... 26
Holding a Call ... 27
Redial ... 28
3
System Telephone Features
Feature Activation Digit ... 31
Abbreviated Dial ... 31
Creating an Abbreviated Dial Code ... 31
Modifying an Abbreviated Dial Code ... 32
Deleting an Abbreviated Dial Code ... 32
Verifying an Abbreviated Dial Number ... 32
Anonymous Call Rejection ... 33
Enabling Anonymous Call Rejection ... 33
Disabling Anonymous Call Rejection ... 33
Authorization Code Calling ... 33
Blind Transfer ... 33
Broadcast Paging ... 34
Receiving a Broadcast Page ... 35
Billing Codes ... 35
Call Block (Selective Call Rejection) ... 35
Enabling/Disabling Call Block... 36
Blocking Number of Last Call Received ... 36
Adding Numbers to Call Block List ... 36
Listing Blocked Numbers... 37
Deleting Numbers from Call Block ... 37
Call Forward (All Calls) ... 38
Enabling Call Forward (All)... 39
Disabling Call Forward (All) ... 39
Call Forward (Busy) ... 39
Enabling Call Forward (Busy)... 40
Disabling Call Forward (Busy) ... 41
Call Forward (No Answer) ... 41
Enabling Call Forward (No Answer) ... 41
Disabling Call Forward (No Answer) ... 42
Call Forward (Out of Service) ... 43
Enabling Call Forward (Out of Service) ... 43
Disabling Call Forward (Out of Service) ... 44
Call Pickup ... 44
Directed Call Pickup ... 44
Group Call Pickup ... 44
Call Return ... 45
Call Trace ... 45
Caller ID Block ... 45
Call Waiting ... 45
Answering the Second Call ... 46
Suspending Call Waiting ... 47
Call Waiting with Caller ID ... 47
Call Waiting/Caller ID Manager ... 47
Conference ... 48
Conference Call Tips ... 49
Do Not Disturb ... 49
Tips for using Do Not Disturb ... 49
Enabling/Disabling Do Not Disturb ... 49
Group Speed Dial ... 49
Hold ... 50
Hold-on Queuing ... 50
Hunt Groups ... 50
Intercom ... 50
Meet-Me Conference ... 51
Meet-Me Conference Operations ... 51
Joining a Meet-Me Conference ... 51
Silencing Announcements ... 52
Dialing In Too Early ... 53
Entering an Incorrect ID... 54
Extending the Conference Duration ... 54
Roll Call ... 54
Adding More Ports to an Active Meet-Me Conference ... 54
Dropping a Conference Call ... 55
Muting a Conference Call ... 55
Locking a Conference Call ... 56
Raising/Lowering Hands in a Conference Call ... 56
Scheduling a Meet-Me Conference ... 56
Canceling a Meet-Me Conference... 57
Modifying a Meet-Me Conference ... 58
Getting a List of Meet-Me Conferences... 59
MultiCall Park ... 59
Parking a Call ... 60
Retrieving a Parked Call... 60
Music on Hold ... 60
Mute ... 60
Permanent Caller ID Block Release ... 61
Priority Call ... 61
Adding Members to the Priority Call List ... 62
Listing Priority Call Members... 62
Deleting Priority Call Members ... 62
Privacy Guard ... 64
Access Codes ... 64
Caller Actions ... 64
Entering an Access Code ... 65
Recording a Name... 65
Answering Privacy Guard Call... 65
Enabling/Disabling Privacy Guard ... 66
Managing the Access Code ... 66
Changing the Access Code ... 66
Listening to Access Code ... 66
Managing the Selective Caller List ... 67
Adding to the List... 67
Listening to the List... 67
Deleting from the List... 67
Remote Access to Call Forwarding ... 68
Setting or Changing Remote Forwarding ... 68
Canceling Remote Forwarding ... 69
Remote Phone ... 69
Dial-in Setup of Remote Phone ... 70
Deactivating Dial-up Remote Phone ... 70
Web Portal Setup of Remote Phone ... 71
Deactivating Remote Phone via Web Portal ... 71
Feature Interaction: Remote Phone with Find-Me... 72
Using Remote Phone Features ... 72
Selective Call Forward ... 72
Enabling/Disabling Selective Call Forward... 73
Entering the Forwarding Destination Number ... 73
Identifying the Forwarding Destination Number ... 73
Adding Forwarded Phone Numbers ... 74
Listing Forwarded Phone Numbers ... 74
Deleting Forwarded Phone Numbers ... 74
Star Codes ... 75
4
Voice Mail Features (Default Menu)
Accessing Voice Mail ... 80
Access from Your SoftPhone ... 80
Access from any Other Internal Phone ... 80
Access from any Outside Touchtone Phone ... 81
Dialing Main Number ... 81
Dialing Your Telephone ... 82
Access from the Email Program on Your PC ... 82
Menus and Commands ... 83
Using Controls While Playing Messages ... 86
Rewind/Fast Forward ... 86
Rewind to the Beginning of a Message ... 86
Fast Forward to the End of a Message ... 87
Pause Play of a Message... 87
Composing Messages before Sending ... 87
Compose and Send a Message ... 87
Marking a Message as Urgent ... 88
Changing Your Password ... 89
Skipping the Mail Menu to Hear Messages ... 89
Returning to the Auto Attendant or Operator ... 89
Zeroing Out to a Custom Operator ... 89
Replaying a Message ... 90
Saving a Message ... 90
Skipping to the Next Message ... 91
Deleting a Message ... 91
Forwarding a Message to Another Mailbox ... 91
Replying to a Message ... 92
Dialing Back a Caller ... 92
Sending a Message Directly to an Extension ... 92
Personal Greetings ... 93
Recording Personalized Mailbox Greetings ... 93
Listening to Your Greetings ... 94
Receiving Voice Mail Notification ... 94
What You Receive with Voice Mail Notification ... 94
Managing Distribution Groups ... 95
Editing or Modifying a Group ... 96
Listing All Group Members ... 97
Adding a Member to the Group ... 97
Deleting a Group Member ... 97
Playing the Group Name ... 98
Changing the Group Name... 98
Deleting a Group ... 98
Listening to a List of Distribution Groups... 99
Exiting the Voice Mail System ... 99
5
Voice Mail Features (Option A Menu)
Accessing Voice Mail ... 102
Access from Your SoftPhone ... 102
Access from any Other Internal Phone ... 102
Access from any Outside Touchtone Phone ... 103
Dialing Main Number ... 103
Dialing Your Telephone ... 104
Access from the Email Program on Your PC ... 104
Menus and Commands ... 105
Using Controls While Playing Messages ... 109
Rewind/Fast Forward ... 109
Rewind to the Beginning of a Message ... 109
Fast Forward to the End of a Message ... 110
Pause Play of a Message... 110
Composing Messages before Sending ... 110
Compose and Send a Message ... 110
Marking a Message as Urgent ... 111
Changing Your Password ... 111
Skipping the Mail Menu to Hear Messages ... 112
Returning to the Auto Attendant or Operator ... 112
Zeroing Out to a Custom Operator ... 112
Replaying a Message ... 113
Saving a Message ... 113
Skipping to the Next Message ... 113
Deleting a Message ... 114
Forwarding a Message to Another Mailbox ... 114
Dialing Back a Caller ... 115
Sending a Message Directly to an Extension ... 115
Personal Greetings ... 116
Recording Personalized Mailbox Greetings ... 116
Listening to Your Greetings ... 117
Receiving Voice Mail Notification ... 117
What You Receive with Voice Mail Notification ... 117
Managing Distribution Groups ... 118
Creating a New Group... 118
Editing or Modifying a Group ... 119
Listing All Group Members ... 120
Adding a Member to the Group ... 120
Deleting a Group Member ... 120
Playing the Group Name ... 121
Changing the Group Name... 121
Deleting a Group ... 121
Listening to a List of Distribution Groups... 122
Exiting the Voice Mail System ... 122
6
Voice Mail Features (Option B Menu)
Accessing Your Voice Mail... 124
Access from Your SoftPhone ... 124
Access from any Other Internal Phone ... 124
Access from any Outside Touchtone Phone ... 125
Dialing Main Number ... 125
Dialing Your Telephone ... 126
Access from the Email Program on Your PC ... 126
Menus and Commands ... 127
Using Controls While Playing Messages ... 130
Rewind/Fast Forward ... 130
Rewind to the Beginning of a Message ... 130
Fast Forward to the End of a Message ... 130
Pause Play of a Message... 131
Composing Messages before Sending ... 131
Compose and Send a Message ... 131
Marking a Message as Urgent ... 132
Skipping the Mail Menu to Hear Messages ... 132
Returning to the Auto Attendant or Operator ... 133
Zeroing Out to a Custom Operator ... 133
Replaying a Message ... 134
Saving a Message ... 134
Skipping to the Next Message ... 134
Deleting a Message ... 134
Forwarding a Message to Another Mailbox ... 134
Replying to a Message ... 135
Dialing Back a Caller ... 136
Sending a Message Directly to an Extension ... 136
Personal Greetings ... 136
Recording Personalized Mailbox Greetings ... 137
Listening to Your Greetings ... 137
Receiving Voice Mail Notification ... 138
What You Receive with Voice Mail Notification ... 138
Managing Distribution Groups ... 139
Creating a New Group... 139
Editing or Modifying a Group ... 140
Listing All Group Members ... 141
Adding a Member to the Group ... 141
Deleting a Group Member ... 141
Playing the Group Name ... 142
Changing the Group Name... 142
Deleting a Group ... 142
Listening to a List of Distribution Groups... 143
Exiting the Voice Mail System ... 143
7
Set Up Outlook for TAPI
Installing the TAPI Support Software ... 146
Configuring Windows for TAPI ... 149
Configuring Outlook to Use TAPI ... 156
1
About the SoftPhone
This guide describes how to install and use all of the features on your SoftPhone that are provided by the telephone system.
In this section:
3
“System Requirements” on page 23
“SoftPhone Installation” on page 23
“SoftPhone Uninstall” on page 53
“Starting the SoftPhone” on page 53
“Configuring the SoftPhone” on page 63
“Exiting the SoftPhone” on page 103
“SoftPhone Description” on page 113
“Options Menu” on page 143
“Other Login Detected” on page 15System Requirements
The application will run on any PC with the following configuration:
•
Windows XP with Service Pack 2 or Windows 2000 Operating System•
1.6 GHz processor or better•
256 MB of RAM minimum•
Windows .NET Framework 2.0•
Disk space required:•
5 MB for the application;•
20 MB for .NETTo use the video capability on your SoftPhone requires the following configuration:
•
A video camera installed on your PC•
The service provider must enable the video feature for your phone•
Under Options > Configuration > Video, the Enable Video checkbox must be checked.•
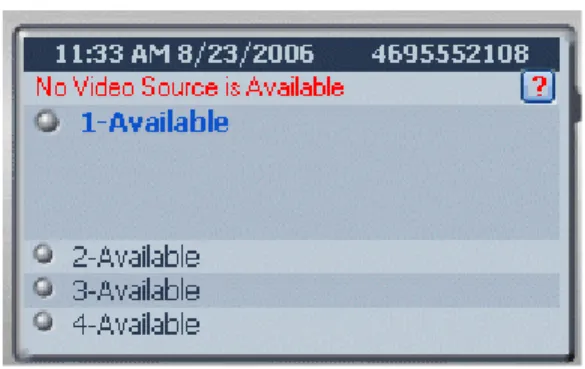
The source or destination for the call must also have video capability If you do not have a video camera configured, or the SoftPhone cannotcommunicate with the camera, when you try to use the camera, you will see a red error message in the SoftPhone display, as shown in Figure 1.
Figure 1: No Video Source Error Message
SoftPhone Installation
Your service provider may have provided instructions on how to download and install your SoftPhone. If so, please follow the service provider’s instructions to acquire the SoftPhone installation program.
Once you have the installation executable, use the following procedure to install the SoftPhone.
1. Run the SoftPhone executable by double-clicking on the file.
2. The SoftPhone requires Windows .NET Framework 2.0 or greater. If it has not been installed on your machine, you will see the following prompt:
3. Click Yes which will take you to a Microsoft web site. On this site under “.NET Framework 2.0 Redistributable Package”, click the Download x86 version
link.
4. You will be prompted to either run or save the downloaded file. Select Run.
5. When the installation is complete, you will see a reminder to update your system with the latest service packs. Click Finish.
6. After downloading .NET 2.0 (if it was needed), double-click on the SoftPhone installation executable again and follow the prompts to install the application.
7. On the Select Installation Folder screen, you must choose whether the SoftPhone will be available for:
•
Just me – only the user that installed the SoftPhone can run it.8. When the installation is complete, start the SoftPhone application and follow the prompts to configure it, as described in “Configuring the SoftPhone” on page 6.
SoftPhone Uninstall
To remove the SoftPhone from your PC:
1. Click on Start > Control Panel.
2. Click on Add or Remove Programs.
3. Scroll down and select SoftPhone and click Remove.
Starting the SoftPhone
Your service provider will provide instructions as to how you can download, install and configure your SoftPhone. Once you have the program installed on your computer, you can run the SoftPhone by:
•
double-clicking on the SoftPhone desktop icon.Configuring the SoftPhone
When you first install or start the SoftPhone on a new PC, you will be presented with a Configuration dialog. The following procedure describes the steps to configure the SoftPhone.
1. Initially, the General screen is presented. You must enter your phone number and phone password.
2. If desired, click any of the Preferences buttons:
a. Launch with Windows – when checked, automatically starts the SoftPhone when you log into Windows.
b. Task Bar Notification on Ring – when checked, causes a New Call Disposition Pop-up to appear when there is an incoming call. See “Answer Using the New Call Pop-up” on page 23. If this is unchecked, and Popup on Ring is unchecked, then you must double-click on the
SoftPhone icon in the System Tray and click the Answer button, or press Control-A to answer the call.
3. If you have not set the network information, then the next screen that is presented is the Network configuration screen.
4. Set the fields as follows:
a. Address –Server IP address provided by your service provider.
b. Address2 – Optional backup server IP address. Only enter this value if instructed to by your service provider.
c. Keep-Alive – The interval, in seconds between keep-alive requests. The default is 30 seconds and this should not be set higher than 60 seconds.
d. SIP Port –The value of the network SIP port on the Call Agent. This value must match the value set on the Call Agent server. Only change this value if instructed to do so by your service provider.
e. Phone SIP Port – The local SIP port for the SoftPhone. Only change this value if instructed to do so by your service provider.
f. Upgrade Server – Server IP address where the SoftPhone will check for updates. This address should also be provided by your service provider.
g. Use SSL – Check this box to use a secure server link (https) to the Call Agent.
h. Adapter – Specify the network adapter that the SoftPhone should use for communication. The default Use Windows preferred adapter will work in most situations. A different value may need to be specified if there are multiple network cards in the computer and the proper one is not being used.
i. Connection type – Specify the type of Internet connection. The
SoftPhone may use this value to make optimizations for the selected type of Internet connection.
j. RTP Ports – Specify the available network port values that can be used for audio communication during a phone call. The default allows the SoftPhone to randomly select free port values between 5004 and 65535. If a more specific range is required due to firewall or other network requirements, then a Custom range can be specified. Enter in a range of port values that the SoftPhone can be used. It is required that a minimum of 2 values be available for each phone call. Therefore, a minimum range of 8 port values is generally required.
k. Click Save when done.
5. You may optionally select the Audio button and configure the sound devices that you will be using with the SoftPhone.
a. Record (Input) – specify the Audio Input device that will be used for SoftPhone communication. Default is the Windows default Recording device. Specify a different value if another input device should be used.
b. Play (Output) –specify the Audio Output device that will be used for SoftPhone communication. Default is the Windows default Play device. Specify a different value if another output device should be used.
c. Sound devices – specify the type of audio device used for SoftPhone communication. The SoftPhone may use this value to make performance improvements.
d. Use Noise Reductor –enables or disables the Noise Reductor. If enabled, the ambient noise captured by the microphone as well as the noise introduced by audio cards may be reduced. This may provide better voice quality.
e. Ring PC Speaker – check this box to cause the SoftPhone to ring through the PC speaker. If you are using a headset but you are not currently wearing it, this allows you to still hear the SoftPhone ringing.
f. Click Save when done.
6. You may optionally select the Video button and configure the video function of the SoftPhone.
NOTE: Your service provider must enable the video capability on your SoftPhone in order for you to have video service.
a. Enable Video – when checked, enables video functionality on your SoftPhone.
b. Video Devices –allows selection of the video camera to be used by the SoftPhone.
c. Video Format – allows selection of a video format. The QCIF Low Resolution format is recommended for the smoothest, non-jerky video. For higher bandwidth systems, the CIF High Resolution format may be the best choice.
d. Default Frame Rate –allows selection of the frame rate (number of video frames per second). The best results have been seen when it is set to 5 frames per second.
e. Answer Call with Video – three radio buttons allow configuration of how a video call will be answered:
•
Never answer a call with video – restricts the SoftPhone from answering a call with video.•
Always answer a call with video – configures the SoftPhone to answer all calls with video.•
Ask before answering each call – (Default) configures theSoftPhone to pop up a New Call dialog that allows you to choose how to answer the call.
f. Make Call with Video – three radio buttons allow configuration of how you can initiate a video call:
•
Never make a call with video – restricts the SoftPhone from making a call with video.•
Always make a call with video – configures the SoftPhone to make all calls with video.•
Ask before making each call – (Default) configures the SoftPhone to pop up menu when you click on the Dial button that allows you to choose how to make the call.g. Click Save when done.
Exiting the SoftPhone
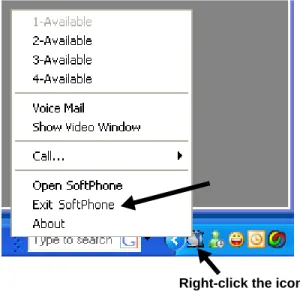
To terminate the SoftPhone application, you must right-click on the icon in the system tray and select Exit SoftPhone from the menu, as shown in Figure 2.
Figure 2: SoftPhone Control Menu in System Tray
SoftPhone Description
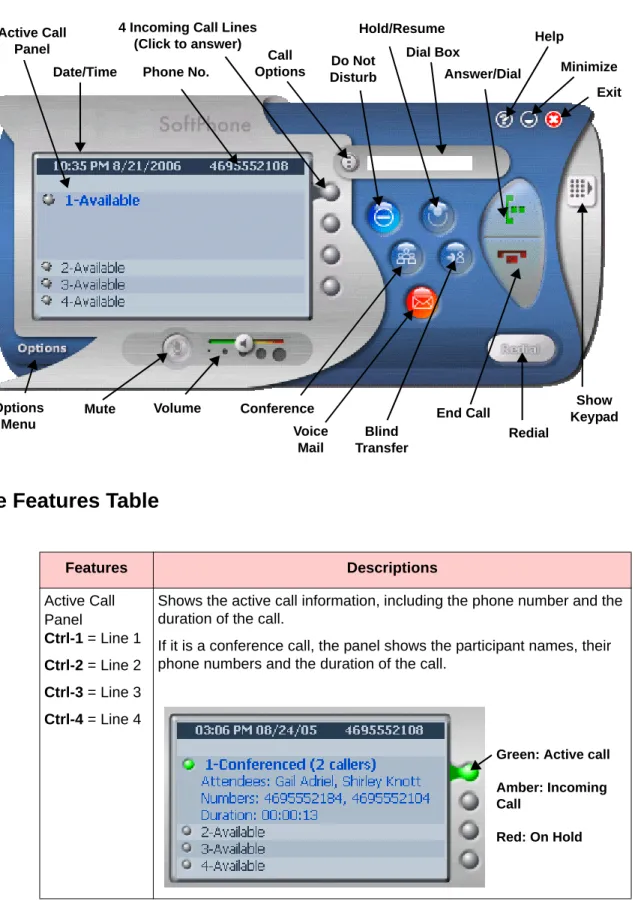
The SoftPhone is a full-featured telephone that provides voice communication over an IP network. The phone functions much like a traditional analog phone, allowing you to place and receive telephone calls. The phone also supports features such as video calling, call forwarding, redialing, transferring calls, conference calls, and access to voice mail. The SoftPhone has several key components, which are shown in Figure 3.
Figure 3: SoftPhone Features
SoftPhone Features Table
Phone No.
4 Incoming Call Lines (Click to answer)
Hold/Resume
Redial Help
Options Menu
Date/Time
Conference Voice
Answer/Dial
Blind Transfer
Minimize Exit
Volume End Call
Do Not Disturb Active Call
Panel
Show Keypad Dial Box
Call Options
Mute
Features Descriptions
Active Call Panel
Ctrl-1 = Line 1
Ctrl-2 = Line 2
Ctrl-3 = Line 3
Ctrl-4 = Line 4
Shows the active call information, including the phone number and the duration of the call.
If it is a conference call, the panel shows the participant names, their phone numbers and the duration of the call.
Green: Active call
Amber: Incoming Call
Answer/Dial
Ctrl-A = Ans
Alt-A = Ans/Vid
Ctrl-M = Dial
Ctrl-1 = Line 1
Ctrl-2 = Line 2
Ctrl-3 = Line 3
Ctrl-4 = Line 4
• Answers an incoming call. You can also press Ctrl-A to answer without video, Alt-A to answer with video, or Ctrl-<n> where <n> is the line number to pick up the incoming call.
• Dials the number that has been entered in the Dial Box. You can also make a new call by pressing Ctrl-M.
Call Options Allows you to choose whether or not to start a video phone call by bringing up the Dial Number dialog.
End Call
Ctrl-E
Disconnects the currently active call.
Redial Redials the number selected from the pop-up list associated with the button. If you press Ctrl while clicking one of the selections from the Redial pop-up menu, it will display the Dial Number dialog that allows you to make a video call (if you have that feature enabled).
Blind Transfer
Ctrl-T
Pops up a dialog that allows you to enter a number to transfer to, or you may select a number from the Call History List button on the pop-up.
Hold/Resume
Ctrl-H
Places an active call on hold, resumes a held call, or switches between an active call and a held call—depending on the line state.
Features Descriptions
Options Menu
The Options menu on the SoftPhone provides several functions:
•
Configuration – allows you to change the server IP addresses, set behavior preferences, and configure audio features. See “Configuring the SoftPhone” on page 6 for more detail.•
Initialize Phone – reinitializes the phone.•
Calls List – This tool provides a phonebook of the following categories of numbers:•
Contacts – Allows you to add numbers that will be available when you click on the Redial button or in the Call History list when you click on Call Options ( ).Do Not Disturb Blocks all incoming calls and sends them to your Do Not Disturb destination (typically your voice mail). You may use the Webportal to change your Do Not Disturb destination.
Mute On an active call, this button disables outgoing audio. The other party will not be able to hear you.
Immediate Conference
Ctrl-C
Pops up a dialog that allows you to enter a number to conference in to the active call. You may select a number from the Call History List button on the pop-up.
Voice Mail Accesses the Voice Mail menu. This button appears red if there are new messages in your voice mailbox. If you hold the mouse over the Voice Mail button, a tooltip displays the number of new and old (already retrieved) messages.
NOTE: If you accidentally press this button and enter the Voice Mail menu, hang up the phone to exit.
Show Keypad By default, the Dial Pad is hidden. Click on the Show Keypad icon to display the keypad. Click on the numbered buttons or use the number keypad on your keyboard to display the number in the Dial Box. Volume Increases or decreases volume for the handset. Also controls the
ringer volume (if on-hook).
Options Menu Allows configuration and update of the SoftPhone.
Minimize Minimizes the application to the Taskbar. Click on the icon in the Taskbar to display the SoftPhone.
Help Pops up the online help window. Exit Exits the SoftPhone application.
•
Placed Calls – the SoftPhone automatically populates this list with the numbers of all outgoing calls. You can edit these entries and add a name. These numbers will be available when you click on the Redial button or in the Call History list when you click on Call Options ( )•
Received Calls – the SoftPhone automatically populates this list with the caller ID and number of any incoming calls, but you can also delete or edit entries in the list here. These numbers will be available when you click on the Redial button or in the Call History list when you click on Call Options ( ).•
Call Reminders – Allows you to enter reminders with a name, number, and number of minutes in the future when prompt will pop up and remind you to make the call.•
Redirect Numbers – Allows you to add numbers that can be used with the Call Dispostion window to redirect incoming calls. This list is also populated by typing in a number in the text field next to the Redirect button on the Call Disposition pop-up window. See “Answering a Call without Video” on page 22.•
Show Video Window – If there is no active video call, the video window will show the local camera output. When there is an active video call, it brings the video window to the front.•
Check for Updates – launches the Download Manager that checks to see if a new version is available. See “Download Manager” on page 16 for more information.•
About – Shows the version of the SoftPhone application.Other Login Detected
If you are running the SoftPhone on one PC and then you try to start the SoftPhone application on a different PC, you will see the following dialog on the first PC:
The SoftPhone on the first PC will be disconnected automatically.
•
Click Login to reconnect the SoftPhone on the first PC.•
Click Close to leave the SoftPhone disconnected. To restart the SoftPhone:•
on the SoftPhone itself, click on Options > Initialize Phone, or•
go to Start > Programs > SoftPhone,or•
double-click on the SoftPhone desktop icon .Download Manager
When the SoftPhone is configured with an Upgrade Server IP address (see “Configuring the SoftPhone” on page 6), then the application will periodically check for updates to the software.
You can also force the check for updates by clicking on Options > Check for Updates.
1. On the dialog presented, which is shown in Figure 5 on page 17, do the following:
a. Enter the Update Server IP Address specified by your service provider.
b. If you wish to be notified when there are minor-level updates to the application, check the Notify on Minor Updates checkbox.
c. Check the Use SSL checkbox if your service provider instructs you to. This will be required if the provider is using a secure server to provide application updates.
Figure 5: SoftPhone Download Manager Update Prompt
1. The next dialog that pops up will notify you if an update is available.
NOTE: If it is a required update, you must download the new version in order for the SoftPhone to continue operating.
3. If the softphone application is still running, you will see the following prompt:
The following are the possible results of clicking the available buttons:
•
Yes - closes the SoftPhone application and goes to the web page where you can access the Download Manager.•
No - does not close the Softphone application, but still goes to the Download Manager web page.•
Cancel - does not close the SoftPhone application, and cancels the download operation.4. If you selected Yes or No on the previous dialog, your web browser will pop up with a link to download the new version of the phone. Click on the
SoftPhone link on the page.
6. The next dialog is about the publisher. Click Run again.
7. The software will download and the extraction process begins. Click Extract
on the dialog.
8. Next, the InstallShield Wizard appears. Click Next to continue.
9. On the License Agreement window, click the radio button to accept the license agreement and then click Next.
10. Choose a destination folder for the SoftPhone, or just click Next.
11. A dialog appears showing the current download settings. Click Install.
12. A dialog will appear showing the progress of the download. When it is complete, if you chose earlier in the process to not close the SoftPhone application, then a dialog appears stating that the process cannot continue until you exit the SoftPhone application. Exit the SoftPhone application and then click Retry.
2
Basic Phone Operation
The following basic phone operations are described in this section:
3
“Answering a Call without Video” on page 223
“Answering a Call with Video” on page 223
“Answer Using the New Call Pop-up” on page 233
“Answering a Second Call” on page 243
“Adjusting the Volume” on page 253
“Hanging Up (End Call)” on page 253
“Making a Call” on page 253
“Making a Call with Video” on page 263
“Holding a Call” on page 27Answering a Call without Video
When a call is incoming, you can answer in several ways:
•
by clicking the Answer/Dial button•
by pressing Ctrl-A•
by clicking the yellow line button for the incoming callAnswering a Call with Video
If you have video capability on your SoftPhone, you can answer calls with video. See “System Requirements” on page 2 for information on enabling video.
On the SoftPhone, you can click on Options > Configuration > Video and you can configure your SoftPhone to:
•
always answer with video, or•
never answer with video or•
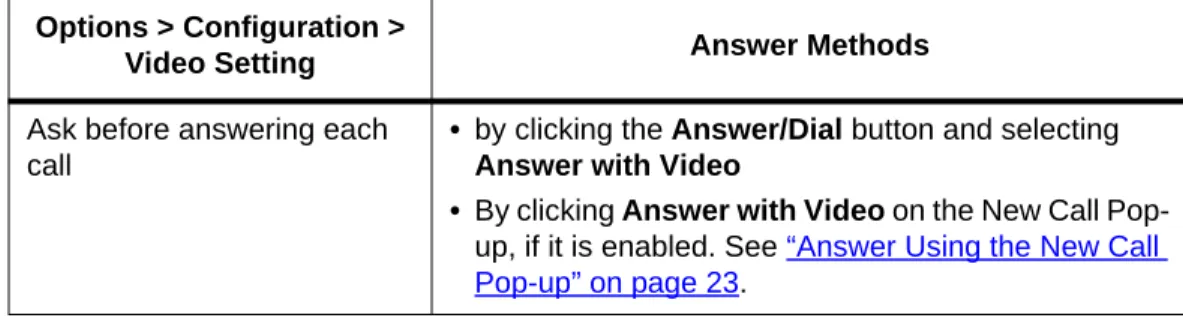
ask before answering each call.Depending on how you have this set, the ways you can answer a call with video are described in Table 1.
Table 1: Answering a Call With Video
Click on Line Button to answer
Options > Configuration >
Video Setting Answer Methods
Never answer call with video • By clicking Answer with Video on the New Call Pop-up, if it is enabled.
Always answer call with video
• by clicking the Answer/Dial button
• by pressing Alt-A
• by clicking the yellow line button for the incoming call
• By clicking Answer with Video on the New Call Pop-up, if video is enabled.
Answer Using the New Call Pop-up
You can answer a call using the New Call pop-up (shown in Figure 6) that optionally appears when there is an incoming call. To enable the pop-up to appear when a call is incoming, check the “Task Bar Notification on Ring” check box on the
Options > Configuration > General page. See “Configuring the SoftPhone” on page 6.
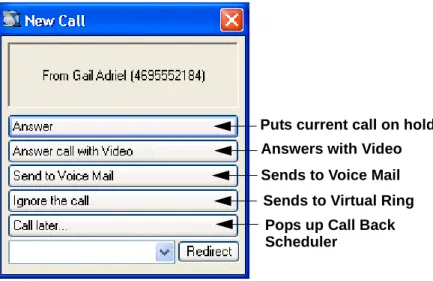
Figure 6: New Call Pop-up
The New Call pop-up allows the following functions:
•
Answer – answers the call with audio only and displays the SoftPhone.•
Answer call with Video – clicking this button will answer the incoming call with a video display. This button will only appear if:•
you have video capability enabled by your service provider and•
you have it enabled through the Options > Configuration > Videoscreen.
•
Send to Voice Mail – sends the incoming call straight to voice mail.•
Hold the call – puts the incoming call on hold without answering it first. To resume the call, click on the red line button.Ask before answering each call
• by clicking the Answer/Dial button and selecting
Answer with Video
• By clicking Answer with Video on the New Call Pop-up, if it is enabled. See “Answer Using the New Call Pop-up” on page 23.
Options > Configuration >
•
Ignore the call – sends the call to “virtual ring”; the SoftPhone will not answer the call, but the caller will hear the phone ring contnuously until they finally hang up.•
Call Later – pops up a window that allows you to schedule a call-back reminder.•
Redirect – redirects the call to the number that you have typed into the text box next to the Redirect button, or to a number selected from the pull-down list. The Redirect Numbers list is populated by adding numbers under Options > Calls List > Redirect Numbers.Answering a Second Call
If you are currently engaged in a call and a second call comes in, you can pick up the second call in the same way you answer any call:
•
by clicking the Answer/Dial button or•
by pressing Ctrl-A to answer without video or Alt-A to answer with video•
by clicking the amber line button for the incoming call. The button will not be lit, but the caller ID of the incoming call will be shown in the display. Clicking the line button for the second call will put the first call on hold; or•
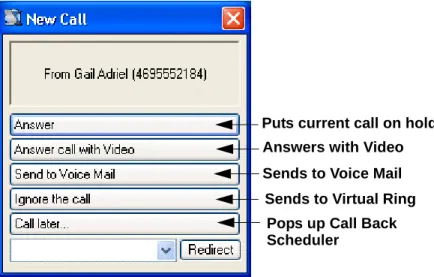
by using the the New Call pop-up that appears when there is an incoming call (if enabled). To choose whether the pop-up appears when a call is incoming, see “Configuring the SoftPhone” on page 6.Figure 7: New Call Pop-up for Second Call
The New Call pop-up for a Second Call allows the following functions:
•
Answer – answers the call with audio only and displays the SoftPhone. The currently active call will be put on hold automatically. To switch between calls, click the red line button for the other call. The current call is held and the first call resumes.Sends to Virtual Ring Sends to Voice Mail Puts current call on hold Answers with Video
Pops up Call Back Scheduler
•
Answer call with Video – Clicking this button will put the current call on hold and answer the incoming call with a video display. This button will only appear if:•
you have video capability enabled by your service provider and•
you have it enabled through the Options > Configuration > Videoscreen.
•
Send to Voice Mail – sends the incoming call straight to voice mail.•
Ignore the call – lets the phone ring indefinitely until the caller hangs up.•
Call Later – Pops up a window that allows you to schedule a call-back reminder.•
Redirect – redirects the call to the number that you have typed into the text box next to the Redirect button, or to a number selected from the pull-down list. The Redirect Numbers list is populated by adding numbers under Options > Calls List > Redirect Numbers.When you hang up, the current call is disconnected, but the other call will still be on hold. To resume the other call:
•
click the red line button,•
or press Control-<n> where <n> is the line number.Adjusting the Volume
The volume control at the base of the SoftPhone allows you to adjust the volume of the ringer as well as the phone conversations.
•
If you adjust the volume control during an active call, it adjusts the audio volume.•
If you adjust the volume control while the phone is ringing, it will adjust the ringer volume.Hanging Up (End Call)
There are several ways to end a call on the SoftPhone:
•
click the End Call button or•
press Ctrl-EMaking a Call
To make a call, you can either:
•
enter the desired number in the text box using the computer numeric keypad or•
click the Show Keypad button to expand the SoftPhone keyboard on the right side of the SoftPhone and enter the number;and then:
•
press Enter or•
click the Answer/Dial button or•
press Ctrl-M.You can also make a call using the System Tray Menu as follows:
1. Right-click on the SoftPhone icon ( ) in the System Tray.
2. Select the Call submenu.
3. Optionally select a line to use for the call by clicking on 1-Available, 2-Available, etc.
4. Select any of the phone numbers you have called previously or any from the
Received Calls submenu.
5. On the Dial Number dialog that pops up, you can check the Video Call
checkbox to place the call with video.
6. Click Call to dial the number.
Making a Call with Video
If you have video capability on your SoftPhone, you can make calls with video. See “System Requirements” on page 2 for video requirements.
On the SoftPhone, you can click on Options > Configuration > Video and you can configure your SoftPhone to:
•
never make calls with video or•
always make calls with video, or•
ask before making each call.Depending on how you have this set, the ways you can make a call with video are described in Table 2.
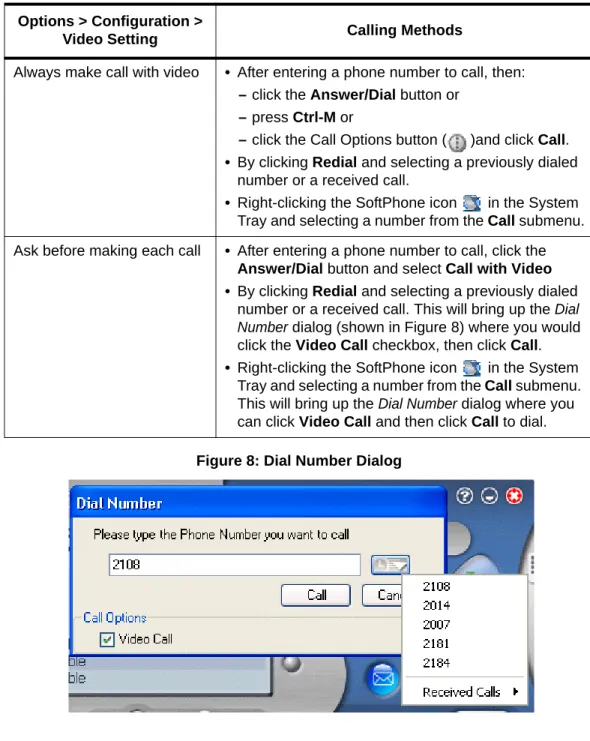
Table 2: Making a Call With Video Options > Configuration >
Video Setting Calling Methods
Never make call with video • By clicking the Call Options button ( )and checking the Video Call checkbox, then clicking Call.
Figure 8: Dial Number Dialog
Holding a Call
1. To put a call on hold, press the Hold button or press Ctrl-H.
2. To resume the call:
•
click the Hold button, or•
press Ctrl-H, or•
click the red line button.Always make call with video • After entering a phone number to call, then:
– click the Answer/Dial button or
– press Ctrl-M or
– click the Call Options button ( )and click Call.
• By clicking Redial and selecting a previously dialed number or a received call.
• Right-clicking the SoftPhone icon in the System Tray and selecting a number from the Call submenu. Ask before making each call • After entering a phone number to call, click the
Answer/Dial button and select Call with Video • By clicking Redial and selecting a previously dialed
number or a received call. This will bring up the Dial Number dialog (shown in Figure 8) where you would click the Video Call checkbox, then click Call.
• Right-clicking the SoftPhone icon in the System Tray and selecting a number from the Call submenu. This will bring up the Dial Number dialog where you can click Video Call and then click Call to dial.
Options > Configuration >
Redial
You can redial any number that you have called before or any number of a received call.
You can redial a number in one of two ways:
•
Press the Redial button and select the desired number from the drop-down menu, or•
Type *07 in the text box and press Enter or the dial button to redial the last number.The number is dialed instantly and you may speak with the called party. If you have selected “Always make call with video” on the Options >
Configuration > Video screen, then the call will be made with video automatically. If you have checked “Ask before making each call” on the Video Configuration screen, then the Call Options dialog (shown in Figure 8) will appear. You can then choose to make the call with video or not.
3
System Telephone Features
This chapter contains an alphabetical summary of all features that may be provided on your telephone. You will only be able to use those features that have been configured on to your telephone by the system administrator.
NOTE: The features on your phone are set by the service provider. It is possible that some system features are not provided for your phone. If you do not have a feature listed in this chapter and would like to have it on your phone, contact your service provider for help.
In this section:
3
“Feature Activation Digit” on page 313
“Abbreviated Dial” on page 313
“Anonymous Call Rejection” on page 333
“Authorization Code Calling” on page 333
“Blind Transfer” on page 333
“Broadcast Paging” on page 343
“Billing Codes” on page 353
“Call Block (Selective Call Rejection)” on page 353
“Call Forward (All Calls)” on page 383
“Call Forward (Busy)” on page 393
“Call Forward (No Answer)” on page 413
“Call Forward (Out of Service)” on page 433
“Call Pickup” on page 443
“Group Call Pickup” on page 443
“Call Return” on page 453
“Call Trace” on page 453
“Caller ID Block” on page 453
“Call Waiting” on page 453
“Call Waiting with Caller ID” on page 473
“Call Waiting/Caller ID Manager” on page 473
“Conference” on page 483
“Do Not Disturb” on page 493
“Group Speed Dial” on page 493
“Hold-on Queuing” on page 503
“Hunt Groups” on page 503
“Intercom” on page 503
“Meet-Me Conference” on page 513
“MultiCall Park” on page 593
“Music on Hold” on page 603
“Mute” on page 603
“Permanent Caller ID Block Release” on page 613
“Priority Call” on page 613
“Privacy Guard” on page 643
“Remote Access to Call Forwarding” on page 683
“Remote Phone” on page 693
“Using Remote Phone Features” on page 723
“Star Codes” on page 75Feature Activation Digit
Some features require you to dial an activating digit followed by a numeric code (example: 588). The default value for this activating digit is 5 and it is used throughout this document. However, your system administrator may choose to use another digit for this function. In that case, substitute your activating digit for the default. Operation of all features will be exactly the same.
NOTE: The feature codes (“star codes”) listed in these procedures are the default values for your phone system at the time of installation. They may be changed by your service provider. Any list of feature codes given to you by your service provider should be used in place of the codes listed here.
Abbreviated Dial
This feature lets a you create, modify, delete, verify and use a personal list of up to 100 Abbreviated Dial codes. Abbreviated Dial codes must be entered as two digits when programming and dialing (Example: enter 04 instead of 4).
Creating an Abbreviated Dial Code
1. Type 75* in the number field and press Enter or the dial button. A voice prompt will lead you through the remaining steps.
2. Press 1 to program (set) the Abbreviated Dial code.
3. Press the digits (00-99) you wish to use as the Abbreviated Dial code or enter
* to exit.
4. Dial the phone number you want to assign to this Abbreviated Dial code, followed by #.
The phone number you entered for this Abbreviated Dial number is repeated back.
NOTE: Be sure to enter all the numbers normally required to dial the call. This includes the area code for long distance calls and may include the area code for local calls in some areas.
5. Press # to save or * to exit without saving.
6. Program or verify another Abbreviated Dial code or hang up to exit. A voice prompt will lead you through the remaining steps.
Using an Abbreviated Dial Code
1. Type *3 in the number field followed by the desired Abbreviated Dial code (00-99).
2. Press the dial button or press Enter.
3. Wait for the called party to answer.
Modifying an Abbreviated Dial Code
1. Type 75* in the number field and press Enter or the dial button. A voice prompt will lead you through the remaining steps.
2. Press 1 to program (set) the Abbreviated Dial code (00-99).
3. Press the digits of the Abbreviated Dial code to modify followed by # or press * to exit.
4. Dial the phone number you want to assign to this Abbreviated Dial code followed by the # sign, or press * to cancel.
The phone number you entered for this Abbreviated Dial number is repeated back.
NOTE: Be sure to enter all the numbers normally required to dial the call. This includes the area code for long distance calls and may include the area code for local calls in some areas.
5. Press # to save the changes or * to exit without saving.
6. Program or verify another Abbreviated Dial code or hang up to exit.
Deleting an Abbreviated Dial Code
1. Type 75* in the number field and press Enter or the dial button. A voice prompt will lead you through the remaining steps.
2. Press 1 to program (set) the Abbreviated Dial code (00-99).
3. Press the digits of the Abbreviated Dial code to delete followed by the # sign. A confirmation message tells you: “No phone number was entered.”
4. Press # to save the changes or * to exit without saving.
5. Program or verify another Abbreviated Dial code or hang up to exit.
Verifying an Abbreviated Dial Number
1. Type 75* in the number field and press Enter or the dial button.
3. Press the Abbreviated Dial code you wish to verify.
The phone number you entered for this Abbreviated Dial number is repeated back.
4. Program or verify another Abbreviated Dial code or hang up to exit.
Anonymous Call Rejection
When enabled, this feature rejects calls from callers who block the display of their caller ID information.
Enabling Anonymous Call Rejection
1. Type *77 in the number field.
2. Press Enter or the dial button.
3. Hang up.
On any subsequent incoming call that provides no caller ID, the calling party gets a message that the party they are calling does not accept anonymous calls.
Disabling Anonymous Call Rejection
1. Type *87 in the number field.
2. Press Enter or the dial button.
3. Hang up.
Authorization Code Calling
This feature is available system-wide to allow/deny long distance and other types of dialing and does not appear as a button on your telephone.
If you are required to enter an authorization code for a call, enter <outside access
digit>#<auth code>.
For example, if the outside access digit is 9, and the Authorization Code is 123, enter: 9#123 and click the Dial button or press Enter.
Blind Transfer
Use this feature to transfer a call to another number.
1. Tell the calling party you will transfer the call, then press the BlindTransfer
2. The call is placed on hold and a dialog pops up allowing you to enter a number or you can click the call history list and select a number.
3. Click Call to dial the other phone. When the other phone picks up, the call is automatically transferred.
Broadcast Paging
This feature allows you to dial a preset number and make a broadcast page to other users within the same paging group. Your system administrator will tell you if you can make pages, who is in the paging group, and what the paging number is.
•
No Call Screening, Forward to Voice Mail, Call Forwarding or Remote Phone treatments are applied to a broadcast page with the exception of Do Not Disturb. Depending on your system’s configuration, a broadcast page may or may not override Do Not Disturb.•
Only one person can dial the paging number at a time.•
Paging is “best effort” and as many receipients will be reached as possible. The page will not be cancelled or delayed by a single phone failure or lack of bandwidth. There is no warning that the page did not reach all intended recipients.•
If the paging call fails, a reorder (fast busy) tone is played. The paging call might fail for any of following reasons:•
You are not allowed to originate paging calls using the dialed number,•
The paging group is busy,•
All members are either busy, out of service, or in DnD mode (depends on system configuration).•
If a server swap occurs while a broadcast page is in progress, the following apply:•
If the paging originator and members have displays on their phones, the displays will continue to show that they are connected to the paging group.•
If the paging originator or recipient is an SCCP device, the broadcast paging call is dropped. The source phone cannot continue tobroadcast paging and destination phone will not hear the paging if it continues.
•
If the paging originator or recipient is an MGCP device, the MGCP device can continue to broadcast paging and MGCP devices can hear the paging.•
If the paging originator or recipient is a SIP, paging may continue if the device supports the re-invite function and is able to change its sending and/or receiving port in the middle of streaming.•
Making a Broadcast Page1. Enter the paging number in the dial box and click the Dial key.
2. Make your announcement after the tone.
3. When you are done, hang up by pressing the End Call key.
Receiving a Broadcast Page
When you are receiving a broadcast page, a warning tone will play through the phone speaker to indicate a page is incoming. The paging warning tone will be followed by the broadcast announcement. You do not need to click on the answer button to listen to the page.
Your phone must be idle for a broadcast page to reach you. Broadcast pages may override Do Not Disturb, depending on your system’s configuration.
Billing Codes
This feature lets you assign a project or client code (up to 30 characters) to any call. The code entered is recorded in the Call Data Record (CDR) file for the call. Contact your system administrator to retrieve the billing records from the CDR file. While in an active call, follow these steps:
1. Notify the other party that you need to put them on hold for a moment. Press the Transfer button.
2. Enter *02.
3. Enter the desired billing code followed by the pound sign (#). The call will resume.
Call Block (Selective Call Rejection)
Call Block (also known as Selective Call Rejection) allows you to program your phone to reject calls from a list of telephone numbers. All calls from phones on the list receive a message which says you are not accepting calls.
To use this feature (*60), you create a list of telephone numbers that receive the message when a call with that caller ID appears at your telephone.
Call Block is managed through a menu of commands activated by pressing digits on the keypad. The menu commands are:
•
1 - Enable/disable feature•
2 - Add last caller to blocked list•
3 - Add numbers to blocked list•
4 - List numbers to blocked list•
5 - Delete numbers from blocked listEnabling/Disabling Call Block
The system allows you to turn the Call Block feature on and off (i.e., decide when calls from your list will be forwarded and when they will ring at your telephone as usual). Disabling (turning off) the feature does not delete your list of callers who are blocked.
1. Type *60 or *80 in the number field and press Enter or the dial button. A voice prompt tells you whether Call Block is enabled or disabled and then gives the menu choices.
2. Press 1 to enable Call Block if it is disabled or to disable the feature if it is enabled.
Blocking Number of Last Call Received
1. Type *60 or *80 in the number field and press Enter or the dial button. A voice prompt tells you whether Call Block is enabled or disabled and then gives the menu choices.
2. Press 2 to add the number of the last call you received to the blocked list. You are returned to the Selective Call Forward menu.
3. Select a menu item or hang up.
NOTE: Adding a number this way does not affect any numbers already on your list, but simply adds the most recent caller to your blocked list.
Adding Numbers to Call Block List
1. Type *60 or *80 in the number field and press Enter or the dial button. A voice prompt tells you whether Call Block is enabled or disabled and then gives the menu choices.
2. Press 3 to add telephone numbers to the list of numbers that will be blocked.
3. Enter the number with no spaces, dashes or special characters followed by the # key.
4. Press # to save the entryor * to exit without saving.
5. Select a menu item or hang up.
Listing Blocked Numbers
1. Type *60 or *80 in the number field and press Enter or the dial button. A voice prompt tells you whether Call Block is enabled or disabled and then gives the menu choices.
2. Press 4 to hear the list of numbers which will be blocked. The voice prompt announces the list and the first number.
3. Press # to hear the next number or press * to return to the Call Block menu. As long as you press # for the next number, the system will scroll through the list of member numbers, starting over with the first number after the last number is spoken.
4. Repeat the previous two steps until you have heard as many of the numbers as you want.
5. Press * to return to the Call Block menu when you are finished listening to member numbers.
Deleting Numbers from Call Block
1. Type *60 or *80 in the number field and press Enter or the dial button. A voice prompt tells you whether Call Block is enabled or disabled and then gives the menu choices.
2. Press 5 to delete telephone numbers from the list of numbers which will be blocked.
3. The voice prompt provides options for deleting members including:
•
Press 1 if you know the number to delete; (see Step 4)•
Press 2 for a list of numbers; (see Step 8)•
Press 3 to delete all numbers; (see Step 14)•
Press * to return to the Call Block menu.4. Press 1 to remove a specific number.
•
Enter the number to delete with no spaces, dashes or special characters followed by the # key.The voice prompt repeats the number you just entered.
•
Press # to save the entry (delete it from your list) or press * to cancel the entry.•
Select a menu item or hang up.5. Press 2 to hear the list of numbers and have the option to delete them as you go through the list.
The voice prompt announces the list and the first number.
•
Press # until you find the number you wish to delete.•
Press 1 to delete the number, # to hear the next number or * to return to the Call Block menu.The number is deleted immediately and the next number in the list is announced.
•
Repeat the previous two steps until you have found and deleted as many of the numbers as you want.•
Press * to return to the Call Block menu or hang up6. Press 3 to immediately delete all member numbers.
The voice prompt announces that all phone numbers have been removed from the list and you are returned to the Call Block menu.
7. Select a menu item or hang up.
Call Forward (All Calls)
Call Forward (All Calls) allows you to forward all calls for your phone to the number you enter. Calls will not ring at your phone and will be sent to the number you entered as the forward destination. You can forward calls to an IP or non-IP phone. The LCD display on your phone will show that your phone is forwarded.
NOTE: If you have set up particular phone number as an “Urgent Call” using Call Screening in Web Portal, then the call will not be forwarded. However, any calls coming in that the caller has marked Urgent will be forwarded.
Calls forwarded to an external number that are unanswered will roll over to voice mail (if available) at that number. Calls forwarded to an internal number that are unanswered will roll over to voice mail for the called party (not the forwarding destination).
External forwarding must be supported by your system for external numbers to be accepted. Be sure to include the access code for an outside line and the area code, if necessary, with the external number. Up to 20 digits may be entered.
Enabling Call Forward (All)
1. Type 72* in the number field and press Enter or the dial button.
•
If you do not have a previously configured forward number, you will be instructed to enter a forwarding number followed by #.•
If you previously configured a forwarding number, you will be instructed to do one of the following:•
Enter 1 to enable forwarding. Go to step 7.•
Enter 2 to change the current forwarding number. Go to step 2.2. Enter the number to which you want to forward all your calls followed by #. Be sure to enter the number exactly as you would if you were to call that number. Include the area code, if necessary.
3. A prompt asks you to confirm the forwarding number by entering # or re-enter the forwarding number by pressing *.
4. If you entered *, return to step 2 or hang up.
5. If you entered #, you are offered the option to verify the forwarding number.
•
Enter 1 to verify the number you entered.•
Enter 2 to enable the number. Go to step 7.6. If you entered 1, the forwarding number is dialed.
•
Call is answered by a person: Explain your call, have them hang up, and then enter # to enable the forwarding number or * to exit without enabling forwarding.•
Call is not answered: Enter # to end the verification attempt. A prompt explains the call is not connected and asks you to enter # to enable the forwarding number or * to exit without enabling forwarding.•
Answering machine or voice mail answers: Enter # to escape. A prompt explains the call is not connected and asks you to enter # to enable the forwarding number or * to exit without enabling forwarding. Forwarding for all calls is enabled.Disabling Call Forward
(All)
1. Enter 73* in the number field.
2. Press Enter or the dial button.
Call forwarding (all) is disabled and the phone hangs up.
Call Forward (Busy)
Call Forward (Busy) allows you to forward calls arriving at your phone while it is busy to be forwarded to the number you enter. Calls will not ring at your phone and will be sent to the number entered as the forward destination.