NetIQ Cloud Manager 2.2.2
Installation Guide
Legal Notice
NetIQ Product Name is protected by United States Patent No(s): nnnnnnnn, nnnnnnnn, nnnnnnnn.
THIS DOCUMENT AND THE SOFTWARE DESCRIBED IN THIS DOCUMENT ARE FURNISHED UNDER AND ARE SUBJECT TO THE TERMS OF A LICENSE AGREEMENT OR A NON-DISCLOSURE AGREEMENT. EXCEPT AS EXPRESSLY SET FORTH IN SUCH LICENSE AGREEMENT OR NON-DISCLOSURE AGREEMENT, NETIQ CORPORATION PROVIDES THIS DOCUMENT AND THE SOFTWARE DESCRIBED IN THIS DOCUMENT "AS IS" WITHOUT WARRANTY OF ANY KIND, EITHER EXPRESS OR IMPLIED, INCLUDING, BUT NOT LIMITED TO, THE IMPLIED WARRANTIES OF MERCHANTABILITY OR FITNESS FOR A PARTICULAR PURPOSE. SOME STATES DO NOT ALLOW DISCLAIMERS OF EXPRESS OR IMPLIED WARRANTIES IN CERTAIN TRANSACTIONS; THEREFORE, THIS STATEMENT MAY NOT APPLY TO YOU.
For purposes of clarity, any module, adapter or other similar material ("Module") is licensed under the terms and conditions of the End User License Agreement for the applicable version of the NetIQ product or software to which it relates or
interoperates with, and by accessing, copying or using a Module you agree to be bound by such terms. If you do not agree to the terms of the End User License Agreement you are not authorized to use, access or copy a Module and you must destroy all copies of the Module and contact NetIQ for further instructions.
This document and the software described in this document may not be lent, sold, or given away without the prior written permission of NetIQ Corporation, except as otherwise permitted by law. Except as expressly set forth in such license agreement or non-disclosure agreement, no part of this document or the software described in this document may be reproduced, stored in a retrieval system, or transmitted in any form or by any means, electronic, mechanical, or otherwise, without the prior written consent of NetIQ Corporation. Some companies, names, and data in this document are used for illustration purposes and may not represent real companies, individuals, or data.
This document could include technical inaccuracies or typographical errors. Changes are periodically made to the information herein. These changes may be incorporated in new editions of this document. NetIQ Corporation may make improvements in or changes to the software described in this document at any time.
U.S. Government Restricted Rights: If the software and documentation are being acquired by or on behalf of the U.S. Government or by a U.S. Government prime contractor or subcontractor (at any tier), in accordance with 48 C.F.R. 227.7202-4 (for Department of Defense (DOD) acquisitions) and 48 C.F.R. 2.101 and 12.212 (for non-DOD acquisitions), the government’s rights in the software and documentation, including its rights to use, modify, reproduce, release, perform, display or disclose the software or documentation, will be subject in all respects to the commercial license rights and restrictions provided in the license agreement.
© 2013 NetIQ Corporation and its affiliates. All Rights Reserved.
Contents
About NetIQ Corporation 9
About this Book and the Library 11
Part I Preparing for Cloud Manager Installation 13
1 Installation Checklist 15
2 Cloud Manager System Requirements 19
2.1 Cloud Manager Licensing Requirements . . . 19
2.1.1 License Requirements During Installation . . . 19
2.1.2 Product Evaluation Terms and Procurement . . . 19
2.1.3 Upgrading the Server from a Trial License to a Purchased License . . . 20
2.2 Cloud Manager Orchestration Server Requirements . . . 20
2.2.1 Required Network Resources for the Cloud Manager Orchestration Server . . . 21
2.2.2 Required Network Resources for the Cloud Manager Orchestration Web Server. . . 22
2.3 Cloud Manager Orchestration Agent Requirements . . . 23
2.4 Cloud Manager Application Server Requirements . . . 23
2.5 Cloud Manager Application Console Requirements . . . 24
2.6 Requirements and Cloud Manager Support for the Virtual Environment . . . 26
2.6.1 RHEL 6 VM Support . . . 28
2.6.2 Requirements for Machines Designated as VM Hosts . . . 29
3 Choosing the Installation Packages and Where to Install Them 31 3.1 NetIQ Cloud Manager Installation Pattern . . . 31
3.2 Cloud Manager Orchestration Server Install Pattern . . . 32
3.3 Cloud Manager Monitoring Server Pattern. . . 33
3.4 Cloud Manager Orchestration Agent Pattern . . . . 34
3.5 Orchestration Console Install Pattern . . . 35
3.6 Monitoring Agent Install Pattern . . . 36
4 Orchestration Components Preinstallation Tasks 39 4.1 Gathering Certificate and License Information . . . 39
4.2 Preparing the Server When Multiple NICs and DNS Addresses Exist . . . 39
Part II Component Installation 41 5 Installing Cloud Manager Orchestration Components 43 5.1 SLES 11 Standard Installation . . . 44
5.2 Alternative Installation Methods for the Orchestration Agent . . . 45
5.2.1 Obtaining the Agent Installer and Supporting Files from the Administrator Information Page . . . . 46
5.2.2 Installing the Agent on Windows Machines . . . 47
5.2.5 Advanced Agent Installation Methods . . . 49
5.3 Alternative Installation Methods for the Orchestration Console and Clients . . . 52
5.3.1 Obtaining Installers from the Administrator Information Page . . . 52
5.3.2 Installing the Console and Clients on Windows . . . 53
5.3.3 Installing the Console and Clients on a SLES Server . . . 54
5.4 Alternative Installation Methods for the Cloud Manager Monitoring Agent . . . 55
5.4.1 Installing the Cloud Manager Monitoring Agent on Linux Servers . . . 55
5.4.2 Installing the Cloud Manager Monitoring Agent On Windows Machines . . . 56
6 Installing Cloud Manager Application Server Components 59 6.1 Installing to SLES 11 . . . 59
Part III Standard Cloud Manager Component Configuration 61 7 Configuring Cloud Manager Orchestration Components 63 7.1 Configuring the Orchestration Server. . . 64
7.2 Configuring the Monitoring Server and Monitoring Agent . . . 66
7.3 Configuring the Orchestration Agent . . . 66
7.4 Validating and Optimizing the Orchestration Installation . . . 68
8 Configuring Connections to the Cloud Manager Application Server 69 8.1 Enabling a Secure Connection. . . 69
8.1.1 Configuring the Cloud Manager Web Service Secure Port . . . 69
8.2 Enabling a Non-Secure Connection . . . 70
9 Launching the Orchestration Console and Logging in to the Orchestration Server 71 9.1 Launching the Orchestration Console . . . 71
9.2 Logging In Explicitly to a Named Server . . . 72
10 Creating a Resource Account 73 10.1 Opening the Resources Monitor . . . 74
10.2 Automatically Registering a Resource . . . 75
10.3 Selecting a Resource for Manual Registration . . . 75
10.4 Manually Registering a Resource in the Orchestration Console . . . 76
10.4.1 Using the Orchestration Console to Create a Resource Account . . . 76
10.4.2 Installing an Orchestration Agent to Match the New Resource . . . 77
11 Configuring Orchestration Provisioning Adapters 81 11.1 Configuring the vSphere Provisioning Adapter . . . 81
11.1.1 Configuring the vSphere Provisioning Adapter to Discover VMs. . . 81
11.1.2 Discovering Enterprise Resources in Multiple vSphere Environments . . . 92
11.2 Configuring the Citrix XenServer Provisioning Adapter . . . 96
11.2.1 Deploying the Citrix XenServer Provisioning Adapter . . . 96
11.2.2 Configuring the Citrix XenServer Updater . . . 98
11.2.3 Configuring Orchestrator for Personalization with XenServer . . . 99
11.2.4 Using Xen VNC Proxy to Establish a Remote Desktop Connection to XenServer VMs . . . 99
11.3.2 Configuring the Provisioning Adapter to Discover iSCSI Target Repositories. . . 103
11.3.3 Configuring the Provisioning Adapter for Sysprep . . . 103
11.3.4 Enabling a Remote Console Session for a Hyper-V VM . . . 103
11.3.5 Configuring Hyper-V Linux VMs to Enable Visibility of Added vDisks . . . 104
11.4 Configuring the SUSE Xen Provisioning Adapter . . . 104
11.4.1 Cloud Manager Orchestration Defaults in a SUSE Xen Cluster . . . 104
11.5 Configuring the KVM Provisioning Adapter . . . 108
11.5.1 Authentication Settings . . . 108
11.5.2 Debug Settings . . . 109
12 Configuring Sysprep or Autoprep 111 12.1 Understanding and Configuring Sysprep . . . 111
12.1.1 How Sysprep Works . . . . 112
12.1.2 Setting Sysprep Facts in the Orchestration Console . . . 112
12.1.3 Using the Sysprep deploy.cab Files . . . 120
12.1.4 Applying Sysprep Facts . . . . 122
12.1.5 Example Sysprep Scenarios . . . 123
12.1.6 Known Sysprep Limitations . . . 123
12.2 Understanding and Configuring Autoprep . . . 125
12.2.1 How Autoprep Works . . . . 125
12.2.2 Setting Autoprep Facts in the Orchestration Console . . . 126
12.2.3 Applying Autoprep Facts . . . . 129
12.2.4 Example Autoprep Scenarios . . . 129
12.2.5 Known Autoprep Limitations . . . 130
13 Using the Cloud Manager Application Server Configuration Tool 131 13.1 Configuring the PostgreSQL Database Connection and Credentials . . . 131
13.2 Configuring the PostgreSQL Database Connection and Credentials . . . 135
13.3 Configuring Cloud Manager to Use Authentication Sources . . . 138
13.3.1 Configuring Authentication to an LDAP Directory . . . 139
13.3.2 Configuring Authentication through an NCSS Director . . . 141
13.3.3 Configuring LDAP Plus NCSS Authentication . . . 143
13.3.4 Configuring Authentication to Novell Access Manager . . . 147
13.4 Installing and Configuring Other Cloud Manager Feature Settings . . . 148
13.4.1 Installing the Cloud Manager Application Console . . . 148
13.4.2 Configuring the Cloud Manager Web Server (Jetty) . . . 148
13.4.3 Configuring the Cloud Manager Web Server to Use SSL . . . 149
13.4.4 Configuring Cloud Manager SMTP Mail Settings . . . 150
13.4.5 Configuring Cloud Manager System Shell Login Information . . . 151
Part IV Advanced Installation and Integration Topics 153 14 Preparing the Cloud Manager Orchestration Server for SUSE High Availability Support 155 14.1 Overview . . . 155
14.2 Orchestration Server Failover Behaviors . . . 156
14.2.1 Use Case 1: Orchestration Server Failover . . . 156
14.2.2 Use Case 2: VM Builder Behavior at Orchestration Server Failover and Failback . . . 157
14.2.3 Use Case 3: Monitoring Behavior at Orchestration Server Failover and Failback. . . 157
14.3 Installing the Orchestration Server to a SLES 11 Pacemaker Cluster Environment . . . 157
14.3.1 Meeting the Prerequisites . . . . 158
14.3.2 Installing the SLES 11 SP2 High Availability Pattern. . . 159 14.3.3 Configuring SLES 11 Nodes with Time Synchronization and Installing Pacemaker to
14.3.4 Setting Up OCFS2 on SLES 11 SP2 . . . 161
14.3.5 Installing the Orchestration Server on the First Clustered SLES 11 Node . . . 162
14.4 Configuring the Orchestration Server for High Availability . . . 163
14.4.1 Some Considerations When Configuring with the GUI Wizard . . . 164
14.4.2 The Configuration Procedure. . . 164
14.4.3 Checking the Configuration . . . 166
14.4.4 Running the High Availability Configuration Script . . . 167
14.5 Installing and Configuring Orchestration Server Packages for High Availability on Other Nodes in the Cluster. . . 167
14.6 Creating the Server Cluster Resource Group . . . 167
14.7 Testing the Failover of the Orchestration Server in a High Availability Grid. . . 168
14.8 Installing and Configuring other Orchestration Components to the High Availability Grid . . . 168
14.9 High Availability Best Practices . . . 169
14.9.1 Jobs Using scheduleSweep() Might Need a Start Constraint . . . 169
15 Installing and Configuring the Orchestration Agent for Xen VM Deployment in a SLES HAE Cluster 171 15.1 Xen Cluster Architecture . . . 171
15.2 Installing the Orchestration Agent in a SLES 11 SP1 HAE Xen Cluster . . . 172
15.3 Configuring the Orchestration Agent in a SLES 11 SP2 HAE Xen Cluster . . . 173
15.3.1 Configuring the Agent for the Cluster . . . 173
15.3.2 Creating the Agent Cluster Resource Group . . . 175
15.3.3 Removing the Orchestration Agent from a Clustered VM Host . . . 176
15.4 Sample Orchestration Agent CIB XML. . . 176
16 Configuring the Orchestration Server to Use an Audit Database 179 16.1 Installing the PostgreSQL Package and Dependencies on an Independent Host . . . 179
16.1.1 Detail . . . 180
16.2 Configuring PostgreSQL to Accept Remote Database Connections . . . 181
16.3 Logging in Locally to the PostgreSQL Database . . . 182
16.4 Creating an Orchestration Server User for the PostgreSQL Database . . . 182
16.5 Configuring the Orchestration Server Audit Database on a Separate Host . . . 182
16.6 Installing and Configuring the Orchestration Server for Use with a Local PostgreSQL Audit Database . . . 184
16.6.1 Installing the PostgreSQL Package and Dependencies . . . 184
16.6.2 Configuring PostgreSQL to Accept Local Database Connections . . . 185
16.6.3 Logging in Locally to the PostgreSQL Database . . . 185
16.6.4 Installing and Configuring the Local Orchestration Server Audit Database . . . 185
16.7 Configuring the Audit Database after the Cloud Manager Orchestration Server Is Configured . . . . 187
16.8 Configuring the Remote Audit Database after the Cloud Manager Orchestration Server Is Configured . . . 188
16.9 Modifying Audit Database Tables to Accommodate Long Names . . . 189
16.10 Understanding Grid ID Usage in the Audit Database. . . 189
17 Integrating the Orchestration Server with a Sentinel Collector 191 17.1 Integration Architecture . . . 191
17.2 System Requirements . . . 192
17.3 Importing and Deploying the Orchestration Server Sentinel Collector Plug-in. . . 193
17.4 Connecting the Orchestration Server to the Sentinel Collector Plug-In . . . 195
17.5 Verifying the Sentinel Configuration After Connecting to the Orchestration Server . . . 195
18 Configuring Secure Authentication Sources to Communicate with Cloud
Manager 201
18.1 Configuring Novell Access Manager to Work with Cloud Manager . . . 201
18.1.1 Managing a Reverse Proxy for Authentication to Cloud Manager . . . 201
Part V Upgrading 209 19 Orchestration Components Upgrade Overview 211 19.1 Basic Functions of the Orchestration Components Upgrade . . . 211
19.2 Cloud Manager Orchestration Components That Are Not Upgraded. . . 212
20 Upgrading Cloud Manager Orchestration Components 215 20.1 Upgrading Orchestration Components. . . 215
20.1.1 Backing Up the Orchestration Components Prior to Upgrading . . . 216
20.1.2 Backing Up the Application Components Prior to Upgrading . . . 216
20.1.3 Checking the Current Version of Cloud Manager Orchestration Components . . . 217
20.1.4 Snapshotting the Existing Orchestration Server Installation . . . 217
20.1.5 Upgrading the Orchestration Packages . . . 218
20.1.6 Checking the Upgraded Version of the Orchestration Components . . . 221
20.1.7 Configuring the Upgraded Packages . . . 221
20.1.8 Manually Configuring the Remote Audit Database after Orchestration Components Are Upgraded . . . 225
20.1.9 Upgrading the XenServer Provisioning Adapter . . . 226
20.1.10 Running Discovery on VM Hosts and Images . . . 226
20.2 Alternate Methods for Upgrading Older Agents and Clients . . . 227
20.2.1 Automatically Upgrading the Orchestration Agent from the Cloud Manager Orchestration Console . . . 227
20.2.2 Using the ISO to Upgrade the Orchestration Agent on Red Hat Enterprise Linux 5 Machines . . . 228
20.2.3 Using the ISO to Upgrade the Old Orchestration Agent or the Orchestration Clients on Windows Machines . . . 228
20.2.4 Using the Administrator Information Page to Upgrade the Agents and Clients . . . 229
20.3 Running the Upgrade Configuration on an Enterprise Scale . . . 229
20.4 Upgrading a Cloud Manager Orchestration High Availability Configuration. . . 229
21 Upgrading the Cloud Manager Application Server Components 231 21.1 Backing Up the PostgreSQL Database . . . 231
21.2 Performing a Complete Cloud Manager System Backup. . . 232
21.3 Running the Cloud Manager Configuration Script . . . 232
21.3.1 Using the Configurator Tool to Update Resource Pool Data on the Cloud Manager Application Server . . . 233
21.4 Restoring Cloud Manager In the Event of a System Failure . . . 233
A Compatibility Checking Behavior for Orchestration Components 235 A.1 If the Orchestration Server Is Not Compatible with the Orchestration Console . . . 235
A.2 When an Agent Version Does Not Match the Server Version . . . 236
B How to Recover from a Failed Orchestration Server Upgrade 239 B.1 Upgrade Failure Scenarios . . . 239
B.2 Restoring the Orchestration Server If the Upgrade Fails . . . 240 B.2.1 Requirements . . . 240 B.2.2 Rollback Procedure Using the rug Command . . . 240
Part VI Uninstalling 245
22 Uninstalling Orchestration Component Patterns from a SLES Server 247
About NetIQ Corporation
NetIQ, an Attachmate business, is a global leader in systems and security management. With more than 12,000 customers in over 60 countries, NetIQ solutions maximize technology investments and enable IT process improvements to achieve measurable cost savings. The company’s portfolio includes award-winning management products for IT Process Automation, Systems Management, Security Management, Configuration Audit and Control, Enterprise Administration, and Unified Communications Management. For more information, please visit www.netiq.com.
Contacting Sales Support
For questions about products, pricing, and capabilities, please contact your local partner. If you cannot contact your partner, please contact our Sales Support team.
Contacting Technical Support
For specific product issues, please contact our Technical Support team.
Contacting Documentation Support
Our goal is to provide documentation that meets your needs. If you have suggestions for improvements, click Add Comment at the bottom of any page in the HTML versions of the documentation posted at www.netiq.com/documentation. You can also email [email protected]. We value your input and look forward to hearing from you.
Worldwide: www.netiq.com/about_netiq/officelocations.asp
United States and Canada: 888-323-6768
Email: [email protected]
Web Site: www.netiq.com
Worldwide: www.netiq.com/Support/contactinfo.asp
North and South America: 1-713-418-5555
Europe, Middle East, and Africa: +353 (0) 91-782 677
Email: [email protected]
Contacting the Online User Community
Qmunity, the NetIQ online community, is a collaborative network connecting you to your peers and NetIQ experts. By providing more immediate information, useful links to helpful resources, and access to NetIQ experts, Qmunity helps ensure you are mastering the knowledge you need to realize the full potential of IT investments upon which you rely. For more information, please visit http:// community.netiq.com.
About this Book and the Library
The Installation Guide provides information about planning and installing the NetIQ Cloud Manager components. This section includes the following information:
Part I, “Preparing for Cloud Manager Installation,” on page 13 Part II, “Component Installation,” on page 41
Part III, “Standard Cloud Manager Component Configuration,” on page 61 Part IV, “Advanced Installation and Integration Topics,” on page 153 Part V, “Upgrading,” on page 209
Part VI, “Uninstalling,” on page 245 Chapter 23, “What’s Next?,” on page 249
Intended Audience
This book provides information for individuals responsible for understanding administration concepts and implementing a secure, distributed administration model.
Other Information in the Library
The library provides the following information resources: Product OverviewProvides information about the NetIQ Cloud Manager product features, functionality, and concepts.
Installation Guide
Provides detailed planning and installation information. Procedures Guide
Provides step-by-step guidance for many administration tasks. Reference Guide
I
IPreparing for Cloud Manager
Installation
The information in this section can help you prepare your data center for the NetIQ Cloud Manager installation.
Chapter 1, “Installation Checklist,” on page 15
Chapter 2, “Cloud Manager System Requirements,” on page 19
Chapter 3, “Choosing the Installation Packages and Where to Install Them,” on page 31 Chapter 4, “Orchestration Components Preinstallation Tasks,” on page 39
1
1Installation Checklist
To ensure that you successfully install and configure NetIQ Cloud Manager, you should follow the installation checklist provided below. Each task provides brief information and a reference to where you can find more complete details.
Task Details
Review Cloud Manager concepts and terminology
NetIQ Cloud Manager includes functionality and components you need to understand to successfully install, configure, maintain, and use the product. Cloud Manager also interacts with other products such as hypervisors and directory services.
If you are not already familiar with Novell Cloud Manager concepts and its interaction with these other products, see the NetIQ Cloud Manager 2.2.2 Product Overview.
Virtualize your physical datacenter
If you have not already applied a virtualization infrastructure to your physical datacenter, you need to implement a hypervisor technology. NetIQ Cloud Manager supports SUSE Linux Xen, Citrix Xen, VMware vSphere (vCenter), and Microsoft Hyper-V hypervisorsand the Amazon EC2 virtual environment.
Review the supported Cloud Manager environments and software installation requirements
See Chapter 2, “Cloud Manager System Requirements,” on page 19 and
Chapter 2.6, “Requirements and Cloud Manager Support for the Virtual Environment,” on page 26.
Prepare for Orchestration components installation.
Some security certificate and licensing tasks must take place before you begin installing Orchestration components.
See Chapter 4, “Orchestration Components Preinstallation Tasks,” on page 39.
Install the Cloud Manager Orchestration Server, the Orchestration Console, and the Orchestration Agent
The Cloud Manager Orchestration Server communicates with its Orchestration Agents. These agents establish communication with your virtualization infrastructure (hypervisor technology). With this link in place, the Cloud Manager Orchestration Server utilizes specialized provisioning adapter jobs to automate the provisioning, management, and
deprovisioning of virtual machines.
There are some alternative methods you can use for installing these components. See Chapter 5, “Installing Cloud Manager Orchestration Components,” on page 43.
Configure the Cloud Manager Orchestration components
Although you could install the Cloud Manager Application components while you have the installation media mounted on the SUSE server, it’s not likely that Application and Orchestration components will be installed on the same server. For this reason, you should configure the packages you have installed for the Orchestration components. These configuration tasks include:
configuring the Orchestration Server
configuring the Orchestration Agent
creating a resource account in the Orchestration Console
getting provisioning adapters running for VM discovery
configuring the Orchestration Web service to connect to the Cloud Manager Application Server
See Chapter 7, “Configuring Cloud Manager Orchestration Components,” on page 63, Chapter 10, “Creating a Resource Account,” on page 73,
Chapter 11, “Configuring Orchestration Provisioning Adapters,” on page 81, and Chapter 8, “Configuring Connections to the Cloud Manager Application Server,” on page 69.
NOTE: Although you might not need some of the advanced functionality in Orchestration components, you might be interested in the advanced configuration tasks detailed in Section 5.2, “Alternative Installation Methods for the Orchestration Agent,” on page 45 and in Section 5.3, “Alternative Installation Methods for the Orchestration Console and Clients,” on page 52.
Prepare for Cloud Manager installation
Before installing and configuring Cloud Manager, you need to prepare a remote database for storing Cloud Manager data. See Chapter 13.1, “Configuring the PostgreSQL Database Connection and Credentials,” on page 131.
You also need to decide which method you want to use to authenticate your users in the Cloud Manager system. The authentication method you use depends on the external authentication source or sources you have already implemented in your data center environment. The sources supported by NetIQ Cloud Manager include:
LDAP (Active Directory or eDirectory)
Novell Cloud Security Services (NCSS)
LDAP and NCSS combined
Novell Access Manager (NAM)
There are required tasks you need to perform and information you need to gather for to prepare your chosen authentication source to support Cloud Manager authentication and configuration.
See Chapter 13, “Using the Cloud Manager Application Server Configuration Tool,” on page 131.
After you have completed the installation and configuration of both the Orchestration components and the Cloud Manager system, continue with “Setting Up the Cloud Environment” in the NetIQ Cloud Manager 2.2.2 Procedures Guide to start populating your Cloud Manager Application Server and Application Console with components to enable users to provision their own business services.
Install the Cloud Manager Application Server and its console.
The Cloud Manager Application Server provides the interface through which users request virtual resources. Requests are communicated to the Orchestration Server, which performs the required virtualization
operations in conjunction with your hypervisor technology. See Chapter 6, “Installing Cloud Manager Application Server Components,” on page 59.
Configure the Cloud Manager system
After installation, you must complete several configuration tasks before Cloud Manager can be used, including
configuring the Cloud Manager Application Server authentication source connections
configuring the Cloud Manager Application Server database connection
See Chapter 13, “Using the Cloud Manager Application Server Configuration Tool,” on page 131.
2
2Cloud Manager System Requirements
Before you begin installing the NetIQ Cloud Manager, you need to compare your system resources with the requirements of the product. This section includes information to help you with that evaluation so that you can adequately plan for the installation. The following subsections are included:
Section 2.1, “Cloud Manager Licensing Requirements,” on page 19
Section 2.2, “Cloud Manager Orchestration Server Requirements,” on page 20 Section 2.3, “Cloud Manager Orchestration Agent Requirements,” on page 23 Section 2.4, “Cloud Manager Application Server Requirements,” on page 23 Section 2.5, “Cloud Manager Application Console Requirements,” on page 24
Section 2.6, “Requirements and Cloud Manager Support for the Virtual Environment,” on page 26
2.1
Cloud Manager Licensing Requirements
NetIQ Cloud Manager requires any installation of its Orchestration Server to be licensed. None of the Cloud Manager components functions properly without a licensed server installation.
2.1.1
License Requirements During Installation
The Cloud Manager Orchestration Server is normally the first component of the product to be installed. During the configuration of the downloaded server package, you are required to provide a path to a license file.
This file can be either a trial key (evaluation) license or a license you purchase from NetIQ. The installation configuration cannot proceed without the license.
2.1.2
Product Evaluation Terms and Procurement
You can download and evaluate NetIQ Cloud Manager without a purchased product license for 90 days. After 90 days, you must purchase a license or discontinue use of the product.
To initiate the evaluation:
1 Contact an authorized NetIQ Sales representative at 800-529-3400, or submit a product evaluation request at the How to Buy NetIQ Cloud Manager (https://wwwtest.netiq.com/ products/cloud-manager/how-to-buy/) Web page.
Your representative will send you a link to the Cloud Manager product download page at the Novell Customer Center.
2 On the product download page, click Get Trial Key to link to the Product Evaluation Activation page.
3 On the Product Evaluation Activation page, select My Products > Products to open the Products page.
4 On the Products page, select Novell Cloud Manager to expand that product list.
5 In the Cloud Manager 2.1 product line, click Go To to open the Product Subscription Information page in the Novell Customer Center.
6 In the Downloads section of the page, select License to open the Download page for the trial key.
7 Download the trial key file (trial_keys_3.x_7003_8002-exp-05-01-2013_(xx).txt) to a location that you can access during the Cloud Manager installation.
After you have obtained the trial key, you can download the product from the Novell Customer Center link sent to you.
For installation and configuration information, see the NetIQ Cloud Manager 2.x documentation (http://www.novell.com/documentation/cloudmanager2/) Web site.
2.1.3
Upgrading the Server from a Trial License to a Purchased License
If you are operating the Cloud Manager Orchestration Server with a trial license key, use the following steps to upgrade to a license key you purchased from NetIQ:
1 Stop the Orchestration Server.
(/etc/init.d/netiq-cmosserver stop
2 Copy the purchased license file (key.txt) to the /opt/novell/zenworks/zos/server/license
directory. You overwrite an older license file in this process.
3 Start the Orchestration Server.
(/etc/init.d/netiq-cmosserver start
2.2
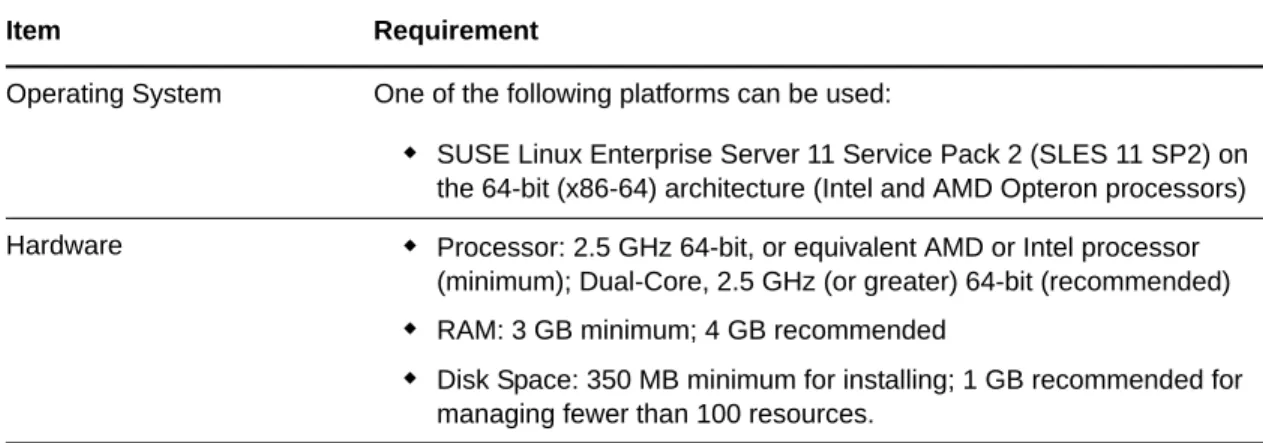
Cloud Manager Orchestration Server Requirements
The network machine where you install Cloud Manager Server software must meet the following requirements:
Table 2-1 Orchestration Server Requirements
Item Requirement
Operating System One of the following platforms can be used:
SUSE Linux Enterprise Server 11 Service Pack 2 (SLES 11 SP2) on the 64-bit (x86-64) architecture (Intel and AMD Opteron processors) Hardware Processor: 2.5 GHz 64-bit, or equivalent AMD or Intel processor
(minimum); Dual-Core, 2.5 GHz (or greater) 64-bit (recommended)
RAM: 3 GB minimum; 4 GB recommended
Disk Space: 350 MB minimum for installing; 1 GB recommended for managing fewer than 100 resources.
Other important requirements you might need to know about the Orchestration Server are included in the following sections:
Section 2.2.1, “Required Network Resources for the Cloud Manager Orchestration Server,” on page 21
Section 2.2.2, “Required Network Resources for the Cloud Manager Orchestration Web Server,” on page 22
2.2.1
Required Network Resources for the Cloud Manager Orchestration
Server
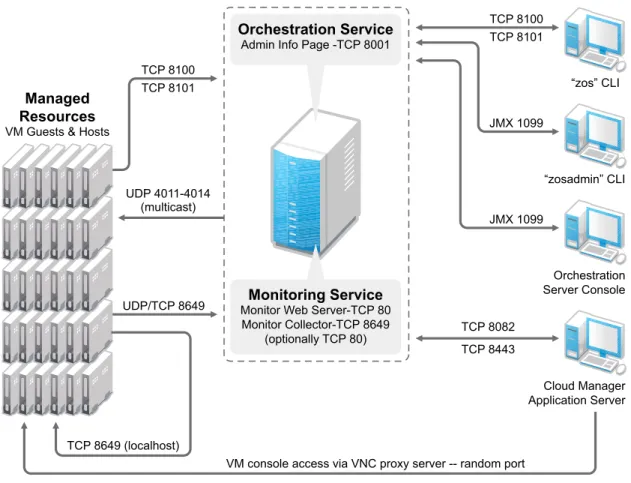
The Orchestration Server must allow traffic on TCP ports 80, 8001, 8100, 8101 (these four ports are configurable), and UDP and TCP port 1099 (mandatory).
Port 8001 is used for communication with the Administrator Information page.
Port 8100 is used with a custom protocol for communication with the Orchestration Agent and for invoking the zos command line interface or opening the Java Developer’s toolkit.
Port 8101 is also used for invoking the zos command line interface or opening the Java Developer’s toolkit by using TLS.
Port 1099 is used with RMI for invoking the zosadmin command line interface or for running the Orchestration Console.
Monitored systems (physical and virtual) send metrics to the Monitoring Server on UDP port 8649. The Monitoring Server is installed on the same system as the Cloud Manager Orchestration Server. Connections to VM consoles are accommodated through a VNC client. Typically, this means TCP port 1000 for the first VM on a VM host, 1001 for the second, and so on. These connections go to the VM host, exposing the console on behalf of the VM.
Datagrid multicast file transfers use UDP ports 4011-4014. UDP port 4000 is used as a datagrid multicast request port and a control channel port. Multicast groups for datagrid multicast-based file transfers are 239.192.10.10-14.
The following illustration shows these relationships:
Hostname Resolution The server must resolve device hostnames by using a method such as DNS (recommended).
IP Address The server must have a static IP address or a permanently leased DHCP address.
Figure 2-1 Required Network Resources for the Cloud Manager Orchestration Server
2.2.2
Required Network Resources for the Cloud Manager Orchestration
Web Server
The Cloud Manager Orchestration Web Service exposes a RESTful interface used by the Cloud Manager Application Server to communicate with the Cloud Manager Orchestration Server through ports 8082 and 8443.
Orchestration Service
Admin Info Page -TCP 8001
Managed Resources
VM Guests & Hosts
Monitoring Service
Monitor Web Server-TCP 80 Monitor Collector-TCP 8649
(optionally TCP 80)
TCP 8100
JMX 1099
JMX 1099 TCP 8101
“zos” CLI
“zosadmin” CLI
Orchestration Server Console
Cloud Manager Application Server TCP 8443
TCP 8082 TCP 8100
TCP 8101
UDP 4011-4014 (multicast)
UDP/TCP 8649
TCP 8649 (localhost)
2.3
Cloud Manager Orchestration Agent Requirements
The physical or virtual machine where you install the Orchestration Agent must meet the following minimum requirements:
Table 2-2 Orchestration Agent Requirements
If you are installing the agent to a vSphere environment, you can install the agent either locally on the vCenter Server (the vCenter appliance is not supported), or on a dedicated system (virtual or physical) as long as the OS in that system is supported for the Orchestration Agent.
2.4
Cloud Manager Application Server Requirements
The Cloud Manager Application Server requires the following:
Item Requirement
Operating System Linux machines:
SUSE Linux Enterprise Server 10 SP4 (64-bit)
SUSE Linux Enterprise Server 11 SP2 (64-bit)
Red Hat Enterprise Linux 5 (latest update, 64-bit)
Red Hat Enterprise Linux 6 (latest update, 64-bit) Windows machines:
Windows Server 2003 (latest SP, 64-bit)
Windows Server 2003 R2 (latest SP, 64-bit)
Windows Server 2008 R2 SP1 (64-bit)
Windows Server 2008 R2 (latest SP, 64-bit)
Windows Server 2008 R2 (latest SP, with HyperV role, 64-bit) Hardware The Orchestration Agent does not require a minimum hardware
configuration other than a minimum recommended disk space of 100 MB. TCP Ports The computing node communicates with the Orchestration Server over a custom protocol. The server listens for the agent on port 8100 and 8101 (port 8101 is for secure agent connections). Network firewalls need to allow outgoing agent connections to these ports on the server.
Item Requirement
Operating System Any of the following:
SLES 11 SP2 (64-bit): SUSE Linux Enterprise Server 11 Service Pack 2 on the 64-bit (x86-64) architecture (Intel and AMD Opteron processors)
2.5
Cloud Manager Application Console Requirements
The Cloud Manager Application Console is a Web-based application that requires the following:
Hardware If the Cloud Manager Application Server is the only application, the following are minimum requirements:
Xeon dual-core or higher
20 GB disk space
4 GB RAM
If the Cloud Manager Application Server and Cloud Manager Orchestration Server are on the same server, the following are minimum requirements:
4 Pentium-class CPU cores
40 GB disk space
4 GB RAM
Database PostgreSQL (included with SLES)
TCP Ports The following ports are used by the Cloud Manager Application Server. The ports (or their substitutes if not using the defaults) must be open for both inbound and outbound communication:
8061 - ESB HTTP port
8102 - Karaf SSH port
8181 - Karaf Management Console port
8182 - Jetty HTTP default port
8183 - Jetty HTTPS default port
10990 - RMI Registry port
61613 - Active MQ Stomp port
61616 - Active MQ Openwire port
VNC Ports By default, a VNC proxy port is chosen at random, however the port can be set by the Cloud Administrator in the Configuration page of the Cloud Manager Web Console. There is also an option for an external proxy to offload the traffic from the Cloud Manager Application Server.
For more information, see “Configuring Remote Console Access to Workloads” in the NetIQ Cloud Manager 2.2.2 Procedures Guide. LDAP Directory Service The Cloud Manager Application Server authenticates users by using an
LDAP directory. The directory must be either of the following:
Microsoft Active Directory
Novell eDirectory
Item Requirement
Web Browser Any of the following:
Internet Explorer 9.0 and later: Supported on Windows 7 (64-bit)
Mozilla Firefox 7.x and later: Supported on Windows 7 (64-bit)
Safari 5 and later: Supported on Windows 7 (PC,64-bit)
Display Resolution The minimum requirement is 1024 x 768 with the browser in Full Screen mode (F11)
Pop-Up Blocker Allow pop-ups from the Cloud Manager Application Server to enable the Help system
2.6
Requirements and Cloud Manager Support for the Virtual
Environment
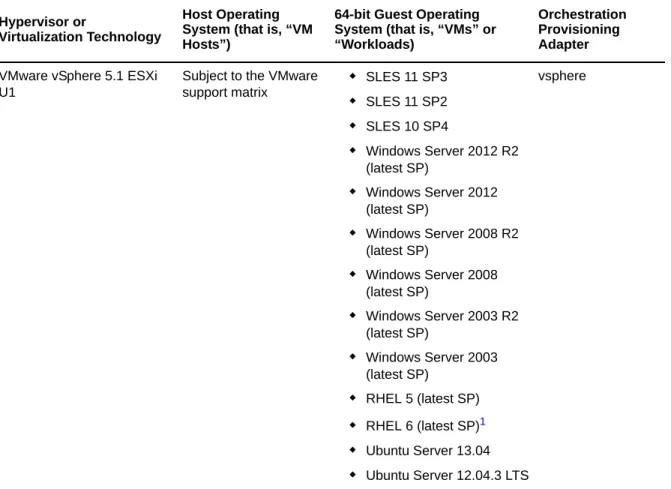
The following table lists the virtual machine technologies or hypervisors, the host operating system for these technologies, the guest operating systems (also known as virtual machines (VMs) or “workloads”) supported by these technologies, and the provisioning adapter job available in the Cloud Manager Orchestration Server that is used to provision and manage the life cycle of the VMs. More information about RHEL 6 VM support in Cloud Manager is also provided in this section. For more detail about the life cycle management capabilities of Cloud Manager Orchestration, see Chapter 11, “Configuring Orchestration Provisioning Adapters,” on page 81.
Table 2-3 VM Technologies with Supported Host Operating Systems, Guest Operating System, and Provisioning Adapter
Hypervisor or
Virtualization Technology
Host Operating System (that is, “VM Hosts”)
64-bit Guest Operating System (that is, “VMs” or “Workloads)
Orchestration Provisioning Adapter
VMware vSphere 5.1 ESXi U1
Subject to the VMware support matrix
SLES 11 SP3
SLES 11 SP2
SLES 10 SP4
Windows Server 2012 R2 (latest SP)
Windows Server 2012 (latest SP)
Windows Server 2008 R2 (latest SP)
Windows Server 2008 (latest SP)
Windows Server 2003 R2 (latest SP)
Windows Server 2003 (latest SP)
RHEL 5 (latest SP)
RHEL 6 (latest SP)1
Ubuntu Server 13.04
Ubuntu Server 12.04.3 LTS
VMware vSphere 5.0 ESXi U2
Subject to the VMware support matrix
SLES 11 SP3
SLES 11 SP2
SLES 10 SP4
Windows Server 2012 R2 (latest SP)
Windows Server 2012 (latest SP)
Windows Server 2008 R2 (latest SP)
Windows Server 2008 (latest SP)
Windows Server 2003 R2 (latest SP)
Windows Server 2003 (latest SP)
RHEL 5 (latest SP)
RHEL 6 (latest SP)1
Ubuntu Server 13.04
Ubuntu Server 12.04.3 LTS
vsphere
Citrix XenServer 6.1 Free Edition
Citrix XenServer SLES 11 (latest SP)
RHEL 6 (latest SP)
CentOS 6
Windows Server 2003 R2 (latest SP)
Windows Server 2008 R2 (latest SP)
xenserv
Citrix XenServer 6.1 Enterprise Edition
Citrix XenServer SLES 11 (latest SP)
RHEL 6 (latest SP)
CentOS 6
Windows Server 2003 R2 (latest SP)
Windows Server 2008 R2 (latest SP)
xenserv
Microsoft Hyper-V4 Windows Server 2008 R2 with Hyper-V enabled
SLES 11 (latest SP)
RHEL 6
CentOS 6
Windows Server 2003 R2 (latest SP)
Windows Server 2008 R2 (latest SP)
hyperv
Hypervisor or
Virtualization Technology
Host Operating System (that is, “VM Hosts”)
64-bit Guest Operating System (that is, “VMs” or “Workloads)
Orchestration Provisioning Adapter
1For more information about RHEL 6 VM support, see RHEL 6 VM Support, below.
2Windows VMs running on the Xen hypervisor require a VM host CPU with the Intel VT or AMD-V technology available and enabled.
4A complete listing of guest OS support for the Hyper-V hypervisor is available at the Microsoft TechNet Web site (http://technet.microsoft.com/en-us/library/cc794868(WS.10).aspx) and at the Windows Server 2008 Hyper-V product page (http://www.microsoft.com/windowsserver2008/en/us/ hyperv-supported-guest-os.aspx). This matrix shows only those guest OS’s supported by Cloud Manager.
2.6.1
RHEL 6 VM Support
You need to be aware of the following limitations of Red Hat Enterprise Linux 6 VMs in the NetIQ Cloud Manager environment:
Although RHEL uses LVM partitioning by default, we recommend that you do not use it. You need to change the partitioning method manually.
SLES 11 hosts can mount the ext4 file system if you load the proper kernel module on the host. You can do this by entering the following command at the command line of the SLES 11 host:
modprobe –allow-unsupported ext4
To allow the ext4 module to be loaded at boot time:
1. Edit the /etc/modprobe.d/unsupported-modules file and set
allow_unsupported_modules to 1.
2. Edit /etc/sysconfig/kernel and add ext4 to the MODULES_LOADED_ON_BOOT variable. These procedures work only on SLES 11 kernel, not the SLES 10 kernel.
Making these changes could make the system unavailable for support. The unsupported-modules text file states:
“Every kernel module has a ‘supported’ flag. If this flag is not set, loading this module taints your kernel. You will not get much help with a kernel problem if your kernel is marked as tainted. In this case you firstly have to avoid loading of unsupported modules.”
SUSE Xen 4.0 SLES 11 (latest SP) SLES 11 (latest SP)
RHEL 6 (latest SP)1
Windows Server 2003 R2 (latest SP)2
Windows Server 2008 R2 (latest SP)2
xen
Kernel-based Virtual Machine for Linux (KVM)
SLES 11 SP1 or SP2 running libvirt 0.7.6 or greater
Subject to the published KVM support matrix (http://www.linux-kvm.org/page/ Guest_Support_Status) kvm Hypervisor or Virtualization Technology Host Operating System (that is, “VM Hosts”)
64-bit Guest Operating System (that is, “VMs” or “Workloads)
Orchestration Provisioning Adapter
Discovered RHEL 6 VMs show appropriate fact values. For example, the value for the
resource.os.type fact is rhel6. The value for resource.os.vendor.string is Red Hat
Enterprise Linux Server release 6.0 (Santiago) and the value for
resource.os.vendor.version is 6.
RHEL 6 uses the udev service, which testing has shown renames the network interfaces on a cloned VM and causes configuration errors. To turn of the udev service so that network configuration can work with personalization,
1 In the file structure of the template VM, open the /etc/udev/rules.d/70-persistent-net.rules file and remove all its lines.
2 In the file structure of the template VM, open the /lib/udev/write_net_rules file and comment (that is, add a # sign preceding the code) the line that looks similar to this:
write_rule "$match" "$INTERFACE" "$COMMENT"
NOTE: Editing the template VM files assures that all its clones will work properly.
2.6.2
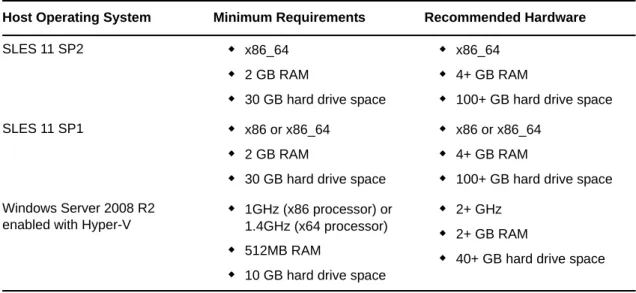
Requirements for Machines Designated as VM Hosts
We recommend that computers designated as VM hosts in your data center be able to host the VM and run it according to designated parameters of the specific VM. The processor architecture must match the designated VM’s processor in architecture, although not in version number. In order for a machine to serve as a host machine, it must also have a hypervisor installed along with the operating system.
Table 2-4 Minimum and Recommended Hardware Requirements for VM Host Machines
Host Operating System Minimum Requirements Recommended Hardware
SLES 11 SP2 x86_64
2 GB RAM
30 GB hard drive space
x86_64
4+ GB RAM
100+ GB hard drive space SLES 11 SP1 x86 or x86_64
2 GB RAM
30 GB hard drive space
x86 or x86_64
4+ GB RAM
100+ GB hard drive space Windows Server 2008 R2
enabled with Hyper-V
1GHz (x86 processor) or 1.4GHz (x64 processor)
512MB RAM
10 GB hard drive space
2+ GHz
2+ GB RAM
3
3Choosing the Installation Packages and
Where to Install Them
NetIQ Cloud Manager is comprised of a number of different RPMs that are bundled in different installation patterns, all of which are available on the installation media you download from Novell (http://download.novell.com), an Attachmate Group associate of NetIQ. Your NetIQ sales
representative provides the URL to the media download site, along with the license key you purchased.
NOTE: If you install or configure Cloud Manager components by using a trial key, the product behaves normally for 90 days, although the trial key controls the number of users and managed nodes you can configure. For fully supported functionality, product components require a purchased license key. Contact your NetIQ Sales Representative or a Certified NetIQ Partner for purchase information.
The RPMs in the install patterns must be installed to a supported version of SUSE Linux Enterprise Server (SLES) 11. The installation uses the Add-On Products utility that is available in SUSE’s YaST program.
After the initial installation and configuration, installers for some Cloud Manager Orchestration components for other operating systems become available in the Orchestration filesystem.
You can install the Cloud Manager component patterns on machines in your data center according to your own criteria. The information in this section can help you decide which Cloud Manager patterns you want to install and the machines in your data center where you want to install them.
Section 3.1, “NetIQ Cloud Manager Installation Pattern,” on page 31
Section 3.2, “Cloud Manager Orchestration Server Install Pattern,” on page 32 Section 3.3, “Cloud Manager Monitoring Server Pattern,” on page 33
Section 3.4, “Cloud Manager Orchestration Agent Pattern,” on page 34 Section 3.5, “Orchestration Console Install Pattern,” on page 35 Section 3.6, “Monitoring Agent Install Pattern,” on page 36
3.1
NetIQ Cloud Manager Installation Pattern
Description: The NetIQ Cloud Manager installation pattern consists of packages for the Cloud Manager Application Server and its Web console. This server communicates with Cloud Manager Orchestration Servers to provide instructions for provisioning, managing, and removing workloads. It also performs user authentication with the LDAP server or Novell Cloud Security Services.
The server requires initial configuration after installation to establish authentication with LDAP, NetIQ Cloud Security Services, or NetIQ Access Manager. The configuration also establishes communication with the Cloud Manager Orchestration Server and its console.
Packages in the Pattern: The table below lists the RPMs in the NetIQ Cloud Manager pattern.
Table 3-1 NetIQ Cloud Manager Packages
When you select the NetIQ Cloud Manager pattern, the netiq-cloudmanager and the postgresql-server packages are selected by default. Although you would typically install Cloud Manager to use an external PostgreSQl database, selecting the postgresql-server package lets you install Cloud Manager to an embedded PostgreSQL server.
You can obtain more information about these patterns and packages in the YaST utility when you have mounted the product ISO.
Installation recommendations: Your server might be capable of handling tasks in addition to its Cloud Manager tasks. However, we strongly recommend that you install the Cloud Manager Server software on a dedicated server to ensure optimal performance. For example, you might not want the same server to host the Cloud Manager Orchestration Server or Novell eDirectory.
Although not mandatory, we recommend that you install and configure the Orchestration Server before you install and configure the application components.
3.2
Cloud Manager Orchestration Server Install Pattern
Description: This server receives workload instructions from the Cloud Manager Application Server and directs the creation and management of those workloads by the virtual infrastructure.
Depending on the size of your virtual infrastructure, you might have one or many Orchestration Servers.
The server requires configuration after installation. To perform the initial configuration, you can use a a text interface at the Linux console (./config) or a GUI configuration wizard (./guiconfig). Packages in the Pattern: The table below lists the RPMs in the Orchestration Server pattern. Install Pattern
[Short Name] Default Packages Installed
Additonal Required
Patterns Additional Recommended
Patterns
Server /Agent
NetIQ Cloud Manager [cloudmanager]
netiq-cloudmanager postgresql-server
Table 3-2 Orchestration Server Packages
You can obtain more information about these patterns in the YaST utility when you have mounted the product ISO.
NOTE: Orchestration Server patterns are labeled version 3.2.2 in the NetIQ Cloud Manager 2.2.2 release.
Installation recommendations: Although the machine where you install this server might be capable of handling tasks in addition to the tasks an Orchestration Server performs for Cloud Manager, we strongly recommend that you install the Orchestration Server software on a dedicated server to ensure optimal performance. For example, you might not want the server to host the Cloud Manager Application Server or Novell eDirectory.
NOTE: Although you can install the Orchestration Server on a Virtual Machine, do not try to manage that VM through the Orchestration Console or other Orchestration Clients.
Further, be advised that installing the server on a VM slows down the performance of the product. Although not mandatory, we recommend that you install and configure the Orchestration Server before you install and configure the Cloud Manager application components.
3.3
Cloud Manager Monitoring Server Pattern
Description: The Cloud Manager Monitoring Server is an Apache Web server that uses open source Ganglia monitors defined performance data on network resources in a time period you can define. This server requires configuration after installation. To perform the initial configuration, you can use a a text interface at the Linux console (./config) or a GUI configuration wizard (./guiconfig). Packages in the Pattern: The table below lists the RPMs in the Orchestration Server pattern. Install Pattern
[Short Name] Default Packages Installed
Additional Required Patterns [short name]
Additional Recommended Patterns
Server /Agent
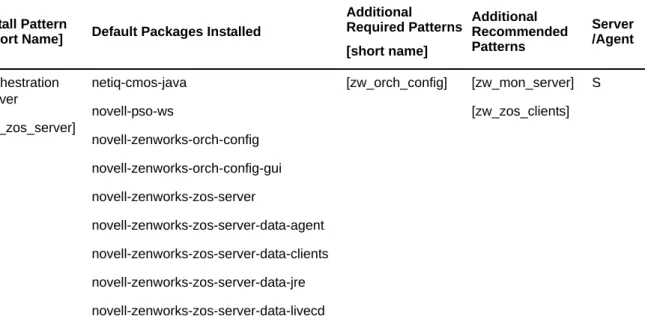
Orchestration Server
[zw_zos_server]
netiq-cmos-java novell-pso-ws
novell-zenworks-orch-config novell-zenworks-orch-config-gui novell-zenworks-zos-server
novell-zenworks-zos-server-data-agent novell-zenworks-zos-server-data-clients novell-zenworks-zos-server-data-jre novell-zenworks-zos-server-data-livecd
[zw_orch_config] [zw_mon_server] [zw_zos_clients]
Table 3-3 Orchestration Server Packages
You can obtain more information about these patterns and packages in the YaST utility when you have mounted the product ISO.
NOTE: Monitoring Server patterns are all version 3.2.2 in the NetIQ Cloud Manager 2.2.2 release. Installation recommendations: You can install this server on the same machine with the
Orchestration Server, or you can choose any other server with access to the Monitoring Agents.
3.4
Cloud Manager Orchestration Agent Pattern
Description: The Cloud Manager Orchestration Agent provides communication between the Orchestration Server and the VM hosts managed by the server. The agent is installed on the VM hosts that run as nodes under the management of the Orchestration Server.
The agent requires configuration after installation. To perform the initial configuration, you can use a text interface at the Linux console (./config) or a GUI configuration wizard (./guiconfig).
You can also install the agent from a Windows installation program or use the Linux pattern files to install to RHEL machines. For more information, see Section 5.2, “Alternative Installation Methods for the Orchestration Agent,” on page 45.
Packages in the Pattern: The table below lists the RPMs in the Orchestration Agent pattern. Install Pattern
[Short Name] Default Packages Installed
Additional Required Patterns [short name]
Additional Recommended Patterns
Server /Agent
Monitoring Server [zw_mon_server]
libconfuse0
novell-zenworks-monitor-gmetad novell-zenworks-monitor-web novell-zenworks-orch-config novell-zenworks-orch-config-gui
[zw_mon_agent] [zw_orch_config]
Table 3-4 Orchestration Server Packages
You can obtain more information about these patterns inside the YaST utility when you have mounted the product ISO.
NOTE: Orchestration Agent patterns are labeled version 3.2.2 in the NetIQ Cloud Manager 2.2.2 release.
Installation recommendations: Installing the Cloud Manager Orchestration Agent on the same machine with the Orchestration Server is not supported.
If you are installing the agent to a vSphere environment, you can install the agent either locally on the vCenter Server (the vCenter appliance is not supported), or on a dedicated system (virtual or physical) as long as the OS in that system is supported for the Orchestration Agent.
If you want to support virtual resource management in multiple vSphere environments, NetIQ recommends you deploy an Orchestration Agent on a dedicated system. For more information, see “The VMware vSphere Provisioning Adapter” in the NetIQ Cloud Manager 2.2.2 Component Reference.
3.5
Orchestration Console Install Pattern
Description: The Cloud Manager Orchestration Server Console is a java-based thick client that administers the functionality of the Orchestration Server from any SLES 11 server or a Windows 7 desktop on the same network with the Orchestration Server. Before you can perform any
Orchestration Server management functions, such as creating user accounts and managing activities of the server, you need to install the Orchestration Console. The console is a thick desktop client designed for administrative tasks including infrastructure management (for example, managing computing resources) and monitoring. You can install the console on the server itself or on another network computer.
This pattern includes both a GUI console and two command line interface tools. These clients let you troubleshoot, initiate, change, or shut down server functions for the Orchestration Server and its computing resources. For information about the client tools, see the NetIQ Cloud Manager 2.2.2 Component Reference.
Packages in the Pattern: The table below lists the RPMs in the Orchestration Console pattern. Install Pattern
[Short Name] Default Packages Installed
Additional Required Patterns [short name]
Additional Recommended Patterns
Server /Agent
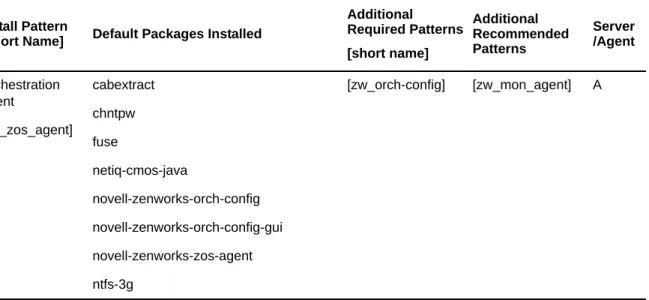
Orchestration Agent
[zw_zos_agent]
cabextract chntpw fuse
netiq-cmos-java
novell-zenworks-orch-config novell-zenworks-orch-config-gui novell-zenworks-zos-agent ntfs-3g
Table 3-5 Orchestration Console Packages
You can obtain more information about these patterns inside the YaST utility when you have mounted the product ISO.
NOTE: The Orchestration Console pattern is labeled version 3.2.1 in the NetIQ Cloud Manager 2.2.2 release.
The Orchestration Console and Clients are available as a downloadable Windows installation program (.exe file) in the ISO images. For information about using this program, see Section 5.3, “Alternative Installation Methods for the Orchestration Console and Clients,” on page 52.
Installation recommendations: No other Cloud Manager components need to be installed on the machine where you install the console and clients. Provided that the machine where you install the clients can connect with Orchestrate Servers in your data center, where you install the clients is at your discretion.
3.6
Monitoring Agent Install Pattern
Description: The Cloud Manager Monitoring Agent can be installed on a server where any other Orchestration pattern is installed, or independently on a SLES or Windows server. The agent
installation lays down the Ganglia Agent on each monitored node to collect performance metrics and send the data to the Cloud Manager Monitoring Server.
The agent requires configuration after installation. To perform the initial configuration, you can use a text interface at the Linux console (./config) or a GUI configuration wizard (./guiconfig).
You can also install the agent from a Windows installation program or use the Linux pattern files to install to RHEL machines. For more information, see Section 5.4, “Alternative Installation Methods for the Cloud Manager Monitoring Agent,” on page 55.
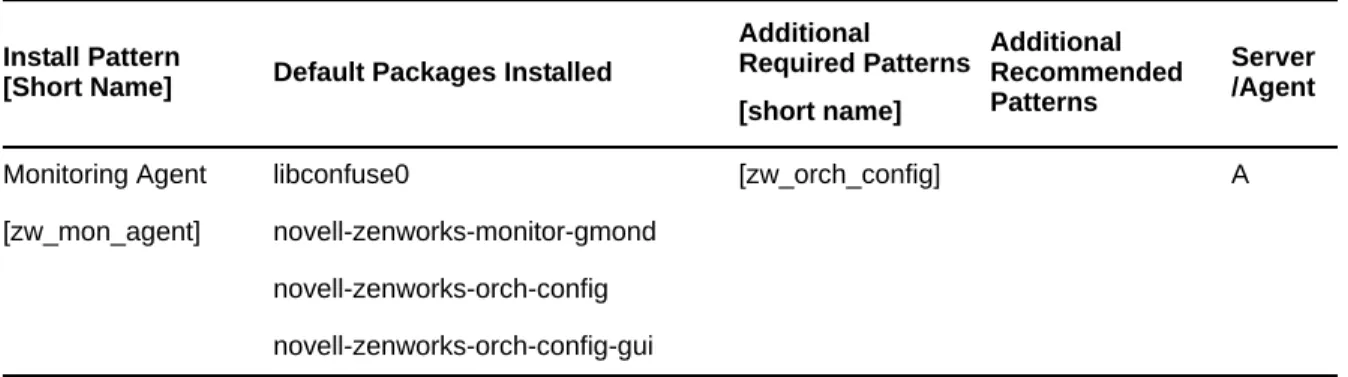
Packages in the Pattern: The table below lists the RPMs in the Monitoring Agent pattern.
Table 3-6 Orchestration Server Packages Install Pattern
[Short Name] Default Packages Installed
Additional Required Patterns [short name] Additional Recommended Patterns Server /Agent Orchestration Agent [zw_zos_clients netiq-cmos-java novell-zenworks-zos-clients
S or A
Install Pattern
[Short Name] Default Packages Installed
Additional Required Patterns [short name] Additional Recommended Patterns Server /Agent Monitoring Agent [zw_mon_agent] libconfuse0 novell-zenworks-monitor-gmond novell-zenworks-orch-config novell-zenworks-orch-config-gui [zw_orch_config] A
You can obtain more information about these patterns and packages in the YaST utility when you have mounted the product ISO.
NOTE: Monitoring Agent patterns are all version 3.2.2 in the NetIQ Cloud Manager 2.2.2 release. Installation recommendations: If you select the Orchestration Agent pattern, the Monitoring Agent pattern is selected by default. This is only a recommended dependence (most users install both components together) and is not binding. The autoselection is made for your convenience.
Although this agent can be installed using YaST, you can also install it from pattern files located on the ISO image. For more information about these patterns, see Table 5-2, “Monitoring Agent Installation Pattern Files for Linux,” on page 55.
4
4Orchestration Components
Preinstallation Tasks
Before you install the NetIQ Cloud Manager Orchestration components, you need to prepare the environment where those are to be installed:
Section 4.1, “Gathering Certificate and License Information,” on page 39
Section 4.2, “Preparing the Server When Multiple NICs and DNS Addresses Exist,” on page 39
4.1
Gathering Certificate and License Information
Before you install NetIQ Cloud Manager, you need to have the following information available: A license key (90-day evaluation license or a full license) is required to use the Cloud Manager
Orchestration Server. You should have received this key from NetIQ, then you should have subsequently copied it to the network location that you identify during the pattern installation. Be sure to include the name of the license file in the path.
If you install or configure Orchestration components by using a trial key, the product behaves normally for 90 days, although the trial key controls the number of users and managed nodes you can configure. For fully supported functionality, product components require a purchased license key. Contact your NetIQ Sales Representative or a Certified NetIQPartner for purchase information.
(Optional) Certificate authority information (internal, or signed certificate, private key, and public certificate).
4.2
Preparing the Server When Multiple NICs and DNS
Addresses Exist
If your anticipated Cloud Manager Orchestration Server has multiple network interfaces and multiple DNS addresses, you need to edit the /etc/hosts file on the server to change the default (127.0.0.1 or 127.0.0.2) address to the actual IP address of the server. This is necessary because at server startup, the Orchestration Server tries to determine the matrix.hostname.full fact. If the IP address of the hostname is found to be a loopback address (for example, 127.0.0.2), it is skipped and subsequently configured incorrectly.
If this change is not made, the Install Agent action performed on a VM misconfigures the VM to point to the wrong address (because the grid’s matrix.hostname.full fact is incorrect), resulting in no connection to the server.
II
IIComponent Installation
The information in this section provides direction for installing NetIQ Cloud Manager. Chapter 5, “Installing Cloud Manager Orchestration Components,” on page 43 Chapter 6, “Installing Cloud Manager Application Server Components,” on page 59
5
5Installing Cloud Manager Orchestration
Components
The RPMs in the Orchestration install patterns must be installed to a supported version of SUSE Linux Enterprise Server (SLES) 11.
Some Cloud Manager RPMs have dependencies on SLES patterns that might not have been previously installed on the SLES server. For this reason, we recommend that you mount the SLES install media in a CD ROM drive on the server while you install the Cloud Manager packages, either from another CD ROM drive on the same server or from a downloaded ISO image.
Section 5.1, “SLES 11 Standard Installation,” on page 44
Section 5.2, “Alternative Installation Methods for the Orchestration Agent,” on page 45 Section 5.3, “Alternative Installation Methods for the Orchestration Console and Clients,” on
page 52
Section 5.4, “Alternative Installation Methods for the Cloud Manager Monitoring Agent,” on page 55
After the initial installation and configuration, installers for some Cloud Manager Orchestration components for other operating systems become available in the Orchestration file system. For more information about these alternative post-installation methods, see Section 5.2, “Alternative
Installation Methods for the Orchestration Agent,” on page 45, Section 5.3, “Alternative Installation Methods for the Orchestration Console and Clients,” on page 52, and Section 5.4, “Alternative Installation Methods for the Cloud Manager Monitoring Agent,” on page 55.
NetIQ recommends that you install and configure the Cloud Manager Orchestration components before continuing with the installation and configuration of Cloud Manager components. For more information, see the Chapter 6, “Installing Cloud Manager Application Server Components,” on page 59.
NOTE: Testing has shown that installing the Cloud Manager Orchestration Server and the Cloud Manager Application Server on the same machine causes problems with the installation and subsequent operation of Cloud Manager. The product is specifically designed for separate installations of these two complementary servers.
For information about automated methods you can use to install the Orchestration Agent see Section 5.2, “Alternative Installation Methods for the Orchestration Agent,” on page 45.
For information about uninstalling Cloud Manager components, see Chapter 22, “Uninstalling Orchestration Component Patterns from a SLES Server,” on page 247.
For advanced configuration tasks and methods for optimizing the Cloud Manager Orchestration components, see the NetIQ Cloud Manager 2.2.2 Component Reference.
5.1
SLES 11 Standard Installation
The steps for installing Cloud Manager Orchestration components on a SLES 11 server, including the Orchestration Server, Orchestration Agent, the Orchestration Console (accompanied by other Orchestration clients), and the Cloud Manager Monitoring Server and Monitoring Agent are included in this section.
You should have already decided which SLES file packages you want to install, and on which machines. If not, the information in Chapter 3, “Choosing the Installation Packages and Where to Install Them,” on page 31 can help you make that decision.
1 Log in to the target SLES server as root, then open YaST or YaST2. You should install the Orchestration Server on a dedicated server for optimal performance.
2 Download the appropriate NetIQ Cloud Manager ISO to the SLES server. or
Load the NetIQ Cloud Manager DVD on the SLES server.
3 Define the NetIQ Cloud Manager ISO or DVD as an add-on product:
3a In the YaST Control Center, click Software, then click Add-On Products.
3b Click Add, select Local ISO Image or DVD, then follow the prompts to add the product.
4 Read and accept the license agreement, then click Next to display the Software Selection and System Tasks dialog box.
5 Select the installation pattern that contains the Orchestration component packages you want to install on this server.
You should have previously decided which packages to install. For more information, see Chapter 3, “Choosing the Installation Packages and Where to Install Them,” on page 31.
6 Click OK to install the packages.
7 When package installation is complete, click OK to close the Installed Add-On Products dialog box.