vRealize Business User Guide
vRealize Business Advanced or Enterprise 8.2
This document supports the version of each product listed and
supports all subsequent versions until the document is
replaced by a new edition. To check for more recent editions
of this document, see
http://www.vmware.com/support/pubs
.
You can find the most up-to-date technical documentation on the VMware Web site at:
http://www.vmware.com/support/
The VMware Web site also provides the latest product updates.
If you have comments about this documentation, submit your feedback to:
Copyright © 2014 VMware, Inc. All rights reserved. Copyright and trademark information.
VMware, Inc.
3401 Hillview Ave. Palo Alto, CA 94304 www.vmware.com
About This Book 7
1
Using vRealize Business 9
Log in to vRealize Business 9
Getting Started with IT Financial Management 10 Viewing Links to Reports and Dashboards 10 Searching in vRealize Business 12
Tasks in vRealize Business 16 Business Processes 19
Common vRealize Business Toolbar Options 19 Using the Administrative Links 20
Using Keyboard Shortcuts 21
Using the vRealize Business Workspace 22 Mandatory Fields 23
2
Cost And Cost Analysis 25
About Cost Models 25
Getting Started with Cost Models 26 Working with Cost Models 27
Uploading Data to vRealize Business 38 Working with Allocation Settings 58 Analyzing Cost Data 63
Viewing Model Problems 85 Cost Model Metrics 87
3
Planning Budgets 89
Create a Plan Model 90 Modify a Plan Model 90 Using the History Feature 101 Plan Model Metrics 102 Viewing Model Metrics 103 Managing Budgets 104 Analyze Plan Data 105 Refresh Plan Results 105
Upload Forecast Data to a Cost Model 106 Add a Service Plan Scenario 106
View Service Planning Dashboard 108
About Service Planning Scenario Dashboard 108
4
Overview of Service Level Management 111
Agreements Tab 112 Agreement List 112 Master Agreement 112 Create an Agreement 113
Add a Live Link to a Master Agreement 114 Add a Service Instance 114
Modify an Agreement 115 Display Customized Data 115 Define the Approval Duration 116 Adjust Data 116
5
Benchmarking Module 119
About Reports in the Benchmarking Dashboard 119
6
Portfolio 121
PortfolioTab 122
Subscribe to Services in a Portfolio 122 View and Subscribe to Published Services 122 View Business or Technical Services 124 Service Bundles 130
Add a Classification 131 Add an Expense Account 131 Add a Specification 132 Business Rule Templates 132
Uploading Data to vRealize Business 133
7
Reports, Dashboards, and Booklets 135
Working with Reports 135 Working With Dashboards 151 Working with Booklets 164
8
Troubleshooting vRealize Business Issues 167
Adaptors Cannot Access Database after Import 167 Cannot Find Database Package After Import 168 No Data Appears in Plan Model 168
Unable to See Data in Report 168
Unable to Upload File in Internet Explorer 8 169 Unable to Upload Yearly Data 169
Report is Invalid 169
When Adaptors Leads to Out Of Memory 170 Stranded Objects in Plan Model 170
9
Miscellaneous Topics 173
Deleting Objects in vRealize Business 173 Browse Selector 173
Managing Contacts 174 Attachments 174
Right Click Menus 175
10
Administration vRealize Business 179
Organizations 179 Customers 180 Providers 181 All Uploads 181 Security 182
Resource Management 188 General Preferences 193
Open vRealize Business Designer 199
11
Financial Management Scenarios 201
Analyze Total Cost of Ownership 201 Create Cost Model 202
Setting Cost Model Nodes 204 Analyzing IT Costs 204
12
Input 205
Schedules 205 Rules 206 Value Sets 208
Database Connections 209 URL Connections 212
13
Resources Tab 215
Resources 215 Resource Groups 216 Resource Types 218 Resource Group Types 220
14
Design 223
Workshop 223 Flow Manager 311 Color and Ordering 322 Performance Tuning 324
15
Tools 327
System Definitions 327 About Batch Editor 335 Self Documentation 341
Importing and Exporting Data 341 Refresh Cache 347
16
ODBC Configuration 349
Index 351
The vRealize Business Advanced and Enterprise User Guide describes the features of vRealize Business. vRealize Business IT Financial Management (ITFM) is a set of Software as a Service (SaaS) business applications that automate key processes for vRealize Business and also provides on-site deployment. The vRealize Business ITFM product includes:
n IT Costing
n IT Demand Management and Budget Planning n IT Showback and Chargeback
n IT Cost Optimization n Vendor Manager n SLA Manager
NOTE Vendor Manager and SLA Manager are available in the vRealize Business Enterprise. But these two modules are not available in vRealize Business Advanced.
Intended Audience
The information is written for experienced Windows, UNIX, and Linux system administrators.
VMware Technical Publications Glossary
VMware Technical Publications provides a glossary of terms that might be unfamiliar to you. For definitions of terms as they are used in VMware technical documentation, go to
Using vRealize Business
1
vRealize Business automates the core financial processes needed to easily plan, charge, and optimize the cost and value of IT. With its intuitive visual interface, automated data association and mapping engine, combined with pre-built workflows, cost models, reports, and dashboards, vRealize Business delivers dramatically lower cost of ownership and risk than any other approach.
This chapter includes the following topics: n “Log in to vRealize Business,” on page 9
n “Getting Started with IT Financial Management,” on page 10 n “Viewing Links to Reports and Dashboards,” on page 10 n “Searching in vRealize Business,” on page 12
n “Tasks in vRealize Business,” on page 16 n “Business Processes,” on page 19
n “Common vRealize Business Toolbar Options,” on page 19 n “Using the Administrative Links,” on page 20
n “Using Keyboard Shortcuts,” on page 21
n “Using the vRealize Business Workspace,” on page 22 n “Mandatory Fields,” on page 23
Log in to vRealize Business
To use vRealize Business, you must provide registered user name and password. Prerequisites
Install and configure vRealize Business. Procedure
1 Start your Web browser on a computer that is connected through the network to the server machine on which vRealize Business is installed.
2 Type the appropriate URL:
n For systems with the vRealize Business SaaS solution, user needs to enter the name of the URL provided by the administrator.
<host> is the name of the machine on which vRealize Business is running. <port> is the number of the port wherevRealize Business is running.
3 Type the User Name and Password.
4 Click Go (vRealize Business SaaS system) or Login (non-SaaS system) or press Enter.
Getting Started with IT Financial Management
vRealize Business IT Financial Management is a set of Software as a Service business applications that automate key processes and also provides an on-site deployment.
Through its proactive planning, billing, and cost optimization capabilities, IT Financial Management provides the visibility and predictability that enables stakeholders to improve value and align spending with business goals. Identifying cost elements helps in creating your organization's cost model to track and manage costs. Use this checklist to help organize information:
n Identify the services that you want to measure. Email and storage, for example, are services that are used by every department in your organization. Services can be designated as business services (help desk facility and video conferencing) or technical services (storage, network, and wireless network). Let us consider your business consumes business services directly, while business services are based on and consume technical services.
n Understand the cost drivers and cost allocation targets for each service. Cost drivers contribute costs, and cost allocation targets receive costs. The element can be both a cost driver and the source of a cost allocation.
For example, storage contributes costs to servers, and servers pass costs to R and D. In this example, storage is a cost driver of servers, servers are one of the cost allocation targets for storage, and servers are a cost driver of R and D.
n Understand your cost data. Cost data collected from various sources can be input directly or calculated within the system.
For example, expense spreadsheets usually contain detailed information including expense accounts, amounts, and cost objects to which expenses are allocated. Conversely, help desk data needs to be extracted and analyzed before useful cost data is computed. You can collect cost data in several ways . You can find expenses in your general ledger module of your ERP system. You can use your
monitoring system to collect usage data, for example, storage usage or network usage.
Accuracy is enhanced by detailed usage data. However, if the detailed data is unavailable, cost allocation can be defined by several allocation settings that are built-in, such as properties or by percentage.
Use the services, drivers or allocation targets, and cost data to map your organization’s structure to a cost model. You can start with a subset and add cost elements as you become more comfortable with the cost model feature. For more information, see “Create a Cost Model,” on page 36.
Viewing Links to Reports and Dashboards
You can view a list of links to reports, dashboards, and favorite that are of particular importance to you . You can construct a My Menu menu by creating folders to organize the links. vRealize Business only displays links for which you have appropriate permissions. The frame also displays tasks that are pending in your name. See “Tasks in vRealize Business,” on page 16 for details.
You can open the My Menu tab by selecting My Preferences from the Administrative Links in the top right-hand corner of the main window.
Create and Organize Your Menu
You can add links to your favorite reports and organize them in a folder. You can click the folder under the
My Menu link to expand or collapse the view of the folder contents.
Prerequisites
You must have an administrator permissions. Procedure
1 Log in to vRealize Business.
2 Go to My Preferences and click My Menu tab. 3 Click the arrow on the Add option.
u To add a folder, select Folder from the Add option. a Type a name for the folder.
b Click OK.
4 To add a links to the folder, select Link from the Add option. a Type a name for the link.
b Select a parent folder for the link.
c Click Browse to navigate to your favorite report or go to the target for the link.
5 (Optional) To edit folders or links in the My Menu frame, select an element and click the Edit... option. 6 (Optional) To reorder the folders and links, point to an element and when the mouse pointer changes,
drag the element to the new required location in My Menu.
Define a Home Page for vRealize Business
You can set your vRealize Business home page to a particular report or dashboard. This helps you to navigate to a frequently used report or dashboard easily.
Prerequisites
You must have administrator permissions. Procedure
1 Log in to vRealize Business. 2 Go to My Preferences. 3 Select the My Menu tab.
4 Select one of the following options to set an entry page for ITFM and SLA.
n Entry Page- to display a standard page with pictorial links to the most common vRealize Business features.
n Report - to display a specific report or dashboard as your home page, click Browse and navigate to the relevant object.
5 Click Save.
Enable the Portal Page for vRealize Business
For some users, an vRealize Business window runs in a Portal on their external system. You can view a particular report or dashboard inside this external vRealize Business window.
Prerequisites
Log in to vRealize Business as an administrator. Procedure
1 Go to Tools > General Preferences> on the Options tab. 2 Select the Enable Portal Page check box.
3 In the portal on the external system, define a link tovRealize Business by using a URL of the form http://<hostname>:</port>/jserf/loadstreport.jsp.
NOTE This is case sensitive.
Searching in vRealize Business
You can use vRealize Business search to find objects in the system. vRealize Business provides two search options.
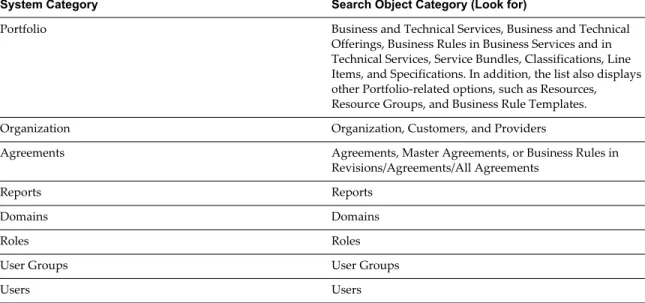
n Regular Search - Select an object category from the Look for drop-down list and type an object string (or partial string) in the text box. Click Search. The search results appear in the Search Results Pane. Table 1‑1. System Categories
System Category Search Object Category (Look for)
Portfolio Business and Technical Services, Business and Technical Offerings, Business Rules in Business Services and in Technical Services, Service Bundles, Classifications, Line Items, and Specifications. In addition, the list also displays other Portfolio-related options, such as Resources, Resource Groups, and Business Rule Templates. Organization Organization, Customers, and Providers
Agreements Agreements, Master Agreements, or Business Rules in Revisions/Agreements/All Agreements
Reports Reports
Domains Domains
Roles Roles
User Groups User Groups
Users Users
n Advanced Search- Click Advanced Options to view an advanced search dialog and complete the fields. Partial strings are acceptable for any of the text fields. The search feature treats character and numeric fields differently.
For character fields, the search feature retrieves records with a string that contains the input characters. For example, if the user types abc for the Name field, any agreements that contain the string abc in their Name is
displayed. Character field searches are not case-sensitive.
For numeric fields or drop-down menus, the search feature retrieves records with an exact match to the input selection. For example, if the user types 80 for the Weight field or selects Draft for the agreement
Every search option contains different criteria, and so, different fields might appear for each object category. In addition, some fields are User Defined Fields and vary per system.
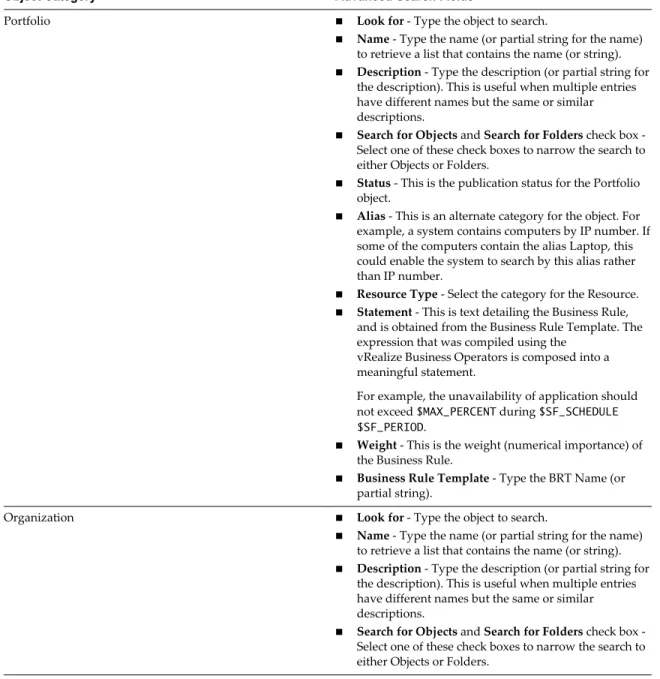
Table 1‑2. Advanced Search Fields
Object Category Advanced Search Fields
Portfolio n Look for - Type the object to search.
n Name - Type the name (or partial string for the name)
to retrieve a list that contains the name (or string).
n Description - Type the description (or partial string for
the description). This is useful when multiple entries have different names but the same or similar descriptions.
n Search for Objects and Search for Folders check box
-Select one of these check boxes to narrow the search to either Objects or Folders.
n Status - This is the publication status for the Portfolio
object.
n Alias - This is an alternate category for the object. For
example, a system contains computers by IP number. If some of the computers contain the alias Laptop, this could enable the system to search by this alias rather than IP number.
n Resource Type - Select the category for the Resource. n Statement - This is text detailing the Business Rule,
and is obtained from the Business Rule Template. The expression that was compiled using the
vRealize Business Operators is composed into a meaningful statement.
For example, the unavailability of application should not exceed $MAX_PERCENT during $SF_SCHEDULE $SF_PERIOD.
n Weight - This is the weight (numerical importance) of
the Business Rule.
n Business Rule Template - Type the BRT Name (or
partial string).
Organization n Look for - Type the object to search.
n Name - Type the name (or partial string for the name)
to retrieve a list that contains the name (or string).
n Description - Type the description (or partial string for
the description). This is useful when multiple entries have different names but the same or similar descriptions.
n Search for Objects and Search for Folders check box
-Select one of these check boxes to narrow the search to either Objects or Folders.
Table 1‑2. Advanced Search Fields (Continued)
Object Category Advanced Search Fields
Agreements n Look for - Type the object to search.
n Name - Type the name (or partial string for the name)
to retrieve a list that contains the name (or string).
n Description - Type the description (or partial string for
the description). This is useful when multiple entries have different names but the same or similar descriptions.
n Customer Name - This is the name of the Service
recipient.
n Provider Name - This is the name of the Service
supplier.
n Agreement Type - Agreements can be classified into
four different types.
Stand Alone - This agreement is not dependent on any other type of agreement, nor does it have any other agreements linked to it.
Master - This Agreement is used as a template for other Agreements. Master agreements have no customers and no engine calculations are performed for these agreements.
Live Link - This is a pointer to a master agreement. The advantage to using Live Links is that any change to the master agreement affects all of the Live Links
simultaneously.
Detached - This type indicates that an agreement has changed from a Master agreement to a Stand Alone Agreement.
Agreement Status - An Agreement can contain many revisions.
Revision - Select a Revision number from the drop-down list. Search based on the description field which opens the agreement with the revision details.
n Statement - This is text detailing the Business Rule
(obtained from the Business Rule Template). The expression that was compiled using the vRealize Business Operators is composed into a meaningful statement.
For example: The unavailability of application should not exceed $MAX_PERCENT during $SF_SCHEDULE $SF_PERIOD.
n Weight - This is the weight (numerical importance) of
the Business Rule.
n Business Rule Template - Business Rule Templates are
instantiated in agreements using different parameters to form different Business Rules.
n Classification - A set of performance-related categories
to which Business Rules belong. Examples include Performance, Quality, and Satisfaction.
Table 1‑2. Advanced Search Fields (Continued)
Object Category Advanced Search Fields
Reports n Look for - Type the object to search.
n Name - Type the name (or partial string for the name)
to retrieve a list that contains the name (or string).
n Description - Type the description (or partial string for
the description). This is useful when multiple entries have different names but the same or similar descriptions.
n Search for Objects and Search for Folders check box
-Select one of these check boxes to narrow the search to either Objects or Folders.
n Path - Select a path in the report tree to narrow the
search.
Domains n Look for - Type the object to search.
n Name - Type the name (or partial string for the name)
to retrieve a list that contains the name (or string).
n Description - Type the description (or partial string for
the description). This is useful when multiple entries have different names but the same or similar descriptions.
Roles n Look for - Type the object to search.
n Name - Type the name (or partial string for the name)
to retrieve a list that contains the name (or string).
n Description - Type the description (or partial string for
the description). This is useful when multiple entries have different names but the same or similar descriptions.
n Role Type - Select the type of Role. This is useful for
searching for Users with a particular Role. User Groups n Look for - Type the object to search.
n Name - Type the name (or partial string for the name)
to retrieve a list that contains the name (or string).
n Description - Type the description (or partial string for
the description). This is useful when multiple entries have different names but the same or similar descriptions.
Users n Look for - Type the object to search.
n Name - Type the name (or partial string for the name)
to retrieve a list that contains the name (or string).
n Full Name - Type the full name (or partial string for
the full name).
n Email - Type the Email address (or a partial string).
This is useful when searching for all users from a particular company.
n Phone Number - Type all (or part) of the phone
number. This is defined as a string field. The system does not try to match the exact field, but rather matches fields that contain this phone number. This is useful when searching for all users from a particular area code.
If you initiate the search while viewing the Portfolio Browser or My Subscriptions, the regular search yields links to objects in the Portfolio Browser. However, if you start the search while viewing service objects in the Tree view (via Manage), the regular search yields links to objects in the Manage-Tree view. If you cannot access the Manage feature, the search results in links in the Portfolio Browser. Conversely, if the Portfolio is not installed, the search produces Manage-Tree view links.
NOTE To enable breadcrumbs, see Infrastructure Configuration Parameters in the vRealize Business Installation and Administration Guide.
Tasks in vRealize Business
In vRealize Business, there are business processes that are comprised of multiple steps. For example, subscribing to a service involves not only the customer’s action of subscribing, but also the account manager’s approval of the subscription. Such steps are managed using Tasks.
Tasks are generated from the following sources:
n Agreement Activation - A user who wants to activate an agreement but does not have permission to do so requests activation from a manager. In this case, the manager receives a task called Account Manager Approval.
n Subscription Approval - A user subscribes to a service in the portfolio. An agreement is automatically generated and requires the manager to approve the agreement activation.
n Upload Data - An upload process, which requires one or more users to upload data for processing (for example, Monthly Reports), generates an Upload Data Task.
View Task List
When vRealize Business assigns a task, the participating user receives email alerting to the subscription request or upload task.
In the My vRealize Business frame, the tasks link indicates the number of tasks that await this user’s attention. See “Viewing Links to Reports and Dashboards,” on page 10.
Prerequisites
To view the My Tasks link, the View Tasks option must be selected in the User’s Role. Procedure
u Click the list to view the Task List.
The number indicates the tasks that are currently active and require attention. These include tasks that are in progress, suspended, and offered.
This task list includes the following information:
Task Name - This name describes the task - either Approval or Upload Data. You can click the link to see
the Task details. See “View Task Details,” on page 17 for more information.
Process Name - The name reflects the origin of the Task:
n For tasks generated from agreement activation, the Process Name is a combination of the agreement name with revision activation.
n For tasks generated from subscription approval (available when the portfolio application is installed), the Process Name is a combination of the agreement name with approval.
n For tasks generated from upload data, the Process Name is a combination of the adaptor name with data upload.
n For tasks generated from monthly validation, the Process Name is a combination of the Month/Year for which the monthly validation is executed with Validate Cost Model, Validate Data Gathering, or Validate Results.
Status - Options include:
n <Blank> - Select this option at the top of the list to view all status entries.
n Default - Select this option to view In Progress, Suspended, and Offered entries simultaneously. n Offered - When a task is initiated, it can be assigned to one or more individuals or to all members of a
role. When it is assigned to more than one user, its status is Offered. When someone claims the task, it is removed from the Task List of the other role members and its status changes to In Progress.
n In Progress - The process has started and is in the user’s task list.
n Suspended - Sometimes, an approval process must be delayed. For example, more research might be required until a decision can be made, or input is required from an individual who is away from the office. The user or manager can suspend the task, which freezes the task execution. See “View Task Details,” on page 17.
n Completed - The task is complete.
n Cancelled - The task has been cancelled, but rather than removing it from the Task List, its status becomes Cancelled.
Process Start - This is the date that the process was initiated.
My Start - This is the date that the manager began to work on the task.
Quick Action - Click this link to go to the agreement or upload dialog. Both of these targets can be accessed
from the Task tab. See “View Task Details,” on page 17 for more information.
View Task Details
Select the View Business Process Details option to view the History and Process Diagram tabs. You can use the Task Name link from the task list to view additional information about the task.
n You can view the general information about the task under the Task tab. The fields on the tab depends on whether the task involves approval or upload data. Common fields include the process name that reflects the origin of the task, the description, which provides processing instructions for the manager, the start date of the task, and the current status of the task.
You can click the Action link to open the Agreement or Upload File dialog box. You can browse to select the file that should be uploaded and then upload the data.
n You can see the agreement name connected to the task, the customer involved with the agreement, subscriber comments, task manger comments in the Agreement Approval Task tab.
You can use the Upload Data Task tab to include the identifiers that are unique to the upload task. n You can view the various individual actions involved in the task under the History tab. For each action,
the tab lists the contact, start time for the action, and comments.
Using Toolbar for Tasks
In addition to the regular toolbar buttons, several toolbar buttons appear for tasks. You can use the toolbar to perform task related actions such as approving the task, adding comments, submitting, or denying the task.
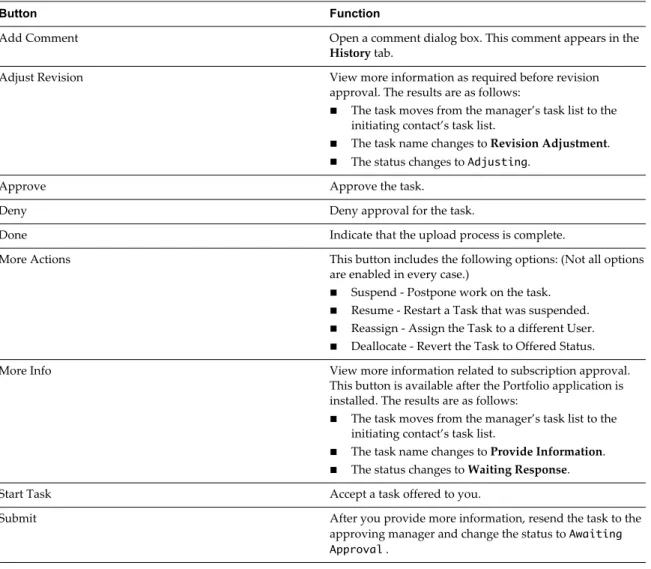
Table 1‑3. Toolbar for tasks
Button Function
Add Comment Open a comment dialog box. This comment appears in the History tab.
Adjust Revision View more information as required before revision approval. The results are as follows:
n The task moves from the manager’s task list to the
initiating contact’s task list.
n The task name changes to Revision Adjustment. n The status changes to Adjusting.
Approve Approve the task.
Deny Deny approval for the task.
Done Indicate that the upload process is complete.
More Actions This button includes the following options: (Not all options are enabled in every case.)
n Suspend - Postpone work on the task. n Resume - Restart a Task that was suspended. n Reassign - Assign the Task to a different User. n Deallocate - Revert the Task to Offered Status.
More Info View more information related to subscription approval. This button is available after the Portfolio application is installed. The results are as follows:
n The task moves from the manager’s task list to the
initiating contact’s task list.
n The task name changes to Provide Information. n The status changes to Waiting Response.
Start Task Accept a task offered to you.
Submit After you provide more information, resend the task to the approving manager and change the status to Awaiting Approval .
Tracking Tasks Related to Groups
Using vRealize Business, managers can track tasks that are assigned to their group members.
When users are added invRealize Business, a manager can be assigned. All of the tasks that belong to a manager's group appear automatically under My Group Tasks. While monitoring these tasks, the manager can perform the following actions:
n Decide to assign a task to a different user in the group.
n Open a task and add comments, which appear on the History tab.
The My Group Tasks includes the same fields as those for the task list, along with one additional field related to the task owner . The task owner is the user to whom the task is currently assigned. If the user is on vacation or cannot complete the task, the manager can reassign the task to a different user.
Reassign Tasks
Tasks are assigned to task owners. If a task owner is on vacation or cannot complete the task, the manager can reassign the task to a different user.
Prerequisites
You must have manager privileges. Procedure
1 Click the task name.
2 Click More Actions and select Reassign from the drop-down list. 3 Click Browse to select an alternative user.
Business Processes
In vRealize Business, business processes are comprised of multiple tasks. The system includes a set of default Business Process Definitions (BPD), and lets you to add custom definitions.
Select Tools> System Definitions > Business Process Definitions to view the business process details. The types of business processes that appear depend on the installed applications. The list includes: n ID - The ID is assigned by vRealize Business during business process definition creation. It cannot be
modified. (If this field does not appear, select the Show ID columns check box in the My Preferences Options tab. See “Using the Administrative Links,” on page 20 for details.)
n Process Type - The name of the business process definition. Click a link to see the process diagram. This diagram illustrates the tasks that are involved with this particular business process definition. Click
Download to save this business process definition. Users with proper knowledge, can edit and save this
copy and upload it as a new version.
n Description - Provides the description for business process definition.
n Version - You can create more than one business process definition for any particular process type. However, vRealize Business uses only the latest version of a business process definition. To revert to a previous version, delete the current version. The system maintains the earlier versions and
automatically uploads the next and highest version in its place.
n Process Class - The type of the business process definition that determines when it will be used. When defining a new business process definition, you must assign a process class.
Add a Business Process Definition
To create a new business process definition, click Add.
n Select a Process Class from the drop-down menu. A custom process class is available beside the standard process classes.
n Click Browse to upload a customized business process definition.
Common vRealize Business Toolbar Options
The toolbar contains various options for the current page, but includes some basic set of buttons in common. Additional toolbar buttons that are relevant to a particular feature are presented within each feature section. See “List View,” on page 22 for additional information on list button for the specific buttons associated with lists.
Toolbar Button Function
Cancel Cancel the editing changes. Save Save the editing changes.
Go one level up Move one level up in the hierarchy. Table of Contents Table of Contents view.
Buttons are enabled, disabled, or absent according to the user set permission and the relevance of action. Clicking the arrow icon at the bottom of the toolbar displays a drop-down menu with additional options, which differ from button to button.
NOTE In the list view, the user can select multiple items for deletion. This feature is not available within the folder view.
Using the Administrative Links
Located in the top right-hand corner of the screen, the administrative links let you customize the system. n User ID - This string indicates the ID of the user who is currently logged into the system. Roll the
cursor over this string to see the date and time of the last login. n Logout - Click this link to logout of vRealize Business.
n My Preferences – Click this link to modify user preferences.
After changing any of these preferences, you must either log out and log in to vRealize Business, or refresh the browser window for the settings to be effective.
Complete the fields in the My Preferences options tab: n User Name – This is the login ID.
n Full Name – This field can only be edited by the system administrator. n Password – Click Change to modify your password.
n User Locale – This setting affects date and currency or number formats. Use the default value or select an alternative value.
n Report Time Sort Order – This option determines the default sort order for data displayed in reports. Ascending displays data from the least recent to the most recent and descending displays data from the most recent to the least recent.
n Results Per Page – Set this value to the maximum number of search results to be displayed on each page in the list view. The system provides paging links for the user can navigate to additional results. See “List View,” on page 22.
n Context behavior on login - Use this option to pre-set the context for your login session. Select between use default context and use last context. For more information on context, see “Context”. n Display - Select the display check boxes as required:
Check Box Description
Show ID columns Select this check box to display an additional column in the workspace with the ID of thevRealize Business object. This can be useful for troubleshooting. (This check box is disabled by default.)
Show warning before leaving an unsaved object
Before leaving a page, vRealize Business gives a warning if an item on the page has been modified but not saved. Select this check box to enable the warning messages. (The check box is enabled by default.)
Check Box Description
Show confirmation upon
success After modifying an item, vRealize Business gives a confirmation message if thechanges are saved successfully. Select this check box to enable the confirmation messages. (The check box is enabled by default.)
Show confirmation upon
successful deletion If an item is deleted, vRealize Business gives a warning message. Select this checkbox to enable the warning messages. (The check box is enabled by default.) Show confirmation
when editing Hierarchy in Cost Model
If an item is edited, vRealize Business gives a warning message. Select this check box to enable the warning messages. (The check box is enabled by default.) Show warning upon
saving Dashboard When the administrator (or any User with publish report permissions) modifies thesystem dashboard (see “Customizing a Report” for details), these changes apply to all Users in the system. Select this check box to show a warning message to this effect. (The check box is enabled by default.)
n Keyboard - Select the keyboard check box as desired:
Check Box Description
Enable keyboard
shortcuts Select this check box to facilitate keyboard navigation in the vRealize Business userinterface, minimizing the need for mouse usage. In the keyboard shortcuts tab, the user defines keyboard shortcuts for common vRealize Business activities. See “Using Keyboard Shortcuts,” on page 21 for more information.
Show simplified reports for keyboard navigation
Select this check box to facilitate keyboard navigation in the vRealize Business user interface, minimizing the need for mouse usage. In the keyboard shortcuts tab, the user defines keyboard shortcuts for common vRealize Business activities. See “Using Keyboard Shortcuts,” on page 21 for more information.
n My Menu tab - In this tab, the user sets the home page and defines the contents for the My Menu frame in vRealize Business. See “My Menu” for more information.
n Keyboard Shortcuts tab - Use this tab to define keyboard navigation for common vRealize Business activities. See “Using Keyboard Shortcuts,” on page 21 for details.
Click Save to apply the changes and they are affective immediately.
Click Restore Default Settings to overwrite any applied values with the original values. Click Cancel to close the window without applying any changes.
Using Keyboard Shortcuts
If you have difficulties using a mouse or prefer to use the keyboard instead of the mouse, you can define customized keyboard shortcuts for common vRealize Business activities.
Select My Preferences from the user (in the top right-hand corner of the main window) and select the
Keyboard Shortcuts tab.
For most vRealize Business activities, a default shortcut is already defined. To change this value, click the definition. In the New key text box, type the desired keyboard combination. Press <Backspace> to remove
the assigned shortcut. Use any key as a shortcut; adding <CTRL>, <ALT>, and/or <SHIFT> (or any combination)
is optional.
With Internet Explorer, several combinations that are interpreted by the browser cannot be used in vRealize Business. For example, <CTRL>+F and <CTRL>+R.
With Firefox, no such limitations are applicable. However, use of a combination is usually interpreted by the browser. Even if a shortcut is assigned to an operation that is currently unavailable, it will perform the regular browser action. For example, if <CTRL>+R is the shortcut for revert changes and the Cancel button in
Using the vRealize Business Workspace
The workspace contains various vRealize Business screens based on the selected options, either from the main menu options or from the left pane selections.
Workspace format can include list view. See “List View,” on page 22 for additional information.
List View
List view displays data in the records area in a table. Each record occupies one row of the table. In addition to the records area, this view contains the filter row, paging links, and list buttons.
Click any column heading in the heading Row to sort the contents of a particular column.
Filter Row
The filter row appears at the top of all tables in the list view. The fields in this row correspond to the fields in the table. Use the filter row to quickly filter the table, to view specific desired values. For example, the agreement list displays all agreements by default. To view only the active agreements, select active from the empty cell in the filter row that corresponds to the Status column. Press Enter to see the filtered results. Use a semicolon (;) to filter for multiple values. For example, type 6;red in the name box to view all names that contain the numeral 6 or the string red.
Paging Links
Paging links are used to navigate between pages in the list view. The number of items on each page is determined by the user in the My Preferences page. (See “Using the Administrative Links,” on page 20 for details.)
The page numbers act as links for navigating to a particular page. In addition, the paging links contain the following navigation symbols:
Symbol Meaning
First Page Jump to the first page .
Previous Page Display the previous ten pages. Up to ten numbers are displayed. Next Page Display the next ten pages. Up to ten numbers are displayed. Last Page Jump to the last page.
No Previous Pages No previous pages. No Next Pages No next pages.
View All Display all of the list entries, regardless of the number defined in the results per page field. Clear Filters Clears all filters.
Search Search the list view. Clear Sorting Clears sorting.
List Buttons
List buttons are located above vRealize Business lists, and include the following set of options.
Button Function
Add Add an appropriate element. In addition to the default action (which differs for each Object set), click the drop-down arrow to see additional add options.
Button Function
Delete Delete the selected entry.
Move Move an object to another folder. Note that this button is only available in list view and only for selected Objects. Click browse to select an alternative location.
Tree View
The tree view displays each element as a level in an tree. Levels are determined by the structure of hierarchy.
Select a number and the list of numbers varies according to the number of available levels to display the desired level.
Mandatory Fields
In vRealize Business, there are fields that are mandatory and these fields are marked with asterisks along with text boxes or with asterisks only.
The mandatory fields are physical and logical by nature.
n Physical mandatory field - This field is denoted by and asterisk together with a text box (for example, a name field). These fields must be populated before any information can be saved.
n Logical mandatory field - Indicated by an asterisk only (for example. the report field). This field is mandatory and will affect calculations and final results. However, the user can save and close the window without completing this field.
For example, a report distribution is defined. It must have a name, but if the user does not know exactly which report should be distributed, the dialog box can still be saved, and the precise report can be defined at a later time.
Cost And Cost Analysis
2
IT Finance Managers, and similar users, use a cost model in vRealize Business to manage cost data and from which to analyze cost data.
A cost model is a multi-tiered set of allocation rules that map the financial relationships between expenses and other objects within the organization. Cost analysis illustrates the relationship between the cost and business needs. vRealize Business includes analysis dashboards that demonstrate the association between services and their delivery costs through business processes.
This chapter includes the following topics: n “About Cost Models,” on page 25
n “Getting Started with Cost Models,” on page 26 n “Working with Cost Models,” on page 27
n “Uploading Data to vRealize Business,” on page 38 n “Working with Allocation Settings,” on page 58 n “Analyzing Cost Data,” on page 63
n “Viewing Model Problems,” on page 85 n “Cost Model Metrics,” on page 87
About Cost Models
A cost model is a multi-tiered set of allocation rules that map the financial relationships between expenses and other objects within the organization. This relationship reveals the entities that drive the cost of other entities and the entities to which cost is passed.
The cost model diagram is a visual representation of the cost model high-level structure. It illustrates cost flow throughout the organization.
vRealize Business includes a default cost model. The IT controller, or similar user, creates and modifies the cost model to reflect cost relationships in the business structure. Modifications to the cost model include adding and deleting cost objects, and changing dependencies to reflect the current contributory
Elements of a Cost Model Diagram
The cost model diagram is a visual representation of the cost model high-level structure. It illustrates cost flow throughout the organization.
The cost model diagram includes expenses, groups, and objects.
n Expenses are the critical input to all cost models. vRealize Business uses expense data to calculate the cost of all other cost model elements. Because the cost model represents expense allocation
relationships, expenses are the only entities that initially contain actual numeric costs and therefore are an integral part of the cost model. The default cost model diagram includes an expenses node, and you can add additional expenses nodes to represent general ledgers or other expense inputs. Every element in the cost model should either have expenses directly linked to it or indirectly linked through other elements. Expense nodes in the cost model diagram are square.
n Cost group are collections of cost objects. Groups can be standalone, such as names of individual servers, or folders that contain other cost objects. For example, cost centers can be a cost group that includes the cost object folders related to IT security, database team, and storage products. Cost groups in the cost model diagram are squares with rounded corners and layered frames.
n Cost objects are entities associated with the organization’s activity for which costs are incurred. The object itself, a product, service, department, or other entity, might have expenses of its own. Conversely, you can evaluate its cost by applying cost allocation rules to its cost drivers. Cost objects in the cost model diagram are squares with rounded corners.
Cost Model Diagram
The cost model diagram shows the state and relationships of the cost model elements.
n Costs originate in expenses and flow from left to right through the elements in the diagram. n Links represents cost movement, connect cost model elements.
n Cost model elements can display a monetary amount that indicates the total cost of the element. n When you point to a cost path, the relevant cost model nodes are highlighted.
n By default, the cost model diagram reflects organizational data for the current month. Because vRealize Business might contain different cost data, or cost allocations might change from month to month, you can select a date to view cost data for an alternative month and year.
n Metrics are measurements of data. They appear in the status line above the cost model and in each cost model element. The system presents up to two metrics at any given time. You can change metrics to view alternative information.
n The date of the last cost calculation appears in the upper-right corner. The time appears if the last calculation was done during the current day.
Getting Started with Cost Models
vRealize Business includes a default cost model. The cost model incorporates the most common cost groups and cost objects with related links that reflect an organization’s structure. You can customize the default cost model to match any organization.
Some of the cost groups in the default cost model are initialized with standard data. For example, the physical servers cost group includes UNIX, Linux, and Windows, the most common physical server types that allow benchmark comparison with industry standards and peers. Other cost groups, like Applications, are initially empty. Populate these cost groups with data that is appropriate to your organization.
Follow these basic steps to achieve a complete, functional, and useful cost model.
1 Upload expense accounts and hierarchies for your organization’s IT cost centers, data centers,
applications, and business units. For more information, See “Uploading Data to vRealize Business,” on page 38.
2 Upload the General Ledger expenses, mapping, and usage files for the organization’s specific cost objects to the default cost model by using the Upload Data Sources feature. See“Upload Data Sources,”
on page 45.
3 View the cost model results and resolve any issues or missing data. “Resolve Upload Problems,” on page 56.
4 To obtain a comprehensive view of the cost model, review the default content dashboards. For the best value from these dashboards, and especially in the CIO Dashboard, customize the reports and select the relevant services that best fit your organization. See“Analyzing Cost Data,” on page 63.
Working with Cost Models
vRealize Business includes a default cost model with common cost objects such as expenses and cost centers. The IT controller or a similar user can add or delete objects, upload cost data, and define cost drivers and cost allocation targets.
Add a Cost Model Element
A cost model element represents an entity in the organization for which the IT Controller or a similar user wants to examine costs. Elements can represent departments in a company, or objects such as email or CPUs. You can add a node to the cost model to analyze its cost and calculate its unit cost.
Connecting nodes to the cost model illustrates the node’s relationship in the organization and allows costs to be distributed to and from the node.
Prerequisites
You must have update permission to add cost model nodes. An administrator can modify the user’s role as required.
Procedure
1 Point to the area above or below the center of an existing cost model element and click the Add Element icon.
2 Select the required element from the Add Element pop-up window.
The new node appears in the cost model where you clicked the Add Element icon. 3 Type the name of the new element in the text box.
4 To keep similar elements together, drag elements to the required location in the cost model. 5 Point to an element node to which the new element should be connected.
6 Drag the arrow to the new element. What to do next
Define Cost Object Details
You can upload data to a stand-alone cost object. Prerequisites
You must be an IT controller or a similar user. Procedure
1 Right-click cost object and select Setup Object. The Help Desk: Setup Object window appears.
2 Select a Category from the drop-down menu and select the Role. 3 Click Manage > Add.
4 Select Users and select the User Name. 5 Click OK.
What to do next
To define a cost group, see “Define Cost Group Details,” on page 28.
Define Cost Group Details
You can upload data either as a flat list or as a hierarchy. The decision to categorize a cost group as one or the other depends on the data, the organization, and how costs are distributed.
Prerequisites
You must be an IT controller, or a similar user. Procedure
1 Click the name link for a cost object.
The Browse Cost pop-up window opens with cost details for the object. 2 Point to the group name and click the down icon.
3 Select Setup Group from the drop-down menu. 4 On the Select Group Type page, select a category.
You can assign a category for cost objects to filter or generate reports based on category . 5 Select the group type.
Option Description
Flat List Creates a group with data that is not hierarchical. Click Finish to close the
wizard or click Next to add aliases.
New Hierarchy Type the name of the hierarchy in the text box and click Next.
Existing Hierarchy Select a hierarchy from the drop-down menu. Click Finish to close the
wizard or click Next to define the hierarchy structure.
6 On the Hierarchy Structure page, for new hierarchy groups, click Add to define the levels of the hierarchy.
The order of the levels is significant to the hierarchy structure. You can drag levels to change the order as required.
7 Click Next.
8 On the Alias page, define one or more aliases for the group. a Click Add to add an alias for the group.
b If vRealize Business uses the alias as the object title, select the check box in the Same as Object
Title column.
9 Click Finish. What to do next
To define a cost object, see “Define Cost Object Details,” on page 28.
View Cost Details
You can view cost details for an object in the cost model. A folder icon indicates a level in a cost group or hierarchy.
For example, the Business Services cost group contains folders for Hotel Operations, Associate Services, and Professional Services. Metrics appear in Browse Cost pop-up window for every cost object with associated costs. To view alternative metrics, see “Viewing Model Metrics,” on page 103.
Prerequisites Create a cost model. Procedure
1 Click the name link for a cost object.
The Browse Cost pop-up window appears with cost details for the object.
2 To view cost details for an object in a cost group or hierarchy, click the required line in the Browse Cost pop-up window.
3 To sort the columns with metric data, click the column title.
View Cost Drivers
Cost drivers are objects that contribute cost to other objects. Prerequisites
Create a cost model. Procedure
1 Click the name link for a cost object.
2 Point to a cost object in the Browse Cost pop-up window. The Drivers link appears to the left of the window. 3 Click the Drivers link.
View Cost Allocation Targets
Cost allocation targets are objects that receive cost from other objects. When you view cost allocation targets, the metrics in the primary Browse Cost pop-up window appear in the Allocations pop-up window.
Prerequisites Create a cost model. Procedure
1 Click the name link for a cost object.
2 Point to a cost object in the Browse Cost pop-up window.
3 Click the Allocations link to open an additional Browse Cost pop-up window, to the right of the current window, with a list of the allocation targets for the selected object.
View Pass Through Cost
Pass through cost represents costs that are routed by means of other cost objects in the cost model. Use this window to track costs that are not used in a cost object, but passed to other cost objects.
Prerequisites Create a cost model. Procedure
1 Click the name link for a cost object.
The Browse Cost pop-up window opens with cost details for the object. 2 Point to any object and click the down-arrow icon.
3 Select Pass Through Cost from the drop-down menu.
The Pass Through Cost window shows pass through cost details, such as amount and cost path, related to the selected cost object.
Add a Property
This allows the user to add a property to cost group or object.
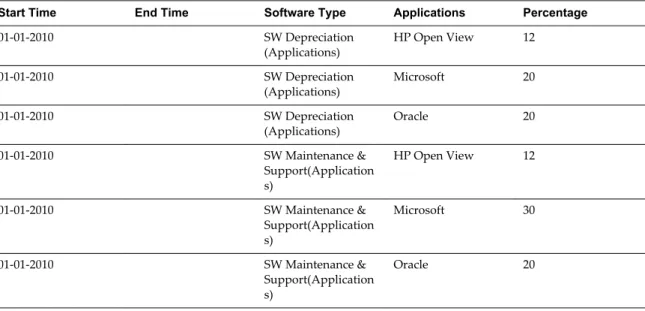
You can assign property values for the cost group or object for each month in the fiscal year. See “Modify Property Values,” on page 31. You can upload multiple properties with value data from hierarchies, expenses, or flat list cost groups. See“Uploading Data to vRealize Business,” on page 38. Properties link a cost object or cost group with a value to improve cost allocation calculations. An example of a property is head count. For example, vRealize Business uses head count information to manage costs for employees in the different departments in a company.
Prerequisites Create a cost model. Procedure
1 Click the name link for a cost object.
The Browse Cost pop-up window opens with cost details for the object. 2 Point to an object and click the down-arrow icon.
3 Select Property List from the drop-down menu.
If the selected object is a cost group, the Property List window appears. If the selected object is a cost object, the Property Values window appears.
4 Click Add to add a property for the selected cost group or object. 5 In the Add Property window, select an option and click Save.
Option Description
Select Choose a property from the drop-down list.
Create New Type a property in the text box. You can reuse the new property for any
cost object or group.
6 Click Close.
Modify Property Values
The property values help to predict changes in cost for the organization. You can assign property values for each month in the fiscal year.
For example, the headcount in January is twenty. Due to a hiring effort, the headcount for February through May is projected to be fifty. The system administrator can define the first month of the fiscal year in the Options tab under General Preferences. This directly affects costing and budgeting calculations. For the months January through July, the fiscal year is set to the calendar year to which the first month belongs. For August through December, the fiscal year is set to the following year. For example, if the current year is 2012 and the first month is set to October, the fiscal year in vRealize Business is set to 2013.
You can upload multiple properties with value data. See “Uploading Data to vRealize Business,” on page 38.
Prerequisites
You must be an IT Controller, or a similar user. Procedure
1 Click the name link for a cost object.
The Browse Cost pop-up window opens with cost details for the object. 2 Point to any object and click the down-arrow icon.
3 Select Property List from the drop-down menu.
If the selected object is a cost group, the Property List window appears. If the selected object is a cost object, the Property Values window appears.
4 For a cost group, select the property to set monthly values.
5 In the Property Values window, click inside a cell to edit the value and click Save.
Add an Expense Account
This allows you to add an expense account which includes Travel, Salaries, and Office Supplies.
Expense accounts are categories that explain the purpose of each expense. The IT Controller, or similar user, collects data from the chart of accounts and uploads all expense account information to vRealize Business. Prerequisites
Procedure
1 Select Costing > Expense Accounts.
2 Click Add and complete the required fields in the New Account page. 3 Click Add.
Add an Expense Record
Expense records help you track and organize expenses. Prerequisites
Open a cost model. Procedure
1 Point to an expenses element in the cost model and click the down-arrow icon. 2 Select View Expenses from the drop-down menu.
The Expense Records window shows details for all expense records. 3 Click Add to add an expense record.
4 In the New Record window, supply the required information, and click OK.
Option Description
Amount Amount of the expense. Date Month and year for the expense.
Account Expense account to which the expense belongs. Expense Code Optional code for the expense.
Fixed/Variable To understand the fixed/variable implications of your budget plan, ensure your accounts fixed/varibale property is defined correctly.
1 Click Date to open the account tree, and for each account, click edit. 2 Select the Fixed/Variable field and assign the correct value 3 Click OK and refresh the system.
Type of overhead expense.
n Fixed costs do not change when production activity changes. Examples include rent and
insurance.
n Variable costs respond to changes in activity or volume. Examples include hourly wages and
office supplies.
Capex/Opex To understand the capex/opex implications of your budget plan, ensure your accounts capex/opex property is defined correctly.
1 Click Date to open the account tree, and for each account, click edit. 2 Select the Capex/Opex field and assign the correct value
3 Click OK and refresh the system. Type of expense.
n Capital expenditures, Capex, are those for which the benefit extends beyond the tax year.
These expenditures includes fixed assets, such as equipment or property.
n Operating expenditures, Opex, are those required for day-to-day business functions, such as
Export Cost Model Data
You can export cost model data to use in another application, such as email, or in a presentation. The output is a .csv file.
Prerequisites
Verify that you have an open cost model from which to export data. Procedure
1 Click the name link for a cost object. The Browse Cost pop-up window opens. 2 Navigate to the required object for export. 3 Click Export and select the export level.
Option Description
Current Level The output file includes all cost objects, and related cost information, for
the current level.
All Levels The output file includes the cost information for the current level, displays
the parent level and all levels to which this level allocates cost. Use this option to export all levels for hierarchical data.
For compatibility between different applications, the output file does not include formatting in the columns, and units, such as $ or %, appear in the column headers only. Use the formatting features of the application that you use.
4 Click Open or Save, as required.
Manage Cost Data
The IT Controller or users with a similar role can modify and track cost model upload activities for expenses, allocations, and unit cost or unit price settings.
For example, you might have a monthly process for collecting and uploading data to the cost model. You can use this feature to review the status of your uploads, and upload missing information, or contact the appropriate person to upload the data.
Verify that you have a cost model with uploaded data and one or more cost allocations. For information about uploading data, see “Uploading Data to vRealize Business,” on page 38.
For information about uploading, adding, and editing expense records, see “Add an Expense Record,” on page 32.
For information about allocation settings, see “Working with Allocation Settings,” on page 58. For information about properties, see “Modify Property Values,” on page 31.
Prerequisites Procedure
1 Click Manage Data from the toolbar.
The Manage Data window shows information and statistics for upload activity.
2 Click a link in the Log column to view a read-only upload log for the corresponding Target Object. 3 Click a link in the Upload column to upload data for the corresponding Target Object.
4 Click a link in the Edit column to modify upload details.
The action is different according to the value in the Type column.
Option Action
Expense The Expense Records window appears.
Allocation The list of cost allocations for which uploads have occurred appears. Click a Path link to edit the Allocation routing.
Group Property The list of values for the uploaded property appears.
Delete the Cost Model Data
The administrators can delete the cost model data for the expenses allocated, delete the allocation data and also delete the allocation rules set.
Prerequisites
Verify that you have a cost model with uploaded data and one or more cost allocations. Procedure
1 Click Manage Data from the toolbar.
The Manage Data window displays information and statistics for upload activity.
2 Click the tab Delete Cost Model Data to cleanup cost model or to empty the data and optional allocation methods.
3 Select one of the allocation methods to cleanup the data or the allocation rules. n Delete Expenses: Deletes the expenses which refers to the particular cost model.
n Delete Allocation Data: Deletes the allocation data which refers to the particular cost model. n Delete Allocation Rules: Deletes the data and allocation rules which refers to the particular cost
model.
NOTE If you select the Delete Allocation Rules option the Delete Allocation Data is automatically greyed out.
NOTE When you perform this operation the changes are reflected in the application after running the full cycle.
Define Cost Model Permissions
The IT Controller, or similar user, can assign permissions per cost model for non-administrative users or groups. For example, a cost model contains business unit-specific information. The manager in charge of this business unit must have permission to manage this cost model. The same manager’s access should be excluded on a different cost model to which he has no connection.
Prerequisites
Verify that the cost model is open. Verify that the primary hierarchy for the users in the Authorization List is set to Cost Models. See “Role,” on page 184.
Procedure
1 Click Permissions in the toolbar.
The Permissions window shows the roles and the associated authorized users or groups that have permissions for the cost model.
2 Highlight a role and click Manage to modify the list of authorized users for the role. 3 In the Manage Authorization window, click Add and select either Users or Groups. 4 Select the required users or groups and click OK.
Authorized users can delete only users or groups that they add to the Authorization List. The Can Be
Deleted column indicates that the current user can delete a user.
5 Click Close.
Defining a Calculation Period for Cost Models
You can define the default time frame for the cost model calculation. You can also set a cost model not to calculate by default. This improves the cost model calculation performance.
Prerequisites Create a cost model. Procedure
1 Select Costing > Cost Models and select the required cost model. 2 Click Properties from the toolbar.
3 In the Properties pop-up window, select one of the options to define the calculation period. n Do not calculate - Select this option to disable cost model calculation.
n Calculate for default period (24 months back, 36 months forward) - Select this option to calculate cost data from past two years till 36 months.
n Calculate for custom period- Select this option to specify the calculation period according to your requirement.
Refresh Cost Model Calculations
After modifying a cost model, recalculate the cost data to update the model with the most accurate cost information.
Prerequisites
Verify that the cost model is open. Procedure
1 Click Refresh Results.
The system updates all monetary calculations for the current cost model for the current month. 2 Select Full Results from the Refresh Results drop-down list to recalculate monetary data for all cost
Define Primary Cost Model
You can define multiple cost models, but only one model is the primary cost model.
vRealize Business uses the primary cost model as the default input for cost-related dashboards and reports. If you designate an alternative cost model as the primary cost model, results for all cost-related dashboards and reports will change.
Prerequisites Open a cost model. Procedure
1 Select Costing > Cost Models.
2 Click the line with the required cost model and click Set Primary. 3 In the confirmation pop-up window, click OK.
The primary cost model appears in the Cost Models list in bold.
Create a Cost Model
The cost model represents a set of cost elements and their financial relationships. You can create either an empty cost model or create a cost with out-of-the-box cost elements.
Prerequisites
You must be an administrator, IT Controller, or similar user. Procedure
1 Select Costing > New Cost Model.... 2 Select the cost model type.
n Blank Cost Model - To create an empty cost model on which you require cost elements. n Primary Cost Model - To create a cost model with default cost elements and their relationships.
NOTE vRealize Business uses the primary cost model as the default input for cost-related dashboards and reports. You can create multiple cost models, but only one model is the primary cost model. You can set any cost model as a primary cost model at any time. See “Define Primary Cost Model,” on page 36.
3 Provide a name to the cost model. 4 Click Add.
Delete a Cost Model
The IT Controller or similar user can delete a cost model if the cost relationships are no longer valid or if the cost data is obsolete.
Prerequisites Create a cost model. Procedure