Photography
Hanna Morales and Gur-eyal Sela
Mr. Swenson
New Explorations into Science, Technology and Math
AP Chemistry
Abstract
Over the past few weeks, we have been searching about the early history of photography and how the process has evolved over time. Our research goes back to the 16th century and discusses the
Introduction
Photography is a method through which images are recorded and made permanent. It has been an ongoing experiment that, through trial-and-error, has improved over the years. In the 1800s, black and white photographs started to emerge, followed by image gradients, colored pictures, and now digital, higher-quality photographs. The equipment used in the process has also evolved over time. The metal sheets covered with chemicals that were once used to record an image became film cameras and
eventually digital cameras which now take considerably less time to capture an image. As a result of these advancements in technology, photography became increasingly cheaper and more available to the public.
More access to photography has had a major impact on societies. It has helped police officers solve crimes, increased business for the fashion industries, and created jobs for people such as a model or a paparazzo. Photography may not only signify a job, for each individual has his or her own views on the craft. For some, it may also be a way to capture special moments in life; a birthday, a wedding, or a special dinner. And then there are those who may consider it a form of art, working on exhibitions and other projects.
The role played by photography in societies is of great importance, which is why we have chosen photography as the subject for our project. We also took into consideration the emotions that we associate with it, such as the happiness after successfully taking a picture, the nostalgia whenever one looks through baby albums, and the amazement at the sight of beautiful, breath-taking pictures. Moreover, we believe that, in a time when everything is being dominated by electronics, it is important to preserve the knowledge of photography as it used to be, for the past is as precious as the future.
Literature Review
Black and White Photography
Photography is a process based on the exposure of silver ions to light. A photographic film is a plastic coated with gelatin and some type of silver salt, usually a silver halide (United States Naval Academy, 2003). This coating is known as the emulsion (Lenman, 2005). What happens when the photographic film is exposed to the light is a redox reaction. Photons absorbed by the anion lead to the release of an electron, which the silver cation then takes to form a neutral silver atom. A latent image is imprinted on the photographic film, still invisible to the human eye (United States Naval Academy, 2003). The developing process is used not only to create a visible image but also to make it permanent. A cluster of silver atoms is responsible for the black and white sections in a photograph. The black sections are where one finds the clusters of silver atoms, which, due to their diffraction of the light, appear dark (United States Naval Academy, 2003). A reducing agent is used to selectively reduce silver ions in the emulsion to form these clusters. The reducing agent only reacts with those silver ions that are next to neutral silver atoms (Olmsted and Williams, 2006). Hydroquinone is a popular reducing agent that forms the hydroquinone dianion in the presence of a strong base. High pH levels are required to produce sufficient dianion because this is the compound that undergoes oxidation to make the reduction of silver cations possible. The redox reaction continues until all silver ions are reduced and the film turns
completely black, unless the photographic film is introduced in a diluted acidic solution that can stop the production, and thus the oxidation, of hydroquinone dianion (United States Naval Academy, 2003). One last substance must come into contact with the emulsion in order to finish the process. Silver cations that were not reduced when exposed to the light or the hydroquinone dianion must be removed from the emulsion, since, over time, exposure to the light will lead to the reduction of these silver cations and to complete darkening of the photograph. Any compound that could form a soluble substance with the silver salt can be used, for, once the solution is formed, it can be
washed away with all the silver salt that did not undergo a redox reaction and prevent it from ruining the final image, a negative (United States Naval Academy, 2003). The following images, obtained from the United States Naval Academy, illustrate the reactions that must take place in order to form, develop, and make an image permanent.
Exposure to light: Reducing agent:
Exposure to the reducing agent:
Addition of the acidic solution:
Making the image permanent, or fixing the image:
silver carbonate as a result of the silver present in the nitric acid. Schulze noticed that, when exposed to light, the solution would turn purple. He began to apply the newly acquired knowledge by creating images of text in this solution, allowing light to go through perforations made in a sheet of paper and to initiate the redox reaction in the silver carbonate (Webster van Tonder, n.d.). This was one of the first steps in the creation of photography. In 1802, Thomas Wedgwood and Humphry Davy published their own attempts to create images using light. A solution of silver nitrate over paper or leather successfully created the images through which the sun’s rays passed in order to reach the solution (Towler, 1864). The problem that persisted was that there existed no method which would allow for the fixation of the image.
The first permanent image was created by Joseph Nicéphore Niépce in 1826. Through trial and error, Niépce was able to determine that bitumen, a type of petroleum, could be effectively dissolved in lavender oil and washed away from the printing plate. The substance would harden
after exposure to light,
leaving only the unexposed sections viscous and soluble in lavender oil (Boyd, 2010). In 1829, Joseph Niépce began a partnership with Louis
Daguerre. What resulted was a process, today known as daguerreotype, through which photographers could effectively develop and fix an image. The only difference between Daguerre’s method and Niépce’s method was the materials. Daguerre utilized “iodide of silver on a metal plate, mercury as
a developer, and hyposulphite of soda as a fixing agent; in that of [Niépce], bitumen on a metal plate, iodine as a developer, and oil of lavender in place of hyposulphite of soda” (Towler, 1864). The
chemicals used in the past had the same effects as the ones used today. They would accelerate reduction of the silver ions to form clusters of silver atoms. They would then halt the process and dissolve the unexposed sections in another substance that could then be removed from the picture. The difference is that the materials used today are safer, an example being the use of a weak acid solution to make a latent image visible rather than mercury vapor, a toxic substance that could potentially affect the kidneys, liver, brain, and nervous system (Science Lab, 2013). There have also been improvements in the amount of
Figure 2 (wikipedia.org)
time it takes to obtain a latent image. Niépce’s 1826 photograph had to be exposed to the light for about
eight hours in order to form a latent image (Boyd, 2010). Nowadays, exposure for a few seconds may turn the whole image black, so one can only expose the photographic film for a small fraction of a second. This is due to the sensitizers with which the silver salt is usually treated to make it more sensible to the light. Although sensitizers were being used in the 19th century and had allowed time of exposure to be reduced significantly, the duration was still long compared to today’s standards. A photographer would
take seconds back then to capture an image (Towler, 1864). Emulsions have changed greatly since the 1800s as well. Collodion, “a viscous, volatile mixture of gun cotton […] damped down with butinol and dissolved in ether with added alcohol,” was used as an emulsion for much of the second half of the 19th century, since it provided the chemicals used for sensitization of the silver salt (Lenman, 2005; Towler, 1864). It was used in the production of different types of images, such as the ambrotypes, the tintypes, and the wet-plate negatives (Lenman, 2005). But this flammable substance was slowly replaced by dry plates, made from emulsions of gelatin and silver bromide. These dry plates would remain sensitive to the light for longer periods of time than collodion and allowed for shorter exposure times (Lenman, 2005). Gelatin silver halide emulsions are still used to this day in the production of photographic film.
Photography has evolved greatly over the past few centuries. Through trial and error, analysis, and other methods, scientists from all over the world have been able to improve the art of photography and complete it. Different aspects have changed independently, such as emulsions, while others have been directly affected by that independent change, such as time of exposure. But regardless of these changes, the basis has stayed the same. The goal is to capture an image, make it visible to the human eye, and prevent it from undergoing any other change that would distort or erase the image.
Color Photography
Color photography is based on the same chemical reactions that take place to produce a black and white photograph. The addition of compounds that can create dyes is one of the biggest differences between the two types of photography. While black and white photography is only based on the redox reaction of silver salts, color photography is based on the redox reaction of multiple compounds to re-create the colors from a scene. The first attempts to re-create color photographs were in the 1840’s. Since
photographers and chemists at the time knew that a black and white photograph is simply a pattern of molecules that have reacted with the light, they knew it was just a matter of finding the correct
Search for the chemicals and procedures that would yield a colored photograph began as early as 1810. Dr. T. J. Seebeck had noticed how different frequencies of light affected silver salts to change color. Light closer to violet on the visible spectrum would have a greater impact on the change of color than light closer to red. The way in which the compounds reacted with light of different frequencies led Seebeck to conclude that creating a color photograph depended on finding the right compounds to change color with the right frequency of light. Because a single compound, known as a “chameleon” compound,
could not turn into different colors by exposure to light of different frequencies, mixtures began to be created in order to develop colored photographs (Zollinger, 2003).
Robert Hunt was one of the first scientists that, for the purpose of photography, studied the reactions that chemicals underwent when exposed to light. He had succeeded in recreating a scene, however with incorrect colors. When utilizing silver’s sensitivity to light, he relied upon the theory that
the color of the silver compound created by the energy of a certain monochromatic light would match the light’s color. This was not true however. If, for example, the energy needed to create Ag3+
was satisfied by a beam of green light, the resulting Ag3+ would be red. And indeed, the colors of each object in Hunt’s pictures were not properly matched with the respective objects: The blue skies were crimson, and the grass appeared light blue (Marien, 2002).
In the late 1800s, another attempt was done by Henri Becquerel to create colored photographs which replicated the colors of the scene correctly. He discovered that light of different frequencies affected silver chloride differently. In his experiment, he arranged different layers of silver chloride on a silver plate in order to change the saturation of the resulting image, since more saturation would result from a thicker layer of silver chloride. In order to attain the precise thickness of silver chloride, he at first used copper chloride on a silver plate, and filtered out the unnecessary copper. Yet, he later found out that the use of diluted hydrochloric acid on the silver plate (as seen in Figure 4) gave a more precise control over the thickness of the silver chloride produced. It also led to more
easily disposable and extraneous products such as H2 gas (Williams, 1990).
In 1855, James Clerk Maxwell published his theory on the production of colored photography through the use of only three colors. Maxwell had incorrectly proposed that using different hues of red, green, and blue could produce any color. Therefore, instead of relying on different compounds to create the needed color, he proposed that only three compounds be used, one for each of the colors, and that each colored layer
of a colored photograph. This approach proved successful. Using different filters, scientists were able to create three different sets of a photo. Sergei
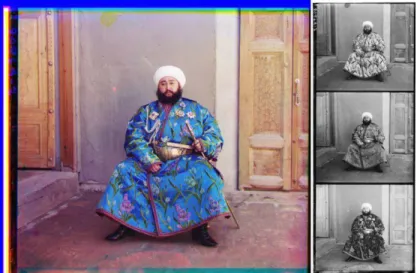
Mikhailovich Prokudin-Gorskii was the first to follow Maxwell’s idea in 1855 by proposing the
Red-Blue-Green (RGB) system. As seen on Figure 5, a colored picture taken by Sergei Mikhailovich Prokudin-Gorskii was created by the combination of three colors (Zillinger, 2003). Looking at the man’s blue robes,
one could say that the button grey-scale picture was
originally the blue film, since the robes in that copy are the darkest (Eaton, 1957).
Polaroid
In 1937, Edwin H. Land founded the Polaroid Corporation. The company released into the market a new product known as instant photography. In the instant photo film, the reactant would be kept on the edges of the Polaroid film to prevent it from developing. As the photo was taken, the film would record the scene and go through a pair of rollers that would spread the reactant across it. Robert Hunt’s use of the chemical product’s color, as well as Maxwell’s and
Prokudin-Gorskii’s use of complementary colors, was a method utilized in the Polaroid to create colored photographs. Yet, Edwin Land had to come up with a mechanism that would expedite the reaction process and ensure that the film would not be burned during the developing process
(Williams, 1990).
Unlike traditional film development, in which the film reacts with other substances to create the picture, instant photo film is built on dyes. It
also has to accommodate for the need to dispose of any unused products during the development process (Marien, 2002). In the Polaroid, each
hydroquinone dye is matched with a silver bromide layer that excites when absorbing the frequency of the dye’s opposite color. When light hits the film, the silver
bromide that has not reacted with the light allows the dye below it to travel up, with the help of a reagent, potassium
hydroxide, rolled onto the film by the pins. The basic potassium hydroxide reacts with the slightly basic hydroquinone dye and further agitates the dye upward in a capillary motion. This results in the creation of
spots that, if not hit by the light, begin to show the dyes of the color opposite to the light’s color. This
way, for example, places that were not hit by green light generate magenta dye (Marien, 2002).
Afterwards, the unused silver bromide is cleaned away by the acid and timing layers. These layers both break and get rid of the silver bromide after reacting with potassium
thiosulfate. They also lose their opaque color, become transparent, and get rid of the extra potassium hydroxide which might react with acidic hydroquinone (Marien, 2002).
The disadvantages of using Polaroid are that the film is of relatively bad quality in terms of blurriness and incorrect coloring. This often happens because the
process relies on the mechanical movement of the dyes going towards the top. There is an inherent error that occurs as they are slightly swayed from their initial horizontal position. This, as well as the fact that potassium hydroxide and the dyes react in varying degrees at different temperatures, add to the result of relatively low-quality
pictures (Mees, 1954). Figure 7 is a prime example of this problem. The yellow dye has spread over the edges of the photo resulting from the reactant’s spill on the edges. Some of the white dots on the lower part of
the picture show that some parts of the reactants have not been properly disposed of. Instant photography does its jobs in terms of speed, but lacks the quality that traditional photos have.
Method and Materials for Procedure #1
Developing pictures requires that our working area is in complete darkness. Additional exposure to the light could damage the images by turning them entirely black. So the first step we took was to find a dark room or turn a regular room from our apartment into one. The latter was done by placing black bags over the small window of the bathroom, an ideal working area because it contains a sink and a faucet with running water. For safety precautions, we waited until the night to start the process, when no light would leak in from the outside.
We began by cleaning all the containers and measuring equipment we would use. This would decrease the risk of contamination. We then took the correct measurements of distilled water for each individual substance and prepared the solutions. A graduated cylinder and a pipette were used for exactitude. A funnel was also available in case we considered that there was a high risk for spilling something. It is recommended to use gloves, for certain substances are slightly basic and others are slightly acidic. Two of the four substances we used allowed for different levels of dilution. The developer gave us the 1+15 option and the 1+31 option. Because we did not want our film to take too long to create a latent image, we decided to prepare the more concentrated solution of 1+16, using 34.4 mL of the developer rather than 17.2 mL. The fixer also gave us two options; 1+4 and 1+9. We chose to prepare a solution with the latter because we only had 500 mL of the fixer available and did not want to run out of fixer if any spilling accident took place.
Once all the solutions were ready, we began to practice how to load the film into a reel, three times in the light and twice in the dark. This part of the process is what requires the room to be
completely dark, for the film is now taken out of the stool and has no protection against the light. After having practiced, we turned off the lights and started to work with a film that had not been completely exposed but had captured an image instead. The process was slow, since we did not want the film to get stock in the spiral structure and get any marks. We made sure to memorize where the scissors and all parts of the developing tank were located, since we would need to use them in the dark. When using the
scissors, we used the tip of our fingers to find where the smooth surface of the film ended and the rough texture of another sheet began. We were careful not to cut parts of a picture or parts of our hands.
The steps that we took to finalize the process were taken as preventive measures. Rinsing the film with tap water was done to remove any chemicals that might have been left behind in the developing tank or the film itself. The wetting agent solution was used to get a faster and more uniform drying of the film. And the employment of a cloth towel to slightly dry the film was done to remove any excess water or chemicals from the surface of the film.
Method and Materials for Procedure #2
To prepare the pinhole camera, the first step that must be taken is to calculate the size of the
pinhole. According Jozef Petzval’s formula, , there is a specific match between the pinhole diameter, the focal length (the distance between the pinhole and the film), and the wavelength of the light passing through the hole which can yield an ideal image, one with maximum focus and proper brightness (Rayleigh, 1891). Yet, the equation above would only work with monochromatic light, and polaroid images are usually created by expsosure to regular daylight (Archie, 2001). A conversion table that provides the specific pinhole diameter and focal length for exposure to regular daylight was then found (Archie, 2001). We would need a 0.45 mm diameter #10 needle and a corresponding focal length of 157 mm.
To create the pinhole, it is recommended that a drilling motion, rather than poking, is used. Poking can lead to dents which might prevent light from properly passing through the hole, and, as a result, yield a non-circular outline of the picture taken as well as a blurry image. The drilling motion prevents this from happening by ensuring a more circular hole in which light is not blocked by dents. The next few steps, which require that the insides of the Pringles can be covered with black cardboard paper, were taken to minimalize light reflection inside the pinhole camera during exposure time, since the original surface inside the Pringles can was too shiny.
Duct tape was utilized throughout the experiment because of its relatively high durability and high adhesion, as well as its ability to be removed from a surface without causing much damage to it. The duct tape made the rectangular cardboard paper stronger and more durable . It became less likely to dent or rip. Two different cutting utensils were also utilized. The knife was helpful to make precise and relativelty straight cuts, as well as to cut through the tape. The scissors were more useful while cutting non-straight lines, such as the circular cover which was to be placed at the bottom of the Pringles can.
Results for Procedure #1
Note: Observations made of each shot will be relative. Each shot will be compared with the previous shot and/or the following shot.
Roll Film #1
Shot # Shutter speed (seconds) Aperture (F-stops) Observations
1 ¼ 3.8 Black
2 ¼ 4.3 Black
3 ¼ 5.6 Black
4 ¼ 6.1 Black
5 ¼ 8 Black
6 ¼ 8.5 Black
7 ¼ 11 Black
8 ¼ 11.5 Black
9 ¼ 16 Black
10 ¼ 16.5 Black
Development time: 12 minutes and 30 seconds Stop bath time: 30 seconds
Fixing time: 5 minutes
General observations: The film has a stain which makes its shiny surface opaque.
Roll Film #2
Shot # Shutter speed (seconds) Aperture (F-stops) Observations
1 1/15 8 Too light. The floor can
almost blend with the wall and lockers.
2 1/8 8 Details are slightly more
noticeable.
3 ¼ 8 Details are slightly more
noticeable.
4 ½ 8 The background begins to
fade in the dark.
5 1 8 The background turns slightly
6 1 8 Slightly blurry. A little too dark.
7 ½ 8 Better contrast between black
and white. Small marks in the windows indicate the trees outside.
8 ¼ 8 Slightly brighter classroom.
The trees become more noticeable.
9 1/8 8 Increasingly brighter. Details
are slightly more noticeable.
10 1/15 8 Brighter. The trees and
buildings outside can be identified.
Development time: 4 minutes and 30 seconds Stop bath time: 30 seconds
Fixing time: 4 minutes
Additional observations: As we move from shot #1 to shot #5, the images get darker. As we move from shot #6 to shot #10, the images get brighter.
Roll Film #3
Shot # Shutter speed (seconds) Aperture (F-stops) Observations
1 1 5.6 Blurry and a little dark.
2 1 6.1 Less blurry but still dark.
3 1 8 A little brighter. Periodic
table and writing on the board more noticeable.
4 1 8.5 Slightly brighter.
5 1 11 Details are more noticeable.
6 1 11.5 Slightly brighter.
7 1 16 Details are more noticeable.
8 1 16.5 Dirt in the floor is more
9 1 22 Slightly brighter. Details are more noticeable.
10 1 22.5 Slightly brighter. Details are
very noticeable. Development time: 6 minutes
Stop bath time: 30 seconds Fixing time: 4 minutes
General observations: The images get brighter as we move from shot #1 to shot #10.
Roll Film #4
Shot # Shutter speed (seconds) Aperture (F-stops) Observations
1 1/30 8 Great contrast between black
and white.
2 1/30 8 Suchita’s face seems to
slightly fade in the background.
3 1/30 8 Details very noticeable.
4 1/30 8 Not much contrast between
Nikki and background. Details in the shirt very noticeable.
5 1/30 8 Suchita’s shoulders seem to
fade in the background.
6 1/30 8 Great contrast between black
and white.
7 1/30 8 Slightly blurry and too
bright.
8 1/30 8 Slightly blurry foreground.
Details in Charlotte’s hair
very noticeable.
9 1/30 8 Great contrast between black
10 1/30 8 Bright foreground. Details are noticeable in the foreground.
Development time: 7 minutes Stop bath time: 30 seconds Fixing time: 4 minutes
General observations: Blurry background. Great contrast between black and white areas.
Results for Procedure #2
Exposure time (seconds) Image Setting
12 Window seal. Outside
the window.
16 Window seal. Outside
the window.
20 Window seal. Outside
Discussion for Procedure #1
The first film we developed did not yield positive results. No images were formed on the film. Instead, we had a completely black film with dried water or chemicals covering most of its surface. The liquid on the film simply dried before it was removed, for we did not see it in the dim light of the darkroom and forgot to pass a cloth towel over the film. The lack of images on the film has a different explanation however. There are two possible answers to why we ended up with a black film. The first one could be that the film was completely exposed to the light which we had in the darkroom. This would have led to a redox reaction between the silver cations and the accompanying anions. Reduction of all silver ions would have then yielded to massive clutters of silver atoms and a completely black film. The problem with this explanation is that the light used in the darkroom was a safelight. Though regular safelights are red and the light emitted in the darkroom seemed orange to the eye, we were assured that the light had no effect on the film due to its long wavelength and short frequency. Another explanation for our first results could also be that the film was left in the developer for too long. The Ilford Ilfotec HC developer acts as a catalyst to reactivate the reduction reaction of silver cations and form the visible clutters of black, silver atoms. The hydroquinone which the substance contains, along with the weak base diethanolamine, provides an ideal environment for this reaction (“Technical Information Film Chemicals – Low Volume,” n.d.; “Diethanolamine,” n.d.). Diluted in water, the developer is to give a pH of 9.05,
allowing the hydroquinone to react with the hydroxide anion and then oxidize (Technical Information Ilfotec HC,” n.d.). The reduction that would follow is that of the silver cations. If left in this solution for too long, the film might end up with so many silver clutters that all the emulsion turns completely black.
The second results we obtained were more successful. The film was not exposed to any light as it was been loaded into the reel, and the development time was reduced to 4 minutes and 30 seconds. Discarding the theory that the safelight had initially ruined our images, we could argue that the
development time is to blame for the previous results. With the second roll film, the time seemed to have been enough to allow for the formation of silver clutters but not for the formation of an entirely black emulsion. The rest of the chemicals seemed to have worked as expected. Changes in the brightness of each picture are due to the change in shutter speed or exposure time. Shots #1 through #5 obtain an increasing amount of exposure time. This is why the pictures get darker from shot #1 through shot #5. More light is being allowed to pass through the lens of the camera. Each subsequent picture obtains an increasing number of photons which electrons from an anion absorb. The more photons these electrons absorb, the greater the amount of silver atoms that form. Shots #6 through #10 show brighter and brighter pictures because the shutter speed is being decreased from one shot to the next.
indicates a smaller aperture (“F-stop,” n.d.). As we increased the aperture, the images got brighter, for the
opening of the lens kept getting smaller each time. The increasing bright areas in each subsequent image indicate that little light was reaching the emulsion. Knowing that some of the images might come out being too bright, we decided to increase the development time to 6 minutes. That way, the brightest image could also be developed, though the first and darkest image, as we expected, would come out a bit too dark.
The last set we had was roll film #4. The shutter speed and aperture were kept at 1/30 of a second and 8 F-stops, respectively. No changes in brightness were occurring from image to image. Since all the images taken were by the window and the light was very bright, the images came out a little too dark. The brightness from the sun outside helped to highlight the dark objects in the image. These came out to be almost white in the film, since did not emit any light but rather absorbed all of it. Only shot #7, which captured the dark classroom, came out brighter than the rest. Little light was getting to the film and, as a result, less reduction of the silver cations was taking place.
Roll film #4 was the darkest film, excluding roll film #1. The images from this film were taken next to a window. More light than in any other film could have resulted in a greater reaction rate and thus darker negatives. One could also say that the development time, being the highest used amongst the last three films developed, might have caused the darkness in the images.
In general, it is best to have a small aperture or shorter shutter speed when taking pictures of a bright object. That way, the amount of light which starts the redox reaction in silver halides or silver salts does not create clutters of silver atoms which are too large. The appropriate development time is also key to obtaining a latent image. One must make sure to leave the film in this solution for enough time. Little time could result in very light pictures such as the one in Figure 1, while overdevelopment could result in very dark pictures like the one in Figure 2.
Discussion for Procedure #2
All the pictures taken were visible and comprehensible, yet they remain flawed. The white spots visible in all the images show that varying amounts of light leaked through the sides of the pinhole. Each picture was marked by these white spots. The different degrees of light leakage from one image to the next were probably caused by the different manner in which the Pringles can and the rectangular base were aligned with the Polaroid back. Another explanation for this damage could come from the manner in which the can and rectangular base were pressed onto the Polaroid back during exposure time.
Further damage was done to the pictures as a result of the faulty pinhole. The silhouette of each image shows a pinhole that, though apparently circular when looked at with the eyes, is not completely round. The edges of each image are curved, barely forming the shape of a circle. This could have been from the fact that we did not properly drill the needle into the container’s bottom. The dents left from the poking motion have blocked some of the light and prevented light rays at the outskirts of the hole from reaching the film, resulting in a non-circular picture. However, looking at the edges of the pictures themselves, one could see that they are very smooth and sharp. This may indicate that the dents were barely blocking the light, and that the addition of narrow strips of duct tape to secure the Pringles can and the rectangular base might have been behind this problem. The ends of the duct tape that was used were in almost direct contact with the film itself, which increases the chances of an irregular, non-circular shape such as the one observed in every picture.
Due to the use of a Polaroid film, there were small, white specs covering some of the pictures. These specs were a result of the inherent low quality that comes along with the Polaroid film. This could also be seen in the pictures’ saturated surface, showing that the there was some blurriness in the picture.
As we move on from the 12-second exposure to the 20-second exposure we notice visible changes: Blurriness, light leakage, and photo brightness all increase. The longer the exposure time, the more light the Polaroid image absorbs. This results in increasing brightness, as well as higher light leakage. Higher exposure time can also be the cause for blurriness. The longer the time one has to hold the camera, the higher the chances one’s hands will begin to shake. The greater brightness and shaking of one’s hands have led to a lesser sharpness in the images with higher exposure time. Based on our
Appendix A
Materials for Procedure #1
Ilford Ilfotec HC (1 L*) Ilford Ilfostop (500 mL*)
Ilford Rapid Fixer (500 mL*)
Ilford Ilfotol (1 L*)
Distilled water (amount varies depending on the number of films to be developed)
Developing tank (1)
Reel (amount varies depending on the number of films to be developed, the size of the film to be developed, and the size of the developing tank to be used)
Plastic container or beaker (4) Funnel (1***)
Pipette (1***)
Stirring rod (optional) (1***) Thermometer (1***)
1000 mL graduated cylinder (1***) Pair of scissors (1)
Scrub sponge (1)
Soap (amount varies) Stopwatch (1)
Pair of gloves (1)
Paper towels (amount varies)
Chamois cloth, cloth towel, or squeegee tongs (1)
Exposed roll film (amount varies)
*These measurements indicate one bottle. If the brand or number of films to be developed is changed, these numbers might also change.
Procedure #1*
Note: Our pictures were taken with a Mamiya RB67 and the roll film used was Ilford HP5 Plus 400, which has a film format of 120. Our developing tank, the Omega Universal Developing Tank, can take up to 550 mL of solution and develop a single roll film of format 120.
1) Wash all containers and measuring equipment with soap and scrub sponge. Use paper towels to dry them.
2) Label 4 containers as “Developer,” “Stop Bath,” “Fixer,” and “Wetting Agent.”
3) To dilute chemicals, put on your gloves and follow the instructions on each bottle’s label. Use distilled water as the solvent.
If the label indicates that the substance is mixed at a 1+n ratio and the developing tank
can hold up to k milliliters of solution, the amount of substance to be used is k/(1+n) milliliters and the amount of distilled water used is k - k/(1+n) milliliters.
4) Using a graduated cylinder, and a funnel and a pipette if necessary, measure 34.4 mL of Ilford Ilfotec HC. Pour the substance into the container labeled “Developer.” Now, measure 515.6 mL of distilled water and pour this in the “Developer” container. Stir with a stirring rod or, if the
container has a cap, shake it.
5) Introduce a thermometer into the solution. The temperature needs to be at about 20°C (or 68°F). A mixture of hot and cold distilled water can be used to attain this temperature.
6) If there is only one funnel, pipette, thermometer, stirring rod, and graduated cylinder, wash and dry these before using them again.
7) Follow the procedure in steps four and five to dilute the stop bath, the fixer, and the wetting agent.
You will need 27.5 mL of Ilford Ilfostop with 522.5 mL of distilled water, 55 mL of
Ilford Rapid Fixer with 495 mL of distilled water, and 2.7 mL of Ilford Ilfotol with 547.3 mL of distilled water.
8) Place the scissors and developing tank in a way that will allow for quick and easy access in the dark.
9) Turn off the lights. Make sure the room is completely dark. Black tape over the windows, or black bags taped to the windows, as well as a towel at the bottom of the door, might help if you don’t have a dark room.
10)Take off your gloves and remove the film from the film canister. Without touching the emulsion, find the leader and cut it off with a pair of scissors.
to load the rest of the film into the spiral. Towards the end, cut the film to separate it from the spool and finish loading this into the reel.
12)Place the reel into the developing tank and close the tank. Make sure it is completely secured. 13)Now, turn on the lights and put on your gloves. Using the funnel if necessary, pour the developer
solution into the tank and start the timer. Tap the tank into a surface to get rid of any air bubbles. 14)In the course of 10 seconds, rotate (180° rotation) and tap the tank 4 times. Repeat the process at
1-minute intervals. This will continue until the development time is over. The development time varies with developer and extent to which this one is diluted. It starts as soon as the film is in contact with the developer and ends as soon as the film is separated from the developer, so it is best to start draining the tank a few seconds before time is up. Development tables will provide the time.
15)Pour the developer solution out of the tank and zero the timer. Then, immediately pour the stop bath solution into the tank. If the funnel is needed once again, make sure to clean it before you use it. Rotate the tank continuously for 10 to 30 seconds. Afterwards, the stop bath is removed. 16)The next solution to be introduced into the tank is the fixer. Start the timer again. The fixing time
varies from 2 to 5 minutes. Agitate the tank as described in step fourteen. After time is up, pour the fixer out of the tank.
17)To rinse the film, remove the lid from the tank and let water from the sink run down into the spiral for 5 to 10 minutes. Make sure the water is at a temperature similar to that of the solutions (20°C or 68°F). Another option would be to fill the tank with water and rotate 5 times. Then, drain and refill the tank to rotate 10 times. And once again drain and refill the tank to rotate 20 times.
18)After the rinse, pour the wetting agent solution into the tank and then agitate for 5 seconds. Let it sit there for 25 more seconds and then pour wetting agent solution out.
19)Remove the lid from the tank and take out the reel. Pull the film out of the reel.
20)Using a clip, hang the film from a hook, nail, or line high enough to prevent the film from touching the floor.
21)Run squeegee tongs, chamois cloth, or a cloth towel across the film. Then, let the film dry at
room temperature.
Materials for Procedure #2 Roll of duct tape (1)
Empty Pringles can (1) Knife (1)
Pair of scissors (1)
A4 black cardboard paper (2) 0.45 mm needle (1)
Ruler (1)
Procedure #2
Note: In our experiment, we employed the Polaroid back of a Mamiya RB67. 1) Using a ruler, mark a Pringles can 15.7 cm above its metallic bottom.
2) With a knife, cut out the Pringles can at the mark obtained from the previous step. Make sure that the line has no bumps.
3) Create a hole in the center of the metal bottom using a 0.45 mm needle. At first, an outside force might be needed to pierce the metal bottom, but a drilling motion is recommended once the bottom has been pierced. Make sure that the entire needle can easily go through the metal bottom. 4) Then, take the ruler once again and place this on a sheet of A4 cardboard paper. The ruler must be
perpendicular to the shorter side of the paper. Measure 15.7 cm of this cardboard paper and cut through this line with the scissors. Once again, make sure the line is straight.
5) Roll the piece of paper obtained and insert it into the Pringles can, making sure that the paper remains “stuck” onto the sides of the can.
6) Using the bottom of the Pringles can as a mold, draw a circular shape on top of what remains from the first sheet of cardboard paper and cut it out. This is to represent the cross section of the can.
7) If the cross section cannot fit into the container, trim it along its perimeter evenly to shorten its radius and preserve its circular shape.
8) After the piece fits into the container, fold it in half. Using the scissors, cut out a semicircle whose center is the same as the folded paper’s center.
9) Unfold the piece of paper; a circular hole should be present in its center.
10)Insert the piece of paper onto the Pringles can. Make sure the hole made by the needle is not covered by the cardboard paper.
11)With the ruler, measure the dimensions of the Polaroid back’s window. These measurements come out to be 9.5 cm by 9.5 cm.
12)Draw a rectangle on another sheet of cardboard paper with the dimensions of the Polaroid back’s window.
13)Using the scissors, cut out the figure and make sure that the piece can properly fit inside the Polaroid back’s window.
14)Cover one side of the rectangle with duct tape, folding excess pieces of duct tape over the edges of the rectangle.
16)Turn the can around. Create an open container once again by using the knife to cut out a hole in the rectangular piece. Make sure that no cardboard paper remains around the edges of the can. 17) Secure the container to the rectangular piece using narrow strips of duct tape. Make sure to cover
the whole perimeter.
18)Attach the rectangular piece to the Polaroid back’s window and secure it using the plastic panel that comes with the Polaroid back, making sure the Pringles can and the rectangular piece cannot move while sealed to the Polaroid back.
19)Now, cut out a thumb-sized piece of cardboard paper and make sure that, when pressed against the pinhole, it completely covers it. The pinhole camera is now finished.
20)To take a photograph, place the pinhole camera in front of the object whose picture you wish to take. The bottom of the Pringles can must be facing the object.
21)Determine the exposure time. Press the thumb-sized cardboard paper onto the pinhole and pull out the slide from the Polaroid back.
22)With the help of a person, start the stopwatch while simultaneously removing the thumb-sized cardboard paper from the pinhole.
23)While waiting for exposure, place a hand on the Pringles container to ensure no movement of the camera.
Works Cited:
Achifaifa. (2012, July 20). Revelar en casa: Mitos y leyendas sobre la fotografía analógica [Web log comment]. Retrieved June 6, 2013, from http://achifaifa.wordpress.com/2012/07/20/revelar-en-casa-mitos-y-leyendas/
Archie, J. (2001, September 12). Pinhole - Math. Photography w/o Lenses. Retrieved June 1, 2013, from http://pinhole.stanford.edu/pinholemath.htm
Boyd, J.E. (2010). Silver and Sunlight: The Science of Early Photography. Chemical Heritage, 28. Retrieved June 6, 2013, from http://www.chemheritage.org/discover/media/magazine/articles/28-2-silver-and-sunlight.aspx?page=1
Diethanolamine (Cas 111-42-2). (n.d.). In Santa Cruz Biotechnology. Retrieved June 6, 2013, from http://www.scbt.com/datasheet-211311-diethanolamine.html
Eaton, G. T. (19651957). Photographic chemistry in black-and-white and color photography, (2nd ed.). Hastings-on-Hudson, N.Y.: Morgan & Morgan.
Experiment 35 Black and White Photography. (2003, January 2). Retrieved June 6, 2013, from http://www.usna.edu/ChemDept/plebeChem/manual/Ex35.pdf
F-stop. (n.d.).In Webopedia. Retrieved June 6, 2013 from ttp://www.webopedia.com/TERM/F/F_stop.html
Fact Sheet Rapid Fixer. (2002, August). Retrieved June 6, 2013, from http://www.ilfordphoto.com/Webfiles/2006130218312091.pdf
How to Process and Print Black-and-White Film. (2005, June). Retrieved June 6, 2013, from http://www.kodak.com/global/en/professional/support/techPubs/aj3/aj3.pdf Ilfordphoto. (2009, October 2). Ilfostop [Material Safety Data Sheet]. Retrieved from
http://www.ilfordphoto.com/Webfiles/2009212918272126.pdf
Ilfordphoto. (2010, August 9). Ilfotec HC Developer [Material Safety Data Sheet]. Retrieved June 6, 2013, from http://www.ilfordphoto.com/Webfiles/2011118112851741.pdf
Ilfordphoto. (2009, October 2). Ilfotol [Material Safety Data Sheet]. Retrieved June 6, 2013, from http://www.ilfordphoto.com/Webfiles/2009212917572217.pdf
Ilfordphoto. (2010, November 26). Rapid Fixer [Material Safety Data Sheet]. Retrieved June 6, 2013, from http://www.ilfordphoto.com/Webfiles/2012430120381541.pdf
Information Leaflet Processing Your First Black and White Film (2003, October). Retrieved June 6, 2013, from http://www.ilfordphoto.com/Webfiles/200629163442455.pdf
Lenman, R. (2005). The Oxford Companion to the Photograph. Oxford, Great Britain: Oxford University Press.
Mees, C. E. (1954). The theory of the photographic process (Rev. ed.). New York: Macmillan. Niépce, J. (Photographer). (1826). The First Photograph [Photograph], Retrieved June 6, 2013, from
http://upload.wikimedia.org/wikipedia/commons/5/5c/View_from_the_Window_at_Le_Gras%2 C_Joseph_Nic%C3%A9phore_Ni%C3%A9pce.jpg
Niépce, J. (Photographer). (1826). The First Photograph [Photograph], Retrieved June 6, 2013, from http://www.hrc.utexas.edu/exhibitions/permanent/firstphotograph/
Olmsted, J.A. & Williams, G.M. (2006). Chemistry (4th ed.). Hoboken, NJ: John Wiley & Sons Pinhole - Math. (2001, September 12). Photography w/o Lenses. Retrieved June 1, 2013, from
http://pinhole.stanford.edu/pinholemath.htm
Rayleigh, J. (1891, January 25). Lord Rayleigh on Pin-hole Photography. Philosophical Magazine, 31, 87-99.
Rjt. (Photgrapher). (2004, October 21). Pozytyw i negatyw [Photograph], Retrieved Jun 6, 2013, from http://upload.wikimedia.org/wikipedia/commons/6/60/Pozytyw_i_negatyw.jpg
ScienceLab. (n.d.). Mecury [Material Safety Data Sheet]. Retrieved June 6, 2013, from http://www.sciencelab.com/msds.php?msdsId=9927224
Technical Information Film Chemicals – Low Volume. (n.d.). In Ilfordphoto. Retrieved June 6, 2013, from http://www.21gradi.it/Public/tech_chemicals_ilford_filmchem.pdf
Technical Information Ilfostop Pro Ilfotol Washaid Bioclean Ilfoclean. (2010, July). Retrieved June 6, 2013, from http://www.ilfordphoto.com/Webfiles/2011427101531770.pdf
Technical Information Ilfotec HC. (2010, June). Retrieved June 6, 2013, from http://www.ilfordphoto.com/Webfiles/2011427105392231.pdf
Towler, J. (1864). The Silver Sunbeam. Retrieved June 6, 2013, rom http://albumen.conservation- us.org/library/monographs/sunbeam/
Webster van Tonder, C. (n.d.). Photography - Bastard of Science or Esoteric Art? Retrieved June 6, 2013, from http://www.academia.edu/3176977/Photography_bastard_of_science_or_esoteric_art Williams, T. I. (1990). Science: a history of discovery in the twentieth century. Oxford, England: Oxford
University Press.
Wonnacott, J. (Photographer). (n.d.). [A well exposed negative that has been overdeveloped]. Retrieved June 6, 2013, from http://www.aregeebee.net/negs/eneg.htm
Wonnacott, J. (Photographer). (n.d.). [A well exposed negative that has been underdeveloped]. Retrieved June 6, 2013, from http://www.aregeebee.net/negs/eneg.htm