XO Hosted PBX
Document version: 2.02 Issue date: 17 May 2013
XO Hosted PBX
XO Hosted PBX
Table of Contents
Table of Contents ... i
About this Document... 1
Accessing MyPhone ... 1
The MyPhone User Interface ... 1
MyPhone essentials ... 1
Voicemail and Unified Messaging ... 2
Voicemail tips ... 3
My Numbers ... 3
Do-Not-Disturb and Call Forwarding ... 4
Extended features in MyPhone ... 5
Rejecting unknown callers ... 5
Call history... 5
Custom call-handling rules ... 6
Using XO Hosted PBX with a mobile phone (XO Anywhere) ... 7
XO Hosted PBX, Page 1
XO Hosted PBX
About this Document
Welcome to XO Hosted PBX! With XO Hosted PBX, you get an advanced communications system that uses the latest cloud technology to deliver you crisp, high-quality voice over the nationwide XO MPLS network.
This document guides you through the key features of the MyPhone web portal. MyPhone is an easy-to-use web interface for configuring your service and customizing your settings to meet your needs.
Accessing MyPhone
Connecting to MyPhone is easy. You need a recent web browser with Flash support and an Internet connection. Point your browser to
https://portal.xo.bizcommservices.com/MyPhone/index.html
and log in with your username and password. Your login credentials were emailed to you when your site administrator configured your service.
Tip: Don’t know your username or password? Ask your site administrator to review them in the MySite administration portal. They can look up your username and reset your password with just a few clicks.
The MyPhone User Interface
The first page you see in MyPhone is the Home screen. This outlines the things that you can do in the Portal and provides a simple starting point. Immediately above the message you’ll see the interface bar, like so:
Each one of the six items on the bar is clickable.
User interface elements
The MyPhone user interface is quick and simple to use. Here are some of the key elements that you will see as you navigate the screen.
Radio buttons: you may choose one, and only one, of these options.
Check boxes: you may choose, zero, one or more of these options.
Help button: a button identified by a “?”. Click this to see a help message.
Magnifying glass button: a button labeled with a looking-glass icon. Click on this to perform a search or filter.
Save button: a button labeled with the word Save. You must click on this to save any changes you make.
MyPhone essentials
In this section, we’ll describe how to use MyPhone to set up the basic elements of your service. We will explain how to
configure Voicemail and unified messaging
define frequently-used numbers
XO Hosted PBX
Voicemail and Unified Messaging
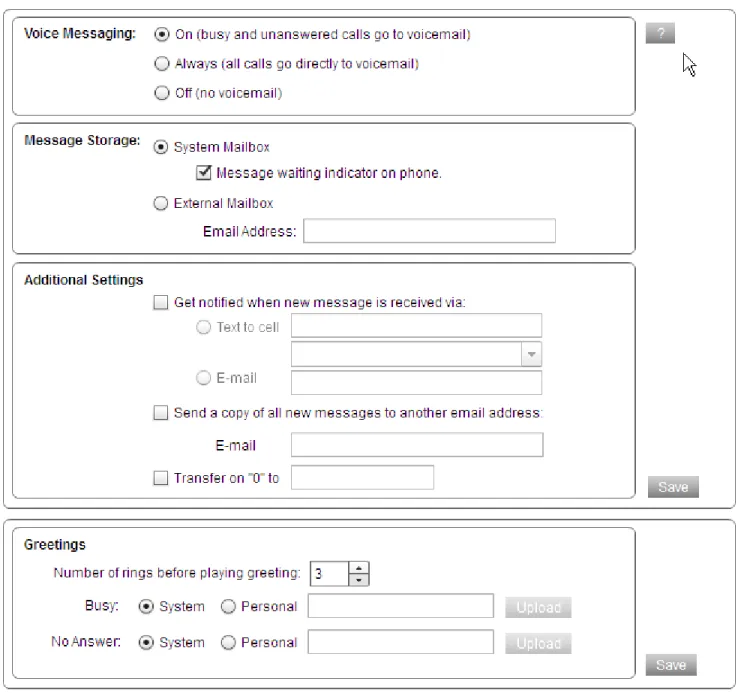
From the Home screen, click on Unified Messaging to access the settings for your voicemail and unified messaging service. Figure 1 shows the interface.
XO Hosted PBX, Page 3
XO Hosted PBX
Use the Voice Messaging radio buttons to choose whether to send all calls to voicemail, no calls, or only
unanswered ones. Most users select the last choice, but if you are part of a call center, for example, you do not want calls delivered to your line to end up in voicemail, so you would disable it.
Message storage defines where your voicemails are stored. XO Hosted PBX includes an easy to use voicemail system, but you can alternatively choose to forward all voicemails to another system as email attachments.
You can combine the two, by choosing the System Mailbox checkbox and the Additional Settings choices to notify you of new message arrival – or even send you a copy of the message – to your email account or cell phone.
You will want to set your Greeting that callers will hear when you are busy or unavailable. You can upload a pre-recorded greeting, or use the system-defined ones. (You can, of course, record your greeting using the phone, if you prefer.) Further documentation on uploading greetings is contained in the document XO Hosted PBX – Customer
Voicemail Greetings, available from your XO representative.
Tip: If you want to give callers more choice, use the Transfer on “0” option in the Additional Settings section to set a number that they will be transferred to if they hit 0, then refer to that choice in your greeting. For example, “Hi, this is Jane in Sales. Please leave a message at the tone, or press 0 to be transferred to the account desk.”
Remember to click Save where you see that button to save your changes.
Voicemail tips
Your voice PIN is important. It provides access to both your voicemail and to the voice portal. If your PIN is compromised, unauthorized users could make calls on your behalf. Therefore, you should
Keep your PIN safe and do not disclose it to anyone else
Choose a secure PIN.
For example, PINs should not contain “easy to guess” sequences such as repeated digits or fragments of your phone number. Another best practice is to use PINs longer than the default length of 4 digits. For example, a six- or eight-digit is considerably harder for an attacker to guess than a four-digit one. Your enterprise may also have security policies that should be followed when selecting passwords and PINs. Consult with your security
administrator if you are unsure.
Your Hosted PBX mailbox can store up to 100 minutes of voicemail, an each individual message can be up to ten minutes long. There is no age limit on messages stored in the system: they stay until you delete them.
My Numbers
The My Numbers panel is the place to store numbers that you frequently use with the service. Any number that you will
direct incoming calls to is a good candidate to be stored here. For example, if you intend to forward your office line to your cellphone, you’ll want to store your cellphone number here so that you can reference it when you come to set up that feature.
XO Hosted PBX
Figure 2 My Numbers user interface panel - example
Using the panel is straightforward. Simply enter a name and phone number in the form, select what type of number it is (office/mobile/home/miscellaneous) from the drop-down menu, and hit Add.
Do-Not-Disturb and Call Forwarding
From the Home screen, click on My Features. You’ll see a screen similar to the following:
Figure 3 My Features user interface panel
The exact list of features displayed will vary by your site type and individual seat type.
As you can see, this panel is one of the most powerful in the MyPhone portal. For the purposes of this section, we will look at only two features, Do Not Disturb and Call Forwarding.
XO Hosted PBX, Page 5
XO Hosted PBX
To enable Do-Not-Disturb, click on the Do Not Disturb label in the My Features panel and check the box marked “Do
not disturb me.” To disable it, uncheck the box.
Tip: You can set a ring reminder so that you do not inadvertently leave it switched on for longer than you intended. In any case, the MyPhone portal will display an alert indicator telling you that the feature is active.
Call Forwarding can be configured to
Forward all calls to a new number
Forward only unanswered calls, either to voicemail or to a different number
Forward calls only when your line is unreachable, for example if your site is down due to a flood or power cut. We’ll handle each of these in turn.
Forward All Calls
Click on the Forward All Calls label in the My Features panel to forward all incoming calls to your line to another number. Simply select the check box and select the target number from the drop down list. The list is populated by the numbers you previously configured in the My Numbers panel.
Forward unanswered calls
By default, unanswered calls are forwarded to voicemail after three rings. If you prefer to forward such calls to another number, click on the Forward Unanswered Calls label in the My Features panel and select the check box to forward to another number. Select the target number from the drop down list.
Forward calls when unreachable
This feature is commonly called Business Continuity. If your phone is unreachable, the Hosted PBX platform can send incoming calls to a different number. Simply select the Business Continuity label in the My Features panel and check the box. Then, select the target number that will receive the forwarded calls.
Extended features in MyPhone
In this section, we’ll describe how to use MyPhone to set up the more advanced elements of your service.
Rejecting unknown callers
You can automatically reject anonymous calls, that is, calls that do not present caller ID. Using the My Features panel, select the Reject Unidentified Callers label and check the box to switch on the feature.
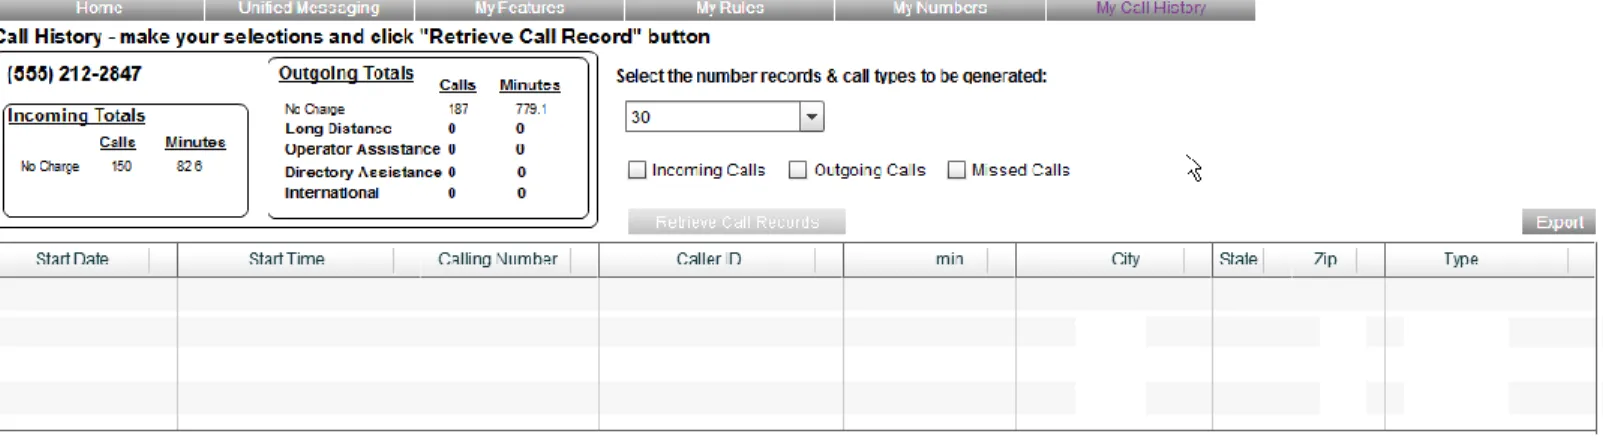
Call history
You can search for, and display all calls to and from your line using the Call History panel. Click on the My Call History label in MyPhone to open the panel.
XO Hosted PBX
Figure 4 Call History panel user interface
Select the type of call you want to search for (incoming/outgoing or missed) using the check boxes, and choose the maximum number of records to retrieve. You can review the results by day within the interface, or, if you prefer, export the results as a CSV file on your PC by clicking on the Export button.
Custom call-handling rules
With XO Hosted PBX, you can create rules for how calls should be handled, whether
at different times of day/days of the week
from specific numbers.
For example, you might want to forward calls from an important customer to your manager, or redirect calls that arrive out of business hours to another site.
To configure rules, choose the My Rules label from the MyPhone home page. The interface is shown in Figure 5.
XO Hosted PBX, Page 7
XO Hosted PBX
To add a rule, click the Add Rule button and fill out the Rule Definitions panel on the right hand side:
Give the rule a name, for example “Call from Customer VP”.
Specify the condition that must be matched for the rule to be triggered. This could be
calls from a particular number, or all numbers;
anonymous or unavailable (caller ID) numbers
received during your site’s scheduled business hours, if your site administrator has defined them, or on your own schedule.
If you want to define a new schedule, click the Manage Schedules button and fill out the form indicating the days and times that it represents.
Tip: Rules only trigger for calls received within a schedule period. For example, you cannot have a rule that directs a call when it is received outside of a schedule period.
Click Add to save and add your rule. The rule will be displayed in the left hand panel of the interface.
New rules are automatically activated. If you are not ready to activate the rule, deactivate it by unchecking the box in the Active column.
Using XO Hosted PBX with a mobile phone (XO Anywhere)
With XO Anywhere, your mobile phone can be an extension of your office line. It doesn’t matter whether your mobile is a smartphone or a regular phone, or whether it is your personal device or one issued by your enterprise: with Anywhere, your business persona follows you everywhere.
The way it works is as follows. Callers dial your office line number and the call rings one or more phones of your choosing simultaneously. You can answer the call on any one of them. To make a call, you can dial from your office line, as normal, or, if you are away from the office, you dial the number of the Anywhere portal, and enter your office line number, your voicemail PIN and the target number.
Before you set up XO Anywhere, add the phone number of the Anywhere portal to the list of numbers in the My Numbers panel. When you want to make a call and have it appear like a regular call from your office line, you will call this number. If you do not know the number, ask your site administrator or click the View Portals button in the Anywhere section of the
My Features panel.
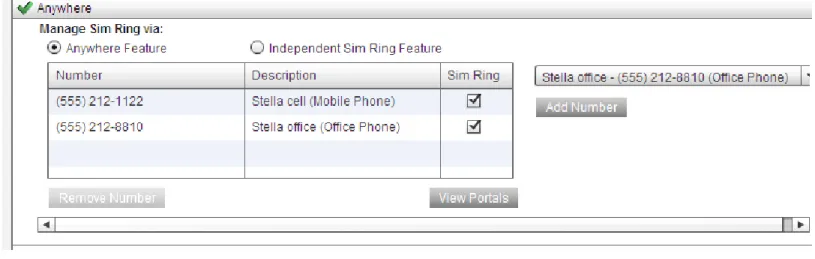
To set up the Anywhere feature, select the Anywhere label from the My Features panel. The interface will look like Figure 6.
XO Hosted PBX
Figure 6 XO Anywhere interface
Make sure that the Manage Sim Ring via radio button is set to Anywhere Feature. Next, select the numbers that you want to ring when someone calls your office line by picking them from the drop-down list and choosing Add Number.
Where To Go Next
This document has covered the fundamentals of the MyPhone portal. There are many more things that the XO Hosted PBX service can do, including functions such as integrating with Outlook and auto-attendants. For more information, please visit the XO Hosted PBX website here.