1
DocAve 6: Lotus Notes Migrator
User Guide
DocAve
®
6 Lotus Notes Migrator
Service Pack 6, Cumulative Update 1
Issued December 2015
2
DocAve 6: Lotus Notes Migrator
Table of Contents
What’s New in this Guide ... 5
About Lotus Notes Migrator ... 6
Complementary Products ... 6
Submitting Documentation Feedback to AvePoint ... 7
Before You Begin ... 8
AvePoint’s Testing Policy and Environment Support ... 8
Supported Hardware ... 8
Supported Backup and Recovery ... 8
Configurations ... 9
Agents ... 9
Required Permissions ... 9
Required Permissions for the Source ... 9
Required Permissions for the Destination: Migration to SharePoint On-Premises ... 10
Required Permissions for the Destination: Migration to SharePoint Online ... 10
Local System Permissions ... 12
Forms Based Authentication Permissions ... 12
Migration Speed Considerations... 13
Health Analyzer ... 14
Getting Started ... 15
Launching DocAve Lotus Notes Migration ... 15
Navigating DocAve ... 16
Pre-migration Configurations ... 18
Configuring Migration Databases ... 18
Configuring Lotus Notes Connections ... 19
Managing Lotus Notes Connections ... 19
Creating and Editing Lotus Notes Connections ... 20
Configuring Filter Policies ... 22
Creating and Editing Filter Policies ... 22
3
DocAve 6: Lotus Notes Migrator
User Mapping ... 23
Group Mapping ... 24
Permission Mapping ... 24
SharePoint Permission Levels ... 25
Configuring Dynamic Rules ... 27
Managing Dynamic Rules ... 27
Creating and Editing Dynamic Rules ... 27
Configuring Staging Locations (Offline Jobs Only) ... 28
Managing Staging Location ... 28
Creating and Editing Staging Locations ... 29
About Online Migrations ... 30
Online Migration Overview ... 30
Setting Up a Lotus Notes Online Migration Profile ... 30
Migration Options ... 31
Mapping Options ... 34
Advanced Options ... 37
Performing a Lotus Notes Online Migration ... 39
Select the Source and Destination Nodes ... 39
Configuring the Run Now Interface ... 43
Configuring the Save As New Plan Interface ... 44
Lotus Notes Migration for SharePoint Online ... 47
About Offline Migrations ... 48
Offline Migration Overview ... 48
Configuring Lotus Note Offline Migration Profiles ... 48
Setting Up an Export Profile ... 49
Setting Up an Import Profile ... 49
Performing a Lotus Notes Offline Migration ... 50
Exporting Data ... 50
Importing Data ... 53
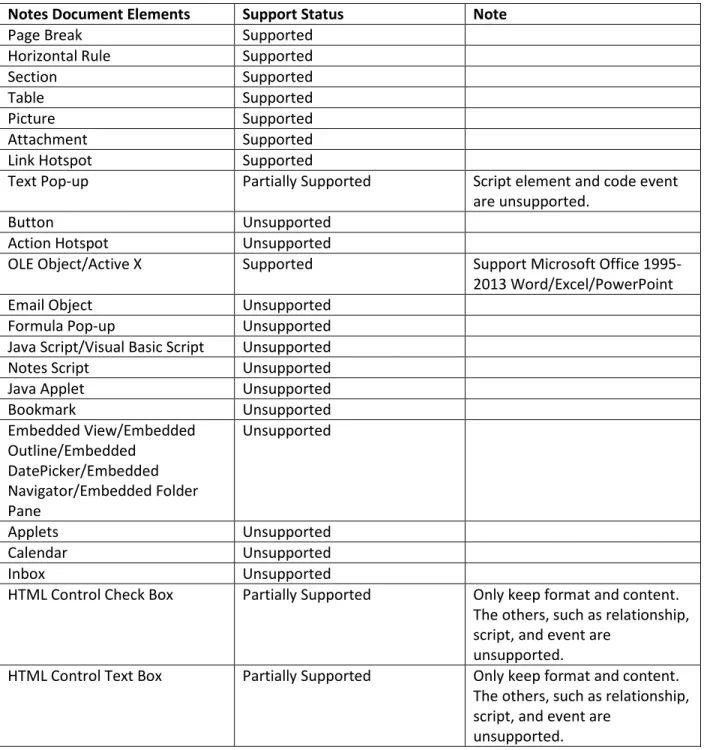
Supported and Unsupported Elements in Lotus Notes Migrator ... 59
Supported and Unsupported Lotus Notes Document Elements ... 62
4
DocAve 6: Lotus Notes Migrator
Managing Sub-profiles ... 65
Editing an Existing Sub-profile ... 65
Deleting an Existing Sub-profile ... 65
Downloading an Existing Sub-profile ... 65
Uploading a Configured Sub-profile... 65
Managing Plans ... 67
Lotus Notes Migrator Tool ... 68
Accessing Lotus Notes Migration Hot Key Mode ... 69
Home Page ... 69
Migration Database ... 70
Configure Connection ... 70
Profile Settings ... 70
Online Migration ... 71
Export ... 72
Import ... 72
Plan Manager Page ... 72
Appendix A: Lotus Notes Migration Database Information ... 74
Job Detail ... 74
Job Notification ... 77
Job Statistic ... 78
Job Logs ... 82
Appendix B: Lotus Notes Customization Support Table ... 83
Appendix C: Lotus Notes Migrator Configuration File ... 93
LotusNotesMigrationWorker.xml ... 93
Appendix D: Conflict Resolution ... 99
Container Level Conflict Resolution ... 99
Content Level Conflict Resolution ... 100
5
DocAve 6: Lotus Notes Migrator
What’s New in this Guide
6
DocAve 6: Lotus Notes Migrator
About Lotus Notes Migrator
DocAve Lotus Notes Migrator lets SharePoint administrators easily automate the process of
consolidating legacy Lotus Notes implementations into Microsoft SharePoint 2013, SharePoint 2010, and SharePoint Online with minimal impact on end-users.
Lotus Notes Migrator allows organizations to:
• Streamline the data transfer easily from Lotus Notes to SharePoint
• Preserve and map all associated metadata and security settings of Lotus Notes content during the migration
• Plan migration jobs according to business needs with granular or bulk content migration and customizable job scheduling
To ensure a complete and successful migration, DocAve's Pre-Migration Scanner provides a detailed analysis of the migration before it is performed. The DocAve Pre-Migration Scanner will detect and notify you of any illegal characters, user permissions, user names, user domains, and other legacy elements that must be mapped in order to migrate successfully into SharePoint.
Organizations can further minimize business disruption and time-to-value by leveraging AvePoint Partner Services (APPS) to perform detailed data analysis, content and application migrations, and post-migration verifications.
As with all AvePoint software, our SharePoint Migration tools leverage only fully supported Microsoft methodologies and APIs.
Complementary Products
Many products and product suites on the DocAve 6 platform work in conjunction with one another. The following products are recommended for use with DocAve Lotus Notes Migrator:
• DocAve Content Manager for SharePoint for restructuring or moving SharePoint content.
• DocAve Report Center for SharePoint to examine pain points in the SharePoint infrastructure and report on SharePoint user behavior and changes.
• DocAve Data Protection for setting backup and recovery points prior to adjusting SharePoint governance policies in this product.
• DocAve Replicator to perform live or event-driven, as well as scheduled or offline replication. Synchronization and management of all content, configurations, and securities is performed with full fidelity.
7
DocAve 6: Lotus Notes Migrator
Submitting Documentation Feedback to AvePoint
AvePoint encourages customers to provide feedback regarding our product documentation. You can Submit Your Feedback on our website.
8
DocAve 6: Lotus Notes Migrator
Before You Begin
Refer to the sections for system and farm requirements that must be in place prior to installing and using DocAve Lotus Notes Migrator.
AvePoint’s Testing Policy and Environment Support
Supported Hardware
AvePoint is committed to maintaining a hardware agnostic platform to ensure that DocAve operates on common Windows file sharing and virtualization platforms. To ensure that DocAve is hardware agnostic, AvePoint tests hardware that is intended to support SharePoint and DocAve infrastructure, storage targets, and hardware-based backup and recovery solutions, as supported by AvePoint’s partnerships. AvePoint directly integrates with the following platforms: any Net Share, IBM Storwize Family, FTP, Amazon S3, AT&T Synaptic, Dropbox, Box, Caringo Storage, Del DX Storage, EMC Centra, HDS Hitachi Content Platform, Rackspace Cloud Files, TSM, Network File System, and Windows Azure Storage. All other hardware platforms that support UNC addressable storage devices are supported. *Note: Most of the hardware partnerships referenced in this guide are intended to make use of advanced functionality (such as snapshot mirroring, BLOB snapshots, indexing, long-term storage, WORM storage, etc.), and are not indications that any changes to the product are required for basic support. In most cases, hardware can be supported with no change to the product.
Supported Backup and Recovery
DocAve supports BLOB backup storage according to the list of hardware platforms above. BLOB snapshot functionally, however, is currently only supported on OEM versions and NetApp hardware. DocAve supports SQL content and Application database backups via the SharePoint Volume Shadow Copy Service (VSS) on all Windows and SQL server platforms listed above. DocAve also supports snapshot-based SharePoint VSS on all hardware listed above where the hardware partner has certified support with Microsoft.
DocAve supports application and configuration server backups for all the supported software
environments listed above. DocAve 6 SP5 supports VM backup via Hyper-V/VMWare for the following operating systems: Windows Server 2008 R2, Windows Server 2012, Windows Server 2012 R2, and Microsoft Hyper–V Server 2012 R2.
9
DocAve 6: Lotus Notes Migrator
Configurations
In order to use DocAve Lotus Notes Migrator, the DocAve 6 platform must be installed and configured properly on your farm. DocAve Lotus Notes Migrator will not function without DocAve 6 present on the farm.
To review a list of migration source versions and systems supported by DocAve Migrator, refer to Appendix C – Migration Source Environment in the DocAve 6 Installation Guide.
Agents
DocAve Agents are responsible for running DocAve jobs and interacting with the SharePoint object model. DocAve Agents enable DocAve Manager to communicate with the respective servers, allowing for DocAve Lotus Notes Migrator commands to function properly.
*Note: The use of system resources on a server increases when the installed agent is performing actions. This may affect server performance. However, if the agent installed on a server is not being used, the use of system resources is very low and, therefore, the effect on server performance is negligible.
For instructions on installing the DocAve Platform, DocAve Manager, and DocAve Agents, see the DocAve 6 Installation Guide.
Required Permissions
To install and use DocAve Lotus Notes Migrator properly, ensure that the following permissions are met.
Required Permissions for the Source
Before using Lotus Notes Migrator, ensure the DocAve Agent account in the source has the following permissions:
1. Local System Permissions: If there are no strict limitations within your organization on the permissions that can be applied, add the source DocAve Agent Account to the local Administrators group. Otherwise, ensure the source Agent account has the following permissions:
• Full Control permission to the Lotus Notes installation directory.
• The permissions listed in Local System Permissions, which are automatically configured by DocAve during installation.
2. Lotus Notes Permission: The permission must be manually configured prior to using DocAve 6 Lotus Notes Migrator; it is not automatically configured.
10
DocAve 6: Lotus Notes Migrator
3. SQL Permissions: These permissions must be manually configured prior to using DocAve 6 LotusNotes Migrator; they are not automatically configured.
• Member has a Database Role of db_owner for Migration Database. • Member has a Server Role of dbcreator to SQL Server.
Required Permissions for the Destination: Migration to SharePoint
On-Premises
Before using Lotus Notes Migrator for SharePoint on-premises, ensure that the destination Agent account has the following permissions:
Local System Permissions: The permissions are automatically configured by DocAve during installation. Refer to Local System Permissions for a list of the permissions automatically configured upon installation. If there are no strict limitations within your organization on the permissions that can be applied, you can simply add the DocAve Agent Account to the local Administrators group to apply all of the required permissions.
SharePoint Permissions: These permissions must be manually configured prior to using DocAve 6 Lotus Notes Migrator; they are not automatically configured.
• Member of the Farm Administrators group:
Full Control to all zones of all Web applications via User Policy for Web applications
Managed Metadata Service – Term Store Administrator • Other permissions required
Managed Metadata Service – Full Control Managed Metadata Service – Administrator
SQL Permissions: These permissions must be manually configured prior to using DocAve 6 Lotus Notes Migrator; they are not automatically configured.
• Member has a Database Role of db_owner for all of the databases related to SharePoint, including Content Databases, SharePoint Configuration Database, and Central Admin Database.
• Member has a Database Role of db_owner for Migration Database. • Member has a Server Role of dbcreator to SQL Server.
*Note: If forms based authentication (FBA) is selected as a Web application’s claims
authentication type, refer to Forms Based Authentication Permissions to configure additional settings for the Web application.
Required Permissions for the Destination: Migration to SharePoint Online
11
DocAve 6: Lotus Notes Migrator
Local System Permissions for Agent Account
For the registered SharePoint Online site collections, the Agent account is on the Agent machine that will run migration jobs. This machine must have network connection or have configured Agent Proxy Settings. For more information about Agent Proxy Settings, refer to the DocAve 6 Control Panel Reference Guide.
For the registered SharePoint on-premises site collections, the Agent account is on the Agent machine that will run migration jobs. This machine must be the Central Administration server or one of the Web front-end servers of the farm where the registered site collections reside, or the machine that can communicate with the Central Administration server or one of the Web front-end servers.
The Agent account must have proper Local System permissions. These permissions are automatically configured by DocAve during installation. Refer to Local System Permissions for a list of the permissions automatically configured upon installation. If there are no strict limitations within your organization on the permissions that can be applied, you can simply add the DocAve Agent Account to the local Administrators group to apply all of the required permissions.
Required Permissions for the User Used to Register SharePoint Online Site Collections
The user that is used to register SharePoint Online site collections in Control Panel > RegisteredSharePoint Sites > Manual Input Mode must have the following permissions to each site collection: • User is a member of the Site Collection Administrator group.
• Managed Metadata Service – Term Store Administrator
The user that is used to register the SharePoint Online site collections in Control Panel > Registered SharePoint Sites > Scan Mode must have the following permissions:
• The user role of SharePoint administrator
• Managed Metadata Service – Term Store Administrator
Required Permissions for the User Used to Register SharePoint On-Premises Site
Collections
The user that is used to register SharePoint on-premises site collections in Control Panel > Registered SharePoint Sites > Manual Input Mode must have the following permissions to each site collection:
• User is a member of the Site Collection Administrator group. • Managed Metadata Service
Term Store Administrator Full Control
Administrator
The user that is used to register SharePoint on-premises site collections in Control Panel > Registered SharePoint Sites > Scan Mode must have the following permissions:
12
DocAve 6: Lotus Notes Migrator
• Full Control permission to all zones of all Web applications via User Policy for WebApplications.
• Member has a Database Role of db_owner for all of the databases related to SharePoint, including Content Databases, SharePoint Configuration Database, and Central Admin Database.
• User is a member of the Site Collection Administrator group. • Managed Metadata Service
Term Store Administrator Full Control
Administrator
Local System Permissions
The following Local System Permissions are automatically configured during DocAve 6 installation: • User is a member of the following local groups:
IIS WPG (for IIS 6.0) or IIS IUSRS (for IIS 7.0) Performance Monitor Users
DocAve Users (the group is created by DocAve automatically; it has the following permissions):
Full Control to the Registry of
HKEY_LOCAL_MACHINE\SOFTWARE\AvePoint\DocAve6
Full Control to the Registry of
HKEY_LOCAL_MACHINE\System\CurrentControlSet\Services\eventlog
Full Control to the Communication Certificate
Permission of Log on as a batch job (it can be found within Control Panel > Administrative Tools > Local Security Policy > Security Settings > Local Policies > User Rights Assignment)
Full Control to DocAve Agent installation directory
Forms Based Authentication Permissions
If forms based authentication (FBA) is selected as a Web application’s claims authentication type, ensure at least one of the following conditions is in place:
• The Agent account must be a member who has a Database Role of db_owner for the FBA database.
• Add the Agent account in the connectionStrings node in this Web application’s
web.config file to make the Agent account have the permission to the FBA database. For details, refer to the instructions below:
13
DocAve 6: Lotus Notes Migrator
i. Navigate to Start > Administrative Tools > Server Manager > Roles > Web Server (IIS) > Internet Information Services (IIS) Manager, find the desired Web application in the Sites list.
ii. Right-click the Web application and select Explore.
iii. A window appears and you can find the web.config file in it. iv. Open the web.config file with Notepad.
v. Find the connectionStrings node and specify a user that has access to the database that stores FBA security information.
Migration Speed Considerations
Speed is a very important factor when migrating content. To estimate how long your migration plans will take, in order to better inform stakeholders, the following are some key factors that should be taken into consideration prior to running your migration plans.
• Network bandwidth between the two SharePoint environments • SQL I/O and memory
• Memory on Web front-end servers
• Memory on the server hosting the DocAve Media service • Number of CPUs on Web front-end servers
• Source environment deployment Number of objects in source
Divide database and folder structures into small data sets before running the migration. Consider a granular migration approach. Size of objects in source
A single 1 GB file will migrate far quicker than a million files that have a sum of 1 GB.
Complexity of folders and sites
Prioritize content to be migrated into SharePoint, and utilize tools to establish co-existence throughout the course of the migration project to slowly roll-out SharePoint to users as their content becomes available. Whether DocAve has to create site collections during migration
Use folders to break up large document libraries or data subsets to manage library size, consider utilizing filtering to migrate a sub-set of the data at a time.
14
DocAve 6: Lotus Notes Migrator
Permissions can be configured to be migrated in the migration plans. Whether metadata is included in the plan
Health Analyzer
AvePoint recommends using Health Analyzer to check the prerequisites you need to correctly use DocAve Lotus Notes Migration.
*Note: Only the users in the DocAve Administrators group can use Health Analyzer.
*Note: AvePoint recommends that you create two different Health Analyzer profiles to scan the source Agent and the destination Agent separately.
After selecting Lotus Notes Migration as the module, all of the scan rules are selected by default, including the rules for the source environment and the rules for the destination environment. When the Health Analyzer job is finished, you can view the Health Analyzer results. If the scan rule is for the destination environment, but it is applied on the source environment, ignore the error or warning, and vice versa.
15
DocAve 6: Lotus Notes Migrator
Getting Started
Refer to the sections below for important information on getting started with DocAve Lotus Notes Migration.
Launching DocAve Lotus Notes Migration
To launch Lotus Notes Migration and access its functionality, follow the instructions below: Log into DocAve. If you are already in the software, click the DocAve tab. The DocAve tab displays all product suites on the left side of the window.
Click Migration to view all of the Migration modules. Click Lotus Notes Migration to launch the module.
*Note: If desired, access the License Details information for Migrator products from the Migration landing page.
16
DocAve 6: Lotus Notes Migrator
Navigating DocAve
DocAve mimics the look and feel of many Windows products, making for an intuitive and familiar working environment. While there are many windows, pop-up displays, and messages within DocAve products, they share similar features and are navigated in the same ways.
Below is a sample window in DocAve. It features a familiar, dynamic ribbon, and a searchable, content list view.
Figure 2: Navigating DocAve.
Ribbon Tabs – Allows users to navigate to the DocAve Welcome page and within the active modules.
Ribbon Panes – Allows users to access the functionality of the active DocAve module.
Manage columns ( ) – Allows users to manage which columns are displayed in the list. Click the manage columns ( ) button, and then select the checkboxes next to the column names in the drop-down list.
17
DocAve 6: Lotus Notes Migrator
Filter the column ( ) – Allows users to filter the information in the List View. Click the filter the column ( ) button next to the column and then select the checkbox next to the column name. Search – Allows users to search the List View pane for a keyword or phrase. You can select Search all pages or Search current page to define the search scope.
*Note: The search function is not case sensitive.
18
DocAve 6: Lotus Notes Migrator
Pre-migration Configurations
Configure the following settings before performing Lotus Notes migration. Click the link to jump to the corresponding section.
• Configuring Migration Databases • Configuring Lotus Notes Connections • Configuring Filter Policies (Optional) • Configuring Mapping Settings (Optional) • Configuring Dynamic Rules (Optional)
• Configuring Staging Locations (Offline Jobs Only)
Configuring Migration Databases
In order to use Lotus Notes Migration, you must configure a dedicated migration database to store links and detailed job information in SQL for every farm and My Registered Sites that will be using Lotus Notes Migration. For detailed information on the Migration database schema, refer to Appendix A: Lotus Notes Migration Database Information.
*Note: The version of SQL Server required to create a migration database must be SQL Server 2005 SP1 or higher.
1. On the Home tab, in the Settings group, click Migration Database. The Migration Database page appears.
2. Select the farm or My Registered Sites that will be using Lotus Notes Migration. 3. Click Configure in the Manage group. The Configure page appears.
4. Configure the following settings for the database that will store migration job data:
Configure Migration Database –Specify a migration database. Enter a new Database Server and a Database Name in the corresponding fields.
Authentication – Select the authentication mode for the migration database.
Windows Authentication (recommended) – Select this mode to verify the user’s identity by Windows.
By default, the Specify a Window account checkbox is deselected and DocAve will create a new migration database or access the existing migration database using the destination DocAve Agent account.
To access the database server with a specified Windows account, select the Specify a Windows account checkbox and select a managed account profile from the Managed Account Profile drop-down list, or click New Managed Account Profile to create a new managed account
19
DocAve 6: Lotus Notes Migrator
profile in Control Panel. Then, click Validation Test to validate the account. For more information, refer to the DocAve 6 Control Panel Reference Guide.
SQL authentication –Select this mode to verify the user’s identity by SQL Server. Enter the user’s account and password in the Account and Passwordfields. You can also validate the SQL database account by clicking Validation Test.
*Note: The account for creating or accessing the migration database must have a server role of db_creator for the SQL server where you want to create the migration database, and the account must have a database role of db_owner for the newly created/existing migration database.
Failover Database Server (optional) – Choose a failover database server. In the event that the migration database collapses, the data stored in the Migration database can be transferred to this standby database.
Alternatively, you can specify a Migration Database in the Advanced settings by entering a connection string instead of configuring the settings in Step 4.
Click Advanced; the Connection String section appears.
Select the Edit Connection String directly checkbox to activate this feature, and then enter the connection string according to the example listed in the left pane.
Click Validation Test to validate the connection string. For more information about how to configure the connection string, refer to the ConnectionString property in SQL Server Books Online or SQL Server Tutorials by navigating to Start > Microsoft SQL Server (with the version you are using) > Documentation and Tutorials.
5. Click Save to finish and save the configuration, or click Cancel to return to the Migration Database page without saving any configurations.
To view the configuration details of a migration database, select the migration database and click View Details on the ribbon in the Migration Database page. The detailed configurations are displayed in the View Details interface.
Configuring Lotus Notes Connections
To use Lotus Notes Migration, you must first configure the Lotus Notes connection so that the DocAve Agents can connect to the Lotus Domino Servers. In the Home tab, click Configure Connection on the ribbon. The Lotus Notes Connection interface appears.
Managing Lotus Notes Connections
The Lotus Notes Connection interface displays all of the Lotus Notes connections that you have previously created.
20
DocAve 6: Lotus Notes Migrator
In this interface, you can change the number of Lotus Notes connections displayed per page and the order in which they are displayed. To change the number of Lotus Notes connections displayed per page, select the desired number from the Show rows drop-down menu in the lower right-hand corner. To sort the Lotus Notes connections, click on a column heading such as Name, Agent, Notes .INI File Path, and Last Modified Time.Perform the following actions in the Lotus Notes Connection interface:
• Create – Click Create on the ribbon to create a new Lotus Notes connection. For details on creating a new Lotus Notes connection, see Creating and Editing Lotus Notes Connections.
• View Details – Click View Details on the ribbon and you will see the configured settings for this Lotus Notes connection. Here you can also click Edit on the ribbon to make changes to the Lotus Notes connection’s settings. You will be brought to the Edit Lotus Notes Connection interface where you can change this Lotus Notes connection. • Edit – Click Edit on the ribbon to change the configurations for this Lotus Notes
connection. For details on editing configurations for a Lotus Notes connection, see Creating and Editing Lotus Notes Connections.
• Delete – Click Delete on the ribbon. A confirmation window appears, confirming that you want to proceed with the deletion. Click OK to delete the selected Lotus Notes connections, or click Cancel to return to the Lotus Notes Connection interface without deleting the selected Lotus Notes connections.
Creating and Editing Lotus Notes Connections
To create a new Lotus Notes connection, click Create on the ribbon. To modify a Lotus Notes connection, select the Lotus Notes connection, and then click Edit on the ribbon.
In the Create Lotus Notes Connection or Edit Lotus Notes Connection interface, configure the following settings:
1. Name and Description – Enter a Name for the Lotus Notes connection. Then enter an optional Description for this Lotus Notes connection for future references.
2. Connection – Configure the following settings to connect the Lotus Notes Domino Server to the source DocAve Agent.
• Agent – Select your desired DocAve Agent installed in Lotus Notes environment from the drop-down list.
• NOTES .INI file path – Notes .INI files can be found in the Lotus Notes server. A default path is entered automatically. You can also enter the path by yourself, but make sure that the path you enter is the absolute path where Notes .INI file locates.
• User ID file – Click here to load the user ID file, then select one from the drop-down list. • Password – Enter the password of the user that you have selected in User ID file. Click
21
DocAve 6: Lotus Notes Migrator
3. Click Save to save the configurations and return to the Lotus Notes Connection interface, or click Cancel to return to the Lotus Notes Connection interface without saving any changes.
22
DocAve 6: Lotus Notes Migrator
Configuring Filter Policies
Use Filter Policy to set up filter rules that help you can control which documents within the Lotus Notes databases appear, so you can target content more precisely. By setting up and saving filter policies, you can apply the same filter policies to different Lotus Notes migration plans without having to recreate them each time.
To access Filter Policy, click Profile Settings on the ribbon in the Home tab. On the Profile Settings page, click Filter Policy on the ribbon.
The Filter Policy interface displays any filter policies that you have previously configured.
In this interface, you can change the number of filter policies displayed per page and the order in which they are displayed. To change the number of filter policies displayed per page, select the desired
number from the Show rows drop-down menu in the lower right-hand corner. To sort the filter policies, click on a column heading such as Filter Policy Name, and Description.
Perform the following actions in the Filter Policy interface:
• Create – Click Create on the ribbon to create a new filter policy. For details on creating a new filter policy, see Creating and Editing Filter Policies.
• Edit – Click Edit on the ribbon to change the configurations for this filter policy. For details on editing configurations for a filter policy, see Creating and Editing Filter Policies.
• Delete – Click Delete on the ribbon. A confirmation window appears, confirming that you want to proceed with the deletion. Click OK to delete the selected filter policies, or click Cancel to return to the Filter Policy interface without deleting the selected filter policies.
Creating and Editing Filter Policies
To create a new filter policy, click Create on the ribbon. To modify a filter policy, select the filter policy, and then click Edit on the ribbon.
In the Create Filter Policy or Edit Filter Policy interface, configure the following settings: 1. Name – Enter a Name for this filter policy.
2. Description – Enter an optional Description.
3. Filter Rule – Filters content that you want to migrate by setting up a set of filter criteria. Follow the steps below to set up your own filter rules.
Select Time Range or Attachment as the filter criteria.
If you choose Time Range, Lotus Notes documents are filtered according to the created time or modified time.
23
DocAve 6: Lotus Notes Migrator
If you choose Attachment, the attachments within Lotus Notes documents are filtered according to the size or type of attachments.
Click Add a Filter Level Group to add a filter rule. The filter rule configuration field appears.
For Time Range – Select Created Time or Modified Time from the drop-down menu. In the Condition column, select Before, After, Within, or Older Than. Set up Time Zone and the exact time in the Value column.
For Attachment – In the Rule column, select Size or Type from the drop-down menu.
Size – In the Condition column, select > = or < =, enter your desired value in the Value column, and then choose KB, MB, or GB.
Type – In the Condition column, select Contains, Does Not Contain,
Equals, or Does Not Equal, and then select or enter a file type in the Value column.
Click the delete ( ) button to delete the specified criterion or filter level. You can change the logical relationship between the criterions.
Repeat step a and b to add more filter rules.
The logic options And and Or are selectable. By default, the logic is set to And. Change the logic to Or by selecting it from the drop-down list.
• And – The content that meets all the criterions will be filtered to be included. • Or –The content that meets any one of the criterions will be filtered to be included. Basic Filter Conditions – View the logical relationship of the filter rules in this area.
For example, if the logical relationship is ((1 And 2) Or 3) in the Basic Filter Condition area, the content that meets both filter rule 1 and filter rule 2, or that meets the filter rule 3, will be included.
4. Click Save to save the configurations and return to the Filter Policy interface, or click Cancel to return to the Filter Policy interface without saving any changes.
Configuring Mapping Settings
Before performing a Lotus Notes migration job, you can define optional User Mapping, Group Mapping, and Permission Mapping. Refer to the following sections to learn how to configure the mapping settings.
User Mapping
User mapping maps an existing source node username to SharePoint user in the destination. During migration, Migrator will replace the source username with your specified username in the destination.
24
DocAve 6: Lotus Notes Migrator
To access User Mapping, click Profile Settings on the ribbon in the Home tab. Then in the ProfileSettings interface, click Mappings and select User Mapping on the ribbon. The Control Panel appears. For specific instructions on setting up user mapping, refer to the DocAve 6 Control Panel Reference Guide. Make sure that the source username that you enter in the Source Username column is one of the following formats:
• username/orgname
• username/orgname/orgname
• username/orgname/orgname/orgname
The organization in Lotus Notes can be multilevel and here the orgname you enter can also be multilevel.
Group Mapping
Use group mapping to map an existing source group name to a SharePoint group. During the migration, Migrator will replace the source group name with your specified group name in the destination node. To access Group Mapping, click Profile Settings on the ribbon in the Home tab. Then in the Profile Settings interface, click Mappings and select Group Mapping on the ribbon. The Control Panel appears. For specific instruction on setting up user mapping, refer to the DocAve 6 Control Panel Reference Guide.
Permission Mapping
Permission mapping allows you to map permissions in the source to SharePoint permissions in the destination. During the migration, Migrator will replace the source permission with SharePoint permission levels of Default Permission Mapping or your specified permission levels in the destination node.
*Note: If a user mapping and a permission mapping are combined, the permission of the destination user is the merged result of the mapped user’s permission and the mapped permission.
For example, there is User A who has the permission of Read in the source Lotus Notes and User B who has the permission of Design in the destination SharePoint. In User Mapping, you map User A to User B. In Permission Mapping, you map Read to Contribute. After the migration job is finished, the permission of User B is Design + Contribute.
To access Permission Mapping, click Profile Settings on the ribbon in the Home tab. Then in the Profile Settings interface, click Mappings and select Permission Mapping on the ribbon. In the Permission Mapping interface, any permission mappings that you have previously created are displayed in the main display pane.
25
DocAve 6: Lotus Notes Migrator
Managing Permission Mappings
In this interface, you can change the number of permission mappings displayed per page and the order in which they are displayed. To change the number of permission mappings displayed per page, select the desired number from the Show rows drop-down list in the lower right-hand corner. To sort the permission mappings, click on a column heading such as Name and Description.
Perform one of the following actions on a selected permission mapping:
• Create – Click Create on the ribbon to create a new Permission Mapping. For details on creating a new Permission Mapping, see Creating and Editing Permission Mappings. • View Details – Click View Details on the ribbon and you will see the previously
configured settings for this permission mapping. Here you can also click Edit on the ribbon to make changes to the permission mapping’s settings. You will be brought to the Edit Permission Mapping page where you can change this permission mapping. • Edit – Click Edit on the ribbon to change the configuration of this permission mapping.
For details on editing permission mapping, see Creating and Editing Permission Mappings.
• Delete – Click Delete on the ribbon. A confirmation window appears, confirming that you want to proceed with the deletion. Click OK to delete the selected permission mappings, or click Cancel to return to the Permission Mapping without deleting the selected permission mappings.
Creating and Editing Permission Mappings
To create a new permission mapping, click Create on the ribbon. To edit a permission mapping, select the permission mapping and then click Edit on the ribbon.
In the Create or Edit Permission Mapping interface, configure the following settings:
1. Name and Description – Enter a name for the permission mapping that you are about to create or edit. Then enter an optional Description.
2. Permission Mapping – Set up the mapping of Lotus Notes permissions to SharePoint permissions. Choose one SharePoint permission level from the SharePoint Permission Level drop-down list. We do not recommend changing the default permission mapping. If there is no SharePoint permission level that meets your requirements, you can click New SharePoint Permission Level from the drop-down list to create a new one. For details on creating a new SharePoint permission level, refer to Creating and Editing SharePoint Permission Levels.
SharePoint Permission Levels
You can manage SharePoint Permission Levels by creating a new level, viewing the details of a level, editing a level, or deleting a level.
To access Manage SharePoint Permission Level, click Profile Settings on the ribbon in the Home tab. Then in the Profile Settings interface, click Mappings and select Permission Mapping on the ribbon. In the Permission Mapping interface, click Manage SharePoint Permission Level on the ribbon.
26
DocAve 6: Lotus Notes Migrator
The Manage SharePoint Permission Level interface displays any permission levels that you havepreviously created.
In this interface, you can change the number of SharePoint Permission Levels displayed per page and the order in which they are displayed. To change the number of SharePoint Permission Levels displayed per page, select the desired number from the Show rows drop-down list in the lower right-hand corner. To sort the SharePoint Permission Levels, click on a column heading such as Name and Description. Perform the following actions in the Manage SharePoint Permission Level page.
• Create– Click Create on the ribbon to create a new SharePoint Permission Level, for details on creating a new SharePoint Permission Level, see Creating and Editing SharePoint Permission Levels.
• View Details – Click View Details on the ribbon and you will see the previously configured settings of a customized permission level or the default setting of a default SharePoint Permission Level.
• Edit – Click Edit on the ribbon to change the configurations for this SharePoint
Permission Level. For details on editing configurations for a SharePoint Permission Level, refer to Creating and Editing SharePoint Permission Levels.
*Note: Default SharePoint Permission Levels are displayed as default, including Contribute, Design, Edit, Full Control, Read, and View Only. They are not editable. • Delete – Click Delete on the ribbon. A confirmation window appears, confirming that
you want to proceed with the deletion. Click OK to delete the selected SharePoint Permission Levels, or click Cancel to return to the Manage SharePoint Permission Level interface without deleting the selected SharePoint permission levels.
Creating and Editing SharePoint Permission Levels
To create a new SharePoint Permission Level, click Create on the ribbon. To modify a SharePoint Permission Level, select the level, and then click Edit on the ribbon.
In the Manage SharePoint Permission Level interface, configure the following settings:
1. Name and Description – Enter a Name for this permission level that you are about to create or edit. Then enter an optional Description.
2. Permissions – Choose which permissions to include in this permission level. You can select permissions from the List, Site, and Personal Permissions levels by selecting the checkbox before a specified permission. Select the Select All checkbox to select or clear all permissions.
3. Click Save to save the configuration and return to the Manage SharePoint Permission Level interface, or click Cancel to return to the Manage SharePoint Permission Level interface without saving any change.
27
DocAve 6: Lotus Notes Migrator
Configuring Dynamic Rules
Dynamic rules map the Lotus Notes field names and the corresponding values to SharePoint column names and column values using the DLL files, which are customized in C#.
Managing Dynamic Rules
To access Dynamic Rule, click Profile Settings on the ribbon of Home tab. In the Profile Settings tab, click Dynamic Rule on the ribbon.
In the Dynamic Rule interface, you will see a list of configured dynamic rules.
In this interface, you can change the number of dynamic rules displayed per page and the order in which they are displayed. To change the number of dynamic rules displayed per page, select the desired number from the Show rows drop-down menu in the lower right-hand corner. To sort the dynamic rules, click on a column heading such as Name, Description, DLL File Name, and Last Modified Time. You may perform the following actions to a Dynamic Rule:
• Create – Click Create on the ribbon to create a dynamic rule. For detailed on creating a new dynamic rule, refer to Creating and Editing Dynamic Rules.
• View Details – Click View Details on the ribbon and you will see the previously configured settings for this dynamic rule. Here you can also click Edit on the ribbon to make changes to the dynamic rule’s settings. You will be brought to the Edit dynamic rule page where you can change this dynamic rule.
• Edit – Click Edit on the ribbon to change the configuration of this dynamic rule. For details on editing dynamic rule, refer to Creating and Editing Dynamic Rules.
• Delete – Click Delete on the ribbon. A confirmation window appears, confirming that you want to proceed with the deletion. Click OK to delete the selected dynamic rule, or click Cancel to return to the dynamic rule without deleting the selected dynamic rules.
Creating and Editing Dynamic Rules
To create a new dynamic rule, click Create on the ribbon. To edit a dynamic rule, select the rule, and then click Edit on the ribbon.
In the Create Dynamic Rule interface or Edit Dynamic Rule interface, configure the following settings: 1. Name and Description – Enter a name for the dynamic rule that you are about to create or edit.
Then enter an optional description.
2. Upload a DLL File – Click Browse, and then navigate to the DLL file you want to use. Select the DLL file and then click Open.
*Note: AvePoint provides a sample code for the DLL file. Click the Download the Sample Code link in the left description to download the sample code.
28
DocAve 6: Lotus Notes Migrator
3. Click Save to save the configuration and return to the Dynamic Rule interface. Click Cancel toreturn to the Dynamic Rule interface without saving any configuration or changes.
Configuring Staging Locations (Offline Jobs Only)
The Staging Location feature is a mandatory requirement of an offline Lotus Notes Migration. There are two staging location modes: Export Mode and Import Mode. Export Mode is used to set up an export location where you will store offline migration data. Import Mode migrates exported data to the destination farm.
To access Staging Location settings, complete the following steps:
1. Click Export or Import in the Plan group on the ribbon to access Export mode or Import mode. 2. Click Staging Location in the Settings group on the ribbon; the Staging Location interface
appears.
Managing Staging Location
In both Export Mode and Import Mode in the Staging Location interface, all previously created staging locations are displayed in the main display pane.
In this interface, you can change the number of stage locations displayed per page and the order in which they are displayed. To change the number of staging locations displayed per page, select the desired number from the Show rows drop-down menu in the lower right-hand corner. To sort export locations, click on a column heading such as Export Location Name, Agent, and Last Modified Time. To sort import locations, click on a column heading such as Import Location Name, Farm, and Last
Modified Time.
Perform the following actions in the Staging Location interface:
• Create – Click Create on the ribbon to create a new staging location. For details on creating a new staging location, see Creating and Editing Staging Locations. • View Details – Click View Details on the ribbon and you will see the previously
configured settings for this staging location. Here you can also click Edit on the ribbon to make changes to the staging location’s settings. You will be brought to the Edit Export Location page where you can change the settings of this staging location.
• Edit – Click Edit on the ribbon to change the configurations for this staging location. For details on editing configurations for a staging location, refer to Creating and Editing Staging Locations.
• Delete – Click Delete on the ribbon. A confirmation window appears, confirming that you want to proceed with the deletion. Click OK to delete the selected staging locations, or click Cancel to return to the Staging Location interface without deleting the selected staging locations.
29
DocAve 6: Lotus Notes Migrator
Creating and Editing Staging Locations
To create a new staging location, click Create on the ribbon. To modify a staging location, select the staging location, and then click Edit on the ribbon.
Export Mode
In the Create Staging Location for Export Mode or Edit Staging Location for Export Mode interface, configure the following settings:
Name and Description – Enter a name for the export location that you are about to create. Then enter an optional description.
Agent and Path – Configure the following settings to specify an export location to store the offline migration data.
• Agent – Select the DocAve Agent installed in the source environment for the export location that you are about to create from the drop-down list.
• UNC path – Enter a Universal Naming Convention (UNC) path as the location where the exported data will be stored in the UNC path text box. For example, \\admin-PC\c$\data or \\admin-PC\shared folder
• Managed Account Profile – Select a managed account profile from the drop-down list to set up access to the UNC path, or click New Managed Account Profile to create a new one. For details, refer to the DocAve 6 Control Panel Reference Guide, and then click Validation Test to validate the account.
Click Save to complete the configuration of the export location for Export Mode.
Import Mode
In the Create Staging Location for Import Mode or Edit Staging Location for Import Mode interface, configure the following settings:
Name and Description – Enter a name for the import location that you are about to create. Then enter an optional description.
Farm and Path – Configure the following settings to designate the import location where to retrieve the exported data and specify a farm where you wish the exported data to be migrated to.
• Farm – Select your desired destination farm that the exported data will be imported to from the Farm drop-down list.
• UNC path – Enter the UNC path which has been configured in Staging Location for Export Mode and has stored the exported data to get the data.
• Managed Account Profile – Select a managed account profile from the drop-down list to set up access to the UNC path, or click New Managed Account Profile to create a new one. For details, refer to the DocAve 6 Control Panel Reference Guide. Then, click Validation Test to validate the account.
30
DocAve 6: Lotus Notes Migrator
About Online Migrations
An Online Migration job migrates content, configurations, securities, and metadata from a source Lotus Notes environment to a destination SharePoint environment when a network connection between the source and destination is available.
Online Migration Overview
To perform Online Migration jobs, the following steps must be performed in this order. Click the link to jump to the corresponding section.
Pre-migration Configurations
• Configuring Migration Databases • Configuring Lotus Notes Connections • Configuring Filter Policies (Optional) • Configuring Mapping Settings (Optional) • Configuring Dynamic Rules (Optional) Setting Up a Lotus Notes Online Migration Profile
Migration Options Mapping Options Advanced Options
Performing a Lotus Notes Online Migration Select the Source and Destination Nodes
Creating Containers
Select one of the following methods to perform an online migration Configuring the Run Now Interface
Configuring the Save As New Plan Interface
Setting Up a Lotus Notes Online Migration Profile
While it is theoretically possible to run an Online Migration job without configuring the settings described in the sections below, it is strongly recommended that you configure these settings in order to ensure appropriate content management during migration.
31
DocAve 6: Lotus Notes Migrator
The Online Migration Profile allows you to define numerous settings for the migration jobs, including: Migration Options, Filter Options, Mapping Options, and Advanced Options. Follow the instructions below to create an Online Migration Profile.
From the Home tab, in the Profile Manager group, click Profile Settings. The Profile Settings tab appears.
On the Profile Settings tab, in the Plan Mode group, select Online Mode. From the Profile Settings tab, under the Profile/Sub-profile group, click New. Enter a profile name in the pop-up window and click OK.
Select the Migration Options from the left-hand pane. Select a Migration Options Sub-Profile from the drop-down list. For details about this section, refer to Migration Options.
Select the Filter Options from the left-hand pane and select a Filter Policy from the drop-down list. Or click New Filter Policy from the drop-down list to create a new filter policy. For details on creating a filter policy, refer to Creating and Editing Filter Policies.
Select the Mapping Options from the left-hand pane. Select a Mapping Options Sub-Profile from the drop-down list. For details about this section, refer to Mapping Options.
Select the Advanced Options from the left-hand pane and configure the Dynamic Rule, the Character Length Settings, and the Illegal Character Replacement Settings. For details about this section, refer to Advanced Options.
Click Save to save the profile or click Save As and enter a profile name to save it as new profile. Select Save and replace existing profile to replace the original profile.
Migration Options
Migration options allow you to configure which content settings and security settings can be migrated. Set up a Migration Options Sub-Profile by the following steps.
From the Home tab, click Profile Settings in the Profile Manager group. The Profile Settings tab appears.
From the Profile Settings tab, select Online Mode in the Plan Mode group. Click Migration Options on the left-hand pane.
In the Sub-profile group, click Edit Sub-profile to make the Migration Options field active. From the Profile Settings tab, under the Profile/Sub-profile group, click New.
Enter a sub-profile name in the pop-up window and click OK.
Click the Content tab to configure common settings for this Migration Options. You can configure the following settings:
• Document Format Option – Defines the document type that the Lotus Notes document will be converted to after the migration. Select the Convert Lotus Notes documents to checkbox and select a document format from the drop-down list. You can choose one of the following types to convert the Lotus Notes document to: .docx, .doc, InfoPath, pdf,
32
DocAve 6: Lotus Notes Migrator
.aspx, html, and .msg. If you choose a library as the destination node, the converted document will be generated in the library as a file. If you choose a list as the destination node, the converted document will be added as an attachment of the item that is generated from the Lotus Notes document.If you deselect the Convert Lotus Notes documents to checkbox, the Lotus Notes document will generate an item only after the migration.
*Note: DocAve supports converting Lotus Notes documents to Microsoft Office InfoPath. You need configure Generate InfoPath Mapping and Publish InfoPath Template by Migrator Tool. If you select InfoPath, make sure that you have generated the InfoPath mapping and published the InfoPath template by Migrator Tool.
*Note: If you select msg, make sure Microsoft Outlook has been installed in the destination environment.
• Create Folders by Field Values – Classifies items generated from Lotus Notes documents in a list by putting these items into folders named by specific field values. Select the Migrate Lotus Notes documents into folders named by field values checkbox and then enter a field name in the text box. If the source field values contain any separator, enter the separator in the text box, and choose the folder structure, Nested or Parallel. By default, the separator \ is provided. For example, the field values is “A\B” and you entered \ as the separator. If you choose to create nested folders, a folder B is created under folder A. If you choose to create parallel folders, a folder A and folder B are created in the same level.
• Item Number Limitation – Limits the number of items in a SharePoint list or library. Select the Create multiple lists/libraries during migration when the number of list/library items exceeds checkbox. The default number is 5000. You can change the number to decide how many items a list or library can contain. If you select this option, additional lists or libraries are created when the number of items in a list or library exceeds the limit. A numerical suffix (1, 2, 3…) will be added to additional lists’ or libraries’ name.
• Image Option – Normally if you select a list as the destination, embedded images in Lotus Notes documents are added as attachments to the items that are generated from Notes documents. If you select a document library as the destination, embedded images in Lotus Notes documents are migrated to the document library, along with the items that are generated from Notes documents. To extract the embedded images from the list or document library and to collect them in a SharePoint picture library, select the Extract embedded images into Picture Library checkbox. Lotus Notes Picture Library is provided as the default name of the picture library. You can customize this name. • Link Tracking Option – Select this option to prevent broken links. Links are broken when
the source DocLinks are migrated to the destination, but the objects that the DocLink points to are not migrated to the destination. When you select the Redirect to the Lotus Notes Link Tracking Page for the DocLinks pointing to a migrated object checkbox, the DocLinks that point to the migrated objects are directed to the Link Tracking Page, which will redirect to the objects in SharePoint. If this option is deselected, the DocLinks
33
DocAve 6: Lotus Notes Migrator
that point to a successfully migrated object are directed to the destination object URLs in SharePoint. When the DocLinks point to objects that are not migrated to the
destination, regardless of which option is selected, the viewer is directed to the Link Tracking Page.
*Note: To select this option, make sure that you have deployed the
SP2010LotusNotesLinkTracking Solution or the SP2013LotusNotesLinkTracking Solution in Control Panel > Solution Manager.
• View Migration Option – Select the Migrate view checkbox to migrate Lotus Notes views to SharePoint views. The view mappings configured in the DocAve Migrator Tool will take effect during the migration. For more information about how to configure view mappings, refer to the DocAve 6 Supplementary Tools User Guide.
If enabled, choose one of the following conflict resolution methods, which determines how DocAve handles naming conflicts between the source and destination views:
Skip – The source view will be skipped and the destination view will be kept. Append – The source view will be migrated to the destination by adding a suffix (1, 2,…, increasing in numerical value) at the end of the view name.
• Lotus Notes Attachment Migration Option – Places Lotus Notes document attachments in a separated SharePoint document library. Select the Migrate attachment to a
separated Document Library checkbox. Lotus Notes Attachment Library is provided as the default name of the destination document library. You can also customize the name by entering a document library name in the text box.
*Note: This option only takes effect when the destination node is a Custom List, Discussion Board, Contacts, Calendar, or Wiki Page Library.
• Folder Creation Option (Only for migrating to a document library or a folder within a document library) – Classifies items generated from Lotus Notes documents in a
document library by putting items into folders generated by DocAve. Folders are named by the source subject. Select the Create folder for the migrated documents in
destination checkbox; the document, response, and response to response with the same subject will be migrated into the folder. With this option selected, you can also select the Migrate reply documents into sub-folder of main topic checkbox to migrate responses and response to responses into the sub-folders.
• Document Set Option (Only for migrating to document library or folder) – Migrates Lotus Notes documents to SharePoint document sets. Select the Migrate Lotus Notes documents to SharePoint Document Set checkbox; the property and security of the source data are kept during the migration. The attachments within the Lotus Notes documents are migrated to the document set within the document library, and you can manage the property and security in destination.
• Default List Template – Allows users to choose a default list template that will be used as the destination list template when you choose a site collection or a site as the destination node. Select a list template from the Default list template drop-down list.
34
DocAve 6: Lotus Notes Migrator
*Note: The list that you saved as template in SharePoint can be used as the default list template.Click the Security tab to configure the following security settings.
• User and Group – Select Migrate user and group to migrate the source Lotus Notes users and groups to SharePoint.
• Security – When the Migrate user and group checkbox is selected in the section above, you can also choose to migrate the security of the source users and groups.
• List Permission Inheritance (this section is only available when the Migrate security checkbox is selected in the section above) – Choose whether a list that is migrated from Lotus Notes database will inherit its parent site’s permissions in the destination. Choose Do not inherit parent site permission for a list to not inherit permissions of its parent site or choose Inherit parent site permission for a list to inherit permissions of its parent site.
• Item Permission Inheritance (this section is only available when the Migrate security checkbox is selected in the section above) – Choose whether an item that is migrated from Lotus Notes document will inherit its parent list permission in the destination. Choose Inherit parent list permission for an item to inherit permissions of its parent list or choose Keep source inheritance relationship for an item to keep the permission inheritance relationship in Lotus Notes.
Click Save to save the sub-profile. Alternatively, click Save As and enter a sub-profile name to save it as another profile. Select Save and replace existing sub-profile to replace the original profile. Otherwise, it is saved without removing the original profile.
Mapping Options
Mapping options allow you to configure list mapping, content type mapping, security mapping, and dynamic mapping. Set up a Mapping Options Sub-Profile by the following steps.
From the Home tab, click Profile Settings in the Profile Manager group. The Profile Settings interface appears.
From the Profile Settings tab, select Online Mode in the Plan Mode group.
Click Mapping Options from the left-hand pane. From the Profile Settings tab > Sub-profile group, click Edit Sub-profile to make the Mapping Options field active.
From the Profile Settings tab, under the Profile/Sub-profile group, click New. Enter a sub-profile name in the pop-up window and click OK.
Click the List Mapping tab and configure the following settings to map the Lotus Notes database to the specified list.
Click Add a List Mapping; a mapping entry appears for you to configure relevant rules. Double-click the text box under the Lotus Notes Database Name column, and enter the name of the Lotus Notes database that you wish to map in the text box.
35
DocAve 6: Lotus Notes Migrator
Double-click the text box under the SharePoint List Name column, and enter the name of the SharePoint list that you wish the Lotus Notes database to be mapped to in the text box. If the entered list name does not exist in the destination, a new list with the entered name will be automatically created during the migration. If you enter an existing list, make sure the list template you select in step d is the same as that of the existing one; otherwise a new list with the selected list template will be created in the destination during the migration. A suffix (_1) is added at the end of the list name. Select a template for the entered SharePoint list from the SharePoint List Template drop-down list. Custom List, Document Library, Discussion Board, Contacts, Calendar, and Wiki Page Library are provided. You can also enter a SharePoint list template name or list template ID.
*Note: The list that you saved as template in SharePoint is supported to be used as the list template.
Repeat the steps above to add more mappings.
To delete one or more list mappings, select them and then click Delete the Selected List Mapping(s). You can also click the delete ( ) button to remove a list mapping.
Click the Content Type Mapping tab; you can choose to use the content type mapping that is created by the DocAve Migrator Tool or choose to configure the content type mapping manually.
• Choose Use the content type mapping generated by the Migrator Tool to automatically apply the content type mapping that you configured in the DocAve Migrator Tool during the migration.
*Note: If you choose to use the content type mapping generated by the DocAve Migrator Tool but have never configured the mapping using the tool, the default content type mapping will be automatically generated for use during the migration. • To configure the content type mapping in this page by yourself, select the Manually configure the content type mapping option and the Rule tab appears. Configure the following settings to set up a rule:
Content Type Mapping – Maps a Lotus Notes form to a SharePoint content type. Enter the name of a Lotus Notes form in the Lotus Notes Form column, and enter the name of a SharePoint content type in the SharePoint Content Type column. If the SharePoint content type does not exist in the destination, a new content type with the entered name will be created automatically during the migration. If you enter an existing SharePoint content type, you need to enable Update Content Type in a configuration file. On the destination DocAve Agent server, navigate to
…\AvePoint\DocAve6\Agent\data\Migrator\LotusNotesSettings\ConfigurationFi le to open LotusNotesMigrationWorker.xml with Notepad, and then change the value of <ContentTypeConfig UpdateContentType=“False”> to True.
36
DocAve 6: Lotus Notes Migrator
Specified Title –Specify a source field whose value will be used as the title of an item in SharePoint. Select the Please specify a title checkbox and enter a field name in the text box.Column Mapping – Specify the SharePoint column name and SharePoint column type for the mapped Lotus Notes field. Click Add a Column Mapping to create a column mapping. Enter the name of a Lotus Notes field in the Lotus Notes Field Name column, and enter the name of a SharePoint column name in the
SharePoint Column Name column. Then, select a SharePoint column type for this column from the SharePoint Column Type drop-down list.
Repeat the steps by clicking Add a Column Mapping to add more column mappings. To delete one or more column mappings, select the mappings and then click Delete the Selected Column Mapping(s). You can also click the delete ( ) button to remove a column mapping.
*Note: If you select Managed Metadata, it requires you to enter a term set path, and choose whether to allow multiple values in this column. For example, in the Term Set Path text box, System is the group name; “;” is the separator; Keywords stands for the term set. Select the Allow multiple values checkbox to define multiple values for the column. You can customize which separator will be used to separate multiple values in the text box. “;” is provided as default. *Note: If you select Lookup, you must configure the Column Settings in the pop-up window. Enter the name of the list/library you want to search, and then enter a name for this Lookup column that you are creating. Thus, you will be able to get the information from the list/library through this Lookup column. You can choose whether to allow multiple values, and designate the separator. Click the plus ( ) button beside the Rule 1 tab to add more rules.
Configure the Security Mapping. Click the Security Mapping tab to select user mapping, group mapping, permission mapping, and configure AD group mapping.
• User Mapping – Select a user mapping from the drop-down list or click New User Mapping in the drop-down list to create a new one. For details on creating a user mapping, refer to the DocAve 6 Control Panel Reference Guide.
• Group Mapping – Select a group mapping from the drop-down list or click New Group Mapping in the drop-down list to create a new one. For details on creating a group mapping, refer to the DocAve 6 Control Panel Reference Guide.
• AD Group Mapping – Maps a Lotus Notes group to an AD group that exists in the
domain of the SharePoint environment. Click Add an AD Group Mapping, then enter the name of a Lotus Notes group in the Lotus Notes Group Name column, and enter the name of an AD group in the AD Group Name column.
Repeat the steps by clicking Add an AD Group Mapping to add more AD Group Mappings. To delete a one or more AD group mappings, select the mappings and then