Installer/User Guide
Emerson, Emerson Network Power and the Emerson Network Power logo are trademarks or service marks of Emerson Electric Co. Avocent, the Avocent logo andTrellisare trademarks or service marks of Avocent Corporation or its affiliates in the U.S. and other countries. Liebert is a trademark and service mark of Liebert Corporation. All other marks are the property of their respective owners. This document may contain confidential and/or proprietary information of Avocent Corporation, and its receipt or possession does not convey any right to reproduce, disclose its contents, or to manufacture or sell anything that it may describe. Reproduction, disclosure, or use without specific authorization from Avocent Corporation is strictly prohibited. ©2013 Avocent Corporation. All rights reserved.
NOTE:This document supports versions up to and including release 4.0.
T A B L E O F C O N T E N T S
Product Overview
1
Features and Benefits
1
System Components
2
Third party products 3
Partner products 3
Supported Units
3
Target devices 5 Power devices 6System Configuration
6
Installation
9
About Installation
9
Minimum requirements for the DSView software 9
DSView software and virtual environments 10
Before installing and configuring the DSView software 10
Avocent Customer Express (ACE) Account
10
DSView Software Activation 10
Installing the DSView Software
12
Upgrading the DSView Software
13
Configuring the DSView Software
14
Running the DSView Software
15
Minimum client requirements 15
Opening a client session 16
Regaining access 17
Uninstalling the DSView Software
17
Closing a DSView Software Session
17
Java Installation
18
Avocent Viewer Plug-in Installation
19
Installing the DSR Remote Operations Software
19
DSView Explorer Windows
21
Accessing Target Devices
22
Using the Side Navigation Bar
22
Using Windows
23
Sorting information in a window 23
Filtering information in a window 23
Saving information in a window 24
Displaying pages 26
Printing a window 26
Refreshing a window 26
Using keyboard commands
26
Basic Operations
29
DSView Help
29
Configuring the DSView help location 29
Installing DSView help on a local server 30
Global System Properties
30
Legal Notice
30
PCI Compliance Configuration
31
Power Settings
32
Profiles
32
Changing user options 32
Changing your password 33
Choosing the serial session application 33
Specifying a user certificate 34
Specifying an SSH key 35
Enabling user credential caching 35
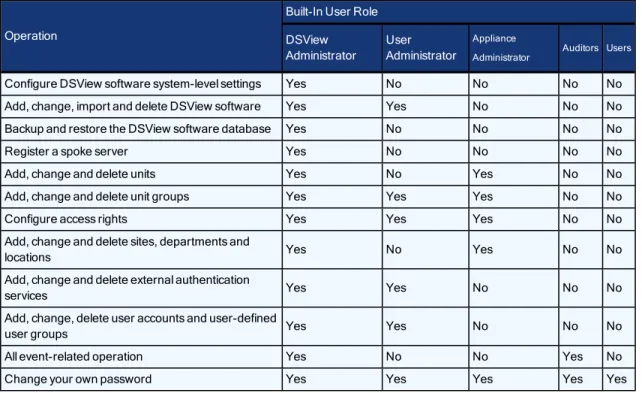
Built-in User Groups Roles
36
Preemption Levels
36
Internet Explorer Considerations
37
Managing ActiveX® controls 38
Video Viewer management 39
Security zones 39
Advanced Internet options 41
Certificates
41
System certificate policy and trust store 42
Integrated Windows Authentication
44
Firewalls
44
VPNs
45
NAT Devices
46
Licenses
48
Adding a new license key 49
System Information
50
ISV Partners
50
DSView Servers
51
Server certificates 52
Avocent proxy server 56
Server trap destinations 57
Client session information 57
DSView software modem sessions 58
Email 59
Unit status polling 60
Backing up and Restoring Hub Servers Manually
60
Spoke Servers
62
Replication
65
Authentication Services
69
Supported Authentication Services
69
DSView software internal authentication service 70
Active Directory external authentication service 71
Windows NT external authentication service 76
LDAP external authentication service 77
RADIUS external authentication service 81
TACACS+ external authentication service 83
RSA SecurID external authentication service
86
User Authentication Services Window
88
Units View Windows
89
Types of Units View windows 89
Topology view 90
Accessing Units View windows 91
Showing and hiding units 92
Units View windows fields 93
Multiple unit operations from a Units View window 95
Unit Overview Windows
96
Unit Status Window
98
Adding and Deleting Units
99
Adding Units
99
Wizards that add units 100
Adding a single managed appliance 100
Adding a single embedded appliance 102
Adding managed appliances from a range or list of IP addresses 103
Adding a generic appliance or an EVR1500 environmental monitor 105
Adding a target device 105
Automatically deleting attached units 106
Synchronizing the DSView Software Database
107
Name Synchronization
107
Automatic name push 107
Automatic name pull 108
Manual name push 109
Manual name pull 110
Topology Synchronization
111
Automatic topology synchronization 111
Topology synchronization options in the Add Unit Wizard 112
Topology synchronization options in the Resync Wizard 113
Merging target devices 113
Merging or splitting cascade switches 115
Automatic Discovery
115
Automatic Inheritance for Group Memberships and Properties
116
Managing Units
117
Appliance Configuration Templates
117
Saving appliance configuration templates 117
Modifying appliance configuration template properties 118
Applying appliance configuration templates 118
Unit Properties
119
About Access Rights
123
How access rights can be assigned 125
Assigning Access Rights
125
Viewing Effective Access Rights
125
Managed Appliance Settings
126
Managed Appliance Status
127
Managed Appliance SNMP Settings
128
Target Device Services
129
Target Device Settings
130
Target Device Naming
131
IQ Module Settings
132
KVM Switch and Cascade Switch Settings
133
OSCAR interface settings 134
Local Account Settings
135
Embedded Units
137
Launching embedded unit sessions 137
Asset and Usage Reports
139
Asset 139
Usage 139
Power Devices and Power Device Sockets
141
Power Devices
141
Power Device Input Feed
143
Power Device Sockets
144
Power Control of Devices Attached to Power Devices
145
Unit Sessions and Connections
147
Managed Appliance Session Settings
147
Customizing the Appliance Sessions window 147
Active Sessions
151
All active sessions 151
Active sessions on a target device 152
Active modem sessions 154
Connections to Units
155
Connection display format 155
Renaming a managed appliance connection 156
Adding and deleting target device connections 157
Merging virtual and physical target device connections 157
Data Logging
159
Configuring Data Logging
160
Enabling the SSH server 160
Enabling the Syslog server 161
Enabling and disabling data logging on units 161
Verifying the data logging settings for each connection 162
Viewing and customizing the SSH server settings 162
Configuring the buffer warnings events as SNMP 163
Specifying where data log files will be stored 164
Archiving and deleting data log files 164
Viewing Data Log Files
166
SSH Passthrough Sessions
169
Configuring SSH Passthrough
169
Enabling SSH Passthrough 170
SSH port sharing 170
SSH Passthrough Sessions
171
Establishing an SSH Passthrough connection to a unit 171
Break sequences 174
Transferring read/write access 175
Disconnecting a session 175
Displaying session output 175
Supported service processor commands 176
Grouping Units
177
Site, Department and Location Groups
177
Custom Fields
179
Unit Groups
181
Unit group hierarchy 182
Adding or deleting a unit group 185
Changing the unit group properties 185
DS Zones
189
Managing and Accessing Zones
189
Enabling DS Zones 189
Creating zones 189
Accessing zones 190
Transferring units to a zone 190
Managing zone properties 191
Using Zones
193
Units actions in a zone 193
Managing User Accounts
197
User Accounts Windows
197
Adding User Accounts
198
Deleting User Accounts
200
Unlocking User Accounts
200
Resetting a User Account Password
201
Changing User Account Properties
201
Username 201
User certificates 202
User SSH key 202
User password 203
User account restrictions and expiration settings 203
User group membership 204
Preemption level 204
Address 204
Phone contact 205
User notes 205
Custom field properties 205
User Access Rights
206
User Groups and User Roles
207
Adding User-defined User Groups
208
Deleting User-defined User Groups
210
User Group Properties
211
Changing User Group Members
211
User Group Access Rights
212
Using the Video Viewer
215
About the Video Viewer
215
Window Features
216
Opening a KVM Session
217
Opening an exclusive KVM session 217
Connecting to an existing session 218
Video Viewer session properties 219
Session time-out 219
Closing a Video Viewer Session
220
KVM Session Profiles
220
General profile settings 220
Cursor profile settings 222
Toolbar profile settings 223
Video profile settings 223
Managing KVM session profiles 224
Using Menu Commands to Manage Session Settings
227
General commands 227
Cursor commands 228
Toolbar commands 229
Video commands 229
Mouse scaling command 230
Avocent Mouse Sync 230
Manual Video Adjustment
231
Saving the View
233
Displaying Video Viewer Users
234
Scan Mode
234
About scan mode 234
Thumbnail Viewer features 235
Macros
238
Macro groups 240
Power Control of Devices Attached to Power Devices
242
Using Virtual Media
242
Virtual Media dialog box 243
Virtual media session settings 244
Opening a virtual media session 244
Closing a virtual media session 246
Using Smart Cards
246
Video Viewer Troubleshooting
247
Using the Telnet Viewer
249
About the Telnet Viewer
249
Telnet Viewer Window Features
249
Telnet Viewer window toolbar 251
Security Property
251
Opening a Session
252
Customizing the Telnet Viewer
252
Customizing Session Properties
253
Login scripts 255
Reviewing Session Data
256
Macros
256
Macro groups 258
Logging
260
Copying, Pasting and Printing Session Data
262
Power Control of Devices Attached to Power Devices
263
Closing a Telnet Viewer Session
263
Using Tools
265
Using Unit Tools
265
Exporting units 265
Exporting access rights 266
Merging target devices 267
Merging target device endpoints 268
Using the Managed Appliance Tools
268
Rebooting 269
Upgrading firmware 269
Resynchronizing units 270
Saving a managed appliance configuration 271
Saving a managed appliance user database 272
Restoring a managed appliance user database 272
Using Tasks
273
Using the Tasks Window
273
Adding tasks 273
Specifying when to run tasks 274
Adding Tasks Using the Add Task Wizard
276
Task: Backup DSView software database and system files 276
Task: Configure SNMP trap settings on a managed appliance 277
Task: Exporting an event log .csv file 278
Task: Exporting an Asset Report to a .csv file 279
Task: Exporting a Usage Report to a .csv file 279
Task: Sending an IPMI chassis control command to target devices 280
Task: Test modem connections to selected units 281
Task: Updating the firmware of an appliance type 282
Task: Validating user accounts on an external authentication server 282
Task: Pull names from selected units 283
Task: Update topology for selected units 283
Running tasks manually 284
Displaying task results 284
Deleting tasks 285
Changing tasks 285
Firmware Management
286
Events and Event Logs
289
Event Severity and Categories
289
Event severity 289
Event categories 290
Email Notifications
290
Enabling and Disabling Event Logging
292
Displaying the Event Log
293
Event states 294
Using the date filter 295
Changing the Event Log Retention Period
295
Creating an Event Log .csv File
296
Plug-ins
297
Recommended Sequence for Adding/Upgrading Plug-ins
297
Adding Plug-ins
297
Managing Plug-ins
299
Upgrading a plug-in 299
Disabling and activating a plug-in 300
Technical Support
301
TCP and UDP Ports
302
KVM switch ports
302
Serial console appliance ports
304
DSView server ports
305
Avocent® Universal Management Gateway Appliance SP Proxy Server Ports
305
Generic appliance ports
305
External authentication ports
306
SNMP ports
306
DSR Remote Operations Software
308
Before using the DSR Remote Operations software
309
Installing the DSR Remote Operations software
310
Using the DSR Remote Operations software
311
Window features
312
Rebooting a switch
314
Managing servers
314
Power control of devices attached to power device sockets
314
Terminal Emulation
316
VT terminal emulation
316
VT100+ terminal emulation
316
VT102 terminal emulation
317
VT100 terminal emulation
317
VT220 terminal emulation
321
VT52 terminal emulation
323
VT320 terminal emulation
324
Glossary
327
Access control 327 Active Directory 327ADSAP (Avocent DS Authentication Protocol) or ADSAP2 327
AIDP (Avocent Install and Discover Protocol) 327
Applet 327
Appliance 327
ASMP (Avocent Secure Management Protocol) 327
Authentication 328
Authentication server 328
Authorization 328
AVSP (Avocent Video Session Protocol) 328
Browser session 328 Cascade device 328 Cascade switch 328 CCM appliance 329 Certificate authentication 329 Connection 329 CPS appliance 329 Database replication 329
DHCP (Dynamic Host Configuration Protocol) 329
Digital Certificate 329
DSR switch 330
DSView management software 330
DSView server 330
DSView software client 330
DSView software client session 330
DSView software hub server 330
DSView software spoke server 331
DSView software system 331
Embedded appliance 331
Encryption 331
External authentication server 331
Flash 331
FRU (Field Replaceable Unit) 332
Graceful shutdown 332
Hotkey 332
HTML (Hypertext Markup Language) 332
HTTP (Hypertext Transfer Protocol) 332
HTTPS (Secure Hypertext Transfer Protocol) 332
Integrated windows authentication 332
IQ module 333 Java 333 KVM 333 KVM session 333 KVM session profiles 333 KVM switch 333
Local port 333
Managed appliance 334
MIB (Management Information Base) 334
NAT (Network Address Translation) 334
NAT device 334
Negative hysteresis 334
OSCAR interface 334
Power device 335
Positive hysteresis 335
PPP (Point to Point Protocol) 335
SDR repository device 335
Serial console appliance 335
Serial session 335
Server 335
Session 336
Site 336
Smart card 336
SNMP (Simple Network Management Protocol) 336
SNMP manager 336
SSH Passthrough session 336
SSL (Secure Sockets Layer) 336
Target device 336
Target device session 337
TCP/IP (Transmission Control Protocol) 337
Telnet session 337
Telnet Viewer 337
Tiered switch 337
UDP (User Datagram Protocol) 337
Unit 337
Video Viewer 337
VPN (Virtual Private Network) 337
(WAN) Wide Area Network 338
(WAS) Web Application Server 338
(Webapp) Web Application 338
Web server 338
Product Overview
1
The DSView™4 management software is a secure, web browser-based, centralized enterprise management solution
that allows users to remotely access, manage, monitor and control target devices through Avocent managed appliances. A session may be launched to a target device with a single point of access.
NOTE:All instances of DSView software within this document refer to DSView software version 4 or higher.
Features and Benefits
Network rebooting and troubleshooting
The DSView software uses industry standard IP connections so that you can easily troubleshoot a server, or even reboot it, from the Network Operations Center (NOC), from your desk or from any location in the world. With the DSView software, you can access all of your data center devices from a single screen - making complex network access and control remarkably easy. Using out-of-band management, the software can be used to reach and restart servers or other devices that are not functioning or responding to in-band commands, regardless of the state of the equipment’s operating system.
Web-based access and control
The DSView management software provides secure “point-and-click” browser-based access to control virtually any data center device using managed appliances from DSView software clients located anywhere in the world.
Secure authentication and communication
Secure Socket Layer (SSL) encryption may be used to encrypt data traveling within the DSView software system. Users may be authenticated through internal or external services such as LDAP, Active Directory, NT Domain, TACACS+, RADIUS and RSA SecurID.
Unit and user management
The DSView management software provides centralized network access, control and security for managed
appliances. A DSView software administrator may add, remove, delete and change settings for managed appliances and target devices, including assigning permissions and per-device contact information, which are stored on the DSView server. A DSView software administrator may also assign unique permissions which allow individual users or a group of users access to units or groups of units.
Proxy server access
The proxy server feature allows keyboard, video and mouse (KVM) and serial sessions to be proxied through the DSView server. When a session is initiated with a target device, the viewer communicates using the Avocent Proxy Protocol (APP) and the DSView server makes a direct connection to the appliance.
Virtual media
On supported KVM switches, a virtual media capable IQ module and the virtual media feature allow the client workstation user to load files onto USB2-compatible target devices when the usual network resources are unavailable.
Mapping physical drives or image files on the client system as virtual drives on the target device can
accommodate critical tasks required on the target device, such as operating system installation or recovery, BIOS updating and configuration backups.
Dual stack support for IPv4 and IPv6
The DSView server is a dual stack host for IPv4 and IPv6 network protocols. Several Avocent appliances support IPv6, including DSR™ switches, ACS advanced console servers, and MergePoint™service processor (SP)
managers.
Virtual segregation of resources with DS Zones
DS Zones provide virtual segregation of data center resources, including appliances, target devices and virtual machines. You can manage the users, licenses and authentication services assigned to each zone, and transfer units among zones.
Enhanced security
Federal Information Processing Standard (FIPS) appliance support will support changing the mode of an added appliance from FIPS to non-FIPS. All of the functionalities supported by DSView software on non-FIPS appliances be supported for FIPS mode appliances, too. Support for 2048 Bit SSL encryption for the system and the client provides stronger SSL keys for user access to DSView software and for appliances.
NOTE:FIPS 140-2 compliance is only supported on MergePoint Unity™ KVM over IP and serial console switch and ACS 6000 console server.
System Components
The DSView software system contains the following components.
DSView management software
The DSView software resides on the DSView server (host or hub computer) and provides a web gateway and services for managing units (appliances and target devices) using a web browser. The gateway allows for IP-based video, serial management, Telnet Viewer, third party Telnet viewer, web browser and other supported session types.
Users may connect to the DSView server from DSView software clients and use the DSView Explorer windows to communicate with the system.
DSView server
The DSView server contains the DSView management software. The server provides a centralized database for storing configuration, user, unit and system information. It also provides services for authentication, access control, logging events, monitoring and license management.
You may configure one or more spoke (backup) servers in addition to the hub server. The hub server is
responsible for maintaining the master copy of the database in a DSView software system. Only one server in a DSView software system may be configured as the hub server.
Spoke servers perform database replication with the hub server. The hub server acts as the coordinator for database replication between itself and all of the other spoke servers in a DSView software system. A hub server and a spoke server both offer the same DSView software functionality to a user. The distinction of hub or spoke refers only to the database replication role that the server plays and not with the functionality that the server provides. Adding one or more spoke servers to a DSView software system provides redundancy and the ability to distribute DSView software functionality across multiple sites.
After the hub server and optional spoke server(s) are configured, you may create and configure the type of access levels for users within your network environment. You may also set up event logs to record full details of user access and other events.
DSView software client
A DSView software client is a computer with a web browser that can access the DSView management software installed on the DSView server.
Third party products
Third party products are not a part of the DSView software, but are supported for use with it.
External authentication servers- An external authentication server enables the DSView server to broker authentication requests from users requesting access to the DSView software system.
SNMP managers- The SNMP (Simple Network Management Protocol) manager monitors the managed appliances and receives SNMP traps from the DSView software on the server.
Third party Telnet viewers- A third party Telnet viewer may be used for serial sessions instead of the DSView software Telnet Viewer.
Third party session software- Third party software such as RDP or VNC, when properly installed and configured on the target device, may be enabled for use within the DSView software for initiating sessions with the target device. At the beginning of a session, the RDP viewer allows users to map local resources for use with virtual media.
Partner products
Environmental monitoring with Uptime Devices
DSView software can help you access Uptime Devices SensorHub environmental monitoring equipment so you can quickly detect environmental conditions (equipment to track temperature, humidity, airflow, water, voltage and contact closures) that could adversely affect operation of servers and other network devices. Visit
www.uptimedevices.com for ordering information.
Proactive Network Security with NetClarity Auditor Enterprise
Integrate NetClarity Auditor Enterprise with the DSView software and manage one or more Auditor appliances to alert, block and correct critical IT security and compliance problems in your data center and entire enterprise network. Visit www.netclarity.net for ordering information.
Supported Units
For management functions, the DSView software client uses HTTPS (Hypertext Transfer Protocol with SSL encryption) to send a request to the DSView server, which then sends a command to the managed appliance. The appliance then performs the requested function.
The DSView software supports the managed appliances listed in this section. Other appliances may be supported by plug-ins; see the Avocent web site, www.avocent.com, for a list of plug-ins that may currently ship with the DSView software and/or that can be added to the DSView software. SeePlug-inson page 297 for information about adding and managing plug-ins in the DSView software system.
Cyclades ACS advanced console server
ACS advanced console servers allow users to access serially attached devices over a standard TCP/IP connection using the Avocent Telnet Viewer, a third party Telnet viewer or a Secure Shell (SSH) client. These serial sessions can be shared among multiple users across multiple DSView servers. For more information, see the ACS console server plug-in documentation.
KVM over IP switches
KVM over IP switches allow KVM signals to be transmitted over a standard TCP/IP network connection. Some DSR switches may be connected using a modem, which provides benefits for branch offices such as low cost and dial-up performance.
NOTE:The DSView software supports all DSR and MergePoint Unity switch models.
For DSR switches, a target device is first attached to an IQ module, which is then attached to a DSR switch. DSView software clients communicate with target device ports using a Video Viewer connection between the client and the managed appliance.
The DSR switches allow the cascading of legacy analog KVM switches from DSR switch ports, which may be managed in a DSView software system. Certain DSR switch models also allow the cascading of another switch. For more information, see the DSR Switch Installer/User Guide.
NOTE:PEM cascade devices are not supported.
MergePoint service processor (SP) manager
The MergePoint service processor manager is a secure, centralized enterprise management solution for target devices equipped with IPMI, HP iLO and Dell DRAC service processors. You can use the DSView software to access, monitor and control the MergePoint SP manager and attached target devices.
The MergePoint SP manager provides a standardized interface independent of the management protocols used to manage each target device. Management operations can be performed either by using commands or scripts over a Telnet or SSH version 2 session or by using the appliance’s web interface from a standard web browser.
For more information, see the MergePoint appliance plug-in documentation.
Cyclades OnSite branch office appliance
OnSite branch office appliances may be used to access multiple traditional or headless servers, networking devices, infrastructure components or any other device with a serial console or KVM port. You can use the DSView software to access, monitor and control the OnSite appliance and attached target devices. For more information, see the OnSite appliance plug-in documentation.
Virtual environments
The DSView management software plug-in for Virtualization allows you to access and control virtual machines from the DSView software. Supported unit types include Microsoft® Hyper-V, VMware®VirtualCenters, ESX
Servers and virtual machines, as well as Citrix®XenServersTMand virtual machines. You can launch a Virtual
Network Computing (VNC), Remote Desktop (RDP), Secure Shell 2 (SSH) or VMware viewer session to supported virtual machines from a single point of access. For more information, see the Virtualization plug-in
documentation. Licenses may be required; see your Avocent representative or www.avocent.com for more information.
Blade chassis
The DSView software plug-in for Blade Chassis allows you to access multi-vendor blade chassis and blades from the DSView software. You can launch a KVM session to any managed blade from a single point of access. For a list of supported blade chassis and other information, see the Blade Chassis plug-in documentation.
Generic appliances
Generic appliances manage data center devices such as routers. These devices may be managed within a DSView software system by launching a standard web browser to the device URL or by opening a Telnet session.
Embedded units
Using the DSView software, you may add/delete, configure/display properties, and launch video sessions to the following versions of third party embedded units:
• IBM®ASM (Advanced System Management) RSA II (Remote Supervisor Adapter II) - Version 5, Build
GRE132AUS
• DRAC 4 (Dell™ Remote Access Controller) - Version 1.0, Build 06.14 • HP iLO (Integrated Lights-Out) - Version 1.20
• NEC IPF (Itanium Processor Family) - Version 0.5.1.20
For management functions (other than launching video sessions) that are not performed by the DSView software, see the documentation for the unit.
Legacy units
The following legacy units are supported in the DSView software. • DSI5100 IPMI proxy appliances
• EVR1500 environmental monitors • DS1800 digital switches
• Cyclades KVM/net KVM over IP switches • Cyclades KVM/net Plus KVM over IP switches • Cyclades TS appliances
• CCM console management appliances
• CPS810 and 1610 serial over IP network appliances
Target devices
Target devices encompass a wide range of data center components such as servers and routers that a DSView software administrator may manage virtually through the DSView software system. A target device is added automatically to your DSView software system when the supported managed appliance is added. A target device may also be added individually.
Power devices
A power device is a type of target device that can be cascaded from a managed appliance.
When a DSView software client sends a power control request to a target device, an HTTPS request is sent to the DSView server, which then sends a command to the managed appliance. The command is converted and serially sent to the power device. The power device then performs the requested action (for example, turning a power outlet on or off).
The DSView software supports the following power devices: • Avocent SPC power control devices
• Server Technologies Sentry Switched CDU 8H1, 8H2, 16V1, 16V2, 24V2, CW-24V3, CW-32VD1 and CW-32VD2 (supported models may change; contact Avocent Technical Support for current information)
• Cyclades™Power Distribution Units
• Liebert MPH and MPX rack PDUs (only supported through ethernet)
• APC AP71xx, 78xx and 79xx series and AP8661, AP8941 PDUs (only supported through ethernet) All of the above power devices, unless otherwise noted, are supported on KVM over IP switches that contain one or more SPC ports. Avocent and Server Technologies power devices are also supported on CCM and CPS appliances.
System Configuration
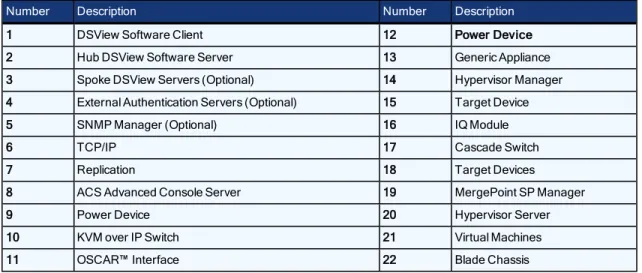
Figure 1.1 illustrates an example system configuration using the DSView management software. For information about the TCP ports that the DSView software uses, seeTCP and UDP Portson page 1.
Figure 1.1: Example System Configuration
Number Description Number Description
1 DSView Software Client 12 Power Device 2 Hub DSView Software Server 13 Generic Appliance 3 Spoke DSView Servers (Optional) 14 Hypervisor Manager 4 External Authentication Servers (Optional) 15 Target Device 5 SNMP Manager (Optional) 16 IQ Module 6 TCP/IP 17 Cascade Switch 7 Replication 18 Target Devices 8 ACS Advanced Console Server 19 MergePoint SP Manager 9 Power Device 20 Hypervisor Server 10 KVM over IP Switch 21 Virtual Machines 11 OSCAR™ Interface 22 Blade Chassis
Installation
This chapter describes the following installation sequence for the DSView software:
2
• What you should do before installing the DSView software • Installing the DSView software
• Configuring the DSView software, plus considerations when upgrading • Running the DSView software, that is, start a client session
Final sections describe how to change your password, uninstall the software, end a DSView software session and install Java.
About Installation
When the DSView management software is installed, the DSView software database and a hub server are also installed on the dedicated server.
Rebooting the dedicated server is not required prior to using the DSView software.
Once the DSView software is installed and you have configured the hub server, users may log in at another computer as a DSView software client, using a supported web browser.
You may also install the DSView software on additional computers and configure them as spoke servers. SeeSpoke Serverson page 62 andInstalling the DSR Remote Operations Softwareon page 19.
NOTE:A license key permits the operation of the DSView software on the dedicated server. The license key also specifies the number of clients that may use the software and the number of spoke servers allowed on a system. SeeLicenseson page 48.
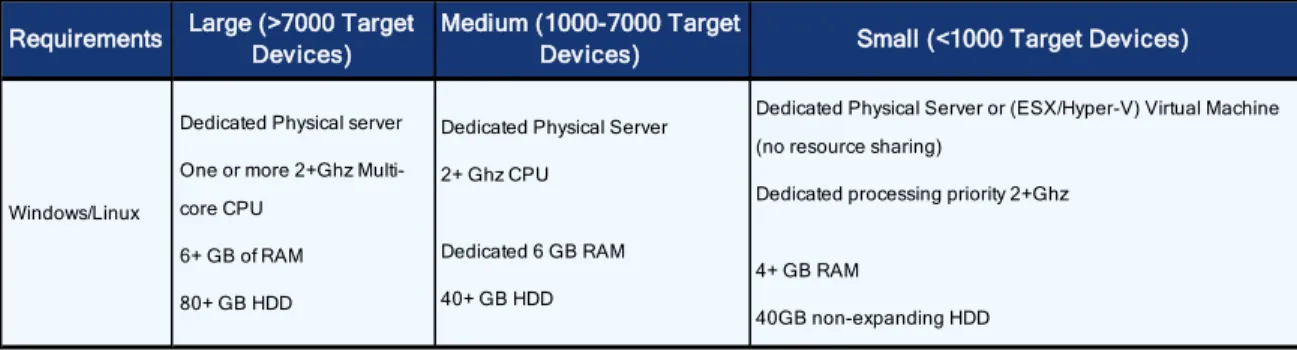
Minimum requirements for the DSView software
Please refer to the latest release notes for operating system and browser requirements. The table below lists the hardware requirements based on the number of target devices.
Requirements Large (>7000 Target Devices)
Medium (1000-7000 Target
Devices) Small (<1000 Target Devices)
Windows/Linux
Dedicated Physical server One or more 2+Ghz Multi-core CPU
6+ GB of RAM 80+ GB HDD
Dedicated Physical Server 2+ Ghz CPU
Dedicated 6 GB RAM 40+ GB HDD
Dedicated Physical Server or (ESX/Hyper-V) Virtual Machine (no resource sharing)
Dedicated processing priority 2+Ghz
4+ GB RAM
40GB non-expanding HDD
Requirements Large (>7000 Target Devices)
Medium (1000-7000 Target
Devices) Small (<1000 Target Devices)
Sun Server 1 Ghz UltraSparc III 4+ GB RAM 40+ GB HDD 1 Ghz UltraSparc III 4+ GB RAM 40+ GB HDD 1 Ghz UltraSparc III 4 GB RAM 40 GB HDD LAN 1gbps/10gbps 10mbps/100mbps/1gbps (recommended) 10mbps/100mbps
Database Local or Remote Local or remote Local
For more information visithttp://www.avocent.com/software-requirements.
DSView software and virtual environments
DSView software running in a virtual environment is not a recommended configuration. DSView software is designed to incorporate a Java Virtual Machine within which the services reside. As a result of this architecture, DSView software will fully utilize the CPU and memory allocated to it. Installing DSView software on a virtual machine where CPU and memory are competing with other virtual machines increases processing latency and reduces the responsiveness of the DSView software service. The latencies can cause database request time-outs, plug-in request time-outs, appliance lost connection events and database corruption. Therefore, running DSView software in a virtual environment is not recommended.
NOTE:Virtual environments include those provided by Microsoft®, Xen® and VMware®.
Before installing and configuring the DSView software
Before installing the DSView management software, install the managed appliance hardware.
If the computer will be a hub server, you will need the license key obtained from Avocent and provide a username and password to use for initial log in.
If the computer will be a spoke server, you will need to identify the associated hub server and provide the name/password of the hub server’s DSView software administrator.
Avocent Customer Express (ACE) Account
The ACE (Avocent Customer Express) account is used for activating the DSView software. This will also allow you to interact with technical services agents who will have a full history of your account, including past support calls. You will also find easy access to the most commonly requested documents, including technical documentation, product bulletins, recent upgrades and other online resources to provide you with up-to-date information on your Avocent products.
DSView Software Activation
In order to use DSView software, it must be activated. For each license (or block of licenses), purchased, you will receive an Activation Token. The activation token is an alpha-numeric string of 21 characters. You should have the activation token available when registering your license.
To register the activation token, visit http://support.avocent.com. To save time during the installation process, register your token prior to starting installation.
Based on the Master License/Child License model, there are two methods to activate your software. The
installation license (the initial license for the hub), is activated independently. It then becomes a Master License Key.
The Add-on Component License is activated using a specific master license key. It then becomes a Component (or Child) License Key.
To register the installation license:
1. Using a web browser, navigate to http://support.avocent.com. 2. ClickSoftware Activation link.
3. You will be asked to create or enter your Avocent Customer Express (ACE) account information.
NOTE:If this is the first time you have registered a product (software or hardware) with Avocent, you will see a message that you have no components registered.
4. If this is the first time you are logging in, clickClick here for your registered products.
5. Enter the activation token in the field at the bottom of the screen. Ensure that you use all capital letters, and include the dashes in the token.
6. ClickSubmit.
7. Your Master License Key will be displayed on screen. Print this page for your records.
NOTE:Once logged into your ACE account, you can see a list of your registered products by clicking on the registered products link.
8. Return to the DSView installation and enter the license key when prompted.
To register an add-on component license:
1. In the DSView software, selectSystem - Licenses - License Keys.
2. Find the Master License Key and write it down or copy it to the clipboard. 3. Using a web browser, navigate to http://support.avocent.com.
4. ClickSoftware Activation link.
5. You will be asked to create or enter your Avocent Customer Express (ACE) account information. Depending on how many licenses you have registered, you will see one or more licenses listed.
6. Carefully match the license from DSView that you copied earlier with one the licenses displayed on Avocent¹s registration page.
NOTE:Add-on component licenses which are activated against the wrong master license key cannot be corrected.
7. The first part of each license listed is a hyperlink. Click on that link to choose which DSView master license key to register your add-on component to.
8. A new page will display, similar to the first, which shows the license information for the master license key you’re registering to, and another field at the bottom.
9. Enter the add-on component activation token in the field. Ensure that you use all capital letters, and include the dashes in the token.
10. ClickSubmit.
11. The Component License Key will be displayed on screen.
12. Print this page for your records. Return to DSView software and if necessary selectSystem Licenses -License Keys.
NOTE:Once logged into your ACE account, you can see a list of your registered products by clicking on theRegistered Productslink.
13. Click theAddbutton.
14. Enter the license key in the fields provided.
15. Ensure that you use all capital letters, but do not include the dashes. 16. Your add-on component license is now entered in DSView software.
Before software installation
When installing a hub server, you will need the license key obtained from the ACE account, and you will create an initial DSView administrator account. A hub server must be installed before spoke servers can be added to it. When installing a spoke server, you will need to provide the hub server address and a valid username/password for the DSView hub server.
Installing the DSView Software
The DSView management software may be installed using the DSView software DVD or by downloading the software in a self-extracting .zip file from the Avocent web site. DSView does not support network drive installations. The software must be installed on a hard drive partition. In addition, the installation is not supported on a domain controller. As a recommendation, install DSView on a server with a properly configured hostname, which resolves to the IP address of the server where the application is installed. The IP address of the DSView server should never be changed.
NOTE:If you are upgrading the DSView software from a previous version, it is strongly recommended that you perform a database synchronization between the hub and spoke servers; seeReplicationon page 65. You should also back up the hub server prior to upgrading the DSView software; seeBacking up and Restoring Hub Servers Manuallyon page 60. Failure to perform
synchronization and backup may have detrimental effects. A backup should be performed both before the upgrade and immediately following the upgrade.
NOTE:If you are upgrading from DSView 3 software, see the DSView Transition Guide for more information.
To install the DSView software:
1. Log on to the dedicated server as local administrator.
2. Using your web browser, download the DSView software from the Avocent web site. Go to www.avocent.com/download and chooseDSView Software Upgrades.
3. ClickClick here to download Installers, Plug-ins and Utilities.
4. After download is complete, double-click on the downloaded installation package (setup.exe). ClickNext. 5. The Introduction window will open. ClickNext.
6. The License Agreement window will open.
• If you accept the terms, clickI accept the terms of the License Agreementand then click Next. Go to step 8.
• If you do not accept the terms, clickI do NOT accept the terms of the License Agreement. A License Agreement Warning message box will appear.
• If you clickQuit, the installation will exit without installing the DSView software. • If you clickResume, you will be returned to the License Agreement window.
The DSView software license agreement may also be viewed from the User Login window by clicking theAvocent DSView End User License Agreementlink. The agreement will appear in a separate web browser window.
7. ClickNexton the Installation Settings dialog box. 8. Choose the DSView installation folder and clickNext.
9. Review the default DSView software TCP Port Settings screen, make any changes needed and clickNext. 10. On the PostgreSQL Installation screen, clickNextto install a new instance.
-or-Check the box to Use Existing Database, if connecting to an existing database, and clickNext.
11. The PostgreSQL Installation screen allows you to make changes to the installation folder location and Port. Enter the password twice and clickNext.
NOTE:Ensure the password you choose also adheres to the password complexity group policy in effect on the server being installed on.
-or-For an existing PostgreSQL server, enter the IP address, port, username and password.
12. For an existing PostgreSQL server (under \PostgreSQL\9.0\data), edit the pg_hb.conf file and the postgresql.conf files.
a. Enter<host all all 0.0.0.0/0 md5>in the pg_hba.conf file.
b. Enter<custom_variable_classes = ‘symmetric’>in the postgresql.conf file. c. Restart the database service and clickNext.
NOTE:The DSView software now leverages a PostgreSQL (Version 9.0.4) database. This can either be installed on the DSView server, or on a separate server.Please refer to the DSView 4 Database Acceptable Use document on the Avocent Community (community.avocent.com) for full details regarding the new database structure as well as best practices.
13. Confirm the installation settings and clickInstallto begin the installation. 14. ClickOKon the DSView service startup message.
15. ClickDone.
Upgrading the DSView Software
When upgrading to a newer version of the DSView software, all DSView servers should be upgraded at the same time. The DSView hub server should be upgraded first, followed by each spoke server.
Before upgrading, a replication should be performed (seeReplicationon page 65), then a backup immediately before and after upgrading the DSView software (seeBacking up and Restoring Hub Servers Manuallyon page 60).
The firmware for the appliances may also need to be upgraded in order to support new functionality in the DSView software. The DSView software should work with the existing firmware revisions, but in cases where new functionality is not supported until the firmware is upgraded, the DSView software will indicate this in the GUI.
For more information on upgrading DSView software, see the DSView Management Software Transition Technical Bulletin located at www.avocent.com/download under the DSView Software heading.
Configuring the DSView Software
After the DSView software has been installed, it must be configured using a web browser.
During configuration, you specify whether the computer will be a hub server or a spoke server. If this is your first DSView server installation,hubshould be selected in the Select DSView Server Role window. The hub server should be installed before any spoke servers are added.
What you will need
If the computer will be a hub server, you will need the license key obtained from Avocent and provide a username and password to use for initial log in.
If the computer will be a spoke server, you will need to identify the associated hub server and provide the name/password of the hub server’s DSView software administrator.
To configure the DSView software:
1. If you are configuring the DSView software during the installation process, you have already clickedDone in the Launch Default Browser window.
If you quit after installing the DSView software installation process (by closing the window), select Start - All Programs - Emerson - DSView 4 Software.
2. A security alert box will appear containing certificate information. SeeCertificateson page 41. 3. The Select DSView Server Role window opens.
• ClickHubto assign the dedicated server as the hub server, then clickNext. Go to step 3. • ClickSpoketo assign the dedicated server as a spoke server, then clickNext. Go to step 8.
4. The Type in Master License Key window opens. Type the Avocent-provided license key for the DSView software hub server, then clickNext. (DSView software license keys prior to version 3.0 are not valid.) If you did not receive a license key, click thehttp://www.avocent.com/activationlink to obtain a license key.
If the entered license is already in use on another server, a license violation will occur when you log in, and you must configure the server as a spoke server.
5. The Type in Initial Administrator Account window opens. Type a username, a password and confirm the password of the user to whom you wish to give administrator privileges. Usernames are case sensitive and may contain up to 64 characters. ClickNext.
6. A Request in Progress message will appear. The license key will be installed and a DSView software administrator account will be created. The built-in user groups will also be created.
7. The Completed Successful window will open when configuration is completed. ClickFinish. 8. The User Login window will open in the DSView Explorer.
If you chose to configure the server as a spoke server in the Select DSView Server Role window or if you entered a duplicate software license key in the Type in Master License Key window, continue with the following steps.
NOTE:The DSView software versions of the spoke server and the hub server must match in order to register the spoke server. For example, you may not register a spoke server running DSView software version 4.0 with a hub server running DSView software version 3.2.
9. The Type in Hub Server Address and Port window will open. Type the address of the DSView software hub server using standard dot notation (xxx.xxx.xxx.xxx) or type the DNS name in the Address field. ClickNext. 10. The Accept DSView Server Certificate window will open. ClickNextto accept the certificate.
11. The Type in Hub Administrator Credentials window will open. Type a valid username and password for a user with DSView software administrator privileges on the DSView software hub server. ClickNext. 12. The Registering Spoke Server window will open with the messageRequest In Progress Please WaitThe
configuration of the spoke server will be saved to the database of the hub server and the spoke server’s certificates will be installed on the hub server.
13. The Completed Successful window will open when the spoke server has been added. ClickFinish.
Running the DSView Software
DSView software clients access the DSView management software host using a supported web browser. Any software required by the client, such as applets and the Java Runtime Environment (JRE), will be automatically installed by the DSView server host.
The DSView software uses Secure Sockets Layers (SSL) encryption to send data between the DSView software host and the web browser on the client to ensure data integrity and privacy. When a user attempts to log in to a DSView software client session, the authentication service configured in the DSView software by the DSView software administrator verifies the credentials of the user. Security alerts related to the certificates on the DSView software host may appear. SeeCertificateson page 41.
Minimum client requirements
Please refer to the latest release notes for operating system and browser requirements. 2 GHz Pentium or equivalent processor
1 GB of RAM
100BaseT NIC (1GByte LAN recommended) VGA video with graphics accelerator Desktop size of 1024x768 or higher Color palette of 256 colors or more Adobe Flash Player version 9.0 or higher Java Runtime Environment version 1.6 u24
Opening a client session
Before opening a client session
• Enable cookies and JavaScript on the client’s web browser.
• Configure the web browser. If you are using Internet Explorer, seeInternet Explorer Considerationson page 37.
To open a client session:
NOTE:If DSView Software Client Certificate Authentication or DSView Software Client Integrated Windows Authentication is being used, the user will not be required to log in. SeeCertificateson page 41.
1. From the DSView software client web browser, enter the URL of the server host in the address bar in the format:
https://<servername>/dsview
In this case, <servername> is the DNS name of the host system, or the IP address in standard dot notation (xxx.xxx.xxx.xxx).
NOTE:To avoid multiple security warnings, enter the DNS name.
-or-If you are opening the session on the DSView server, you may selectStart Programs Emerson -DSView 4 Software.
2. Accept all security alerts that may appear as the client computer connects to the DSView server. The DSView Explorer User Login window will open.
If an RSA SecurID external authentication service has been added to the DSView software, seeRSA SecurID loginon page 16 below for the login procedure.
3. Type a valid username and password in the fields provided.
Depending on the settings specified by the administrator, you may be required to change your password before being allowed to complete the login process. SeeAdding User Accountson page 198.
4. ClickLogin. The window that appears depends on the rights assigned to the DSView user that is logging in. If the client machine uses an onboard video controller and experiences video problems, be sure the BIOS is updated to the latest version.
RSA SecurID login
When an RSA SecurID external authentication service has been added to the DSView software, the login credentials include a username and a passcode. The passcode includes a PIN and an RSA SecurID tokencode. The login request is sent to the RSA Authentication Manager. Depending on the user configuration and state on the RSA Authentication Manager, the user may be prompted for a second successive tokencode.
The user configuration also specifies how the 4-6 digit PIN will be generated: • User defined - the user must enter a PIN
• System generated - the user cannot enter a PIN; it must be generated by the RSA server • User selectable - the user may choose to enter a PIN or allow the RSA server to generate it
If a PIN has not yet been assigned to the user or if security policy requires a PIN change, the user will be prompted accordingly. If the RSA server generates the PIN, the user will be given a brief interval to memorize it.
Regaining access
If access to a DSView software system is lost, contact Avocent technical support.
Uninstalling the DSView Software
To uninstall the DSView software on a supported Windows system:
1. SelectStart - Settings - Control Panel. The Control Panel will appear.
2. From the Control Panel, clickAdd/Remove Programs. The Add/Remove Programs dialog box will appear. 3. SelectAvocent DSView4 and then clickChange/Remove. The Uninstall Avocent DSView window will
open.
4. ClickUninstall.
To uninstall the DSView software on a supported Linux or Solaris system:
1. Log in to the server as root.
2. Insert the DSView software DVD into your DVD drive. If AutoMount is supported and enabled, open a command window and continue with step 3.
-or-If your system does not support AutoMount, issue the following command to mount the DVD volume:
mount <device> <mount point>, where <device> and <mount point> are the names of your server’s DVD Linux or Solaris device and mount point directory, respectively.
For example, to mount a DVD which is the second IDE unit on /media/cdrom, enter the command: mount /dev/cdrom /media/cdrom
3. Enter the following command to access the readme file.
less /media/cdrom/DSView/readme
Follow the instructions in the readme file.
Closing a DSView Software Session
Files are copied to DSView software clients when you log in to the DSView software. When using Internet Explorer, temporary files may be removed by selecting theDelete Temporary Internet Filescommand and active web components may be uninstalled by selecting theRemove Objectscommand. See the Internet Explorer documentation for more information.
To close a DSView software session:
Java Installation
On non-Windows clients, the Video Viewer, Telnet and VNC Viewers require Java version 1.5. The Telnet/SSH applet may work with other versions; the Video Viewer requires that version.
On Windows clients, Java is required to run the Avocent Telnet/SSH Viewer. If the Win32 PuTTY Telnet/SSH Viewer is selected in the user’s profile, then Java is not required on the client. On a Windows client, it is recommended that the JRE (Java Runtime Environment) be installed in the C:\Program Files\ location. If your system automatically installs programs in another location, you may not be able to launch the Video Viewer. In this case, you can configure Java to find the JRE.
To configure Java to find the JRE:
1. Access the Java Control Panel. 2. Select theJavatab.
3. In the Java Application Runtime Settings panel, clickView. 4. Change the path to the installed JRE.
5. ClickOK.
For Windows, Linux and Solaris operating systems, the DSView software client automatically downloads and installs the JRE the first time it is needed. For Macintosh operating systems, you must update Java and install the JRE using the Macintosh software updates. Refer to the Macintosh operating system documentation for more information.
To install the JRE on a Windows client:
1. In a DSView software Units View window (seeAccessing Units View windowson page 91), click an Action link.
2. A window will open, containing a link for downloading the JRE installer. Download the JRE installer, then close all browser windows.
3. Click on the JRE icon to launch the installer. 4. Restart the browser, and click an Action link.
To install the JRE on a Linux or Solaris client:
NOTE:Only one version of the JRE can be installed in the browser for DSView software support. Depending on your system’s configuration, you may have to log in as the root user to install the JRE. Contact your system administrator if you need help with installing software as the root user.
1. In a DSView software Units View window (seeAccessing Units View windowson page 91), click an Action link.
2. A window will open, containing a link for downloading the JRE installer. Download the JRE installer, then close all browser windows.
3. Run the installer.
Avocent Viewer Plug-in Installation
On Windows clients, the Video Viewer, Telnet and VNC Viewers require the Avocent Viewer Plug-in. If you are using Firefox 2 or Internet Explorer, the plug-in downloads automatically from the browser window. If you are using Firefox 3, additional set up is required.
To install the Avocent Viewer Plug-in when using Firefox 3 on a Windows client:
1. In a Units View window containing the target device you want to access (seeAccessing Units View windowson page 91), click an Action link.
2. The Installing Avocent Viewer Plug-in pop-up window opens. ClickDownload Avocent Viewer Plug-in. 3. ClickSave, then open the saved file. The Firefox downloads window opens.
4. ClickOK, the follow the instructions in the installer wizard to install the file. Once the installation is complete, the viewer session starts automatically.
NOTE:If the Firefox version is 10 or above, you will need to create a plugins folder under Firefox install folder.
NOTE:If the Firefox version is 21 or above, you will need to go to about:config and change the plugins.load_appdir_plugins value to true.
Installing the DSR Remote Operations Software
NOTE:Installing and using the DSR Remote Operations software is optional.
If your DSView software system includes KVM over IP appliances, you may use the DSR Remote Operations software for switch access using a dial-up point to point protocol (PPP) modem connection when an Ethernet connection is unavailable.
SeeDSR Remote Operations Softwareon page 1 for information about installing and using the DSR Remote Operations software.
DSView Explorer Windows
3
When a user has been logged in and authenticated, the Avocent Explorer window opens. From the Explorer window, you may view, access and manage units.
Figure 3.1: Example Avocent Explorer Window Areas
Number Description
1
Top option bar - Use the top option bar to bookmark a software window, refresh a window display, print a page, log out of a software session or access online help. The name of the logged in user appears on the left side of the top option bar.
2 Tab bar - Use the tab bar to display and manage units, user accounts, reports, system settings and session profiles.
3 Top navigation bar - The selections in the top navigation bar vary, depending on the active tab in the tab bar. Topics relevant to each selection display in the side navigation bar.
4 Side navigation bar - Use the side navigation bar to select system information to display or edit in the content area. The side navigation bar contains arrows that affect its display.
5 Content area - The information specified by the tab bar, top navigation bar and side navigation bar selections is displayed and changed in the content area.
Accessing Target Devices
Target devices (TDs) that may be accessed system-wide are displayed in a Units View window. You may initiate a session with a target device from a Units View window by clicking the link in the Action column. SeeUnits View Windowson page 89.
You may also initiate a session with a target device from a Unit Overview window. SeeUnit Overview Windows on page 96.
For information about controlling the power of target devices attached to power devices, seePower Control of Devices Attached to Power Deviceson page 145.
Using the Side Navigation Bar
The side navigation bar is used to display windows that specify settings or perform operations. The contents of the side navigation bar varies, depending on the tab and top navigation bar selections and the window that is displayed.
Figure 3.2: Example Side Navigation Bar Table 3.2: Side Navigation Bar Descriptions
Number Description
1 Collapse All Nodes - Click this arrow in the upper right corner to collapse all nodes and their links.
2 Expand All Nodes - Click this arrow in the upper right corner to expand all nodes and display additional links. 3 Collapse Node - Click the - to collapse an opened tree branch and its links.