CIPHERMAIL EMAIL ENCRYPTION
Ciphermail for BlackBerry Quick
Start Guide
Introduction
This guide will explain how to setup and configure a Ciphermail Virtual Appli-ance in combination with Ciphermail for BlackBerry. This step-by-step guide will be based on an example showing how Ciphermail can periodically fetch email from an external Gmail account, encrypt the email and then forward the encrypted email to the BlackBerry’s BIS email account.
In This quick start guide we will explain a) how to configure the Ciphermail gateway to fetch email from an external Gmail account,b)create a certificate and private key and import the certificate and private key into a BlackBerry smartphone, c) encrypt the email and forward the encrypted email to a BIS email account,d)install and configure Ciphermail for BlackBerry and finally,e)
how to configure a Ciphermail gateway and Ciphermail for BlackBerry, to relay email from a BlackBerry via a Ciphermail gateway protected with an encrypted S/MIME tunnel.
Note: This quick start guide uses Gmail as an external store from which email will be forwarded. Email stored on Gmail servers however is not encrypted un-less the sender encrypted the message. The use of Gmail in this quick start guide is merely for demo purposes. If all external email should be encrypted, we advise you to run Ciphermail as a full SMTP gateway or, other (fully trusted) POP3 servers should be used instead of Gmail.
Running a Ciphermail gateway with Fetchmail is not as scalable and reliable as running Ciphermail as a full SMTP gateway. If more than a dozen BlackBerry smartphones should be supported by a single gateway, it’s better to run Ci-phermail as a full SMTP gateway. For advanced setups of CiCi-phermail see the Ciphermail administration guide for more information.
This guide assumes that the user has a valid Gmail account with POP enabled and a BIS email address on which BlackBerry email can be received.
Note: We advise you to create a new Gmail account for this example. All ex-isting email from the Gmail account will be forwarded to the BlackBerry smart-phone when Fetchmail is enabled for the Gmail account. A new Gmail account however is not required, only advised. The Gmail account should not already be configured for a BlackBerry smartphone.
This guide assumes that the following Gmail account and BIS email address are used∗:
Gmail account: username:[email protected], password:test
BIS email: [email protected]
ex-1 RECEIVING EMAIL
amples should be changed to match the real Gmail account and BIS email address.
This guide consists of two parts. The first part explains how to setup Cipher-mail for BlackBerry for receiving encrypted eCipher-mail. The second part explains how to securely sent email from a BlackBerry smartphone with Ciphermail for BlackBerry.
1
Receiving encrypted email
This section explains how to setup a Ciphermail gateway server and how to setup Ciphermail for BlackBerry for receiving encrypted email. The following steps will be explained:
1. Install Virtual Appliance 2. Enable Fetchmail 3. Login to the Web admin 4. Configure MTA
5. Configure SMTP authentication 6. Configure Fetchmail
7. Create CA 8. Issue certificate 9. Download certificate 10. Configure user
11. Import certificate into BlackBerry 12. Install Ciphermail for BlackBerry
1.1
Install Virtual Appliance
Download and install Ciphermail Virtual Appliance. The required Virtual Ap-pliance distribution and installation procedure differs between VMware infras-tructure (ESX, ESXi etc.) and other VMware virtual machines (VMware player, VMware workstation etc.). For more detailed instructions on how to install the Virtual Appliance see theVirtual Appliance Guide.
After the Virtual Appliance has been started, the user must login to the console with the following default credentials:
username: sa
password: sa
After logging into the Virtual Appliance console, a system configuration tool is started. The system configuration tool will be used to enable Fetchmail.
1.2 Enable Fetchmail 1 RECEIVING EMAIL
1.2
Enable Fetchmail
Fetchmail will be used to retrieve email from Gmail by periodically polling the account via POP3. The Ciphermail Virtual Appliance has Fetchmail support built-in. Fetchmail however is disabled by default and should therefore be en-abled.
Fetchmail can be enabled by opening the menu item Config→Fetchmail. . .
from the console system configuration tool, selectEnableand apply (see figure1).
Figure 1: Virtual Appliance config
1.3
Login to the Web admin
Login to the administration page by opening the following URL in a browser:
https://192.168.1.1/. The actual IP address will be different and should match the IP address of the gateway. The current IP address of the gateway can be retrieved by selecting the menu itemInfo→Networkfrom the console system configuration tool.
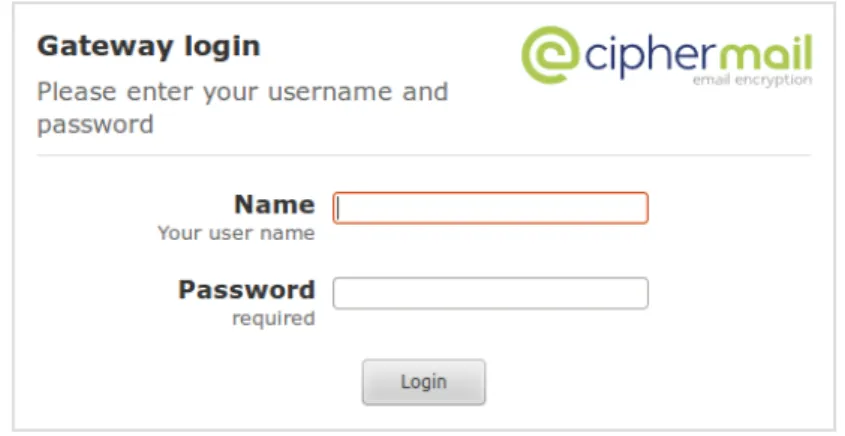
Figure 2: Login dialog
1.4 Configure MTA 1 RECEIVING EMAIL
Login credentials: Use the following default credentials:
username: admin
password: admin
Note: it can take some time to login after a restart because the web applica-tion must be initialized upon first login.
1.4
Configure MTA
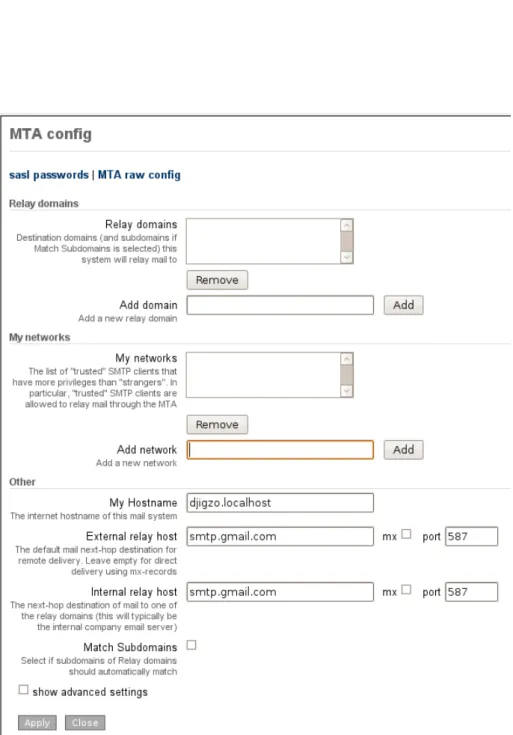
Ciphermail should be setup to relay encrypted email via the Gmail SMTP
servers. The MTA config page (see figure 3) can be opened from the Ad-min menu (Admin→MTA config).
The following items should be configured: 1. My Hostname
2. External relay host 3. Internal relay host 4. My networks
My Hostname My Hostnameshould be a fully qualified domain name or an IP address. Because in this example all outgoing email will be relayed via Gmail the hostname can be a local name. Useciphermail.localhostfor the
My Hostnamesetting.
Note: if outgoing email should be sent directly (i.e. not relaying email via Gmail) theMy Hostnameshould be an externally valid domain name. See the Ciphermail administration guide for more information on setting an externally validMy Hostname.
External relay host All email to non-relay domains should be relayed via the GmailSMTPserver (smtp.gmail.com) via port 587 (this is the mail submission port).
host: smtp.gmail.com
mx: leave unselected
port: 587
Internal relay host All email to relay domains should be relayed via the Gmail
SMTPserver (smtp.gmail.com) via port 587 (this is the mail submission port).
host: smtp.gmail.com
mx: leave unselected
1.4 Configure MTA 1 RECEIVING EMAIL
1.5 Configure SMTP authentication 1 RECEIVING EMAIL
My networks Should be empty unless the gateway is also being used with an external email client (like Outlook, Thunderbird etc.).
The final MTA settings should be similar to the settings seen in figure 3. By pressing the Apply button, all changes will be saved and the updated MTA configuration will be reloaded.
1.5
Configure SMTP authentication
All outgoing email will be relayed by the Gmail SMTP servers. Gmail however only allows email to be relayed via the Gmail SMTP servers when the user is authenticated. Enabling authentication requires two steps: a) Enable SMTP client authentication,b)Add a new SASL account1.
Enable SMTP client authentication SMTP client authentication is not en-abled by default. Gmail requires that all SMTP authentication is protected with SSL.
SMTP client authentication via SSL can be enabled by uncommenting the fol-lowing lines in theMTA raw configpage (scroll down the config file and remove the hash [#] in front of the relevant lines):
smtp_tls_security_level = may smtp_sasl_auth_enable = yes
smtp_sasl_password_maps = hash:/etc/postfix/smtp_client_passwd smtp_sasl_type = cyrus
smtp_tls_CApath = /etc/postfix/certs/ smtp_sasl_security_options =
TheMTA raw configpage can be opened by clickingAdmin→MTA config→MTA raw config.
Figure 4: MTA raw config
The final MTA raw config should look similar to figure4. Make sure that all other lines are not modified.
By pressing theApply button, all changes will be saved and the updated MTA configuration will be reloaded.
1SASL stands for Simple Authentication and Security Layer. This is a framework for
1.6 Configure Fetchmail 1 RECEIVING EMAIL
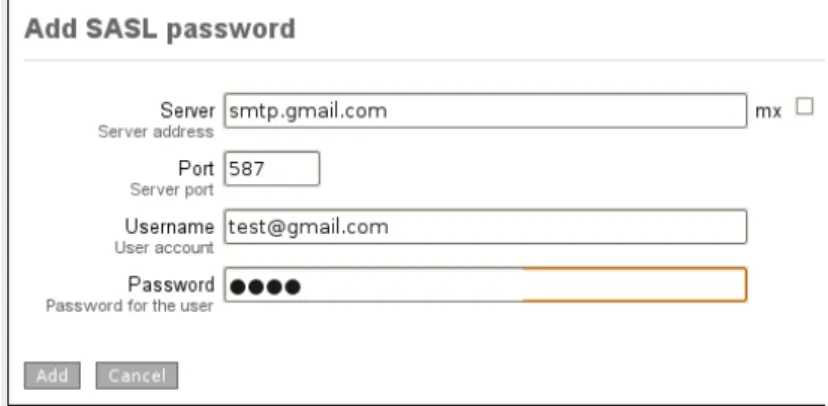
Add a new SASL account The correct login credentials for the Gmail ac-count should be set. SMTP credentials for a specific host can be added by clickingsasl passwordson theMTA configpage (see figure3, top-left). A new SASL account should now be added by clickingadd password. This opens the
Add SASL password page (see figure5). Use the following settings:
Figure 5: SASL add password
Server: smtp.gmail.com
Port: 587
Username: [email protected]∗
Password: test∗
*username and password should match the real Gmail account. Note that the username should [email protected].
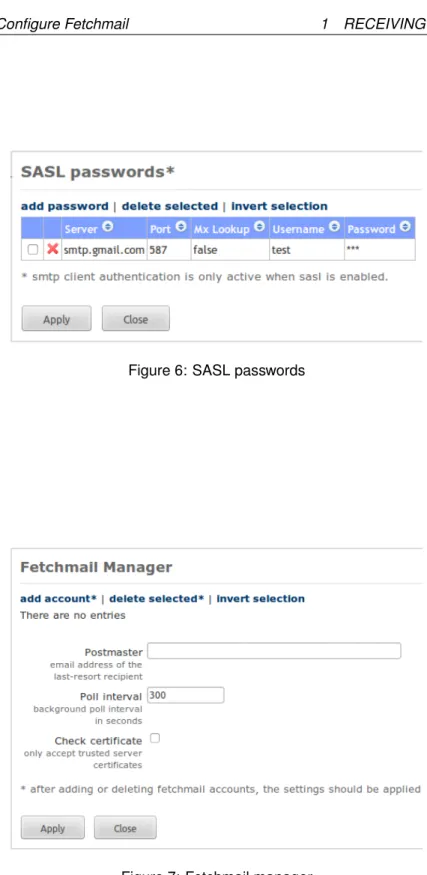
TheAdd SASL password page should look similar to figure5. The password should now be added by pressingAdd. TheSASL passwordspage will now be opened (see figure6) showing all available SASL accounts. By pressing the
Apply button, all changes will be saved and the updated configuration will be reloaded.
1.6
Configure Fetchmail
Fetchmail will be used to retrieve email from Gmail by periodically polling the account via POP3. The Gmail account to fetch email from and the BIS email address to which encrypted email will be forwarded to should be configured. New accounts from which mail should be fetched can be added with the Fetch-mail manager (Admin→Fetchmail manager).
The following two fetchmail settings should be set: Postmaster andPoll inter-val.
Postmaster If email cannot be forwarded, an error message will be sent to the postmaster email address. SetPostmaster to an email address on which
1.6 Configure Fetchmail 1 RECEIVING EMAIL
Figure 6: SASL passwords
1.6 Configure Fetchmail 1 RECEIVING EMAIL
email can be received. Under normal circumstances email will always be for-warded. In all the examples we will assume the following postmaster email address:
email address: [email protected]∗
*The postmaster email address should be changed to match the real postmas-ter address.
Note: Make sure the Postmaster email address is not the same email address for which email will be fetched to prevent a mail loop.
Poll interval The number of seconds between consecutive checks for new email. ThePoll interval should not be too low to prevent flooding of the remote server. You are advised to set thePoll intervalto 30 seconds.
The settings can be saved by clickingApply.
Note: the first time apply is clicked, an error message will be shown (“. . . no mailservers have been specified.”). This is normal because there are no ac-counts specified. The error message can be ignored.
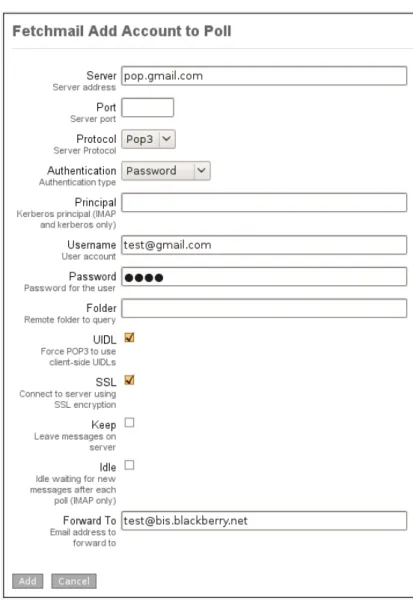
Adding new account A new Fetchmail account can be added by clickingadd account in the Fetchmail manager. The page Fetchmail Add Account to Poll
will be opened (see figure 8). Email from Gmail will be retrieved with POP3. Use the following settings:
Server: pop.gmail.com
Protocol: Pop3
Authentication: Password
Username: [email protected]∗
Password: test∗
UIDL: should be selected
SSL: should be selected
Forward To: [email protected]∗
*username and password should be changed to match the real Gmail account. The username should [email protected]. TheForward Toparameter should be the email address of the BIS account on which the BlackBerry receives email.
The new Fetchmail account page should look similar to figure8. By clicking
Add, the new Fetchmail account will be added.
Note By applying the new settings Fetchmail will start fetching all existing and new incoming email from the configured Gmail account and forward it to the configured BIS email address. Fetchmail forwarding can be disabled for a specific account by deleting the account from the Fetchmail manager and
1.7 Create CA 1 RECEIVING EMAIL
applying the new settings.
Fetchmail will be configured with the new settings and restarted after clicking
Apply on the Fetchmail manager page (see figure7).
1.7
Create CA
Ciphermail for BlackBerry uses X.509 certificates for encryption and signing of messages. The BlackBerry smartphone therefore requires a certificate and private key to be installed on the BlackBerry smartphone. The Ciphermail gate-way contains a built-in CA which can be used to create certificates and private keys.
Before a new end-user certificate can be created, a new root and interme-diate certificate should be created. Instead of creating new certificates with the built-in CA, existing certificates can be used instead. Instructions on how to use existing certificates however, is beyond the scope of this quick start guide (see theCiphermail Administration Guidefor more information on using exist-ing certificates).
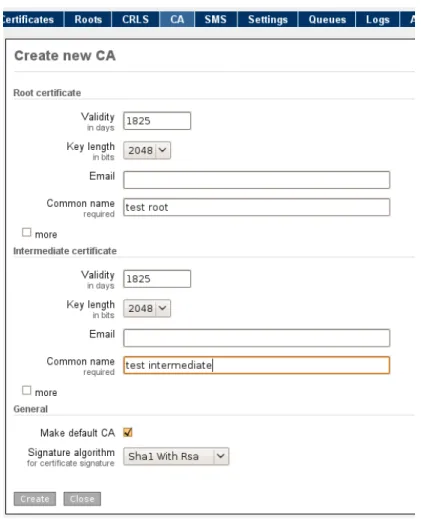
A new CA can be created by clicking CA in the main menu and then select
Create new CA. This opens theCreate new CApage (see figure9). The only required parameters are theCommon nameof the root and intermediate cer-tificate.
The common name of the root certificate should be different from the com-mon name of the intermediate certificate. For example use the companies name prefixed with “root” and “intermediate” respectively as the common name. Leave all other parameters at their default values and clickCreateto create the new root and intermediate certificates. The new CA is now active.
1.8
Issue certificate
The newly created CA can now be used to issue a new end-user certificate (and private key) for the BIS email address. This certificate will be used to encrypt email sent to the BlackBerry BIS email address.
A new certificate can be created with theCreate new end-user certificate
page which can be opened by clickingCAin the main menu (see figure10). The only two required parameters are:Email andCommon name:
Email: [email protected]∗
Common name: Certificate for Ciphermail for BlackBerry∗
* The Email address should be the email address of the BIS account. The common name typically is the users first name and last name.
1.8 Issue certificate 1 RECEIVING EMAIL
1.8 Issue certificate 1 RECEIVING EMAIL
1.9 Download certificate 1 RECEIVING EMAIL
Figure 10: New end user certificate
1.9
Download certificate
The newly created certificate and private key should be imported into the BlackBerry smartphone using the BlackBerry desktop manager. The certificate and private key should therefore be downloaded from the Ciphermail gateway and stored in a password protected.pfx file.
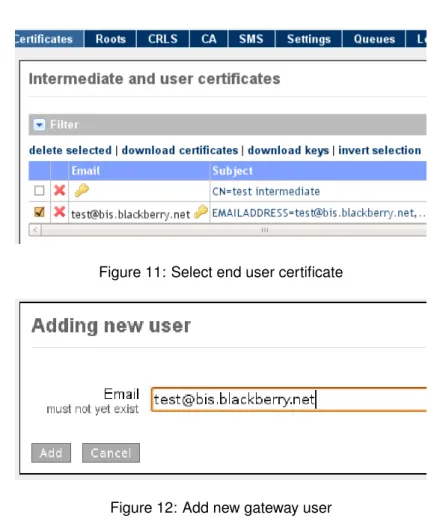
The certificate and private key can be downloaded by selectingCertificates
from the main menu. On the Intermediate and user certificates page select the end-user certificate with the correct email address (see figure 11). The certificate and private key can be downloaded by clicking download keys. A password should now be provided which is used to encrypt the.pfx file with. Enter a secure password and clickDownload to start the download process. The.pfx file is required during later steps and should be locally stored on the desktop computer.
1.10
Configure user
The Ciphermail gateway should be configured in such a way that email is en-crypted when email is sent to the BIS email address. A new user object for the BIS email address should therefore be created.
Create a new user object by clickingAdd user on the left-hand side menu. On the Adding new user page, enter the BIS email address and click Add (see figure12).
After the user has been added, theEdit user page is opened on which the user preferences for the newly added user can be set. With all settings set to the
1.10 Configure user 1 RECEIVING EMAIL
Figure 11: Select end user certificate
Figure 12: Add new gateway user
default gateway settings, only one BlackBerry specific user preference should be changed: Recipient uses add-on.
Because this setting is an advanced setting, theshow advanced settings
checkbox should be selected. Theinherit checkbox for the preference Recip-ient uses add-on should be unchecked andRecipient uses add-onshould be selected (see figure13). Any changes to the user preferences should be saved by clickingApply.
Note: TheRecipient uses add-onsetting is required to make sure BIS does not block the S/MIME message.
1.11 Import certificate into BlackBerry 1 RECEIVING EMAIL
1.11
Import certificate into BlackBerry
The gateway is now correctly setup to start encrypting and forwarding email from the Gmail account to the BlackBerry smartphone. The BlackBerry smart-phone however requires a private key for decrypting encrypted messages.
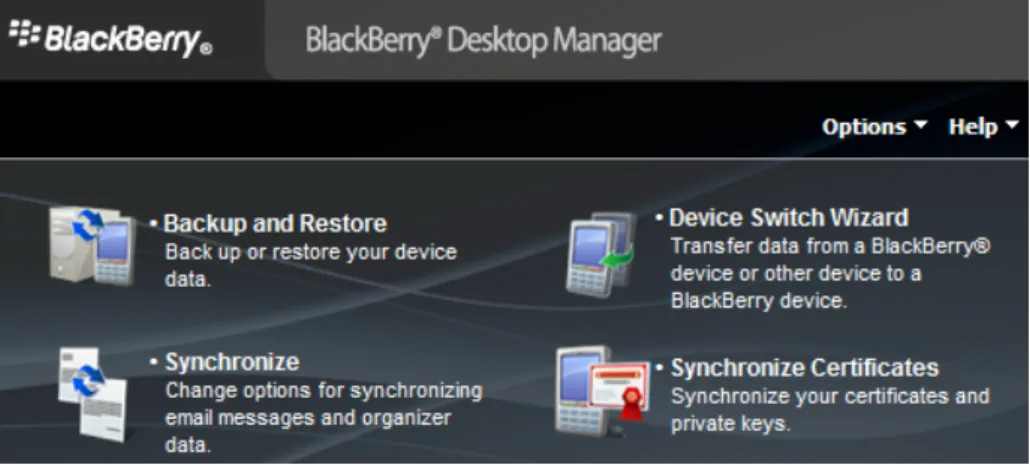
The.pfx file created in step 1.9 should now be imported into the Black-Berry smartphone using the BlackBlack-Berry Desktop Manager Certificate Synchro-nization tool (see “Synchronize Certificates” in figure 14). If the Synchronize Certificates option is not available it should be enabled first.
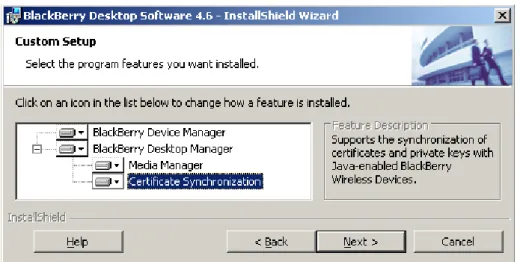
Enable Certificate Synchronization This paragraph can be skipped if the Synchronize Certificates option is already enabled. The Synchronize Certifi-cates option can be enabled by modifying the BlackBerry Desktop Software.
On Windows, open the Control Panel→Add or Remove Programs→ Se-lect BlackBerry Desktop Software and click the Change/Remove button. This opens the BlackBerry Desktop Software installation wizard. Enable the “Certifi-cate Synchronization” option and finish the wizard by pressing Next and Finish (see figure15).
Figure 14: BlackBerry Desktop Manager
Import PFX The.pfx file can be imported into the BlackBerry smartphone by connecting the BlackBerry smartphone to the desktop and clicking “Syn-chronize Certificate” (see figure 14). The first time certificates and keys are synchronized, a new Key Store Password must be set. The Key Store is the store which stores the private keys. The Key Store is password protected. Af-ter the password is enAf-tered, the Certificate Synchronization tool is started (see figure16).
To import the .pfx file click Import certificate. . .. In the Select Certificate To Import dialog make sure that “Personal Information Exchange (*.pfx, *.p12)” file type is selected and select the .pfx file which was saved on the desktop computer in step1.9. ClickOpento import the.pfx.
1.11 Import certificate into BlackBerry 1 RECEIVING EMAIL
Figure 15: Enable Certificate Synchronization option
Figure 16: Certificate Synchronization tool
Because the.pfx file is password protected the password chosen at step1.9
must be entered. After entering the password the certificate and private key will be imported into the Windows certificate store. The certificate and private key can now be imported into the BlackBerry smartphone. The certificate and private key are already selected (see figure16). By clickingSynchronize, the selected certificate and private key will be imported into the BlackBerry smart-phone.
Note: By default the private key security level will beHigh. This means that the key store password must be entered every time the private key is used to decrypt a message. This is very secure, but not very practical. The private key security level can be modified by opening the certificate synchronization op-tions. See theCiphermail for BlackBerry Reference Guidefor more information on how to change the security level.
1.12 Install Ciphermail for BlackBerry 1 RECEIVING EMAIL
1.12
Install Ciphermail for BlackBerry
Ciphermail for BlackBerry is a BlackBerry application which should be installed on a BlackBerry smartphone. Ciphermail for BlackBerry can be installed over-the-air from http://m.ciphermail.com/bb. There are different versions for different BlackBerry OS versions: 4.5, 4.6 and≥4.7.
After Ciphermail for BlackBerry has been installed, encrypted email can be re-ceived and opened on the BlackBerry smartphone. All email sent [email protected]
will now be retrieved by Fetchmail, encrypted by the gateway and then for-warded to the [email protected].
What now follows is a short introduction to Ciphermail for BlackBerry. For more detailed information see theCiphermail for BlackBerry Reference Guide.
Ciphermail for BlackBerry Encrypted email is stored in the inbox of the BlackBerry mail application just like normal non-encrypted email. Whether or not the message is automatically decrypted when the user opens the message depends on the size of the encrypted message.
Messages smaller than 64KB will be automatically decrypted when opened (figure 17shows an HTML message which was encrypted with 3DES). Mes-sages larger than 64KB are initially not fully delivered to the BlackBerry smart-phone. Messages larger than 64KB should be manually opened by the user by selectingOpen Attachmentfrom the context menu. The message will then be downloaded and opened.
Encrypted messages that should be manually opened can be recognized by the attachment named “attachment.smime” (see figure 18). The body of the message containing the encrypted “attachment.smime” is based on theBB add-ontemplate (see the Templates section in the Ciphermail Administration Guide for more information).
Figure 17: Encrypted HTML message
Key Store password Depending on the selectedPrivate key security level, a password must be entered when the message is decrypted (see figure19).
1.12 Install Ciphermail for BlackBerry 1 RECEIVING EMAIL
Figure 18: S/MIME attachment
Depending on the settings, the Key Store password will be cached for some time. For more information, see the synchronization options section in the
Ciphermail for BlackBerry Reference Guide.
Figure 19: Key Store password
Suitable Private Key not found If a message is encrypted, but the BlackBerry smartphone cannot find the correct private key to decrypt the message with, a warning message will be shown. For more information on how to find out which certificates were used for encryption, see theCiphermail for BlackBerry Reference Guide.
Attachments Encrypted messages can contain attachments. The complete message, including any attachment, is encrypted. Ciphermail for BlackBerry allows attachments to be opened and saved. Only attachments for which a content handler is registered can be opened (for example .doc and .xlt files will
1.12 Install Ciphermail for BlackBerry 1 RECEIVING EMAIL
be opened withDocuments to Go). Attachments are shown at the bottom of the email (see figure20). Attachments can be opened by clicking the attachment. Attachments can be saved by selecting the attachment and selecting Save Attachment from the context menu. A save-as popup screen will be opened (see figure21).
Figure 20: Message with attachment and Good signature.
Figure 21: Save attachment
Finish
Now Ciphermail for BlackBerry has been installed and the gateway has been configured, encrypted email can be received and opened on the BlackBerry smartphone. All email sent [email protected] now be retrieved by
Fetch-mail, encrypted by the gateway and then forwarded to the [email protected]. Email sent [email protected] which is already S/MIME encrypted (for
ex-ample encrypted with Outlook) can be opened by Ciphermail for BlackBerry as long as the BlackBerry smartphone contains the correct private key to decrypt
2 SENDING EMAIL
the message with.
The next section will explain how email sent with Ciphermail for BlackBerry can be securely relayed via an encrypted S/MIME tunnel to the Ciphermail gateway2. This section can be skipped if sending email with Ciphermail for
BlackBerry is not required.
2
Sending secure email
This section explains how to send secure email from a BlackBerry smartphone with Ciphermail for BlackBerry. The most difficult part of email encryption is key management. Selecting the correct certificate for a recipient, importing root certificates etc. requires some knowledge of the PKI process. This is especially hard on mobile devices. Ciphermail for BlackBerry therefore relies on the Ciphermail gateway for most certificate management functions.
Messages sent from a BlackBerry smartphone with Ciphermail for Black-Berry are encrypted with a server certificate and digitally signed with a certifi-cate from the BlackBerry’s key store. The message is then sent to the Cipher-mail gateway by eCipher-mail via a signed and encrypted S/MIME tunnel. The gateway checks whether the sender is allowed to relay messages through the gateway and whether the digital signature is correct. Only if the signature is correct and the message is signed with the correct private key, will the message be forwarded to the final recipients (see figure 22). It depends on the gateway settings whether or not messages sent to the final recipients are encrypted by the Ciphermail gateway.
Messages sent from the BlackBerry smartphone will be relayed by the gate-way to the final recipients. The gategate-way therefore has to handle relay messages differently from ‘normal’ messages. In this example the Ciphermail gateway is not setup as a full SMTP server. Email is therefore not directly received but fetched with fetchmail. Another Gmail account should therefore be used for email that should be relayed.
Note: We advise you to create a new Gmail account for the relay email ad-dress. All existing email on the Gmail account will be forwarded to the Cipher-mail gateway when FetchCipher-mail is enabled. A new GCipher-mail account however is not required, only advised. The only requirement is that the relay Gmail account is not the same Gmail account as the Gmail account used in the Receiving encrypted email section and that the Gmail account is not already setup for the BlackBerry smartphone.
In this example the following relay account will be used∗:
username: [email protected]
password: test
*Where needed, the Gmail account used in the examples should be changed
2With an S/MIME tunnel, every message is S/MIME encrypted. This is different from a TLS
2.1 Configure Fetchmail account 2 SENDING EMAIL
Figure 22: BlackBerry user sends a message. The message is S/MIME signed and encrypted (secure enveloped) and sent to [email protected]. The Ciphermail server fetches the email via POP3, decrypts it and sends it to [email protected]
to match the real Gmail account.
Note: only one relay account is required for multiple users. The relay account is only used to temporarily store the relay messages until the messages are fetched by the gateway.
To setup an authenticated S/MIME tunnel between the gateway and Ciphermail for BlackBerry the following steps are required:
1. Configure Fetchmail account
2. Configure Ciphermail for BlackBerry for relay 3. Configure gateway user for relay
2.1
Configure Fetchmail account
Email securely sent with Ciphermail for BlackBerry is delivered to the relay email address where it will be picked-up by the Ciphermail gateway for further delivery. Because the Ciphermail gateway is not setup as a full SMTP server, fetchmail should be configured to periodically retrieve new email from the relay account. Adding a new Fetchmail account is already explained on page8.
2.2 Configure Ciphermail for BlackBerry for relay 2 SENDING EMAIL
Use the following settings for the new relay fetchmail account:
Server: pop.gmail.com
Protocol: Pop3
Authentication: Password
Username: [email protected]∗
Password: test∗
UIDL: should be checked
SSL: should be checked
Forward To: the postmaster email address. See postmaster on page8
*username and password should be changed to match the real Gmail account. The username should [email protected].
Forward To TheForward To parameter should be the email address of the postmaster (this should be the same as the postmaster email address used on page 8). Normally when everything is setup correctly will the Ciphermail gateway relay the email to the final recipient.
However, if the sender is not allowed to relay (seeRelay allowed on page
26) or if the message is not signed with an approved signing certificate for the sender (see Select relay certificate on page27) the message will not be relayed and the message will be sent to the Forward Toaddress. Make sure theForward To address is not equal to the relay email address (to prevent a mail loop).
2.2
Configure Ciphermail for BlackBerry for relay
Email sent with Ciphermail for BlackBerry is protected with an authenticated and encrypted S/MIME tunnel. The message is relayed by the Ciphermail gate-way to the final recipients (see figure22). Because the message will be relayed by the Ciphermail gateway, the message should be encrypted with a certificate for which the gateway has a private key. To make sure only approved senders are allowed to relay messages via the gateway, messages should be signed with a private key.
The following Ciphermail for BlackBerry settings must be configured:From,
Sign cert, Enc. cert and Relay email. If one of these settings is missing the message cannot be sent and a warning will be shown. The configuration screen can be opened by clicking the Ciphermail icon in the download folder3
(see figure23).
From When a relay message if forwarded by the gateway, theFromheader of the new message will be set to this value. Set the from header to the BIS email [email protected]. This should be the same email address as the email address of the newly added user from step1.10.
Signing certificate (Sign cert) The signing certificate is the certificate which is used for digitally signing outgoing messages and is used to authenticate the
2.2 Configure Ciphermail for BlackBerry for relay 2 SENDING EMAIL
Figure 23: Ciphermail Settings Icon
sender of the message. A signing certificate can be selected by pressing the “. . . ” button. Select the certificate that was previously imported (see figure24).
Figure 24: Select signing certificate
Encryption certificate (Enc. cert) Email sent from the BlackBerry smart-phone must be encrypted with a certificate for which the Ciphermail gateway has a private key (the Ciphermail gateway should be able to decrypt the mes-sage). The Encryption certificate will be used to encrypt all email sent from the BlackBerry smartphone (via an S/MIME tunnel). An encryption certificate can be selected by pressing the “. . . ” button. There are multiple certificates to choose from. Select the certificate that was previously imported (see figure
2.3 Configure gateway user for relay 2 SENDING EMAIL
Figure 25: Select encryption certificate
Relay email When sending encrypted email with Ciphermail for BlackBerry, the email is securely relayed by the Ciphermail gateway via an encrypted S/MIME tunnel. TheRelay email address should be set to the email address of the relay Gmail account:
email address: [email protected]∗
*change the email address to match the real relay address.
2.3
Configure gateway user for relay
When sending encrypted email with Ciphermail for BlackBerry, email is se-curely relayed by the Ciphermail gateway via an encrypted S/MIME tunnel. The Ciphermail gateway decrypts the message, checks whether the sender is allowed to relay via the Ciphermail gateway and delivers the message to the final recipient. The Ciphermail gateway should therefore handle relay emails differently from ‘normal’ emails (see the introduction ofSending secure email
on page21).
To make a distinction between relay and non-relay messages, the gateway needs to know which email address is used for the relay messages. The Re-lay email address setting is a special email address on which the Ciphermail gateway listens for incoming relay messages.
A message will only be relayed if the sender is allowed to relay and if the message is signed with an approved certificate. The relay email address and the user relay settings should be setup with the Ciphermail Web admin.
Relay email address The relay email address is the email address the gate-way listens on for relay messages sent from a BlackBerry with Ciphermail for BlackBerry. The relay email address should be specified on the advanced relay global settings page (see figure26). The global settings page can be opened by clickingSettingsfrom the menu (the relay setting is an advanced setting so
2.3 Configure gateway user for relay 2 SENDING EMAIL
Because all email retrieved with fetchmail from the relay Gmail account is forwarded to the “postmaster” email address (seeConfigure Fetchmail Account
on page22) theRelay emailaddress of the gateway should be set to the “post-master” email address∗.
*change the email address to match the real postmaster address.
Figure 26: Global Relay Settings
Relay allowed A sending user is only allowed to relay email ifRelay allowed
is selected. By checking the global Relay allowed setting all senders are al-lowed to relay. The sending user still requires an approved signing certificate for relaying. ClickingApply saves the current changes.
Note: If a relay message is received by the gateway but the sender is not allowed to relay, the message will be delivered to theForward Toemail address (which is set to the postmaster address in these examples).
Make the postmaster an internal recipient All relay email is forwarded to the “postmaster” address (seeConfigure Fetchmail Accounton page22). Email sent to this email address is checked by the gateway to see if the email is a re-lay message sent with Ciphermail for BlackBerry. The gateway only checks whether the email is a relay email if theRelay email addressis an internal ad-dress. The “postmaster” user should therefore be added as an internal user (see figure27).
2.3 Configure gateway user for relay 2 SENDING EMAIL
Select relay certificate for the BIS address The Ciphermail gateway checks whether the relay message sent by Ciphermail for BlackBerry is signed with an approved signing certificate. If the message is not signed with an approved certificate, the message will not be relayed and will be sent to theForward To
email address (which should be set to the postmaster email address).
Because email sent from the BlackBerry smartphone with Ciphermail for BlackBerry is sent by user [email protected] the relay certificates for this user should be set to allow email to be relayed.
The relay certificates for user [email protected] can be set by clicking the user in the user overview (this is the user that was added in in section1.10) and selecting the advanced settings. Make sure thatRelay allowedis checked. Now click onSelect relay certificates(see figure28). TheSelect relay cer-tificates page will be opened (see figure 29). Select the certificate for email address [email protected] (this is the certificate which was created in section1.8Issue certificate).
Save the settings by clickingApply.
Figure 28: Advanced settings: relay certificates for user [email protected]
2.3 Configure gateway user for relay 2 SENDING EMAIL
Finish
It should now be possible to securely send messages from the BlackBerry with Ciphermail for BlackBerry. Email sent with Ciphermail for BlackBerry will be S/MIME encrypted, signed and sent to [email protected], the Ciphermail gate-way will then check the signature and forward the message to the final recipi-ent(s).
Note: if a message was not correctly relayed, the MPA log (Logs→MPA) will provide more information as to why the message was not relayed.
Final note
In this quick start guide, we showed you how to forward email from a Gmail account to a BlackBerry smartphone in a secure - encrypted - way. We also showed you how email sent from a BlackBerry with Ciphermail for BlackBerry can be relayed via a Ciphermail gateway.
Alternatively, Ciphermail can be setup as a full SMTP gateway. Running Ciphermail as a full SMTP gateway is more scalable, more secure and easier to manage. For advanced setups of Ciphermail (like running Ciphermail as a full SMTP gateway) see the Ciphermail administration guide for more information.