1
SupportDesk and Customer Relationship Management
1 Introduction
The CRM Module is a SupportDesk optional extra, available in the Windows and Web interfaces. It is intended for those supporting external companies as it is used to track sales opportunities and generate email or letter-based marketing campaigns. The images below are for the Web interface.
2 Marketing Campaigns
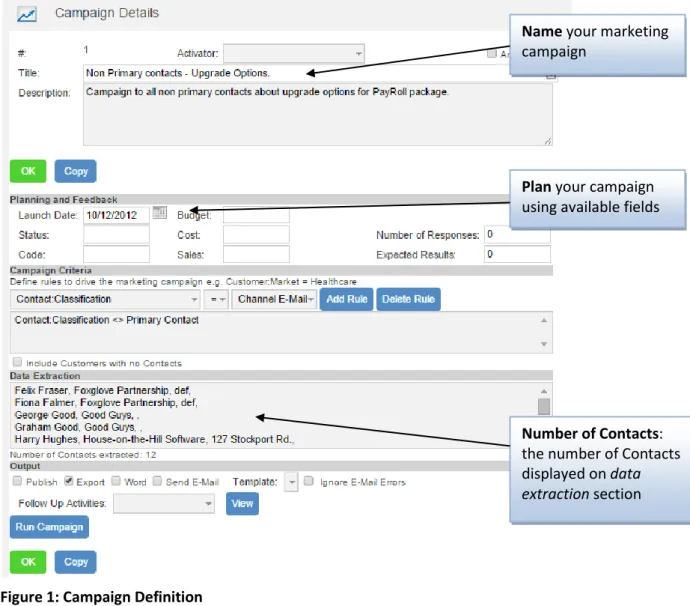
SupportDesk Marketing Campaigns essentially allow you to filter Customer and Contact information by a series of rules and then run a mass mail merge or email campaign.
Figure 1: Campaign Definition
Name your marketing campaign
Plan your campaign using available fields
Number of Contacts: the number of Contacts displayed on data extraction section
2
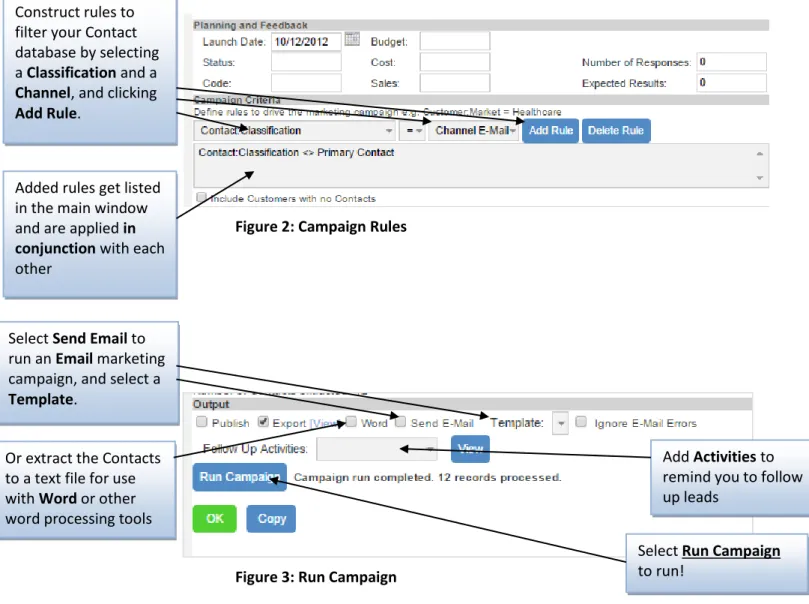
Figure 2: Campaign Rules
Figure 3: Run Campaign
Running a Word Campaign
Note: This run through is based on Microsoft Word being your default word processing program.
To create a letter using an existing template there are five steps:
1. Tick the ‘Word extract…’ box. 2. Browse for template
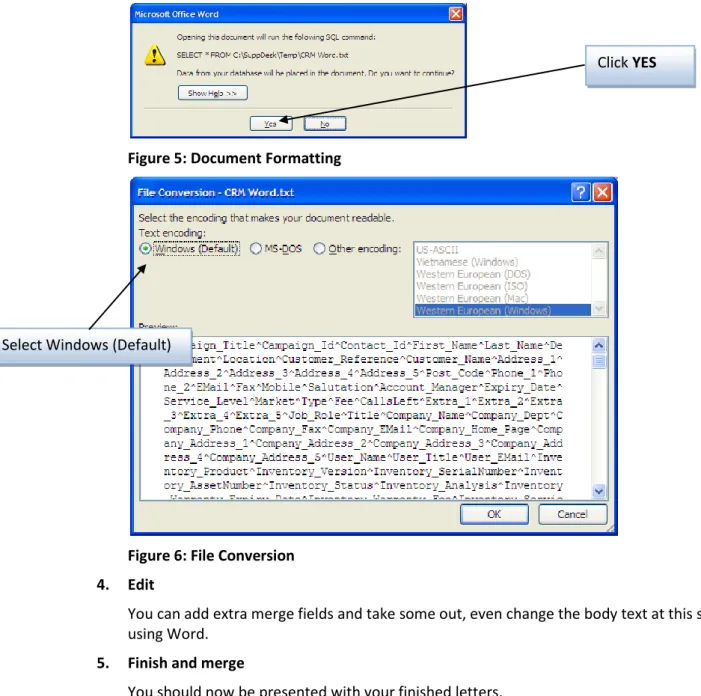
Shipped templates can be found in the templates folder in the SupportDesk installation directory (typically C:\suppdesk\templates). Select a .doc file, such as letter – ad hoc 3. Click Run Campaign
At this point SupportDesk will generate a data source file (CRM Word.txt). Control will then be passed to MS Word. You will also see some pop-ups relating to the formatting of the incoming CRM source file. These pop-ups will differ depending on your version of Word. The screenshots shown are from Word 2007.
Construct rules to filter your Contact database by selecting a Classification and a
Channel, and clicking
Add Rule.
Added rules get listed in the main window and are applied in conjunction with each other
Select Send Email to run an Email marketing campaign, and select a
Template.
Or extract the Contacts to a text file for use with Word or other word processing tools
Add Activities to remind you to follow up leads
Select Run Campaign
3
Figure 5: Document Formatting
Figure 6: File Conversion 4. Edit
You can add extra merge fields and take some out, even change the body text at this stage using Word.
5. Finish and merge
You should now be presented with your finished letters.
Running an Email Campaign
Tick the email box and select an email from the drop-down list or click the Email button to compose a new mail template. In the template, the variable fields are of the format
<campaign:field name> where the field name is an extracted merge field. The available field names can be found in CRM Word.txt, referred to in the previous section on running a campaign through MS Word.
An email will be sent through your default email client to each Contact found in the data extraction.
Click YES
4
Adding Follow-up Activities
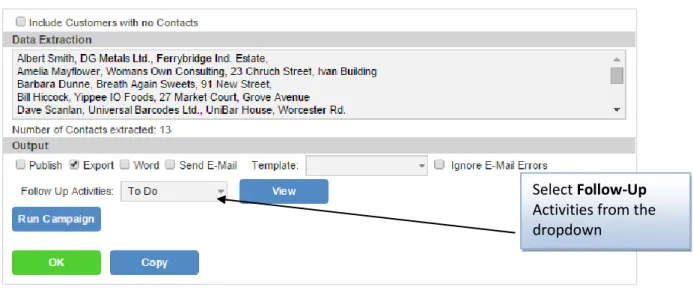
If you select a follow-up Activity from the dropdown on the Marketing Campaign Details…
…an Activity will be added to each Contact (viewable via the Activity tab in the Contact record) via your data extraction when Run Campaign is pressed. This allows you to plan follow-up work using the Activity features of SupportDesk.
Figure 7: Adding Follow-Up Activities
3 Contact Classifications
Use Contact Classifications to label your Contacts with various tags that can then be used in Marketing Campaigns, in order to extract only the relevant contacts for the campaign. The creation and deletion of these Classification Tags is very simple and controlled via the Settings dropdown, and selecting ‘Tags’
Figure 8: Contact Classification Tags
Follow-up Activities on
Contact record generated by
Marketing Campaigns. Select Follow-Up
Activities from the dropdown
Via Settings > Tags, create new
Classification Tags for marketing
campaigns. Click New Tag to
create Classification Tags.
5
Once you have created your Classification Tags, you can apply them to Contacts.
Figure 9: Classifications Tags on Contact record
Figure 10: Campaign Rules
Select the classifications for this Contact…
…And search for them later in a marketing campaign!
6
4 Sales Opportunities
Use sales opportunities to track your Customers’ interest in your Products, generate quotes and even transfer these purchases to your Customers’ inventories.
Creating a Sales Opportunity:
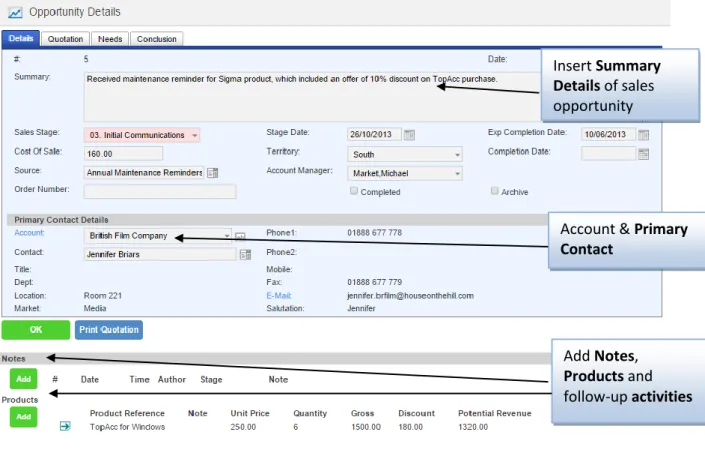
Figure 11: Sales Opportunity Details
Add Products and Purchases to Sales Opportunities:
Figure 12: Addimg Products/Purchases to Sales Opps
Account & Primary Contact
Insert Summary Details of sales opportunity
Add Notes,
Products and follow-up activities
Select purchases from your list of
Products
Enter Unit Price & Quantity being purchased (gross is worked out from these)
Enter Discount if applicable
Potential Revenue is worked out automatically
7
Automatically calculate and print Quotations:
Figure 13: Sales Opportunity Quotation Tab
Sales Opportunity Conclusion record:
Figure 14: Sales Opportunity Outcome Tax is calculated using
the rate entered on SupportDesk’s
Company Configuration form
Press Print Quotation
to generate a quote
Fill in a conclusion and
result when the sales opportunity has reached a conclusion
Tick to Transfer purchases to the helpdesk – see page 8
8
Transferring Purchases to Helpdesk
When closing off a Sales Opportunity, you can choose to transfer the purchases to helpdesk. This creates corresponding inventory items on the Customer’s inventory tab.
Figure 15: Transfer Purchases to Customer/Account Inventory
Use this functionality to record a sales opportunity becoming an actual asset for your support team’s records.
9
5 CRM Dashboards
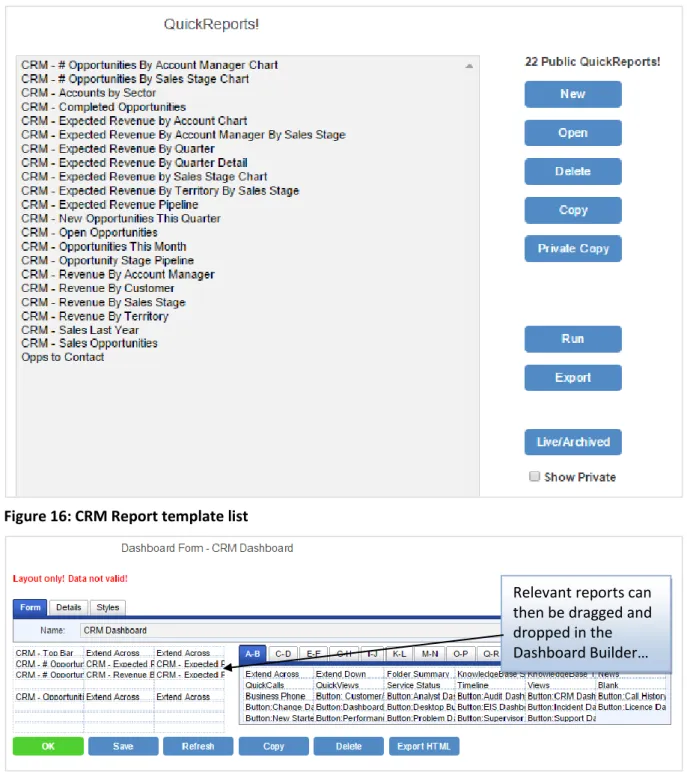
Using SupportDesk’s Drag n Drop Dashboard Designer, in conjunction with the QuickReport Designer, it is simple to create CRM Dashboards for instant performance overview.
SupportDesk with CRM is shipped with CRM reporting templates, or these can be created from scratch using the QuickReport Designer:
Figure 16: CRM Report template list
Figure 17: Drag n Drop Dashboard Designer
Relevant reports can then be dragged and dropped in the Dashboard Builder…
10
Figure 18: CRM Dashboard
...to create a Customer Relationship Management Dashboard, which can be displayed on the login pages of specific user profiles