Knock and Drill Technique: A Simple Tips for the Instrumentation
in Complex Craniovertebral Junction Anomalies without using
Fluoroscopy
Arun Srivastava, Jayesh Sardhara, Sanjay Behari, Sindgikar Pavaman, Jeena Joseph, Kuntal Das, Anant Mehrotra, Awadhesh K. Jaiswal, Kamlesh Bhaishora
Address for correspondence:Dr. Arun Srivastava, Department of Neurosurgery, Sanjay Gandhi Postgraduate Institute of Medical Sciences, Lucknow ‑ 226 014, Uttar Pradesh, India. E‑mail: [email protected]
do not match ever, the morphology of two complexes CVJ is hardly to be similar. Considering this very important fact, the surgical technique has to be tailored and individualized based on their present morphological combinations. Finally, it has to be understood that for any technique to be successful in cases of complex CVJ, the main pivot of that procedure is to be the bony purchase. It is obvious that after good bony purchase different surgical techniques and innovation can be applied to get the better surgical outcome. The described entry point, exit point, and screw trajectory in literature mainly focus on the normal anatomy and applying that to a complex/abnormal anatomy can lead to various
Original Article
Introduction
T
he craniovertebral junction (CVJ) anomalies have the various sets of variation in the bony and vascular morphology, and the most of the treatment has been focussed on the less complex CVJ anomalies. Summarizing the current treatment policies and nuances of CVJ surgical strategies, there are three important goals that are to be achieved in isolation or in combinations. (1) Alleviation of compression from the neuroaxis (decompression), (2) realignment of bony morphology to the normal or near normal (reduction), and (3) bony fusion by utilizing different instrumentation technique (fusion). Various techniques were described in literature where all these three goals are accomplished with single surgical strategy through posterior approach.[1‑6]These bony variations of CVJ are comparable with individual’s fingerprints. As fingerprints of two individuals
Context: Existence of complex variable bony and vertebral artery (VA) anomalies at craniovertebral junction (CVJ) in subset of complex CVJ anomalies demands individualized instrumentation policy and placing screws in each bone requires strategic preoperative planning and intraoperative skills. Aim: To evaluate the clinical accuracy of knock and drill (K and D) technique for the screw placement in complex CVJ anomalies. Settings and Design: Prospective study and operative technical note. Materials and Methods: Totally 36 consecutive patients (16 ‑ pediatrics, 20 ‑ adult patients) of complex CVJ: Complete/partial occipitalized C1 vertebra; at least one hypoplastic (C1/C2) articular mass, rotational component, and variations in the third part of VA were included in this study. Preoperative detail computed tomography (CT) CT CVJ with three‑dimensional reconstruction was done for the assessment of CVJ anatomy and facet joint orientation. The accuracy of novel technique was assessed with postoperative CT to evaluate cortical breach in between 5th and
7th postoperative day in all the patients. All patients were underwent clinico‑radiological evaluation
at 6‑month follow‑up. Results: Totally 144 screws were placed using K and D technique (pediatric group ‑ 64 screws, adult patients ‑ 80 screws). Total of 12 screws were placed in C1 lateral mass in both age group without any bony cortical breach and complication. Sixteen C2 pedicle screws and 12 C2 pars screw in pediatrics and 18 C2 pedicle screws in adult patients were placed without any bony breach or VA injury. Out of thirty subaxial lateral mass screws in pediatric group, the bony breach was encountered with one screw (3.3%). Total of 38 C2 pars screws was placed in adult group in which bony breach along with VA injury was encounter with 1screw (2.6%). Conclusion: A simple technique of K and D for placing a screw increases the accuracy and spectrum of bony purchase and has the potential to reduce the complication in patients with complex CVJ anomalies.
Keywords: Atlantoaxial dislocation, Basilar invagination, complex craniovertebral junction anomalies, knock and drill technique
Department of Neurosurgery, Sanjay Gandhi Postgraduate Institute of Medical Sciences, Lucknow, Uttar Pradesh, India
ABSTRACT
This is an open access article distributed under the terms of the Creative Commons Attribution-NonCommercial-ShareAlike 3.0 License, which allows others to remix, tweak, and build upon the work non-commercially, as long as the author is credited and the new creations are licensed under the identical terms.
For reprints contact: [email protected]
How to cite this article: Srivastava A, Sardhara J, Behari S, Pavaman S, Joseph J, Das K, et al. Knock and drill technique: A simple tips for the instrumentation in complex craniovertebral junction anomalies without using fluoroscopy. J Neurosci Rural Pract 2017;8:14-9.
Access this article online
Quick Response Code:
Website:
www.ruralneuropractice.com
DOI:
complications such as vertebral artery (VA) injury or injury to the neuraxis.[7,8] The intraoperative fluoroscopy, in spite of adding ease to the surgical procedure, may confuse more in cases of complex CVJ anomalies. In the present study, we are sharing our current preoperative and intraoperative strategies for catering the best possible surgical treatment on individualized basis in the background of good bony purchase.
Materials and Methods
Totally, 36 consecutive patients were included in this prospective study. There were 16 pediatrics patients and 20 adults. All the 36 patients were selected prospectively of complex CVJ anomalies. We define complex CVJ anomalies as the cases of congenital varieties of irreducible atlantoaxial dislocation have following components [Figure 1]: (1) Basilar invagination, (2) complete/partial occipitalized C1, (3) at least one articular mass hypoplastic (C1/C2), (4) rotational component, and (5) variations in the third part of vertebral arteries (VA).
Preoperative detail computed tomography (CT) study of CVJ with three‑dimensional (3D) reconstruction was done for the assessment of CVJ anatomy and facet joint orientation. All 36 patients underwent posterior fusion and fixation with simple knock and drill (K and D) technique for the placement of screw. Distraction was achieved in some patients by Goel’s method and in few by placing bone graft alone in the C1/C2 joint space.[1] Efficacies of technique
were assessed with postoperative CT to screen the cortical breach between 5th and 7th postoperative day in all the
patient. The screw failure in the form of cortical breach was determined by the radiological evidence of obvious cortical breach (more than 50% of screw width is out of the cortex) in any direction except the bicortical breach in the direction of screw. All patients were underwent clinico‑radiological evaluation at 6 month follow‑up. This study was permitted by our Institutional Ethical Committee [IEC code no: 2013‑08‑MCH‑67].
Surgical technique: The prerequisites
For proper preoperative planning of posterior fixation requires:
1. Preoperative 3D‑CT CVJ with angiography.
Following information in detail should be ensured: (a) VA course overlapped with bony anatomy; (b) complete information about C1 lateral mass, C2 pars,
pedicle and joint orientation, and subaxial lateral masses 2. Pneumatic/electric driven fine drill bit (1.1–1.2 mm
diameter) [Figure 2a]
3. Any instrumentation system with fine diameter bone
sound (user‑friendly)
4. Kocher forceps or equivalent instrument to hold the bone.
Surgical steps
Initial step
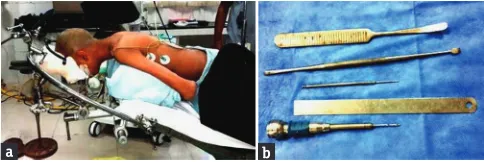
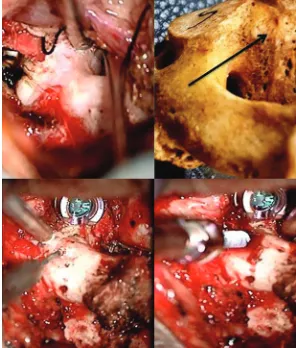
The patient was placed prone with the head end of the operating table elevated by 30° [Figure 2b]. Gardner‑Wells traction was applied to stabilize the head during surgery, and the direction of the traction resulted in a near‑floating head position and avoided pressure on the face. During intraoperative period, we used to apply traction of 7–10% body weight in all the patients for stabilization of head and neck in extension. A midline skin incision was made from inion to C2 spinous process. The laminae on both sides were exposed with subperiosteal dissection [Figure 3a] follow the C‑2 laminae to pars and walk on the medial edge of pars to avoid injury to VA, use sharp dissection with 15 no. blade to avoid venous bleeding [Figure 3b]. Here, preoperative 3D CT angiography and optimal assessment of VA course and anatomy of C2 foramina transversarium should kept in mind before starting dissection; this helps in preventing inadvertent injury to VA. Use 15 no. knife to sharply dissect the soft tissue and fascia from medial border of the junction of laminae, pars, and pedicle. Retract the dura along with venous channels medially to expose and feel the pedicle.
C1/C2 joint exposure and preparation
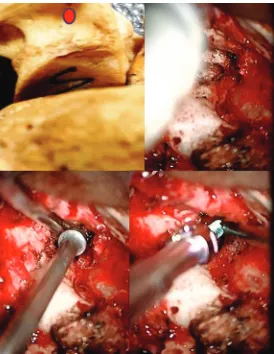
Further, walking superiorly on the pars will lead to the C1–C2 joint space [Figure 3b]. The facet joints were distracted using varying‑sized osteotomes. The flat end of the osteotome was introduced into the facet joint and then turned 90° to make it vertical for effective distraction [Figure 4]. The articular cartilage was widely removed using a screwing motion of the osteotome and when necessary a power‑driven microdrill [Figure 5]. The Goel cervical facet spacer or bone chips as and when required was impacted into the joint using
Figure 2: (a) Prone position with the head end of the operating table elevated by 30 with the direction of the traction resulted in a near‑floating head position and avoided pressure on the face. (b) Drill bits of two different companies with different types of osteotomes for joint preparation
a b
Figure 1: (a) Sagittal view of craniovertebral junction with evidence of (e/o) basilar invagination; partially occipitalized C‑1;partial C‑2/3 fusion; (b) e/o asymmetrical articular masses of C‑1/C‑2; (c) e/o rotational component; (d) abnormal course of vertebral artery with e/o right‑sided hypoplastic pars and pedicle
a b
gentle hammering over the base of the spacer impactor. The spacers used were varied in height from 4‑8 mm, and the diameter was 8 mm.
Knock and drill technique
The concept of K and D technique is nothing but simultaneous utilization of drilling as well as sound probe confirmation to ensure safe and accurate bone drilling. The power‑driven drill bit with the specification (1.1 mm/1.2 mm diameter and 22– 25 mm long tip) is used after the confirmation of bone bulk and its orientation. During the process of drilling, rather than confirming bone all around with sound probe, the drill itself can be used each time after drilling every few millimetres without much bone loss. The drilled length gives the idea of required screw length. The rest of the steps are common like Awl, manual drill, and then putting the screw of appropriate length. The use of very thin drill bit offers the advantage of less bone loss during drilling and thus several attempts of drilling are possible without compromising the safety.
C‑2 pedicle screw placement with knock and drill technique
See and feel the pedicle for the direction, orientation, and bulk. Drill the bone for initial 3–4 mm after visualizing the pedicle from the medial aspect, and knock it inside to feel the bone all around, if bone is present drill it further. Once it is drilled, drill it several times (4–5 times) in same course for smooth instrumentation. The length of the screw can be determined by length of the drill which was tapped or by preoperative 3D CT measurement.
C‑2 pars screw placement with knock and drill technique
The dimension and orientation of the pars has to be assessed intraoperative [Figure 6]. The VA and its foramen laterally and exposed medial border gives enough information about the width and axial orientation of the pars. The exposed C1/C2 joint gives information about sagittal orientation of the pars. With this information and by applying K and D technique, the accurate screw placement can be done without using fluoroscope. C‑1 lateral mass screw placement with knock and drill technique
Prepare the end plates of joint similar to anterior discectomy. Anatomically, the end plate of C‑1 facet is concave, so slight
Figure 4: Walking superiorly on the medial aspect of pars will lead to exposure of C1/C2 joint space
Figure 5: Various strategies for C1/C2 joint preparation
Figure 6: The bulk and orientation of C2 pedicle can be seen, the additional information and vision of vertebral artery can safely provide the information about screw trajectory and lead to successful screw placement
Figure 3: (a) The operative steps are compared with normal bone showing initial subperiosteal dissection with exposed C2 spinous process and C1; C2 laminae. (b) Sharp dissection with the help of no‑15 surgical blade on the medial aspect of laminae and further exposure of pedicle
a
drilling of edges makes it flat. After joint preparation, see and feel the orientation of lateral masses as it will follow the direction of the end plate of C‑1 [Figure 7]. The sagittal and axial direction of the screw could be assessed with accuracy and without using fluoroscope. The chasing anterior tubercle of the C‑1 in cases of complex CVJ anomalies on several occasions is difficult as there is assimilation of anterior arch in most of the cases. Entry point for the C‑1 lateral mass is the junction of posterior arch with lateral mass, and if you want to preserve C‑2 nerve root you can directly drill through the posterior arch, which is attached to the lateral mass [Figure 8]. Once we are sure about the bulk of lateral mass and orientation of the lateral mass in the sagittal and axial direction. Screw placement can be achieved with the help of K and D technique.
C‑3 lateral mass screw insertion technique
Consider the lateral mass as cube and orientation of cube is defined by the upper and lower facet. Open the upper facet but not the lower one as in any case upper facet is going to be stabilized. Now, select an entry point in such a way that it should purchase the cube from the posterior inferior medial point to in the direction of anterior superior lateral point [Figure 9]. The VA is running in relation to the middle part of the lateral mass in its anterior aspect. Use the K and D technique to ensure the bony purchase. Similarly, other lateral mass of subaxial spine can be instrumented by the same technique.
Results
Totally, 36 consecutive patients with irreducible atlantoaxial dislocation with complex CVJ anomalies were included prospectively in this study. All of them underwent posterior fusion (with or without transoral decompression) [Table 1]. A total of 144 screws (excluding occipital screws) were placed using K and D technique (pediatric group‑64 screws, adult patients ‑ 80 screws) [Table 2]. A total of 12 screws were placed in C1 lateral mass in both age group without any bony cortical breach and complication. Sixteen C2 pedicle screws and 12 C2 pars screw in pediatrics and 18 C2 pedicle
screws in adult patients were placed without any bony breach or VA injury. Out of 30 subaxial, lateral mass screws in pediatric group, the bony breach was encountered with one screw (3.3%). A total of 38 C2 pars screws were placed in adult group in which bony breach along with VA injury was encountered with 1 screw (2.6%). In 10 lateral mass screws, there was bony purchase failure (outer cortical breach during drilling/placing screw) which needs intraoperative revision in the form of screw placement one level below.
Discussion
The various popular surgical techniques are applied on symmetrical bony morphology and articular masses. Hence, here, we are focusing on the subset of complex CVJ anomalies which are having A ‑ complete/partial occipitalized C1, B ‑ at least one articular mass hypoplastic (C1/C2), C ‑ rotational component, and D ‑ variation in the third part of VA in a different
Table 1: Summary of surgical treatment
Paediatric group (n) Adult group (n) Transoral
decompression 5 2
C1‑C2 distraction &
fusion 3 3
Occipito‑C2‑C3/4
fusion* 13 17
* on the side of high riding VA with narrow isthmus along with C‑2/C‑3 fusion the C‑3 and C‑4 lateral mass were purchased with contralateral normal side C2‑pedicle/pars along with C‑4 lateral mass
Table 2: Summary of instrumentation in this study.
Type of screw placement Paediatric group (n) Adult group (n)
C1 lateral mass 6 6
C2 pedicle 16 18
C2 pars 12 36
Sub ‑ axial lateral mass 30 20
Total (144 screws) 64 80
Figure 7: The entry point of C1 lateral mass. The orientation of C1 endplate gives a clue for the trajectory and length of the screw
combinations.[8] We must emphasize on preoperative preparation and intraoperative surgical nuances for optimal bony purchase. Preoperative consideration
The 3D CT‑CVJ along with CT angiography for VA anatomy provides generous important information required for surgical planning.[9,10] Bulk and orientation of major articular masses
(C‑1; C‑2; Lateral masses of C‑3 and below), single/anomalous (medial deviation particularly with occipitalized atlas or high‑riding VA, orientation and dimension of C‑2 pars and pedicle as well as C1/2 facet joint orientation should be evaluated before surgical planning. Moreover, length and width of screws can also be planned. The 1.1 mm/1.2 mm thin and around 20–25 mm long tip pneumatic or electrical drill bit are easily available with commonly used drill system. The drill bit can be used as a drilling agent as well as sound probe. The benefit of being it so thin is that the trajectory could be revised without much inadvertent bone loss and chances of injury to surrounding the structure is also less. The alternating technique of sounding the bone all around with the drill bit and further drilling likewise will help the surgeon in knowing the completion of drilling (cortical breach) and further deciding upon the final screw length required for placement. Intraoperative consideration
Intraoperative subperiosteal dissection is utmost importance for optimal exposure of C1 and C2 facet joint orientation, it also guides us the trajectory of screw in bone and once we are aware of VA course the exposure becomes safer. The second important step is to achieve a good exposure with minimal venous bleeding and for that correct positioning of the patient, anesthetic considerations, and sharp dissection with the help of no‑15 knife on the medial edge of C‑2 lamina and pars is required.
Intraoperative innovation
The surgical technique not only has to be tailored on individual basis but also has to be tailored on individual articular masses basis on either side in same patient. The various innovations as per requirement was applied like, in cases where there were unilateral C‑1 articular mass hypoplasia, the sagittal orientation of the drill is increased in cranial direction, and with the help of K and D technique partial or complete occipital condyle can be purchased.
The same innovation was applied in C‑2 where based on radiological and operative finding we have purchased C‑2 Pedicle on one side and C‑2 pars on other side.
The lateral masses of C‑3 and C‑4 are normally has good bulk, to put screws in lateral masses the following facts have
to be understood. The first fact is that the lateral masses are like cube, and the orientation of that cube is defined by the orientation of joint above and below. The second fact is that the VA is situated anteriomedial aspect of this cube, and nerve is related to anterosuperior aspect of the Cube. Considering these facts, we understand that lateral orientation of screw will never injure a normal coursed VA. In addition applying the K and D technique, we can put screws with bicortical purchase. Complication
We had complications in two cases. The first complication in the form of VA injury with massive bleeding occurred in an adult patient while placing the screw in right C‑2 pars. The immediate hemostasis was achieved and in tandem the coiling of injured VA segment was done after ensuring the good blood flow through codominant VA. In 3D CT angiography, there was type‑4 vertebral groove (narrow and high type) with high‑riding VA. The complication in this case has happened while manual drilling of Pars, where the drill breached the lateral border and injured the VA. This complication could have been avoided by ensuring appropriate resting of the manual drill on the entry point and its stable movement while drilling. Nevertheless, radiological details should be respected at any cost. Another complication was encountered on postoperative CT CVJ, and in this patient the lateral mass screw was wrongly directed to the neural canal without causing any neurological deficit. Ten lateral mass screws, out of total fifty lateral mass screws placed, were revised intraoperatively as there was outer cortical breach while manually drilling/placing screw. Considering the dimension of the subaxial lateral masses, especially in pediatric age group, the 3.0–3.5 mm width screws and drills usually lead to the outer cortical breach, thus finer width manual drill and screws are recommended to avoid this complication.
Conclusion
The existence of complex variable bony and VA anomaly at CVJ in complex CVJ anomalies demands individualized instrumentation polices for each and every articular masses. This simple technique of K and D increases the accuracy and spectrum of bony purchase and also has the potential to reduce the complication in patients with complex CVJ anomalies. Financial support and sponsorship
Nil.
Conflicts of interest
There are no conflicts of interest.
References
1. Goel A. Treatment of basilar invagination by atlantoaxial joint distraction and direct lateral mass fixation. J Neurosurg Spine 2004;1:281‑6.
2. Chandra PS, Kumar A, Chauhan A, Ansari A, Mishra NK,
Sharma BS. Distraction, compression, and extension reduction of basilar invagination and atlantoaxial dislocation: A novel pilot
technique. Neurosurgery 2013;72:1040‑53.
3. Brooks AL, Jenkins EB. Atlanto‑axial arthrodesis by the wedge compression method. J Bone Joint Surg Am 1978;60:279‑84.
4. Dickman CA, Sonntag VK, Papadopoulos SM, Hadley MN.
The interspinous method of posterior atlantoaxial arthrodesis. J Neurosurg 1991;74:190‑8.
5. Harms J, Melcher RP. Posterior C1‑C2 fusion with polyaxial screw and rod fixation. Spine (Phila Pa 1976) 2001;26:2467‑71.
6. Salunke P, Sahoo SK, Deepak AN, Ghuman MS, Khandelwal NK. Comprehensive drilling of the C1‑2 facets to
achieve direct posterior reduction in irreducible atlantoaxial
dislocation. J Neurosurg Spine 2015;23:294‑302.
7. Wright NM, Lauryssen C. Vertebral artery injury in C1‑2 transarticular screw fixation: Results of a survey of the AANS/
CNS section on disorders of the spine and peripheral nerves. American Association of Neurological Surgeons/Congress of
Neurological Surgeons. J Neurosurg 1998;88:634‑40.
8. Behari S, Bhargava V, Nayak S, Kiran Kumar MV, Banerji D,
Chhabra DK, et al. Congenital reducible atlantoaxial dislocation: Classification and surgical considerations. Acta Neurochir (Wien)
2002;144:1165‑77.
9. Sardhara J, Behari S, Mohan BM, Jaiswal AK, Sahu RN, Srivastava A, et al. Risk stratification of vertebral artery vulnerability during surgery for congenital atlanto‑axial dislocation with or without an occipitalized atlas. Neurol India 2015;63:382‑91.
10. Salunke P, Futane S, Sahoo SK, Ghuman MS, Khandelwal N.
Operative nuances to safeguard anomalous vertebral artery without compromising the surgery for congenital atlantoaxial
dislocation: Untying a tough knot between vessel and bone. J Neurosurg Spine 2014;20:5‑10.
Author Help: Reference checking facility
The manuscript system (www.journalonweb.com) allows the authors to check and verify the accuracy and style of references. The tool checks the references with PubMed as per a predefined style. Authors are encouraged to use this facility, before submitting articles to the journal.
• The style as well as bibliographic elements should be 100% accurate, to help get the references verified from the system. Even a
single spelling error or addition of issue number/month of publication will lead to an error when verifying the reference.
• Example of a correct style
Sheahan P, O’leary G, Lee G, Fitzgibbon J. Cystic cervical metastases: Incidence and diagnosis using fine needle aspiration biopsy. Otolaryngol Head Neck Surg 2002;127:294-8.
• Only the references from journals indexed in PubMed will be checked.
• Enter each reference in new line, without a serial number.
• Add up to a maximum of 15 references at a time.
• If the reference is correct for its bibliographic elements and punctuations, it will be shown as CORRECT and a link to the correct
article in PubMed will be given.
• If any of the bibliographic elements are missing, incorrect or extra (such as issue number), it will be shown as INCORRECT and link to