Fall 2018
App Description Language
App Description Language
Tanmay Kumar Ghosh
Iowa State University, [email protected]
Follow this and additional works at: https://lib.dr.iastate.edu/creativecomponents
Part of the Software Engineering Commons
Recommended Citation Recommended Citation
Ghosh, Tanmay Kumar, "App Description Language" (2018). Creative Components. 61.
https://lib.dr.iastate.edu/creativecomponents/61
by
Tanmay Kumar Ghosh
A Creative Component Report submitted to the graduate faculty
in partial fulfillment of the requirements for the degree of
MASTER OF SCIENCE
Major: Computer Science
Program of Study Committee: Dr. Simanta Mitra, Co-major Professor Dr. Gurpur Prabhu, Co-major Professor
Dr. Carl K. Chang
The student author, whose presentation of the scholarship herein was approved by the program of study committee, is solely responsible for the content of this dissertation/thesis. The Graduate College will ensure this dissertation/thesis is globally accessible and will not permit alterations
after a degree is conferred.
Iowa State University
Ames, Iowa
2018
DEDICATION
To my parents, friends, family and teachers for their constant support and guidance throughout
TABLE OF CONTENTS
Page
LIST OF TABLES . . . v
LIST OF FIGURES . . . vi
ACKNOWLEDGMENTS . . . viii
ABSTRACT . . . ix
CHAPTER 1. INTRODUCTION . . . 1
1.1 Background . . . 1
1.2 Challenges and Objectives . . . 2
1.3 Organization . . . 3
CHAPTER 2. MOTIVATION . . . 4
CHAPTER 3. APP DESCRIPTION LANGUAGE . . . 5
3.1 General Idea . . . 5
3.2 Architecture . . . 5
3.3 Technology Description . . . 6
3.3.1 Gradle/Maven . . . 6
3.3.2 SpringBoot . . . 6
3.3.3 Mustache . . . 7
3.3.4 Websocket . . . 8
3.4 Specification . . . 8
3.5 Implementation . . . 12
3.5.1 Server-Side Automation . . . 12
CHAPTER 4. EXPERIMENTAL EVALUATION . . . 17
4.1 Experiment Settings . . . 17
4.2 Experiment 1 . . . 17
4.3 Experiment 2 . . . 27
4.4 Measure of Success . . . 28
4.4.1 Functionality . . . 28
4.4.2 Efficiency . . . 28
4.4.3 Maintainability . . . 28
CHAPTER 5. RELATED WORK . . . 29
CHAPTER 6. CONCLUSION AND FUTURE WORK . . . 30
LIST OF TABLES
Page
Table 3.1 This table shows possible data types of attributes in model . . . 13
Table 3.2 This table shows possible features in input spec and how they are automated
LIST OF FIGURES
Page
Figure 3.1 Architecture flow diagram of ADL . . . 6
Figure 3.2 Architecture flow diagram of generated code . . . 7
Figure 3.3 Sample example of using jMustache library . . . 8
Figure 3.4 Sample input specification in JSON . . . 9
Figure 4.1 Provided Input spec . . . 18
Figure 4.2 Generated Output Directory Structure . . . 19
Figure 4.3 Generated application properties file . . . 19
Figure 4.4 Generated Server project structure . . . 20
Figure 4.5 Auto generated Database Tables . . . 20
Figure 4.6 A sample auto generated Controller Class . . . 21
Figure 4.7 Generated Websocket project structure . . . 22
Figure 4.8 Generated Client project structure . . . 22
Figure 4.9 A sample generated front end for saving a record . . . 23
Figure 4.10 Auto-generated getAll records from db feature . . . 23
Figure 4.11 Auto-generated One to Many Mapping . . . 24
Figure 4.12 Auto-generated Google Maps integration in UI . . . 25
Figure 4.13 A sample input excel file for bulk upload . . . 25
Figure 4.14 File upload during Bulk Upload . . . 26
Figure 4.15 Data entry in MySQL db post bulk upload . . . 26
NOMENCLATURE
ADL App description Language
UI User Interface
POJO Plain old java object
JSON Javascript Object Notation
DDL Data Definition Layer
PK Primary Key
ORM Object-relational Mapping
OOP Object-Oriented
Program-ming
REST Representational State
Trans-fer Architecture
IDE Integrated Development
ACKNOWLEDGMENTS
I would like to express my heartfelt gratitude to Dr. Simanta Mitra for his substantial guidance
and support throughout the course of this research. I would also like to extend my appreciation to
my co-major professor Dr. Gurpur Prabhu and my committee member Dr. Carl Chang for their
help and support.
In addition, I would also like to thank my friends, colleagues, the departmental faculty, and
department staff for making this journey not only possible, but also a memorable one.
Last but not the least, I would like to extend my gratitude to my parents for their unbounded
ABSTRACT
This project is an effort to automate the generation of software applications including a
server-side and a client-server-side component. App description language is a simple JSON based language,
following a structured organization and template, where the desired features of the application can
be described. The application parses the input spec and creates the required files in a structured
directory and initial set-up files using a templating language Mustache and advanced File processing
and String Manipulation in Java. The server-side code is generated in SpringBoot as it is the most
advanced, powerful and robust framework available for Java in the market. The client-side code is
generated using HTML and JavaScript, and it is connected to server-side using XMLHttp requests.
With the generated output codebase, users with little or no programming experience can create
software applications, as per their need, and developers requiring advanced logic and performance
metrics, can get a boiler-plate codebase with a very good starting point, saving a huge amount of
CHAPTER 1. INTRODUCTION
Software Development has always been a very popular area in the field of Software Engineering,
Computer Science and Information Technology. Recent years have seen a drastic growth in the
number of software applications. Latest digital transformation for replacing all pen and
paper-based data management systems to computer-paper-based tables and databases has opened immense
scope of automating the generation of web applications. The app description language presented
in this report, is a JSON based language, very simple yet powerful enough to generate REST client
with Spring Boot, and User interface with HTML and Javascript. The specification or language
to auto generate code is simple enough to be written by anyone with little to no programming
experience.
ADL is also useful for those, who are skilled to develop the whole application but have time
constraints on rewriting the simple and mundane thousands of lines of code. Instead, the time and
energy can be focused on building the more important parts of application i.e. logic and security
aspects.
1.1 Background
A typical server-side REST application which follows MVC (Model-View-Controller) pattern,
involves a main application class, plain java model objects for each entity or table in the database,
controllers for exposing the endpoints, repositories corresponding to each model for Hibernate or
any other ORM tool. Further, it requires settings and description of dependency management, and
properties file to configure application level properties. The view is optional and can be omitted
The user interface/client-side is an interactive layer between the end-user and server-side code.
jQuery is used to select and work on the HTML components. Together, Javascript with HTML
and jQuery is definitely the most popular method of generating front-end application and tie it to
the corresponding back-end. Due to increased demand of usability and manageability, integration
of external APIs is pretty common in current applications. Google cloud platform provides easy
and sophisticated APIs to integrate popular functionalities such as Maps, Drive, Calendar etc, and
saves a huge amount of time by not rewriting the code for same functionalities.
1.2 Challenges and Objectives
The major challenge in developing app description language is to design the input spec file.
The file should capture as much information as possible, at the same time minimizing the different
input parameters and keeping it simple to understand and write a new one for users. The existing
code generators like Swagger (8) primarily focuses on capturing the very relevant parameters, but
it might be challenging for a non-technical person to design the same, although it supports multiple
languages and can accommodate many features. Another challenge is to understand what the user
wants and requires without explicitly having to mention it. For example, to get the list of all users
based on a geographic location say city is to be captured by a simple understandable word like
getUsersByCity and should be able to generate corresponding server-side and client-side.
Furthermore, since the logic and security aspects are something, which must be configured
man-ually later on top of the generated code, it is important to keep the code modular, indented and
easy to understand, so that developers can further work on it.
Another important aspect to consider is that fact that there is plethora of applications users
might want to generate, and thus the language description should be able to understand the
easy to parse and understand the users requirements and generate the code with high modularity
and simplicity.
1.3 Organization
The next part of the report is organized as follows. Firstly, we talk about the motivation
behind pursuing this project, and why it is intriguing and interesting to work. Next, we discuss
about the core methodology, technology used and flow of information to automate the application
development. Then, we experiment with the automation using two examples. One example is
to verify and establish the automation achieved. Another one is to showcase its limitations and
domain and scope. Lastly, we talk about the related works done in this domain, and possible future
CHAPTER 2. MOTIVATION
In my past experience with application development involving server-side and client-side
com-ponents, it is observed that it takes about 2-3 months with a group of 3-4 developers with average
technical skills to develop a moderate size application. It is also important to note that, most
of the components in a server and client-side application are pretty much same for a wide range
of applications and it does not require any logic and human intelligence, and thus can be automated.
Apart from just saving time and effort, server-side code framework such as Spring Boot
some-times can get very tedious and cumbersome to code. Especially with the naming conventions of
data model attributes and Hibernate query formations. Delegating the work to a computer i.e. an
automation tool would eradicate the chances of human error in the same.
Last but not the least motivation to work on this project is the fact that, the requirement of
software application development is immense. Typically, every small to large organization needs
to have some use case of saving few tables, creating forms for adding, updating and deleting data.
With this automation tool, we are empowering more individuals to develop their own applications,
CHAPTER 3. APP DESCRIPTION LANGUAGE
3.1 General Idea
The general idea behind ADL is to parse an input file in JSON format. Extract various
infor-mation from this input including the Models, its attributes, relationships, features wanted in the
user interface, along with any external integrations required. The information is extracted as a java
object, as it is easy to manage. Once the information is extracted, server-side Spring Boot code
is generated with standard templates for Model, Controller, Main Application, properties file and
dependency management files. The auto generated code adheres to Spring Boot guidelines, along
with automatic DDL (9) configuration, which auto-generates the tables and relationships, when
the app runs for the first time. A standard convention is followed for creating the API endpoints
with corresponding GET and POST methods.
Next, the client-side code is generated with standard templates for index html page, and html
page for each entity, along with a standard CSS and JavaScript file. HTML elements are mapped
in Javascript by jQuery. The standard convention is used to call the corresponding Spring Boot
API methods to interact with database. The overall code is generated in a folder with the same
name as project name provided in input spec, placed inside the provided output path.
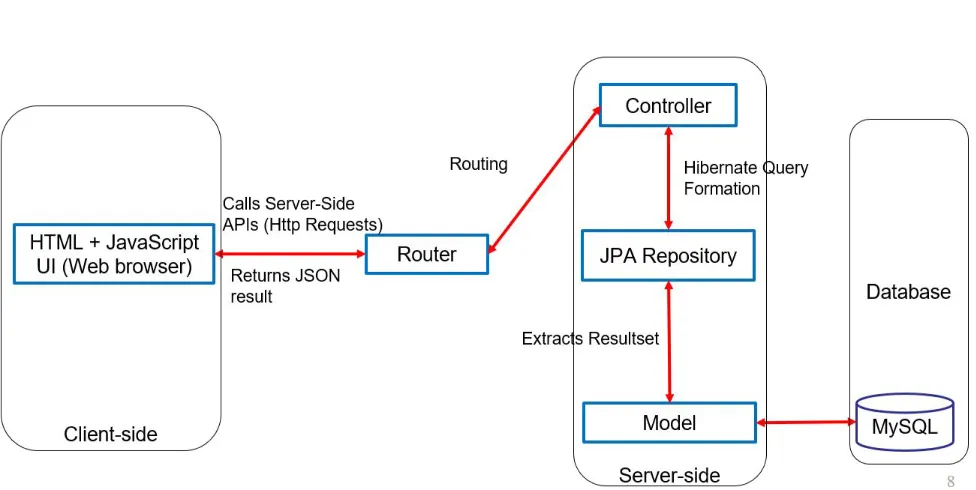
3.2 Architecture
The general idea described in the previous section is outlined in the flow diagram in Figure 3.1.
The generalized flow diagram in Figure 3.2 explains the auto-generated server-side and
Figure 3.1 Architecture flow diagram of ADL
3.3 Technology Description
3.3.1 Gradle/Maven
Gradle (6) and Maven (7) are very popular dependency management tools. For ADL project,
Gradle has been used, with external dependencies such as Apache StringUtils for advanced
manip-ulation etc. For automatically generated server-side code, Maven has been used. The configuration
for maven is present in a pom.xml file. It contains all the information such as title, description,
packaging method etc. along with external libraries to be used.
3.3.2 SpringBoot
SpringBoot (5) is a very popular framework for developing stand-alone server-side applications.
It already comes embedded with Tomcat, Jetty or Undertow server. It automatically configures
all the components like Model and Controller in the project and no explicit mapping is required.
Figure 3.2 Architecture flow diagram of generated code
3.3.3 Mustache
Mustache (4) is a tag based template language. It is called ”logic-less” because there are no
if-else or for statements, instead there are just clauses. Some tags are replaced with a value, some
nothing, and others a series of values. It also has a good performance. Templates are parsed
separately from execution. A template will specialize its variables on (class of context, name) pairs
so that if a variable is first resolved to be (for example) a field of the context object, that will be
attempted directly on subsequent template invocations, and the slower full resolution will only be
tried if accessing the variable as a field fails. Mustache is used heavily in developing ADL.
Figure 3.3 Sample example of using jMustache library
3.3.4 Websocket
The WebSocket (12) protocol enables interaction between a web client (such as a browser) and a
web server with lower overheads, facilitating real-time data transfer from and to the server. This is
made possible by providing a standardized way for the server to send content to the client without
being first requested by the client, and allowing messages to be passed back and forth while keeping
the connection open.
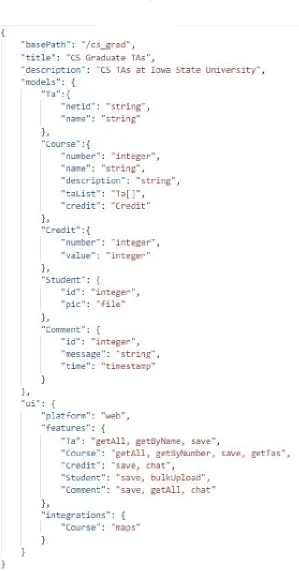
3.4 Specification
Writing the spec is the most important aspect of using ADL to generate Applications
automat-ically. To properly understand various components present in the JSON specification file, let us
The major components in the JSON spec are as follows:
1. basePath: It is an optional argument, and it is the server-side context path appended after
the server host URL. The basePath in the attached spec in Figure 3.4 is ”/cs-grad”.
2. title: It is the title of the project, and the same name that shows up in the index page of
the UI. Also, the server-side project is packaged under this name. Similarly, the title in the
attached spec in Figure 3.4is ”CS Graduate TAs”.
3. description: An optional parameter and is only used to mention in the dependency
man-agement pom file. The description in the attached spec in Figure 3.4 is ”CS TAs at Iowa
State University”.
4. models: It contains a list of various entities involved in the application, and each model
contains a list of its attributes and corresponding data types. ADL currently supports String,
Integer, File and Timestamp data type. It also captures the relationship between 2 entities
by mentioning the data type as either another entity name or by entity name followed by
[] to represent one-to-one and one-to-many relationship respectively. In the attached spec
in Figure 3.4, we have 4 models named Ta, Course, Student and Comment. Also, ”netid”
and ”name” are the attributes of model ”Ta”, with both string data types. Similarly, other
attributes can be deduced. The important thing to note here is the model ”Course”. Out of
it’s 5 models, 2 are relationship mapping. Since one course can have multiple TAs, Course
has an attribute called ”taList” with type ”Ta[]”, implying One-to-Many relationship with
Ta. Similarly, Course is related in One-to-One mapping with Comment, assuming that one
Course can have one Comment.
Moreover, a student can have a picture, thus an attribute is mentioned as ”pic” with ”file”
type. Any media type can be attached as file type. Similarly, a comment’s timestamp can be
noted, thus the attribute called ”time” has the type as ”timestamp”, so as to store the time
in database. Note that by mentioning the models, our intention is to create the tables with
5. ui: It is again an object containing various other important arguments, which are following:
(a) platform: Since there are multiple options to launch and expose the service such as
web, mobile etc. Currently, ADL supports just web as the value of this attribute, but
we can expand it to work for lot more such as Android, iOS etc.
(b) features: This is the most important part of the specification, as here we mention the
services needed for the application, we are trying to build. The corresponding services
or features would then be exposed via a simple button in the corresponding models
html page. We specify the features for each model individually. If there are no features
corresponding to a model, the application will assume the corresponding entity as an
inner or helper model. The queries corresponding to relationships are critical and must
be mentioned carefully with a standard unified formatting technique. In the attached
spec in Figure 3.4, the major features required are:
getAll in TA: Get the list of all TAs currently listed in database
getByNumber in Course: Get(Search) the Course by the Course number. Note that
number is an attribute of Course. The case is very important here. The first letter of
attribute has to be capitalized along with the ’B’ in By.
save in Course: This feature is to save a record in database, i.e. to add a row in
Course table.
getTa in Courses: Since Course and Tas are related as One-to-Many relationship, this
feature is to get a list of all TAs in a given course.
chat in Comment: This feature is to enable chat in the concerned screen developed
via Websockets.
(c) integrations: In this part, we provide the 3rd party integration we might need. It
is again, has to be mentioned corresponding to individual model. If no integration is
needed for any model, then this part can be ignored. Currently ADL supports just
Google Maps integration. But maps integration provides a solid evidence that most
”maps” integration requirement is mentioned in the input spec in Figure 3.4 under
integration and corresponding model.
3.5 Implementation
Auto-code generation with ADL is a Gradle project written in Java due to its rich libraries in
String Manipulation, File Handling, high compatibility with JSON, environment independence and
OOP nature. Gradle helps in managing dependencies for the above-mentioned core functionalities
and packaging. The program requires 2 arguments: first is the input JSON specification, and second
is the output directory. We already saw how to write the specification to generate required features
in the application, in the previous section. With the correct program arguments, the application
first parses the JSON using ObjectMapper (10).
3.5.1 Server-Side Automation
After the input spec is parsed, server-side code is generated. Initially all the template files
are copied to the output directory. We categorize all the files into 2 categories: First is the
standard one, which does’t require any additional lines/methods to be added. These files are
MainServerApplication, pom.xml and application properties. We then use Mustache to load the
standard files as template and replace the customizable field using the values obtained from the
input spec. The second category is the files that requires heavy customization, which are Controller,
Model and Repository files. Since, these files are to be created for each model present in the spec,
we first create a copy with the appropriate naming convention for each model, and then we work
on all 3 files corresponding to each model, one by one.
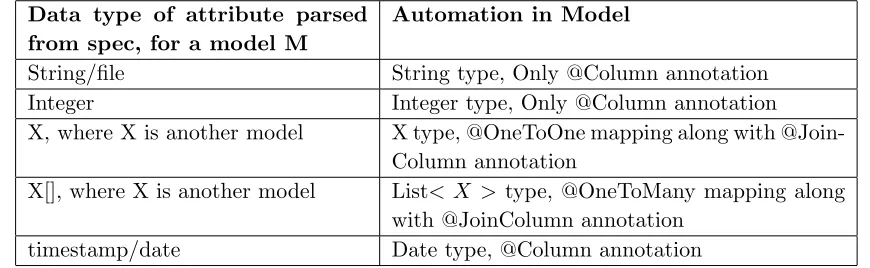
3.5.1.1 Model
Name of the model class is the same model name, provided in spec. We annotate each model
with @Entity and @Table. Then each attribute for a model is considered and we add a declaration
we save it as String type, as we save the file in a server location, and then just store the absolute
path of the file in database. For timestamp, we use Java Utils Date format. The time is stored as
current system time in local time format in the database. Table 3.1 presents various data types
supported by input spec and how they are automated in ADL.
Data type of attribute parsed from spec, for a model M
Automation in Model
String/file String type, Only @Column annotation
Integer Integer type, Only @Column annotation
X, where X is another model X type, @OneToOne mapping along with @Join-Column annotation
X[], where X is another model List< X > type, @OneToMany mapping along with @JoinColumn annotation
[image:23.612.86.521.201.335.2]timestamp/date Date type, @Column annotation
Table 3.1 This table shows possible data types of attributes in model
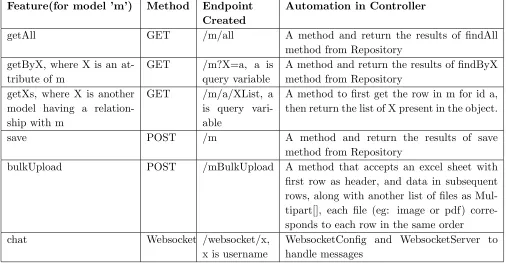
3.5.1.2 Controller
The naming convention followed is the model name and then Controller is appended. Each
Controller is read line by line first. Then each feature in ui component in spec is created as an API
endpoint in Controller. We first categorize the features as GET or POST method. Therefore, the
naming convention for features is one of the most important aspects of writing the spec. Initially,
we Autowire (5) the corresponding repository, as this will be required to use hibernate queries on
the model. Table3.2 consisting of various possible options for feature generated from ADL and a
rough idea of how the code is autogenerated for the same.
3.5.1.3 Repository
The naming convention followed is the model name and then Repository is appended. Each
repository is read line by line first. The repository is an interface and extends Spring JpaRepository
for Hibernate. JpaRepository provides most of the common functionalities for database by default,
Feature(for model ’m’) Method Endpoint Created
Automation in Controller
getAll GET /m/all A method and return the results of findAll
method from Repository getByX, where X is an
at-tribute of m
GET /m?X=a, a is query variable
A method and return the results of findByX method from Repository
getXs, where X is another model having a relation-ship with m
GET /m/a/XList, a is query vari-able
A method to first get the row in m for id a, then return the list of X present in the object.
save POST /m A method and return the results of save
method from Repository
bulkUpload POST /mBulkUpload A method that accepts an excel sheet with first row as header, and data in subsequent rows, along with another list of files as Mul-tipart[], each file (eg: image or pdf) corre-sponds to each row in the same order
chat Websocket /websocket/x,
x is username
[image:24.612.71.577.110.373.2]WebsocketConfig and WebsocketServer to handle messages
Table 3.2 This table shows possible features in input spec and how they are automated in Controller
according to Hibernates naming convention, which we do by iterating all features for a model, from
the ui component of spec, and then look for any advanced query required apart from the 3 default
queries, if so, we add the method in Repository.
3.5.1.4 Websocket
The websocket component is developed when there is a ”chat” feature required in at least
one screen. The websocket backend has a standard WebsocketConfig and WebsocketServer classes
along with Main Application, as currently it is developed as a separate application to keep things
untangled. The WebsocketServer can further be modified manually to deal with more advanced
things. The standard format of this file comprises onOpen, onMessage and onClose methods,
which are right now automated to enable a multi-user live chat feature. Due to minimal level of
3.5.2 Client-Side Automation
Client-side is a web project in HTML and Javascript, and designing is done via a css file. Firstly,
we create an index.html page which is the starting point of the web application. For simplicity, we
have a specific format and design of the web pages. We can provide further customization to it as
our future work. In index page, we add hyper links to various model pages through buttons. The
title and description is shown in this home page. Since the design is fixed, css file is also fixed. For
both index and css file, we copy it from template file and put specific names and models through
mustache.
3.5.2.1 Model HTML Files
We iterate all models present in features under ui component in spec file to create HTML pages
for each model. They are firstly created from the default standard template. We do not create
pages for those models, which are not present in features component, as we do not want to expose
it and let users do any operation on it. Once the template file is copied to appropriate location in
output directory, we add hyper-links to all other html pages as buttons, including index to interlink
the whole project. Apart from hyper-link buttons, we add the div form element for each type of
”post” feature present in the input spec, i.e. save and bulkUpload as mentioned in Table-3.2. In
case of save, we add the input HTML element for each attribute present in the model, and in
case of bulkUpload, we add input element for excel file and collection of individual elements, in
accordance with the server-side API. These div elements are initially hidden and we expose them
through buttons in the model page, and each feature corresponds to a button. For GET features,
as per Table-3.2, upon clicking the corresponding data is presented in tabular view. For POST
features, it’s the corresponding form, which is loaded.
Further, we also search the integrations component in the spec to look for whether the same
model requires any 3rd party integrations, if so, we just add the div element accordingly. The
3.5.2.2 Javascript File
A single JS file is generated with methods corresponding to each operation in all the model
pages. Similar to other pages, we load it through a template file. The major task of javascript file
is to make Http calls to server side, thus we already have the basic functionality of a GET and
a POST http call through XmlHttpRequest implemented and added. Now, as we consider each
model present in feature at a time, we go through all operations needed with the server-side. Each
button corresponding to a GET element in html is mapped to make a Http GET request to the
corresponding API and once the result are fetched, the data is converted to tabular form by adding
each JSON object from the JSON array to the table as a row.
Further, for each button corresponding to a POST element in html is first mapped to launch
the corresponding div form, and then once the data is filled out by user, input JSON request body
is compiled with the same data, including the files, if provided. Then the submit button in the form
is mapped to make a Http POST request to the corresponding API. The success and failure of the
request is then notified. With the various mappings happening between model file and javascript
file and then to the server-side APIs, it is quite evident that the naming convention has to be
uniform, unique and properly defined for each type of operations, which we try to do by using the
same names for operation as provided by user in feature to keep uniformity between client-side and
server-side.
3.5.2.3 Websocket
Similar to backend, the websocket javascript file is only created if there is a requirement of ”chat”
feature in at least one model. This javascript file simply makes a Websocket call to the respective
server-side method, which implements onOpen, onClose and onMessage methods. Further, the chat
box in the concerned model is added, which is implemented via a simple html table. With the help
CHAPTER 4. EXPERIMENTAL EVALUATION
4.1 Experiment Settings
All the experiments were performed in a standard IDE for Java with Java 1.8 virtual
environ-ment. The program seeks one input file and one output directory location with absolute path. The
generated code has been tested by running the server-side code in a Windows 10 PC, with MySql
server set-up in the same machine, and the client-side UI is tested in Google Chrome and Mozilla
Firefox browsers.
4.2 Experiment 1
Scenario: An application for managing the students and teams for TAs and Instructors.
So, in detail, there would be students, teams, tas and instructors. TAs and Instructor should be
able to manage Teams and students along with feature to upload image and files for each team.
Input JSON Spec:
Figure 4.1 provides a comprehensive input spec file which captures almost all features; ADL can
automate at this moment.
Parsing the input:
As described in Section 3.4, the spec contains 5 models which are Student, Team, Ta, Instructor
and Comment, with respective attributes. Team has a One to Many relationship with Student, and
one to one relationship with Ta. Also, every team can have a corresponding file(image/pdf/doc etc).
Further, w.r.t features, in addition to simple getAll and save feature, we need bulkUpload and
getStudents for a given team in Team; get TA information by name in Ta; and chat feature in
Figure 4.2 Generated Output Directory Structure
Server-side:
Figure 4.2 shows the autogenerated folder structure. It is generated in the mentioned output
directory, with separate server, client and websocket directory.
Now, Figure 4.4shows the project structure generated for the server-side code. We verify that
pom.xml, application.properties and ServerApplication is generated in appropriate directory, and
[image:29.612.82.527.410.598.2]similarly Controllers, Models, and Repositories are generated for each model mentioned in spec.
Figure 4.3 Generated application properties file
Further, spring related config is verified in application.properties file, which is attached in Figure
url is set for default local, which can be modified manually later in case of production or any other
instance of mysql db.
Figure 4.5shows the automatically generated tables in the database, upon running the
[image:30.612.75.336.205.656.2]Server-Application. The columns and types are verified and they align with the required data types.
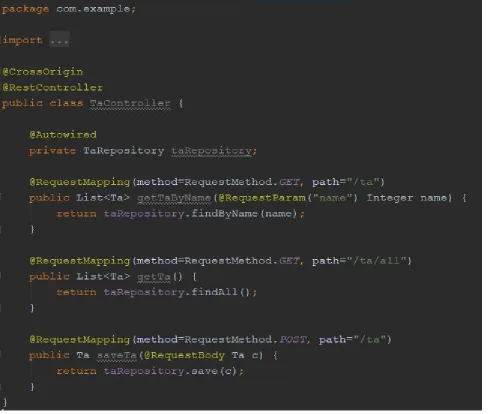
[image:30.612.352.565.229.652.2]Figure 4.6 A sample auto generated Controller Class
Now, if we consider a generated Controller class say TaController in Figure 4.6, generated
based on the features corresponding to Ta in input spec in Figure 4.1. The features mentioned in
spec are save, getAll and getByName; and thus the controller has the corresponding methods with
Figure 4.7 Generated Websocket project structure Figure 4.8 Generated Client project structure
Figure 4.7shows the generated Websocket project, as the input spec requires a chat feature in
Comment page. The project is a simple Websocket project in Spring framework.
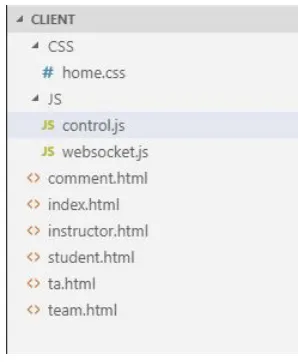
Client-side:
Figure 4.8 shows the layout of client-side project, with html, css and javascript files. home.css
file contains all the style elements of the project. For changes in UI/UX pattern, this css file can
be further modified. The basic functionalities for main application is contained in generated
con-trol.js, which calls the server-side APIs for integration. The websocket related integration is done
in websocket.js. Lastly, features corresponding to each model is implemented in remaining html
files, with index.html being the start page of the application.
Now, if we consider the feature of saving a Team, Figure 4.9 shows a basic form element to
capture the attributes of Team model, as mentioned in the corresponding model. Since Image
attribute is mentioned as file type, the auto-generated form seeks a file to be uploaded. Currently,
[image:32.612.350.499.123.304.2]Figure 4.9 A sample generated front end for saving a record
[image:33.612.72.538.395.645.2]Similarly, getAll feature is verified by Figure 4.10. This table is populated by calling the GET
API generated in server-side application for Get all comments from Comment table in database.
The tables are formatted as Datatables (11), which provides a nice template for tables with in-built
sorting, searching and pagination feature.
The next figure, Figure 4.11verifies the auto-generation of getStudents feature listed in Student
model, which intends to fetch list of students for a given team number, The below form in the same
page asks for a team number as input, and only shows the students who are in corresponding team
as per the Team-Student one to many mapping.
Another important feature is the bulk upload feature, which is again mentioned as a requirement
for Team model in the input spec. This form for bulk upload shown in Figure 4.14 which seeks
an excel file, each row represents a data entry in Team table in database, first row is reserved for
[image:34.612.71.547.378.626.2]header, the order of which needs to match with the attribute order.
Next, Figure 4.12verifies the auto-integration of Google Maps API, mentioned under
[image:35.612.96.511.153.377.2]integra-tion component in the input spec.
Figure 4.12 Auto-generated Google Maps integration in UI
A sample excel file is shown in Figure 4.13. The first three attributes are described as mentioned.
Since, the Team model also has a file type attribute, those files are to be uploaded separately. Figure
4.14shows a demonstration of uploading the additional files, the count of which has to match with
the row count in excel (in addition of header row), and the order of which will be mapped to the
order of entries in excel file. For example selected pic1 will be mapped to Team number 1, both of
which are first entries in excel sheet and multi-file upload respectively.
[image:35.612.194.417.576.656.2]Upon successfully submitting the bulkUpload form, we query the database to verify the save,
shown in Figure 4.15, and we see corresponding pictures are saved to a predefined location, and
the location of each is stored in database in particular order. Also, each data entry maps to record
[image:36.612.82.524.197.461.2]in the excel file.
Figure 4.14 File upload during Bulk Upload
[image:36.612.78.532.531.639.2]Last, but not least, we verify the working of chat feature via websocket, the chat button appears
on Comment page, as we mentioned in the input spec. The chat is integrated via websocket.js file,
[image:37.612.74.538.173.423.2]and multi-users can chat together in the chat box.
Figure 4.16 A sample auto-generated working chat feature
4.3 Experiment 2
Scenario: Develop a top-down arena-style online multiplayer space shooter game incorporating
multiple gameplay modes.
Outcome: This example is important in terms of understanding the limitations of App
De-scription Language. Since Java or Python standard libraries are numerous, so it is very difficult
to cover each one of them. Hence, for this type of project; especially games, tracking, application
involving data science and/or based on 3rd party libraries is beyond the scope of the input spec
provided in the App description language. However, on an another note, some smaller features
along with managing high score of individual and/or all players. But ultimately for developing
Graphics, which involves continuous manual supervision, it is very difficult to automate games via
ADL.
4.4 Measure of Success
We define following measures of success to evaluate the performance of ADL.
4.4.1 Functionality
As we see, ADL provides quite a few basic functionalities and features, along with some advanced
and useful features like bulkUpload, chat and maps integration. Definitely there is a huge scope
of further addition to the features, which we talk about in Chapter 6. Moreover, the generated
code provides an advanced starting point for developers, who might want to add more personalized
features.
4.4.2 Efficiency
Understanding and writing the input spec is easy and definitely will get more faster with
subsequent uses. The generation of whole desired application upon passing a correct input json
takes few seconds, which is way more faster than designing and coding the whole application
manually, which might take more than a month.
4.4.3 Maintainability
Both the App Description Language application and generated code is very easy to maintain
CHAPTER 5. RELATED WORK
Automatic Code generation is a relatively new topic, but there has been considerable amount of
work and effort that has been put into it. Swagger Codegen (8) is the most popular code generators
available. This project is inspired by Swagger codegen’s implementation idea. Swagger Codegen
uses Mustache to create files from the existing template. It is a very general purpose automation
tool, that supports more than 50 languages and frameworks, and the user has the option to choose
from them to generate the server-side. Swagger doesn’t provide the client-side automation, but
Stirewalt and Rugaber et. al (2) discusses a mechanism to automate the client-side using HTML
and Javascript through a tags based specification.
Moreover, Swagger doesn’t provide any functionality in the generated code, it lays out the
foun-dation and basic boiler plate code, albeit it can generate the layout for a really complex scenario.
Once it generates the code, the developer has to further work on understanding the codebase and
then further work on it to add the functionalities like use Hibernate to fetch records from the
database.
Another area, which I believe this project focuses on is the fact that ADL can be used by a
person with little to no programming experience, unless the requirement is highly complex. Whereas
Swagger demands the user to have pre-knowledge about all possible options of development. It also
requires to manually set endpoint paths, http method type, authorization tokens, and lot more.
Although, these provide a great range of customizations, but sometimes it might get overwhelming
CHAPTER 6. CONCLUSION AND FUTURE WORK
In this project, we tried to automate the process of software application development. Upon
providing an input as a JSON file, the application is able to generate the server-side code in Java
SpringBoot and client-side code using HTML and Javascript. The major advantage of this project
is the simplicity of input spec and good amount of features that can be automated. Software
de-velopment is vast, and there can be a plethora of different things one could think or required to do.
Hence, the scope of this project to automate each and every possible option and feature is infinite.
For the scope of the primary effort to automate the application development, and implement
important and most common things, the immediate next thing to work on would be to probably
include update(PUT) and DELETE feature along with GET and POST. Since the proof of concept
is already established for GET and POST Http calls, this is something definitely possible and
doable. Another feature to work on is to facilitate Many-to-Many relationships between entities,
as One-to-One and one-to-Many is already done. Further, Plugin architecture can be automated
so that it can be directly integrated with various IDEs and other 3rd party tools. Apart from
the above mentioned features, that could be added, the application can be extended to automate
the generation of Android app as client-side along with Web. Same procedure can be adopted to
develop the same, i.e. with basic templates and then adding the required customizations and lines
REFERENCES
[1] R.E. Kurt Stirewalt, Spencer Rugaber (2000). The Model-Composition Problem in
User-Interface Generation.Automated Software Engineering,7(2), 101–124.
[2] Christoforos Zolotas, Themistoklis Diamantopoulos, Kyriakos C. Chatzidimitriou, Andreas L.
Symeonidis (2017). From requirements to source code: a Model-Driven Engineering approach
for RESTful web services.Automated Software Engineering.24(4), 791-838
[3] Anthony Savidis, Constantine Stephanidis(2006). From requirements to source code: a
Model-Driven Engineering approach for RESTful web services. Automated Software Engineering,
13(2), 303–339.
[4] ”Mustache GitHub Documentation” https://github.com/samskivert/jmustache,
[5] ”Spring Boot Documentation”https://spring.io/projects/spring-boot,
[6] ”Gradle Documentation” https://gradle.org/,
[7] ”Maven Documentation” https://www.maven.co/,
[8] ”Swagger Documentation”https://swagger.io/tools/swagger-codegen/,
[9] ”Data Definition Layer Documentation”
https://docs.spring.io/spring-boot/docs/current/reference/html/howto-database-initialization.html
[10] ”JSON ObjectMapper Documentation”
https://fasterxml.github.io/jackson-databind/javadoc/2.7/com/fasterxml/jackson/databind/ObjectMapper.html
[11] ”Datatables” https://datatables.net/
[12] ”Websockets” https://git.linux.iastate.edu/vamsi/WebSockets/tree/master,