Projekt współfinansowany ze środków Unii Europejskiej w ramach
ROZWÓJ POTENCJAŁU I OFERTY DYDAKTYCZNEJ POLITECHNIKI WROCŁAWSKIEJ
Wrocław University of Technology
Internet Engineering
Marek Piasecki
APPLICATION PROGRAMMING -
MOBILE COMPUTING
Mobile Computing
Wrocław 2011Wrocław University of Technology
Internet Engineering
Marek Piasecki
APPLICATION PROGRAMMING -
MOBILE COMPUTING
Mobile Computing
Wrocław 2011Copyright © by Wrocław University of Technology Wrocław 2011
Reviewer: Czesław Smutnicki
ISBN 978-83-62098-25-5
Table of contents
1.The Course Book Outline ... 4
2. Programming Java Micro Edition (J2ME) ... 6
2.1 Understanding J2ME, Configurations and Profiles ... 6
2.2 Tools – J2ME Programming Environments ... 7
2.3 Programming Exercises ... 10
J2ME.ex1 Standard MIDlet Life Cycle ... 10
J2ME.ex2 MIDlet User Interface and Input Event Handling ... 13
J2ME.ex3 Drawing Low Level Graphics on the Device Screen ... 19
J2ME.ex4 Wireless Messaging by SMS Texting ... 26
J2ME.ex5 MIDP Persistent Data Storage Using RMS ... 29
3. Programming Microsoft Windows Mobile ... 36
3.1. .NET Compact Framework Platform ... 36
3.2 Visual Studio Integrated Development Environment ... 37
3.3 Laboratory Exercises ... 37
WM.ex1 Building the first application with a Windows Forms based GUI ... 38
WM.ex2 Exploring Important .NET CF Windows Forms Controls ... 41
WM.ex3 Sending and Intercepting SMS Messages ... 46
WM.ex4 Data Persisting with a Mobile Database Server ... 49
WM.ex5 Using the GPS to Track Geographic Position of Device ... 54
4. Programming Symbian S60 ... 59
4.1 Symbian OS versions and tools for C++ development ... 59
4.2 Programming Exercises ... 61
SYM.ex1 Symbian OS C++, Basic Classes, Naming Conventions ... 63
SYM.ex2 Symbian OS exception handling mechanisms ... 66
SYM.ex3 User Interface and Event Handling with Qt library ... 69
SYM.ex4 Accessing Mobile Phone Features with Qt Mobility API ... 74
5. Laboratory Class Schedule ... 79
1.
The Course Book Outline
The purpose of this course handbook, is to gather together teaching and training materials from different sources (programming documentation, Web pages of manufacturers and IDE providers, technical journals, textbooks, etc.), to support students activities during “Mobile Computing” laboratory. This laboratory is planned as a supplementary class to INEA00112 academic course “Application programming – Mobile Computing” at the Wrocław University of Technology.
The course aims to give students most of the essential knowledge, skills and hands-on experience indispensable in programming advanced mobile phones, palmtops and smartphones. Apart from 30h lecture, the course comprises 15h hands-on programming laboratory and 15h of individual project activities. As a basic pre-requisite, it is expected that the course participants have a basic knowledge in the area of object-oriented programming using Java and C++ languages.
The laboratory is composed of six programming exercises which are arranged in three series presenting three totally different mobile platforms: Sun's Java Microedition (MIDlets), Microsoft Windows Mobile and Nokia's Symbian S60 with Qt/QtMobility framework. The principle idea of such selection, is to create effective learning process with slowly stepping-up curve of acquired knowledge difficulty (from more familiar to more demanding). The second idea is to present mobile technologies which are the most popular in the area of European Union. This is a reason why some less popular platforms like BlackBerry or Palm were omitted.
The course starts with the Java ME framework, which should be the easiest to learn, because students are expected to be familiar with Java language and Java technologies from the 1st semester course "Application programming - Java and XML technologies". Additionally, almost 100% of mobile phones support Java ME MIDlets, so all the students will have the occasion to test the created software on their own mobile devices, which can make the laboratory more attractive.
The second series of exercises is related to mobile incarnation of Microsoft .NET framework – Windows Mobile. The C# programming language will be used in Windows Mobile section, but all examples are constructed in such a way that they should be easy readable and understandable for people familiar with Java. Besides, Microsoft Windows products are very popular in Europe and many students are familiar with .NET technologies and creating Windows.Forms based UI for desktop applications. Normally, Microsoft development environment for Windows Mobile is an expensive commercial product. It can be even more expensive if we try to create real business applications utilizing enterprise solutions like Web Services, Microsoft SQL Server or Microsoft Internet Information Server. Fortunately, the Faculty of Electronics is a member of MSDN AA program, and the course participants can use these tools without charge (which could be perceived as an additional benefit).
The last series of exercises is devoted to Nokia's Symbian, which has been the most popular mobile platform in the world, and especially in Europe. Cumulative number of mobile devices shipped with the Symbian OS, is estimated at about 390 million, which generates an impressive market of software-consumers. Unfortunately, native Symbian C++ dialect with its a little antiquated software techniques developed two decades ago (for the much more restricted mobile hardware) caused tiresome complexity of the created software code. In two beginning exercises, we will shortly present some of these techniques, to give the student "a taste" of traditional Symbian programming in Carbide.C++ development environment. Final exercises will present very attractive current Nokia's approach to Symbian and Maemo/MeeGo platform programming, based on Qt and QtMobility frameworks.
All the three chosen platforms have a settled reputation, confirmed by more than 10 years of evolutionary development, multitude of shipped devices, with complete and widely accessible documentation.
We hope, that such selection and composition of teaching materials, based around a series of practical exercises, will create a good starting point for further individual studies, which are indispensable in the emerging world of mobile devices.
In the last three years, smartphones have transformed from a niche product category to a fast growing segment, playing a key role in competitive struggle between mobile and Internet giants. The unprecedented success of iPhone, followed shortly after by Google Android, changed market requirements almost overnight. Today smartphones are all about smooth delivery of digital content, applications and Web services.
Most of recently emerged mobile platforms, especially iPhone and Android, are subject to instant changes. It is considerably probable that in two years some of their today's documentation will become out-of-date. To avoid this problem, we will suggest them as the subject of an individual student's project, which will be the third supplementary class form of this Mobile Computing course.
About the Author
Marek Piasecki is an academic lecturer at the Institute of Computer Engineering, Control and Robotics, Wrocław University of Technology. A graduate in: Automation (MS), Computer Science (MS) and Mobile Robotics (PhD). The area of his scientific interests includes: software engineering for mobile devices, autonomous and adaptive systems, user modeling and user adapted interaction, personalization, automatic recommendation, computer ontologies, semantic Web, software agent systems and languages, infobots, soft computing and artificial intelligence.
2.
Programming Java Micro Edition (J2ME)
Many mobile applications use the Java 2.0 Micro Edition (Java ME, J2ME) platform, which was initially developed by Sun for small devices like mobile phones, but is now used on a wide variety of devices. Examples of such devices are: TV set-top boxes, Internet TVs, car computers, phones, pagers, Personal Data Assistants. Java ME uses scaled down subsets of Java Standard Edition (J2SE) components, virtual machines and APIs. It also defines several APIs that are specifically targeted at consumer mobile and embedded devices. The most popular variant of J2ME platform is a Mobile Information Device Profile (MIDP). An application written using the MIDP APIs is called MIDlet, and is directly portable to any MIDP device according to general Java motto “Write Once, Run Anywhere”.
Important aspect of J2ME is its support from huge Java community and its security. MIDlet suites can be cryptographically signed and verified on the device, which gives users some security about executing downloaded code. A permissions architecture controls an application access to critical API, allowing the user to deny untrusted code access to certain device resources. For example, enables to block network connections if it is not explicitly necessary. J2ME is deployed globally on millions of phones and PDAs, and is supported by most of leading integrated development environments.
2.1 Understanding J2ME, Configurations and Profiles
J2ME is divided into configurations, profiles, and optional APIs, which provide specific information about APIs and different categories of devices. A configuration defines a Java Virtual Machine for a specific family of devices, based on memory constraints and processor performance. It specifies a subset of the full Java 2 Platform Standard Edition (J2SE) APIs, that will be used on the mobile device. Currently there are two: the Connected Device Configuration (CDC) and the Connected, Limited Device Configuration (CLDC). Device manufacturers are responsible for porting a specific configuration to their devices. In the course of our laboratory we will concentrate on devices with CLDC configuration.
CLDC configuration encompasses mobile phones, pagers, PDAs, and other small devices having: limited display and input, limited memory (160KB to 512KB), limited CPU power, limited network throughput (data rates starting from 9.6Kbps.) and limited battery life. CLDC 1.1 includes some enhancements to CLDC 1.0, including support for floating-point data types.
Profiles are more specific than configurations. They provide additional APIs, such as user interface, necessary to develop applications running on the device. A profile is a high level abstraction of all resources for a class of devices which can be used by an application. It includes APIs for application life cycle, user interface, and persistent storage. Several different profiles are being developed under the Java Community Process. For example, the PDA Profile (PDAP) is designed for advanced palmtop devices with an onboard memory 512KB÷16MB and an application model using a subset of the J2SE Abstract Windowing Toolkit (AWT) for graphic user
interface. But at the moment, only one of them, the Mobile Information Device Profile (MIDP) is the most frequently met on the market.
There are two versions of MID profile: basic MIDP 1.0 (JSR 37), and extended MIDP 2.0 (JSR 118) which features a number of enhancements (e.g. support for multimedia, game API, HTTPS connection). During this course, we will concentrate on MIDP 2.0, which has the following requirements:
• A minimum of 256KB of ROM for the MIDP implementation • A minimum of 128KB of RAM for the Java runtime heap
• A minimum of 8KB of nonvolatile writable memory for persistent data • A screen of at least 96×54 pixels
• User input by keypad, keyboard, or touch screen • Two-way network connection
More information about MIDP could be found at http://java.sun.com/products/midp/. The APIs available to a MIDP application come from packages in both CLDC and MIDP (Figure 2-1). CLDC 1.1 MIDP 2.0 java.lang javax.microedition.lcdui +java.lang.ref +javax.microedition.lcdui.game java.io +javax.microedition.media java.util +javax.microedition.lcdui.control javax.microedition.io javax.microedition.midlet java.lang +javax.microedition.pki java.lang javax.microedition.rms
Figure 2-1 Java packages composing basic J2ME/MIDP 2.0 application programming interface
Optional packages provide functionality that may not be included in a specific configuration or profile. One example of an optional package is the Bluetooth API [BTAPI] described in JSR-82, providing a standardized API for Bluetooth networking, which could be used on devices equipped with Bluetooth transmitter. Another example is JSR-75 [PIM & File Data API] which enables personal information management (phone contacts, calendar events, alarms, etc) and direct access to the device file system and additional memory cards.
2.2 Tools – J2ME Programming Environments
Although the MIDlets are designed to run on a small pocket-size devices, they are programmed on regular desktop computers. There is a very wide choice of different IDEs supporting MIDlet programming under a variety of OSes. Because J2ME creation was led by Sun, the first programming tool could be Sun’s J2ME Wireless Toolkit, available from http://java.sun.com/products/j2mewtoolkit/. Unfortunately, this WTK toolkit does not contain a specialized programming editor or
other important developing tools enabling advanced debugging of MIDlet code. Among other possible IDEs, the most popular are (in alphabetical order):
• Borland JBuilder X Mobile Edition, • Eclipse J2ME Plugin,
• IBM WebSphere Studio Device Developer, • NetBeans Mobility,
• Nokia Developer’s Suite for J2ME,
• Research In Motion BlackBerry Java Development Environment, • Sun Java Studio Mobility.
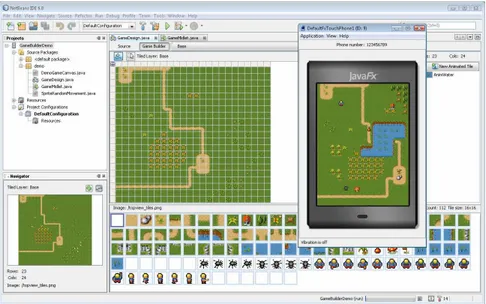
In the course of this laboratory, NetBeans will be suggested as a professional and very comfortable J2ME programming environment (See figure 2-2). As an alternative to NetBeans, the Eclipse could be chosen. In general, NetBeans is an IDE for developing Java server and client applications. By additional installation of NetBeans Mobility Pack plug-in, its functionality is extended to Java Microedition development (NetBeans version 6.0 and above comes integrated with mobility pack). NetBeans with Mobility Pack supports two J2ME configurations and two additional embedded platforms:
• Connected Limited Device Configuration (CLDC). Which includes support for the area of our interest: Mobile Information Device Profile (MIDP).
• Connected Device Configuration (CDC). Supporting advanced smart phones, set-top boxes, embedded servers and devices.
• JavaFX Mobile. Supporting mobile, desktop, web and television screens. • Java Card platform which enables application development for smart cards and
other microdevices.
Figure 2-2 Game Builder - example screen of NetBeans IDE programmer interface
The first step in developing MIDlet applications is to create a new Project, which contains information about application components: program files, resources and IDE
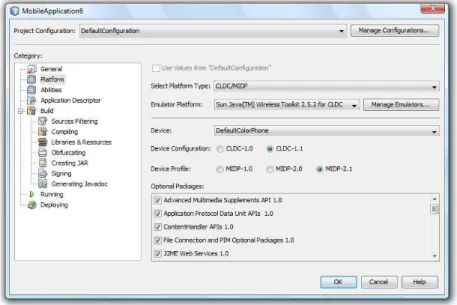
configuration settings. To create a project, select File→New Project from the main menu of NetBeans IDE. Then select Java ME in the project Categories window and choose Mobile Application (for totally new code) or alternatively Mobile Project with Existing MIDP Sources (for importing from existing code). In the case of a new project, following dialog windows of project wizard enables to set the project name, location, select emulator platform, and give the names of new MIDlet class and package name. Project properties can be browsed and modified by selecting File→Project Properties (Figure 2-3). Using this option, we can review and edit: included optional packages, application descriptor attributes for JAD and JAR manifest, additional libraries, JAR names, MIDlet signing settings, and many other.
Figure 2-3 NetBeans IDE MIDP project properties dialog.
After finishing the MIDlet code editing, the project should be compiled by selecting Run→Build Project option. To run the MIDlet on the mobile device emulator, select Run→Run Main Project option from main IDE menu (or Debugg Main Project to initialize debugging). You will see a mobile phone emulator window with the screen showing a list of MIDlets in the downloaded MIDlet suite (in most cases there will be only one). Finally, click on the LAUNCH soft button to start up the MIDlet, and see the first MIDlet screen. To finalize testing, select the MIDlet's EXIT command to leave the MIDlet, and then close the emulator window or hit the ESC key, to end the emulator session
One or more MIDlets can be packaged in a single jar file and distributed as a MIDlet suite. All of the MIDlets in a suite are installed onto a device as a single entity and can share theirs resources. A MIDlet suite consists of Java Application Descriptor file (.jad) and Java Archive file (.jar). The JAD file includes the archive file name, the names and classes for each MIDlet in the suite, and more. The JAR file contains the MIDlet classes and resource files (data, icons, sounds, etc.). In NetBeans IDE, the
JAD and JAR files for the MIDlet suite will be generated and placed in the "dist" subdirectory of the project.
The final step of our application development is a MIDlet suite deployment, i.e. the process of transferring the application developed in the IDE to a mobile device. NetBeans IDE supports several methods of deployment, as an example:
• Device Anywhere Deployment - website for professional mobile developers that allows you to remotely deploy MIDlet suites to the most popular mobile devices on the market today. (Registration required).
• File Transfer Protocol (FTP) - uses the file transfer protocol to move the MIDlet suite files to a remote server over the Internet.
• Nokia Mobile Devices - transfers the MIDlet suite files to a Nokia Mobile device from the IDE using Nokia's PC Suite.
• Sony Ericsson Phone - transfers the MIDlet suite files to a Sony Ericsson phone. This deployment method also enables you to run and debug the on-device application from the IDE.
• Windows Mobile Devices - transfers the MIDlet suite files to a Windows Mobile device using ActiveSync and Sun's CLDC/MIDP Virtual Machine. We may also use any file transfer tool (via USB cable or Bluetooth connection) to copy the JAR/JAD files to the physical mobile device memory.
2.3 Programming Exercises
In the following sections, we are going to illustrate the MIDlet development process with five practical programming exercises. These exercises are planned to be performed in the course of the three beginning laboratory classes. Every exercise is supported with brief theoretical introduction and contains sample code listings. In first exercises, the laboratory participants will get familiar with MIDlet life cycle, creation of user friendly interface from high-level components and generation of two-dimensional graphic. Fourth exercise concerns examples of Wireless Messaging Services based on SMS interception. The last exercise is devoted to MIDlet's capabilities of persistent data storage.
Exercise J2ME.ex1 Standard MIDlet Life Cycle
Create a simple application (with a very limited or without user interface), demonstrating all possible states and transpositions of MIDlet's life cycle: a) Pure background MIDlet (console) application, which does not possess any
graphical user interface components, which notifies life cycle changes by System.out.print() messages in debug/output window of IDE. b) "HelloWorld" application displaying a single Form with the selected title,
which quits after counting down assigned time interval (e.g. 5 seconds). MIDP applications are called MIDlets, as continuation of the Java naming pattern from applets and servlets. To be classified as a MIDlet, a mobile Java appli-cation must extend the abstract class javax.microedition.midlet.MIDlet,
which controls the MIDlet lifecycle. Moreover it has to be packaged and distributed in a Java Archive ( JAR) file which includes a MANIFEST.MF file.
The core of the MIDlet lifecycle is the Application Management Software (AMS),which is a part of the device's operating environment and manages MIDlets states. As the result of MIDlet launching, the AMS instantiates it by calling the method, which starts its lifecycle. Then AMS maintains control over the MIDlet lifecycle throughout its execution. As a response to user initiated actions, or other events (like a phone call) the MIDlet can be send to the background (paused state). The system can close a MIDlet at any time. Just before closing, the AMS calls the MIDlet's destroyApp() method, then waits about 5 seconds to give it a chance to save resources, and finally terminates the MIDlet forcefully.
loaded/paused destroyed active startApp() pauseApp() destroyApp(boolean) destroyApp(boolean) startApp() paused
Figure 2-4 The life cycle of the MIDlet [5]
To organize a MIDlet life cycle, it was decided that MIDlet can exist in four different states: loaded, active, paused and destroyed. Figure 2-4 gives an overview of the MIDlet lifecycle and Listing 2-1 illustrates the skeleton of typical MIDlet class code implementation.
Listing 2-1 Skeleton of typical MIDlet class implementation import javax.microedition.midlet.*;
public class ExampleMIDlet extends MIDlet { public ExampleMIDlet() {
System.out.println(">>> Entering Constructor"); // . . .
}
public void startApp() {
System.out.println(">>> Entering StartApp"); // . . .
}
public void pauseApp() {
System.out.println(">>> Entering PauseApp"); // . . .
}
public void destroyApp(boolean unconditional) { System.out.println(">>> Entering destroyApp"); // . . .
} }
When a MIDlet is loaded onto the device, its constructor is called, and the MIDlet enters the loaded state. When a user launches the MIDlet, the program manager (AMS) starts the application by calling the startApp() method. After startApp(), the MIDlet enters the active state, and hold it until the program manager calls pauseApp() or destroyApp(). All state change callback methods should perform as fast as possible, because the state is not changed before the method returns. In the pauseApp() method, the MIDlet should release resources that are not needed while paused, to avoid resource conflicts with other applications and to reduce battery power consumption. Calling destroyApp() method, indicates that the MIDlet process should terminate. The MIDlet can request that it does not enter the destroyed state by throwing a MIDletStateChangeException. This only is a valid response if the unconditional flag is set to false.
State changes could be also initialized by the MIDlet itself. Being in active state, MIDlet can call notifyPaused() method, which notify the application manager that it decides to go to the paused state. Being in paused state, the MIDlet can request to resume its activity by calling resumeRequest() (which would result with startApp() callback, if AMS decides to activate this application). In order to force termination, a MIDlet can call notifyDestroyed() method, which notifies the application management software that it has entered into the destroyed state. Be careful, in this case, the application management software will not call the destroyApp() callback method, and the MIDlet must have performed all the cleaning operations by itself. Termination by calling System.exit(), known from standard edition, is not supported in MIDP. The MIDlet, can also send itself to the background by calling Display.setCurrent(null) method (described in the second exercise). In fact, this command will not change the current displayable, but will be interpreted by AMS as a request from the application to be placed into the background. In similar manner, to activate from the background, the MIDlet can call Display.setCurrent(Displayable), where Displayable is a reference to window object, which should be shown on the device screen.
Listing 2-2 Example implementation of ”Hello World” flash-up MIDlet import javax.microedition.lcdui.*;
import javax.microedition.midlet.*; public class HelloWorld extends MIDlet { public void startApp() {
Display.getDisplay(this).setCurrent(new Form("Hello World"));
// 1 second delay
try{ Thread.sleep(1000); }
catch(InterruptedException e){}
notifyDestroyed();
}
public void pauseApp() {}
public void destroyApp(boolean unconditional) {} }
Listing 2-2 presents more interesting example code of flash-up "Hello World" MIDlet, which: creates user interface window entitled "Hello World", than waits some time interval (in milliseconds) , and finally calls notifyDestroyed() method , to inform AMS about its lifecycle termination. In a more correct MIDlet implementation, operations and should be transferred to a separate thread (because startApp() method should not contain any time consuming elements). This separate thread could randomly call all possible MIDlet's signaling methods: notifyPaused(), resumeRequest(), notifyDestroyed(). The resulting messages, notifying about state changes, could be observed in output console window of NetBeans IDE.
Exercise J2ME.ex2
MIDlet User Interface and Input Event Handling
Create a MIDlet application utilizing MIDP High-Level UI API to compose user friendly interface for standard key-pad based cell phone.
a) MIDlet implementation of currency exchange calculator.
b) MIDlet implementation of questionnaire form, collecting selected personal, education and employment data for national census
(for future sending, by SMS or WLAN, to census office)
c) The user interface for a foreign language mini-dictionary for a tourist, supporting self-memorizing and quick searching for popular phrases.
The user interface requirements for mobile devices are different from those for desktop computers. The display size of handheld devices is smaller, and the input does not always include pointing devices like a mouse or a stylus. We cannot follow the same user interface programming guidelines for applications running on desktop computers and hand-held devices. The MIDP creators decided not to translate the existing Java standard edition UI packages, like AWT or Swing, for J2ME. The reason is, that mentioned packages are optimized for desktop computers. They support many features not found on handheld devices. For example, extensive support for window management, such as resizing overlapping windows. However, the limited display size of handheld devices makes resizing a window impractical. Additionally, the shape of mobile application window has to reflect the shape of the device screen, which is usually diverse for different device classes. Simultaneously, the application interface has to adopt to dynamical changes of mobile device screen orientation (vertical or horizontal).
To achieve high portability between different devices, the API employs a high-level abstraction and gives you little control over its look and feel. For example, you cannot define the visual appearance (shape, color, or font) of components. It is the device manufacturer responsibility to define the exact implementation of components appearance and manage all necessary adaptation to the device's hardware and native user interface style.
The central abstraction of the MIDP UI is a displayable, i.e. an object that has the capability of being placed on the display. Display class represents the display
hardware, whereas Displayable is something that can be shown on it. The high-level API is based on Screen, i.e. an application window which fills up the whole area of the device display (except for a thin strip at the top or bottom of the display). Screen class inherits from Displayable, and all high-level API windows are implemented by classes that inherit from the Screen class. Only one screen can be visible at a time, and the user can traverse only through the items on that screen, or switch to another screen.
The Display class and all other user interface classes of MIDP are located in the package javax.microedition.lcdui. To show something on a MIDP device screen, you need to obtain the device’s display. The Display class provides a setCurrent() method that sets the current display content of the MIDlet.
When a MIDlet application is first started, there is nothing displayed on the device screen and there is no current Displayable object. It is the responsibility of the application to ensure that some Displayable is visible and can interact with the user at all times. Therefore, the application should always call setCurrent() as part of its initialization. The display hardware (of a device) can be accessed by calling the static method getDisplay(), where the MIDlet itself is given as a parameter. To show a Displayable object we must use the setCurrent() method on the Display object, as on example listing below:
Form exampleForm = new Form ("Display some Displayable"); Display display = Display.getDisplay(this);
display.setCurrent (exampleForm);
In following subsections, we shortly review some descendants of basic Screen class which with great probability will be used in laboratory programs:
Alert
The simplest subclass of a Screen is an Alert. It consists of a label, text, and an optional Image. It is possible to set a period of time the Alert will be displayed before another Screen is shown. The parameter must either be a positive time value in milliseconds, or the special value FOREVER. In this second case, the Alert will be shown until the user confirms it. The following code creates an Alert with the assigned title, content text, and displays it until it is confirmed by clicking "Done" button:
Alert exampleAlert = new Alert ("Title of Example Alert"); exampleAlert.setTimeout (Alert.FOREVER);
exampleAlert.setString ("Text displayed in the Alert window"); display.setCurrent (exampleAlert);
Other methods of an Alert class enable to set remaining properties:
• setType(AlertType) – the type of generated alert (i.e. constant from AlertType class: ALARM, ERROR, INFO, etc) which usually influences the generated alert sound,
• setImage(Image) – an icon/image displayed in Alert window,
• setIndicator(Gauge) – an activity indicator showing the passing time of the Alert displaying period.
Forms and Items
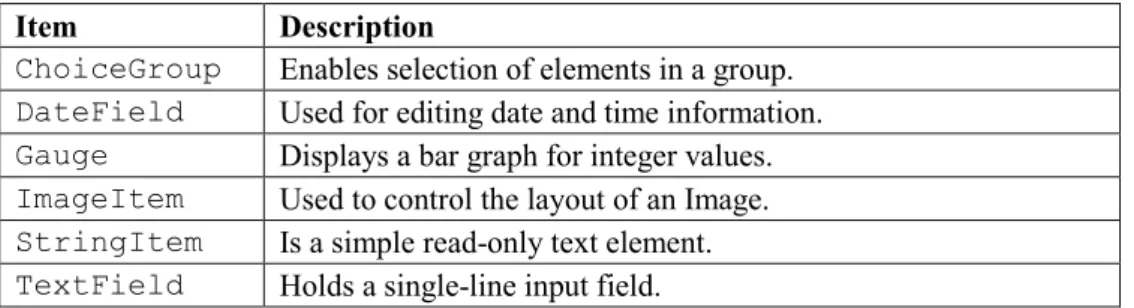
The most important subclass of Screen is the class Form. In many aspects it is analogous to Forms known from Standard Edition API. A Form can hold any number of items such as StringItem, TextField, ChoiceGroup, etc. Items can be added to the Form using the append() method. Possible subclasses of Item are presented in table 2-1:
Table 2-1 Subclasses of Item, which can populate a Form (an application window)
Item Description
ChoiceGroup Enables selection of elements in a group. DateField Used for editing date and time information. Gauge Displays a bar graph for integer values. ImageItem Used to control the layout of an Image. StringItem Is a simple read-only text element. TextField Holds a single-line input field.
All the above items have one common property Label, which can be managed by setLabel(String) and String getLabel() methods. The Label should give the short description of the Item meaning. It could be removed by setting to null, but its presence and descriptiveness is very important in the case of interactive items like TextField, values of which are usually entered in separate full screen window entitled with the item's Label. Without the labels, it is difficult to associate the sense of entered values.
In contrast to the Abstract Windows Toolkit, the Item components cannot be positioned or nested freely. Item's method setLayout(int layout) enables to influence the relative position of Item to positions of other items in sequence, where layout is a composition of layout constants combined using the bit-wise OR operator '|'. Example of layout constants are:
• LAYOUT_LEFT, LAYOUT_RIGHT, LAYOUT_CENTER – values indicating horizontal alignment
• LAYOUT_TOP, LAYOUT_BOTTOM, LAYOUT_VCENTER – values indicating vertical alignment
• LAYOUT_NEWLINE_BEFORE, LAYOUT_NEWLINE_AFTER – constants setting line breaking points in the stream of successive items.
Thorough description of all components of MIDlet user interface API is provided in JavaDoc documentation of javax.microedition.lcdui package. A very good illustration of every item functionality and appearance, is a User Interface Demo application which can be found in File→New Project→Samples→Java ME project category entitled as "UI Demo". In this place, we describe only two Item components: StringItem and TextField, which certainly will be used in student's applications created in the course of this Mobile Computing laboratory.
StringItem
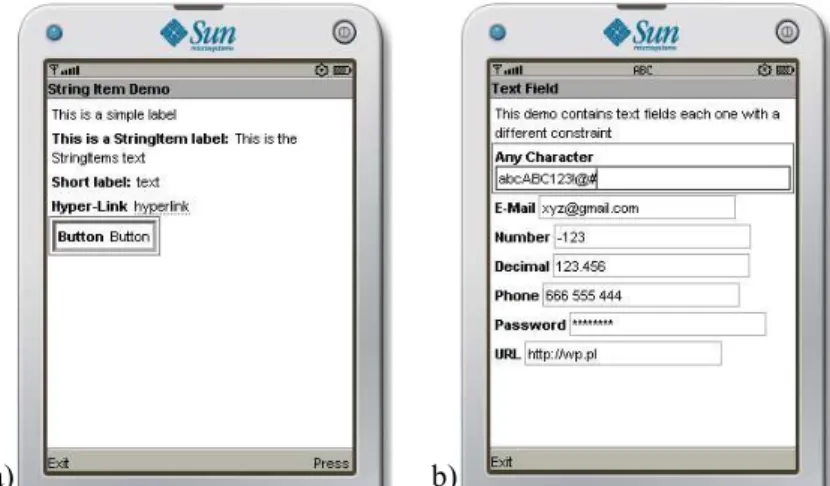
A StringItem is a simple display-only component with three characteristic properties: label, textual content and appearance mode. Both the label and the textual content of a StringItem may be modified by the application at any moment by calling setText(String) and setLabel(String) methods, but cannot be directly edited by the user. The appearance mode can be set at StringItem creation phase as a third argument of the constructor. The appearance could be one of the constants: Item.PLAIN, Item.HYPERLINK, or Item.BUTTON and influence the way how the StringItem text is displayed on the screen (as a plain text, like a hyperlink in a browser or as a push button). Listing 2-3 illustrates Java code which could be used to create StringItems collection presented on figure 2-5.a.
a) b)
Figure 2-5 Illustration of StringItem and TextField appearance in "UI Demo" a) StringItems with different appearanceMode (PLAIN, HYPERLINK, BUTTON)
b) TextFields with different constraints (ANY, EMAILADDR, NUMERIC, etc)
Listing 2-3 Snippet of StringItem Demo application code. Form mainForm = new Form("String Item Demo");
mainForm.append("This is a simple label");
mainForm.append( new StringItem( "This is a StringItem label: ", "This is the StringItems text" )); mainForm.append( new StringItem("Short label: ", "text") );
mainForm.append( new StringItem("Hyper-Link ", "hyperlink", Item.HYPERLINK) );
mainForm.append( new StringItem("Button ", "Button", Item.BUTTON) ); TextField
Textual input is handled by the class TextField. In MIDP emulator, text can be entered directly into a TextField either by clicking the number buttons in the emulator or by typing on the keyboard. However, majority of MIDP real phone
implementations show a separate screen for edition of each. The constructor of TextField takes four values: a label, initial text, a maximum text size, and constraints:
TextField(String label, String text, int maxSize, int constraints);
The different constraints allow the application to request that the user's input be restricted in a variety of ways. For example, if the application requests the NUMERIC constraint, the implementation must allow only numeric characters to be entered. A basic restrictive constraint settings are listed in table 2-2:
Table 2-2 Graphics constants used to restrict user input to TextField instances
Constant Meaning
ANY Allows any text to be added.
EMAILADDR Adds a valid e-mail address, for instance [email protected] NUMERIC Allows integer values.
PASSWORD Lets the user enter a password. Entered text is masked with '*'. PHONENUMBER Lets the user enter a phone number.
URL Allows a valid URL.
Figure 2-5.b illustrates possible use of these constraints in a Form containing several different text field inputs.
Event Handling with Commands and Listeners
Receiving changes and events generated by high-level screens and items in MIDP is based on a listener model, similar to standard edition AWT API. There are two kinds of listeners: CommandListener and ItemStateListener. The former, is related to a very flexible user interface concept, a Command. A Command is something the user can invoke. It could be GUI button, hardware button, text menu option, voice recognized command, etc. Usually Commands are implemented by so-called soft buttons, i.e. additional hardware buttons without fixed functionality. Typical phone device provides at least two such buttons placed just below phone display. Their functionalities are dynamically assigned by textually displayed button "names" (on the bottom strip of the display) depending on the application context. The device determines how the commands are shown on the screen. If the number of activated Commands exceeds the number of available hardware buttons, a separate text menu is created automatically to collect all exceeding commands. To create a Command, we need to supply a label, a type, and a priority:
Command(String label, int commandType, int priority);
The label string contains the displayed name of the button/option. The commandType, provided by the developer during Command construction, is an additional hint for the device system, about where and how to arrange the displaying of the Command. It is used to signify commonly used Commands and place them in the manner most expected by the user. For example, if in the native phone system, the exit operation is always assigned to the leftmost soft button, the MIDP will make the same assignment for the Command.EXIT command. Example command types are listed in table 2-3:
Table 2-3Graphics constants used to indicate a Command type Command type Meaning
BACK Returns to the previous screen. CANCEL Standard negative answer to a dialog EXIT For exiting from the application. HELP A request for on-line help.
ITEM Specific to the Items of the Screen or the elements of a Choice
OK Standard positive answer to a dialog SCREEN An application-defined command
STOP A command that will stop some currently running process, operation, etc.
Every Command has a priority. Lower numbers indicate higher priority. The priority '0' Command will most probably be shown up on the screen directly (as the soft button). The other Commands will most likely end up in a secondary menu. To create a standard OK command, for example, we would do this:
Command commandOK = new Command("OK", Command.OK, 0 );
Created commands could then be added (or removed) to a Form or any other subclass of Displayable by using the following Displayable inherited methods:
public void addCommand( Command newCommandObject ); public void removeCommand( Command removedCommandObject);
Added commands are shown on the related Displayable and generate appropriate events when a user invokes them (by pressing a button or selecting a menu option). As we stated before, the MIDP uses a classic Java listener model for detecting command actions. The events are sent to the commandAction callback method of the associated CommandListener. At least one of the MIDlet objects (or the MIDlet itself) has to implement CommandListener interface, and should be registered to the considered Displayable using the setCommandListener(listener) method. Only one listener is allowed for each Displayable class instance, but the same listener can be registered to several displayables. The commandAction() method receives two parameters:
public void commandAction(Command comm, Displayable disp);
The comm parameter object identifies the Command which was invoked. The disp parameter identifies the Displayable on which this event has occurred. Using these parameters the commandAction implementation can distinguish different sources of the event and generate an adequate action on adequate Diplayable. CommandListener method should return immediately because MIDP specification does not require the platform to create several threads for the event delivery. Thus, if a CommandListener method return is delayed, the system may be blocked. Listing 2-4 illustrates single Form MIDlet with two associated Commands.
Listing 2-4 Example implementation of Hello World start-up MIDlet import javax.microedition.lcdui.*;
import javax.microedition.midlet.*;
public class HelloWorld extends MIDlet implements CommandListener { private Form mainForm;
public HelloWorld () {
mainForm = new Form("Hello World");
mainForm.append(new StringItem(null, "Welcome!"));
mainForm.addCommand(new Command("Exit", Command.EXIT, 0));
mainForm.addCommand(new Command("Change item", Command.ITEM, 1)); mainForm.setCommandListener(this);
}
public void startApp() {
Display.getDisplay(this).setCurrent(mainForm); }
public void pauseApp() {}
public void destroyApp(boolean unconditional) {} public void commandAction(Command c, Displayable s) { if( c.getCommandType() == Command.EXIT )
notifyDestroyed(); else
((StringItem)mainForm.get(0)).setText("Press Exit! Goodbye!"); }
}
Summing up, CommandListener with it's commandAction method is dedicated to handle signals from softbuttons and menu elements.
The second interface ItemStateListener is dedicated to receive events that indicate changes in the internal state of the interactive Items within a Form screen (value adjustments of an interactive Gauge, TextField value changes, switching the state of ChoiceGroup, etc.) . Most of items in a Form can fire events when the user changes them. Our application can listen for these events by registering an ItemStateListener (with the method: setItemStateListener (ItemStateListener iListener)). When an item state change is detected, the listeners method itemStateChanged(Item item) is called.
Exercise J2ME.ex3
Drawing Low Level Graphics on the Device Screen
Create a MIDlet application utilizing Canvas object for implementing custom user interface composed of geometrical figures and animation.
a) Implement selected two-dimensional computer game (like Ping-Pong, PacMan or Arkanoids) which demands to perform some simple drawing and animation.
b) For devices with a touch screen, supporting pointer events, create a simple “Paint”-like graphical editor, which allows one to draw basic figures (lines, rectangles, circles)
MIDP profile offers a low level API based on Canvas class from package javax.microedition.lcdui, that allow us fully control the device’s screen at pixel level. Canvas is another subclass of Displayable, so in result, a MIDlet can mix and match regular full screen Displayable (like Forms, Alerts, Lists, etc) with full screen graphics Canvases. For example, a game application can be composed of high-level Forms (to modify game setup, configuration or player preferences in the text-based mode) and several Canvases representing different graphic scenes of the game course. But in contrast to AWT, Canvas graphics does not allow to mix high-level and low-level components on the same screen simultaneously.
The Canvas provides a paint(Graphics g) callback method, similar to the paint() method in custom AWT or Swing components. Whenever the MIDP system determines that it is necessary to redraw the content of the device screen, the paint() callback method of Canvas is called. A typical Canvas implementation is presented on Listing 2-5:
Listing 2-5 Simple demo of typical Canvas implementation import javax.microedition.lcdui.*;
public class DrawingDemoCanvas extends Canvas { public void paint(Graphics g) {
// Draw stuff using Graphics object <g>
. . . g.setColor(128,255,0); g.drawLine(0,0,10,20); . . . } }
In order to see our DrawingDemoCanvas on the screen, we need to set it as a current Displayable object for the MIDlet device display. Example of such operation is presented on Listing 2-6.
Listing 2-6 Setting example Canvas as a current Displayable import javax.microedition.midlet.*;
import javax.microedition.lcdui.*;
public class DrawingDemoMIDlet extends MIDlet { public void startApp(){
Display.getDisplay(this).setCurrent(new DrawingDemoCanvas()); }
public void pauseApp(){ }
public void destroyApp(boolean unconditional){ } }
Using the Canvas object, we can draw whatever we want on the screen, find out exactly which keys a user is pressing on, and detect pointer position, if the device is supporting stylus, touch screen or a trackball.
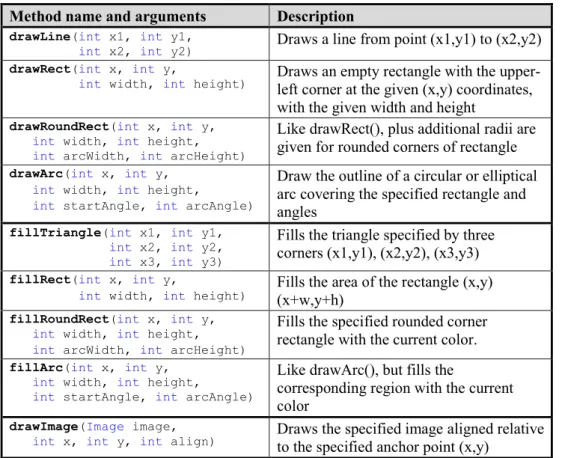
The Graphics class, which is an argument of a Canvas paint() method, contains methods for drawing shapes, text, and images on the Canvas surface. MIDP’s Graphics class is similar to the Graphics and Graphics2D classes in J2SE but it is much smaller. Coordinate space of the drawing is based on the pixels of the device screen. By default, the origin of this coordinate space (0,0) is located in the upper-left corner of the Canvas. We can find out the size of the Canvas by calling getWidth() and getHeight() methods which return surface dimensions in screen pixels. In the case it could be useful, we can adjust the origin of this coordinate space by calling the translate(int x, int y) method, which translates the origin of the graphics context to the point (x, y). To find out the location of the translated origin relative to the default origin, call getTranslateX() and getTranslateY().
Table 2-4 Drawing methods of J2ME Canvas Method name and arguments Description
drawLine(int x1, int y1,
int x2, int y2) Draws a line from point (x1,y1) to (x2,y2)
drawRect(int x, int y,
int width, int height) Draws an empty rectangle with the upper-left corner at the given (x,y) coordinates,
with the given width and height drawRoundRect(int x, int y,
int width, int height, int arcWidth, int arcHeight)
Like drawRect(), plus additional radii are given for rounded corners of rectangle drawArc(int x, int y,
int width, int height,
int startAngle, int arcAngle)
Draw the outline of a circular or elliptical arc covering the specified rectangle and angles
fillTriangle(int x1, int y1, int x2, int y2, int x3, int y3)
Fills the triangle specified by three corners (x1,y1), (x2,y2), (x3,y3) fillRect(int x, int y,
int width, int height)
Fills the area of the rectangle (x,y) (x+w,y+h)
fillRoundRect(int x, int y, int width, int height, int arcWidth, int arcHeight)
Fills the specified rounded corner rectangle with the current color. fillArc(int x, int y,
int width, int height,
int startAngle, int arcAngle)
Like drawArc(), but fills the
corresponding region with the current color
drawImage(Image image,
int x, int y, int align) Draws the specified image aligned relative to the specified anchor point (x,y)
All basic drawing methods of the Canvas are listed in the Table 2-4. First four methods draw only outline of a figure (using the concept of current color and line style), the following four methods draw shapes filled with the current color. The last primitive, draws an image which was earlier created in memory, loaded from
application resources or downloaded from network. Alignment for the drawImage() method is created by composing vertical alignment constants (Graphics.TOP, VCENTER, BOTTOM) with the horizontal alignment constant (Graphics.LEFT, CENTER, RIGHT).
For grayscale devices Graphics provides setGrayScale(int greyness) as a method to control figure shade. An argument is a number from 0 (for black) to 255 (for white). Current grayscale value can be retrieved by calling getGrayScale().
In devices with color screen, colors are represented as combinations of red, green, and blue, with 8 bits for each color component. We can set the current drawing color using the method setColor(int RGB), where the color argument is specified in the form of 0x00RRGGBB (least significant eight bits giving the blue component, the next eight the green, and the third eight bits giving the red component, the highest order byte is ignored). An alternate three argument method setColor(int red,int green,int blue) accepts red, green, and blue values as integers in the range from 0 to 255.
Different devices can support different levels of color representation. Starting from monochrome (black & white) known as “1-bit color”, up to full 24-bit color. Two Display methods isColor() and numColors() return useful information about the color capabilities of the device:
boolean Display.getDisplay(this).isColor(); //monochrome or color
int Display.getDisplay(this).numColors(); //number of colors
Example Listing 2-7 illustrates sequence of Canvas drawings to create smiling face Listing 2-7 Example Canvas paint() implementation – a smiling face public void paint(Graphics g) {
// Calculate face size in relation to screen dimensions int w = getWidth();
int h = getHeight();
int size = Math.min ( w, h ) / 2;
// Clear the background and translate the graphics origin
g.setColor ( 255, 255, 255 ); g.fillRect ( 0, 0, w, h ); g.translate ( w/2, h/2 );
// Draw the face filling and outline
g.setColor ( 255, 255, 200 );
g.fillArc ( -size/2, -size/2, size, size, 0, 360 ); g.setColor ( 0, 0, 0 );
g.drawArc ( -size/2, -size/2, size, size, 0, 360 ); // Draw mouth and eyes
g.drawArc ( -size/6, size/7, size/3, size/6, 0, -180 ); g.setColor ( 150, 150, 255 );
g.fillArc ( -size/6-10, -size/6-10, 20, 20, 0, 360 ); g.fillArc ( +size/6-10, -size/6-10, 20, 20, 0, 360 ); }
Lines can be drawn with two line styles represented by constants in the Graphics class: Graphics.SOLID (the default) and Graphics.DOTTED for
dotted lines. We can set or retrieve the current style using methods: setStrokeStyle() and getStrokeStyle().
Apart from geometrical figures, graphic interfaces usually contain texts written with different decorative fonts and sizes. Canvas graphics provide three methods for drawing text specified as an ASCII code, an array of chars or a String:
public void drawChar(char character, int x, int y, int anchor); public void drawChars(char[] data, int offset, int length, int x, int y, int anchor);
public void drawString(String str, int x, int y, int anchor);
Assigned text is drawn relative to the location and type of anchor. Anchor location is specified with coordinates (x,y). Anchor type is defined by horizontal (Graphics.LEFT, HCENTER, RIGHT) and vertical (Graphics.BOTTOM, BASELINE, TOP) components. The following example shows how to locate text at various areas/corners of the Canvas (Listing 2-8)
Listing 2-8 Demo of drawing text (drawString) on Canvas import javax.microedition.lcdui.*;
public class TextDemoCanvas extends Canvas { public void paint(Graphics g) {
int w = getWidth(); int h = getHeight(); g.setColor(0xffffff); g.fillRect(0, 0, w, h); // Label the four corners
g.setColor(255,0,0);
g.drawString("top-left", 0, 0,Graphics.TOP|Graphics.LEFT); g.drawString("top-right", w, 0,Graphics.TOP|Graphics.RIGHT); g.setColor(0,255,0);
g.drawString("bottom-left", 0, h,Graphics.BOTTOM|Graphics.LEFT); g.drawString("bottom-right", w, h,Graphics.BOTTOM|Graphics.RIGHT); // Mark the center of the screen
g.setColor(0,0,255);
g.drawString("center",w/2,h/2,Graphics.BASELINE|Graphics.HCENTER); }
}
It is also possible to control: face, style and size of drawn fonts. There are three available font faces represented by constants in the Font class: FACE_SYSTEM, FACE_MONOSPACE, and FACE_PROPORTIONAL. Font style can be combined by binary “or” operation of STYLE_PLAIN, STYLE_BOLD, STYLE_ITALIC, and STYLE_UNDERLINE constants. The size can be simply SIZE_SMALL, SIZE_MEDIUM, or SIZE_LARGE.
For example, to create a large, bold, italic, proportional font and to set it active style for subsequent text drawings, the following two calls should be done:
Font myFont = Font.getFont( Font.FACE_PROPORTIONAL, Font.STYLE_ITALIC | Font.STYLE_BOLD, Font.SIZE_LARGE);
a) b)
Figure 2-6 Drawing results of paint() implementation from listings a) 2-7 b) 2-8
Because the Canvas class inherits from Displayable, it provides the same support for Command (soft buttons) as classes from the high-level interface (e.g. Form or Alert). To arrange user input interactions with Canvas contents, standard approach with CommandListener interface could be used. But, Canvas also handles events at a lower level, which enables to handle interaction with the individual keys of a device. There are three callback methods which are called whenever the user presses and releases a key:
protected void keyPressed(int keyCode); protected void keyReleased(int keyCode); protected void keyRepeated(int keyCode);
All three methods provide an integer argument denoting the Unicode character code assigned to the manipulated button on the device keyboard. If a button has no Unicode correspondence, the given keyCode has negative value. Because most MIDP devices have phone keypad, Canvas provides several constants corresponding to standard keypad numeric keys from KEY_NUM0, KEY_NUM1, KEY_NUM2, ..., to KEY_NUM9, and including KEY_STAR and KEY_POUND. Devices may have more keys than these (pressing of which will result in device-specific key codes), but portable applications should not rely on the presence of any additional key codes. If it is necessary, an application can get the real name of the pressed key by calling getKeyName(key) method.
Nowadays, most of mobile devices support a pointing device like stylus and a touch-sensitive screen. The Canvas API provides methods for testing pointer device support: hasPointerEvents() and hasPointerMotionEvents(). If the device supports pointer events, the following callback methods get called when the pointer is pressed, released or dragged:
protected void pointerPressed(int x, int y); protected void pointerReleased(int x, int y); protected void pointerDraged(int x, int y);
While implementing any of abovementioned user input event callback methods, please remember, that all of them and the paint() method are called serially. All these methods should return quickly to protect against situation when the user interface becomes frozen. Any longer processing should be served in a separate thread.
In the case of programming real-time graphic applications like computer games or animations, several additional issues should be taken into account. The first one is repainting the Canvas. If we want to refresh the display content, we can not call paint() method directly (because we can't provide the appropriate Graphics argument). Instead, the MIDlet should call Canvas.repaint() method, which notifies the AMS system that a repaint is necessary. Unfortunately, the call of paint() is not performed immediately. It may be delayed, until the control returns from other event handling methods. The AMS system can even merge several repaint requests. To coerce the implementation to service all the repaint requests without delay, the method serviceRepaints() should be used. Canvas does not automatically clear itself when we call repaint(). The application should clear the screen in the paint() method .
By default, Canvas supports a full-screen mode. Some devices can supports an alternate modes for Canvas, where top or bottom strip is reserved to present information about the state of the device. To force switching into real full-mode, we can use the method Canvas.setFullScreenMode(true).
All MIDlet Displayables, in some situations can go to background (hide) and after some time get back to the foreground (become shown). Each time the Canvas is shown, the showNotify() method will be called. If another Displayable is shown, or the application manager switches to run a different application, hideNotify() is called. The game interaction can be additionally made more attractive with Display methods: vibrate(int duration), flashBacklight(int duration), which enable to control device body vibration and the screen backlight (duration is given in milliseconds).
Students who are more interested in computer games can extend this third exercise to utilize javax.microedition.lcdui.game optional package or JSR184, the optional API for rendering of 3D graphics. The Game package contains game API, a set of classes that simplify development of two-dimensional games. It provides game-specific capabilities such as an off-screen graphics buffer, the ability to query key status (useful for detecting user input in a game thread) and supports LayerManager which can combine multiple layers to create complex scenes. The Sprite class supports heroes animation and collision detection. Large scenes or backgrounds can be constructed efficiently using TiledLayer.
Using Mobile 3D Graphics (JSR 184), it is possible to render 3D graphics to a 2D MIDP component such as a Canvas by binding to the singleton Graphics3D instance. Graphics3D controls lights for illuminating a 3D scene and camera to determine the portion of the scene that is displayed. All the objects inside the animation world can be located and manipulated using immediate mode API calls.
Exercise J2ME.ex4 Wireless Messaging by SMS Texting
Create MIDlet applications communicating with each other through SMS-based communication channel.
a) Create a distributed implementation of tic-tac-toe (noughts and crosses) game which enables to play the game remotely between two SMS subscribers. b) Create an application which automates the process of SMS-based
broadcasting of selected predefined text messages, to predefined group of phone subscribers (for example: inviting friends to a Friday party, informing superiors about illness or absence)
Using the Internet on the phone could be quite costly because usually connection time is billed per minute or per packet. An interesting lower cost alternative is the Short Message Service (SMS), which is one of the most widely available and popular services for cell phones. The Wireless Messaging API (WMA 1.1, JSR-120), is an optional API that enables MIDP applications to send SMS messages. WMA version 2.0 (JSR-205), adds the support for Multimedia Message Service (MMS) with the ability to send large binary messages consisting of multiple parts. These messages could carry: images, sound, video, or multimedia presentations. There are many possible applications of WMA: chat-type applications, interactive gaming, event reminders, e-mail notification, informational services, etc.
All the interfaces and classes in WMA are a part of the package javax.wireless.messaging. WMA is built on top of CLDC and Generic Connection Framework, so we get a MessageConnection by passing in an address to the connect() method, analogically to SocketConnection and DatagramConnection in the GCF. But in contrast to the above, we cannot open an input or output stream from it. MessageConnections are only used to send and receive messages. The SMS URL address has to have the format: “sms://” + phone_number + ":" + port_number. Second part, with port_number could be omitted. Examples of URL connection strings are:
• "sms://+111222333" → to send SMS message to the specified phone number • "sms://+111222333:4444" → to send SMS to a port 4444 on the specified phone • "sms://:4444" → to open server mode connection on port 4444 Server mode connections are used to receive incoming messages. The concept of a port allows multiple applications to accept messages on the same device. It also enables the device to differentiate between SMS messages destined for a WMA application and standard text messages. The cost of using a port in SMS address is eight bytes of data at the beginning of an SMS message.
To send a single SMS message using WMA, first create an empty message using the newMessage() method of the open MessageConnection which works as the class factory for messages (Listing 2-9 ). We also need to specify the message type as MessageConnection.TEXT_MESSAGE for SMS text message.
Listing 2-9 Example code sending SMS text message import java.io.*; import javax.microedition.io.*; import javax.wireless.messaging.*; MessageConnection smsConnection; TextMessage smsMessage; . . . try { smsConnection=(MessageConnection)Connector.open("sms://5550000"); smsMessage=(TextMessage)
smsConnection.newMessage(MessageConnection.TEXT_MESSAGE);
smsMessage.setPayloadText("text of example SMS");
smsConnection.send(smsMessage);
} catch (IOException ex) { // manage an exception
}
Then, set the text string that you want to send using setPayloadText(). Finally, use the send() method of MessageConnection to send the message .
There are two options to receive SMS messages by a MIDlet. The first one is to use a MessageConnection.receive() method. Since receive() is a blocking call, it should always be called in its own thread. Listing 2-10 demonstrates how to use this first option.
Listing 2-10 Receiving SMS message with blocking method receive() MessageConnection serverConnection;
Message receivedMessage;
try {
serverConnection=(MessageConnection)Connector.open("sms://:4444"); receivedMessage=serverConnection.receive();
if( receivedMessage instanceof TextMessage ) {
String smsText =((TextMessage)receivedMessage).getPayloadText(); String senderAddress = receivedMessage.getAddress();
Date messageDate = msg.getTimestamp();
// manage received smsText }
} catch (IOException ex) { // manage an exception
}
Because received message can be of TextMessage or BinaryMessage type, we have to check it before retrieving message payload . In addition to the text payload, two other interesting informations appear in the message header, which can be retrieved by getAddress() and getTimestamp() methods .
MessageConnection also supports a second, nonblocking (event listener-based) way for receiving SMS messages. To use this, we need to create and register a MessageListener object with the setMessageListener() method, and handle the callback on the notifyIncomingMessage() method of this MessageListener interface. Only one listener can be registered at a time for the serverConnection. The callback is performed by WMA on a system thread, so
the notifyIncomingMessage() method should return as soon as possible, and any laborious message processing must be performed in a separate thread.
To ease testing of MIDlet SMS applications on debugger, we can use a Sun Wireless Toolkit (WTK) utility called the WMA console, which monitors wireless messaging activities and enable to simulate sending trial SMS/CBS/MMS messages. WMA console can be launched, by starting:
C:\Program Files\NetBeans 6.5.1\ mobility8\WTK2.5.2\bin\ktoolbar.exe
and then selecting File→Utilities→WMA console from Wireless Toolkit main menu.
Figure 2-7 Utilizing WMA console to monitor SMS messaging activities of phone emulator
The second way of testing WMA applications is to use two or more running instances of the device emulator. Each of the instances has its own unique phone number displayed on the device window title bar (default are: +5550000, +5550001, etc.). If sending messages between these numbers, the emulator environment will take care of simulating wireless transmission between emulated devices.
The Wireless Messaging API, extends the CLDC’s Generic Connection Framework, adding the ability for J2ME applications to send and receive SMS messages. The latest JSR 205, specifying WMA 2.0, extends this further to take advantage of the content-rich Multimedia Message Service (MMS) that is becoming available starting from 2.5G and 3G phone networks. Presented exercise, can be extended to enable transmission of MultipartMessage carrying an image, an audio or video clip file. A MultipartMessage is a subinterface of Message. Apart from basic methods like setAddress() inherited from Message, additional methods on this interface deal with the additional features owned by MMS messages (for example: addAddress(String type, String address) to set multiple recipients for “to”, “cc”, and “bcc” fields similarly to e-mail). Listing 2-11 illustrates how to send multipart message containing a png image.
Listing 2-11 Sending *.png image by multipart MMS message
//prepare an image buffer with multimedia content (image) to send
String imageName = "/images/example_image.png";
InputStream inputStream = getClass().getResourceAsStream(imageName); byte[] imageBuffer = new byte[inputStream.available()];
inputStream.read(imageBuffer);
//compose a multipart message
String receiver = "mms://+5550000:5555"; MessageConnection mmsConnection;
MultipartMessage mmsMessage;mmsConnection = (MessageConnection) Connector.open(receiver);
mmsMessage = (MultipartMessage)
mmsConnection.newMessage(MessageConnection.MULTIPART_MESSAGE);
mmsMessage.setSubject("MMS with example png image"); mmsMessage.addMessagePart(new MessagePart(imageBuffer,0,
imageBuffer.length, "image/png","id1","location", null));
//send the prepared MMS message
mmsConnection.send(mmsMessage);
Exercise J2ME.ex5
MIDP Persistent Data Storage Using RMS
Create MIDlet applications that permanently memorize data collected during subsequent sessions or share the same data between several MIDlets (from different Suites).
a) Implement a MIDlet with history-feature, that stores all the Data/Time moments of its launching.
b) Create a composition of three cooperating MIDlets, which share the same RecordStore. At least one of them should be from different MIDlet Suite. Consider three functionalities: record owner, reader (read only) and writer. c) Create a MIDlet implementation of a home private library database
representing books, readers and their relation in the form of three tables. Most of the mobile applications need to store some data in a permanent way (even when the device is switched off). MIDP defines a set of classes for storing and retrieving data called Record Management System (RMS). This mechanism is modeled after a simple record oriented database and enables to persistently store data and retrieve it later. The central concept for persistent storage is the RecordStore. Each RecordStore consists of a collection of records that will remain persistent across multiple invocations of a MIDlet. The records data are stored in a dedicated memory part of mobile device which is generally called "persistent storage", but the details of how exactly records are stored are specific to the device implementation and are not exposed to a MIDlet.
Any MIDlet suite that plans to use RMS memory, should specify the minimum number of bytes for the data storage it requires, by setting the MIDlet-Data-Size attribute (in application descriptor and the JAR manifest). If not, the device could assume the MIDlet suite does not require any space for persistent data storage. The RMS is not suitable for storing big amounts of data. The MIDP specification dictates

![Figure 2-4 The life cycle of the MIDlet [5]](https://thumb-us.123doks.com/thumbv2/123dok_us/1804571.2759170/12.892.221.635.425.605/figure-life-cycle-midlet.webp)