Volume 5, Issue 4, April 2016
Abstract -Speech recognition is a familiar and accessible concept to most people in western society. All that is needed in order to use speech recognition is a smart phone with some form of speech recognition application. Home automation might not be as well-known as speech recognition but it is still an area that offers a lot of products and solutions for people that are interested in a more comfortable or manageable lifestyle. Most home systems come in complete solutions with different kinds of features and possibilities. The design and implementation of Secure Home Automation using Raspberry Pi 2 for mobile devices that leverage mobile technology to provide essential security to our homes and associated control operations is provided. Sound intelligence is added to home automation for physically challengedpeople as a broad perspective of the system. Raspberry Pi manages operations on home appliances, such as turning ON/OFF a television, lights and other electronic/electrical devices. According to the received texts, appliances can be controlled. The entire above are implemented in a low cost Raspberry Pi 2 board.
Index Terms—Voicecommand, Web based control, Raspberry Pi 2, Google API, NGINX, Wiring Pi.
I. INTRODUCTION
Manually controlling various devices found in one‟s home might be tiresome.This system is able to ease a user‟s interaction with home equipment by providing a new, easy to use, interface. The initial phase of the development involved surveying the current field by conducting studies on speech-recognition software and the needs of potential users. These studies provided a foundation for the prototype requirements that acted as the goal for the implementation phases that followed. The paper also presents the finished prototype, which is a system capable of interpreting speech as commands. These commands can be formulated in several different ways to make the interaction more natural. After a command has been interpreted an appropriate action is taken on the correct home equipment. In order to control a number of different equipment the control is achieved through radio-controlledoutlets or multi-channel relay boards. The use of outlets enables the prototype to control most equipment that is controlled with on and off switches. A further development carried out is to control the equipments through web as well.
II. IMPLEMENTATION METHODOLOGY
A. Software implementation
The below given figure shows the basic block diagram of speech recognition system [11]. To detect the speech
signal electric microphone is used. The microphone can be either a dedicated USB microphone or a usb powered headset microphone. The speech signal fed using the mic is converted to a text signal. There are various speech to text conversion engines available, but Google STT (speech to text) proves to be the fastest and the most accurate one. Hence the Google STT engine is used. The conversion of this speech signal to text signal is carried out online by the Google web server. Once it is converted to text signal, it is matched with a configuration file stored in raspberry pi. This configuration file has a list of commands that should be recognised properly and to every command there is a function to be carried out. If the speech signal was recognised and converted properly into a text signal, it shall match with the command stored in the configuration file and the necessary function will be carried out For example: If the user says “Turn ON the lights” then this signal is first converted to text signal and then assigned to specific task i.e. turning on the light. In this way a dictionary of commands (configuration file) is created which will be used to perform the various automation tasks. If a command said by the user is not present in the pre-defined dictionary (configuration file), no operation will be carried out and the user will be prompted “Command not recognised” by raspberry pi. The environment created is very user friendly where the hardware also communicates with the user.
Figure.1 Block diagram of speech-recognition system [11]
B. Hardware implementation
The heart of this project is its mini-computer i.e. Raspberry Pi 2 [1]. The Raspberry Pi is a low cost, credit-card sized computer that plugs into a computer monitor or TV, and uses a standard keyboard and mouse. It is a capable little device that enables people of all ages to explore computing, and to learn how to program in languages like Scratch and Python. It‟s capable of doing
Speech & Web Based Appliance Control
Volume 5, Issue 4, April 2016
everything one would expect a desktop computer to do, from browsing the internet and playing high-definition video, to making spreadsheets, word-processing, and playing games.What‟s more, the Raspberry Pi has the ability to interact with the outside world, and has been used in a wide array of digital maker projects, from music machines and parent detectors to weather stations and tweeting birdhouses with infra-red cameras.
Figure.2 Raspberry pi 2 [1]
A small relay circuit has been made to switch an appliance ON/OFF [10]. It consists of a BC547 transistor, which acts like a switch. The transistor triggers the relay when it receives a voltage at its base from the GPIO pin of raspberry pi. A 1N4001 diode is used to protect the transistor from reverse voltages created in the relay coil. The circuit can be powered either using the 5V supply from the raspberry pi or using an external battery.The GPIO 4 (pin 7) of raspberry pi should be connected to the base of transistor and pin 6 (GND) of raspberry pi should be grounded.
Figure 3 Relay Board [10]
Figure 4 Interfacing relay with raspberry pi [6]
(Note: The above connection shows a Raspberry pi board. It remains the same for Raspberry pi 2 board)
C. Flow of the Project
1. Receive input speech using external MIC connected to Raspberry pi
2. Convert the speech signal to text signal using online Google API speech engine.
3. Process the text signal, match it with the stored command file. If they match, send it to GPIO (General Purpose Input Output) pin on Raspberry pi
4. Perform the required operation as per the text signal (Example: If one says Lights ON, then the light connected to the Raspberry pi will turn ON)
5. A relay board is connected to GPIO pins to connect multiple devices to Raspberry pi
Volume 5, Issue 4, April 2016
Figure 5 Project Flow [14]
III. SETTING UP RASPBERRY PI
Raspberry pi works on Raspbian operating system which works best for beginners. Below mentioned are the steps for installing Raspbian on Raspberry pi [2].
1. Format an SD card which is 4 GB or greater with FAT 32 format
2. Download and extract files from the zip file of operating system
3. Copy the extracted files onto the SD card that you just formatted.
4. On the first boot the „Recovery FAT ‟ partition will be automatically resized to a minimum size Now once the Raspberry pi is setup, various dependencies will be needed to perform speech recognition and controlling the GPIO pins. Following dependencies will be required to start with speech recognition and control the hardware:
Wiring Pi:-This will be required to control the GPIO pins i.e. to turn high or low a particular pin from the terminal window of raspberry pi [4].
Voicecommand:-Voicecommand is based on Google speech to text engine. This dependency will be required to recognise the speech commands, convert them to text, and then perform the required operations. A list of commands called configure file is created so that the user is familiar about the commands recognised by Raspberry pi [5]
A. Installing Wiring Pi
The java script that controls the electrical devices relies on the Wiring Pi project to switch the GPIO pins high and low. Run the following commands to download and install Wiring Pi.Executing the following commands in the terminal shell (command window) will install Wiring Pi on Raspberry Pi [4]:
1. sudo apt-get install git-core
2. git clone git://git.drogon.net/wiringPi 3. cd wiring Pi
4. ./build
B. Installing Voicecommand
Voice Command is a program that will run on the Raspberry Pi and listen for a keyword for addressing it.
After hearing its keyword or name, the Voice Command will prompt for an instruction by default saying "Yes sir". It will then attempt to process whatever is said depending on how it is configured.Type the following commands in the terminal shell (command window) to install Voicecommand on Raspberry Pi [5]:
1 sudo apt-get install git-core
2gitclonegit://github.com/StevenHickson/PiAUISuite.git 3 cd PiAUISuite/Install/
4 ./InstallAUISuite.sh
IV. FURTHER WORK
After the successful implementation of speech based device control, raspberry pi has been made to act as a web server so that it could be remotely accessed. An HTML page is created and two buttons are added to turn ON or OFF a device [10].To make raspberry pi act as a web
server, NGINX application is used. NGINX
(pronounced engine x) [7] is a popular lightweight web server application that can be installed on the Raspberry Pi to allow it to serve web pages.Like Apache, NGINX can serve HTML files over HTTP, and with additional modules can serve dynamic web pages using scripting languages such as PHP [8].
Figure .6Web based control [10]
The whole system is composed of two parts: Server and Client. Here, the server is the web interface consisting of buttons and UI (User Interface) that will turn ON/OFF a device.It consists of PHP files, Html files and a .txt file (to store data).The server usually stores information regarding the button press on the page (ON/OFF) on a .txt file. This is a simple Html file consisting of two buttons.The clicking of the buttons will trigger the execution of a PHP file called button.php [10]. This program serves as an API (Application Programming Interface) to store data on to a text file calledbuttonStatus.txt.The data is a string : “ON”, if ON button is clicked and “OFF”, if OFF button is
Volume 5, Issue 4, April 2016
clicked.Thus the current button press state is recorded in the text file called buttonStatus.txt.
The client side consists of a Raspberry Pi with a relay circuit connected to its GPIO pin. Raspberry pi runs a program which is used to „Post‟ a url link using urllib2.That is, the raspberry pi constantly reads the contents of a url link. Here, the url link is another PHP file called buttonStatus.php. This PHP file serves as an API to read the contents of the text file buttonStatus.txt.After reading the data, the program checks if the string obtained is “ON” / “OFF” based on which it switches ON/OFF the relay respectively via its GPIO pin.
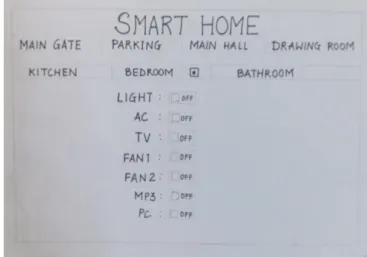
Below given Figure 7 shows the screenshot of the GUI for two devices. A single toggle button is used to turn ON/OFF a device instead of using two separate buttons. One button will turn ON/OFF the lights in the room, whereas the other button will turn ON/OFF the Television in the room. On similar basis a GUI multiple devices can be developed to control every device at home as shown in Figure 8.
Figure 7 Screenshot of mobile web browser
Figure 8 GUI for multiple device control
V. CONCLUSION
After carrying out logical analysis of the project, certain conclusions were made. The time taken for speech to text translation depends on the internet connectivity speed. If the speed is slow, the time required for the commands to get recognized and the operation to be performed is high. Since this conversion is carried out by Google speech to text engine, this system will not work offline. The accuracy of the system is high. The words get properly recognized even is spoken very quickly. The system can be made portable by using a wifi dongle instead of an Ethernet cable. This system is made from easily available hardware which is quite affordable. Features like security can be added. The system can be made to respond and operate only on voice of a single person which makes it user dependent. A mobile application can be developed to control the devices from home and also from remote location. The possibilities are immense. The field of IoT (Internet of Things) can be incorporated along with speech recognition to widen the scope of this project.
REFERENCES [1].https://www.raspberrypi.org/help/noobs-setup/ [2].https://www.raspberrypi.org/help/quick-start-guide/ [3].https://www.raspberrypi.org/documentation/setup/ [4].http://computers.tutsplus.com/articles/how-to-control- a-lamp-with-voice-commands-and-a-raspberry-pi--mac-60825 [5].http://stevenhickson.blogspot.in/2013/06/installing-and-updating-piauisuite-and.html [6].http://www.instructables.com/id/Controlling-AC-light-using-Arduino-with-relay-modu/step2/Connections/ [7].https://www.raspberrypi.org/documentation/remote-access/web-server/nginx.md [8].https://www.youtube.com/watch?v=EAMLwbShFFQ
Volume 5, Issue 4, April 2016 [9].https://www.youtube.com/watch?v=xt-rrH04O2g [10].http://diyhacking.com/raspberry-pi-home-automation/ [11].http://diyhacking.com/best-voice-recognition-software-for-raspberry-pi/
[12].Dhawan S. Thakur and Aditi Sharma”Voice recognition wireless home automation system based on zigbee” Journal of Electronics and Communication Engineering research volume 6,issue 8, May-june2013. [13].S.Suresh and Y.Sindhuja Rao “Modelling of Secured Voice Recognition Based Automatic Control System” Journal of Emerging Technology in Computer Science & Electronics, Volume 13, Issue 2, March 2015 [14].ThorayaObaid, HaliemahRashed, Ali Abu El Nour, Muhammad Rehan, Mussab Muhammad Saleh, and Mohammed Tarique,” ZIGBEE BASED VOICE
CONTROLLED WIRELESS SMART HOME
SYSTEM” International Journal of Wireless & Mobile Networks (IJWMN) Vol. 6, No. 1, February 2014 [3]. [15].Y.Usha Devi 1, II M.Tech, Wireless Home Automation System Using ZigBee, International Journal of Scientific & Engineering Research Volume
3, Issue 8, August-2012
[16]Textbook on “Getting started with Raspberry Pi” by Matt Richardson & Shaw Wallace
Mr. Sanjay Mirchandani is working as an Assistant Professor in Electronics & Telecommunication Department in V.E.S. Institute of Technology, Chembur, Mumbai from July 2013. He has passed B.E. in 2008 and M.E. in 2010. He has published one paper in IEEE International Conference and three papers at the National level Conferences. His field of interest is System Design, Development & Integration of Microwave Electronic based systems which includes RF & Digital Signal Processing
Mr. Mohit Khatri is currently pursuing B.E in
Electronics & Telecommunication from V.E.S. Institute of Technology, Mumbai and will be completing the course in May 2016. He has published a technical paper on “Bionic Eye- A Vision of Hope” in the International Journal of Scientific Engineering and Technology Research (IJSETR), ISSN 2319-8885, Vol 4 Issue 36, September 2015. His area of interest is Embedded Systems &Networking. He has been an Executive Committee member in the international student body named IEEE for the year 2014-15. He has received as special prize for the project “Paraplegic Wheelchair” made under the Research & Development (R&D)Department of college.
Ms. Kinjal Vaghamshi is currently pursuing
B.E in Electronics & Telecommunicationfrom V.E.S. Institute of Technology, Mumbai and will be completing the course in May 2016. Her area of interest is Networking & Switching. She has been the secretary of a technical student body named I.S.T.E. for the year 2012-13.She is certified as an Embedded System programmer by Maximus Technolabs. She has also received academic excellence award for being the topper of EXTC department in college in the year 2014-15
Mr. Aditya Nairis currently pursuing B.E in
Electronics & Telecommunication Department from V.E.S. Institute of Technology, Mumbai and will be completing the course in May 2016. His area of interest is Microwave & Radar Engineering. He also has keen interest in the technology of MiG & Sukhoi series aircrafts He has been a council member in the international student body named IEEE for the year 2013-14.
Ms. Sonali Talrejais currently pursuing B.E in
Electronics & Telecommunication Department from V.E.S. Institute of Technology, Mumbai and will be completing the course in May 2016. Her area of interest is Wireless communication and also growing knowledge in the field of Mobile communication. She has been a state level fencing player.
![Figure 3 Relay Board [10]](https://thumb-us.123doks.com/thumbv2/123dok_us/8216608.2178499/2.892.477.813.82.620/figure-relay-board.webp)
![Figure .6Web based control [10]](https://thumb-us.123doks.com/thumbv2/123dok_us/8216608.2178499/3.892.491.841.615.868/figure-web-based-control.webp)