WebObjects
Deployment Guide
Using JavaMonitor
Contents
Introduction to WebObjects Deployment Guide Using JavaMonitor
7 Organization of This Document 7See Also 8
WebObjects Deployment
9 The WebObjects Deployment Model 9The WebObjects Deployment Environment 12 Communication Paths 12
Deployment Tools 14 Keeping Your Site Secure 16
Installing Software
18 Choosing What to Install 19HTTP Adaptor Files 19 Deployment Files 20
Types of WebObjects Deployment Installations 20 HTTP Adaptors 21
General Adaptor Building Issues 21 Building the Apache Adaptor 23 Building the CGI Adaptor 24 Data-Store Adaptor Installation 25
Database Adaptors 25
Directory Services Adaptors 26
HTTP Adaptors
27Adaptors, Applications, and Hosts 28 Types of Adaptors 29
CGI Adaptors 30 API-Based Adaptors 30 State Discovery 30
Using a Multicast Request 31 Using a Static Host List 34
Customizing HTTP Adaptors 41
Setting the Multicast Address and Port 42 Setting the Host List 42
Setting the Name of the HTTP Adaptor Configuration File 43 Setting Access to the WebObjects Adaptor Information Page 43 Setting an Alias for cgi-bin in the WebObjects URL 43
Setting the Document Root Path of the Web server 44 Setting WebObjects Options 44
Managing Application Instances
46 Configuration Files 46Lifebeats 47
wotaskd Processes 48
Security Issues with wotaskd 49 Starting WebObjects Services 49
Starting WebObjects Services Automatically on Mac OS X Server 49 Starting JavaMonitor Manually 52
Deployment Tasks
54 Setting Up Hosts 54Adding a Host 55 Configuring a Host 57
Viewing a Host’s Configuration 58 Installing Applications 60
Building for Deployment with Xcode 60 Building for Deployment with Ant 60 Setting Up Applications 62
Adding an Application 63 Configuring an Application 63 Adding Application Instances 72 Configuring Instances 76
Configuring Sites 78
Setting JavaMonitor Preferences 80 JavaMonitor Password 80 Detail-View Refresh Settings 81 Contents
Monitoring Application Performance 84 Logging and Analyzing Application Activity 89 Logging and Analyzing Adaptor Activity 89 Improving Performance 91
Application URLs
93 Types of WebObjects URLs 93 Format of WebObjects URLs 94JMX Monitoring
96Introduction 96
Enabling JMX Monitoring 96 Local Monitoring 96 Remote Monitoring 97 Using jconsole 98
Viewing WebObjects Statistics 99
Deployment Issues with Java Client
101Glossary
103Document Revision History
105 ContentsFigures, Tables, and Listings
WebObjects Deployment
9Figure 1-1 WebObjects deployment model 10
Figure 1-2 WebObjects deployment model—multiple instances of an application 11 Figure 1-3 Deployment using two computers 12
Figure 1-4 The data path of a WebObjects deployment 13 Figure 1-5 The control path of a WebObjects deployment 13
Figure 1-6 The symbols used to represent the data path and the control path 14 Figure 1-7 Two sites deployed on one computer 14
Figure 1-8 Two sites deployed on two computers 15
Installing Software
18Table 2-1 The WebObjects deployment and administration tools 20 Table 2-2 Adaptor source description 22
Table 2-3 CGI debugging variable settings 25
HTTP Adaptors
27Figure 3-1 Deployment on one computer, using one adaptor 28 Figure 3-2 Deployment on one computer using two adaptors 28 Figure 3-3 Deployment using three computers using one adaptor 29
Figure 3-4 Dynamic site configuration using multicast request and polling 33
Figure 3-5 Copying the information that makes up the HTTP adaptor configuration file 38 Figure 3-6 Creating and saving the HTTP adaptor configuration file 39
Figure 3-7 The WebObjects Adaptor Information page 41
Table 3-1 The properties of the HTTP adaptor configuration file 36 Table 3-2 WebObjects options 44
Listing 3-1 A WebObjects adaptor configuration file 34 Listing 3-2 Structure of the HTTP adaptor configuration file 35
Managing Application Instances
46Deployment Tasks
54Figure 5-1 The Hosts page 55
Figure 5-2 Newly added host in JavaMonitor 56 Figure 5-3 Host configuration page 57
Figure 5-4 Host configuration information page 58
Figure 5-5 Adding an application using JavaMonitor’s Applications page 63
Figure 5-6 The New Instance Defaults section of the application configuration page 65 Figure 5-7 The Application Settings section of the application configuration page 68 Figure 5-8 The Scheduling section of the application configuration page 69
Figure 5-9 The Email Notifications section of the application configuration page 70
Figure 5-10 The Load Balancing and Adaptor Settings section of the application configuration page 72 Figure 5-11 The Applications page with one application 73
Figure 5-12 The application detail page 73
Figure 5-13 The application detail page after an instance has been added 74 Figure 5-14 The application detail page with two instances added 75
Figure 5-15 Instance configuration page 76
Figure 5-16 Setting a password for an instance’s statistics page 78 Figure 5-17 The site configuration page 79
Figure 5-18 The preferences page 80
Figure 5-19 Login page displayed by JavaMonitor on a password-protected site 81 Figure 5-20 Page returned by wotaskd when the site is password-protected 81 Figure 5-21 Multiple application environments on one computer 83
Application Administration
84 Figure 6-1 The Applications page 85 Figure 6-2 The application detail page 86Figure 6-3 The instance statistics page—part 1 of 2 88 Figure 6-4 The instance statistics page—part 2 of 2 89
Application URLs
93Table 7-1 WebObjects application URL variables 94 Table 7-2 Component action URL variables 95 Table 7-3 Direct action URL variables 95
JMX Monitoring
96Figure A-1 Local monitoring 98 Figure A-2 Remote monitoring 98
Figure A-3 Viewing WebObjects statistics 100 Figures, Tables, and Listings
Important: This document may not represent best practices for current development. Links to downloads and other resources may no longer be valid.
Note: This document was previously titledWebObjects Deployment Guide.
This document describes the tools and techniques that system administrators and website managers perform to deploy WebObjects applications. The WebObjects Deployment package allows you to deploy applications developed with the WebObjects Development package, so that they can be accessed through a Web server. You need a WebObjects deployment license to deploy WebObjects applications.
This document is intended primarily for system administrators. Application developers can also benefit from the information it provides but it’s not required reading for them.
This document assumes you have a solid background in system administration. You must be familiar with the operation of your platform, especially how to use its command shell editor to issue commands. You must also be acquainted with the operation of your Web server software and TCP/IP networking. Knowledge of WebObjects application development is helpful, but not required.
To deploy WebObjects applications and to administer a deployment, you need to become acquainted with the deployment model of WebObjects. This document shows you how your Web server interacts with the elements of a WebObjects deployment. It also explains what measures you should take to increase your site’s performance.
WebObjects Deployment provides tools for most of the tasks you need to accomplish on a regular basis to maintain your site. If you prefer doing things manually, you can use the command line to start individual application instances or the deployment tools themselves.
Organization of This Document
Introduction to WebObjects Deployment Guide
Using JavaMonitor
● WebObjects Deployment (page 9) gives you an overview of the deployment approach taken with
WebObjects 5. In addition, it lists the ways in which WebObjects Deployment helps you to maintain a secure site.
● Installing Software (page 18) explains which WebObjects Deployment components need to be installed
on a computer, taking into account the computer’s purpose in your site. It also shows you how to build HTTP adaptors, which are interfaces between applications and web servers.
● HTTP Adaptors (page 27) describes the function of the HTTP adaptor in your site. It also describes how
you customize the adaptors included in WebObjects Deployment if the default configuration does not suit your needs. State discovery is how the HTTP adaptor keeps track of the application instances of your site. The chapter describes the different ways that the adaptor can obtain that information and how you configure the adaptor to use one of those methods.
● Managing Application Instances (page 46) introduces you to the deployment tools you use to configure
and maintain your site. It also describes the mechanism used in WebObjects to ensure that application instances are always running, helping you maximize your site’s up time.
● Deployment Tasks (page 54) explains how to perform configuration and maintenance tasks on your site.
It also shows how to maintain multiple sites using the same hardware.
● Application Administration (page 84) shows you how to monitor and improve your site’s performance. ● Application URLs (page 93) describes the format of WebObjects application URLs so that you can use a
web browser to connect directly to a running WebObjects application.
● JMX Monitoring (page 96) describes how to use JMX to monitor WebObjects applications.
● Deployment Issues with Java Client (page 101) lists issues to keep in mind when deploying Java Client
applications. It also tells you what to do if you want to deploy WebObjects 4.5.1 applications together with WebObjects 5.x applications.
See Also
To get an overview of the WebObjects platform, you should readWebObjects Overview. You can find general information about WebObjects athttp://developer.apple.com/webobjects.
ReadWebObjects Application Properties Reference for a complete list of all the application properties for WebObjects applications, JavaMonitor, and wotaskd. These application properties correspond to command-line arguments that you can use to configure your WebObjects applications and tools for the particular deployment environment. Most of options in the JavaMonitor user interface correspond to JavaMonitor properties described inWebObjects Application Properties Reference.
Introduction to WebObjects Deployment Guide Using JavaMonitor
This chapter introduces the essential concepts and tools you use when you deploy WebObjects applications. The chapter contains the following sections:
● The WebObjects Deployment Model (page 9) introduces you to the WebObjects way of deploying
applications. It explains how the users of your applications send requests to application instances running on your site and how responses (webpages) are generated and sent back to users.
● The WebObjects Deployment Environment (page 12) describes the functions of several elements (both
in your platform and in WebObjects Deployment) in a site.
● Keeping Your Site Secure (page 16) lists the security-minded features available in WebObjects Deployment.
The WebObjects Deployment Model
A WebObjects deployment has six major parts:● Client: A user’s web browser or the client side of a Java Client application.
● Web server: Application that receives HTTP requests from clients and sends responses back to them. ● HTTP adaptor: Application that serves as the interface between your web server and your application
instances. The HTTP adaptor routes requests from the web server to the appropriate instance and sends the responses generated back to the web server. The adaptor does this while performingload balancing
to distribute an application’s users among its active instances. Load balancing helps to spread the user load of your site evenly across your application hosts.
● Application instances: Individual processes that receive requests from the HTTP adaptor and send responses
back to it. To create a response, an instance can perform calculations, or save or retrieve data from a data store.
● Data-store adaptor: Interface between an application instance and a data store. WebObjects includes a
JDBCadaptor, allowing your applications to connect to any JDBC-compliant data store. Also included is a JNDI (Java Naming and Directory Interface) adaptor, which allows applications to communicate with an
with Type 4 drivers. Type 2 drivers may require special configuration for them to work properly with the adaptor. If your database provides a Type 2 driver, consult with your database vendor to determine how it needs to be configured to work properly with a JDBC adaptor.
● Data store: The mechanism that your applications use to store persistent data. Consult with your database
vendor or directory service vendor to obtain configuration and optimization details.
When an application user sends a request through a web browser to your web server, the server forwards the request to the HTTP adaptor. The adaptor then determines which application instance should process the request and forwards the request to it. When the application instance receives the request, it performs the necessary processing to produce a response (a new webpage). The instance then sends the response page to the adaptor, which forwards it to the web server. The web server then forwards the response page to the user’s web browser. This process is illustrated in Figure 1-1.
Figure 1-1 WebObjects deployment model
Data store
Web browser Web browser
Web browser
Web server HTTP adaptor
Application instance Data-source
adaptor
Static HTML
Templates
Notice that both the application instance and the web server contribute to the response page’s content. The instance uses templates and logic to generate the HTML code for dynamic pages, while the web server provides the content of images contained in those pages. The server can also dispense static pages.
WebObjects Deployment
The number of instances of your application necessary to support its users depends on the number of users that connect to your application concurrently. In some cases a single instance is adequate. When one instance is not able to process requests in a timely manner, additional instances can solve the problem. This way, the amount of user-state information that a single instance stores is reduced. In addition, with less state to keep track of, an instance can process requests faster. Figure 1-2 shows a site with one host running multiple instances of an application.
Figure 1-2 WebObjects deployment model—multiple instances of an application
Data store
Web browser Web browser Web browser
Web server HTTP adaptor
Application instance 2 Application
instance 1 Applicationinstance 3 Data-source
adaptor Data-sourceadaptor Data-sourceadaptor
WebObjects Deployment
However, adding instances of your application to a host may not be the most effective solution. Eventually, a point of diminishing returns will be reached, where adding instances actually decreases your application’s performance. In such a case, you should consider adding additional application hosts that run the extra instances required to handle the increased traffic to your site. Figure 1-3 shows how a site with two computers, one acting as an web server and application host, and the other just as an application host would look.
Figure 1-3 Deployment using two computers
Web server HTTP adaptor
Application
instance 1 Applicationinstance 2
Application
instance 3 Applicationinstance 4
computer 1
computer 2
The WebObjects Deployment Environment
Before deploying applications, you need to master two important aspects of WebObjects Deployment: the communication paths of client requests and server activity, and the deployment tools you use to configure your site.
Communication Paths
Communication among the elements that make up a deployment occurs in two paths: the data path and the control path.
WebObjects Deployment
A client HTTP request takes the data path after it reaches your web server. Figure 1-4 shows how an HTTP request that your web server receives is passed to the elements that generate the response.
Figure 1-4 The data path of a WebObjects deployment
Web server
HTTP adaptor
Application Request
Request Response
Response
Data store Data-source adaptor
Query Result
JavaMonitor requests take the control path to propagate configuration changes to application hosts and, ultimately, application instances. These include adding application instances and starting and stopping instances according to a schedule that you define. The HTTP adaptor can obtain site information by polling wotaskd (WebObjects task daemon) processes or by reading the adaptor configuration file. (SeeDeployment Tools (page 14) for information about JavaMonitor and wotaskd.) Figure 1-5 shows the control path.
Figure 1-5 The control path of a WebObjects deployment
HTTP adaptor JavaMonitor
wotaskd Sends command
Sends command
Requests data Requests data
Requests data
SiteConfig.xml WebObjects Deployment
Figure 1-6 shows how the data path and control path are differentiated in the rest of the document.
Figure 1-6 The symbols used to represent the data path and the control path
Data path Control path
Deployment Tools
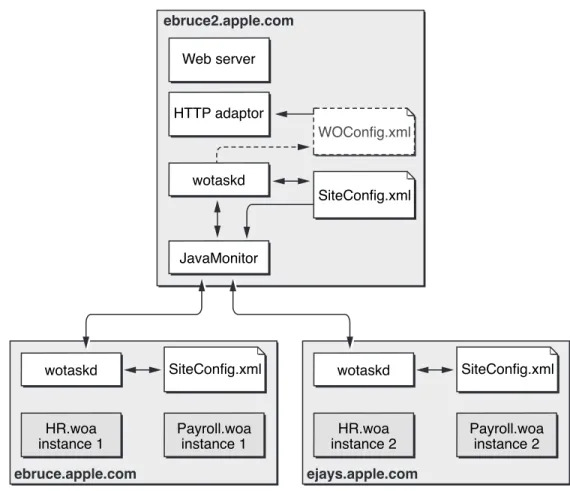
The main tools you use to manage your site are wotaskd and JavaMonitor. Normally, one wotaskd process runs on each application host. If you want to concurrently deploy multiple sites on the same hardware, you can configure a computer to run more than one wotaskd process. This essentially provides you with several independent application hosts per computer.
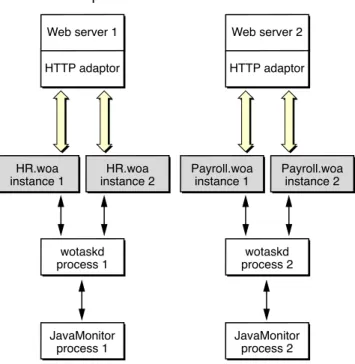
You manage a group of application hosts using JavaMonitor, a tool that uses your web browser as its user interface. JavaMonitor lets you set, among other things, instance scheduling and the load-balancing scheme to be used for each application. Because each JavaMonitor process maintains state information locally, you must run only one instance of JavaMonitor per site. Figure 1-7 shows two application sites on one computer.
Figure 1-7 Two sites deployed on one computer
Web server 1 HTTP adaptor
HR.woa
instance 1 instance 2HR.woa
wotaskd process 1
JavaMonitor process 1
Web server 2 HTTP adaptor
Payroll.woa
instance 1 Payroll.woainstance 2
wotaskd process 2
JavaMonitor process 2 WebObjects Deployment
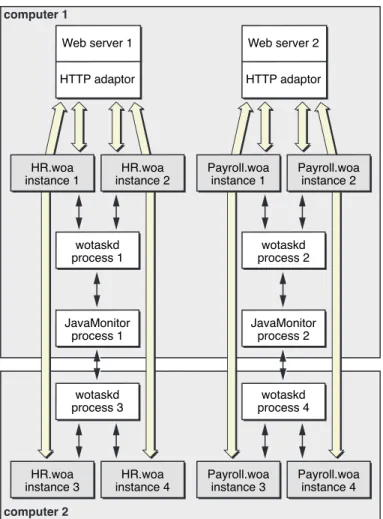
Figure 1-8 shows how you can distribute application instances among two computers.
Figure 1-8 Two sites deployed on two computers
Web server 1 HTTP adaptor wotaskd process 1 JavaMonitor process 1 wotaskd process 3 HR.woa
instance 3 instance 4HR.woa HR.woa
instance 1 instance 2HR.woa
Web server 2 HTTP adaptor wotaskd process 2 JavaMonitor process 2 wotaskd process 4 Payroll.woa
instance 3 Payroll.woainstance 4 Payroll.woa
instance 1 Payroll.woainstance 2 computer 1
computer 2
After you configure your site using JavaMonitor, it enforces that configuration by performing tasks such as stopping and restarting application instances according to a schedule you set and sending email notifications when problems arise. The HTTP adaptor performs load balancing across the instances of each application on your site.
For detailed information on the subjects introduced above, see the following chapters or sections:
● HTTP Adaptors (page 27) shows you the different ways in which you can configure the WebObjects HTTP
adaptor.
● Deployment Tasks (page 54) describes how you use JavaMonitor to configure your site.
WebObjects Deployment
● wotaskd Processes (page 48) explains how wotaskd processes communicate with and manage application
instances.
● Lifebeats (page 47) explains how application instances communicate with a wotaskd process. ● Deploying Multiple Sites (page 82) explains how to configure your platform to deploy multiple sites
concurrently.
● Load Balancing (page 82) describes how load balancing works and lists the algorithms that the HTTP
adaptor can use to implement it.
Keeping Your Site Secure
In a WebObjects deployment, you have several features at your disposal to enhance the security of your site:
● split-installation of applications (application files and web server resources): By installing
application-related files in two locations, you can put sensitive information (such as business logic) into protected locations. Nonsensitive resources (such as image files) can be installed on the Web server’s Document Rootdirectory. For more information, seeInstalling Applications (page 60).
● restricted access to deployment tools:JavaMonitor Password (page 80) explains how you can
password-protect access to JavaMonitor and wotaskd through a single page.
● restricted access to development application instances: If your computing environment supports both
the development and deployment of applications through the same Web server, access to development instances is restricted by the HTTP adaptor. SeeViewing a Host’s Configuration (page 58) for details.
● ability to disallow direct connections (through host name and port number) to an application instance:
With direct connect you can connect to an instance with the following URL:
http://myhost:1234
When you disallow direct connect for an instance, the only way to connect to it is through an Web server. For more information, seeWODirectConnectEnabledinWebObjects Application Properties Reference.
● restricted access to application-instance statistics: Agents external to your organization can use the
statistics that your application instances produce to get privileged information. To avoid this, access to the instance statistics page is restricted. SeeSetting a Password for the Instance Statistics Page (page 77) for details.
● restricted access to HTTP adaptor information (the WebObjects Adaptor Information page) by default:
This closes another potential hacker entry point. For details, seeSetting Access to the WebObjects Adaptor WebObjects Deployment
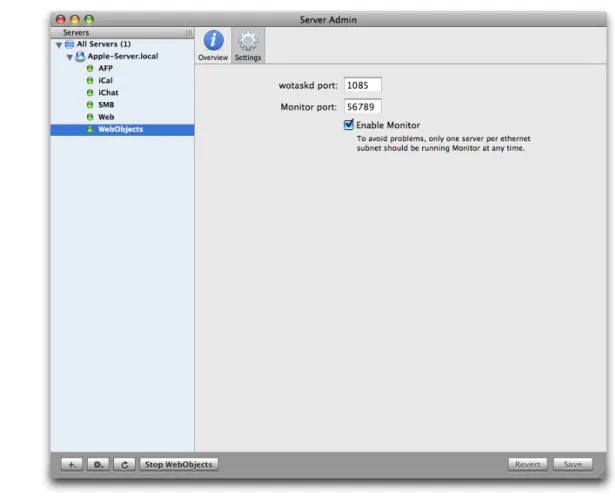
● restricted access to the wotaskd port: wotaskd uses Port 1085. The access to this port (both UPD and
TCP) must be protected through a firewall in order to have a secure environment. See alsoSecurity Issues with wotaskd (page 49)
WebObjects Deployment
Important: In WebObjects 5.3 and later, you do not need a deployment license key. WebObjects Deployment is preinstalled with Mac OS X Server 10.4.1 and later. However, installing earlier WebObjects deployment packages requires a deployment license key. Read the license agreement before installing earlier releases.
Important: On Mac OS X Server v10.5 and later, you have the option of either keeping the configuration files for Apache 1.3 and continuing to use Apache 1.3, or upgrading to Apache 2. Once you upgrade to Apache 2, you cannot return to Apache 1.3.
A clean install of Mac OS X Server v10.5 will always use Apache 2.2. If you wish to keep Apache 1.3, you should do an upgrade install instead of a clean install.
The Migration Assistant automatically converts your Apache 1.3 configuration files to Apache 2 when you upgrade to Apache 2. After an upgrade install, if you want to upgrade your Apache Version from 1.3 to 2.2, start the Server Admin application and select the Web module. Select “Upgrade Apache Version” to upgrade to Apache 2. If there is a problem during the translation process, the conversion stops and your Apache 1.3 configuration files are left unmodified. Errors, warnings, or confirmations of successful operations during the conversion are logged at/Library/Logs/Migration.
SeeMac OS X Server Upgrading and Migrating to Version 10.4 or LaterandMac OS X Server Web Technologies Administrationfor more details.
Important: If your WebObjects adaptor does not start properly with the Apache 2.2 module, then check if the Apache configuration filehttpd.confis missing a reference to the WebObjects adaptor.
To do this, open the/etc/apache2/httpd.conffile and search for this line:
Include /System/Library/WebObjects/Adaptors/Apache2.2/apache.conf
If this line does not exist, add these lines to the/etc/httpd/httpd.conffile and restart your web server: # Including WebObjects Configs
Include /System/Library/WebObjects/Adaptors/Apache2.2/apache.conf
This chapter addresses WebObjects Deployment installation issues, including what elements of the software need to be installed on a computer, taking the computer’s purpose into account.
● Choosing What to Install (page 19) explains which files need to be installed on a computer, based on the
purpose of the computer within a deployment.
● HTTP Adaptors (page 21) covers the various HTTP adaptors that can be used in a deployment. It explains
which adaptors are appropriate for your platform as well as how to build an adaptor from the source files included with WebObjects.
● Data-Store Adaptor Installation (page 25) describes the JDBC and JNDI adaptors that WebObjects
applications can use to interact with data stores, such as databases and directory-services servers.
Choosing What to Install
When you perform a complete installation of WebObjects Deployment on a computer, two types of files are copied to its hard disk: adaptor files and deployment files.
HTTP Adaptor Files
HTTP adaptors allow your web server to communicate with WebObjects application instances. The adaptor processes a single transaction, a request and its response, at a time. Normally, the request is forwarded to a single application instance, which, in turn, generates the response. Exceptions include error conditions or a request for an application that does not exist.
Typically an HTTP adaptor performs the following actions for each request:
1. Reads the request from the server, checks the URL, and collects header data and form data.
2. Finds an application to service the request. This is the part of the process that involves load balancing between instances.
3. Uses an existing socket connection to the application or connects a new socket to the application and forwards the request to the application.
4. Waits for and reads the response (status, headers, and content).
5. Returns the connection to the connection pool or—if the connection is transitory—closes the connection.
6. Sends the response to the client through the web server.
The executable files of the HTTP adaptors are placed in/System/Library/WebObjects/Adaptors. You can build your own adaptors using the source files for the default adaptors as a starting point. These source Installing Software
Deployment Files
Deployment files are divided into two groups:
● Runtime environment. The runtime environment of WebObjects is implemented in JAR (Java archive)
files contained withinframework(.framework) bundles. WebObjects frameworks are installed in /System/Library/Frameworks. These frameworks are used by any WebObjects application, including the deployment tools of WebObjects.
● Deployment tools. WebObjects Deployment includes two deployment tools you use to configure and
monitor your site. The files that make up these tools are placed in
/System/Library/WebObjects/JavaApplications. Table 2-1 shows the purpose of each tool. For more information on the deployment tools, seeManaging Application Instances (page 46).
Table 2-1 The WebObjects deployment and administration tools Purpose Application name
Filename
Site configuration and administration JavaMonitor
JavaMonitor.woa
Instance management wotaskd
wotaskd.woa
Note: In WebObjects 5.4, the source for the deployment tools is located in the
/Developer/Examples/JavaWebObjects/Source/JavaMonitorfolder.
Types of WebObjects Deployment Installations
Depending on the purpose of the computer you’re installing the software on, there are three types of WebObjects Deployment installations you can perform:
● Web server only: On a computer that you want to use as the web server but on which you do not intend
to run application instances (including the deployment tools), you need to install only the HTTP adaptor files.
● Application host only: On computers that you intend to use only as application hosts, you need to install
only the deployment tools. (If you do not plan to run JavaMonitor on that computer, you can delete its files.)
● Web server and application host: When one computer can satisfy all your deployment needs or when
you want a web server to also run application instances, you need to install the adaptor files and the deployment tools.
Installing Software
HTTP Adaptors
WebObjects uses a variety of HTTP adaptors to enable access to applications through a web server. Depending on your deployment platform, particular HTTP adaptors are installed by default.
Mac OS X Server supports Apache and CGI. The Apache adaptor is active by default. Requests in the form http://.../cgi-bin/WebObjects/are handled by the Apache adaptor. If you disable the Apache module, such requests are handled by the CGI adaptor.
General Adaptor Building Issues
Important: In WebObjects 5.4 and later, recompiling the Apache 1.3 adaptor is not supported. The source for the Apache 2 adaptor is located in the
/Developer/Examples/WebObjects/Source/Adaptors/Apache 2folder in the WebObjects development package.
If you want to use an HTTP adaptor other than the one installed by default on your platform, you need to build it and install it. This section discusses building HTTP adaptors from the source code in
/Developer/Examples/WebObjects/Source/Adaptors.
Before building an adaptor, make sure that you have the following installed:
● WebObjects Deployment
● ANSI-C compliant compiler—for example,gccversion 2.7.2 or later ● gnumakeversion 3.74 or later
● Web server software
Follow these steps to build your adaptor:
1. Select the platform you want to build on by editing theADAPTOR_OSvariable inmake.config.
2. Select the adaptor that you want to build by editing theADAPTORSvariable inmake.config. You can build multiple adaptors for different web servers at the same time.
3. Modify the appropriate compile-time parameters inAdaptor/config.h. Most features can be configured at initialization time. Some, however, are determined during compilation; you change these by editing config.h.
Installing Software
● For CGI, you might need to customizeCFLAGSorLDFLAGSinCGI/Makefile. For example, you don’t
need to define-nopdolibwhen you are not using the Apple PDO C compiler.
5. Set theCCvariable inmake.configto point at the compiler you want to use. The compiler must be an ANSI C compiler. TheCCvariable is set togccby default.
6. Typemakein theNEXT_ROOT/Developer/Examples/WebObjects/Source/Adaptorsfolder.
Note: To compile the Apache 2 adaptor on Mac OS X, typemake Apache2.2.
In case you need to modify the default adaptors, Table 2-2 identifies the purpose of the source files in /Developer/Examples/WebObjects/Source/Adaptors/.
Table 2-2 Adaptor source description
Description Source file
Interface modules that interact directly with the web server. Apache/mod_WebObjects.c
Interface modules that interact directly with the web server. CGI/WebObjects.c
Configuration-parameters file. Adaptor/config.h
Operating system–specific configuration items. Adaptor/config.c
Implements request/response processing. Adaptor/transaction.c
Structures and routines to collect headers and form data. Also function support for sending requests to applications.
Adaptor/request.c
Structures and routines to collect response headers and content.
Adaptor/response.c
Getshostentstructure for an application host using gethostbynameand caches the result.
Adaptor/hostlookup.c
Declaration of application IPC API. Adaptor/transport.h
Transport is implemented with nonblocking sockets. This file provides timeouts and user-space buffering.
Adaptor/nbsocket.c
Declaration of functions to provide load balancing. Load-balancing implementations need to define these Adaptor/loadbalancing.h
Installing Software
Description Source file
Load-balancing routine that randomly selects any available application instance.
Adaptor/random.c
Load-balancing routine that selects an instance using a round-robin algorithm.
Adaptor/roundrobin.c
Load-balancing routine that selects an instance using the load average returned by each instance in its headers.
Adaptor/loadaverage.c
printfstyle logging to/tmp/WebObjects.log. Checks for the existence of/tmp/logWebObjects, an empty file that must be owned by root on UNIX platforms. This file should not be present in deployment mode.
Adaptor/log.c
Parses the configuration information supplied in an XML document. This is either supplied from wotaskd, a URL, or a file.
Adaptor/xmlparse.c
WebObjects URL-parsing routines. Adaptor/WOURLCUtilities.c
Additional utility functions to augmentWOURLCUtilities.c. Adaptor/MoreURLCUtilities.c
String key–based dictionary. Adaptor/strdict.c
String key/value lookup data structure. Adaptor/strtbl.c
Data structure used to collect pointers. Adaptor/list.c
Building the Apache Adaptor
A successful build of the Apache adaptor yields a file named mod_WebObjects.so. This file should be copied into/System/Library/WebObjects/Adaptors/Apacheon Mac OS X and
NEXT_ROOT/Library/WebObjects/Adaptors/Apacheon other platforms. In order for the adaptor to work, Apache must be configured to accept Dynamic Shared Objects (DSOs). Refer to the Apache web server documentation available athttp://www.apache.orgfor more information on building Apache to accept DSOs. If the adaptor fails to build, it is probably because Apache is not built to accept DSOs.
Once you have built the adaptor and server, you need to configure the web server to handle WebObjects requests. SeeCustomizing HTTP Adaptors (page 41) for more information on configuring Apache. Installing Software
After you have built and configured the server with the linked adaptor, you should start it and confirm that it’s working by moving aside the WebObjects CGI adaptor in thecgi-bindirectory and making a few requests. You can determine whether the CGI or Apache adaptor is handling requests by turning on the logging feature of the adaptor as follows:
1. As root, execute the following command:
touch /tmp/logWebObjects
2. Make a request to a WebObjects application to initialize the log file.
3. Execute the following command:
tail -f /tmp/WebObjects.log
4. If the Apache web server is configured to use the CGI adaptor, each request is logged as
Info: <CGI> new request: /cgi-bin/WebObjects/MyApp
5. If the Apache web server is configured to use the WebObjects Apache module, each request is logged as
Info: <WebObjects Apache Module> new request: /cgi-bin/WebObjects/MyApp
Building the CGI Adaptor
The default CGI adaptor is a generic CGI adaptor designed to be used with all web servers that support CGI. There is a performance disadvantage when using CGI adaptors; therefore, you should consider using a server plug-in adaptor whenever possible.
To install this adaptor, copy the fileWebObjectsto your web server’scgi-binorscriptsdirectory. This is done for you if you install WebObjects on a system with a web server installed.
It is possible to configure the CGI adaptor to contact the instance of wotaskd on localhost for adaptor
configuration information including the list of instances. For deployment you normally want to use a different mechanism that is less expensive. Set up the CGI adaptor to use either a static file on the web server or a static URL for this information. For examples of this, seeCustomizing HTTP Adaptors (page 41).
Installing Software
● Verify that it is owned by root:admin. ● Make it executable by everyone.
Although generally not the best for production-level deployment, there is a good reason to use the CGI adaptor. It is useful for exercising the underlying request handler and debugging any customizations you may have made to the source code. Since all input to any CGI program is provided in the environment variables and stdin, the WebObjects CGI program can be conveniently run under a debugger.
To do this, set the following environment variables and values as shown in Table 2-3.
Table 2-3 CGI debugging variable settings Value
Environment variable
GET REQUEST_METHOD
HTTP/1.0 SERVER_PROTOCOL
\?foo=bar QUERY_STRING
/cgi-bin/WebObjects SCRIPT_NAME
/MyApps/MyCoolApp PATH_INFO
If you want to include form data, set aCONTENT_LENGTHheader and type the form asstdin. An alternative is to edit and execute theTestCGI.shorEnv.cshfiles provided in
/Developer/Examples/WebObjects/Source/Adaptors/CGI.
Data-Store Adaptor Installation
This section provides resources that help you obtain and install the two types of data-store adaptors that WebObjects applications may require: database adaptors and adaptors for directory-services servers.
Database Adaptors
To ensure that your JDBC driver works with your database, you should get the latest JDBC driver that matches the version of your database and the version of Java JDK installed on your machine.
Installing Software
Directory Services Adaptors
WebObjects provides access to directory services through the use of the JNDI adaptor in conjunction with a service provider. WebObjects has been tested with connections to the following Lightweight Directory Access Protocol (LDAP) servers:
● OpenLDAP Directory Server
To use this LDAP JNDI adaptor, you need to have the JNDI class libraries and the LDAP service provider from Sun Microsystems installed. These are both available fromhttp://java.sun.com/products/jndi. On Mac OS X these are installed by default.
Installing Software
This chapter provides detailed information about the HTTP adaptors that are included in a WebObjects Deployment installation. The HTTP adaptor is an important piece of an application site. It sits between your web server and your application instances. It forwards requests from the web server to the appropriate application instance and responses from the instance back to the web server. It also performs load balancing between instances of an application.
This chapter contains the following sections:
● Adaptors, Applications, and Hosts (page 28) provides a high-level view of the interaction between the
HTTP adaptor, application instances, and application hosts.
● Types of Adaptors (page 29) explains the differences among the two types of HTTP adaptors that you can
use on your site.
● State Discovery (page 30) describes how to configure an HTTP adaptor to obtain your site’s state dynamically
or using a configuration file. It also explains how to change a dynamic configuration into a static one.
● The WebObjects Adaptor Information Page (page 41) shows an example of the web browser page that
displays information about an HTTP adaptor.
● Customizing HTTP Adaptors (page 41) summarizes all the settings available for HTTP adaptors.
Adaptors, Applications, and Hosts
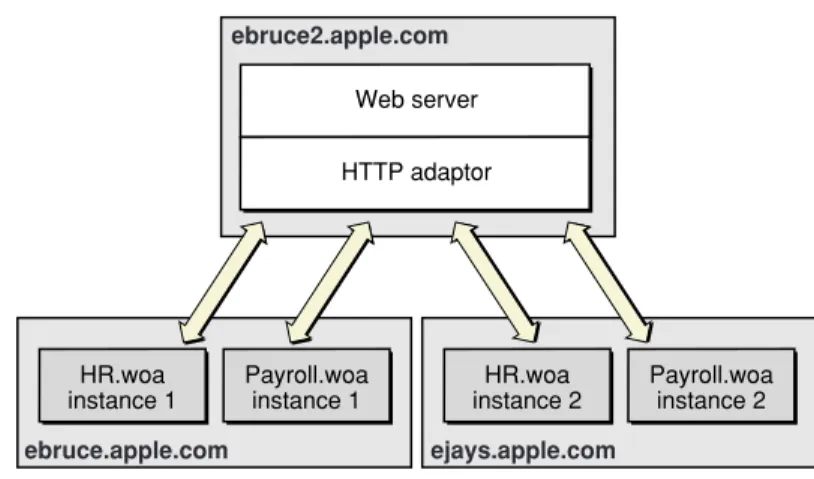
The HTTP adaptor forwards requests from an web server to application instances and returns responses from instances back to the server. You may need to have more than one instance of a given application to support a large number of concurrent users. Figure 3-1 illustrates a simple site, implemented with one computer. It serves two applications, with two instances for each application.
Figure 3-1 Deployment on one computer, using one adaptor
Web server HTTP adaptor
HR.woa
instance 1 instance 2HR.woa Payroll.woainstance 1 Payroll.woainstance 2
ebruce2.apple.com
Although the WebObjects installation provides several HTTP adaptors, only one is active by default (seeHTTP Adaptors (page 21) for details). However, an application instance can communicate with an adaptor other than the active adaptor.
Figure 3-2 depicts an application site running on one computer, using two adaptors.
Figure 3-2 Deployment on one computer using two adaptors
HR.woa
instance 1 instance 2HR.woa Payroll.woainstance 1 Payroll.woainstance 2 ebruce2.apple.com
Web server Default HTTP
adaptor Additional HTTPadaptor HTTP Adaptors
Most sites require multiple computers to ensure that an instance of a particular application is always available. In this kind of deployment, usually one computer runs the web server and the HTTP adaptor, while one or more additional computers serve as application hosts. Figure 3-3 illustrates an application site using three computers, one running the web server and the adaptor, and the other two running application instances.
Figure 3-3 Deployment using three computers using one adaptor
Web server HTTP adaptor
HR.woa
instance 1 Payroll.woainstance 1 instance 2HR.woa Payroll.woainstance 2 ebruce2.apple.com
ejays.apple.com ebruce.apple.com
The HTTP adaptor needs to periodically determine your site’s state—which application instances are running. There are two ways in which the adaptor can obtain this information:
● dynamically: The adaptor determines your site’s state by asking each application host for its state. The
adaptor can use a multicast request to find out which hosts are available or you can define a host list for it. Using this method, you avoid having to configure new hosts as you add them to your site.
● from a static file: An adaptor configuration file contains host and application information about your site;
it includes information about every application instance you want to run. After the adaptor reads the file, it has all the information it needs to communicate with the application instances you want to run. Using this kind of configuration avoids multicast requests and host polling. However, when you add new hosts, you have to update the configuration file. For more information on the adaptor configuration file, see Using a Configuration File (page 34).
Types of Adaptors
There are two general types of HTTP adaptors,CGI adaptorsandAPI-based adaptors. CGI adaptors are portable across many platforms. API-based adaptors are generally more efficient than CGI adaptors.
HTTP Adaptors
CGI Adaptors
WebObjects Deployment includes a CGI adaptor, which is an executable file namedWebObjects. The CGI adaptor resides in the Web server’scgi-binorscriptsdirectory. This adaptor works with any web server that conforms to the CGI standard.
The major drawback of CGI adaptors is their performance. When the web server receives a request from a web browser, it creates a new process for the HTTP adaptor. When the adaptor is done processing the request, the process is terminated.
The CGI adaptor is installed by default on all platforms, but it may not be the active one on your platform. See HTTP Adaptors (page 21) for more information.
API-Based Adaptors
API-based adaptors are founded on API specific to a particular web server. They allow CGI-like tasks to run as part of the main server process, avoiding the creation and termination of a process for each request. WebObjects Deployment includes Apache’s module API.
State Discovery
Your site’s state is represented by
● a list of application hosts
● a list of running application instances on each host
The HTTP adaptor captures your site’s state at regular intervals, which you set when you configure the adaptor. You also define the method that the adaptor uses to gather state information by configuring the adaptor itself. For details, seeCustomizing HTTP Adaptors (page 41).
The adaptor can obtain the state of your site using one of three methods:
● Multicast request: The adaptor sends a multicast request to find out what application hosts are available.
After compiling the host list, the adaptor polls each host to get its list of running application instances.
● Static host list: This method requires that you configure the host list in the adaptor itself. As with the first
method, the adaptor polls the hosts on the list for their lists of running application instances.
● Configuration file: The adaptor obtains the site’s configuration by reading anXML(Extensible Markup
Language) document. HTTP Adaptors
The method that requires the least administration on your part is the multicast request. If an application host goes down, the adaptor automatically removes the application instances running on it from its list of active instances. When the host is brought back up, the adaptor adds the instances back to its list. You should use this method if your site has many application hosts. SeeUsing a Multicast Request (page 31) for more information.
The second method, defining a host list for your adaptor, eliminates the multicast request. Use this method if you do not want the adaptor to send regular multicast requests out on your network or if you seldom add or remove application hosts from your site. This is the method that is active by default. However, the host list contains only one host,localhost. For details, seeUsing a Static Host List (page 34).
In the third method, using a configuration file, the HTTP adaptor obtains your site’s configuration by reading a file. This file can be static or it can be dynamically updated as you configure your site with Monitor. For details, seeUsing a Configuration File (page 34).
You can write the adaptor configuration file in one of two ways:
● Manually: The information in the configuration file is stored in an XML document. For details, seeThe
HTTP Adaptor Configuration File (page 34).
● Using JavaMonitor and wotaskd: After configuring your site to your liking using JavaMonitor, you can
have a file created for you or you can copy-and-paste the information. SeeCreating the HTTP Adaptor Configuration File (page 37) for more information.
Using a Multicast Request
When you configure an adaptor to obtain your site’s state using a multicast discovery request, the adaptor obtains the list of active application hosts by broadcasting a message to which each computer configured as a WebObjects application host responds. After the adaptor compiles the list of available hosts, it polls each one to obtain its state (the list of running application instances).
There are drawbacks to using the multicast method:
● It increases network traffic. By default, the HTTP adaptor sends a multicast request every 100 seconds. ● A host may become unavailable between discovery requests if the multicast request or a wotaskd process’s
response is lost (multicast is an inherently unreliable protocol).
● Normally, multicast broadcasts are limited to a subnet. However, you can configure your routers to pass-on
the multicast request to other subnets if you wish. HTTP Adaptors
Warning: By default, wotaskd does not respond to multicast requests. To be able to use the multicast request method, you must configure wotaskd processes in your application hosts to respond to multicast requests. If you configure wotaskd to respond to multicast requests, your server may be vulnerable to attacks unless properly protected by a firewall or other security measures.
Multicast Request
To discover available hosts, the adaptor sends a host-discovery request on the multicast channel (a nonrouting IP address and a port number), which is set to IP address239.128.14.2and port1085by default. The frequency of each multicast request is ten times as long as the adaptor’s configuration refresh interval. For details on how to change the multicast channel, readSetting the Multicast Address and Port (page 42). Also, seeWOPort,WOMulticastAddress, andWORespondsToMulticastQueryinWebObjects Application Properties Reference. When a wotaskd process starts, it creates a UDP (User Datagram Protocol) socket that listens to the multicast channel through which it receives multicast requests.
Note: If you change the address and port that adaptors use to send multicast requests, you must also change the address and port that wotaskd processes use to receive multicast requests.
When each wotaskd process receives the multicast request, it replies with its URL, such as http://host1.site.com:1085. The adaptor in turn compiles a list of these URLs.
Sending a multicast request on an entire subnet is an expensive process. If your available hosts never change, consider using a static host list instead.
HTTP Adaptors
Host Polling
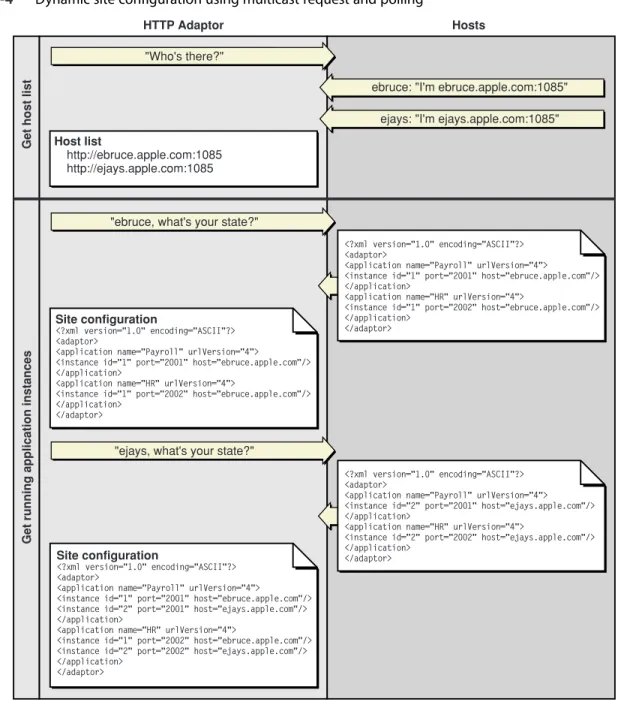
After the HTTP adaptor constructs the host list, it polls each application host on the list for information on the active application instances running on it. Each wotaskd process, in turn, sends its state information using the format inListing 3-2 (page 35). Host polling to obtain information on active instances occurs at the interval indicated in the configuration refresh interval setting for the HTTP adaptor. Figure 3-4 illustrates the process used to determine the configuration of the site inFigure 3-3 (page 29).
Figure 3-4 Dynamic site configuration using multicast request and polling
HTTP Adaptor Hosts
Site configuration
<?xml version="1.0" encoding="ASCII"?> <adaptor>
<application name="Payroll" urlVersion="4">
<instance id="1" port="2001" host="ebruce.apple.com"/> </application>
<application name="HR" urlVersion="4">
<instance id="1" port="2002" host="ebruce.apple.com"/> </application>
</adaptor>
Site configuration
<?xml version="1.0" encoding="ASCII"?> <adaptor>
<application name="Payroll" urlVersion="4">
<instance id="1" port="2001" host="ebruce.apple.com"/> <instance id="2" port="2001" host="ejays.apple.com"/> </application>
<application name="HR" urlVersion="4">
<instance id="1" port="2002" host="ebruce.apple.com"/> <instance id="2" port="2002" host="ejays.apple.com"/> </application>
Host list
http://ebruce.apple.com:1085 http://ejays.apple.com:1085
"Who's there?"
"ebruce, what's your state?"
"ejays, what's your state?"
ebruce: "I'm ebruce.apple.com:1085" ejays: "I'm ejays.apple.com:1085"
<?xml version="1.0" encoding="ASCII"?> <adaptor>
<application name="Payroll" urlVersion="4">
<instance id="1" port="2001" host="ebruce.apple.com"/> </application>
<application name="HR" urlVersion="4">
<instance id="1" port="2002" host="ebruce.apple.com"/> </application>
</adaptor>
<?xml version="1.0" encoding="ASCII"?> <adaptor>
<application name="Payroll" urlVersion="4"> <instance id="2" port="2001" host="ejays.apple.com"/> </application>
<application name="HR" urlVersion="4">
<instance id="2" port="2002" host="ejays.apple.com"/> </application> </adaptor> G et h o st li st G et r u n n in g a p p lic at io n in st an ce s HTTP Adaptors State Discovery
Using a Static Host List
This method is similar to the one described inUsing a Multicast Request (page 31). The only difference is that the HTTP adaptor skips the first part, the multicast request. The host polling process occurs at the interval set in the adaptor’s configuration refresh interval setting.
You must explicitly define a host list for each adaptor. SeeSetting the Host List (page 42) for details on defining the host list for each of the adaptors provided.
Using a Configuration File
Using an HTTP adaptor configuration file is useful when you want to have a static site configuration (one in which application instances are not stopped after they are started) or if you want to use JavaMonitor to configure your site and have the adaptor read your configuration changes immediately. (The adaptor reads the
configuration file every 10 seconds to determine which application instances are active.)
This method also provides a way of having more than one configuration of your site available. You can switch among different configurations by placing the appropriate configuration file in the configuration directory. The HTTP Adaptor Configuration File (page 34) explains how the file is structured and lists the properties that it defines. For instructions on creating the configuration file and configuring the HTTP adaptor to use it, see Creating the HTTP Adaptor Configuration File (page 37).
The HTTP Adaptor Configuration File
You can set up the HTTP adaptor to get your site’s configuration by reading an HTTP adaptor configuration file (calledWOConfig.xmlby default) in the configuration directory (/Library/WebObjects/Configuration by default). You should have only one adaptor configuration file per web server so that it can perform load balancing effectively. (SeeLoad Balancing (page 82) for details.) In addition, in a site with multiple web servers, if two servers share the configuration file, instead of deploying two sites you would be deploying the same site twice. Listing 3-1 shows a configuration file that defines a site with two application hosts
(ebruce.apple.comandejays.apple.com), each running two application instances, one of the Payroll application and the other of the HR application.
Listing 3-1 A WebObjects adaptor configuration file
<?xml version="1.0" encoding="ASCII"?> <adaptor>
<application name="Payroll" urlVersion="4">
<instance id="1" port="2002" host="ebruce.apple.com"/> HTTP Adaptors
</application>
<application name="HR" urlVersion="4">
<instance id="1" port="2001" host="ebruce.apple.com"/> <instance id="2" port="2002" host="ejays.apple.com"/> </application>
</adaptor>
The HTTP adaptor configuration file provides the HTTP adaptor with information about your site’s registered application instances. The structure of the configuration file is provided in Listing 3-2 (you can also view it by opening thewoadaptor.dtdfile, located in the/Developer/Examples/WebObjects/Source/Adaptors directory). For information on the properties defined in the configuration file, consultTable 3-1 (page 36).
Listing 3-2 Structure of the HTTP adaptor configuration file
<?xml version="1.0" encoding="ASCII"?>
<!DOCTYPE WebObjectsAdaptorConfiguration SYSTEM "woadaptor.dtd"> <adaptor>
<application name=STRING retries=NUMBER
scheduler=["RANDOM"|"ROUNDROBIN"|"LOADAVERAGE"] dormant=NUMBER
protocol="http" redir=URL poolSize=NUMBER urlVersion=["3"|"4"]
additionalArgs="unspecified" >
<instance id=NUMBER port=NUMBER host=STRING sendTimeout=NUMBER
recvTimeout=NUMBER cnctTimeout=NUMBER sendBufSize=NUMBER HTTP Adaptors
</application> </adaptor>
Table 3-1 The properties of the HTTP adaptor configuration file Description
Property
This property is used by the adaptor to implement load balancing. The adaptor can load-balance only between instances with the same application name. The property can be used to create groups of instances, even when the instances share the same executable file. This argument is set automatically for instances started by wotaskd.
name
The number of times a request is retried (trying several instances) if a
communications failure occurs before an error page is returned to the web server. retries
The load-balancing scheme used by the adaptor for instances of the application. The options provided by WebObjects are Round Robin, Random, and Load Average. You can also use a custom load balancer; seeLoad Balancing and Adaptor Settings (page 70) for details.
scheduler
The number of times the adaptor skips an instance of the application before trying again.
dormant
The URL that the user is redirected to when an instance fails to respond to a direct request.
redir
The maximum number of simultaneous connections the adaptor should keep open for each configured instance.
poolSize
The WebObjects version to use for URL parsing and formatting. All WebObjects 4, 4.5, and 5.x applications use version 4 URLs by default.
urlVersion
Additional information to send to the instance when it’s started. additionalArgs
The instance’s identification number. Must be unique for the load-balancing process to operate correctly.
id
The port on which the instance runs. port
Specifies the network interface that an instance binds to. This argument should only be used on hosts with multiple network interfaces (IP addresses).
host
The length of time, in seconds, that the adaptor attempts to send data to an sendTimeout
HTTP Adaptors
Description Property
The length of time, in seconds, that the adaptor waits for a response from an instance of the application before giving up.
recvTimeout
The length of time, in seconds, before the adaptor gives up connecting to an instance.
cnctTimeout
The size, in bytes, of the TCP/IP socket send buffer that’s used for adaptor-to-instance communication.
sendBufSize
The size, in bytes, of the TCP/IP socket receive buffer that’s used for adaptor-to-instance communication.
recvBufSize
Creating the HTTP Adaptor Configuration File
You can define your site’s configuration by writing the HTTP adaptor configuration file by hand. However, JavaMonitor provides you with an easy-to-use interface that facilitates this task.
Deployment Tasks (page 54) shows you how to configure your site using JavaMonitor. When you are satisfied with the configuration, you can save the settings into a configuration file by copying and pasting or by telling wotaskd to write the file.
To use the copy-and-paste method, follow these steps:
1. In JavaMonitor, display the Hosts page.
2. Click YES for any host.
The host configuration page is displayed in a new web browser window. HTTP Adaptors
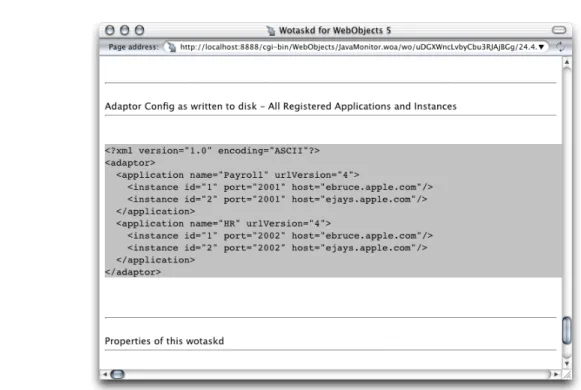
3. Copy the contents of the section Adaptor Config as written to disk—All Registered Applications and Instances, as shown in Figure 3-5.
Figure 3-5 Copying the information that makes up the HTTP adaptor configuration file
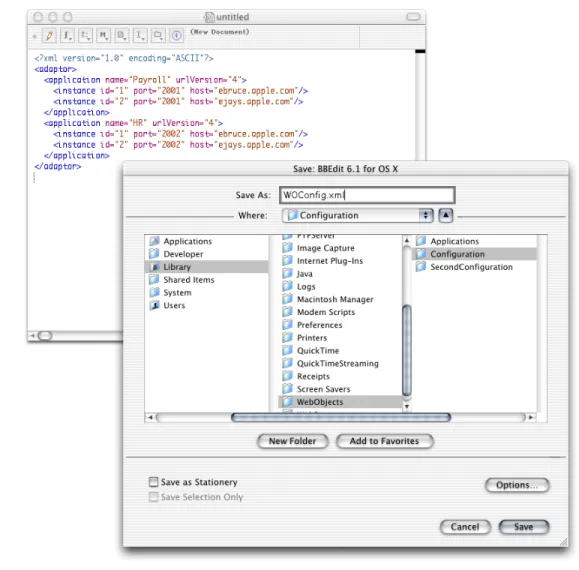
4. Using a text editor, create a new file and paste the contents of the clipboard into it. HTTP Adaptors
5. Save the file asWOConfig.xml(or any other name you choose) in the configuration directory.
Figure 3-6 Creating and saving the HTTP adaptor configuration file
If instead of copying and pasting you want wotaskd to create the configuration file for you, you can start a wotaskd process specifically to create the file or you can tell wotaskd to continually maintain the configuration file.
To start a wotaskd process specifically to create the file, you must first stop the process that corresponds to the site you configured if it’s already running on the web server computer.
To start a wotaskd process that writes the configuration file to the default location, execute the following two commands using your command shell editor:
HTTP Adaptors
To specify a different location for the HTTP adaptor configuration file, see
WODeploymentConfigurationDirectoryinWebObjects Application Properties Reference. If you want to give the file a different name,Setting the Name of the HTTP Adaptor Configuration File (page 43) shows you how.
To tell wotaskd to maintain the configuration file on a permanent basis, add the following to the WOServices script line that starts the wotaskd process:
-WOSavesAdaptorConfiguration true
When you restart your web server, the HTTP adaptor configuration file is updated every time you make a change to your site’s configuration through JavaMonitor. The changes are picked up by the HTTP adaptor the next time it reads the configuration file.
To configure the HTTP adaptor to read the configuration file instead of using a multicast request or a host list, follow the instructions inSetting the Name of the HTTP Adaptor Configuration File (page 43).
HTTP Adaptors
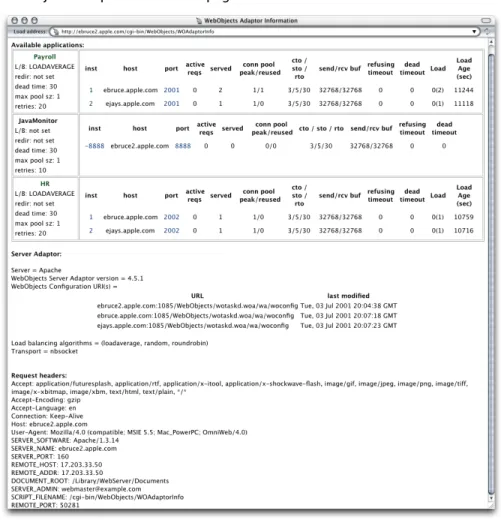
The WebObjects Adaptor Information Page
The WebObjects Adaptor Information page displays information about an HTTP adaptor. Access to this page is disabled by default so you must modify the adaptor configuration file to allow access. SeeSetting Access to the WebObjects Adaptor Information Page (page 43) for details. Figure 3-7 shows an example of the WebObjects Adaptor Information page.
Figure 3-7 The WebObjects Adaptor Information page
Customizing HTTP Adaptors
For the most part, you shouldn’t need to modify the default values of settings in the configuration file. However, if you want to change the way the HTTP adaptor obtains your site’s state information, for example, you need HTTP Adaptors
● Setting the Host List (page 42)
● Setting the Name of the HTTP Adaptor Configuration File (page 43) ● Setting Access to the WebObjects Adaptor Information Page (page 43) ● Setting an Alias for cgi-bin in the WebObjects URL (page 43)
● Setting the Document Root Path of the Web server (page 44) ● Setting WebObjects Options (page 44)
Setting the Multicast Address and Port
The following list explains how to set the multicast address, port, and configuration refresh interval (in seconds) in the supported HTTP adaptors. The default values for each of these properties are239.128.14.2,1085, and10respectively. The adaptor uses the configuration interval to determine the amount of time that passes between state discoveries on your site. The host-discovery process occurs 10 times less frequently than the time indicated by the configuration refresh interval. For example, with the configuration refresh interval set to10, the discovery process occurs every 100 seconds.
● Apache: Set the value of theWebObjectsConfigvariable in theapache.conf file to the desired values,
using the format shown below:
WebObjectsConfig webobjects://<address>:<port> <configuration_interval>
● CGI: Set theWO_CONFIG_URLenvironment variable towebobjects://<address>:<port>. Make sure
your web server is configured to pass the variable to the adaptor (consult your web server’s documentation for instructions).
Setting the Host List
The following list explains how to set a host list for a site with two hosts,host1andhost2, in the supported adaptors with a configuration interval of10(the configuration interval cannot be set in the CGI adaptor).
● Apache: Set theWebObjectsConfigvariable in theapache.conffile to the desired list of hosts. By
default it’s set tohttp://localhost:1085 10(the10is the configuration refresh interval). Separate each host with a comma, as shown in the following example:
WebObjectsConfig http://host1:1085,http://host2:1085 10 HTTP Adaptors
● CGI: Set theWO_CONFIG_URLenvironment variable tohttp://host1:1085,http://host:1085. Make
sure the web server is configured to pass the variable to the adaptor (consult your web server’s documentation for instructions).
Setting the Name of the HTTP Adaptor Configuration File
The following list shows how to set the name and location of the HTTP adaptor configuration file for the supported HTTP adaptors.
● Apache: Set the value ofWebObjectsConfigvariable in theapache.conffile to the path of the adaptor
configuration file.
WebObjectsConfig file://<path-to-an-xml-config-file> 10
● CGI: Set theWO_CONFIG_URLenvironment variable tofile://<path-to-an-xml-config-file>.
Make sure the web server is configured to pass the variable to the adaptor (consult your web server’s documentation for instructions).
Setting Access to the WebObjects Adaptor Information Page
You can provide access to the WebObjects adaptor information page (WOAdaptorInfo) to a specific user or to everyone. To provide access to a single user, you set the values of theusernameandpasswordproperties. To provide public access, set theusernameattribute topublic. The following list explains how to provide access to the information page to a user named Joe in the supported adaptors. For the changes to take effect, you need to restart the web server.
● Apache: Add the following lines to theapache.conffile, located in the
/System/Library/WebObjects/Adaptors/Apachedirectory:
WebObjectsAdminUsername joe WebObjectsAdminPassword secret
● CGI: Set theWO_ADAPTOR_INFO_USERNAMEandWO_ADAPTOR_INFO_PASSWORDenvironment variables
to the appropriate values. Make sure the web server is configured to pass the variables to the adaptor (consult your web server’s documentation for instructions).
HTTP Adaptors
● Apache and CGI: In theapache.conffile, change the line
WebObjectsAlias /cgi-bin/WebObjects
to
WebObjectsAlias /Store/WebObjects
Setting the Document Root Path of the Web server
The following list explains how to set the path to the document root of the supported web servers.
● Apache: In theapache.conffile, change the line
WebObjectsDocumentRoot /Library/WebServer/Documents
to
WebObjectsDocumentRoot <document-root-path>
● CGI: Set the value of theCGI_DOCUMENT_ROOTenvironment variable to the desired path. Make sure that
your web server is configured to pass the variable to the adaptor (consult your web server’s documentation for instructions).
Setting WebObjects Options
You can set several WebObjects options through an environment variable or Registry setting, depending on which web server you’re using. Table 3-2 shows the WebObjects options available:
Table 3-2 WebObjects options Description Option
Full path to log file. logPath
Logging level used to log HTTP adaptor activity. Values (from most verbose to least verbose)Debug,Info,Warn,Error, andUser.
logLevel HTTP Adaptors