System Administration
vRealize Automation 6.2.3
This document supports the version of each product listed and
supports all subsequent versions until the document is
replaced by a new edition. To check for more recent editions
of this document, see
http://www.vmware.com/support/pubs
.
You can find the most up-to-date technical documentation on the VMware Web site at:
http://www.vmware.com/support/
The VMware Web site also provides the latest product updates.
If you have comments about this documentation, submit your feedback to:
Copyright © 2008–2015 VMware, Inc. All rights reserved. Copyright and trademark information.
VMware, Inc.
3401 Hillview Ave. Palo Alto, CA 94304 www.vmware.com
Contents
System Administration 5
Updated Information 7
1
Configuring vRealize Automation 9
Configuring System Settings 9
Configure Branding for the vRealize Automation Console 9 Configuring Global Email Servers for Notifications 10 Configuring IaaS 12
Setting Resource-Intensive Concurrency Limits 12 Configuring Automatic IaaS Emails 15
Enabling Remote Desktop Connections 18 Enabling Users to Select Datacenter Locations 19 Enabling Visual Basic Scripts in Provisioning 20
Configuring the Customer Experience Improvement Program for vRealize Automation 21 Data That VMware Receives 21
Enable or Disable the Customer Experience Improvement Program for vRealize Automation 22 Configure Data Collection Time 22
2
Configure the vRealize Automation Appliance Database 23
Configure Database Virtual IP 24
Configure Internal Appliance Database 24
Configure Appliance Database Replication on the Secondary Appliance 25 Test Appliance Database Failover 26
Test Appliance Database Failback 28
3
Perform an Appliance Database Failover 29
4
Validate Appliance Database Replication 31
5
Bulk Import, Update, or Migrate Virtual Machines 33
Generate Virtual Machine CSV Data File 34 Edit Virtual Machine CSV Data File 35
Import, Update, or Migrate One or More Virtual Machines 36
6
Managing vRealize Automation 39
Managing Tenants 39 Tenancy Overview 39
Create and Configure a Tenant 44 Brand Tenant Login Pages 47
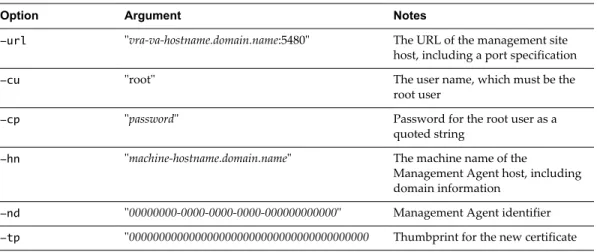
Updating vRealize Automation Certificates 47 Extracting Certificates and Private Keys 48 Updating the Identity Appliance Certificate 48 Updating the vRealize Appliance Certificate 50 Updating the IaaS Certificate 54
Replace the Identity Appliance Management Site Certificate 56 Updating the vRealize Appliance Management Site Certificate 57 Replace a Management Agent Certificate 60
View License Usage 61
Monitoring Logs and Services 62 View the Event Log 62
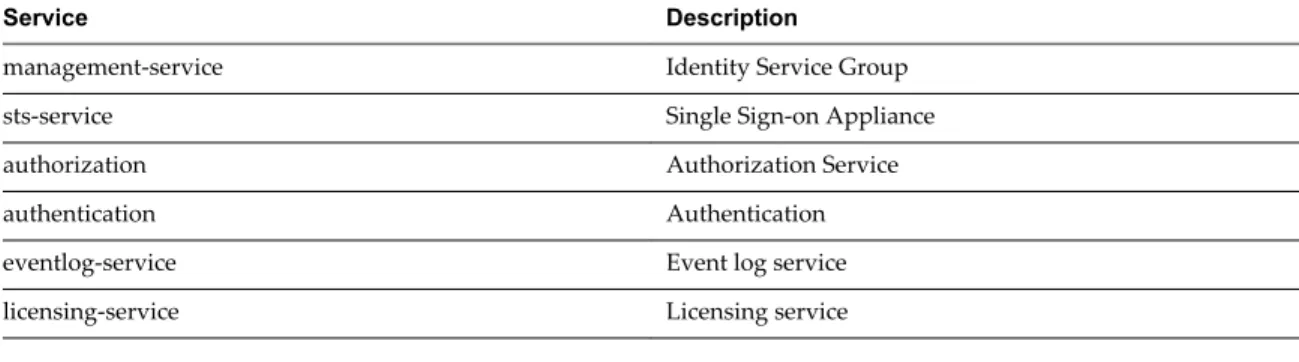
Viewing Host Information for Clusters in Distributed Deployments 62 vRealize Automation Services 64
Starting Up and Shutting Down vRealize Automation 65 Start Up vRealize Automation 65
Restart vRealize Automation 66 Shut Down vRealize Automation 66 Customize Data Rollover Settings 67
Remove an Identity Appliance from a Domain 68
7
Backup and Recovery for vRealize Automation Installations 69
Backing Up vRealize Automation 69
Backing Up vRealize Automation Databases 70 Backing Up the Identity Appliance 71
Backing Up the vRealize Appliance 71 Backing Up Load Balancers 72 Backing Up IaaS Components 72
Backing Up vRealize Automation Certificates 73 Activate the Failover IaaS Server 73
vRealize Automation System Recovery 74 Restoring vRealize Automation Databases 74 Restoring the Identity Appliance 76
Restore the vRealize Appliance and Load Balancer 76
Restoring the IaaS Website, Manager Services, and Their Load Balancers 77 Reinstall the DEM Orchestrator and the DEM Workers 80
Reinstall the IaaS Agents 80
System Administration
System Administration tells you how to customize, configure, and manage vRealize Automation. It includes
information about customizing the vRealize Appliance and VMware Infrastructure as a Service servers as well as information about managing tenants, using the bulk import feature, and performing backup and restore procedures.
NOTE Not all features and capabilities of vRealize Automation are available in all editions. For a
comparison of feature sets in each edition, see https://www.vmware.com/products/vrealize-automation/.
Intended Audience
This information is intended for anyone who wants to configure and manage vRealize Automation. The information is written for experienced Windows or Linux system administrators who are familiar with virtual machine technology and datacenter operations.
vCloud Suite Licensing and Integration
You can license vRealize Automation individually or as part of vCloud Suite. You should consider the licensing and integration options that are available to you.
Some vCloud Suite components are available as standalone products that are licensed on a per-virtual machine basis. When the products are part of vCloud Suite, they are licensed on a per-CPU basis. You can run an unlimited number of virtual machines on CPUs that are licensed with vCloud Suite. For more information, see vCloud Suite Architecture Overview and Use Cases.
VMware Technical Publications Glossary
VMware Technical Publications provides a glossary of terms that might be unfamiliar to you. For definitions of terms as they are used in VMware technical documentation, go to
Updated Information
This System Administration guide for vRealize Automation is updated with each release of the product or when necessary.
This table provides the update history of the System Administration guide.
Revision Description
EN-001648-06 n New documentation for “Brand Tenant Login Pages,” on page 47
n New documentation for importing virtual machines with static IP addresses. See “Edit Virtual
Machine CSV Data File,” on page 35.
EN-001648-05 n Updated documentation for Chapter 2, “Configure the vRealize Automation Appliance Database,”
on page 23
EN-001648-04 n New documentation for Chapter 2, “Configure the vRealize Automation Appliance Database,” on
page 23
n Updated documentation for Chapter 7, “Backup and Recovery for vRealize Automation
Installations,” on page 69.
EN-001648-03 Clarification of steps in the following topics:
n “Update the vRealize Appliance with the Identity Appliance Certificate,” on page 50 n “Update the vRealize Appliance with the IaaS Certificate,” on page 55
EN-001648-02 n New documentation for “Starting Up and Shutting Down vRealize Automation,” on page 65. n Revised and updated documentation for Management Agents. See “Manually Update Management
Agents to Recognize a vRealize Appliance Management Site Certificate,” on page 58
EN-001648-01 n Revised and updated documentation for Chapter 7, “Backup and Recovery for vRealize Automation
Installations,” on page 69. EN-001648-00 Initial release.
Configuring vRealize Automation
1
System administrators can change the appearance of the vRealize Automation console, configure notifications for the vRealize Automation appliance, and configure Infrastructure as a Service features. This chapter includes the following topics:
n “Configuring System Settings,” on page 9 n “Configuring IaaS,” on page 12
n “Configuring the Customer Experience Improvement Program for vRealize Automation,” on
page 21
Configuring System Settings
System administrators can configure system settings to change the appearance of the vRealize Automation console and configure inbound and outbound email servers to handle system notifications.
Configure Branding for the vRealize Automation Console
System administrators can change the appearance of the vRealize Automation console to meet site-specific branding guidelines by changing the logo, the background color, and information in the header and footer. System administrators control the default branding for tenants. Tenant administrators can use the default or reconfigure branding for each tenant.
As you make changes, a preview of each change appears at the bottom of the form. The changes take effect when they are saved.
Prerequisites
Log in to the vRealize Automation console as a system administrator or tenant administrator.
Procedure
1 Select Administration > Branding. 2 Clear the Use default check box. 3 Create a banner.
a Click Choose File to upload a logo image. b Follow the prompts to finish creating the banner. 4 Click Next.
5 Type the copyright information in the Copyright notice text box and press Enter to preview your selection.
6 (Optional) Type the URL to your privacy policy in the Privacy policy link text box and press Enter to preview your selection.
7 (Optional) Type the URL to your contact page in the Contact link text box and press Enter to preview your selection.
8 Click Update.
The console is updated with your changes.
Configuring Global Email Servers for Notifications
Tenant administrators can add email servers as part of configuring notifications for their own tenants. As a system administrator, you can set up global inbound and outbound email servers that appear to all tenants as the system defaults. If tenant administrators do not override these settings before enabling notifications, vRealize Automation uses the globally configured email servers.
Create a Global Inbound Email Server
System administrators create a global inbound email server to handle inbound email notifications, such as approval responses. You can create only one inbound server, which appears as the default for all tenants. If tenant administrators do not override these settings before enabling notifications, vRealize Automation uses the globally configured email server.
Prerequisites
Log in to the vRealize Automation console as a system administrator.
Procedure
1 Select Administration > Email Servers. 2 Click the Add icon ( ).
3 Select Email – Inbound. 4 Click OK.
5 Enter a name in the Name text box.
6 (Optional) Enter a description in the Description text box. 7 (Optional) Select the SSL check box to use SSL for security. 8 Choose a server protocol.
9 Type the name of the server in the Server Name text box. 10 Type the server port number in the Server Port text box. 11 Type the folder name for emails in the Folder Name text box.
This option is required only if you choose IMAP server protocol. 12 Enter a user name in the User Name text box.
13 Enter a password in the Password text box.
14 Type the email address that vRealize Automation users can reply to in the Email Address text box. 15 (Optional) Select Delete From Server to delete from the server all processed emails that are retrieved by
the notification service.
16 Choose whether vRealize Automation can accept self-signed certificates from the email server. 17 Click Test Connection.
18 Click Add.
Create a Global Outbound Email Server
System administrators create a global outbound email server to handle outbound email notifications. You can create only one outbound server, which appears as the default for all tenants. If tenant administrators do not override these settings before enabling notifications, vRealize Automation uses the globally configured email server.
Prerequisites
Log in to the vRealize Automation console as a system administrator.
Procedure
1 Select Administration > Email Servers. 2 Click the Add icon ( ).
3 Select Email – Outbound. 4 Click OK.
5 Enter a name in the Name text box.
6 (Optional) Enter a description in the Description text box. 7 Type the name of the server in the Server Name text box. 8 Choose an encryption method.
n Click Use SSL. n Click Use TLS.
n Click None to send unencrypted communications.
9 Type the server port number in the Server Port text box.
10 (Optional) Select the Required check box if the server requires authentication. a Type a user name in the User Name text box.
b Type a password in the Password text box.
11 Type the email address that vRealize Automation emails should appear to originate from in the Sender
Address text box.
This email address corresponds to the user name and password you supplied.
12 Choose whether vRealize Automation can accept self-signed certificates from the email server. 13 Click Test Connection.
14 Click Add.
Configuring IaaS
A system administrator can adjust concurrency limits for an IaaS Windows server to best use resources, customize email sent from the server, and enable connections to other machines.
Setting Resource-Intensive Concurrency Limits
To conserve resources, vRealize Automation limits the number of concurrently running instances of machine provisioning and data collection. You can change the limits.
Configuring Concurrent Machine Provisioning
Multiple concurrent requests for machine provisioning can impact the performance of vRealize Automation. You can make some changes to limits placed on proxy agents and workflow activities to alter performance. Depending on the needs of machine owners at your site, the vRealize Automation server may receive multiple concurrent requests for machine provisioning. This can happen under the following circumstances:
n A single user submits a request for multiple machines n Many users request machines at the same time
n One or more group managers approve multiple pending machine requests in close succession
The time required for vRealize Automation to provision a machine generally increases with larger numbers of concurrent requests. The increase in provisioning time depends on three important factors:
n The effect on performance of concurrent resource-intensive vRealize Automation workflow activities,
including the SetupOS activity (for machines created within the virtualization platform, as in WIM-based provisioning) and the Clone activity (for machines cloned within the virtualization platform).
n The configured vRealize Automation limit on the number of resource-intensive (typically lengthy)
provisioning activities that can be executed concurrently. By default this is two. Concurrent activities beyond the configured limit are queued.
n Any limit within the virtualization platform or cloud service account on the number of
vRealize Automation work items (resource-intensive or not) that can be executed concurrently. For example, the default limit in vCenter Server is four, with work items beyond this limit being queued. By default, vRealize Automation limits concurrent virtual provisioning activities for hypervisors that use proxy agents to two per proxy agent. This ensures that the virtualization platform managed by a particular agent never receives enough resource-intensive work items to prevent execution of other items. Plan to carefully test the effects of changing the limit before making any changes. Determining the best limit for your site may require that you investigate work item execution within the virtualization platform as well as workflow activity execution within vRealize Automation.
If you do increase the configured vRealize Automation per-agent limit, you may have to make additional configuration adjustments in vRealize Automation, as follows:
n The default execution timeout intervals for the SetupOS and Clone workflow activities are two hours
for each. If the time required to execute one of these activities exceeds this limit, the activity is cancelled and provisioning fails. To prevent this failure, increase one or both of these execution timeout intervals.
n The default delivery timeout intervals for the SetupOS and Clone workflow activities are 20 hours for
each. Once one of these activities is initiated, if the machine resulting from the activity has not been provisioned within 20 hours, the activity is cancelled and provisioning fails. Therefore, if you have increased the limit to the point at which this sometimes occurs, you will want to increase one or both of these delivery timeout intervals.
Configuring Concurrent Data Collections
By default, vRealize Automation limits concurrent data collection activities. If you change this limit, you can avoid unnecessary timeouts by changing the default execution timeout intervals for the different types of data collection.
vRealize Automation regularly collects data from known virtualization compute resources through its proxy agents and from cloud service accounts and physical machines through the endpoints that represent them. Depending on the number of virtualization compute resources, agents, and endpoints in your site, concurrent data collection operations may occur frequently.
Data collection running time depends on the number of objects on endpoints including virtual machines, datastores, templates, and compute resources. Depending on many conditions, a single data collection can require a significant amount of time. As with machine provisioning, concurrency increases the time required to complete data collection.
By default, concurrent data collection activities are limited to two per agent, with those over the limit being queued. This ensures that each data collection completes relatively quickly and that concurrent data collection activities are unlikely to affect IaaS performance.
Depending on the resources and circumstances at your site, however, it may be possible to raise the
configured limit while maintaining fast enough performance to take advantage of concurrency in proxy data collection. Although raising the limit can increase the time required for a single data collection, this might be outweighed by the ability to collect more information from more compute resources and machines at one time.
If you do increase the configured per-agent limit, you might have to adjust the default execution timeout intervals for the different types of data collection that use a proxy agent—inventory, performance, state, and WMI. If the time required to execute one of these activities exceeds the configured timeout intervals, the activity is canceled and restarted. To prevent cancellation of the activity, increase one or more of these execution timeout intervals.
Adjust Concurrency Limits and Timeout Intervals
You can change the per-agent limits on concurrent provisioning, data collection activities, and the default timeout intervals.
When typing a time value for these variables, use the format hh:mm:ss (hh=hours, mm=minutes, and ss=seconds).
Prerequisites
Log in as an administrator to the server hosting the IaaS Manager Service. For distributed installations, this is the server on which the Manager Service was installed.
Procedure
1 Open the ManagerService.exe.config file in an editor. The file is located in the vRealize Automation
server install directory, typically %SystemDrive%\Program Files x86\VMware\vCAC\Server.
2 Locate the section called workflowTimeoutConfigurationSection.
3 Update the following variables, as required.
Parameter Description
MaxOutstandingResourceIntensive WorkItems
Concurrent provisioning limit (default is two) CloneExecutionTimeout Virtual provisioning execution timeout interval SetupOSExecutionTimeout Virtual provisioning execution timeout interval CloneTimeout Virtual provisioning clone delivery timeout interval
Parameter Description
SetupOSTimeout Virtual provisioning setup OS delivery timeout interval CloudInitializeProvisioning Cloud provisioning initialization timeout interval MaxOutstandingDataCollectionWor
kItems
Concurrent data collection limit
InventoryTimeout Inventory data collection execution timeout interval PerformanceTimeout Performance data collection execution timeout interval StateTimeout State data collection execution timeout interval
4 Save and close the file.
5 Select Start > Administrative Tools > Services. 6 Stop and then restart the vRealize Automation service.
7 (Optional) If vRealize Automation is running in High Availability mode, any changes made to the
ManagerService.exe.config file after installation must be made on both the primary and failover
servers.
Adjust Execution Frequency of Machine Callbacks
You can change the frequency of several callback procedures, including the frequency that the vRealize Automation callback procedure is run for changed machine leases.
vRealize Automation uses a configured time interval to run different callback procedures on the Model Manager service, such as ProcessLeaseWorkflowTimerCallbackIntervalMiliSeconds which searches for machines whose leases have changed. You can change these time intervals to check more or less frequently.
When entering a time value for these variables, enter a value in milliseconds. For example, 10000 milliseconds = 10 seconds and 3600000 milliseconds = 60 minutes = 1 hour.
Prerequisites
Log in as an administrator to the server hosting the IaaS Manager Service. For distributed installations, this is the server on which the Manager Service was installed.
Procedure
1 Open the ManagerService.exe.config file in an editor. The file is located in the vRealize Automation
server install directory, typically %SystemDrive%\Program Files x86\VMware\vCAC\Server.
2 Update the following variables, as desired.
Parameter Description
RepositoryWorkflowTimerCallback MiliSeconds
Checks the repository service, or Model Manager Web Service, for activity. Default value is 10000.
ProcessLeaseWorkflowTimerCallba ckIntervalMiliSeconds
Checks for expired machine leases. Default value is 3600000. BulkRequestWorkflowTimerCallbac
kMiliSeconds
Checks for bulk requests. Default value is 10000. MachineRequestTimerCallbackMiliS
econds
Checks for machine requests. Default value is 10000. MachineWorkflowCreationTimerCall
backMiliSeconds
Checks for new machines. Default value is 10000.
3 Save and close the file.
6 (Optional) If vRealize Automation is running in High Availability mode, any changes made to the
ManagerService.exe.config file after installation must be made on both the primary and failover
servers.
Configuring Automatic IaaS Emails
You can configure the automatic notification emails sent to machine owners by the IaaS service about events involving their machines.
The events that trigger these notifications include, for example, the expiration or approaching expiration of archive periods and virtual machine leases.
Tenant administrators can enable or disable IaaS email notifications for machine owners, and machine owners can choose to receive or not receive email notifications. Anyone with access to the
directory \Templates under the vRealize Automation server install directory (typically %SystemDrive %\Program Files x86\VMware\vCAC\Server) can configure the templates for these email notifications.
Email Template Object Reference
You can add email template objects to automatic email templates to return information about URIs, machines, blueprints, costs, and requests.
You can use the following email template objects to return information to automatic email templates.
n WebsiteURIItems n WebsiteURIInbox n VirtualMachineEx
n VirtualMachineTemplateEx n ReservationHelper
n Request
n RequestWithAudit
The WebsiteURIItems object returns the URL of the Items tab on the vRealize Automation console, for example https://vcac.mycompany.com/shell-ui-app/org/mytenant/#csp.catalog.item.list. To use this
object to provide a link to the My Items page in the console, consider the following sample lines.
Click <a>
<xsl:attribute name="href">
<xsl:value-of select="//WebsiteURIItems"/>
</xsl:attribute><xsl:value-of select="//WebsiteURIItems"/>here</a> for your provisioned items.
The WebsiteURIInbox object returns the URL of the Inbox tab on the vRealize Automation console, for example https://vcac.mycompany.com/shell-ui-app/org/mytenant/#cafe.work.items.list. To use this
object to provide a link to the My Inbox page in the console, consider the following sample lines.
Click <a>
<xsl:attribute name="href">
<xsl:value-of select="//WebsiteURIInbox"/></xsl:attribute><xsl:value-of select="//WebsiteURIInbox"/>here</a>
for your assigned tasks.
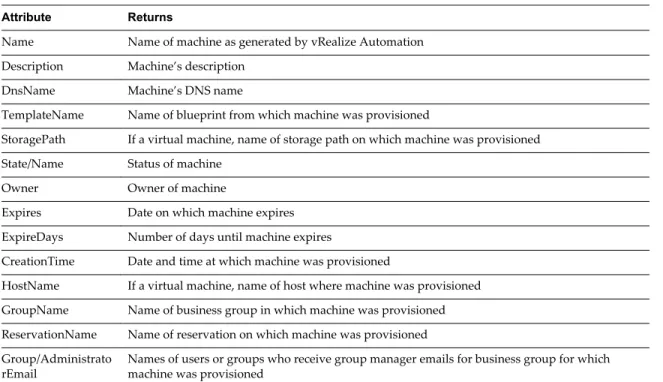
The VirtualMachineEx object returns a specific item of information about the machine associated with the event triggering the email. The information is determined by the attribute provided with the object; see the table Selected Attributes of the VirtualMachineEx Object for more information. For example, you could use the following line to include the expiration date of the machine in an email.
<xsl:value-of select="//VirtualMachineEx/Expires"/>
Table 1‑1. Selected Attributes of the VirtualMachineEx Object Attribute Returns
Name Name of machine as generated by vRealize Automation Description Machine’s description
DnsName Machine’s DNS name
TemplateName Name of blueprint from which machine was provisioned
StoragePath If a virtual machine, name of storage path on which machine was provisioned State/Name Status of machine
Owner Owner of machine
Expires Date on which machine expires ExpireDays Number of days until machine expires
CreationTime Date and time at which machine was provisioned
HostName If a virtual machine, name of host where machine was provisioned GroupName Name of business group in which machine was provisioned ReservationName Name of reservation on which machine was provisioned Group/Administrato
rEmail Names of users or groups who receive group manager emails for business group for whichmachine was provisioned
In addition, the special attribute Properties lets you search the custom properties associated with the machine for a specific property and return the value if found. For example, to include the value of Image.WIM.Name, which specifies the name of the WIM image from which a machine was provisioned, you could use the following lines.
<xsl:for-each select="//VirtualMachineEx/Properties/NameValue"> <xsl:if test="starts-with(Name, 'Image.WIM.Name')">
<xsl:value-of select="Value"/>
If the machine does not have the Image.WIM.Name property, nothing is returned.
The VirtualMachineTemplateEx object returns a specific item of information about the source blueprint of the machine associated with the even triggering the email. The information is determined by the attribute provided with the object; see the table Selected Attributes of the VirtualMachineTemplateEx Email Object for more information. For example, to include the daily cost specified in the source blueprint you could use the following line:
<xsl:value-of select="//VirtualMachineTemplateEx/Cost"/>
Table 1‑2. Selected Attributes of the VirtualMachineTemplateEx Email Object Attribute Returns
Name Name of blueprint
Description Blueprint’s description
MachinePrefix Machine prefix specified in blueprint LeaseDays Number of lease days specified in blueprint
ExpireDays If a virtual blueprint, number of archive days specified Cost Daily cost specified in blueprint
VirtualMachineTemplateEx also takes the special attribute Properties to let you search the custom properties included in the blueprint for a specific property and return the value if found, as described for the
VirtualMachineEx object.
The ReservationHelper object returns information about the daily cost of the machine, as specified by the attributes in the table Selected Attributes of the ReservationHelper Email Object, when a cost profile applies to the virtual or physical machine associated with the event triggering the email.
Table 1‑3. Selected Attributes of the ReservationHelper Email Object Attribute Returns
DailyCostFormatted Daily cost of machine
LeaseCostFormatted Daily cost times the number of days in the machine’s lease.
Modify an Existing Automatic Email Template
You can edit the automatic email templates used by the IaaS service when notifying machine owners and managers.
You can customize the text and format of the automatic email for an IaaS event by editing the XSLT template for the event. You can find the following IaaS templates in the directory \Templates under the
vRealize Automation server install directory (typically %SystemDrive%\Program Files x86\VMware\vCAC\Server).
n ArchivePeriodExpired n EpiRegister
n EpiUnregister n LeaseAboutToExpire n LeaseExpired
n LeaseExpiredPowerOff n ManagerLeaseAboutToExpire n ManagerLeaseExpired
n ManagerReclamationExpiredLeaseModified n ManagerReclamationForcedLeaseModified n ReclamationExpiredLeaseModified n ReclamationForcedLeaseModified n VdiRegister
n VdiUnregister
Prerequisites
Log in to the IaaS Manager Service host using administrator credentials.
Procedure
1 Change to the directory \Templates.
2 Edit an XSLT template as required.
Customize the Date for Email Notification for Machine Expiration
You can choose when to send email to notify users of a machine expiration date.
If vRealize Automation is running in high availability mode, and you make changes to the
ManagerService.exe.config file after installation, you must make the changes on the primary and the
failover vRealize Automation servers.
Procedure
1 Log in to the vRealize Automation server by using credentials with administrative access.
2 Edit the ManagerService.exe.config file in %SystemDrive%\Program Files x86\VMware\vCAC\Server, or
in the vRealize Automation server install directory, if it is in a different location.
3 Locate the workflowEmailByStateSection section to customize machine owner emails and the workflowManagerEmailByStateSection to customize group manager emails.
4 In each section, set the value for DaysNotificationBeforeExpire.
This property sets the number of days before a machine’s expiration that an expiration notification email is sent if LeaseExpired is set to true. The default value is seven. You can set separate values for owners and managers.
5 Save and close the file.
6 Select Start > Administrative Tools > Services and restart the vCloud Automation Center service.
Enabling Remote Desktop Connections
A system administrator can create a custom remote desktop protocol file that tenant administrators and business group managers use in blueprints to configure RDP settings.
The following high-level overview is the sequence of tasks required to enable machine users to connect using RDP.
1 A system administrator creates a custom RDP file and places it in the Website\Rdp subdirectory of the
vRealize Automation installation directory. Provide fabric administrators, tenant administrators, and business group managers with the full pathname for the custom RDP file so that it can be included in blueprints.
2 (Optional) A fabric administrator creates a build profile using the property set
RemoteDesktopProtocolProperties to compile RDP custom properties and values for tenant
administrators and business group managers to include in their blueprints.
3 A tenant administrator or business group manager adds the RDP custom properties to a blueprint to configure the RDP settings of machines provisioned from the blueprint.
4 A tenant administrator or business group manager enables the Connect using RDP or SSH option in a blueprint.
5 A tenant administrator or business group manager entitles users or groups to use the Connect using
RDP or SSH option. See Tenant Administration.
Create a Custom RDP file
A system administrator creates a custom RDP file and provides fabric administrators, tenant administrators, and business group managers with the full pathname for the file so it can be included in blueprints.
NOTE If you are using Internet Explorer with Enhanced Security Configuration enabled, .rdp files cannot be
Prerequisites
Log in to the IaaS Manager Service as an administrator.
Procedure
1 Set your current directory to <vCAC_installation_dir>\Rdp.
2 Copy the file Default.rdp and rename it to Console.rdp in the same directory.
3 Open the Console.rdp file in an editor.
4 Add RDP settings to the file.
For example, connect to console:i:1.
5 If you are working in a distributed environment, log in as a user with administrative privileges to the IaaS Host Machine where the Model Manager Website component is installed.
6 Copy the Console.rdp file to the directory <vCAC_installation_dir>\Website\Rdp.
What to do next
See “Enabling Remote Desktop Connections,” on page 18 for an overview of steps and options for making RDP connections available. Consult your IaaS configuration guide for next steps for your site configuration.
Enabling Users to Select Datacenter Locations
The Display location on request check box on the Blueprint Information tab allows users to select a particular datacenter location at which to provision a requested virtual or cloud machine.
For example, if you have an office in London and an office in Boston, you might have compute resources and business groups in both locations. By enabling the Display location on request check box, your business group users can choose to provision their machines with the resources that are local, for example. The following is a high-level overview of the sequence of steps required to enable users to select datacenter locations:
1 A system administrator adds datacenter location information to a locations file. 2 A fabric administrator edits a compute resource to associate it with a location.
3 A tenant administrator or business group manager creates a blueprint that prompts users to choose a datacenter location when submitting a machine request.
Add Datacenter Locations
The first step in making location choices available to users is for a system administrator to add location information to a locations file.
Prerequisites
Log in to the IaaS web site host using administrator credentials.
Procedure
1 Edit the file WebSite\XmlData\DataCenterLocations.xml in the Windows server install directory
(typically %SystemDrive%\Program Files x86\VMware\vCAC\Server).
2 For each location, create a Data Name entry in the CustomDataType section of the file. For example:
- <CustomDataType>
<Data Name="London" Description="London datacenter" /> <Data Name="Boston" Description="Boston datacenter" /> </CustomDataType
3 Save and close the file. 4 Restart the manager service.
A fabric administrator can edit a compute resource to associate it with a location. See IaaS Configuration for
Cloud Platforms or IaaS Configuration for Virtual Platforms.
Removing Datacenter Locations
To remove a datacenter location from a user menu, a system administrator must remove the location information from the locations file and a fabric administrator must remove location information from the compute resource.
For example, if you add London to the locations file, associate ten compute resources with that location, and then remove London from the file, the compute resources are still associated with the location London and London is still included in the location drop-down list on the Confirm Machine Request page. To remove the location from the drop-down list, a fabric administrator must edit the compute resource and reset the Location to blank for all compute resources that are associated with the location.
The following is a high-level overview of the sequence of steps required to remove a datacenter location: 1 A system administrator removes the datacenter location information from the locations file. 2 A fabric administrator removes all the compute resource associations to the location by editing the
locations of each associated compute resource.
Enabling Visual Basic Scripts in Provisioning
Visual Basic scripts are run outside of vRealize Automation as additional steps in the machine life cycle and can be used to update the custom property values of machines. Visual Basic scripts can be used with any provisioning method.
For example, you could use a script to generate certificates or security tokens before provisioning and then use those certificates and tokens in provisioning a machine.
NOTE This information does not apply to Amazon Web Services.
When executing a Visual Basic script, the EPI agent passes all machine custom properties as arguments to the script. To return updated property values to vRealize Automation, you must place these properties in a dictionary and call a function provided by vRealize Automation.
The sample Visual Basic script PrePostProvisioningExample.vbs is included in the Scripts subdirectory of
the EPI agent installation directory. This script contains a header to load all arguments into a dictionary, a body in which you can include your functions, and a footer to return updated custom properties to vRealize Automation.
The following is a high-level overview of the steps required to use Visual Basic scripts in provisioning: 1 A system administrator installs and configures an EPI agent for Visual Basic scripts. See Installation and
Configuration.
2 A system administrator creates Visual Basic scripts and places them on the system where the EPI agent is installed.
3 Gather the following information for tenant administrators and business group managers for each Visual Basic script:
n The complete path to the Visual Basic script, including the filename and extension. For example, %System Drive%Program Files (x86)\VMware\vCAC Agents\EPI_Agents\Scripts\SendEmail.vbs. NOTE A fabric administrator can create a build profile by using the property sets
ExternalPreProvisioningVbScript and ExternalPostProvisioningVbScript to provide this required information. Doing so makes it easier for tenant administrators and business group managers to include this information correctly in their blueprints.
4 Tenant administrators and business group managers use custom properties in their blueprints to call the Visual Basic scripts.
Configuring the Customer Experience Improvement Program for
vRealize Automation
If you choose to participate in the Customer Experience Improvement Program (Program), VMware receives anonymous information to improve the quality, reliability, and functionality of VMware products and services. VMware wants to better understand your vRealize Automation deployment and business needs, and improve VMware response to customer requirements. You can choose to participate in the Program for vRealize Automation at any time.
Data That VMware Receives
When you participate in the Customer Experience Improvement Program (Program), VMware receives anonymous information from your vRealize Automation deployment on a weekly basis through an encrypted HTTPS connection.
Categories of Information That VMware Receives
Information that VMware receives through the Program contains the following categories:
Category Description
Deployment topology Information about your vRealize Automation deployment, including but not limited to the number of appliances and IaaS servers, SSO configuration, and whether the embedded database or vRealize Orchestrator instances are being used. In addition, this includes the version and license edition of your vRealize Automation instance.
Deployment
environment Information about the environment managed by your vRealize Automation deployment,including but not limited to the number and type of infrastructure endpoints, compute resources, data stores, and machine blueprints.
System configuration Information about your vRealize Automation configuration, including the number of tenants and business groups.
Feature usage Information about your usage of features such as approvals, notifications, and the Advanced Service Designer.
Operational metrics Performance and scale metrics, including but not limited to the number and rate of requests to vRealize Automation services.
All sensitive or identifying information is anonymized, including host names, IP or MAC addresses, user names or email addresses, and tenant or group names.
NOTE You can view the most recently sent files at any time by logging in to the vRealize Appliance and
navigating to the /tmp/vmware/ceip/audit directory. If you have more than one vRealize Appliance in your
deployment, the Telemetry tab of the vRealize Appliance management interface displays the host name of the appliance on which the most recent collection was run.
Collection sets that are more than a week old are deleted when the new weekly data collection set is created.
Enable or Disable the Customer Experience Improvement Program for
vRealize Automation
You can unsubscribe or enroll in the Customer Experience Improvement Program (Program) at any time. You choose whether to participatein the Program at product installation. When you upgrade from a 6.x installation, you are automatically enrolled in the Program. You can change this choice from the management console after you have installed or upgraded vRealize Automation.
Procedure
1 Navigate to the vRealize Appliance management console by using its fully qualified domain name, https://vcac-va-hostname.domain.name:5480/.
2 Log in with the username root and the password you specified when the appliance was deployed. 3 Click the Telemetry tab.
4 Choose to enable or disable your participation in the Customer Experience Improvement Program.
n Select the Enable Customer Experience Improvement Program check box to activate the Program. n Deselect the Enable Customer Experience Improvement check box to deactivate the Program.
5 Click Save Settings.
When you enable the Program, the vRealize Appliance attempts to establish a connection to
https://vmware.com and to automatically discover any proxy server that you might have configured for your vRealize Appliance.
Configure Data Collection Time
When you enable the Customer Experience Improvement Program, your vRealize Appliance is
automatically configured to send data at a specific time each week. You can change this setting at any time.
Procedure
1 Log in to the vRealize Appliance by using SSH.
The user name is root and the password is the password you specified when you deployed the vRealize Appliance.
2 Open the /etc/telemetry/telemetry-collector-vami.properties file in an editor.
3 Change the time at which data collections are sent by modifying the values assigned to frequency.dow
and frequency.hod.
Property Description
frequency.dow=<day_of_week> Specifies the day of the week on which the data collection is sent.
frequency.hod=<hour_of_day> Specifies the hour of the day on which the data collection is sent. Possible values are 0-23 and time is based on local time.
4 Save the file.
5 Type the following command at a command prompt to apply the new settings to all nodes in your deployment.
Configure the vRealize Automation
Appliance Database
2
The vRealize Automation system has been updated to use an internal database that now offers clustering and streaming replication. Users must update new and existing vRealize Automation 6.x systems to use this new Appliance Database.
Designate one vRealize Appliance as the primary Appliance Database machine and the second as the secondary Appliance Database machine. When configured correctly, each appliance can support the Appliance Database as needed.
NOTE The Appliance Database replication channel is not encrypted.
Prerequisites
n Create DNS entry, for example: dbCluster.domain.local n IP address allocated for load balancer.
n Two installed vRealize Appliances freshly deployed and resolvable through DNS.
n The user configuring the Appliance Database must have Administrator access to vSphere in order to
add new disks to the vRealize Appliances.
n Download the 2108923_dbCluster.zip file from the VMware Knowledge Base.
The link is http://kb.vmware.com/selfservice/microsites/search.do?
cmd=displayKC&docType=kc&externalId=2108923 if you need to paste it into a browser.
Procedure
1 Configure Database Virtual IP on page 24
Configure the database virtual IP (VIP) as appropriate for your system configuration in accordance with VMware guidelines.
2 Configure Internal Appliance Database on page 24
Configure an Appliance Database on both the designated primary and secondary vRealize Appliances.
3 Configure Appliance Database Replication on the Secondary Appliance on page 25
Configure the secondary or failover virtual appliance to support appliance database replication. 4 Test Appliance Database Failover on page 26
Test failover functionality from the primary Appliance Database machine to the secondary machine. 5 Test Appliance Database Failback on page 28
Configure Database Virtual IP
Configure the database virtual IP (VIP) as appropriate for your system configuration in accordance with VMware guidelines.
The appropriate virtual IP for your system depends upon numerous factors, including whether or not it uses a load balancer. Most distributed production systems use a load balancer.
The active node in the network load balancer should be the master node with the writeable database.
Procedure
1 Review your system configuration and choose an appropriate virtual IP (VIP configuration. Consult the VMware Knowledge Base for information about choosing a VIP configuration. 2 Configure the database virtual IP (VIP) as appropriate for your system configuration.
When configuring the VIP, observe the following.
n Port 5432 must be balanced.
n Only the current master node can be active in the load balancer.
Configure Internal Appliance Database
Configure an Appliance Database on both the designated primary and secondary vRealize Appliances. For related information, see the following content:
n Add a New Hard Disk to a Virtual Machine in vSphere Web Client in vSphere product documentation n Gracefully Shutting Down a Windows Guest When the Virtual Machine Powers Off (1744) in the VMware
Knowledge Base.
Procedure
1 Perform a graceful shutdown of the target appliance using shut down guest in the VMware vCenter Server™.
2 Add a 20 GB disk to the virtual appliance by using the VMware vCenter Server™. 3 Power on the appliance.
4 Verify that SSH is enabled on the virtual appliance.
a Log in to the Virtual Appliance Management Interface at https://appliance_IP:5480. b Click the Admin tab.
c Ensure that the SSH service enabled and Administrator SSH login enabled check boxes are selected.
d Click Save Settings.
5 Unzip the 2108923_dbCluster.zip file that you downloaded from the VMware Knowledge Base and copy the 2108923_dbCluster.tar file to the appliance.
6 Extract the configureDisk.sh and pgClusterSetup.sh files using the tar xvf 2108923_dbCluster.tar
command.
# tar xvf 2108923_dbCluster.tar configureDisk.sh
7 Locate the disk you added using the parted -1 command.
NOTE For a fresh vRealize Automation deployment, the disk name should be /dev/sdd. The name
differs depending on the original version of vRealize Automation deployed.
# parted -1 ...
Error: /dev/sdd: unrecognized disk label Sector size (logical/physical): 512B/512B
8 Configure the disk using the ./configureDisk.sh disk name command.
For a vRealize Automation deployment, the exact command is ./configureDisk.sh /dev/sdd. # ./configureDisk.sh /dev/sdd
...
Ownership changed successfully
WAL Archive disk configured successfully
9 Run the pgClusterSetup.sh script using the following command.
/pgClusterSetup.sh d] <db_fqdn> D] <db_vip> w] <db_pass> r] <replication_password> [-p] <postgres_password>
Replace the parameters with the following values as appropriate for your system.
Option Value
[-d] Database load balancer FQDN
[-D] Database virtual IP address. Optional, will create /etc/hosts entry. [-w] Sets the database password to the specified entry.
[-r] Replication password. Optional, will use the database password if not set. [-p] Postgres password. Optional, will use database password if not set.
For example, ./pgClusterSetup.sh -d pgCluster.domain.local -w changeMe1! -r changeMe1! -p changeMe1!
NOTE If you are using a load balancer virtual IP, specify the -D parameter using the IP address of the
virtual IP.
# ./pgClusterSetup.sh -d dbCluster.domain.local -w changeMe1! -r changeMe1! -p changeMe1! ...
11.) Updating vRealize Automation to utilize database cluster fully qualified domain name Finished
10 Update the password from ChangeMe! to one that is appropriate for your system.
What to do next
“Configure Appliance Database Replication on the Secondary Appliance,” on page 25.
Configure Appliance Database Replication on the Secondary
Appliance
Configure the secondary or failover virtual appliance to support appliance database replication. Set up database replication on the designated secondary appliance so that the appliance database on the primary appliance is replicated on the secondary appliance in the case of failover.
Prerequisites
The appliance database is installed and configured as described in vRealize Automation Installation and
Configuration.
Procedure
1 Log in to the virtual appliance as root using SSH with the su - postgres command.
2 Configure replication as the postgres user using the following command.
./run_as_replica -h <Primary Appliance> -b -W -U replicate
Replace the parameters with the following values.
Option Value
[-h] Hostname of the master database server. Port 5432 is assumed.
[-b] Take a base backup from the master. This option destroys the current contents of the data directory.
[-W] Prompt for the password of the user performing the replication. [-U] The user performing the replication. Generally this user is replicate.
For example:
# su - postgres
/opt/vmware/vpostgres/current/share/run_as_replica -h app1.domain.local -b -W -U replicate
3 Enter the replicate user password when prompted.
4 Type "yes" after verifying the thumb print of the primary machine when prompted. 5 Enter the postgres user password when prompted.
6 Type "yes" in response to the following message. "Type yes to enable WAL archiving on primary." 7 Type "yes" in response to the following message.
"WARNING: the base backup operation will replace the current contents of the data directory. Please confirm by typing yes."
What to do next
Validate that the replication was successful. See Chapter 4, “Validate Appliance Database Replication,” on page 31.
Test Appliance Database Failover
Test failover functionality from the primary Appliance Database machine to the secondary machine. For this test, the Appliance Database is failed over, and the replica database on the secondary appliance becomes the master database.
Prerequisites
The Appliance Database is installed and configured on primary and secondary vRealize Appliances. See
“Configure Internal Appliance Database,” on page 24 for more information.
Procedure
2 Stop the vpostgres service using the service vpostgres stop command.
A message similar to the following appears.
# service vpostgres stop
Stopping VMware vPostgres: Last login: Mon Apr 27 19:49:26 UTC 2015 on pts/0 ok
3 Log in to the secondary appliance as root using SSH.
4 Run the /opt/vmware/vpostgre/current/share/promote_replica_to_primary command as the postgres
user to promote the replica database to master.
su - postgres
/opt/vnware/vpostgres/current/share/promote_replica_to_primary server promoting
NOTE After running this command, the replica database on the secondary appliance becomes the
master. The Appliance Database on the original primary appliance does not become an actual replica until you run the run_as_replica command.
5 Log in to the targeted replica appliance machine as root using SSH. 6 Configure replication using the following command.
./run_as_replica -h master database appliance -b -W -U replicate
Replace the parameters with the following values.
Option Value
[-h] Host name of the master database server. Port 5432 is assumed.
[-b] Take a base backup from the master. This option destroys the current contents of the data directory.
[-W] Prompt for the password of the user performing the replication. [-U] The user performing the replication. Generally this user is replicate.
For example:
# su - postgres
/opt/vmware/vpostgres/current/share/run_as_replica -h app2.domain.local -b -W -U replicate
7 Enter the replicate user password when prompted.
8 Type "yes" after verifying the thumbprint of the primary machine when prompted. 9 Enter the postgres user password when prompted.
10 Type "yes" in response to the following message.
"WARNING: the base backup operation will replace the current contents of the data directory. Please confirm by typing yes."
What to do next
Validate that the replication was successful. See Chapter 4, “Validate Appliance Database Replication,” on page 31.
Test Appliance Database Failback
Test that failback from the secondary Appliance Database machine to the primary machine functions. For this test, the Appliance Database is failed back from the secondary appliance to the original primary appliance.
Prerequisites
The Appliance Database is installed and configured. See “Configure Internal Appliance Database,” on page 24 for more information.
Procedure
1 Log in to the replica appliance machine, which currently contains the master Appliance Database, as root using SSH.
2 Stop the vpostgres service using the service postgres stop command. # service postgres stop
Stopping VMware vPostgres: Last login: Mon Apr 27 19:49:26 UTC 2015 on pts/0 ok
3 Log in to the primary appliance machine as root using SSH. 4 Promote the replicate database to master as the postgres user with
the /opt/vmware/vpostgre/current/share/promote_replica_to_primary command. # su - postgres
/opt/vmware/vpostgres/current/share/promote_replica_to_primary server promoting
5 Log in to the replica appliance machine as root using SSH.
6 Configure database replication as the postgres user with a command of the form ./run_as_replica-h Primary Appliance -b -W -U replicate
# su - postgres
/opt/vmware/vpostgres/current/share/run_as_replica -h appl.domain.local -b -W -U replicate
7 Enter the replicate user password when prompted. 8 Type "yes" in response to the following message.
"Warning: the base backup operation will replace the current contents of the data directory. Please confirm by typing yes."
What to do next
Validate that the replication was successful. See Chapter 4, “Validate Appliance Database Replication,” on page 31.
Perform an Appliance Database
Failover
3
If your designated primary Appliance Database fails, implement a failover to the designated replica database on the secondary appliance to maintain system operation.
Prerequisites
Configure the Appliance Database as applicable for your system configuration. See Chapter 2, “Configure the vRealize Automation Appliance Database,” on page 23.
Procedure
1 If possible, log in to the appliance hosting the primary Appliance Database as root using SSH. If the appliance or its host machine is not running, skip to step 3.
2 Stop the vpostgres service using the service postgres stop command. # service postgres stop
Stopping Vmware vPostgres: Last login: Mon Apr 27 19:49:26 UTC 2015 on pts/0 ok
3 Promote the replica database on the secondary appliance to be the primary database. a Log in the secondary appliance as root using SSH.
b Promote the replica database to master as the postrgres user using
the /opt/vmware/vpostgres/current/share/promote_replica_to_primary command. # su - postgres
/opt/vmware/vpostgres/current/share/promote_replica_to_primary server promoting
4 Configure the database virtual IP for the new Appliance Database configuration.
VIP Configuration Option Procedure
If you are using a DNS entry for the Appliance Database, change the DNS entry point as appropriate for your system.
1 Modify the IP of the DNS entry to point at the new primary appliance.
2 Log in to each vRealize Appliance as root and execute a service network restart.
If you configured an F5 virtual IP for the Appliance Database, edit the pool that you created containing the two vRealize Automation appliances as nodes.
1 Disable the old primary node. 2 Enable the new primary node.
5 Rebuild the replica database on the original primary Appliance Database host machine. a Log in the appliance as root using SSH.
b Configure database replication as the postrgres user using the ./run_as_replica-h primary appliance -b-W-U replicate command.
# su -postgres
/opt/vmware/vpostgres/current/share/run_as_replica -h appl.domain.local -b -W -U replicate
c Enter the replicate user password when prompted. d Type yes in response to the following message.
"WARNING: the base backup operation will replace the current contents of the data directory. Please confirm by typing yes."
What to do next
Validate that the replication was successful. See Chapter 4, “Validate Appliance Database Replication,” on page 31.
Validate Appliance Database
Replication
4
When testing failover or failback of the Appliance Database, validate that the database was replicated correctly.
After configuring the Appliance Database on designated master and replica appliance host machines, test that the database on either machine can function with your system.
Prerequisites Procedure
1 Log in to the appliance that contains the primary or master database.
2 Run the ps -ef |grep wal command to validate that the WAL process is running. # ps -ef |grep wal
postgres 4784 4779 0 21:42 ? 00:00:00 postgres: wal writer process
postgres 20901 4779 0 22:49 ? 00:00:00 postgres: wal sender process replicate 10.26.36.64(55887) streaming 0/70000B8
3 Run the pg_is_in_recovery command to validate that the master appliance database is ready for
read-write connections.
su - postgres =
SELECT pg_is_in_recovery() ;
The command returns f for false.
vcac=# SELECT pg_is_in_recovery () ; pg_is_in_recovery
---f
(1 row)
4 Quit psql using the \q command.
6 Run the pg_is_in_recovery command to validate that the replica database is read only. su - postgres
/opt/vmware/vpostgres/current/bin/psql vcac SELECT pg_is_in_recovery () ;
The command returns t for true.
vcac=# SELECT pg_is_in_recovery () ; pg_is_in_recovery
---t
(1 row)
Bulk Import, Update, or Migrate
Virtual Machines
5
You can use the Bulk Import feature to import one or more virtual machines to a vRealize Automation deployment. You can also use ths feature to update one or more virtual machines without the need to re-import them or to migrate machines from one environment to another.
The Bulk Import feature imports virtual machines intact with defining data such as reservation, storage path, blueprint, owner, and any custom properties. Bulk Import supports the following administrative tasks:
n Import one or more unmanaged virtual machines so that they can be managed in a
vRealize Automation deployment
n Import one or more managed virtual machines from a vRealize Automation deployment into an
upgraded deployment
n Make a global change to a virtual machine property, such as a storage path n Migrate a virtual machine from one environment to another
You can execute the Bulk Import feature commands using either the vRealize Automation console or the CloudUtil command-line interface. For more information about using the CloudUtil command-line interface, see the Machine Extensibility documentation.
Prerequisites
Log in to the vRealize Automation console as a fabric administrator and as a business group manager.
Procedure
1 Generate Virtual Machine CSV Data File on page 34
You generate a virtual machine CSV data file to import, update, or migrate virtual machines to a vRealize Automation deployment.
2 Edit Virtual Machine CSV Data File on page 35
Before you import or update one or more virtual machines, you must edit the virtual machine CSV data file so that each machine value matches a value that exists in the target deployment. If you are migrating a virtual machine from one environment to another, editing is optional.
3 Import, Update, or Migrate One or More Virtual Machines on page 36
After you edit the virtual machine CSV data file, you can import, update, or migrate one or more virtual machines into a vRealize Automation deployment.
Generate Virtual Machine CSV Data File
You generate a virtual machine CSV data file to import, update, or migrate virtual machines to a vRealize Automation deployment.
Prerequisites
Log in to the vRealize Automation console as a fabric administrator and as a business group manager.
Procedure
1 Select Infrastructure > Infrastructure Organizer > Bulk Imports. 2 Click Generate CSV File.
3 Select the machine type from the Machines drop-down menu.
Option Description
Managed Virtual machine is managed in a vRealize Automation deployment and can be viewed in the console. Select this option if you are updating a machine or migrating from one environment to another.
Unmanaged Virtual machine exists in a hypervisor but is not managed in a vRealize Automation deployment and cannot be viewed in the console. Select this option if you are importing a virtual machine.
4 Select the Business group default value. 5 Select the Owner default value.
6 Select the Blueprint default value.
If you select Unmanaged for the machine type and select a value for Business group and Blueprint, you might see the following results in the CSV data file:
n Host Reservation (Name or ID) = INVALID_RESERVATION
n Host To Storage (Name or ID) = INVALID_HOST_RESERVATION_TO_STORAGE
This happens when you do not have a reservation in the selected business group for the host machine that also hosts the unmanaged machine. If you have a reservation in that business group for the unmanaged machine's host, the Host Reservation and Host To Storage values fill in properly. 7 Select the resource type from the Resource drop-down menu.
Option Description
Endpoint Information required to access a virtualization host.
Compute Resource Information required to access a group of virtual machines performing a similar function.
8 Select the name of the virtual machine resource from the Name drop-down menu. 9 Click OK.
Edit Virtual Machine CSV Data File
Before you import or update one or more virtual machines, you must edit the virtual machine CSV data file so that each machine value matches a value that exists in the target deployment. If you are migrating a virtual machine from one environment to another, editing is optional.
To import, update or migrate virtual machines contained in a CSV data file, each machine must be associated with a reservation, storage location, blueprint, and owner that already exists in the target vRealize Automation deployment. All of the values for each machine must be present in the target vRealize Automation deployment for the operation to succeed. You can change the values for reservation, storage location, blueprint, and owner for any operation on each machine by editing the CSV file.
If you are importing a virtual machine that uses a static IP address, you must append the appropriate command to the CSV file.
Prerequisites
“Generate Virtual Machine CSV Data File,” on page 34
Procedure
1 Open the CSV file and edit the data categories so that they match existing categories in the target vRealize Automation deployment.
Heading Comment
# Import--Yes or No Can change to No to prevent a particular machine from being imported. Virtual Machine Name Do not change.
Virtual Machine ID Do not change because it is ignored during the import process.
Host Reservation (Name or ID) Must match the name of a reservation in the target vRealize Automation instance. Host To Storage (Name or ID) Must match the name of a storage location in the target vRealize Automation
instance.
Blueprint (Name or ID) Must match a blueprint in the target vRealize Automation instance. Owner Name Must match a domain user in the target vRealize Automation instance.
2 If you are importing a virtual machine with a static IP address, append a command in the following form to the CSV file.
,VirtualMachine.Network#.Address, w.x.y.z, HOP
Configure the command with the appropriate information for your virtual machine.
n Change the # to the number of the network interface being configured with this static IP address.
For example, VirtualMachineNetwork0.Address
n Change w.x.y.z to be the static IP address for the virtual machine.
n The HOP string sets the visibility of the property. This default property is removed from the virtual
machine after a successful import.
NOTE For a successful import, the IP address must be available in a properly configured address pool.
If the address cannot be found or is already in use, the import will succeed without the static IP address definition, and an error will be logged.
3 Save the CSV file and close it.
Import, Update, or Migrate One or More Virtual Machines
After you edit the virtual machine CSV data file, you can import, update, or migrate one or more virtual machines into a vRealize Automation deployment.
You can import a managed machine or an unmanaged machine. You can migrate or update only managed machines. A managed machine is a virtual machine that is managed in a vRealize Automation deployment and that you can view in the console. An unmanaged machine is a virtual machine that exists in a
hypervisor but is not managed in a vRealize Automation deployment and cannot be viewed in the console.
Prerequisites
“Edit Virtual Machine CSV Data File,” on page 35
Procedure
1 Select Infrastructure > Infrastructure Organizer > Bulk Imports. 2 Click New Bulk Import.
3 Enter a name for this task in the Name text box.
4 Enter the CSV file name in the CSV file text box by browsing to the CSV file name. 5 Import the file using these options.
n Select Now to begin the import, update, or migrate process immediately. n Select a start date and time in the Start time drop-down menu.
NOTE The specified start time is the server's local time and not the local time of the user's
workstation.
n Select the number of seconds to delay each virtual machine registration in the Delay (seconds)
drop-down menu.
NOTE To specify no delay, leave the option blank. Selecting this option slows the import process.
Select this option when you import a large number of virtual machines.
n Select the total number of machines being registered at a given time in the Batch size menu. NOTE To specify no limit, leave the option blank. Selecting this option slows the import process.
Select this option when you import a large number of virtual machines.
n If you are importing virtual machines, select Ignore managed machines to omit managed
machines during the import process.
NOTE By selecting this option, you can rerun the import without editing the CSV file to exclude
machines that are already successfully imported.
n If you are updating virtual machines, do not select Ignore managed machines.
n If you are migrating machines, select Ignore managed machines in the target environment so that
n Select Skip user validation to omit validating users during the import process.
NOTE Selecting this option sets a machine's owner to the value listed in the Owner column of the
CSV data file without verifying that the user exists. Selecting this option can decrease the import time.
n Select Test import to run the import process without importing machines.
NOTE Testing the import process allows you to test the CSV file for errors before you actually
import the machines. 6 Click OK.
The progress of the operation appears on the Bulk Import Details page.