NovaNet-WEB Server
Administrator’s Guide
Version 4.0
April 2002
Warranty
Information
NovaStor NovaNet-WEB Software License Agreement
All NovaStor users must agree to the following terms and conditions before using this software. Please read them carefully.
PERMITTED USES
1. NovaNet-WEB Server software is licensed for one machine only. The NovaNet-WEB Client software may only be used in conjunction with a legally licensed NovaNet-WEB Server. If you require additional copies, contact the NovaStor Corporation sales department.
USES NOT PERMITTED
2. You may not transfer this software, electronically or otherwise, and you may not make any copies of this software. You may not assign or grant sub licenses or leases, or permit your copy or other copies of this software to be distributed to others. You may not reverse engineer, disassemble, reverse, translate, or in any way derive from this software any source code form.
LIMITED WARRANTY
3. THIS SOFTWARE AND ANY MANUALS PROVIDED WITH IT ARE PROVIDED WITHOUT WARRANTY OF ANY KIND, EITHER EXPRESS OR IMPLIED, INCLUDING, BUT NOT LIMITED TO IMPLIED WARRANTIES OF MERCHANT ABILITY AND WARRANTIES FOR FITNESS FOR A
PARTICULAR PURPOSE. SHOULD THE SOFTWARE OR ANY MANUALS PROVE TO BE DEFECTIVE, NOVASTOR CORPORATION, SHALL NOT BE LIABLE FOR ANY DAMAGES IN EXCESS OF THE PURCHASE PRICE OF THIS SOFTWARE. IN ADDITION, NOVASTOR CORPORATION WILL NOT BE LIABLE FOR ANY CONSEQUENTIAL DAMAGES OR ANY DIRECT DAMAGES OVER AND ABOVE THE PURCHASE PRICE OF THIS SOFTWARE. NOVASTOR CORPORATION, DOES NOT WARRANT THAT THE FUNCTION OF THIS SOFTWARE WILL BE ERROR-FREE. HOWEVER, NOVASTOR CORPORATION DOES WARRANT THE MEDIA ON WHICH THE SOFTWARE IS FURNISHED TO BE FREE FROM DEFECTS IN MATERIAL AND WORKMANSHIP UNDER NORMAL USE FOR A PERIOD OF 30 DAYS FROM THE DATE OF DELIVERY TO YOU. AS SUCH, THE ENTIRE LIABILITY OF NOVASTOR CORPORATION, AND YOUR EXCLUSIVE REMEDY SHALL BE A REFUND OF
WARRANTY ABOVE. SOME STATES DO NOT ALLOW THE EXCLUSION OF IMPLIED WARRANTIES OR THE LIMITATION OF REMEDIES, SO THAT ABOVE EXCLUSIONS AND LIMITATIONS MAY NOT APPLY TO YOU. YOU MAY ALSO HAVE OTHER RIGHTS WHICH VARY FROM STATE TO STATE. MISCELLANEOUS
4. This Agreement is governed by the laws of the State of California. If any legal action is brought by NovaStor Corporation regarding the breach of this License Agreement or in any other way to enforce this Agreement, NovaStor Corporation shall be entitled to recover, in addition to any other relief, lost profits or lost sales of the software, other consequential damage, reasonable attorney fees, court costs and all other expenses of litigation. In the event that one or more of the provisions in this Agreement shall be held invalid by a court of competent jurisdiction, the remaining provisions shall nevertheless be valid.
NovaNet-WEB®
Backup & Restore (Revision April 2002)
Every attempt has been made to accurately and professionally furnish the materials in this manual, yet this publication may still contain technical inaccuracies or typographical errors. (See the warranty section). Since our documentation refinement is an ongoing process, NovaStor Corp. would be grateful for your comments. You may call, write or FAX us with your views. Our technical support team is available between 6am and 7pm, Monday through Friday, Pacific time at (805) 579-6700. Please know that NovaStor Corp. may use or distribute any or all of the information you supply in whatever manner it believes appropriate without incurring any obligations whatsoever.
NovaStor Corp. reserves the right to make improvements and/or changes in the product(s) and or the program(s) described in this manual at any time and without notice. The content of this manual is protected under U.S. and International Copyright Convention and Treaty.©2000, NovaStor Corp. All Rights Reserved. Unauthorized duplication without permission is strictly prohibited.
Windows®, Windows® 95, Windows® 98, Windows® ME, Windows NT®, Windows 2000® and
Windows XP® are registered trademarks of Microsoft Corporation. PKUNZIP and Zip are trademarks
of PKWARE Inc., and WinZip is a registered trademark of WinZip Computing, Inc. All trademarks used are copyrighted by their respective companies. All rights to this and any other applicable trademarks remain with the originator.
http://www.novastor.com ftp://ftp.novastor.com
E-mail:
Table of Contents
Chapter 1: Introduction...1
Introduction to the Backup Server...1
More on the FastBIT Backup... 1
Overview of the Backup Server ...2
NT Integration ... 2
User Authentication ... 2
Secure File Transfer... 2
Encryption ... 2
Warning: Use of Anti-Virus Applications with the Backup Server ... 3
Chapter 2: Installation...5
Backup Server System Requirements...5
Operating System... 5
Hardware... 5
Network ... 5
Installing the Backup Server ...6
To install from the self-extracting executable file:... 6
To install from a downloaded Zip file: ... 6
To install from CD:... 6
Uninstalling the Backup Server...8
Account Information ... 8
Log Information ... 8
Miscellaneous ... 9
Backup Server Install File Descriptions ...9
Upgrading an Existing Backup Server Installation...10
To upgrade an existing installation: ... 10
Auto-upgrade Feature for Client Software ...11
Chapter 3: Getting Started...13
Starting the Backup Server Service...13
Stopping the Backup Server Service ...13
Tamper-Proof Client ... 16
Quota Management... 17
Low Disk Space Management... 18
NT Performance Monitor Integration ... 19
Security and Restore Features... 20
Data Encryption... 20
Master Decryption Key Feature... 20
Previous Version Restores ... 21
Data Restore Wizard ... 22
Configuring Backup Users... 23
Adding New Users... 23
Modifying Existing Users ... 23
Removing Existing Users ... 24
Logging and Error Notifications ... 25
Receiving Error Notifications ... 25
Viewing Logs ... 27
Troubleshooting Errors ... 28
Chapter 4: Using the Backup Server Configuration Manager ... 31
Backup Server Configuration Manager ... 31
The OK Button... 31
The Cancel Button... 31
The Apply Button... 31
Configuration Overview ... 32
General... 32
Comments ... 32
User Accounts and Directories ... 32
The Backup Server Database ... 34
The User Account Properties Window... 39
The Account Properties General Tab... 41
The Account Properties Block Tab... 44
The Account Properties Quota Tab... 46
The Global Account Settings Window ...48
The Global Account Settings Block Tab ... 50
The Global Account Settings Quota Tab ... 52
The Global Quota Warning Messages Window... 54
The General Tab...55
Backup Server Port ... 55
Config Database Update ... 55
Duplicate Account Profiles Directory ... 55
The Security Tab...56
User Authentication ... 56
Enable Master Decryption Key... 58
The LDAP Server Window ... 59
The Directories Tab ...60
Backup Client Version Upgrades ... 60
Work Directory ... 60
The Redundant Files Tab ...62
Redundant File List ... 62
The Logging Tab...63
Master Log ... 63
Account Log Files... 63
Database Logging ... 64
The Notifications Tab ...65
The Notifications General Tab (E-Mail only)... 66
The Notifications Error Conditions Tab (E-Mail, Event Logs, Alerts) ... 67
The Notifications Quota Tab (E-Mail, Event Logs, Alerts) ... 69
The Performance Tab ...70
Performance Monitoring ... 70
Chapter 5: Using the Redundant File List Manager... 75
Redundant File List Manager ... 75
The OK Button... 75
The Cancel Button... 75
The Apply Button... 76
The General Tab ... 76
The Add Button ... 76
The Remove Button ... 76
The Properties Button ... 76
The Redundant File Entry Properties Window ... 77
The Name Tab ... 77
The Specific Files Tab... 78
The File Names Tab... 79
The File Types Tab ... 80
The Stats Tab ... 81
The Info Tab ... 82
Chapter 6: Using the Data Restore Wizard... 83
Creating Restorable Media Sets ... 83
Step 1 - Introduction ... 83
Step 2 - Select User Account ... 84
Step 3 - Select Data Volumes ... 84
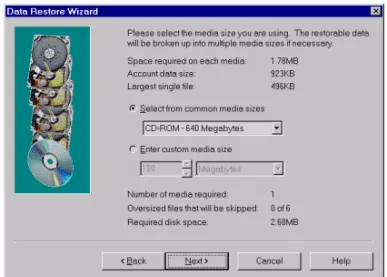
Step 4 - Select Media Size ... 85
Step 5 - Select Root Directory ... 87
Step 6 - Other Options ... 88
Step 7 - About Box Information ... 88
Step 8 - Prepare Account Data... 89
Step 9 - Media Complete... 90
Chapter 1: Introduction
Introduction to the Backup Server
The Backup Server is a key element of the complete backup and restore operation and incorporates many features that simplify setup and administration and reduce total cost of ownership (TCO). In addition, by capitalizing on the stability and security offered by the Windows NT operating system, the Backup Server permits safe and secure backup and restore over any TCP/IP network.
Operating as a native NT Service, the Backup Server incorporates multithreaded functionality, permitting thousands of simultaneous backup and restore sessions on a single server. Furthermore, thoughtful design of the user interface translates to ease of use and permits maintenance of every aspect of the Backup Server’s operation from a single point.
The revolutionary FastBIT technology further enhances the Backup Server by permitting large files and the ongoing changes to those files to be stored in the smallest amount of space. FastBIT also reduces the time it takes to do a backup whether across the room or across the world.
More on the FastBIT Backup
With a FastBIT backup, it is only necessary to backup the changed bytes after the initial backup. These changes may represent additions, deletions and/or modifications. Furthermore, the process can be used to backup any type of file including database, text and executable files. This is possible because the process utilizes an “intelligent” binary
comparison algorithm designed to work on every file. By incorporating the concept of a FastBIT backup, incremental backups are reduced by an average of 85 to 99 percent. This translates into a significant reduction in transmission time.
Overview of the Backup Server
NT Integration
The Backup Server is an automated server application that runs on Windows NT/2000 as a service. It is implemented as a multi-threaded application to allow multiple client requests to be processed in parallel and uses Windows sockets as the communications channel. The server listens on a specified port (default port is 308) for clients to request backup and restore operations.
Since the Backup Server is highly integrated with the NT/2000 security model, it performs client authentication through the local Windows NT/2000 system (workstation or stand-alone server) or the Windows NT Primary Domain Controller for the domain specified in the Windows NT/2000 server installation.
User Authentication
Since the Backup Server is highly integrated with the NT/2000 security model, it performs client authentication through the Windows NT SAM database, Microsoft Site Server Membership Directory or any standard LDAP database, including Windows 2000 Active Directory.
For Windows NT Authentication, users can be authenticated on the local Windows NT system (workstation or stand-alone server) or the Windows NT Primary Domain Controller for the domain specified in the Windows NT server installation. Windows NT authentication is achieved using the challenge/response method (commonly referred to as NTLM), which is the most secure method of authenticating users.
For Membership Authentication, users can be authenticated using the clear-text/basic method or the challenge/response method (commonly referred to as DPA). The clear-text/basic method is the common method for authenticating users against the Membership Directory.
For LDAP authentication, the administrator must configure the LDAP server name or IP address, the LDAP server port and the base distinguished name (DN) that users will be authenticated against. Also, specific credentials (username and password) must be set on the Backup Client for this authentication method. In other words, existing logon credentials cannot be used.
Secure File Transfer
The Backup Server utilizes a secure proprietary binary protocol for the transfer of all data. This secure framework guards against the possibility of an outsider “capturing” data while it is in transit between the Backup Client and Server.
Encryption
In order to ensure that the transfer and storage of data is secure, an encryption scheme is negotiated between the client and the server. The encryption scheme is used to encrypt/decrypt the proprietary
files themselves. The backup files are encrypted during the transfer and remain encrypted as they are stored on the server.
Warning: Use of Anti-Virus Applications with the Backup Server
In order to run the backup server and anti-virus applications together, you must "exclude" users’ data directories and the Backup Server's temporary working directories, if different from the data
directories, from the scan list. Refer to your anti-virus application documentation for the necessary steps.
The actual paths of users’ data directories will vary depending on how you've configured your Backup Server, but if you have multiple paths for users’ data, them you must exclude all of them. Further, if you've configured the working directory to "Use the account's data directory…", located under the Directories Tab of the Backup Server Configuration Manager, then excluding the user data directory is all that is required. However, if you have selected "Specify a work directory…", you must also specify that path in the anti-virus exclude list.
Chapter 2: Installation
Backup Server System Requirements
Operating System
Windows NT 4.0 Workstation or Server
Windows 2000 Professional, Server, or Advanced Server Windows XP Professional
Hardware
Pentium Class machine with 32 Megabytes of RAM (64 MB Recommended).
5 MB Disk Space for program files. Additional space required for processing and storing backup files.
Network Interface Card and/or Modem.
Network
TCP/IP must be configured properly in your Network settings.
If you plan to have clients connect via direct dial-up connections, the Remote Access Service (RAS) must be configured. (To find out more on configuring RAS, go to Help under the Windows NT Start menu and look in the Index for “Remote Access Service”).
Installing the Backup Server
If a previous installation of the Backup Server exists, and you wish to retain current licensing and/or user configuration information, see Upgrading an Existing Backup Server installation on page 10.
To install from the self-extracting executable file:
Simply run the .exe file.
To install from a downloaded Zip file:
Unzip the file into an empty directory. Be sure to retain the original directory structure of the files when extracting from the Zip.
• For PKUNZIP, use the /d option to retain directory structure.
• For WinZip, select the Use Folder Names checkbox before extracting the files.
1. Go to the Disk 1 directory from the directory containing the extracted Backup Server files. 2. Run the Setup.exe program from the Disk 1 directory to install the Backup Server files and
create the Backup Server NT service.
To install from CD:
1. Insert the Installation CD in the CD-ROM drive.
2. Run Setup.exe from the disk to install the Backup Server files and create the Backup Server NT service.
The Install Wizard will prompt you for the following information:
1. Enter the directory where the Backup Server should be installed.
2. Choose an authentication option. This indicates how Backup Clients are authenticated when they connect to the Backup Server. The Backup Server is highly integrated with the NT security model. The choices are:
• Use the Username only for Authentication
If this option is selected, the user name will only be verified against the Backup Server configuration database (i.e. Backup Users configured through BackupServerUtil.exe). No password verification is performed in this mode.
• Use Windows NT Local Authentication
If this option is selected, authentication will be performed against the Windows NT User Accounts Database on the local server. This is achieved through Challenge/Response mechanism often referred to as NTLM (Windows NT Lan Manager) authentication. This type of authentication will attempt to use the current Windows logon credentials before requiring that a password be entered.
• Use Windows NT Domain Authentication
If this option is selected, authentication will be performed against the Windows NT User Accounts Database on the Primary Domain Controller. This is achieved through a Challenge/Response mechanism often referred to as NTLM (Windows NT Lan Manager) authentication. This type of authentication will attempt to use the current Windows logon credentials for the domain before requiring that a password be entered.
• Use Membership Authentication (Clear-text/Basic)
If this option is selected, authentication will be performed against the Microsoft Site Server Membership Directory. In this authentication method, the client always sends the supplied credentials (user name and password) to the server. The credentials are always transmitted in an encrypted manner. This is the most common method used for authenticating users against the Membership Directory.
• Use Membership Authentication (Challenge/Response)
If this option is selected, authentication will be performed against the Microsoft Site Server Membership Directory. This is achieved through a Challenge/Response mechanism often referred to as DPA (Distributed Password Authentication). This type of authentication will attempt to use the current Windows logon credentials before requiring that a password be entered.
• Use LDAP Authentication
If this option is selected, authentication will be performed against a standard LDAP database. The LDAP server name or IP address, the LDAP server port and the base distinguished name (DN) that users will be authenticated against must be configured. If the LDAP directory is Windows 2000 Active Directory Services, the appropriate checkbox must be checked. Also, specific credentials (username and password) must be set on the Backup Client for this authentication method. In other words, existing logon credentials cannot be used.
3. Enter a username and password. This will be the logon account for the Backup Server NT service and it should have administrator rights since the service is responsible for authenticating users.
If you chose to authenticate through the Primary Domain Controller, also enter a domain name. This is the domain name that was specified when you installed your Windows NT server.
4. If the Backup Server was previously installed, choose which previous information, if any, which should be migrated to the new installation. There are options to migrate previous licensing information and/or to migrate previous configuration information.
5. Lastly, the Backup Server help file may be viewed before exiting.
Once the Backup Server has been successfully installed, the next step is to add users with the Backup Server configuration utility (BackupServerUtil.exe).
Uninstalling the Backup Server
The Backup Server can be uninstalled by running “Add/Remove Programs” from the Control Panel and selecting the Backup Server application. The following options are available when uninstalling the application. The default is for all options to be checked.
Account Information
Delete the configuration database
If this option is checked, the configuration database file (BackupServer.mdb) will be deleted.
Delete the account data directories
If this option is checked, the user data directories and their contents for all backup user accounts will be deleted. The user data directories hold all backup data for backup users that are configured.
Delete the account profiles directory
If this option is checked, the account profiles directory and its contents will be deleted. The account profiles directory holds duplicate copies of all user profiles.
Log Information
Delete the master log file
If this option is checked, the master log file (MasterLog.txt) will be deleted. The master log contains overall server information and high-level user information.
Delete the account log files
If this option is checked, the individual user log files for all backup user accounts will be deleted. User log files contain detailed information about particular operations that have been performed for a user account.
Miscellaneous
Delete the redundant file list file
If this option is checked, the redundant file list file will be deleted. The redundant file list file contains specific files, file names and file types that are excluded from backup, even if individual clients have selected those particular files.
Delete the upgrades directory
If this option is checked, the upgrades directory and it’s contents will be deleted. The upgrades directory holds any software upgrades that the server sends to clients that request to be upgraded to a more recent version.
Delete the backup server work directory
If this option is checked, the work directory and its contents will be deleted. The Backup Server uses the work directory as a temporary directory.
Backup Server Install File Descriptions
BackupServer.exe Main program
BackupServer.hlp Backup Server Help file
BackupServerUtil.exe Server Configuration Manager
BackupServer.mdb User configuration database
BackupMsg.dll Backup Server message file
RedundantFileManager.exe Redundant File Manager utility
Uninstall.exe Uninstall program
Uninst.exe Uninstall library
Implode.dll Compression/decompression library
Pw32b.dll FastBIT backup library
Secure.dll Encryption library
Perfmon.dll Performance monitor library
Upgrading an Existing Backup Server Installation
To upgrade an existing installation:
1. Stop the existing Backup Server service through the Control Panel (Windows NT) or Administrative Tools->Services (Windows 2000).
2. Reinstall the Backup Server over the existing installation. The original Backup Server database will be copied to a subdirectory called “Previous Databases”.
3. The setup program will detect an existing installation and there will be a screen displayed called “Migrate Previous Backup Server Options”.
The following message will be displayed:
"An old Backup Server configuration database was detected in your install directory. Please choose the types of information you would like migrated to the new installation."
• “Backup Server licensing information”
If this checkbox is selected, your licensing information will be copied over into your new configuration database. You can change your authentication type between installations, and the license will be migrated successfully. However if you wish to change your licensing mode from per seat to per time or vice versa, unselect this option and a new license will be created.
• “Backup Server options and account information”
If this checkbox is selected, all of the configuration settings and the user account information will be copied over into your new configuration database.
• “Backup Server transactions”
If this checkbox is selected, all of the entries in the ‘Requests’ table in the Backup Server database will be copied over into your new configuration database.
Auto-upgrade Feature for Client Software
The Backup Server can automatically upgrade a client that connects to it by sending any available upgrades for the software. The latest client upgrade files are always shipped with the installation of the Backup Server.
Upgrade files should be placed in the specified “Upgrades” directory. Multiple upgrade files can and should be placed in this directory if they are available. The next time a client connects, the Backup Server is prepared to transmit any upgrades to the client software upon request.
The client will notify the server of its current version and the server will determine which upgrades, if any, need to be transmitted. The server will not upgrade a client to a version that is more current than the server’s own version.
Chapter 3: Getting Started
Starting the Backup Server Service
For Windows NT, from Control Panel->Services, select the Backup Server service and click the Start button. For Windows 2000, from Administrator Tools->Services, select the Backup Server service, go to Properties and click the Start button. The Backup Server service is created with the Automatic start-up option, so this service will start automatically when Windows NT is booted.
If an error occurs, it may be due to one of the following conditions:
• The Configuration database (BackupServer.mdb) was not found or could not be opened. • The Backup License Identification Number could not be validated.
• One of the Backup Server listeners could not be started on the specified port.
• There was a domain name error, indicating either that the domain controller for the domain could not be found or that he domain name itself could not be found.
Once the service is running, many configuration parameters can be changed with the Server Configuration Manager utility. If an option is changed that requires the service to be stopped and restarted, a message box will indicate this. Otherwise, the next time the configuration is read (specified by the database update interval that is chosen), the new changes will take effect.
Stopping the Backup Server Service
From the Control Panel/Services (Windows NT) or Administrative Tools->Services (Windows 2000), select the Backup Server service and click the Stop button.
The service will not stop until currently connected threads have completed processing. The listener thread becomes inactive when the Stop button is pressed to prevent new connections from occurring. However, any existing connections will be permitted to conclude the session before the service terminates.
Server Administration Features
Redundant File Elimination
“Recover from Image”™
The “Recover from Image”™ concept takes advantage of existing PC procurement procedures and enables a disaster recovery capability to each user. For example, many corporations with a large installed base have devised a standard installation for every desktop to minimize technical support. Since these programs are readily available, the backup software can be configured to only backup files that are unique to each user. This is accomplished by using the Redundant File features, which will automatically exclude the standard files from the backup set. This will significantly reduce the total storage space required on the server and increase the speed of the backup for each user. When it comes time to recover from a hard drive failure, the standard image is combined with all of the unique files that have been backed up to quickly rebuild the user’s entire computing environment.
Redundant File Manager Utility
The Redundant File List Manager is a utility that is installed as part of the Backup Server and used by the administrator to create the Redundant File List that is automatically distributed to clients that connect to the server. This utility allows the administrator to create several different lists and provides an importing capability for combining multiple lists into one. Standard Redundant File Lists may be provided for common applications such as Microsoft Windows 95/98/NT and Microsoft Office. Clients can also share Redundant File lists to ensure that only unique user data is backed up to their servers.
Redundant File Criteria
A Redundant File List can be composed of three different types of exclusion rules:
• Specific File - This will scan all the file contents and exclude any files that match identically. • File Names - This will allow the administrator to create a list of file names to ignore, regardless
of file size or content.
• File Types - This will allow the administrator to create a list of file extensions to ignore. Similar to an exclude filter.
Tamper-Proof Client
General
With the “tamper-proof client” feature, the administrator has the ability to "lock down" or block certain functions on each client. At any time, the administrator can view or change the settings that control the options and functionality that are made available to each client. This could be used to prevent users from changing backup schedules or changing file selections.
Options Available for Blocking
The administrator can control over twenty different options. The following list includes the categories of options and individual settings that can be administered:
Functionality
• Block the user from backing up • Block the user from restoring
• Block changing to a different backup set • Block file selections
Backup Sets and Schedules
• Block the configuration of backup sets • Block the configuration of schedules
Filters
• Block the configuration of filters • Block the application of filters on folders
Tools and Toolbars
• Block the configuration of tools • Block the configuration of toolbars
General Options
• Block any or all 5 tabs
Backup Options
• Block any or all 6 tabs
Restore Options
• Block the Restore Tools Tab
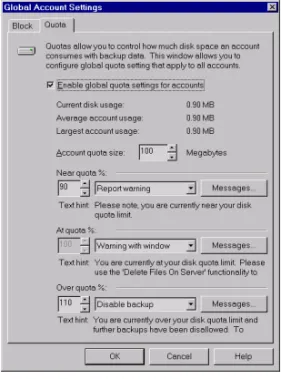
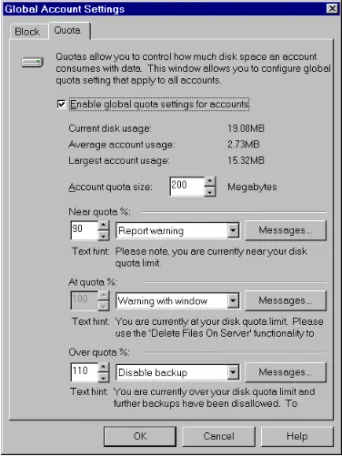
Quota Management
General
The quota management feature allows the server
administrator to better control how much disk space is used by individual users. This feature helps to alleviate situations where a small number of users are occupying a large percentage of the available disk space.
In addition, the server administrator can configure
notifications (i.e. e-mails, event logs, alerts) to be issued in particular quota situations (“near quota, “at quota, “over quota”).
Quota Limits
In order to set quota limits, quota watermarks (i.e.
thresholds) are used. The three watermarks are ‘near quota’, ‘at quota’ and ‘over quota’. The server administrator can control, on a percentage basis, the ‘below quota’ and ‘over quota’ settings. The defaults for these are 90% and 110%
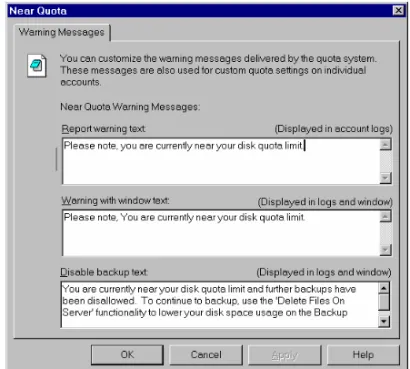
respectively. The ‘at quota’ watermark is always automatically set to 100%. The administrator can also specify what action is to be taken in each quota condition, as well as customized error messages to be displayed in logs and error windows.
Client Delete Feature
When a quota condition is encountered, the backup user has the ability to remove files immediately and permanently from the server storage. In this way, the quota condition can be remedied by the end-user. The ability for users to delete files directly is configurable by the server administrator in the “Client-blocking settings”.
Low Disk Space Management
General
The Backup Server has the capability to detect when a low disk condition is reached for accounts’ user data directories, as well as the Backup Server “Work” directory. When the server detects that a volume has fallen below 100 MB, an error is logged, and any notifications that have been
configured on the server are issued.
Backup Disabled if Low Disk
At the beginning of a client operation, the server verifies that a minimum of 100 MB is available on the volume for the account’s data directory. The work directory is also checked since it is used to prepare files to be downloaded for restore requests. The client operation will not proceed if adequate space is not available. Also, if a “disk full” condition is reached during an individual file transfer (i.e. middle of a backup operation), the incomplete uploaded file will be deleted and the backup will not proceed further. An error will be issued on the client and the server.
NT Performance Monitor Integration
General
The Backup Server exposes more than 20 data points that can be viewed in real-time or tracked over a period of time. This provides system administrators with detailed up-to-the-minute performance information to help monitor and manage their growing end user backup solution.
Pre-configured Settings
A new tab in the Backup Server Configuration Manager displays some pre-installed Performance Monitor settings, or groupings of individual counters that are ready-to-use. With the ability to activate these settings, tracking the Backup Server’s performance becomes virtually effortless. The following list includes some of the pre-installed groupings:
• Active Snapshot
• Client Upgrades (heavy duty) • Client Upgrades (light duty) • Connectivity (heavy duty) • Connectivity (light duty) • Server Performance • Totals (heavy duty) • Totals (light duty)
Example:
To the right is an example of Backup Server performance counters displayed in the Performance
Security and Restore Features
Data Encryption
Encryption Types
User data and the protocol messages used to facilitate client/server communication are always encrypted during transmission, and files are stored on the server in an encrypted manner. File and protocol encryption is based on one of three encryption algorithms: Blowfish, Triple-DES, or DES (Triple-DES not available in International version). The encryption type is configured in the Backup Client software.
Setting a Secret Key
The user can supply a “secret key” in addition to the authentication password, which is sent to Backup Server every time the client connects and is used for encryption. The Backup Server authenticates the user and then validates the secret key before access to the account is allowed. The user can change the encryption type and/or secret key at any time and the server will record a history of the change. The secret key mechanism also allows multiple computers to backup separate volumes using separate secret keys to the same user account. This prevents users from being able to view data belonging to other users who are backing up to the same account.
Master Decryption Key Feature
Setting the Master Key Option
The master decryption key is a universal key that is configured in the Backup Server to give the server administrator the ability to retrieve any user’s data, if necessary. However, the Backup Client has ultimate control over whether the administrator can retrieve a user’s data with this master decryption key.
In order to set or update the master decryption key, the correct password for the Backup Server must first be supplied. This is the password for the administrator account under which the Backup Server was installed. Also if the master key is being changed, the previous key must also be entered. The master key access option for a particular account is set in the User Properties window. It should be noted that if the master decryption key option is not being used or if master key access for a particular account is disabled, and the user forgets or loses their secret key, the data cannot be recovered.
Guaranteed Secure Client
In order to provide a guaranteed secure client in situations where this is desirable, the Backup Client includes an option “Block the backup if the administrator can recover my data”. If this option is set, when the client connects to the server, the server will inform the client whether or not master key access has been enabled for the particular account. If it is enabled, the Backup Client will not backup
any data. Since these options are mutually exclusive, either the user or the server administrator needs to change the relevant setting before backups will be possible.
Recovering Data
As mentioned earlier, in certain situations, it may be necessary to allow the administrator to recover users’ data (e.g. in the event of a lost or missing encryption key). To recover data, the master decryption key is entered as the password in the Backup Client software to connect to the particular user account. The server then attempts to validate the user and detects that the master decryption key is being used.
If the user authentication is successful, the “Get Volume List from Server” and “Get File List from Server” options in the Restore Tab can be used to display the volumes and files that are available for restoring. Files can then be selected and retrieved from the server.
Previous Version Restores
Setting the Restore Window
The Backup Server has the capability of storing multiple versions of the same files. These older versions are available to the user as long as they are within the configured “Restorable window” for that user account. Once old versions are no longer within the restore window, they are deleted from the server. The “Restorable window” is set for a particular account in the User Properties window. The default restore window is 1 month. If it is not desirable to save previous versions of files on the server, the window should be set to the minimum of 1 day.
Available Versions
At the very least, a single version of each file will always be kept on server even if it was not backed up recently. This applies to files that have not been deleted from the user’s backup set. If a file is deleted from the backup set, then any old versions within the current restore window will still be available. Although this is true, once the last version is no longer within the current restore window, it will be deleted from the server.
When the user runs the Backup Client software, and selects “Get File List from Server”, the server will notify the client of all the files and individual versions that are available for restoring.
Data Restore Wizard
Restorable Media Sets
The Backup Server offers the capability to create restorable media sets that can be written to CD-ROMs or other media. The Backup Server includes a “Data Restore Wizard”, which allows the server
administrator to prepare an account's data so it can be immediately restored by the user from local media.
The wizard also divides the data into multiple pieces of a specific size if the user's data will not fit on a single piece of media. The user's data is kept encrypted on the media as well, and can only be restored if the proper secret encryption key is known.
Restore-only Client
In order to restore the data contained on the media, a “Restore-only” backup client program is included on the media. The media also contains an autorun.inf file to allow autorun media (CD-ROM) to automatically start the “Restore-only” Client.
Configuring Backup Users
Adding New Users
To add a new user:
1. Run the Backup Server Configuration Manager (BackupServerUtil.exe)
2. From the Backup Users tab, click on the Add button. The User Properties window will be displayed.
3. Set the desired configuration parameters for this user. For more details on these parameters, see The Account Properties.
As an added convenience, when adding a new user, the application will automatically detect the most common directory names already configured for other users. It will set the default directories based on these path names and the new user name.
The Backup Server will detect the added user the next time the configuration database is read. Otherwise, to have the change take effect immediately, the service must be stopped and restarted.
Modifying Existing Users
To modify an existing user:
1. Run the Backup Server Configuration Manager (BackupServerUtil.exe).
2. From the Backup Users tab, click on the Properties button. The User Properties window will be displayed.
3. Modify the desired configuration parameters for this user. For more details on these parameters, see the User Account Properties Window.
If the Backup Server needs to be restarted because of a changed option, you will be notified with a message box. Otherwise, the Backup Server will update the changed information dynamically the next time the configuration database is read.
For example, user accounts may be added/deleted or enabled/disabled dynamically. There are also individual account settings that may be modified dynamically.
NOTE: In order to change the user data directory for a particular account, it is recommended that the service be stopped, the contents of the old directory moved to the new directory, and the service be restarted again.
Removing Existing Users
To remove an existing user:
1. Run the Backup Server Configuration Manager (BackupServerUtil.exe). 2. From the Backup Users tab, click on the Remove button.
3. As an added feature, a message box will appear to allow the application to automatically delete all associated directories for that user.
The Backup Server will detect the deleted user during the next time the configuration database is read. Otherwise, to have the change take effect immediately, the service must be stopped and restarted.
Logging and Error Notifications
Receiving Error Notifications
The Backup Server offers a number of ways to signal the administrator that an error has occurred in the server processing. Each method is a configuration option and can be set to handle one or more types of error conditions.
The following types of notifications can be issued:
E-mail notifications allow e-mail recipients to be notified under specified error conditions. The Backup Server uses the mail industry standard, SMTP, to connect directly to an SMTP e-mail server and deliver e-mail notifications.
Event Logs
Event logs allow error conditions to be written to the Windows NT/2000 application event log. For event logs to be written, the Event Log service must be running on the server. These events can be viewed in the Windows NT/2000 Event Viewer.
Alerts
Alerts allow designated recipients to receive administrative alert messages for specified error conditions. The recipients are configured through the Server Manager on Windows NT or the Srvmgr.exe utility on Windows 2000, and they can be computer names or the names of logged-on users. Alert messages are sent as Windows NT/2000 messages from the server to a user’s computer. For alerts to be sent, the Alerter and Messenger services must be running on the server. For alerts to be received, the Messenger service must be running on the destination computer.
The following types of error conditions can cause a notification to be issued:
• Exceptions
An exception indicates that the Backup Server generated an application error, such as a file exception or a memory exception.
• NT System Errors
A system error indicates that the Backup Server service could not be started due to a system error.
• Backup/Restore Errors
A backup or restore error indicates that a Backup Server processing error occurred while a backup or restore request from a client was being serviced.
• Connection Failures
A connection failure indicates that a low-level connection between a Backup Client and the Backup Server was prematurely terminated or received an error.
• Authentication Failures
An authentication failure indicates that a user is not configured for the Backup Server or that a user cannot be authenticated against Windows NT or the Microsoft Site Server Membership Directory.
• Low Disk Space Errors
A low disk space error indicates that the Backup Server is running out of available disk space for account data.
• Licensing Warnings/Errors
A licensing error indicates that the current Backup license has expired or that the computer limit for the current license has been exceeded.
For more information on configuring notification methods and errors, see the section titled “Notifications Tab”.
Viewing Logs
The Backup Server maintains two types of log files: the master log file and individual user log files. • Master log file
A master log file is created when the Backup Server service is started. Overall server information as well as high-level user information is recorded. Master log entries also cross-reference user log files so detailed information can be viewed if necessary. Once the maximum size (configured using the Backup Server Configuration Manager) is reached for the master log file, the current log file is moved to an archive file in the same directory and a new master log is created. The master log is located in the Backup Server “install directory” by default or in another specified location that’s configured through the Backup Server Configuration Manager. The file is named “MasterLog.txt”.
• User log files
Individual user log files are created each time a client connects to the Backup Server and requests that a server operation be performed. These user logs provide a detailed account of the operations that are performed, including lists of file names, dates, and sizes. Upload and download times are also indicated.
User log files are located under a sub-directory named “Logs” that resides under the “install directory” or other specified directory. Each user’s logs are kept under the “Logs” sub-directory in another sub-directory that is the same name as the user account name. Each user log file is named with a date/time stamp immediately followed by a one-character identifier that indicates which type of operation was performed. (B =Backup, R=Restore, L=List, D=Delete, E=Error)
User log files can be deleted automatically by the Backup Server by configuring the maximum number of user logs that should be saved for each user.
Troubleshooting Errors
Listed below are some of the problems you may encounter when running the Backup Server. It is important to check the log files frequently to monitor the activity of the Backup Server. For more information, see Viewing Logs on page 27.
Errors during Installation
If you are re-installing the product and receive an error that indicates that the service could not be removed or could not be deleted, make sure that the Backup Server service is stopped (look in the Control Panel under Services).
Errors when starting the service
If you receive a logon error when attempting to start the Backup Server service, verify that your administrator account has the user right to “log on as a service”. The installation process attempts to set this right for you, but it can also be set manually from the User Manager under Policies and User Rights (the Show Advanced Rights checkbox must be selected).
Various errors are logged to the master log file if the service cannot be started: • SRVC STRT FAIL “Could not find the domain controller for the domain”
When the Backup Server was installed, the option to authenticate through the Primary Domain Controller was selected. The Primary Domain Controller was not found for the domain specified during the installation. Verify that the correct domain name was specified.
• SRVC STRT FAIL “The domain name could not be found”
When the Backup Server was installed, the option to authenticate through the Primary Domain Controller was selected. The domain name specified during the installation could not be found. Verify that the correct domain name was specified.
• SRVC STRT FAIL “Connection to Backup Server port failed”
The Backup Server program could not connect to the Backup Server port specified in the configuration. Make sure that an unused port number was chosen.
• SRVC STRT FAIL “Start of Backup Server listener failed”
The Backup Server program could not initiate listening on the Backup port. Verify the port number chosen.
System Errors
• ERRO "Security provider could not be initialized. Error: xxxxxxxxxxx”
This error indicates that security provider could not be initialized for the authentication type selected due to one of the following causes:
• The security DLL could not be loaded (Windows NT Authentication: security.dll; Membership Authentication: msapssps.dll)
• The security interface could not be initialized to allow access to the Security Service Provider
• The credentials handle could not be acquired in order to validate incoming authentication requests.
Authentication Errors
• USER DENY “username” xx.xx.xx.xx “The user name and password received from the client could not be validated”
This failure may be due to one of the following causes:
• User name doesn't exist in Windows User Accounts Database or Membership Directory • Password is invalid
• Security provider was not initialized correctly
License Errors
• ERRO “Invalid license identification number”
If this error appears in the master log file, the Backup Server program found an inconsistency in your current licensing information.
Disk Problems
• ERRO “File exception occurred. Cause: Disk full”
One situation which may cause this error is that the Backup Server program could not process a client request due to an insufficient amount of disk space in the Work Directory specified in the configuration settings. Make more space available for the current work directory or reset the work directory to a new location.
Connection problems
• ERRO “Connection failure”
This error appears in the master log file if the server cannot communicate with the client due to a broken connection. If the connection failed during a backup or restore operation, the processing will resume when the client re-connects to the server and continues from the point where the connection failed.
• ** WARNING: Disconnect or timeout received
This message appears in the user log files when the Backup Server program receives a
“disconnect” or “timeout” indication from the Backup Client. If this message appears at the end of the file after the backup or restore summary, then the “disconnect” is normal and does not indicate a problem. If it appears anywhere before this point, then the connection has been prematurely broken. The processing will resume when the client re-connects to the server and continues from the point where the connection failed.
Chapter 4: Using the Backup Server
Configuration Manager
Backup Server Configuration Manager
The Backup Server Configuration Manager is used to add/delete/modify Backup Server users and to set other configuration parameters. It is also used to view and update current licensing information. See Figure 6. For a general overview, see section titled “Configuration Overview”.
The OK Button
This causes a new Backup Server configuration database to be written to disk, reflecting any updates that have been made.
The Cancel Button
This causes the Server Configuration Manager to exit without writing out a new configuration database, discarding any updates that have been made.
The Apply Button
This causes an updated configuration database to be written to disk, but does not exit the program.
NOTES:
If the Backup Server needs to be restarted because of a changed option, you will be notified with a message box. Otherwise, the Backup Server will update the changed information dynamically the next time the configuration information is read from the database. The frequency at which the configuration database is read and updated is determined by the settings on the “General” tab of the NovaNet-WEB Backup Server Configuration Manager.
Configuration Overview
General
After the Backup Server is installed, the installation directory will contain the file BackupServer.mdb. Each time the configuration database is updated, a duplicate copy of the file named
BackupServerOld.mdb is written in the installation directory. This copy is used in the event that the current copy is deleted, corrupted, etc.
The Backup Server Configuration Manager utility should be used to make all updates to the configuration database. Not only is it easy to use, but also, using the utility will ensure that the configuration database records are created and updated properly. By using the configuration utility, the chance of database corruption is greatly reduced.
Comments
The following comments refer to Backup Server configuration parameters:
• All parameters have default values with the exception of the license identification number and user account entries.
• When specifying user account information, at least one computer must be configured per account. The user data directory specified need not already exist.
• Configuration information is read initially when the Backup Server service is started. The license identification number, the maximum log size, the encryption setting and various other settings may be updated while the service is running. In addition, user accounts may be added/deleted or enabled/disabled. Other configuration settings can also be changed dynamically. The service will detect the changes the next time the configuration database is read.
• To modify all other parameters (including the user data directory specification for existing user accounts), the service must be stopped and restarted in order for the changes to take effect.
User Accounts and Directories
Before running the Backup Server, user accounts must be configured correctly through the User Manager to ensure successful user authentication.
The user data directory is where all backup data (encrypted) resides for a particular user. This allows for more secure storage of data, as well as the ability to store data on remote systems connected to the network.
One recommended way to set up user directories is to create a top-level user data directory and then specific subdirectories for individual user accounts. As a feature, when a new user is added, the application will automatically detect the most commonly used user data directory name already
configured for other users. It will set the default user data directory based on this path name and the new user name.
In order to change the user data directory for a particular account, it is recommended that the service be stopped, the contents of the old directory moved to the new directory, and the service be restarted.
The Backup Server Database
The Backup Server database (BackupServer.mdb) is a Microsoft Jet database that is used to maintain all server configuration information, as well as to optionally log all server transactions (i.e.
backup/restore requests). If the additional transaction option is selected, the database will contain a copy of the pertinent information recorded in the user log files. This information is useful for billing, accounting, or reporting applications that may need an efficient way to retrieve information about individual transactions.
NOTES:
• Even though the database holds the Backup Server configuration settings, all configuration information is still configured via the Backup Server Configuration Manager. If the additional option to have the server log transactions is selected, the Backup Server will still continue to generate user log files in the specified User Log directory.
The following tables are maintained in the BackupServer.mdb file:
• Version Table
The Version Table includes information about the current version of the Backup Server software. • Directories Table
The Directories Table includes information directory paths that are used by the Backup Server. • Errors Table
The Errors Table contains a list of error codes and descriptions that relate to error status codes that are recorded in the Requests Table.
• General Settings Table
The General Settings Table includes miscellaneous configuration information for the Backup Server. This table includes the global quota settings and global blocked client options that may be in effect for user accounts.
• Notifications Table
The Notifications Table identifies which types of notifications are configured and which error conditions result in notifications being sent.
• Requests Table (if “transaction logging” is turned on)
The Requests Table includes information about each client request that is processed by the Backup Server. This table includes the type of request, the date of the request, the result status and relevant information pertaining to the particular type of request.
• Users Table
The Users Table includes information about each backup user that is configured. This table includes specific quota settings and blocked client options that may be customized for a particular user. • Quota Settings Table
The Quota Settings Table includes information about global quota settings that may be in effect for backup users.
• Quota Messages Table
The Quota Messages Table includes information about specific quota message text that will be used in the event of quota conditions being met.
• Account Usage Table
The Account Usage Table includes information about current disk space usage on the server for each backup user that is configured, as well as the total “file selection” size on the computer that originated the backup via the Backup Client program.
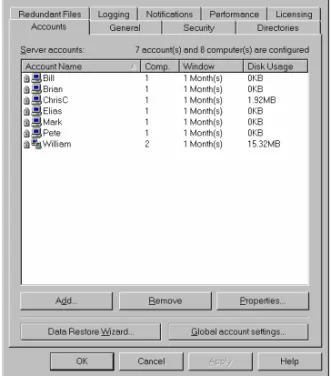
The Accounts Tab
This window displays all of the configured users of Backup Server, including summary information about each user. See Figure 7.
Summary Information
• Account Name
This is the user account name that should match the user account name on the server system (configured through the User Manager).
• Computers
This is the number of computers that will be backing up data to this user account. Clients backing up to this account must not exceed this limit or Backup Server will report an error back to the client. In this case, the number of computers would need to be increased before a successful upload for more computers could occur. • Window
This field indicates the “Previous restore window” for the particular user account.
This is the time interval (in weeks, days or months) where old versions of files will be saved on the server and will be available to restore on the client at a future point in time.
• Disk Usage
This field indicates the current server disk usage for the particular user account. This
information may also be viewed in relation to a possible quota limit established for the account.
The Add Button
The Add Button is used to add new Backup User accounts. Adding user accounts to the Backup Server allows a client to connect to a particular account to perform backup/restore operations. The “Add Account” window is used to add a new user account to the Backup Server configuration. For more information on individual account settings, see the section titled “The User Account Properties Window”. As a reminder, before running the Backup Server, user accounts must be configured correctly through the User Manager to ensure successful user authentication.
One recommended way to set up user directories is to create a top-level user data directory, and then specific subdirectories for individual user accounts. As a feature, when adding a new user, the application will automatically detect the most commonly -used directory name already configured for other users. As a new user name is entered, the default directory will be set based on this path name and the new user name.
The Remove Button
The Remove Button is used to remove current Backup User accounts. Once a user is deleted, clients will no longer be able to connect to that account on the Backup Server. As an added option, the associated directories for that user can also be deleted.
The Properties Button
The Properties Button is used to display or update configuration parameters for a particular user account. This information includes the user name, number of computers, enable status, secure FTP home directory, user data directory and archive directory.
The “Properties” window is used to display or update configuration parameters for a particular user account. This information includes the user name, number of computers, enable status, secure file transfer root directory, user data directory and archive directory. For more information on individual account settings, see the section titled “The User Account Properties Window”.
The “Data Restore Wizard…” Button
This Data Restore Wizard Button is used to run the “Data Restore Wizard”, which will prepare the data for a particular user account so that it can be easily restored by the user from local media (e.g. CD-ROM).
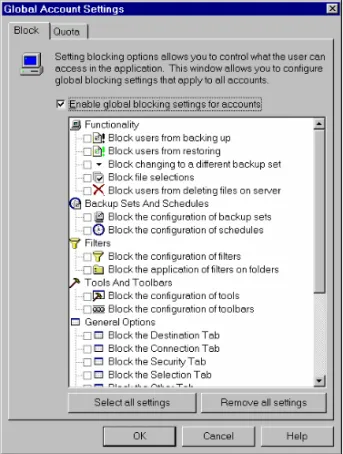
The “Global account settings” Button
The Global Account Settings Button is used to set certain options, such as client-blocking options and quota options that will be used globally for all Backup User accounts. In addition, these global options can be overridden or disabled completely for individual accounts.
The User Account Properties Window
This window is used to add, modify, or view Backup User account information.
The General Tab
The following settings are included in the General Tab: • Account Name
• Enabled Status • Account Type • Master Key Access • Number of Computers
• Single/Multiple Computer Backup Option • Restorable Window
• Account Data Directory • “Restore Wizard…” Button
For more details on individual settings, see the section titled “The Account Properties General Tab”.
The Block Tab
The following list includes categories of client options that can be blocked: • Functionality
• Backup Sets and Schedules • Filters
• Tool and Toolbars • General
• Backup Options • Restore Options • User Delete Capability
The Quota Tab
The following settings are included in the Quota Tab: • Account Quota Setting (Global/Custom/None) • Account Quota Size
• Near Quota Percentage • Near Quota Action • At Quota Action • Over Quota Percentage • Over Quota Action
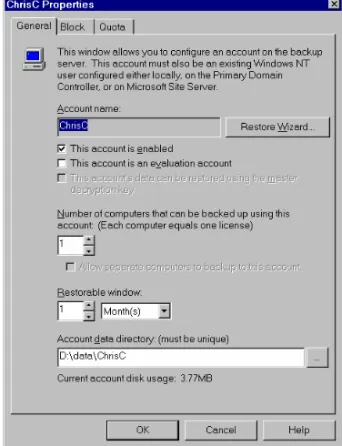
The Account Properties General Tab
This window is used to add, modify, or view the blocking options for a Backup User account. See Figure 8.
• Account Name
This is the user account name that should match the user account name on the server system (configured through the User Manager). • Enabled Status
This checkbox indicates whether a particular user account is enabled or not. If the account is disabled, no backups or restores may be performed by a client connecting to the Backup Server until the account is enabled.
• Account Type
This checkbox indicates whether a particular user account is an evaluation account or not. If this option is checked, it means that the account is being used on an evaluation basis. In this case, the client will only be able to access the account for a limited evaluation period before it times out.
If this checkbox was previously checked and then unchecked, indicating that the account has changed from an “evaluation account” to a “normal account”, the server will notify the client and the client will be automatically upgraded so that it doesn’t time out.
If this checkbox was previously unchecked and then checked, indicating that the account has changed from a “normal account” to an “evaluation account”, the server will notify the client and the client will be automatically downgraded so that it times out after a limited time period.
• Master Key Access
This checkbox indicates whether master key decryption is enabled or not. If master key decryption is enabled, then the data for this account may be recovered using the master key. To recover data, enter the master decryption key as the password in the Backup Client and connect to the particular user account. From the Restore Tab, the “Get Volume List from Server” and “Get File List from Server” options will display the volumes and files that are available for restoring.
• Number of Computers
This is the number of computers that will be backing up data to this user account. Clients backing up to this account must not exceed this limit or the Backup Server will report an error back to the client. In this case, the number of computers would need to be increased before a successful upload for more computers could occur. At least one computer must be configured for each user.
• Single/Multiple Computer Backup Option
The checkbox labeled “Separate computers will be backing up to this account” indicates that more than one physical computer will be backing up to the same account. This will prevent a backup on one computer from deleting volumes that were backed up by other computers. Typically, in the case of a single computer backup, the Backup Server would detect added and deleted volumes when a client backs up and make the necessary adjustments on the server. An example of this option would be backing up a desktop system and a laptop system to the same account.
• Restorable Window
This is the time interval where previous versions of files that were backed up can still be recovered. The default is 1 month. If the capability for previous version restores is not desired for a particular account, this field can be set to 1 day.
• Account Data Directory
This is the directory where all data for this user will be stored in an encrypted manner. This allows for more secure storage of data, as well as the ability to store data on remote systems connected to the network.
• “Restore Wizard…” Button
This button will launch the “Data Restore Wizard”, which will prepare the data for the
particular account so that it can be easily restored by the user from local media (e.g. CD-ROM).
NOTE:
When a new user is added, the Server Configuration Manager will automatically detect the most commonly configured path name already used for other accounts’ data directories. It will set the default account data directory name as the new account name appended to the detected path name.
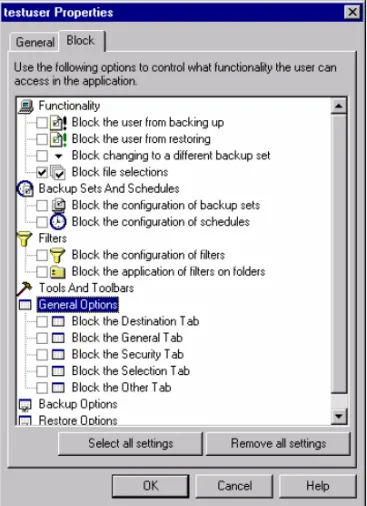
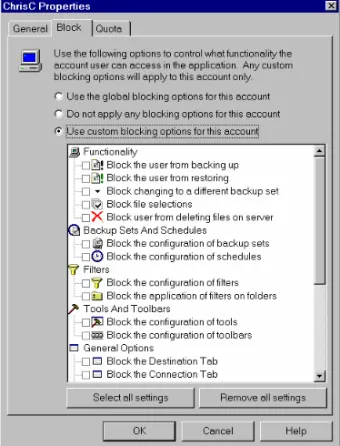
The Account Properties Block Tab
This window is used to add, modify, or view the blocking options for a Backup User account. See Figure 9.
• Account Blocking Setting
There are three blocking options that can be set for a Backup User account. The account can use the global blocking settings, use custom blocking settings, or have no blocking options applied to it at all. If the custom blocking option is chosen, the following options can also be set.
• Options Available for Blocking
Many options in the Backup Client software can be disabled for an individual user account by setting options on the server to block them. The options range from the ability to block basic backup/restore functionality to being able to block individual settings on the client. The following list includes the categories of options and individual settings (checkboxes) that can be blocked:
Functionality
Block the user from backing up Block the user from restoring
Block changing to a different backup set Block file selections
Block the user from deleting files on the server
Backup Sets and Schedules
Block the configuration of backup sets Block the configuration of schedules
Filters
Block the configuration of filters Block the application of filters on folders
Tools and Toolbars
Block the configuration of tools Block the configuration of toolbars
General Options
Block any or all tabs
Backup Options
Block any or all tabs
Restore Options