Version 9.4
Exchange Module Guide
v. 1.0 October 29, 2008Edition
Information in this document applies to version 9.4 of the RightFax Exchange Module Guide. This document was last updated on October 29, 2008. Copyright Notice
©2008 Captaris, Inc. All rights reserved. Captaris
301 116th AVE SE Suite 400 Bellevue, WA 98004 (425) 455-6000 http://www.captaris.com
Information in this document is subject to change without notice. Companies, names, and data used in examples herein are fictitious unless otherwise noted. About Captaris Inc
Captaris, Inc. is a leading provider of software products that automate document-centric business processes. Captaris specializes in document capture, recognition, routing, workflow and delivery. Captaris integrated solutions provide interoperability with leading line of business applications and technology platforms. Captaris products include RightFax, Captaris Workflow, Alchemy, FaxPress, DOKuStar, RecoStar, Single Click Entry and IDStar which are distributed through a global network of leading technology partners. Captaris customers include the entire Fortune 100 and the majority of Global 2000 companies. Headquartered in Bellevue, Washington, Captaris was founded in 1982 and is publicly traded on the NASDAQ Global Market under the symbol CAPA. www.Captaris.com.
iii Chapter 1 Configuring the
RightFax Microsoft Exchange Gateway ... 5
Installing the RightFax Microsoft Exchange Gateway...5
Adding and Configuring the RightFax Microsoft Exchange Gateway Service...6
Running the RightFax Microsoft Exchange Gateway Remotely ...9
Troubleshooting the RightFax Microsoft Exchange Gateway ... 11
Resolving error messages... 11
Chapter 2 Installing the RightFax Connector for Exchange 200313 Requirements ... 13
Configuring the RightFax Connector for Microsoft Exchange 2003 ... 15
Synchronizing Users from Active Directory to RightFax... 18
Configuring the Connector to Work with Multiple Exchange Gateways ... 19
Installing the Connector for Exchange 2003 on a Windows 2003 Cluster... 19
Chapter 3 Installing and Configuring the RightFax Connector for Exchange 2007...23
Architectural Overview ...23
Coexisting with Exchange 2003 Servers ...24
Requirements...24
Configuring the RightFax Connector for Microsoft Exchange 2007 ...26
Synchronizing Users from Active Directory to RightFax ...28
Troubleshooting the RightFax Connector for Exchange 2007 .. 28 Chapter 4 Configuring Outlook Users to Send and Receive Faxes...29
Installing the RightFax Form for Outlook ...29
The Outlook Fax Extension ... 30
Sending Faxes ...31
Sending Faxes Using Certified Delivery ...32
Manually Addressing Outlook Messages to Fax Destinations ...33
Receiving Incoming Faxes via Email ... 34
Email Notification of Received Faxes ...35
Including the Fax ID in the Email Notification ...37
Embedded Codes in Email Messages... 38
Appendix A Email Compatible Embedded Codes ... 39
Appendix B File Formats that Convert to Fax Format ... 45 Index ... 47
5
Chapter 1
Configuring the
RightFax Microsoft Exchange Gateway
The RightFax integration with Exchange consists of the following components:
RightFax Microsoft Exchange Gateway RightFax Connector for Exchange RightFax advanced form for Outlook Captaris Synchronization Module
The RightFax Microsoft Exchange Gateway is a configurable RightFax service that functions as a communication link between RightFax and Exchange. One or more gateways must be enabled on a RightFax server. Setup and configuration is done via a Windows Control Panel application (see “Adding and Configuring the RightFax Microsoft Exchange Gateway Service” on page 6). The RightFax Connector for Exchange is an Exchange service that handles all communication between the Exchange and RightFax servers. The connector service is installed on Exchange servers and is configurable from the Exchange System Manager (Exchange 2003) or a Windows Control Panel (Exchange 2007). The RightFax advanced form for Outlook allows Microsoft Outlook clients to create and send faxes from a RightFax advanced form built into and launched directly from Outlook. The advanced form also lets clients view faxes with the built-in RightFax fax viewer.
When you install the RightFax advanced form for Outlook, a custom fax button is also added to the Outlook toolbar that lets users easily create and address new faxes.
The Captaris Synchronization Module allows RightFax administrators to create and synchronize users from Active Directory domains, groups, and organizational units. An Exchange-specific profile is included with the synchronization module and is designed to map Active Directory and Exchange user attributes to RightFax user attributes. For more information, see the RightFax Administrators Guide.
Installing the RightFax Microsoft
Exchange Gateway
The RightFax Microsoft Exchange Gateway supports the following versions of Microsoft Exchange:
Microsoft Exchange 2003 SP1 or later Microsoft Exchange 2007
The files required by the RightFax Microsoft Exchange Gateway are installed on all RightFax servers during the server installation, however, the RightFax Microsoft Exchange Gateway must be licensed and activated before its functionality is enabled.
To activate the RightFax Microsoft Exchange Gateway, you must have licensed a RightFax server type that includes this module, or purchased and licensed this module separately. For information on activating new components, refer to the RightFax Installation Guide.
After the RightFax Microsoft Exchange Gateway is activated, you must add and configure the gateway service on the RightFax server (described in the next section).
Adding and Configuring the RightFax Microsoft
Exchange Gateway Service
1. Log on to the RightFax server as an Administrator.
2. Open the Windows Control Panel and double-click RightFax E-mail Gateway. The E-mail Configuration window opens.
3. To add a new gateway, click Add Gateway. The E-mail Gateway Selection window opens.
4. Click Microsoft Exchange from the list of gateways followed by
Select.
Tip Because RightFax allows you to install multiple email gateways, each installed gateway is listed in the tree in the left pane. Click each gateway in the list to view its configuration options. Each email gateway you add must be separately configured to work with your Exchange server and your network environment.
5. Click MSEXCH to view the configuration options for the Exchange Gateway.
6. Configure the gateway using the options described in the next section. When finished, click OK.
Configuring the options on the General tab
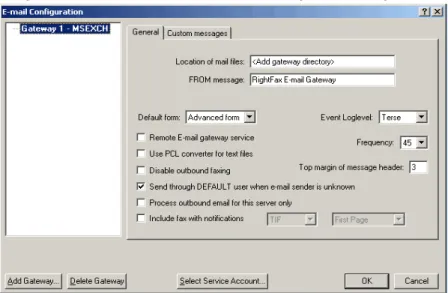
Figure 1.1 The General Tab on the Email Configuration Dialog Box
Location of mail files The Location of mail files box must
contain the UNC path to the message transfer directory located on your Exchange server. The message transfer directory is a
Windows folder created during the Exchange Connector install. After completing the connector install you must share the message transfer directory and grant the email gateway service account (see
“Selecting a service account” on page 8) with share access and the security permission of modify. You can specify any folder on the Exchange server; however, the default location \\<Exchange Server>\RFaxGate is recommended.
FROM message Enter a descriptive name that will appear in
the From field of all inbound documents sent to Exchange from the RightFax server.
Remote Email gateway service Allows the email gateway
processes to execute on a remote computer rather than on the local computer. (It also prevents the email gateway service from being started by the RightFax server, so do not select this check
Chapter 1 Configuring the RightFax Microsoft Exchange Gateway 7
box if you don’t intend to run the gateway remotely.) For more information on running the gateway remotely see “Running the RightFax Microsoft Exchange Gateway Remotely” on page 9.
Use PCL convertor for text files This option is required if
sending messages that contain RightFax embedded codes (see
“Email Compatible Embedded Codes” on page 39). This option will also enable a specialized PCL conversion engine to convert email messages to fax format. This method usually produces the most accurate representation of ASCII text. If you notice that email messages are not converting to fax format as accurately as you expect, clear this check box to return to using the native document conversion engine.
Disable outbound faxing Prevents Outlook clients from
sending mail messages to fax addresses. When you select this option, the Gateway for Microsoft Exchange will only serve to route received faxes and notifications to Outlook clients.
Send through DEFAULT user when email sender is
unknown Assigns fax ownership to the RightFax “Default” user
ID when a fax is sent from an Outlook client who does not have a RightFax user ID. If this option is not selected, faxes sent from Outlook clients that have no matching RightFax user ID will not be sent.
Process outbound email for this server only This option
should only be considered in organizations that use multiple Exchange Gateways. In a multiple gateway environment, each gateway can process faxes. If enabled, this option will restrict all other gateways from processing faxes sent from Outlook clients using the RightFax form. Disabling this option allows all Exchange Gateways within your organization to process RightFax email.
Include fax with notifications Include fax with notifications
is available for all gateway types. If checked, notifications of successfully sent faxes or notifications of faxes that failed to send will include a viewable copy of the fax. Once enabled, select TIF or
PDF format. Choose First Page if you want only the first page of the fax to be included with the notification. Choose All Pages if you want the full fax to be included. When finished, click OK.
Note By default, the Exchange 2007 transport service is configured with a 10MB message size limit. If your organization sends or receives faxes that are greater than 10MB, you must set the Maximum receive size or Maximum send size limit on the Exchange Transport service settings to a value greater than the largest sent or received document. Messages greater than the message size limit will generate an NDR message and will not be processed. For information on configuring Exchange message size limits, see Microsoft documentation.
Event Loglevel Select the level of information logged in the
Application Event Log under the service name “RightFax Email Gateway Module.” The Terse setting records critical errors only.
Verbose records all significant events and is most useful for tracking and resolving problems. Note that if you leave this value set to Verbose for long periods of time, the Event Log can become full which may prevent new events from being logged.
Note Information written to the Application Event Log is valuable in tracking down problems. If you have a problem that can be duplicated, set the LogLevel for all RightFax server applications to Verbose, then go through the steps to duplicate the problem. The data stored in the Application Event Log may help you resolve the problem.
Frequency Sets the interval, in seconds, between checks to the
mail system and the RightFax system for work to do (such as received faxes to route or email to convert to faxes). Decreasing this value is not recommended as it may unnecessarily increase the load on the fax server.
Top margin of message header Enter the number of lines to
add to the top margin of mail messages when converting to fax format. Adding a few lines to the top margin may prevent some plain paper fax machines from cutting off the top of the message headers.
Configuring the options on the Custom Messages tab
When a fax is received as an email attachment and when an email notification about the status of a fax is received, the received mail message includes one or more customizable messages providing information about the status of the fax. To customize the text of these messages, click the Custom Messages tab.
Figure 1.2 The Custom Messages Tab
Each message lets you combine text with one or more variables. Each message has its own available variables, described in the following table.
Selecting a service account
To access the message transfer directory on your Exchange server, you must add the proper service account to run the gateway. This account must be a domain user that belongs to the local admins group on the RightFax server. To add an account that lacks these requirements may prevent the gateway from starting or from accessing the message transfer directory.
To change the gateway service account
1. Open the Windows Control Panel and double-click RightFax E-mail Gateway. The E-mail Configuration window opens.
2. Click Select Service Account. The RightFax Service Account Editor opens.
3. Click the radio button next to This account.
Table 1a Email Gateway Custom Message Settings Notification
message Variables
Sent/Received time ~1 = Date (in Windows locale format) and
time (HH:MM)
Received remote ID ~1 = Remote ID
Sent remote ID ~1 = The destination fax number
~2 = The destination remote ID
Inbound user ~1 = The RightFax user ID of the fax
recipient
~2 = The fax recipient's routing code
Result ~1 = The result code and any
accompanying text as reported by the fax board (These codes and messages may differ depending on your fax board type)
Page record ~1 = The range of page numbers
successfully sent or received
None sent None.
Elapsed time ~1 = The total time that the fax spent being
processed by the fax board displayed (MM:SS)
~2 = The fax channel used to send or receive the fax.
Table 1a Email Gateway Custom Message Settings (Continued) Notification
Chapter 1 Configuring the RightFax Microsoft Exchange Gateway 9 4. Type the service account information using the format of:
Domain\User account or Local Computer\User account.
5. Enter the password for the selected user account in both the Password and Confirm Password box.
6. Click OK to apply the new service account.
Bypassing MAPI session sending limits
By default, a MAPI session in Exchange limits a user to sending a document to 100 recipients. If any of your users will be sending a document to more than 100 recipients, you must add a value to the registry that will allow RightFax to bypass this restriction.
Edit the Windows registry and navigate to
HKEY_LOCAL_MACHINE\Software\RightFax\Gateway. Add a new DWORD value called “AvoidServerLimits” and set its value to 1.
Running the RightFax Microsoft Exchange
Gateway Remotely
By default, the RightFax Microsoft Exchange Gateway service runs on the RightFax server. You may choose to run the Email Gateway service on a different machine if:
You want to decrease the workload on the RightFax server. You anticipate a high volume of gateway traffic and don’t want
the added workload to interfere with the routine operation of the RightFax server.
To run the RightFax Email Gateway service remotely 1. On the RightFax server, run the Email Gateway configuration
program from Windows Control Panel.
2. Click Add Gateway. Select Microsoft Exchange and click
Select.
3. Highlight the new gateway in the pane on the left and select the
Remote Email gateway service option.
4. Set the Location of mail files option to the UNC path of the RightFax\Gateway folder (for example \\Exchange
Server\C$\Program Files\RightFax\RFaxGate).
5. Click Select Service Account and make a note of the domain and user account used by your gateways. For security
purposes, the password for the user account will not be displayed, but you must have this information as well as the password for use later in these steps.
6. Click Cancel to close the Service Account dialog box, and then click OK to save and close the Email Configuration dialog box.
7. Add the gateway user account you noted above to the Administrators group on both the RightFax server and the remote Email Gateway computer.
8. Log on to the remote Email Gateway computer using the Email Gateway service account user name and password.
9. Map a drive to the administrative share for the drive on which the RightFax server is installed (for example, \\RFSERVER\C$).
10.Open a command prompt and change to the RightFax\Bin folder on the drive you mapped and enter the following command:
addsrvRFEMAIL#“RightFax Remote Gateway# Module” “\\RFSERVER\C$\Program Files\RightFax\Gateway \EXCHGateway.exe”
Where # is the number of the Email Gateway you added on the RightFax server, and RFSERVER\C$ is the name of the administrative share on the RightFax server. When complete, the message “Create Service Success” appears. Close the command prompt window.
11.Open Windows Control Panel, select Administrative Tools, and start the Services program.
12.In the list of services, double-click “RightFax Remote Gateway#
Module” (Where # is the Email Gateway number). This opens the Properties dialog box.
13.Under Startup Type, select Automatic.
14.Under Log on as, select This account and then click the browse button to open a dialog box listing available user accounts.
15.Open a list of user IDs on the Email Gateway service account domain, and then double-click the Email Gateway service account user ID you noted earlier. Click OK to return to the
Services dialog box.
16.In the Password and Confirm Password boxes, type the password for the selected service account. Click OK, and then click Close.
17.Close Windows Control Panel.
18.Open the registry editor and navigate to
HKEY_LOCAL_MACHINE\System\CurrentControlSet \Services\GATEWAY#
Where # is the number of the Email Gateway.
19.From the Edit menu, select New, and then select String Value. Type AppParameters and press ENTER to name the new registry key.
20.Double-click the new AppParameters key to open the Edit String dialog box. In the String box, enter:
-fRFSERVER-sgateway#-L\\RFSERVER\C$\ Progra~1\RightFax
where RFSERVER is the name of the RightFax server, # is the Email Gateway number, and \\RFSERVER\C$\Progra~1\ RightFax is the UNC path to the RightFax folder on the RightFax server. (The short name format is required.)
Note Multiple email gateways are sequentially numbered beginning with the second gateway listed in the Email Gateway Configuration. If you are configuring the first email gateway shown in the Email Gateway Configuration to run on a remote server, the number sign (#) show in the syntax above is NOT required. This is also true if your RightFax server is configured for a single Email Gateway.
21.In the registry editor, navigate to HKEY_CLASSES_ROOT and add a new key called RightFax.
22.Under the RightFax key, add a new key called Server.
23.Add a new string value to the Server key called Path. In the
Data value box enter the UNC path to the RightFax\Shared files folder on the RightFax server (for example,
\\RFSERVER\C$\Program Files\RightFax\Shared files).
24.Close the registry editor.
25.Run the Services program from Windows Control Panel
26.Select the “RightFax Remote Gateway# Module” service. If the service is running, click Stop. When the service is stopped, click Start. RightFax will now begin using the remote Email Gateway service.
Chapter 1 Configuring the RightFax Microsoft Exchange Gateway 11
Troubleshooting the RightFax
Microsoft Exchange Gateway
If you experience problems with your RightFax Microsoft Exchange Gateway service, you should first check for errors in the Application log of the Windows Event Viewer. To open the Event Viewer, select
Start > Programs > Administrative Tools > Event Viewer. In the Event Viewer, select Application from the Log menu to open the Application log. Email gateway-related problems will appear on the log in the Source column as “RightFax Email Gateway Module.” Double-click the entry for a description of the error.
The information saved to the Event log is determined by the
LogLevel setting in the RightFax Email Gateway configuration program (described on page 7). With the log level set to Terse, only critical errors will be recorded. Log levels Normal and
Verbose record more information that may help track down problems.
Running the RightFax Microsoft Exchange Gateway service in a command prompt window will also give a very detailed account of what is happening with the gateway.
To run the gateway in a command window 1. Open Enterprise Fax Manager.
2. In the list of RightFax services, right-click RightFax E-mail Gateway and choose Debug. A command prompt will open.
To output debug information to a text file 1. Stop the RightFax Email Gateway Module service.
2. Open a command prompt window.
3. Change to the RightFax\Gateway folder on the RightFax server and enter this command:
exchgateway -d -1 -sgateway# >file.txt
Where # is the number of the email gateway. This number is zero-based, so your first email gateway is referred to as “gateway,” your second email gateway is referred to as “gateway1,” and so on. To confirm the gateway number, open the Windows registry and check the Gateway keys under HKEY_LOCAL_MACHINE\SOFTWARE\RightFax\Gateways.
Example exchgateway -d -1 -sgateway >file.txt
When running the email gateway in a command window, you must set the window properties to allow you to scroll backwards some distance. To set the command window to sufficient size, click the Command Prompt icon in the top left of the command window. Click Properties to open the Command Prompt Properties
dialog box. Click the Layout tab, and then set Screen Buffer Size
height to 2000.
4. To stop debug and view your output, press Ctrl + C on your keyboard. Open the output file located in the
\RightFax\Gateway folder.
Resolving error messages
Error 53
This is a Windows networking error which often indicates that the UNC name which was specified for the Location of Mail Files in the gateway configuration is invalid or otherwise unavailable. If the specified path is correct and valid, it may be that the account being used to start the Email Gateway Module service does not have access rights to that folder.
Error 85 The local device is already in use
This is a Windows networking error stating that the drive to which RightFax is trying to connect the UNC name that was specified for the Location of Mail Files, or API Files is already assigned.
Faxes are going out, but no email notifications are being sent
Normally, users who send faxes via mail do not have a RightFax account and the faxes will be routed through the RightFax Default fax mailbox. When a fax goes out, RightFax tries to notify the user of the fax status. Since the fax went through the Default fax mailbox, RightFax will try to notify the network user Default, thus the notification never reaches the sender.
Cannot access inbound/outbound folder
The folder entered as the Location of In/Out Directories box on the RightFax Connector dialog box is invalid (see “Testing communication between the two servers” on page 21). The path specified may not exist, may be misspelled, may not use proper UNC naming conventions, or the user account specified for the RightFax Connector Service may not have administrative access to the specified folder.
Error resolving destination mailbox: MailBoxName
An incoming fax from the RightFax server could not be converted correctly. This is usually due to the user’s Routing Info box in Enterprise Fax Manager not matching a user email address. Make sure the user’s routing information matches the user’s Exchange Distinguished Name.
13
Chapter 2
Installing the RightFax Connector for Exchange 2003
After you have installed and configured the RightFax Microsoft Exchange Gateway, you must install and configure the RightFax Connector for Exchange.
The RightFax Connector for Microsoft Exchange is made up of several files that direct RightFax messaging through Exchange 2003:
RFaxgate.exe is the main connector service.
RFax_in.dll performs inbound fax information processing. RFax_out.dll performs outbound fax information processing. ExchSnap.dll handles fax configuration in Exchange System
Manager.
Setup of the Exchange Connector is a three step process that consists of:
1. Verifying Windows user account requirements (listed on
page 13).
2. Installing the Exchange Connector (described on page 14).
3. Configuring the connector (described on page 15).
Requirements
Microsoft Exchange 2003 SP1 or later Microsoft .NET Framework 2.0*
Microsoft Visual C++ 2005 runtime components* Microsoft Windows Installer 3.1*
*Installed during RightFax setup
Supported Microsoft Windows Operating Systems
Windows Server 2003 Standard x86 Windows Server 2003 R2 Standard x86 Windows Server 2003 Enterprise x86
Schema Modifications
During setup, RightFax design elements are inserted into the Active Directory schema. These changes are minor and can be viewed before you run setup at: http://www.captaris.com/schemas. Because setup writes to Active Directory, the Windows account used to install the connector must belong to the following groups:
Alternatively, you may update the schema before running setup. For more information, see Answer ID 5298 at the Captaris knowledge base.
To install the RightFax Connector for Microsoft Exchange 2003
1. Log on to the Exchange server using a Windows account that is a member of the Domain, Enterprise, and Schema Admin groups.
2. Insert the RightFax Product Suite DVD. If AutoRun is enabled, a menu of install options appears. If AutoRun is not enabled, browse the DVD and run Setup.exe. The RightFax Product Suite Setup wizard opens.
3. RightFax 9.4 requires Microsoft .NET Framework 2.0 or later and Windows Installer 3.1. If this software is not installed on your system, Setup will prompt you to install it. To install, click
OK. To cancel Setup and install .NET Framework 2.0 and Windows Installer 3.1 yourself, click Cancel.
4. Review the welcome screen and click Next.
5. Carefully read and accept the license agreement and click Next.
6. Setup can check for RightFax updates and other late-breaking information. To check for updates, verify you have an active HTTP connection and click Check for Updates. If updates are found, follow the instructions in the Result section. To skip the update check and continue with Setup, check the box next to
Do not check for updates and click Next.
7. Select the RightFax ExchangeConnector Setup component and click Next.
8. The PreviewRequirements step lists third-party software required by the Exchange Connector and also lists the status of setup operations. Software that must be installed will have a status of Not Installed. To continue, click Next.
9. To apply your settings and install required third-party software, click Apply.
10.If your environment hosts multiple Exchange servers, you must choose an administrative group, server MTA, and routing group to install the connector to. If your Exchange server has multiple information stores, you must also choose one of them to host the connector mailbox. When finished, click OK. This step does not apply to organizations using a single Exchange server.
11.To update the Active Directory schema, click Yes. To cancel setup without updating the schema, click No.
The schema update may take a few minutes or as long as several hours, depending on the size of your Active Directory. A message may appear indicating that the install is unable to add the connector object. Click Retry to check the progress of the update. If the update is still in progress, the message will reappear. If the update is complete, the message will close and the install will continue.
Important If you do not update the schema during setup, the installation will fail. To update the schema before you run setup, see Answer ID 5298 at the Captaris knowledge base at
www.captaris.com,
12.To begin installing RightFax software, click Next followed by
Apply. This may take several minutes.
13.To complete Setup, click Close.
14.Open the Windows Services applet in Windows Control Panel and verify the RightFax Connector service is running.
15.Finally, share the \Program Files\RightFax\RFaxGate folder to enable the RightFax Gateway to communicate with the connector. Set the share access permissions to include the Windows account used to run the Exchange Email Gateway on the RightFax server. This account must have Change access to the share and the security permission of Modify.
Chapter 2 Installing the RightFax Connector for Exchange 2003 15 To Configure the RightFax server
to work with the connector
After the connector software has been installed, follow these steps to configure the RightFax server:
1. On the RightFax server, run Enterprise Fax Manager.
2. Open the RightFax server where the RightFax Microsoft Exchange Gateway installed and double-click RightFax Email Gateway Module in the list of services. The Email
Configuration window opens. Click the General tab.
3. In the Location of mail files box, enter the location of the message transfer directory you specified during the connector installation. If you accepted the default folder location during the connector installation, this is the \\ExchServer\Program
Files\RightFax\RFaxGate folder.
Configuring the RightFax Connector
for Microsoft Exchange 2003
After the connector is installed, you can customize the connector configuration in the Exchange System Manager using the MMC Administrative Tool.
To configure the RightFax Connector for Microsoft Exchange 2003
1. Run the Exchange System Manager program.
2. Navigate to the administrators group or routing group you specified during the install open the Connectors view. Right-click Connector for Captaris RightFax and select
Properties in the shortcut menu.
The rest of this section describes each of the options in this dialog box.
The General tab
Figure 2.1 The Connector for Captaris RightFax Properties General Tab
Message size No limit will accept and forward all messages to
the fax server regardless of the file size of the message. Select
Maximum (KB)to specify the maximum file size of messages that the Exchange server will pass to the fax server. Enter the maximum file size in kilobytes. Messages that exceed this file size will not be forwarded to the fax server.
Delivery order Select the sequence that the Exchange
Message Transfer Agent (MTA) will use when delivering mail to the connector:
FIFO. The MTA delivers messages to the connector on a first-in
first-out (FIFO) basis.
Priority. The MTA delivers messages marked with a high priority
first.
Logging level Select the level of information that will be logged in the Application Event Log under the service name “RightFax Exchange Connector.” Normal records critical errors only. Debug
records all significant events and is most useful for tracking and resolving problems.
If you leave this option set to Debug for long periods of time, the Event Log can become full very quickly, which will prevent new events from being logged.
Enable message tracking Select this option to write a
tracking event in the Exchange Message Tracking Log for each fax message successfully sent to or received from the fax server.
Note Exchange message tracking must be enabled before using this feature. For information about enabling Exchange message tracking, consult Microsoft documentation.
For received faxes, the Message Tracking Log records:
The unique ID of the fax, assigned by the fax server. The caller service identification (CSID) of the sending fax
machine.
The object distinguished name of the fax recipient.
For sent faxes, the Message Tracking Log records:
The Exchange ID of the sender. The destination address for the fax.
The message transfer system identification (MTS-ID) assigned by
the connector.
When message tracking is enabled, you can force all faxes sent via the connector to use the last 15 digits of the MTS-ID as the unique ID of the fax. This will help you locate faxes on the fax server that have been identified in the Exchange Message Tracking Log. To enable this feature, edit the Windows registry. Navigate to HKEY_LOCAL_MACHINE\Software\RightFax\Gateway \Gateway#. Next, add the registry value class DWORD and the value “UseMTSID.” Set its value to hexadecimal “0x1” by entering 1 in the DWORD editor.
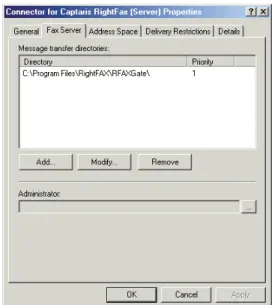
The Fax Server tab
Figure 2.2 The Connector for Captaris RightFax Properties Fax Server Tab
Message transfer directories Message transfer directories
temporarily store the mail messages that are being routed to the fax server and the fax images that are being routed to the Exchange server. You must specify one message transfer directory for each fax server that the Exchange 2003 connector will communicate with. The message transfer directory must be a local folder on the Exchange server, and it must be specified as a local file path (for example, C:\Program Files\RightFax\RFaxGate). Each RightFax server with the RightFax Microsoft Exchange Gateway installed is configured to communicate with one message transfer directory (see “To Configure the RightFax server to work with the connector”
Chapter 2 Installing the RightFax Connector for Exchange 2003 17
Each message transfer directory is assigned a priority. The
RightFax connector will always use the message transfer directory with the lowest priority setting. If a directory can’t be found, it will use the next lowest. If two directories have the same priority, the connector will alternate directories.
Administrator Select a valid Exchange mailbox to receive
undeliverable inbound fax messages and notifications. This account is required and must have a valid email address. If you do not enter a valid Exchange account, the connector will not start.
The Address Space tab
Figure 2.3 The Connector for Captaris RightFax Properties Address Space Tab
Create, modify, or remove an address space This is a list
of the Exchange address spaces that will be routed to the fax server. All messages within the address spaces specified here will
be routed to the fax server. By default, messages with the FAX and RFAX address types (described on page 34) will be routed to the fax server by the connector.
Connector scope Select Entire organization to enable the
connector for all servers on your network. Select Routing group to enable the connector only for servers in the local routing group.
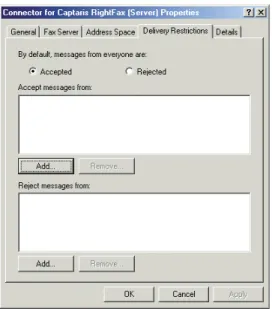
The Delivery Restrictions tab
Figure 2.4 The Connector for Captaris RightFax Properties Delivery Restrictions Tab
Important Before configuring delivery restrictions for RightFax, you must configure Exchange using Microsoft knowledge base article 277872. For more information, see
http://support.microsoft.com/default.aspx?scid=kb;en-us;277872
By default, messages from everyone are accepted. Click Accepted
to accept fax-bound messages from all sources. If you select this option, you will still be able to reject messages from specified
sources. You should select this option if you intend to accept messages from all but a few sources. Specify the exceptions in the
Reject messages from box.
Click Rejected to reject fax-bound messages from all sources. If you select this option, you can still accept messages from specified sources. You should select this option if you intend to accept messages from only a few sources. Specify the exceptions in the
Accept messages from box.
Accept messages from This is a list of senders from whom
messages will be accepted. You may want to add Exchange users to this list if you select Rejected as the default for all users. If so, the connector will only accept messages from users listed here.
Reject messages from This is a list of senders from whom
messages will be rejected. You may want to add Exchange users to this list if you select Accepted as the default for all users. If so, the connector will accept messages from all users except those listed here.
The Details tab
Figure 2.5 The Connector for Captaris RightFax Properties Details Tab
Administrative note Add an optional note, up to 1024
characters.
Synchronizing Users from Active Directory
to RightFax
All user synchronization between RightFax and Exchange 2003 environments is managed by the Captaris Sync Module. An XML-based transform file (for synchronizing user information into RightFax) is available for Exchange 2003 environments. For information on user synchronization, refer to the RightFax Administrator’s Guide.
Chapter 2 Installing the RightFax Connector for Exchange 2003 19
Configuring the Connector to Work with
Multiple Exchange Gateways
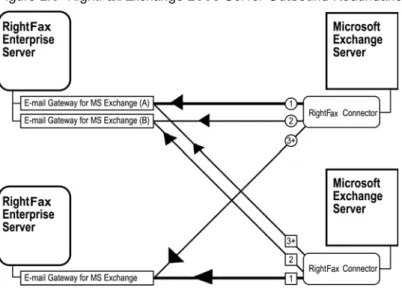
Only one RightFax connector can be installed on each Exchange 2003 server, although each connector can communicate with multiple RightFax gateways through the specified message transfer directories (described on page 16). Each connector/gateway connection is assigned a priority. The connector will always use the message transfer directory with the lowest priority setting. If a message transfer directory can’t be found, it will use the next lowest. If two message transfer directories have the same priority, the connector will alternate between them.
The following diagram illustrates the use of connection priorities to create outbound redundancy in a multiple RightFax/Exchange 2003 server environment.
Figure 2.6 RightFax/Exchange 2003 Server Outbound Redundancy
Server redundancy is enabled by assigning multiple message transfer directories (one per installed gateway) to a single connector and assigning each a different priority level. For
information on configuring message transfer directories in the RightFax connector for Microsoft Exchange, see “Message transfer directories” on page 16.
Installing the Connector for Exchange 2003 on a
Windows 2003 Cluster
Important The Connector for Microsoft Exchange 2003 requires that your cluster environment be configured as Active-Passive. It will not function in an Active-Active Cluster configuration.
Installing the Connector for Exchange 2003 on a Windows 2003 cluster requires these basic steps:
1. Create the mail directories (page 19).
2. Install the connector on the primary node (page 20).
3. Install the connector on the secondary node (page 20).
4. Create the RFAXGATE resource (page 20).
5. Create the file share resource (page 21.
6. Change the mail directory paths (page 21).
7. Modify the Windows Registry (page 21).
8. Test communication between the two servers (page 21).
Creating the mail directories
1. From the root of the cluster shared drive, create a new folder named RFaxGate. Add two subfolders to this folder named RFaxGate\In and RFaxGate\Out.
2. Right-click the RFaxGate folder and select Sharing from the shortcut menu. This opens the Properties dialog box with the
Sharing tab displayed.
3. Select Share this folder and type “RFAXGATE” in the Share name box.
4. Click Permissions, and then click Add.
5. Select the service account that will be used by the Exchange email gateway service and click Add. Click OK.
6. Select the service account you added and allow full control. Click OK to return to the Properties dialog box.
7. Select the Security tab and click Add.
8. Select the service account used by the Exchange email gateway service and click Add. Click OK.
9. Select the service account you added and allow full control.
10.Click Advanced.
11.Check the Reset permissions on all child objects and enable propagation of inheritable permissions check box and click
OK.
12.Close the Permissions dialog box.
Add the email gateway to the RightFax server
1. Log on to the RightFax server as an administrator.2. Open the Windows Control Panel and double-click the RightFax Email Gateway icon.
3. Click the Add Gateway button.
4. Click the Microsoft Exchange Gateway option followed by the
Select button.
5. At the Location of mail files box change the path from C:\Program Files\RightFax
\RFaxGate to \\ClusterName\RFAXGATE.
6. Click the Select Service Account Button.
7. Type the name of the domain where the service account resides.
8. Type the User Account name and Password that will be used to run the Exchange Email Gateway. Click OK when finished.
9. Click OK at the Email Configuration screen to save your changes.
Installing the connector on the primary node
Important You must be working at the Exchange console for the connector to install properly. Connecting remotely to the server will result in an “unknown error” message and the installation will fail.
1. Log on to the primary node using an account that is a member of the Domain Admins, Enterprise Admins, and Schema Admins groups.
2. Install the Exchange 2003 connector according to the
instructions in “To install the RightFax Connector for Microsoft Exchange 2003” (page 14).
Installing the connector on the secondary node
1. Fail over to the secondary node.2. Install the Exchange 2003 connector on the secondary node according to the instructions in “To install the RightFax Connector for Microsoft Exchange 2003” (page 14).
Creating the RFAXGATE resource
1. Fail back to the primary node.2. Run Cluster Administrator and open the Exchange cluster group.
3. Right-click Resources, and then select New > Resource. The Generic Resource wizard opens.
4. In the Name box, enter RFSERVER.
5. In the Description box, enter RightFax Exchange Connector.
6. Set Resource Type to Generic Service.
Chapter 2 Installing the RightFax Connector for Exchange 2003 21 8. In the Possible Owners box, enter the names of both nodes in
the cluster by selecting them and clicking Add.
9. In the Resource Dependencies box, add the MS Information Store, MS MTA, and MS System Attendant resources.
10.Click Finish to add the resource to the group.
Creating the file share resource
1. Right-click Resources, and then select New > Resource. The Generic Resource wizard opens.
2. In the Name box, enter RFaxShare.
3. In the Description box, enter RightFax File Share for Connector.
4. Set Resource Type to File Share.
5. Select the Exchange group.
6. In the Possible Owners box, enter the names of both nodes in the cluster by selecting them and clicking Add.
7. In the Resource Dependencies box, add the Cluster Name and Physical Disk resources.
8. In the Generic File Share Parameters box, enter the path to the RFaxGate folder you created on the virtual drive. Be sure to use RFAXGATE as the share name.
9. Click Finish to add the resource to the group.
Changing the mail directory paths
1. Open the Exchange System Manager.2. For each node, open the Exchange Connector’s Properties
window and click the Fax Server tab.
3. Change the directory path from C:\Program Files\RightFax \RFaxGate to \\ClusterName\RFAXGATE on both connectors.
4. For the second node only, remove the FAX* and RFAX* namespace.
5. Click OK to re-set the connector.
Modifying the Windows Registry
When the Exchange Connectors are installed on the cluster nodes, they each point to different MTS queues. The registry needs to be modified to point them both to the correct queue.
1. Open the Windows Registry on the secondary node.
2. Navigate to HKEY_LOCAL_MACHINE\SYSTEM \CurrentControlSet\Services\RFaxGate\Parameters.
3. Replace the computer name of the secondary node (delimited by brackets) with the computer name of the primary node for the following registry values:
ADSConnector ADsPath CommonName
Important Do not change the settings for HomeDSA.
4. Re-start the Exchange connector.
Testing communication between the two servers
1. Ensure that the Exchange connector service on the active node and the gateway service on the RightFax server are running.
2. On the active node, navigate to the virtual drive where you created the RFAXGATE file share.
3. Open the In and the Out folders in separate windows and set each view to Details.
5. Check the “modified” time and date of each Pulse.txt file and compare them to the actual server time. The time and date of both Pulse.txt files should always be within one minute of the server because they should automatically update every 45 seconds.
If Pulse.txt in the In folder is not updating, ensure that the
RightFax Connector service on the Exchange server is running.
If Pulse.txt in the Out folder is not updating, ensure that the
Email Gateway service on the RightFax server is running.
If both Pulse.txt files are updating properly, send a test fax
through the Exchange gateway.
23
Chapter 3
Installing and Configuring the RightFax Connector for Exchange 2007
Architectural Overview
After installing and configuring the RightFax Exchange Gateway, you must install and configure the RightFax Connector for
Exchange 2007. The connector is a Windows service that runs on Exchange 2007 Hub Transport servers using a Windows service account (usually local system). The connector service is made up of one file (RFExchConn.exe) that directs RightFax messaging through Exchange 2007. Configuration of the connector is done via a Windows Control Panel applet (RightFax Exchange Connector). The connector installation creates a folder on Exchange 2007 servers called RFaxGate. Two subfolders (IN and OUT) are also created. The RFaxGate folder and subfolders are used by both the connector and the Exchange Email Gateway (on the RightFax server) to process outbound and inbound faxes. The default location of the RFaxGate folder is \Program Files\RightFax. Both the \RFaxGate\IN and \RFaxGate\OUT contain the heartbeat file - pulse.txt. The connector writes this file to the RFaxGate\IN folder, while the Exchange Email Gateway Module writes this file to the \RFaxGate\OUT folder. The connector verifies the pulse.txt file is updated in the \RFaxGate\OUT folder to insure the gateway is running. The gateway verifies the pulse.txt file in the RFaxGate\IN folder has been updated within the specified time interval (45 seconds by default) to insure the connector service is running.
Outbound Faxing Workflow
Below is a high-level overview of the processes associated with outbound faxing from an Microsoft Outlook client.
1. A user addresses a fax using a format that is recognizable by the connector (see “Configuring Outlook Users to Send and Receive Faxes” on page 29). The subject of the email is converted to the notes field on the fax coverpage, while the body of the email becomes the first page of the fax. Any attachments are converted and displayed as additional fax pages.
2. The connector processes the fax and creates temporary files (listed below) that are placed in the \RFaxGate\out folder.
HXXXXXXX.tmp: includes fax header information.
MXXXXXXX.tmp: includes the message body and the first
page of the fax.
AXXXXXXX.tmp: includes attachments that are converted to
additional fax pages.
3. The Exchange Email Gateway module on the RightFax server scans for and processes new messages in the \RFaxGate\out folder.
4. The gateway module notifies the RightFax Server module of a new outbound fax document and prepares the document for faxing.
Inbound Faxing Workflow
The following steps provide a high-level overview of the processes associated with inbound faxing with Exchange 2007.
1. A fax is received into RightFax and matched to recipient in the RightFax database.
2. If the user record in the database is associated with a routing type of Exchange the system creates three temporary files:
HXXXXXXX.tmp: includes fax header information.
MXXXXXXX.tmp: includes the message body and the first
page of the fax.
AXXXXXXX.tmp: includes attachments that are converted to
additional fax pages.
3. The *.tmp files are moved by the Exchange Gateway into the \RFaxGate\IN folder on the Exchange 2007 server.
4. The connector then passes the files to Exchange 2007 for processing.
Coexisting with Exchange 2003 Servers
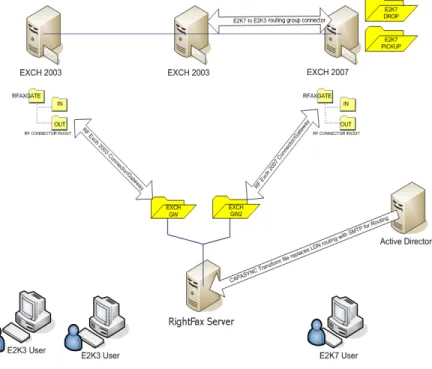
The RightFax Connector for Exchange 2007 can be used with existing RightFax and Exchange 2003 Server integrations. In this scenario, faxing is possible through an Exchange 2003 routing group connector to the Exchange 2007 hub transport server (this connector is included with default Exchange 2007 installations). The following diagram illustrates the function and workflow of the RightFax Connector in a Exchange 2003 Server and Exchange 2007 coexisting environment.
Figure 3.1 Workflow of a RightFax integration with an Exchange 2003 Server and Exchange 2007 coexisting environment
Requirements
Microsoft Exchange 2007 Server configured for the Hub Microsoft .NET Framework 2.0*
Microsoft Visual C++ 2005 runtime components* Microsoft Windows Installer 3.1*
Chapter 3 Installing and Configuring the RightFax Connector for Exchange 2007 25
Supported Microsoft Windows Operating Systems
Windows Server 2003 Standard x64 Windows Server 2003 R2 Standard x64 Windows Server 2003 Enterprise x64
To install the RightFax Connector for Exchange 2007
To ensure that your RightFax Connector for Exchange 2007 installation goes smoothly and to avoid unnecessary delays, it is important to perform each step in the installation completely and correctly before proceeding to the next step.
1. Log on to the computer using a Windows account that is a member of the Exchange Organization Administrators group. If you do not log on as an Exchange Organization
Administrator, the installation will fail.
2. Insert the RightFax Product Suite DVD. If AutoRun is enabled, a menu of install options appears. If AutoRun is not enabled, browse the DVD and run Setup.exe. The RightFax Product Suite Setup wizard opens.
3. The connector requires Microsoft .NET Framework 2.0 or later and Windows Installer 3.1. If this software is not installed on your system, Setup will prompt you to install it. To install, click
OK. To cancel Setup and install .NET Framework 2.0 and Windows Installer 3.1 yourself, click Cancel.
4. Review the welcome screen and click Next.
5. Carefully read and accept the license agreement and click Next.
6. Setup can check for RightFax updates and other late-breaking information. To check for updates, verify you have an active HTTP connection and click Check for Updates. If updates are found, follow the instructions in the Result section. To skip the update check and continue with Setup, check the box next to
Do not check for updates and click Next.
7. Select the RightFax ExchangeConnector Setup component and click Next.
8. The PreviewRequirements step lists third-party software required by the Exchange Connector and also lists the status of setup operations. Software that must be installed will have a status of Not Installed. To continue, click Next.
9. To apply your settings and install required third-party software, click Apply. This may take several minutes. When finished, click
Next.
10.To begin installing RightFax software, click Next followed by
Apply. This may take several minutes.
11.When prompted, enter a Windows account to run the
connector service. The account you choose must be a member of the local administrators group and must have the right to log on as service on the local computer. The local system account is usually adequate. When finished, click OK.
12.At the RightFax Exchange Connector Configuration window, click the button next to the NDR Mailbox field. A pop-up window opens.
13.In the pop-up window, enter an Exchange mailbox that will be used by the connector to deliver errant email. This must be a valid Exchange mailbox. Failure to enter a valid account will not allow the connector installation to complete. When finished, click OK.
14.To complete the Exchange Connector install, click Next
followed by Close.
15.Next, share the \Program Files\RightFax\RFaxGate folder to enable the RightFax Gateway to communicate with the connector. Set the share access permissions to include the Windows service account used to run the Exchange Email Gateway on the RightFax server. This account must have
Change access to the share and the security permission of
To Configure the RightFax server to work with the connector
After installing the connector software you must configure the Exchange Gateway on the RightFax server.
1. Log on the RightFax server as an administrator.
2. Open the Windows Control Panel and double-click RightFax Email Gateway Module. The Email Configuration dialog opens. Click the General tab.
3. In the Location of mail files box, enter the location of the message transfer directory you specified during the connector installation. If you accepted the default folder location during the connector installation on the Exchange server, this is the \\ExchServer\Program Files\RightFax\RFaxGate folder.
Configuring the RightFax Connector
for Microsoft Exchange 2007
After the connector is installed, you can customize the connector configuration settings using the RightFax Exchange Connector control panel program.
To configure the RightFax Connector for Microsoft Exchange 2007
1. Run the Windows Control Panel.
2. Double-click RightFax Exchange Connector. The RightFax Exchange Connector control panel opens.
The rest of this section describes each of the options in Connector control panel.
The General tab
Exchange Install Directory The folder where Exchange 2007
is installed.
Gateway Directory The Gateway Directory stores the mail
messages that are en route to the fax server and fax image files that are en route to the Exchange server. You must specify a Gateway Directory for each fax server that the Exchange 2007 connector will communicate with. The Gateway Directory must be a local folder on the Exchange server, and it must be specified as a local file path (for example, C:\Program Files\RightFax\RFaxGate).
Drop Directory Each foreign connector installed on an
Exchange 2007 Server that does not transmit messages via SMTP must use a Drop directory for outbound messaging. Messages sent to the address space specified in the RightFax Connector configuration (RFAX by default) are placed into the connector's Drop directory where they are then processed by the connector and passed to the Gateway Directory. The default location of the connector's Drop directory is on the Exchange 2007 server at \Program Files\Microsoft\Exchange Server\RightFax Exchange Connector.
Pickup Directory Inbound messages taken from the
\Gateway\In folder are processed by the connector and placed into the Exchange Server Pickup directory. The default location of the Pickup directory is on the Exchange 2007 server at \Program Files\Microsoft\Exchange Server\Transport Roles\Pickup
Note The pickup directory is an Exchange 2007 folder used by all foreign connectors. It should not be deleted, modified, or moved.
NDR Mailbox Select an Exchange mailbox that will receive
undeliverable fax messages. This field is required by the connector and must be populated with a valid Exchange mailbox.
Source Transport Servers Specifies Exchange Hub Transport
servers to route faxes to and from the RightFax Connector.
Message size Select No limit to accept and forward all
messages to the fax server regardless of the file size of the message. Select Maximum (KB)to specify the maximum file size
Chapter 3 Installing and Configuring the RightFax Connector for Exchange 2007 27
of messages that the Exchange server will pass to the fax server. Enter the maximum file size in kilobytes. Messages that exceed this file size will not be forwarded to the fax server.
Caution By default, the Exchange 2007 Transport service is configured with a 10MB message size limit. If your organization sends or receives faxes that are greater than 10MB, you must set the Maximum receive size or Maximum send size limit on the Exchange Transport service settings to a value greater than the largest sent or received document. Messages greater than the message size limit will generate an NDR message and will not be processed. In addition, inbound faxes will be lost if their total size exceeds message (receive) size limits and the recipient RightFax user is configured (in RightFax) with the option to Delete After Routing. For information on configuring Exchange message size limits, see Microsoft documentation.
The Address Space tab
Add, edit, or remove an address space This is a list of the
Exchange address spaces that will be routed to the fax server. All messages within the address spaces specified here will be routed to the fax server. By default, messages with the RFAX and FAX address types will be routed by the connector. An asterisk
indicates that all address formats will be accepted for this address type. A cost value (1–100) for messages with this address type is relevant when using two or more RightFax servers. Exchange will route messages to the RightFax server with the lowest cost.
Connector scope Select Entire Organization to enable the
connector for all Exchange servers on your network. Select AD Site
enable to connector for a specific routing group.
The Logging tab
The Logging tab allows RightFax administrators to control the
types of messages that will be logged by the connector. Each of these messages can be customized using categories and a corresponding logging level. By default all output is written to the Windows Event Viewer Application Log.
Logging Categories
ExchConnInbound logs inbound (fax-to-email) processes. ExchConnManager logs connector manager events that are
associated with in and outbound sub-process
ExchConnOutbound logs outbound (email-to-fax) process RightFax Tools logs events associated with the connector
configuration control panel.
Logging Output Select the level of information that will be
logged in the Application Event Log under the service name “RightFax Exchange Connector.” Off does not record information to the Event Log. Error records only critical errors. Info records informational events (such as normal starting and stopping of the connector), warnings, and errors. Verbose records all events and is most useful for tracking and resolving problems. If you leave this option set to Verbose for long periods of time, the Event Log can become full very quickly and could prevent new events from being logged. Warning records only critical errors and warnings.
Changing the Connector Service Account
The RightFax Connector runs as a local service (RFExchConn.exe) on Exchange 2007 servers. The Windows local system account is used to run the connector service by default, but can be changed if necessary. Regardless of the account type, it must have read access to the Drop directory, read and write access to Pickup directory and Gateway directory, and have permission to logon as a service.
1. To change the service account, click Select Service Account. The Service Account dialog box opens.
2. Click the radio button next to This account.
3. Type the service account information using the format of: Domain\User account or Local Computer\User account.
4. Enter the password for the selected user account in both the Password and Confirm Password box.
5. Click OK to apply the new service account
Synchronizing Users from Active Directory
to RightFax
All user synchronization between RightFax and Exchange 2007 environments is managed by the Captaris Sync Module. An XML-based transform file (for synchronizing user information into RightFax) is available for Exchange 2007 environments. For information on user synchronization, refer to the RightFax Administrator’s Guide.
Troubleshooting the RightFax Connector for
Exchange 2007
If you experience problems with your RightFax Connector for Exchange 2007, you should first check for errors in the Application log of the Windows Event Viewer. To open the Event Viewer, select Start > Programs > Administrative Tools > Event Viewer. In the Event Viewer, select Application from the Log menu to open the Application log. Connector-related problems will appear on the log under the Source column as “RightFax Exchange Connector”. Double-click the entry for a description of the error. The information saved to the Event log is determined by the Logging output setting in the RightFax Connector configuration program. Set the log level to Verbose to record debug-like output that may help isolate a particular issue.
29
Chapter 4
Configuring Outlook Users to Send
and Receive Faxes
The RightFax Microsoft Exchange Module supports these versions of Microsoft Outlook:
Outlook 2000 SP3
Outlook XP base version and SP2 Outlook 2003 base version or higher Outlook 2007
Sending an Outlook mail message to a fax number is similar to sending email, except the message must be specially addressed. Text entered in the Subject field in an Outlook mail message will appear in the “Notes” section of the cover sheet. Text entered in the body of the email will appear as the body of the fax. Attached files will be converted to fax images and added to the fax (see Appendix B, “: File Formats that Convert to Fax Format”). Unsupported file attachments cannot be converted and will be ignored.
Important UTF-8 encoding (unicode) is required for the Euro symbol and some other special characters to appear properly in RightFax documents created in Microsoft Outlook. To support documents with these characters, Microsoft Outlook must be configured for UTF-8 encoding. Refer to the documentation for Microsoft Outlook for information on enabling UTF-8 encoding.
Installing the RightFax Form for Outlook
RightFax provides a custom form for your Microsoft Outlook users that expands and simplifies the process of sending and receiving faxes with Outlook. Features such as an embedded fax viewer and billing code lookup tables allow Outlook to act as a truly unified messaging client for your users.
Note The RightFax form for Outlook requires Microsoft Outlook XP or higher be running on the client workstation.
With the RightFax form for Outlook, users can:
Look up and enter billing information. Send a cover sheet.
Specify conversion options for PowerPoint, Excel, and Visio
documents.
Elect to preview a fax before sending, request a callback, and use
smart-resume.
Specify the resolution of the fax image.
Select defaults for conversion options, cover sheets, and other
sending information.
Preview and select library documents to attach to the fax. Preview and select fax overlay forms.
A preview form can be also installed that will let users preview faxes in Outlook before sending them using the RightFax fax viewer. The RightFax form for Outlook is installed on each individual Outlook client computer as a component of the RightFax client installation (described in the RightFax Installation Guide). If you choose to not install this form on each individual client workstation, Outlook clients can still send faxes via the RightFax server using one of two custom addressing formats. For more information on these fax addressing formats, see “Manually Addressing Outlook Messages to Fax Destinations” on page 33.
The Outlook Fax Extension
The Outlook Fax Extension is installed as part of the RightFax form for Outlook. The extension adds a menu command and button to Outlook so that users can quickly address and send faxes. It also provides a command for viewing the status of faxes.
A button, New Fax to Contact, is added to the Outlook tool bar.
Figure 4.1 The New Fax to Contact Button
When the user clicks this button, a Quick Fax Addressing dialog box may appear depending on the user’s RightFax configuration in Outlook (see “Configuring the Outlook Fax Extension” on page 30). This dialog box lets the user easily enter the necessary fax
addressing information. After the addressing dialog box is
completed, the fax form opens allowing the user to supply the body of the fax message, attach files or library documents, and specify any desired fax transmission options.
The extension adds the menu command Realtime Fax Status to the Actions menu so that users can view the status of the faxes stored in the RightFax mailbox. This is useful for users who want to check the status of faxes sent to or from Outlook. When this command is selected, a dialog box appears listing the folders and faxes in your mailbox. Click a folder name to view the faxes it contains. To view or delete the fax, right-click the fax entry to open a shortcut menu, and then select the appropriate menu option. Right-click in the fax list and select Refresh List to view the most current status of each fax.
Configuring the Outlook Fax Extension
The Outlook Fax Extension must be configured individually on each Outlook client computer. On the client computer in Outlook, navigate to the Tools menu and select Options. The Options
dialog box opens. Select the RightFaxtab.
Use Outlook fax addresses as RightFax addresses
Enables the gateway to send messages to Contacts who have a fax number only in the Business Fax field of their Contact information. If this check box is not selected, RightFax-specific fax addresses must be used in the Business Fax field.
Remove “(Business Fax)” from cover sheet
display name When faxing to Outlook clients, the name of the
Contact information field where the fax number was retrieved (the
BusinessFax field) is automatically appended by Outlook to the fax recipient’s name. For example, your Outlook Contacts may receive faxes addressed like this:
Jane Doe (Business Fax)
Select this check box to automatically remove this text from your fax cover sheets, leaving only the recipient’s name in the To: field.