Exchange ActiveSync
Configurations for GroupWise
Introduction
ISD's Exchange ActiveSync server allows mobile device users to fetch email, contacts and appointments from GroupWise.
Some devices don't require any new clients, as the server will synchronise with the existing email, address book and calendar applications.
Confirmed devices that can connect include Apple iPhone/iPad, Android 2.x and Nokia e52/e71/e72 handsets. Visit the following web site for a full list and complete details:
wiki.novell.com/index.php/Data_Synchronizer_Mobility_Connector_Devices
Pre-requisites
Login to the Helpdesk at helpdesk.beds.ac.uk then select the 'Raise Service Request' option and choose 'Mobile Sync Access'. Complete the form then submit the request. Only when the ISD Helpdesk has confirmed your account will you be able to synchronise.
Apart from knowing your University email address, username and password you need to know the following:
The Exchange ActiveSync server address is sync.beds.ac.uk
SSL will need to be ‘on’ (some devices assume SSL is ‘on’ by default) The Domain isn’t required (some devices require that you type
something in as a Domain even if it isn’t used)
You will know when to use the above settings if you follow the instructions for your device in this document.
To send and receive emails, calendars and contacts your device needs to have a data tariff and be connected to either your phone provider or a wireless Internet connection.
Please note that with the exception of ‘Frequent Contacts’, all other contacts stored in your GroupWise address books will be imported to your device by default if you opt to include ‘Contacts’. You can change this setting by referring to the separate Advanced Exchange ActiveSync for GroupWise guide.
Also, note that Contacts will be stored in the usual way on your device, which is typically one location. So, rather than multiple locations (e.g. multiple address books) as used by GroupWise all contacts are grouped together.
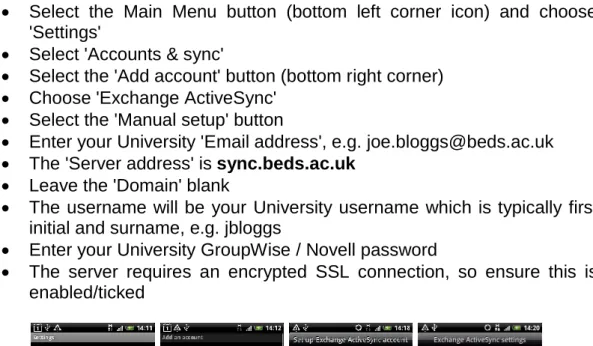
Enter your University 'Email address', e.g. [email protected] The 'Server address' is sync.beds.ac.uk
Leave the 'Domain' blank
The username will be your University username which is typically first initial and surname, e.g. jbloggs
Enter your University GroupWise / Novell password
The server requires an encrypted SSL connection, so ensure this is enabled/ticked
Figure 1 - Setting up the account (Android 2.x)
Select 'Next' and the account is verified. If this is successful, then you can choose which data you wish to synchronise:
Mail, Contacts, Calendar
Please note that although Mail will go into a separate account, Contacts and Calendar appointments will all go into the one Address Book and/or Diary, mixing with any personal contacts or appointments you might have already on your Android phone.
Choose the data (e.g. just 'Mail') and then select 'Finish setup'
Mail Settings
You can amend the settings for the mail account. Simply run the 'Mail' application and select the 'Exchange ActiveSync' account.
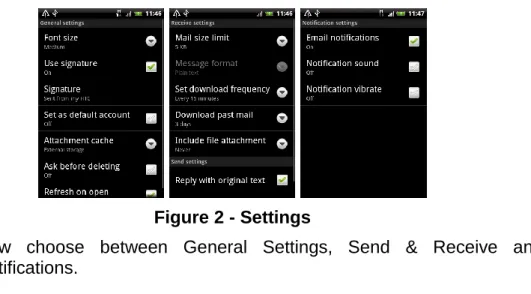
Figure 2 - Settings
Now choose between General Settings, Send & Receive and Notifications.
General Settings
You don't need to change many of the options here. Your signature is probably the option you are most likely to amend.
Send & Receive
By default, the system will retain the last 3 days’ worth of messages within the mail account and it will only download the first 5kb of any message unless you change the option here. You can amend the frequency that the Mail application checks for new messages and alter a few other options too.
Notifications
Amend how the Mail application alerts you to new messages.
Note for Android 2.2+ users
In general terms, the setup is the same as for v2.1. However, you will find that you aren’t asked for the server details until after you have entered the username and password. The setup will then report a problem (usually a certificate) and only when you continue past that will the process ask for the server details.
Having supplied the server details, the setup will then error regarding the username. At this point, amend the username to be first initial and surname, e.g. jbloggs rather than joe.bloggs.
Select Next and then choose ‘Push Mail’.
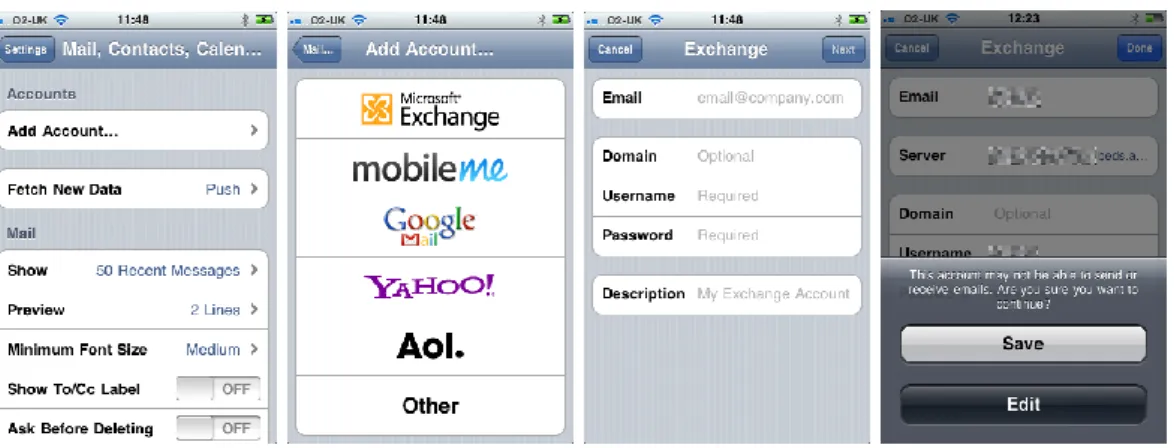
For 'Email' just enter the name part of your email address (e.g. joe.bloggs) - no need to enter @beds.ac.uk
Leave Domain empty
Enter your University username Enter your University password
In Description, enter your name (e.g. Joe Bloggs) Select 'Next' to see a summary of the account
If you are warned that the server identity cannot be verified, select 'Continue' anyway
Enter the server address as sync.beds.ac.uk Select Next and the account will be verified Select Save
If you are warned that the account may not be able to send or receive emails, select the offered 'Save' option anyway
Figure 3 - Setting up the account (iOS 4.x) You now choose which data you are going to sync with:
Mail, Contacts, Calendars
Please note that Contacts is off by default. If you choose to turn it on, you have a choice about whether to keep the current contacts or delete them. If you keep them, all contacts on your device will be stored together.
Figure 4 - Contacts on - warning
Also note that if you have multiple Calendars on your device, remember to choose the correct Calendar when you enter a new appointment. Appointments in different calendars will be colour coded when viewed in the Calendar to help differentiate between them.
Mail Settings
You can amend the settings for the mail account. Simply select 'Settings' from the main menu screen and then choose 'Mail, Contacts, Calendars' and choose the relevant Mail account.
You can amend a whole variety of different settings. From here you can change how frequently the device will 'fetch new data' (default is every hour, but this can be set to 15 minutes or manual for example), how many messages it will show and so on.
(“Preparing for setup”) Select ‘Mail for Exchange’
Enter your University E-mail address, e.g. [email protected] Enter your University Password
Enter your University User name, e.g. jbloggs Leave the Domain blank
Select Next
(“Connecting to Mail for Exchange server”) Enter sync.beds.ac.uk as the server Select Next
Select OK
Emails are synchronised automatically, so choose what else (if anything) to sync: Calendar, Contacts, and To-do notes.
Please note that Calendar and Contacts will all go into central Calendar and Contacts storage, meaning all your appointments and contacts are stored together regardless of where they originated, e.g. work or personal.
Also, note that if you opt to ‘keep phone items’ rather than ‘delete’ when synching contacts then your current phone contacts will be added to your personal GW address book.
Select Next once you’ve made your choices
(“Website has an untrusted certificate. Accept anyway?”) Select Options and select ‘Accept permanently’
Select ‘Yes’
Mail for Exchange should now pull in your work emails.
By default, you are viewing the main GroupWise Mailbox. To access any of your sub-folders, enter the Mail account on your device so you can see some emails then press ‘up’ until the ‘inbox’ section highlights. Press Select and then from the menu choose ‘More folders’. You will now see all of the sub-folders. Selecting one will display emails stored in that folder.
Your appointments will be located in ‘Calendar’ and your contacts will be in ‘Contacts’ (if you chose to synchronise them).
Options
Options, Settings, What to sync
The default is ‘Remove emails older than 1 week’ which means that the phone will only ever retain the last weeks’ worth of emails
Options, Settings, When to sync
You can amend the sync schedule which includes the days it should sync and the start and end times between which the phone handset should sync.
How to delete the mailbox?
To delete your ‘Mail for Exchange’ mailbox from the E72: Select Menu from the Home screen
Select ‘Email’ Select ‘Settings’
Highlight the Mailbox to delete, e.g. ‘Mail for Exchange’ Select ‘Options’
then select ‘Start’
“Allow connection?”. Select ‘Yes’
“You have no Mail for Exchange profile. Create profile?” Select ‘Yes’
E-mail address: Your work email address, e.g. [email protected]
Domain: NA (type anything you like!) Username: Your work username, e.g. jbloggs Password: Your work network/email password
Access point: This can either be a local Wi-Fi service that you have rights to connect to or Internet access provided by your phone service provider (e.g. O2 MobileWeb) Select ‘OK’. You will see a message saying it is retrieving the
Exchange server name. It may then warn you about a certificate with a different website name
Select ‘Options’ and choose ‘Accept permanently’. Select ‘Yes’. You need to enter the Exchange server details manually. Enter sync.beds.ac.uk
Select OK
Select ‘Yes’ for Secure Connection
Access point (this will already be completed based upon your earlier choice)
Select ‘No’ to Sync while roaming Use default port should be ‘Yes’ Select ‘Options’. Select ‘Save’ (“Saving Mail for Exchange Profile”)
Certificate warning again. Select ‘Options’. Select ‘Accept permanently’ Select ‘Yes’
Sync Mode: Peak: Always online (Manual, Always on, Every 15 minutes, 30 minutes, 1 hour, 4 hours, 12 hours). Choose and then select ‘OK’
Off-peak sync schedule: Every 30 minutes (same options as above) Peak start time: 8:00 am
Peak end time: 5:00 pm
Select ‘Exit’
The device will now go and fetch your emails
If the phone says, ‘Current status’ is “Unable to connect. Retrying” then chances are you are not registered on the server. See Pre-requisites
for further details.
Accessing your emails
When a new email arrives on your device, you will see Mail for Exchange appear on the device’s Main Menu. You can then select it to go straight into the account.
You can also access the account by selecting ‘Communications’ from the Menu, then ‘Messaging’ and ‘Mail for Exchange’.
If you set the default mail to be ‘Mail for Exchange’ then you can press the ‘Mail’ button on the handset to go directly into the account. Select the following:
Communications, Messaging. Select ‘Options’ then choose ‘Settings’ and change the ‘Default mailbox’ to read ‘Mail for Exchange’
Calendar, Tasks, Contacts
With Emails confirmed as working, you can also now choose to synchronise your GroupWise Calendar, Tasks and Contacts.
Go to ‘Installations’ and choose ‘Mail for Exchange’ Select ‘Options’
Select ‘Edit profile’
Choose ‘Calendar’, Tasks, or ‘Contacts’ The process for each of the above is very similar.
Firstly, enable the option to ‘Synchronise’ from ‘No’ to ‘Yes’
The next option will depend on whether you are configuring the ‘Calendar’, ‘Tasks’ or ‘Contacts’. For example, the ‘Calendar’ has an option to choose how far n=back to Sync the calendar (default is 2 weeks)
The last option for ‘Initial Sync’ will say ‘Must be defined’, so select ‘Options’ and then choose from ‘Delete items on phone’ or ‘Keep items on phone’.
On Android 2.x devices, go to the ‘Mail’ application and select the Exchange ActiveSync account. Once in the account, select the 'Menu' button’, select ‘More’ and then select ‘Settings’. Choose ‘General Settings’ and ensure that ‘Use signature’ is enabled. Now select ‘Signature’ and edit accordingly. Don’t forget to ‘Save’
On the iOs v4.x devices, select Settings, Mail, Signature and amend accordingly
On the Nokia E72 go to Options, Settings, Mailbox and you can then select ‘Signature’ and amend it accordingly.
Errors?
If you get persistent errors trying to synchronise with the Exchange ActiveSync server, then either the server is down, you haven’t registered to use the sync service or possibly your University password might have expired. If your password has expired, then change it via your desktop computer. Go to:
The GroupWise Windows Client (Tools, Options, Security, Password) The Novell Windows Client (ctrl+alt+delete then select ‘Change
Password’)
Visit pwd.beds.ac.uk/IDM, select the upper right ‘login’ option and supply your current username and password then use the Change Password option (very handy for non-Windows users)
Once your password is changed, the device will synchronise.
If you haven’t registered to use the sync service, log an ISD Helpdesk job at
helpdesk.beds.ac.uk.
If you believe that the sync server is down, log a job via the Helpdesk at the address mentioned above.