Web Form Fundamentals
A
SP.NET introduces a remarkable new model for creating web pages. In old-style ASP development, programmers had to master the quirks and details of HTML markup before being able to design dynamic web pages. Pages had to be carefully tailored to a specific task, and additional content could be generated only by outputting raw HTML tags.In ASP.NET, you can use a higher-level model of server-side web controls. These controls are created and configured as objects and automatically provide their own HTML output. Even better, ASP.NET allows web controls to behave like their Windows counterparts by maintaining state and even raising events that you can react to in code.
In this chapter, you’ll learn some of the core topics that every ASP.NET developer must master. You’ll learn what makes up an ASP.NET application and what types of files it can include. You’ll also learn how server controls work and how you can use them to build dynamic web pages.
The Anatomy of an ASP.NET Application
It’s sometimes difficult to define exactly what a web application is. Unlike a traditional desktop program (which users start by running a stand-alone EXE file), ASP.NET applica-tions are almost always divided into multiple web pages. This division means a user can enter an ASP.NET application at several different points or follow a link from the application to another part of the website or another web server. So, does it make sense to consider a website as an application?
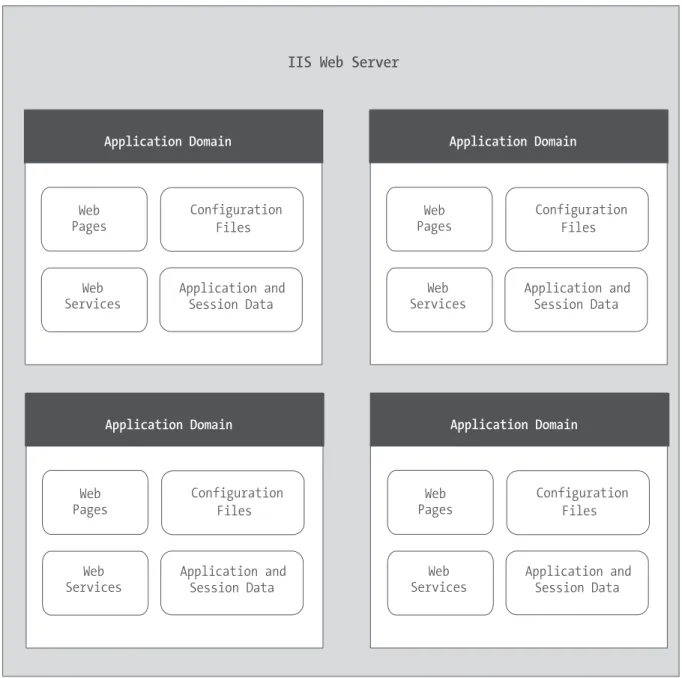
In ASP.NET, the answer is yes. Every ASP.NET application shares a common set of resources and configuration settings. Web pages from other ASP.NET applications don’t share these resources, even if they’re on the same web server. Technically speaking, every ASP.NET application is executed inside a separate application domain. Application domains are isolated areas in memory, and they ensure that even if one web application causes a fatal error, it’s unlikely to affect any other application that is currently running on the same computer. Similarly, application domains restrict a web page in one application from accessing the in-memory information of another application. Each web application is maintained separately and has its own set of cached, application, and session data.
119
The standard definition of an ASP.NET application describes it as a combination of files, pages, handlers, modules, and executable code that can be invoked from a virtual directory (and, optionally, its subdirectories) on a web server. In other words, the virtual directory is the basic grouping structure that delimits an application. Figure 5-1 shows a web server that hosts four separate web applications.
ASP.NET File Types
ASP.NET applications can include many types of files. Table 5-1 introduces the essential ingredients.
Table 5-1. ASP.NET File Types
File Name Description
Ends with .aspx These are ASP.NET web pages (the .NET equivalent of the .asp file in an ASP application). They contain the user interface and, optionally, the underlying application code. Users request or navigate directly to one of these pages to start your web application.
Ends with .ascx These are ASP.NET user controls. User controls are similar to web pages, except that the user can’t access these files directly. Instead, they must be hosted inside an ASP.NET web page. User controls allow you to develop a small piece of user interface and reuse it in as many web forms as you want without repetitive code. You’ll learn about user controls in Chapter 25.
Ends with .asmx These are ASP.NET web services, which are described in Part 5 of this book. Web services work differently than web pages, but they still share the same application resources, configuration settings, and memory.
web.config This is the XML-based configuration file for your ASP.NET application. It includes settings for customizing security, state management, memory management, and much more. This file is referred to throughout the book.
global.asax This is the global application file. You can use this file to define global variables (variables that can be accessed from any web page in the web application) and react to global events (such as when a web application first starts).
Ends with .vb These are code-behind files that contain VB code. They allow you to separate the application logic from the user interface of a web page. We’ll introduce the code-behind model in this chapter and use it extensively in this book.
In addition, your web application can contain other resources that aren’t special ASP.NET files. For example, your virtual directory can hold image files, HTML files, or CSS files. These resources might be used in one of your ASP.NET web pages, or they might be used independently. A website could even combine static HTML pages with dynamic ASP.NET pages.
WHAT ABOUT ASP FILES?
ASP.NET doesn’t use any of the same files as ASP (such as .asp pages and the global.asa file). If you have a virtual directory that contains both .aspx and .asp files, you really have two applications: an ASP.NET web application and a legacy ASP application.
In fact, the process that manages and renders .asp files and the ASP.NET service that compiles and serves .aspx files are two separate programs that don’t share any information. This design has a couple of important implications:
• You can’t share state information between ASP and ASP.NET applications. The Session and Appli-cation collections, for example, are completely separate.
• You specify ASP and ASP.NET configuration settings in different ways. If you specify an ASP set-ting, it won’t apply to ASP.NET, and vice versa.
Generally, you should keep ASP and ASP.NET files in separate virtual directories to avoid confusion. However, if you’re migrating a large website, you can safely use both types of files as long as they don’t try to share resources.
ASP.NET Application Directories
Every web application should have a well-planned directory structure. For example, you’ll probably want to store images in a separate folder from where you store your web pages. Or you might want to put public ASP.NET pages in one folder and restricted ones in another so you can apply different security settings based on the directory. (See Chapter 18 for more about how to create authorization rules like this.)
Along with the directories you create, ASP.NET also uses a few specialized subdirecto-ries, which it recognizes by name (see Table 5-2). Keep in mind that you won’t see all these directories in a typical application. Visual Studio will prompt you to create them as needed.
Table 5-2. ASP.NET Directories
Directory Description
Bin Contains all the compiled .NET components (DLLs) that the ASP.NET
web application uses. For example, if you develop a custom database component (see Chapter 24), you’ll place the component here. ASP.NET will automatically detect the assembly, and any page in the web application will be able to use it. This seamless deployment model is far easier than working with traditional COM components, which must be registered before they can be used (and often reregistered when they change).
Directory Description
App_GlobalResources Stores global resources that are accessible to every page in the web application. This directory is used in localization scenarios, when you need to have a website in more than one language. Localization isn’t covered in this book, although you can refer to Pro ASP.NET 2.0 in VB 2005by Laurence Moroney (Apress, 2005) for more information.
App_LocalResources Serves the same purpose as App_GlobalResources, except these resources are accessible to a specific page only.
App_WebReferences Stores references to web services that the web application uses. You’ll learn about web services in Part 5.
App_Data Stores data, including SQL Server 2005 Express Edition database files and XML files. Of course, you’re free to store data files in other directories.
App_Browsers Contains browser definitions stored in XML files. These XML files define the capabilities of client-side browsers for different rendering actions. Although ASP.NET defines different browsers and their capabilities in a computerwide configuration file, this directory allows you to distinguish browsers according to different rules for a single application.
App_Themes Stores the themes that are used by your web application. You’ll learn about themes in Chapter 10.
Application Updates
One of the most useful features of ASP.NET has nothing to do with new controls or enhanced functionality. Instead, the so-called zero-touch deployment and application updating means you can modify your ASP.NET application easily and painlessly without needing to restart the server.
Page Updates
If you modify a code file or a web form, ASP.NET automatically recompiles an updated version for the next client request. This means new client requests always use the most recent version of the page. ASP.NET even compiles the page automatically to native machine code and caches it to improve performance.
Component Updates
This automatic rollover feature, sometimes called shadow copy, allows you to painlessly update a website without taking it offline, even if it uses separate components.
Configuration Changes
In the somewhat painful early days of ASP programming, configuring a web application was no easy task. You needed to either create a script that modified the IIS metabase or use IIS Manager. Once a change was made, you would often need to stop and start the IIS web service (again by using IIS Manager or the iisreset utility). Sometimes you would even need to reboot the server before the modification would take effect.
Fortunately, these administrative headaches are no longer required for ASP.NET, which manages its own configuration independently from IIS. The configuration of an ASP.NET web application is defined using the web.config file. The web.config file stores information in a plain-text XML format so you can easily edit it with a tool such as Notepad. If you change a web.config setting, ASP.NET uses the same automatic rollover as it does when you update a component. Existing requests complete with the original settings and new requests are served by a new application domain that uses the new web.config settings. Once again, modifying live sites is surprisingly easy in ASP.NET. You’ll learn more about ASP.NET configuration and the web.config file later in the “ASP.NET Configuration” section.
A Simple One-Page Web Application
The first example you’ll see demonstrates how server-based controls work using a single-page applet. This type of program, which combines user input and the program output on the same page, is used to provide popular tools on many sites. Some examples include calculators for mortgages, taxes, health or weight indices, and retirement savings plans; single-phrase translators; and stock-tracking utilities.
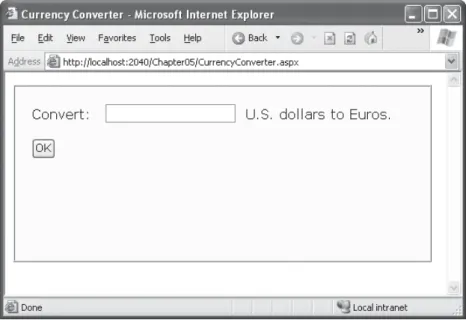
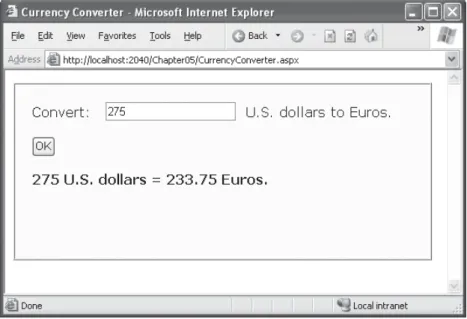
The page shown in Figure 5-2 allows the user to convert a number of U.S. dollars to the equivalent amount of euros.
Figure 5-2. A simple currency converter
<html> <head>
<title>Currency Converter</title> </head>
<body>
<form method="post"> <div>
Convert:
<input type="text"> U.S. dollars to Euros. <br /><br />
<input type="submit" value="OK"> </div>
</form> </body> </html>
THE LEAST YOU NEED TO KNOW ABOUT HTML
If your HTML is a little rusty, a few details in the previous web page might look a little perplexing. To help understand it, review the following basic rules of HTML:
• Anything enclosed in angled brackets (< >) is a tag, which is interpreted by the browser. For example, in the currency converter page, the Convert text is displayed directly, but the <input> tags represent something else—a text box and a button, respectively.
• HTML documents always start with an <html> tag and end with a </html> tag.
• Inside the HTML document, you can place code, additional information such as the web page title, and the actual web page content. The web page content is always placed between <body> and </body> tags. The web page title is part of the information between the <head> and </head> tags.
• Controls, the graphical widgets that users can click and type into, must always be placed inside a form. Otherwise, you won’t be able to access the information the user enters. In ASP.NET, every control needs to go inside the <form> tag.
• The <div> tag, on its own, doesn’t do anything. However, it’s useful to use a <div> tag to group portions of your page that you want to format in a similar way (for example, with the same font, background color, or border). That way, you can apply style settings to the <div> tag, and they’ll cascade down into every tag it contains. (The <div> formatting isn’t shown in this example, because it’s too long. However, you can check out the online currency converter example to see the full list of style settings.)
• Whitespace is ignored in HTML. This means spaces, line breaks, and so on, are collapsed. If you need to explicitly insert additional spaces, you can use the character entity (which stands for nonbreaking space). To insert line breaks, you can use the break tag: <br />.
Technically, you don’t need to understand HTML to program ASP.NET web pages—although having some basic HTML knowledge certainly helps you get up to speed. For a quick primer, you can refer to one of the excellent HTML tutorials on the Internet, such as http://www.w3schools.com/html.
The ASP Solution—and Its Problems
This approach works well for a simple page, but it encounters the following difficul-ties as the program becomes more sophisticated:
“Spaghetti” code: You need to generate the page output in the order it appears, which
often isn’t the natural order in your code. If you want to tailor different parts of the output based on a single condition, you’ll need to reevaluate that condition at several places in your code.
Lack of flexibility: Once you’ve perfected your output, it’s difficult to change it. If you
decide to modify the page several months later, you have to read through the code, follow the logic, and try to sort out numerous details.
Combining content and formatting: Depending on the complexity of your user
inter-face, you may need to add HTML tags and style attributes on the fly. This encourages programs to tangle formatting and content details together, making it difficult to change just one or the other at a later date.
Complexity: Your code becomes increasingly intricate and disorganized as you add
different types of functionality. For example, it could be extremely difficult to track the effects of different conditions and different rendering blocks if you created a combined tax/mortgage/interest calculator. Before you know it, you’ll be forced to write the application using separate web pages.
Quite simply, an old-style ASP application that needs to create a sizable portion of interface using Response.Write() commands encounters the same dilemmas that a Windows program would find if it needed to manually draw its text boxes and command buttons on an application window in response to every user action.
The ASP.NET Solution: Server Controls
In ASP.NET, you can still use Response.Write() to create a dynamic web page. But ASP.NET provides a better approach. It allows you to turn ordinary HTML tags into objects—called
server controls—that you can program on the server.
ASP.NET provides two sets of server controls:
HTML server controls: These are server-based equivalents for standard HTML elements.
Web controls: These are similar to the HTML server controls, but they provide a richer object model with a variety of properties for style and formatting details. They also provide more events and more closely resemble the controls used for Windows devel-opment. Web controls also feature some user interface elements that have no direct HTML equivalent, such as the GridView, Calendar, and validation controls. You’ll learn about web controls in the next chapter.
HTML Server Controls
HTML server controls provide an object interface for standard HTML elements. They provide three key features:
They generate their own interface: You set properties in code, and the underlying HTML
tag is updated automatically when the page is rendered and sent to the client.
They retain their state: Because the Web is stateless, ordinary web pages need to go to
a lot of work to store information between requests. For example, every time the user clicks a button on a page, you need to make sure every control on that page is refreshed so that it has the same information the user saw last time (like text in a text box, the selection in a list, and so on). With ASP.NET, this tedious task is taken care of for you. That means you can write your program the same way you would write a traditional Windows program.
They fire events: For example, buttons fire an event when clicked, text boxes fire an
event when the text they contain is modified, and so on. Your code can respond to these events, just like ordinary controls in a Windows application. In ASP code, every-thing is grouped into one block that executes from start to finish. With event-based programming, you can easily respond to individual user actions and create more struc-tured code. If a given event doesn’t occur, the event handler code won’t be executed.
The easiest way to convert the currency converter to ASP.NET is to start by generating a new web form in Visual Studio. To do this, select Website ➤Add New Item. In the Add New Item dialog box, choose Web Form (the first item in the list), type a name for the new page (such as CurrencyConverter.aspx), and click Add to create the page.
In the new web form, delete everything that’s currently in the .aspx file, except the
page directive. The page directive gives ASP.NET basic information about how to compile
the page. It indicates the language you’re using for your code and the way you connect your event handlers. If you’re using the code-behind approach, which is recommended, the page directive also indicates where the code file is located and the name of your cus-tom page class.
<%@ Page Language="VB" AutoEventWireup="false"
CodeFile="CurrencyConverter.aspx.vb" Inherits="CurrencyConverter" %> <html>
<head>
<title>Currency Converter</title> </head>
<body>
<form method="post"> <div>
Convert:
<input type="text"> U.S. dollars to Euros. <br /><br />
<input type="submit" value="OK"> </div>
</form> </body> </html>
Now you need to add the attribute runat="server"to each tag that you want to trans-form into a server control. You should also add an id attribute to each control that you need to interact with in code. The id attribute assigns the unique name that you’ll use to refer to the control in code.
■
Tip
The quickest way to add the runat="server"attribute is to use Visual Studio. First, add your HTML page to a website. Then, select each HTML tag separately on the design surface of the page. Right-click, and choose Run As Server Control from the menu to transform it into a server control.In the currency converter application, you can change the input text box and the sub-mit button into server controls. In addition, the <form> element must also be processed as a server control to allow ASP.NET to access the controls it contains, as shown here:
<%@ Page Language="VB" AutoEventWireup="false"
CodeFile="CurrencyConverter.aspx.vb" Inherits="CurrencyConverter" %> <html>
<head>
<title>Currency Converter</title> </head>
<body>
<form method="post" runat="server"> <div>
<input type="text" id="US" runat="server"> U.S. dollars to Euros.
<br /><br />
<input type="submit" value="OK" id="Convert" runat="server"> </div>
</form> </body> </html>
■
Note
ASP.NET controls are always placed inside the <form> tag of the page. The <form> tag is a part of the standard for HTML forms, and it allows the browser to send information to the web server.The web page still won’t do anything when you run it, because you haven’t written any code. However, now that you’ve converted the static HTML elements to HTML server controls, you’re ready to work with them.
View State
To try this page, launch it in Visual Studio by pressing F5. Then, select View ➤Source in your browser to look at the HTML that ASP.NET sent your way.
The first thing you’ll notice is that the HTML that was sent to the browser is slightly different from the information in the .aspx file. First, the runat="server"attributes are stripped out (because they have no meaning to the client browser, which can’t interpret them). Second, and more important, an additional hidden field has been added to the form. Here’s what you’ll see (in a slightly simplified form):
<html> <head>
<title>Currency Converter</title> </head>
<body>
<form method="post"> <div>
<input type="hidden" name="__VIEWSTATE" value="dDw3NDg2NTI5MDg7Oz4=" /> </div>
<div>
Convert:
<br /><br />
<input type="submit" value="OK" id="Convert"> </div>
</form> </body> </html>
This hidden field stores information, in a compressed format, about the state of every control in the page. It allows you to manipulate control properties in code and have the changes automatically persisted across multiple trips from the browser to the web server. This is a key part of the web forms programming model. Thanks to view state, you can often forget about the stateless nature of the Internet and treat your page like a con-tinuously running application.
Even though the currency converter program doesn’t yet include any code, you’ll already notice one change. If you enter information in the text box and click the submit button to post the page, the refreshed page will still contain the value you entered in the text box. (In the original example that uses ordinary HTML elements, the value will be cleared every time the page is posted back.) This change occurs because ASP.NET con-trols automatically retain state.
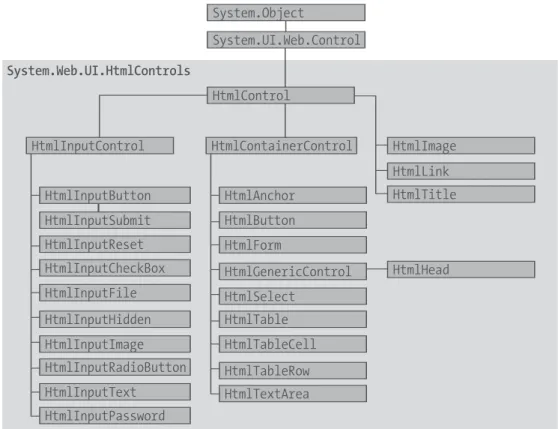
The HTML Control Classes
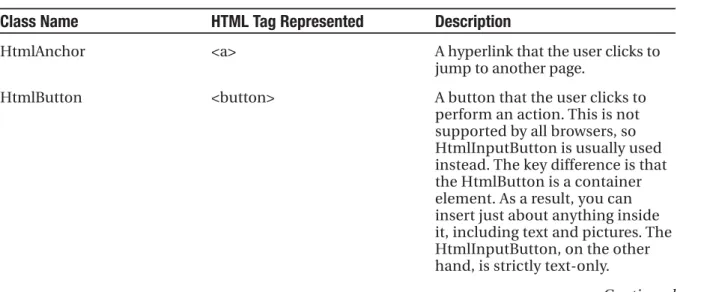
Before you can continue any further with the currency converter, you need to know about the control objects you’ve created. All the HTML server controls are defined in the System.Web.UI.HtmlControls namespace. Each kind of control has a separate class. Table 5-3 describes the basic HTML server controls and shows you the related HTML element.
Table 5-3. The HTML Server Control Classes
Class Name HTML Tag Represented Description
HtmlAnchor <a> A hyperlink that the user clicks to
jump to another page.
HtmlButton <button> A button that the user clicks to
perform an action. This is not supported by all browsers, so HtmlInputButton is usually used instead. The key difference is that the HtmlButton is a container element. As a result, you can insert just about anything inside it, including text and pictures. The HtmlInputButton, on the other hand, is strictly text-only.
Table 5-3. Contined
Class Name HTML Tag Represented Description
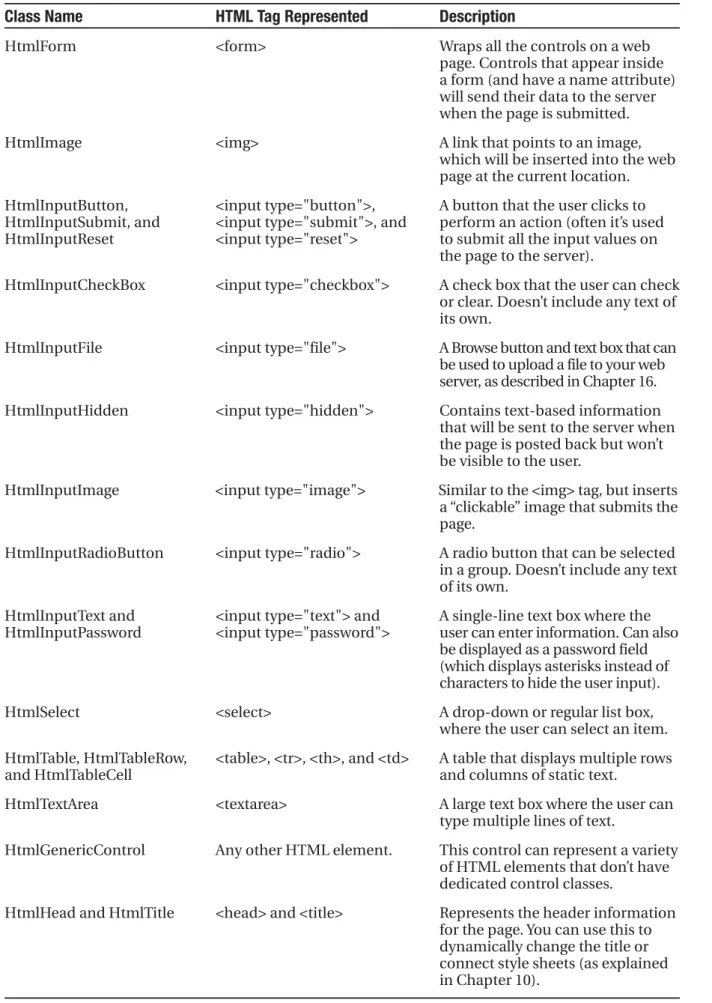
HtmlForm <form> Wraps all the controls on a web
page. Controls that appear inside a form (and have a name attribute) will send their data to the server when the page is submitted.
HtmlImage <img> A link that points to an image,
which will be inserted into the web page at the current location.
HtmlInputButton, <input type="button">, A button that the user clicks to HtmlInputSubmit, and <input type="submit">, and perform an action (often it’s used HtmlInputReset <input type="reset"> to submit all the input values on
the page to the server).
HtmlInputCheckBox <input type="checkbox"> A check box that the user can check or clear. Doesn’t include any text of its own.
HtmlInputFile <input type="file"> A Browse button and text box that can be used to upload a file to your web server, as described in Chapter 16.
HtmlInputHidden <input type="hidden"> Contains text-based information that will be sent to the server when the page is posted back but won’t be visible to the user.
HtmlInputImage <input type="image"> Similar to the <img> tag, but inserts a “clickable” image that submits the page.
HtmlInputRadioButton <input type="radio"> A radio button that can be selected in a group. Doesn’t include any text of its own.
HtmlInputText and <input type="text"> and A single-line text box where the HtmlInputPassword <input type="password"> user can enter information. Can also
be displayed as a password field (which displays asterisks instead of characters to hide the user input).
HtmlSelect <select> A drop-down or regular list box,
where the user can select an item.
HtmlTable, HtmlTableRow, <table>, <tr>, <th>, and <td> A table that displays multiple rows
and HtmlTableCell and columns of static text.
HtmlTextArea <textarea> A large text box where the user can
type multiple lines of text.
HtmlGenericControl Any other HTML element. This control can represent a variety of HTML elements that don’t have dedicated control classes.
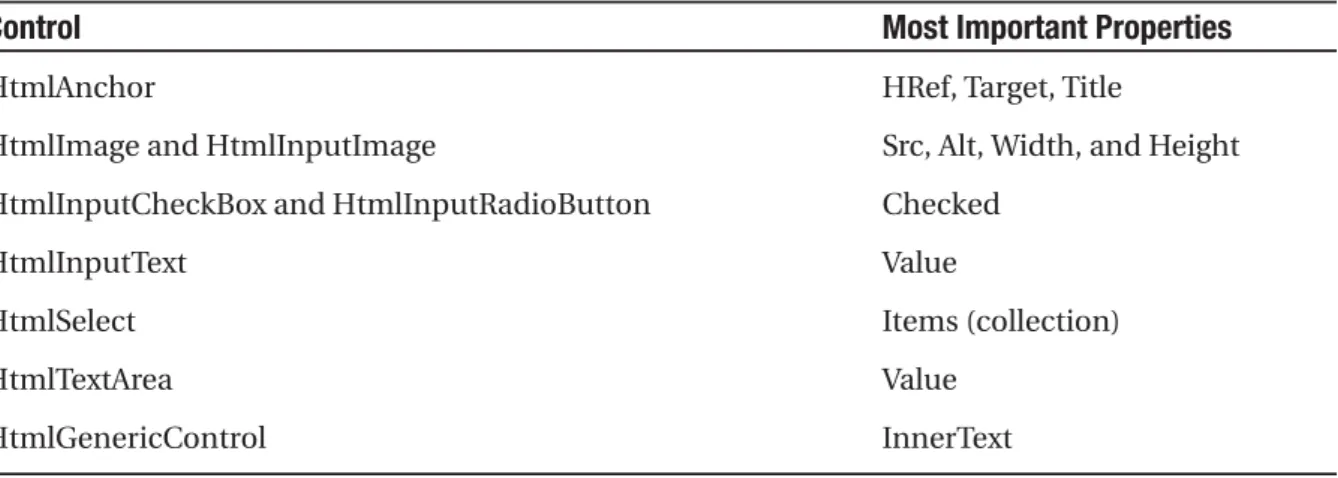
So far, the currency converter defines three controls, which are instances of the Html-Form, HtmlInputText, and HtmlInputButton classes, respectively. It’s important that you know the class names, because you need to define each control class in the code-behind file if you want to interact with it. (Visual Studio simplifies this task: whenever you add a control using its web designer, the appropriate tag is added to the .aspx file, and the appropriate vari-ables are defined in the code-behind class.) Table 5-4 gives a quick overview of some of the most important control properties.
Table 5-4. Important HTML Control Properties
Control Most Important Properties
HtmlAnchor HRef, Target, Title
HtmlImage and HtmlInputImage Src, Alt, Width, and Height
HtmlInputCheckBox and HtmlInputRadioButton Checked
HtmlInputText Value
HtmlSelect Items (collection)
HtmlTextArea Value
HtmlGenericControl InnerText
To actually add some functionality to the currency converter, you need to add some ASP.NET code. Web forms are event-driven, which means every piece of code acts in response to a specific event. In the simple currency converter page example, the most useful event occurs when the user clicks the submit button (named Convert). The HtmlInputButton allows you to react to this action by handling the ServerClick event.
Before you continue, it makes sense to add another control that can display the result of the calculation. In this case, you can use a <div> tag named Result. The <div> tag is one way to insert a block of formatted text into a web page. Here’s the HTML that you’ll need:
<div style="font-weight: bold" id="Result" runat="server"> ... </div>
The style attribute applies the CSS properties used to format the text. In this example, it merely applies a bold font.
The example now has the following four server controls:
• A form (HtmlForm object). This is the only control you do not need to access in your code-behind class.
• An input text box named US (HtmlInputText object).
• A submit button named Convert (HtmlInputButton object).
Listing 5-1 shows the revised web page (CurrencyConverter.aspx), and Listing 5-2 shows the code-behind class (CurrencyConverter.aspx.vb). The code-behind class includes an event handler that reacts when the convert button is clicked. It calculates the currency conversion and displays the result.
Listing 5-1. CurrencyConverter.aspx
<%@ Page Language="VB" AutoEventWireup="false"
CodeFile="CurrencyConverter.aspx.vb" Inherits="CurrencyConverter" %> <html>
<head>
<title>Currency Converter</title> </head>
<body>
<form method="post" runat="server"> <div>
Convert:
<input type="text" id="US" runat="server"> U.S. dollars to Euros. <br /><br />
<input type="submit" value="OK" id="Convert" runat="server"> <br /><br />
<div style="font-weight: bold" id="Result" runat="server"></div> </div>
</form> </body> </html>
Listing 5-2. CurrencyConverter.aspx.vb
Public Partial Class CurrencyConverter Inherits System.Web.UI.Page
Protected Sub Convert_ServerClick(ByVal sender As Object, _ ByVal e As System.EventArgs) Handles Convert.ServerClick
Dim USAmount As Decimal = Val(US.Value) Dim EuroAmount As Decimal = USAmount * 0.85
Result.InnerText = USAmount.ToString() & " U.S. dollars = " Result.InnerText &= EuroAmount.ToString() & " Euros." End Sub
The code-behind class is a typical example of an ASP.NET page. You’ll notice the following conventions:
• The page class is defined with the Partial keyword. That’s because your class code is merged with another code file that you never see. This extra code, which ASP.NET generates automatically, defines all the server controls that are used on the page. This allows you to access them by name in your code.
• The page defines a single event handler. This event handler retrieves the value from the text box, multiplies it by a preset conversion ratio (which would typically be stored in another file or a database), and sets the text of the <div> tag. You’ll notice that the event handler accepts two parameters (sender and e). This is the .NET standard for all control events. It allows your code to identify the control that sent the event (through the sender parameter) and retrieve any other information that may be associated with the event (through the e parameter). You’ll see examples of these advanced techniques in the next chapter, but for now, it’s important to realize that you won’t be allowed to handle an event unless your event handler has the correct, matching signature.
• The event handler is connected to the control event using the Handles keyword in the event handler declaration. Usually, you’ll let Visual Studio add this code in automatically, as described in the previous chapter.
• The &=operator is used to quickly add information to the label. This is equivalent to writing lblTest.Text = lblText.Text & "[extra content]".
• The event handler uses ToString() to convert the decimal value to text. You can perform the conversion without using ToString(), because VB is kind enough to implicitly convert a number to text as needed. However, it’s always a good idea to handle these conversions explicitly to prevent unexpected errors. (For example, adding the text “2” and “1” can produce a result of 3 or 21, depending on whether the conversion is made before or after the addition.)
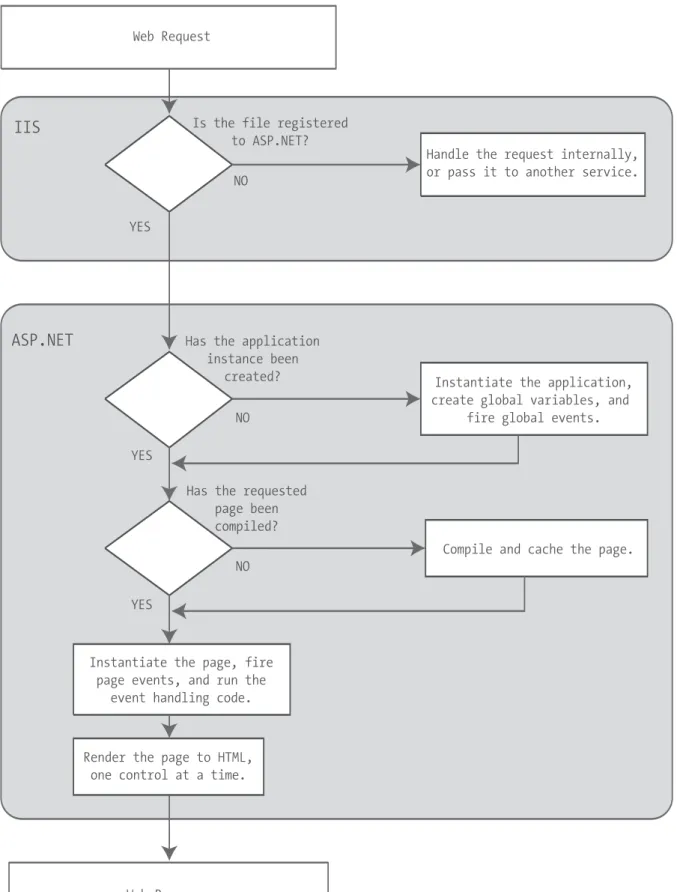
So, what really happens when ASP.NET receives a request for the CurrencyConverter.aspx page? The process actually unfolds over several steps:
1. First, the request for the page is sent to the web server. If you’re running a live site, the web server is almost certainly IIS, which you’ll learn more about in Chapter 12. If you’re running the page in Visual Studio, the request is sent to the built-in test server.
2. The web server determines that the .aspx file extension is registered with ASP.NET and passes it to the ASP.NET worker process. If the file extension belonged to another service (as it would for .asp files), ASP.NET would never get involved.
Figure 5-3. The ASP.NET currency converter
3. If this is the first time a page in this application has been requested, ASP.NET automatically creates the application domain and a special application object (technically, an instance derived from the .NET class System.Web.HttpApplication).
4. ASP.NET considers the specific .aspx file. If it has never been executed, ASP.NET compiles and caches the page in the directory c:\[WinDir\Microsoft.NET\Framework \[Version]\Temporary ASP.NET Files, where [Version] is the version number of the .NET Framework. If this task has already been performed (for example, someone else has already requested this page) and the file hasn’t been changed, ASP.NET will use the compiled version.
5. The compiled CurrencyConverter acts like a miniature program. It starts firing events (most notably, the Page.Load event). However, you haven’t created an event handler for that event, so no code runs. At this stage, everything is working together as a set of in-memory .NET objects.
6. When the code is finished, ASP.NET asks every control in the web page to render itself into the corresponding HTML tags.
■
Tip
In fact, ASP.NET performs a little sleight of hand and may customize the output with additional client-side JavaScript or DHTML if it detects that the client browser supports it. In the case of CurrencyConverter.aspx, the output of the page is too simple to require this type of automatic tweaking.7. The final page is sent to the user, and the application ends.
The description is lengthy, but it’s important to start with a good understanding of the fundamentals. When you click a button on the page, the entire process repeats itself. However, in step 5 the ServerClick event fires for HtmlInputButton right after the Page.Load event, and your code runs.
The most important detail is that your code works with objects. The final step is to transform these objects into the appropriate HTML output. A similar conversion from objects to output happens with a Windows program in .NET, but it’s so automatic that programmers rarely give it much thought. Also, in those environments, the code always runs locally. In an ASP.NET application, the code runs in a protected environment on the server. The client sees the results only once the web page processing has ended and the web page object has been released from memory.
Improving the Currency Converter
Now that you’ve looked at the basic server controls, it might seem that their benefits are fairly minor compared with the cost of learning a whole new system of web programming. In the next section, you’ll start to extend the currency converter application. You’ll see how you can “snap in” additional functionality to the existing program in an elegant, modular way. As the program grows, ASP.NET handles its complexity easily, steering you away from the tangled and intricate code that would be required in old-style ASP applications.
Adding Multiple Currencies
The first task is to allow the user to choose a destination currency. In this case, you need to use a drop-down list box. In HTML, a drop-down list is represented by a <select> element that contains one or more <option> elements. Each <option> element corresponds to a separate item in the list.
To reduce the amount of HTML in the currency converter, you can define a drop-down list without any list items by adding an empty <select> tag. As long as you ensure that this <select> tag is a server control (by giving it a name and adding the runat="server"attribute), you’ll be able to interact with it in code and add the required items when the page loads.
Here’s the revised HTML for the CurrencyConverter.aspx page:
<%@ Page Language="VB" AutoEventWireup="false"
CodeFile="CurrencyConverter.aspx.vb" Inherits="CurrencyConverter" %> <html>
<head>
<title>Currency Converter</title> </head>
<body>
<form method="post" runat="server"> <div>
Convert:
<input type="text" id="US" runat="server"> U.S. dollars to <select id="Currency" runat="server"></select>
<input type="submit" value="OK" id="Convert" runat="server"> <br /><br />
<div style="font-weight: bold" id="Result" runat="server"></div> </div>
</form> </body> </html>
The currency list can now be filled using code at runtime. In this case, the ideal event is the Page.Load event, because this is the first event that occurs when the page is executed. Here’s the code you need to add to the CurrencyConverter page class:
Protected Sub Page_Load(ByVal sender As Object, ByVal e As System.EventArgs) _ Handles Me.Load
If Me.IsPostBack = False Then Currency.Items.Add("Euro")
Currency.Items.Add("Japanese Yen") Currency.Items.Add("Canadian Dollar") End If
End Sub
Dissecting the Code...
This example illustrates two important points:
• You can use the Items property to get items in a list control. This allows you to append, insert, and remove <option> elements. Remember, when generating dynamic content with a server control, you set the properties, and the control creates the appropriate HTML tags.
• Before adding any items to this list, you need to make sure this is the first time the page is being served. Otherwise, the page will continuously add more items to the list or inadvertently overwrite the user’s selection every time the user interacts with the page. To perform this test, you check the IsPostBack property of the current Page. In other words, IsPostback is a property of the CurrencyConverter class, which CurrencyConverter inherited from the generic Page class. If IsPostBack is False, the page is being created for the first time, and it’s safe to initialize it.
Storing Information in the List
Of course, if you’re a veteran HTML coder, you know that a select list also provides a value attribute that you can use to store additional information. Because the currency converter uses a short list of hard-coded values, this is an ideal place to store the conversion rate.
To set the value tag, you need to create a ListItem object for every item in the list and add that to the HtmlInputSelect control. The ListItem class provides a constructor that lets you specify the text and value at the same time that you create it, thereby allowing condensed code like this:
Protected Sub Page_Load(ByVal sender As Object, ByVal e As System.EventArgs) _ Handles Me.Load
If Me.IsPostBack = False Then
' The HtmlInputSelect control accepts text or ListItem objects. Currency.Items.Add(New ListItem("Euros", "0.85"))
Currency.Items.Add(New ListItem("Japanese Yen", "110.33")) Currency.Items.Add(New ListItem("Canadian Dollars", "1.2")) End If
End Sub
To complete the example, you must rewrite the calculation code to take the selected currency into account, as follows:
Protected Sub Convert_ServerClick(ByVal sender As Object, _ ByVal e As System.EventArgs) Handles Convert.ServerClick
Dim oldAmount As Decimal = Val(US.Value)
' Retrieve the select ListItem object by its index number. Dim item As ListItem = Currency.Items(Currency.SelectedIndex)
Dim newAmount As Decimal = oldAmount * Val(item.Value) Result.InnerText = oldAmount.ToString() & " U.S. dollars = " Result.InnerText &= newAmount.ToString() & " " & item.Text End Sub
All in all, this is a good example of how you can store information in HTML tags using the value attribute. However, in a more sophisticated application, you probably wouldn’t store the currency rate. Instead, you would just store some sort of unique identifying ID value. Then, when the user submits the page, you would retrieve the corresponding con-version rate from a database or some other storage location (such as an in-memory cache).
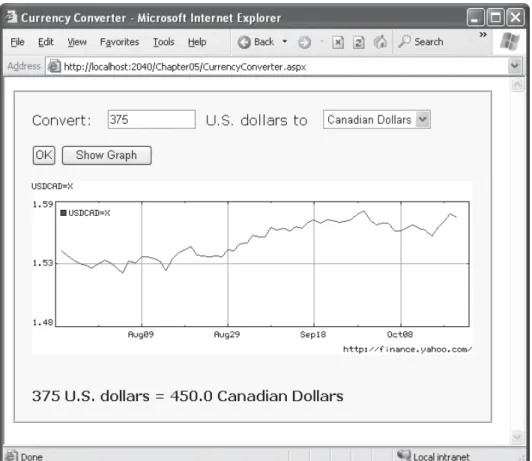
Adding Linked Images
Adding other functionality to the currency converter is just as easy as adding a new but-ton. For example, it might be useful for the utility to display a currency conversion rate graph. To provide this feature, the program would need an additional button and image control.
Here’s the revised HTML:
<%@ Page Language="VB" AutoEventWireup="false"
CodeFile="CurrencyConverter.aspx.vb" Inherits="CurrencyConverter" %> <html>
<head>
<title>Currency Converter</title> </head>
<body>
<form method="post" runat="server"> <div>
Convert:
<select id="Currency" runat="server"></select> <br /><br />
<input type="submit" value="OK" id="Convert" runat="server">
<input type="submit" value="Show Graph" id="ShowGraph" runat="server"> <br /><br />
<img id="Graph" runat="server" /> <br /><br />
<div style="font-weight: bold" id="Result" runat="server"></div> </div>
</form> </body> </html>
As it’s currently declared, the image doesn’t refer to a picture. For that reason, it makes sense to hide it when the page is first loaded by using this code:
Protected Sub Page_Load(ByVal sender As Object, ByVal e As System.EventArgs) _ Handles Me.Load
If Me.IsPostBack = False Then
' The HtmlInputSelect control accepts text or ListItem objects. Currency.Items.Add(New ListItem("Euros", "0.85"))
Currency.Items.Add(New ListItem("Japanese Yen", "110.33")) Currency.Items.Add(New ListItem("Canadian Dollars", "1.2"))
Graph.Visible = False End If
End Sub
Interestingly, when a server control is hidden, ASP.NET omits it from the final HTML page.
Now you can handle the click event of the new button to display the appropriate picture. The currency converter has three possible picture files—pic0.png, pic1.png, and pic2.png—depending on the selected currency:
Protected Sub ShowGraph_ServerClick(ByVal sender As Object, _ ByVal e As System.EventArgs) Handles ShowGraph.ServerClick
Graph.Src = "Pic" & Currency.SelectedIndex.ToString() & ".png" Graph.Alt = "Currency Graph"
Graph.Visible = True End Sub
Setting Styles
In addition to a limited set of properties, each HTML control also provides access to the CSS style attributes through its Style collection. To use this collection, you need to specify the name of the CSS style attribute and the value you want to assign to it. Here’s the basic syntax:
ControlName.Style("AttributeName") = "AttributeValue"
For example, you could use this technique to emphasize an invalid entry in the cur-rency converter with the color red. In this case, you’ll also need to reset the color to its original value for valid input, because the control uses view state to remember all its set-tings, including its style properties:
Protected Sub Convert_ServerClick(ByVal sender As Object, _ ByVal e As System.EventArgs) Handles Convert.ServerClick
Dim oldAmount As Decimal = Val(US.Value)
If oldAmount <= 0 Then
Result.Style("color") = "Red"
Result.InnerText = "Specify a positive number" Else
Result.Style("color") = "Black"
' Retrieve the select ListItem object by its index number. Dim item As ListItem = Currency.Items(Currency.SelectedIndex)
Dim newAmount As Decimal = oldAmount * Val(item.Value) Result.InnerText = oldAmount.ToString() & " U.S. dollars = " Result.InnerText &= newAmount.ToString() & " " & item.Text End If
End Sub
■
Tip
The Style collection sets the style attribute in the HTML tag with a list of formatting options such as font family, size, and color. But if you aren’t familiar with CSS styles, you don’t need to learn them now. Instead, you should use the web control equivalents, which provide higher-level properties that allow you to configure their appearance and automatically create the appropriate style attributes. You’ll learn about web controls in the next chapter.This concludes the simple currency converter application, which now boasts automatic calculation, linked images, and dynamic formatting. In the following sections, you’ll look at the building blocks of ASP.NET interfaces more closely.
A Deeper Look at HTML Control Classes
The next few sections dissect the ASP.NET classes that are used for HTML server con-trols. You can use this material to help understand the common elements that are shared by all HTML controls. For the specific details about each HTML control, you can refer to the class library reference in the Visual Studio Help.
HTML server controls generally provide properties that closely match their tag attributes. For example, the HtmlImage class provides Align, Alt, Border, Src, Height, and Width prop-erties. For this reason, users who are familiar with HTML syntax will find that HTML server controls are the most natural fit. Users who aren’t as used to HTML will probably find that web controls (described in the next chapter) have a more intuitive set of properties.
HTML Control Events
HTML server controls also provide one of two possible events: ServerClick or ServerChange. The ServerClick is simply a click that is processed on the server side. It’s provided by most button controls, and it allows your code to take immediate action. This action might over-ride the expected behavior. For example, if you intercept the click event of a hyperlink control (the <a> element), the user won’t be redirected to a new page unless you provide extra code to forward the request.
The ServerChange event responds when a change has been made to a text or selection control. This event isn’t as useful as it appears because it doesn’t occur until the page is posted back (for example, after the user clicks a submit button). At this point, the ServerChange event occurs for all changed controls, followed by the appropriate ServerClick. The Page.Load event is the first to fire, but you have no way to know the order of events for other controls.
Table 5-5 shows which controls provide a ServerClick event and which ones provide a ServerChange event.
Table 5-5. HTML Control Events
Event Controls That Provide It
ServerClick HtmlAnchor, HtmlButton, HtmlInputButton, HtmlInputImage,
HtmlInputReset
ServerChange HtmlInputText, HtmlInputCheckBox, HtmlInputRadioButton,
HtmlInputHidden, HtmlSelect, HtmlTextArea
Advanced Events with the HtmlInputImage Control
Chapter 4 introduced the .NET event standard, which dictates that every event should pass exactly two pieces of information. The first parameter identifies the object (in this case, the control) that fired the event. The second parameter is a special object that can include additional information about the event.
In the examples you’ve looked at so far, the second parameter (e) has always been used to pass an empty System.EventArgs object. This object doesn’t contain any additional information—it’s just a glorified placeholder. Here’s one such example:
Protected Sub Convert_ServerClick(ByVal sender As Object, _ ByVal e As EventArgs) Handles Convert.ServerClick
... End Sub
In fact, only one HTML server control sends additional information: the HtmlInputImage control. It sends an ImageClickEventArgs object (from the System.Web.UI namespace) that provides X and Y properties representing the location where the image was clicked. You’ll notice that the definition for the HtmlInputImage.ServerClick event handler is a little different from the event handlers used with other controls:
Protected Sub ImgButton_ServerClick(ByVal sender As Object, _ ByVal e As ImageClickEventArgs) Handles ImgButton.ServerClick
Using this additional information, you can replace multiple button controls and image maps with a single, intelligent HtmlInputImage control. The sample ImageTest.aspx page shown in Figure 5-8 puts this feature to work with a simple graphical button. Depending on whether the user clicks the button border or the button surface, a different message is displayed.
The page code examines the click coordinates provided by the ImageClickEventArgs object and displays them in another control. Here’s the page code you need:
Public Partial Class ImageTest Inherits System.Web.UI.Page
Protected Sub ImgButton_ServerClick(ByVal sender As Object, _ ByVal e As ImageClickEventArgs)
Result.InnerText = "You clicked at (" & e.X.ToString() & _ ", " & e.Y.ToString() & "). "
If e.Y < 100 And e.Y > 20 And e.X > 20 And e.X < 275 Then Result.InnerText &= "You clicked on the button surface." Else
Result.InnerText &= "You clicked the button border." End If
End Sub End Class
The HtmlControl Base Class
Every HTML control inherits from the base class HtmlControl. This relationship means that every HTML control will support a basic set of properties and features. Table 5-6 shows these properties.
Table 5-6. HtmlControl Properties
Property Description
Attributes Provides a collection of all the tag attributes and their values. Rather than setting an attribute directly, it’s better to use the corresponding property. However, this collection is useful if you need to add or configure a custom attribute or an attribute that doesn’t have a corresponding property.
Controls Provides a collection of all the controls contained inside the current control. (For example, a <div> server control could contain an <input> server control.) Each object is provided as a generic System.Web.UI.Control object so that you may need to cast the reference to access control-specific properties.
Disabled Disables the control when set to True, thereby ensuring that the user cannot interact with it, and its events will not be fired.
EnableViewState Disables the automatic state management for this control when set to False. In this case, the control will be reset to the properties and formatting specified in the control tag every time the page is posted back. If this is set to True (the default), the control uses a hidden input field to store information about its properties, thereby ensuring that any changes you make in code are remembered.
Page Provides a reference to the web page that contains this control as a System.Web. UI.Page object.
Parent Provides a reference to the control that contains this control. If the control is placed directly on the page (rather than inside another control), it will return a reference to the page object.
Style Provides a collection of CSS style properties that can be used to format the control.
TagName Indicates the name of the underlying HTML element (for example, img or div).
Visible Hides the control when set to False and will not be rendered to the final HTML page that is sent to the client.
PROPERTIES CAN BE SET IN CODE OR IN THE TAG
To set the initial value of a property, you can configure the control in the Page.Load event handler, or you can adjust the control tag in the .aspx file by adding special attributes. Note that the Page.Load event occurs after the page is initialized with the default values and the tag settings. This means your code can override the properties set in the tag (but not vice versa).
The following HtmlImage control is an example that sets properties through attributes in the con-trol tag. The concon-trol is automatically disabled and will not fire any events.
<img Visible="false" id="Graph" runat="server">
Remember, if you set control properties in the Properties window, you are using the control tag approach. As you make your changes, Visual Studio updates the control tag in the .aspx file.
The HtmlContainerControl Class
Any HTML control that requires a closing tag also inherits from the HtmlContainer control. For example, elements such as <a>, <form>, and <div> always use a closing tag, because they can contain other HTML elements. On the other hand, <img> and <input> are used only as stand-alone tags. Thus, the HtmlAnchor, HtmlForm, and HtmlGenericControl classes inherit from HtmlContainerControl, while HtmlImage and HtmlInput do not.
The HtmlContainer control adds two properties, as described in Table 5-7.
Table 5-7. HtmlContainerControl Properties
Property Description
InnerHtml The HTML content between the opening and closing tags of the control. Special characters that are set through this property will not be converted to the equivalent HTML entities. This means you can use this property to apply formatting with nested tags such as <b>, <i>, and <h1>.
InnerText The text content between the opening and closing tags of the control. Special characters will be automatically converted to HTML entities and displayed like text (for example, the less-than character (<) will be converted to <and will be displayed as < in the web page). This means you can’t use HTML tags to apply additional formatting with this property. The simple currency converter page uses the InnerText property to enter results into a <div> tag.
The HtmlInputControl Class
Table 5-8. HtmlInputControl Properties
Property Description
Type Provides the type of input control. For example, a control based on <input type="file"> would return filefor the type property.
Value Returns the contents of the control as a string. In the simple currency converter, this property allowed the code to retrieve the information entered in the text input control.
The Page Class
One control we haven’t discussed in detail yet is the Page class. As explained in the previous chapter, every web page is a custom class that inherits from System.Web.UI.Page. By inheriting from this class, your web page class acquires a number of properties and methods that your code can use. These include properties for enabling caching, validation, and tracing, which are discussed throughout this book.
Table 5-9 describes some of the more fundamental properties, including the traditional built-in objects that ASP developers often used, such as Response, Request, and Session.
Table 5-9. Basic Page Properties
Property Description
Application and Session These collections hold state information on the server. Chapter 9 discusses this topic.
Cache This collection allows you to store objects for reuse in other pages or for other clients. Chapter 26 discusses caching.
Controls This provides a collection of all the controls contained on the web page. You can also use the methods of this collection to add new controls dynamically.
EnableViewState When set to False, this overrides the EnableViewState property of the contained controls, thereby ensuring that no controls will maintain state information.
IsPostBack This Boolean property indicates whether this is the first time the page is being run (False) or whether the page is being resubmitted in response to a control event, typically with stored view state information (True). This property is often used in the Page.Load event handler, thereby ensuring that basic setup is performed only once for controls that maintain view state.
Request This refers to an HttpRequest object that contains information about the current web request, including client certificates, cookies, and values submitted through HTML form elements. It supports the same features as the built-in ASP Request object.
Response This refers to an HttpResponse object that allows you to set the web response or redirect the user to another web page. It supports the same features as the built-in ASP Response object, although it’s used much less in .NET development.
Table 5-9. Continued
Property Description
Server This refers to an HttpServerUtility object that allows you to perform some miscellaneous tasks, such as URL and HTML encoding. It supports the same features as the built-in ASP Server object.
User If the user has been authenticated, this property will be initialized with user information. Chapter 18 describes this property in more detail.
The Controls Collection
The Page.Controls collection includes all the controls on the current web form. You can loop through this collection and access each control. For example, the following code writes the name of every control on the current page to a server control called Result:
Result.InnerText = "List of controls: " For Each ctrl As Control in form1.Controls
Result.InnerText &= " " & ctrl.ID Next
■
Note
Controls are nested hierarchically. That means the preceding code snippet only gets the first level of controls (those contained inside the <form> tag). If these controls contain still more controls (for example, if you are using a <div> to group together several controls), you won’t see these in this list. Instead, you’ll have to dig through the Controls collection of the appropriate container.You can also use the Controls collection to add a dynamic control. The following code creates a new button with the caption Dynamic Button and adds it to the bottom of the page:
Dim ctrl As New HtmlButton() ctrl.InnerText = "Dynamic Button" ctrl.ID = "DynamicButton"
form1.Controls.Add(ctrl)
The HttpRequest Class
The HttpRequest class encapsulates all the information related to a client request for a web page. Most of this information corresponds to low-level details such as posted-back form values, server variables, the response encoding, and so on. If you’re using ASP.NET to its fullest, you’ll almost never dive down to that level. Other properties are generally useful for retrieving information, particularly about the capabilities of the client browser. Table 5-10 provides a quick look at its most frequently used properties.
Table 5-10. HttpRequest Properties
Property Description
ApplicationPath and PhysicalPath ApplicationPath gets the ASP.NET application’s virtual directory (URL), while PhysicalPath gets the “real” directory.
Browser Provides a link to an HttpBrowserCapabilities object
that contains properties describing various browser features, such as support for ActiveX controls, cookies, VBScript, and frames. This replaces the
BrowserCapabilities component that was sometimes used in ASP development.
ClientCertificate An HttpClientCertificate object that gets the security
certificate for the current request, if there is one.
Cookies Gets the collection of cookies sent with this request.
Chapter 9 discusses cookies in more detail.
Headers and ServerVariables Provides a name/value collection of HTTP headers and server variables. You can get the low-level information you need if you know the corresponding header or variable name.
IsAuthenticated and IsSecureConnection Returns True if the user has been successfully authenticated and if the user is connected over SSL (also known as the Secure Sockets Layer).
QueryString Provides the parameters that were passed along
with the query string. Chapter 9 discusses how you can use the query string to transfer information between pages.
Url and UrlReferrer Provides a Uri object that represents the current address
for the page and the page where the user is coming from (the previous page that linked to this page).
UserAgent A string representing the browser type. Internet Explorer
provides the value MSIE as part of its UserAgent string.
UserHostAddress and UserHostName Gets the IP address and the DNS name of the remote client. You could also access this information through the ServerVariables collection.
UserLanguages Provides a sorted string array that lists the client’s
The HttpResponse Class
The HttpResponse class allows you to send information directly to the client. In traditional ASP development, the Response object was used heavily to create dynamic pages. Now, with the introduction of the new server-based control model, these relatively crude methods are no longer needed.
The HttpResponse does still provide some important functionality, namely, caching support, cookie features, and the Redirect method, which allows you to transfer the user to another page:
' You can redirect to a file in the current directory. Response.Redirect("newpage.aspx")
' You can redirect to another website.
Response.Redirect("http://www.prosetech.com")
Table 5-11 lists the most commonly used members of the HttpResponse class.
Table 5-11. HttpResponse Members
Member Description
BufferOutput When set to True (the default), this sends the page to the
client when it’s completely rendered and ready, as opposed to being sent piecemeal.
Cache This references an HttpCachePolicy object that allows
you to configure how this page will be cached. Chapter 26 discusses caching.
Cookies This collection is sent with the response. You can use this
property to add cookies, as described in Chapter 9.
Write(), BinaryWrite(), and WriteFile() These methods allow you to write text or binary content directly to the response stream. You can even write the contents of a file. These methods are de-emphasized in ASP.NET and shouldn’t be used in conjunction with server controls.
Redirect() This method transfers the user to another page in your
application or a different website.
The HttpServerUtility Class
Table 5-12. HttpServerUtility Methods
Method Description
CreateObject() Creates an instance of the COM object that is identified by its programmatic ID (progID). This is included for backward compatibility, because it will generally be easier to interact with COM objects using the .NET Framework services.
HtmlEncode() and HtmlDecode() Changes an ordinary string into a string with legal HTML characters and back again.
UrlEncode() and UrlDecode() Changes an ordinary string into a string with legal URL characters and back again.
MapPath() Returns the physical file path that corresponds to a specified
virtual file path on the web server.
Transfer() Transfers execution to another web page in the current
application. This is similar to the Response.Redirect() method but is slightly faster. It cannot be used to transfer the user to a site on another web server or to a non-ASP.NET page (such as an HTML page or an ASP page).
Out of these methods, the most commonly used are UrlEncode()/UrlDecode() and HtmlEncode()/HtmlDecode(). These functions change a string into a representation that can safely be used as part of a URL or displayed in a web page. For example, imagine you want to display this text on a web page:
Enter a word <here>
If you try to write this information to a page or place it inside a control, you end up with this instead:
Enter a word
The problem is that the browser has tried to interpret the <here> as an HTML tag. A similar problem occurs if you actually use valid HTML tags. For example, consider this text:
To bold text use the <b> tag.
Not only will the text <b> not appear, but the browser will interpret it as an instruc-tion to make the text that follows bold. To circumvent this automatic behavior, you need to convert potential problematic values to their special HTML equivalents. For example, <becomes <in your final HTML page, which the browser displays as the <character.
characters. It also won’t be of any use for controls that don’t provide an InnerText property, such as the Label web control you’ll examine in the next chapter. In these cases, you can use the HtmlEncode() method to replace the special characters. Here’s an example:
' Will output as "Enter a word <here>" in the HTML file, but the ' browser will display it as "Enter a word <here>".
ctrl.InnerHtml = Server.HtmlEncode("Enter a word <here>")
Or consider this example, which mingles real HTML tags with text that needs to be encoded:
ctrl.InnerHtml = "To <b>bold</b> text use the " ctrl.InnerHtml &= Server.HtmlEncode("<b>") & " tag."
Figure 5-9 shows the results of successfully and incorrectly encoding special HTML characters. You can refer to the HtmlEncodeTest.aspx page included with the examples for this chapter.
The HtmlEncode() method is particularly useful if you’re retrieving values from a database and you aren’t sure whether the text is valid HTML. You can use the HtmlDecode() method to revert the text to its normal form if you need to perform additional operations or comparisons with it in your code. Table 5-13 lists some special characters that need to be encoded.
Table 5-13. Common HTML Special Characters
Result Description Encoded Entity
Nonbreaking space
< Less-than symbol <
> Greater-than symbol >
& Ampersand &
“ Quotation mark "
Similarly, the UrlEncode() method changes text into a form that can be used in a URL. Generally, this allows information to work as a query string variable, even if it contains spaces and other characters that aren’t allowed in a URL. You’ll see this technique demonstrated in Chapter 9.
ASP.NET Configuration
The last topic you’ll consider in this chapter is the ASP.NET configuration file system. Every web server starts with some basic settings that are defined in two configuration files in the c:\[WinDir]\Microsoft.NET\Framework\[Version]\Config directory, where [Version] is the version number of the .NET Framework. These two files are machine.config and web.config. Generally, you won’t edit either of these files manually, because they affect the entire computer. Instead, you’ll create a web.config in your web application folder. Using that file, you can set additional settings or override the defaults that are configured elsewhere.
The .config files have several advantages over traditional ASP configuration:
They are never locked: As described in the beginning of this chapter, you can update
web.config settings at any point, and ASP.NET will smoothly transition to a new application domain.
They are easily accessed and replicated: Provided you have the appropriate network
rights, you can change a web.config file from a remote computer. You can also copy the web.config file and use it to apply identical settings to another application or another web server that runs the same application in a web farm scenario.
The settings are easy to edit and understand: The settings in the web.config file are
■
Note
With ASP.NET, you don’t need to worry about the IIS metabase. However, there are still a few tasks you can’t perform with a web.config file. For example, you can’t create or remove a virtual directory. Simi-larly, you can’t change file mappings. If you want the ASP.NET service to process requests for additional file types (such as HTML or a custom file type you define), you must use IIS Manager, as described in Chapter 12.The web.config File
The web.config file uses a predefined XML format. The entire content of the file is nested in a root <configuration> element. This element contains a <system.web> element, which is used for ASP.NET settings. Inside the <system.web> element are separate elements for each aspect of configuration.
Here’s the basic skeletal structure of the web.config file:
<?xml version="1.0" encoding="utf-8" ?> <configuration>
<system.web>
<!-- Configuration sections go here. --> </system.web>
</configuration>
This example adds a comment in the place where you’d normally find additional settings. XML comments are bracketed with the <!-- and --> character sequences, as shown here:
<!-- This is the format for an XML comment. -->
■
Tip
To learn more about XML, the format used for the web.config file, you can refer to Chapter 17.You can include as few or as many configuration sections as you want. For example, if you need to specify special error settings, you could add just the <customErrors> group. Note that the web.config file is case-sensitive, like all XML documents, and starts every setting with a lowercase letter. This means you cannot write <CustomErrors> instead of <customErrors>.
Nested Configuration
ASP.NET uses a multilayered configuration system that allows you to use different settings for different parts of your application. To use this technique, you need to create additional subdirectories inside your virtual directory. These subdirectories can contain their own web.config files with additional settings.
Subdirectories inherit web.config settings from the parent directory. For example, imagine you create a website in the directory c:\ASP.NET\TestWeb. Inside this directory, you create a folder named Secure. Pages in the c:\ASP.NET\TestWeb\Secure directory can acquire settings from three files, as shown in Figure 5-10.
Any machine.config or web.config settings that aren’t explicitly overridden in the c:\ASP.NET\TestWeb\Special\web.config file will still apply to the SecureHelloWorld.aspx page. In this way, subdirectories can specify just a small set of settings that differ from the rest of the web application. One reason you might want to use multiple directories in an application is to apply different security settings. Files that need to be secured would then be placed in a dedicated directory with a web.config file that defines more stringent secu-rity settings.