Management Suite
Architecture and Installation Guide
MANAGEMENT SUITE ARCHITECTURE AND INSTALLATION GUIDE ii
Notice
The information contained in this document ("the Material") is believed to be accurate
at the time of printing, but no representation or warranty is given (express or implied)
as to its accuracy, completeness or correctness. AppSense Limited, its associated
companies and the publisher accept no liability whatsoever for any direct, indirect or
consequential loss or damage arising in any way from any use of or reliance placed on
this Material for any purpose.
Copyright in the whole and every part of this manual belongs to AppSense Limited
("the Owner") and may not be used, sold, transferred, copied or reproduced in whole
or in part in any manner or form or in or on any media to any person other than in
accordance with the terms of the Owner's Agreement or otherwise without the prior
written consent of the Owner.
Trademarks
AppSense and the AppSense logo are registered trademarks of AppSense Holdings Ltd.
Microsoft, Windows and SQL Server are trademarks or registered trademarks of
Microsoft Corporation. Fluent is a trademark of Microsoft Corporation and the Fluent
user interface is licensed from Microsoft Corporation. Other brand or product names
are trademarks or registered trademarks of their respective holders.
iii
Welcome
viii
About this Document
viii
Terms and Conventions
viii
Feedback
ix
Chapter 1 Architecture
1
About the Management Suite
1
Application Manager
2
Components
2
Environment Manager
3
Components
4
Policy Configuration
5
User Personalization
5
Performance Manager
6
Components
7
Management Center
8
Components
9
AppSense Servers
10
MANAGEMENT SUITE ARCHITECTURE AND INSTALLATION GUIDE CONTENTS iv
Chapter 2 Installation
11
Before You Begin
11
Using the Management Suite Installer
12
Standalone Installation
12
Enterprise Installation
13
Manual Installation
16
Uninstallation
18
Product Licenses
19
Chapter 3 Software Upgrade
20
Application Manager
20
Environment Manager
21
Performance Manager
22
Management Center
22
Upgrading Standalone Configurations
23
Chapter 4 Server Configuration
24
First-time Wizard Setup
24
Server Configuration Utility
26
Setup to Configure AppSense Servers using Low SQL Privileges
28
Create Database
28
Install and Configure AppSense Servers
29
Database Maintenance
30
Chapter 5 Upgrading Environment Manager
31
Recommended Upgrade Order
31
When to Upgrade
31
What to Upgrade
32
Server
32
Database
32
Agent
33
How to Upgrade
33
Preparation
33
MANAGEMENT SUITE ARCHITECTURE AND INSTALLATION GUIDE CONTENTS v
Chapter 6 Upgrade Notes for Replicated Personalization Databases
34
Before You Begin
35
Upgrade SQL 2005 and SQL 2008 Databases
35
Upgrade SQL 2000 Database
36
Reset Database – DropRowGuids.sql
38
Chapter 7 Configuring Secure Communications
40
Enable SSL on AppSense Server Websites
40
SSL on IIS 7.x
40
SSL on IIS 6
41
Deploy Certificates Using Group Policy
58
Troubleshooting
62
Chapter 8 System Requirements
63
Supported Operating Systems
64
Supported Technologies
65
Manually Installed Components
66
vi
Figure 1.1 Application Manager Architecture 2
Figure 1.2 Environment Manager Architecture 3
Figure 1.3 Performance Manager Architecture 6
Figure 1.4 Management Center Architecture 8
Figure 6.1 SQL 2005: Disable Publishing and Distribution 35
Figure 6.2 SQL 2000: Delete Subscriptions 36
Figure 6.3 SQL 2000: Disable Publishing 37
Figure 7.1 Windows Component Wizard: Certificate Services 41
Figure 7.2 Windows Components Wizard: CA Type 42
Figure 7.3 Windows Components Wizard: CA Identifying Information 43
Figure 7.4 Internet Information Services (IIS) Manager: Directory Security 44
Figure 7.5 IIS Certificate Wizard: Server Certificate 45
Figure 7.6 IIS Certificate Wizard: Delayed or Immediate Request 45
Figure 7.7 IIS Certificate Wizard: Name and Security Settings 46
Figure 7.8 IIS Certificate Wizard: Organization Information 46
Figure 7.9 IIS Certificate Wizard: Your Site’s Common Name 47
Figure 7.10 IIS Certificate Wizard: Certificate Request File Name 48
Figure 7.11 Certification Authority: Submit New Request 49
Figure 7.12 Open Request File 50
Figure 7.13 Certification Authority: Issue 51
Figure 7.14 Certification Authority: Export Binary Data 52
Figure 7.15 Export Binary Data 52
MANAGEMENT SUITE ARCHITECTURE AND INSTALLATION GUIDE FIGURES vii
Figure 7.16 Save Binary Data 53
Figure 7.17 IIS Certificate Wizard: Pending Certificate Request 54
Figure 7.18 IIS Certificate Wizard: Process a Pending Request 55
Figure 7.19 IIS Certificate Wizard: SSL Port 55
Figure 7.20 Secure Communications 56
Figure 7.21 Certificate Dialog box 59
Figure 7.22 Default Domain Security Settings: Import Certificate 60
viii
W
E L C O M E
This section includes the following: About this Document on page viii Terms and Conventions on page viii Feedback on page ix
About this Document
This document provides information about the AppSense AppSense Management Suite components and architecture, and includes an overview of the Management Suite installation and setup.
Terms and Conventions
The following table shows the textual and formatting conventions used in this document:
Document Information
Document Version APAMS80-04-020310-5 Publication number 5
Convention Use
Bold Highlights items you can select in Windows and the product interface, including nodes, menus items, dialog boxes and features.
Code Used for scripting samples and code strings.
Italic Highlights values you can enter in console text boxes and titles for other guides and Helps in the documentation set.
Green + underlined Indicates a popup with additional information.
> Indicates the path of a menu option. For example,
“Select File > Open" means "click the File menu, and then click Open." Note — Highlights important points of the main text or provides supplementary information.
MANAGEMENT SUITE ARCHITECTURE AND INSTALLATION GUIDE WELCOME Feedback ix
Feedback
The AppSense Documentation team aim to provide accurate and high quality documentation to assist you in the installation, configuration and ongoing operation of AppSense products. We are constantly striving to improve the documentation content and value any contribution you wish to make based on your experiences with AppSense products.
Please send any comments using the following email address: [email protected]
Thanks in advance,
The AppSense Documentation team
Tip — Offers additional techniques and help for users, to demonstrate the advantages and capabilities of the product.
Caution/Warning — Provides critical information relating to specific tasks or indicates important considerations or risks.
Further Information — Provides links to further information which include more detail about the topic, either in the current document or related sources.
1
1
A r c h i t e c t u r e
This section provides details on the architecture of the AppSense Management Suite and the components, and includes the following:
About the Management Suite on page 1 Application Manager on page 2
Environment Manager on page 3 Performance Manager on page 6 Management Center on page 8 AppSense Servers on page 10
About the Management Suite
The Management Suite consists of products for managing computer security, performance, the user environment, AppSense software deployment and Enterprise scale communications, and include:
Application Manager Environment Manager Performance Manager Management Center
Additional server-based components allow you to extend the capabilities of these products, and include:
Management Center – enterprise scale management of the entire AppSense Management Suite.
Environment Manager User Personalization – user environment management. Performance Manager Central Statistics Server – centralized statistics collection and
MANAGEMENT SUITE ARCHITECTURE AND INSTALLATION GUIDE 1 ARCHITECTURE Application Manager 2
Application Manager
AppSense Application Manager consists of the Console, configuration, and the Agent which is deployed to managed computers to implement the configuration rules.
Figure 1.1 Application Manager Architecture
Components
Agent
Application Manager is installed and run on endpoints using a lightweight Agent. In Standalone mode, the Agent is installed directly onto the local computer. In Enterprise mode,
configurations are stored centrally and deployed remotely across a network to multiple controlled computers using the AppSense Management Center.
Agents are constructed as Windows Installer MSI packages which allows them to be distributed using any third-party deployment system which supports the MSI format.
For more information about deploying AppSense software, see the AppSense Management Center Administration Guide.
MANAGEMENT SUITE ARCHITECTURE AND INSTALLATION GUIDE 1 ARCHITECTURE Environment Manager 3
Configuration
Application Manager Configuration files contain the rule settings for securing your system. The Agent checks the configuration rules to determine the action to take when intercepting file execution requests.
Configurations are stored locally in the All Users profile and are protected by NTFS security. In Standalone mode, configuration changes are saved in the custom .AAMP format (AppSense Application Manager Package) and read by the agent. In Enterprise mode, configurations are stored in the AppSense Management Center database, and setup for deployment using the AppSense Management Console.
Configurations can also be exported and imported to and from MSI file format using the Application Manager Console, which is useful for creating templates or distributing configurations using third-party deployment systems.
After creating or modifying a configuration, you must save the configuration with the latest settings to ensure that they are implemented.
Environment Manager
AppSense Environment Manager consists of the Console, Agent, Personalization Server and Microsoft SQL database.
MANAGEMENT SUITE ARCHITECTURE AND INSTALLATION GUIDE 1 ARCHITECTURE Environment Manager 4
Environment Manager can operate either in Standalone mode or Enterprise mode. In
Standalone mode, the console saves settings in a custom file format on the local system which the agent reads. In Enterprise mode, different configurations can be deployed to the controlled computers depending on your system requirements.
Environment Manager consists of the following: Policy Configuration
User Personalization
Policy Configuration and User Personalization work together to provide complimentary control of the entire user environment. Inevitably there are some areas of overlap. The profile settings are applied in the following stages:
Default Settings - Policy Configuration
Usually occur through the use of mandatory profiles, although Policy Configuration is free to set anything at this stage.
Virtual Settings - User Personalization
User specific changes to their own personality settings that are being managed by User Personalization and these are applied on top of the defaults.
Enforced Settings - Policy Configuration
Any policies that the administrator wants to set, regardless of how the user has changed their application previously, so these are applied last. The user may be free to change these while the application is running, but they are reapplied the next time the application runs.
Components
Console
The console is an administrative tool to create and manage configurations. The Agent resides on the controlled computers and can receive configurations from the AppSense Management Center or third-party deployment system to manage the machine and user environment. The console also provides a live connection to the Personalization database.
Personalization Server
The Personalization Server runs as a website, using IIS on either Windows Server 2003 or Windows Server 2008. Client machines connect through HTTP/HTTPS handlers, and the console uses WCF Services.
The Personalization Server acts as a broker between the client and database, providing a secure channel to read and write the Personalization data. It is designed to support thousands of users simultaneously and multiple Personalization Servers can be configured in parallel to use a single database.
For more information about deploying AppSense software, see the AppSense Management Center Administration Guide.
MANAGEMENT SUITE ARCHITECTURE AND INSTALLATION GUIDE 1 ARCHITECTURE Environment Manager 5
Policy Configuration
Policy Configuration enables the administrator to configure both default and enforced corporate policies that can be applied to either the computer or user under a number of different scenarios.
User Personalization
A three-tier architecture is utilized consisting of the following basic components: Tier 1 - Environment Manager Agent
Installed on each managed endpoint, responsible for ensuring user personalization data is saved and restored on demand and also ensures policy configuration settings are applied when required.
Tier 2 - Personalization Server
An IIS web server responsible for synchronizing user personalization settings between the SQL database and the Environment Manager Agent when the user logs on or off or when an application is started or stopped.
Tier 3 - SQL Database
Holds information related to personalization sites and servers, users and groups, applications, endpoint configuration data and user personalization data.
MANAGEMENT SUITE ARCHITECTURE AND INSTALLATION GUIDE 1 ARCHITECTURE Performance Manager 6
Performance Manager
Performance Manager consists of the Console, Agent and Configuration. The Central Statistics Server can be optionally installed and consists of the Local Statistics Service (LSS) agent, the Central Statistics Service agent, the Microsoft SQL Server database and a dedicated area of the Console for generating statistics reports.
Figure 1.3 Performance Manager Architecture
Performance Manager can operate either in Standalone mode or in Enterprise mode. In Standalone mode, the console and agent are installed locally and configurations are deployed by saving directly to the local computer from the console. In Enterprise mode, configurations are stored centrally and deployed remotely across a network to multiple controlled computers using the AppSense Management Center.
For more information about deploying AppSense software, see the AppSense Management Center Administration Guide.
MANAGEMENT SUITE ARCHITECTURE AND INSTALLATION GUIDE 1 ARCHITECTURE Performance Manager 7
Components
Console
The Performance Manager Console is an administrative tool for creating and managing configurations which contain resource-based policies.
The Console allows you to generate and view reports from performance data on the Central Statistics Server collected from managed computers, where this component is installed.
Agent
The Performance Manager Agent resides on the managed computers with the configuration which contains the resource-based policies which the Agent implements to manage the server resources.
When the Central Statistics Server is installed, the Local Statistics Service (LSS) resides on the managed computers to collect and send performance data to the Central Statistics Service residing on the Central Statistics Server.
Central Statistics Server
The Central Statistics Server is an optionally installed component which includes a Microsoft SQL Server database on which historical performance data is collected from managed computers. A comprehensive range of textual and graphical reports can be generated from the
Performance Manager Console using the performance data in the Central Statistics Server to generate reports showing show application and user resource activity on managed computers.
MANAGEMENT SUITE ARCHITECTURE AND INSTALLATION GUIDE 1 ARCHITECTURE Management Center 8
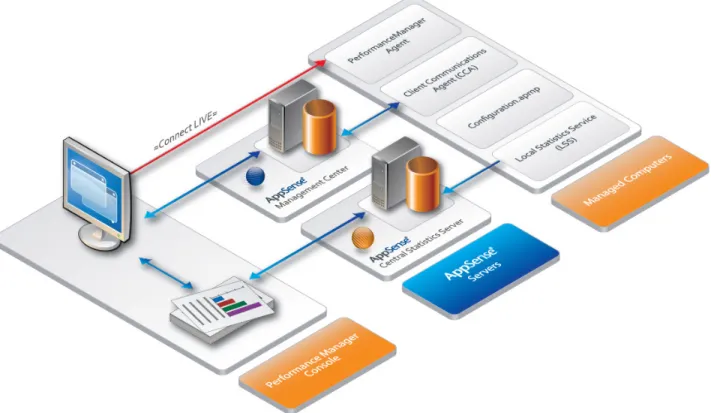
Management Center
The Management Center is comprised of the Management Server, Microsoft SQL Server, Management Console and the Client Communications Agent (CCA) installed on managed computers.
Figure 1.4 Management Center Architecture
The CCA uploads event data from managed computers to the Management Server and downloads product configurations and software updates from the Management Server. Product configurations are created using the product consoles and stored in the Management Center database from where they can be downloaded along with product agents by the CCA for installation on managed machines.
MANAGEMENT SUITE ARCHITECTURE AND INSTALLATION GUIDE 1 ARCHITECTURE Management Center 9
Components
The Management Center includes the following components:
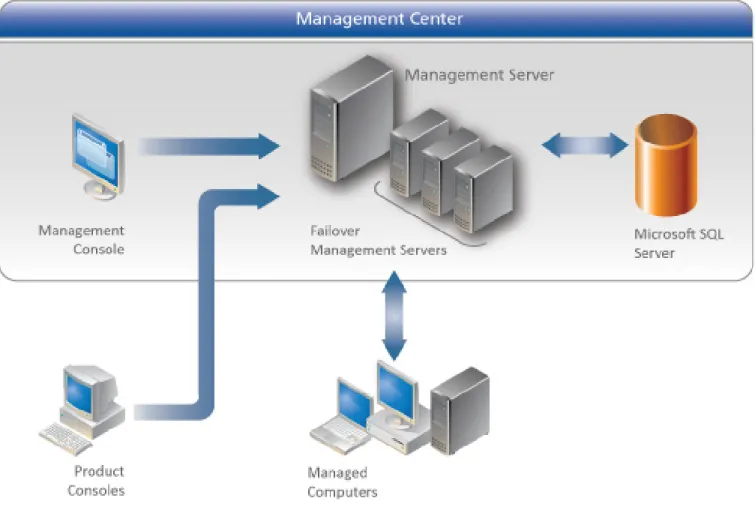
Management Console
The Management Console provides an interface to the Management Server and the other components of the Management Center allowing you to control deployment groups, users, event data and alerts, configurations and packages, registered computers and reports.
Management Server
The Management Server manages communications with a Microsoft SQL Server database for data access and storage, providing security control, communications for managing network discovery services and software deployment to managed computers, resource management and enterprise auditing.
Database
The Management Center relies on the availability on the network of a Microsoft SQL Server for the storage and retrieval of AppSense software agents, configuration packages, license packages, and event and alert data.
The Microsoft SQL Server database is administered by the Management Server and can be installed locally on the Management Center host computer or on a separate computer.
CCA on Managed Computers
The Client Communications Agent (CCA) is installed on managed computers to manage communications between the product agents and the AppSense Management Center. The CCA can be deployed using the CCA Deployment Tool, by downloading and installing the Agent on the managed computer from the Management Server website or using a third-party deployment mechanism.
MANAGEMENT SUITE ARCHITECTURE AND INSTALLATION GUIDE 1 ARCHITECTURE AppSense Servers 10
AppSense Servers
You can select each of the following AppSense Servers during Enterprise Mode installation using the AppSense Management Suite Installer:
Management Server — provides a system for managing, configuring and deploying AppSense Management Suite products to clients. Product consoles are installed with the Server to manage agents and configurations in an enterprise scale environment.
Performance Manager Central Statistics Server — provides statistical reporting by collecting performance data from clients into a database and providing a comprehensive range of graphical and textual reports based on the data for analyzing application and user resource consumption.
Environment Manager Personalization Server — provides User Personalization which delivers personalized data to the client and stores personalization data changes by synchronizing the data between the client and database.
The Central Statistics Server and the Personalization Server are optionally installed components which complement Performance Manager and Environment Manager respectively, by extending the functionality of the products. The Management Server is installed for creating an enterprise mode environment for AppSense management products on the network.
The installation of these components is completed by running the Server Configuration utility of each product to configure the server environment, including the web service, Windows services and the database. You can modify the settings using the relevant utilities at any time.
If no existing Microsoft SQL Server is detected on the host computer, you are prompted to install Microsoft SQL Server 2005 Express or use a remote SQL server which can be configured later using the utility.
The Server Configuration utilities first run as wizards in which you specify settings for the server. Following first-time setup using the wizard, the Server Configuration utility console can be launched allowing you to modify existing settings and providing more options for managing the Server configuration. Each Server Configuration utility can be launched from the following location in the Start menu:
11
2
I n s t a l l a t i o n
This section provides an overview of the AppSense Management Suite installation processes, upgrades and uninstallation, and includes the following:
Before You Begin on page 11
Using the Management Suite Installer on page 12 Manual Installation on page 16
Uninstallation on page 18 Product Licenses on page 19
Before You Begin
The AppSense Management Suite components can be installed using the AppSense Management Suite Installer or manually. The installer provides a comprehensive process for installing any combination of AppSense products in a single fully integrated sequence. The installation process includes a complete check for system prerequisites and provides you with the option to install the required components automatically. Alternatively, you can install each of the product components manually by running the product installer packages for each component.
AppSense Management Suite products can be combined to create integrated Enterprise scale installations with AppSense server-based management tools and feature support, or smaller Standalone product installations for evaluation purposes.
Installer packages are available per product and include 32-bit and 64-bit versions of the following component types:
Agent Console Server
Documentation
Additional prerequisite third party software components are provided with the installation media and can also be installed automatically via the Management Suite installer or manually by running the relevant packages provided.
MANAGEMENT SUITE ARCHITECTURE AND INSTALLATION GUIDE 2 INSTALLATION Using the Management Suite Installer 12
Existing AppSense software packages upgrade automatically during the installation process, including databases, agents and configurations. Before proceeding, make sure you backup all existing AppSense databases and save product configuration packages as MSI files to disk from the existing product consoles. If necessary, save earlier versions of the product agent software which you would like to maintain.
Using the Management Suite Installer
This section provides an overview of the installation processes using the Management Suite installer as follows:
Standalone Installation on page 12 Enterprise Installation on page 13
Standalone Installation
Standalone installation installs the product consoles and agents together on the host computer. Standalone Installation using the Management Suite Installer
1. Run the Installer by executing setup.exe from the installation media. 2. In the Welcome screen, click Next.
3. In User Information screen, provide username and company details. 4. In the License Agreement screen, accept the license agreement.
5. In the License Validation screen, enter a product license code and activation code or select to use the evaluation license (valid for 21 days).
6. In the Installation Type screen, select Standalone to locally install product consoles and product agents.
7. In the Product Selection screen, select the products you want to install: Application Manager
Environment Manager Performance Manager
For more information about saving configuration files from product consoles, see the relevant product documentation.
See Software Upgrade on page 20 for more information about upgrade requirements.
For more information about product licenses, see Product Licenses on page 19 You can change license settings later for Standalone installations using the AppSense
Management Suite Licensing Console which you can launch from the following directory:
MANAGEMENT SUITE ARCHITECTURE AND INSTALLATION GUIDE 2 INSTALLATION Using the Management Suite Installer 13
8. In the Prerequisite Detection screen, a list of required components displays showing the installation status for each component.
Install any software prerequisites which are not already installed.
9. In the Installation Directory screen, select the location in which to install the AppSense product files.
The default location is C:\Program Files\AppSense.
10. The Summary screen lists the products you selected to install, the installation mode, license details, install directory and whether a reboot is required.
When the installation is complete, you are prompted to reboot the computer to complete the installation of the product agents.
Enterprise Installation
Enterprise installation includes the full suite of product consoles together with the AppSense server components. Installation is completed by running the Server Configuration utility for each installed server product.
The servers, SQL databases and consoles for each of the products in Enterprise mode
installations can be installed either together on one computer or distributed across the network on separate computers.
Enterprise Installation Using the Management Suite Installer 1. Run the Installer by executing setup.exe, on the installation media.
2. In the Welcome screen, click Next.
3. In the User Information screen, provide username and company details. 4. In the License Agreement screen, accept the license agreement.
5. In the License Validation screen, enter a product license code and activation code or select to use the evaluation license (valid for 21 days).
In a distributed environment where product consoles and server components are installed on separate management computers, you need to run the installer again on each computer to install the relevant components.
When using the Management Center, you can browse to the web page at the following link to download the console and documentation installers:
http://servername/ManagementServer
For more information about product licenses, see Product Licenses on page 19 You manage the licenses for Enterprise mode installations using the Enterprise
Licensing view in the AppSense Management Console.
MANAGEMENT SUITE ARCHITECTURE AND INSTALLATION GUIDE 2 INSTALLATION Using the Management Suite Installer 14
6. In the Installation Type screen, select Enterprise to install product consoles and server-based products.
7. In the Product Selection screen, select the products you want to install. All product consoles are installed along with each of the following servers you select:
Management Center — system monitoring and agent and configuration software deployment.
Central Statistics Server — performance data collection and reporting.
Personalization Server — user environment management: personalization data storage and retrieval.
8. In the SQL Server installation screen, if no local Microsoft SQL Server is detected, you are prompted either to install a Microsoft SQL Server or browse to select an existing remote SQL Server.
If no existing SQL server is selected, the Installer installs Microsoft SQL Server 2005 Express Edition. If you select this option, accept the license agreement and follow the prompts of the Microsoft SQL Server 2005 Setup to complete the installation.
You can skip this step and configure remote servers later for each of the products using the the Server Configuration utilities for each of the products.
9. In the Prerequisite Detection screen, a list of required components shows the installation status for each component.
Install any software prerequisites which are not already present including SQL Server 2005 Express Edition, if required.
10. In the Installation Directory screen, select a location for installing the AppSense product files.
The default location is C:\Program Files\AppSense.
Agent packages are entered into the Management Center database when you run the Management Server Configuration utility after the installation has completed.
MANAGEMENT SUITE ARCHITECTURE AND INSTALLATION GUIDE 2 INSTALLATION Using the Management Suite Installer 15
11. The Summary screen lists the products you installed, the installation mode, license details, installation directory, and a notification that no reboot is required.
12. When installation is complete, launch the Server Configuration Utility to each server in turn from the installer console or from the product directories, at the following locations: Start > All Programs > AppSense > Environment Manager
Start > All Programs > AppSense > Performance Manager Start > All Programs > AppSense > Management Center
For more information about server configuration, see Server Configuration on page 24.
On completion of the Personalization Server installation, test to ensure the server is functioning by visiting your Personalization Server web site at the following link:
http://localhost/PersonalizationServer/status.aspx
Replace localhost with the server name if you are running this test from a different location.
After an initial 30 second delay while the server starts up, a page of text displays to confirm a successful connection. The Personalization Server can now accept requests from client machines.
MANAGEMENT SUITE ARCHITECTURE AND INSTALLATION GUIDE 2 INSTALLATION Manual Installation 16
Manual Installation
Table 2.1 shows the list of the Windows Installer Packages (MSI) for each of the components in the AppSense Management Suite, which you can run manually on the host computers. The list is organized per product and includes details about which components require a reboot of the host computer after installation.
Additional supporting software requirements for each product installation is covered in System Requirements on page 63.
On completion of the Personalization Server installation, test to ensure the server is functioning by visiting your Personalization Server web site at the following link:
http://localhost/PersonalizationServer/status.aspx
Replace localhost with the server name if you are running this test from a different location. After an initial 30 second delay while the server starts up, a page of text displays to confirm a successful connection. The Personalization Server can now accept requests from client machines.
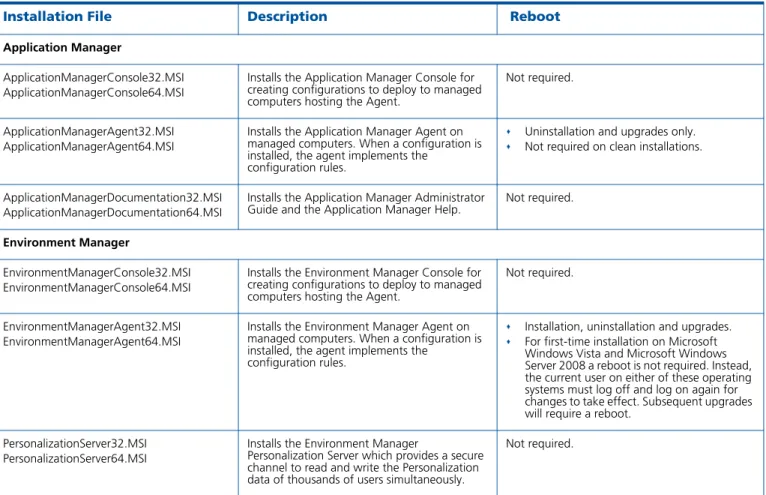
Table 2.1 AppSense Management Suite Installation Packages
Installation File Description Reboot
Application Manager
ApplicationManagerConsole32.MSI ApplicationManagerConsole64.MSI
Installs the Application Manager Console for creating configurations to deploy to managed computers hosting the Agent.
Not required.
ApplicationManagerAgent32.MSI ApplicationManagerAgent64.MSI
Installs the Application Manager Agent on managed computers. When a configuration is installed, the agent implements the
configuration rules.
Uninstallation and upgrades only.
Not required on clean installations.
ApplicationManagerDocumentation32.MSI ApplicationManagerDocumentation64.MSI
Installs the Application Manager Administrator
Guide and the Application Manager Help. Not required.
Environment Manager
EnvironmentManagerConsole32.MSI EnvironmentManagerConsole64.MSI
Installs the Environment Manager Console for creating configurations to deploy to managed computers hosting the Agent.
Not required.
EnvironmentManagerAgent32.MSI EnvironmentManagerAgent64.MSI
Installs the Environment Manager Agent on managed computers. When a configuration is installed, the agent implements the
configuration rules.
Installation, uninstallation and upgrades.
For first-time installation on Microsoft Windows Vista and Microsoft Windows Server 2008 a reboot is not required. Instead, the current user on either of these operating systems must log off and log on again for changes to take effect. Subsequent upgrades will require a reboot.
PersonalizationServer32.MSI PersonalizationServer64.MSI
Installs the Environment Manager
Personalization Server which provides a secure channel to read and write the Personalization data of thousands of users simultaneously.
MANAGEMENT SUITE ARCHITECTURE AND INSTALLATION GUIDE 2 INSTALLATION Manual Installation 17
EnvironmentManagerDocumentation32.MSI EnvironmentManagerDocumentation64.MSI
Installs the Environment Manager Administrator Guide and the Environment Manager Help
Not required.
Performance Manager
PerformanceManagerConsole32.MSI PerformanceManagerConsole64.MSI
Installs the Performance Manager Console for creating configurations containing resource-based policies.
Allows you to view reports based on performance data on the Central Statistics Server.
Not required.
PerformanceManagerAgent32.MSI PerformanceManagerAgent64.MSI
Installs the Performance Manager Agent on managed computers. When a configuration is installed, the agent implements the
configuration rules.
Uninstallation and upgrades only. Not required on clean installations.
PerformanceManagerLocalStats32.MSI PerformanceManagerLocalStats64.MSI
Installs a service on managed computers which collects performance data and sends to the Central Statistics Server.
Not required.
PerformanceManagerCentralStats32.MSI PerformanceManagerCentralStats64.MSI
Installs the Central Statistics Server for collecting performance data from managed computers and providing comprehensive reporting for analysis via the Performance Manager Console.
Not required.
PerformanceManagerDocumentation32.MSI PerformanceManagerDocumentation64.MSI
Installs the Performance Manager Administrator Guide and the Performance Manager Help
Not required.
Management Center
ManagementConsole32.MSI ManagementConsole64.MSI
Installs the Management Center Console which provides an interface to the Management Server and the other components of the Management Center.
Not required.
ManagementServer32.MSI ManagementServer64.MSI
Installs the Management Server which manages data access and storage, security control, network discovery services and software deployment to managed computers, resource management and enterprise auditing. Must be configured using the Management Center Server Configuration utility
Not required.
Table 2.1 AppSense Management Suite Installation Packages (continued)
MANAGEMENT SUITE ARCHITECTURE AND INSTALLATION GUIDE 2 INSTALLATION Uninstallation 18
Uninstallation
Uninstall the AppSense Management Suite by running the AppSense Management Suite Installer by selecting setup.exe on the installation media. Installed product agents including Application Manager Agent, Environment Manager Agent and Application Manager Agent, are uninstalled and a reboot of the host computer is required to complete the uninstallation process.
ClientCommunicationsAgent32.MSI ClientCommunicationsAgent64.MSI
Installs the Client Communications Agent (CCA) to manage communications between the product agents and the AppSense Management Center.
Installation, uninstallation and upgrades.
ManagementCenterDocumentation32.MSI ManagementCenterDocumentation64.MSI
Installs the Management Center Administrator
Guide and the Management Center Help Not required.
Management Suite
LicensingConsole32.MSI LicensingConsole64.MSI
Installs the Licensing Console for managing licenses for products installed in Standalone mode.
Not required.
ManagementSuiteDocumentation32.MSI ManagementSuiteDocumentation64.MSI
Installs the AppSense Management Suite
Architecture and installation Guide. Not required.
Table 2.1 AppSense Management Suite Installation Packages (continued)
MANAGEMENT SUITE ARCHITECTURE AND INSTALLATION GUIDE 2 INSTALLATION Product Licenses 19
Product Licenses
Table 2.2 provides a list of AppSense Management Suite product licenses types.
Table 2.2 AppSense Product License Types
License Description Requires Activation
AppSense Management
Suite Full Suite license. Requires activation using the activation code sent from AppSense Ltd. with the license code.
Application Manager Single product license.
Requires activation using the activation code sent from AppSense with the license code.
Performance Manager Single product license.
Requires activation using the activation code sent from AppSense with the license code.
Environment Manager Single product license.
Requires activation using the activation code sent from AppSense with the license code.
Evaluation Full Suite or single product licenses.
Evaluation licenses are available during the first installation of the product and do not require activation. They are valid for 21 days.
20
3
S o f t w a r e U p g r a d e
The Management Suite installer upgrades all product consoles and servers and provides upgraded product agents. The following information includes details about the processes for upgrading the Management Suite and product configurations.
Application Manager on page 20 Environment Manager on page 21 Performance Manager on page 22 Management Center on page 22
Upgrading Standalone Configurations on page 23
Application Manager
Upgrade Application Manager configurations created with version 6.x and version 7.x product consoles by saving to disk as MSI files using the old console. Open 7.x configuration MSI files in the v8.0 product console. Open v6.x configuration MSIs in a v7.x console and save before repeating these steps and open again in the v8.0 console:
v7.x > MSI > v8.0 (or later)
v6.x > MSI > v7.x > MSI > v8.0 (or later)
Upgrade the configuration by loading the MSI file into the new console using the Import option in the Application Menu.
Once the configuration is upgraded, you can save the configuration to the local computer, a remote computer, to the Management Center or as a file on disk, according to requirements.
APPSENSE PRODUCT MANAGER USER GUIDE 3 SOFTWARE UPGRADE Environment Manager 21
Environment Manager
Recommended Upgrade Workflow
Upgrade AppSense Environment Manager components according to the following recommended order:
1. Upgrade Personalization Servers.
2. Run the Server Configuration Utility to upgrade the database. 3. Upgrade Consoles.
4. Upgrade Agents. 5. Upgrade Configurations.
Upgrading Personalization Servers
When upgrading Personalization Server v8.0, the database is automatically upgraded. You must upgrade all other Personalization Servers on the site.
You must upgrade Environment Manager Consoles.
If replication is enabled, you must upgrade the database and Personalization Servers on all sites that are replicated.
Upgrading Agents
Ensure that the Personalization Server is upgraded before upgrading agents on client machines.
We recommend upgrading the Environment Manager Agent when you upgrade the Personalization Server, although an earlier v8.0 agent is compatible with a later Personalization Server v8.0 (SP1 and SP2).
Environment Manager can upgrade configurations created in version 6.x and version 7.x of the Console. Configurations are converted when the Console runs in Standalone mode and detects configurations or, when configurations on the Management Center are opened in Enterprise mode. The upgrade is completed when the converted configurations are saved.
For more details about upgrading Environment Manager, see Upgrading Environment Manager on page 31.
On completion of the Personalization Server installation, test to ensure the server is functioning by visiting your Personalization Server web site at the following link:
http://localhost/PersonalizationServer/status.aspx
Replace localhost with the server name if you are running this test from a different location. After an initial 30 second delay while the server starts up, a page of text displays to confirm a successful connection. The Personalization Server can now accept requests from client machines.
APPSENSE PRODUCT MANAGER USER GUIDE 3 SOFTWARE UPGRADE Performance Manager 22
Configurations in version 8.x are managed differently to earlier versions as follows:
LDAP strings are stored differently — In earlier versions of the product, only usernames were stored, while in version 8.0, the fully qualified domain name is stored. During the conversion, Environment Manager converts all username strings to fully qualified domain names and provides a list of unqualified names for manual editing.
The following settings in earlier versions configured in the User | Logon node are moved over to User Personalization and a notification message is issued in the Console:
Update Screen Settings – moved and located under Refresh Desktop Settings.
Update Keyboard, Mouse and Language Settings – moved and located under Refresh Desktop Settings.
Allow the user to store certificates – moved and located under Manage Certificates.
Performance Manager
Upgrade Performance Manager configurations created with version 6.x and version 7.x product consoles by saving to disk as MSI files using the old console. Open 7.x configuration MSI files in the v8.0 product console. Open v6.x configuration MSIs in a v7.x console and save before repeating these steps and opening again in the v8.0 console:
v7.x > MSI > v8.0 (or later)
v6.x > MSI > v7.x > MSI > v8.0 (or later)
Upgrade the configuration by loading the MSI file into the new console using the Import option in the Application Menu.
Once the configuration is upgraded, you can save the configuration to the local computer, a remote computer, to the Management Center or as a file on disk, according to requirements. The following settings are retained during the upgrade process:
Application Groups Global Settings:
Memory Optimizer Thread Throttling
Management Center
Backup the database and run the Management Suite installer to upgrade the Management Center and other AppSense products.
When you run the Management Server Configuration Utility after upgrading the software, the latest product agents are added to the Management Server database ready for deployment.
Other resource settings are lost during this process so it is recommended to run
Configuration Profiler in the version 7.x consoles before upgrading to create a record of custom settings which can later be manually entered into the upgraded configurations.
APPSENSE PRODUCT MANAGER USER GUIDE 3 SOFTWARE UPGRADE Upgrading Standalone Configurations 23
Upgrading Standalone Configurations
AppSense product configurations must be upgraded sequentially by major product version. You cannot upgrade directly from version 6.x to version 8.0 and must proceed from v6.x to version 7.x, and from version 7.x to version 8.0.
Configurations are upgraded by exporting from the source product console to MSI file format and importing the configuration file into the next major version of the product console.
1. Launch a 6.x or 7.x version of the product and in the Standalone Configuration node, select Export Configuration in the Action menu.
2. In the Export Configuration dialog box, save the configuration to disk in MSI format. 3. Completely uninstall the current version of AppSense products you are upgrading and
install the new version.
4. Launch the new console and import the saved MSI configuration to perform the upgrade. Repeat these steps for each product in turn.
Configuration Import steps
In Version 7.x, highlight the AppSense product node and select Import Configuration in the Action menu to import the configuration you saved using the previous version of the product.
In Version 8.0, click the application button, select Import & Export > Import configuration from MSI and import the configuration MSI file.
24
4
S e r v e r C o n f i g u r a t i o n
This section provides details of the Server configuration process for AppSense Management Server, Environment Manager Personalization Server and Performance Manager Central Statistics Server using a Server Configuration utility for each product, and includes: First-time Wizard Setup on page 24
Server Configuration Utility on page 26
Setup to Configure AppSense Servers using Low SQL Privileges on page 28 Database Maintenance on page 30
First-time Wizard Setup
The Server Configuration utilities first run as wizards in which you specify settings for the server you are configuring. Following first-time setup using the wizard, the Server Configuration utility console can be launched allowing you to modify existing settings and providing more options for managing the Server configuration. Each Server Configuration utility can be launched from the following location in the Start menu:
Start > All Programs > AppSense > [ProductName] Configuration
Run the Server Configuration utility using a user account with Administrator privileges. Otherwise, a warning message notifies you at start up that some functions may fail, or give inaccurate results. You are prompted for confirmation to continue. If you select No, the Server Configuration utility closes.
During the server configuration process, you are prompted for authentication, including the following types:
SQL authentication = SQL Authenticated Account Windows authentication = The current windows account Impersonated authentication = A custom windows account
MANAGEMENT SUITE ARCHITECTURE AND INSTALLATION GUIDE 4 SERVER CONFIGURATION First-time Wizard Setup 25
Server Configuration Wizard Steps
The wizard guides you through the following steps:
1. Prerequisites Check – The prerequisite check provides a list of the required components and indicates whether each component is installed. Any components which are not enabled are indicated and the View button allows you to display and fix the list of variances by installing components which are not installed.
Some missing components can be fixed by the installer but other components, such as BITS and IIS, must be installed manually. You can proceed or fix the relevant issues and return to the wizard later. If you proceed without resolving outstanding issues, a message notifies you that the product might not operate correctly.
2. Web site — Select a valid website. The utility lists all existing websites. The selected website controls the port used to access the server. The default website is sufficient unless you have a specially designated website which already exists.
3. Client Authentication — Specify the authentication method which managed computers use to access server web directories:
Anonymous authentication
Windows authentication (recommended) 4. Database Selection and Configuration Account
Enter the credentials for an account to configure the database and the name of the SQL Server.
To create a new database, ensure the configuration account has dbcreator server privileges and enter a unique database name.
To setup the schema on an empty placeholder database, ensure the configuration account has dbo privileges on the database, and select the database from the list. To upgrade an existing database, the configuration account must have dbo privilege,
and the database should be selected from the list.
To use an existing database, the configuration account must be a member of the ProductAdministrator or dbo database roles.
5. Database Service Credentials — You are prompted for service account credentials to connect to the SQL database. You can use Impersonated Windows authentication or SQL authentication. The web service and, where relevant, Windows services also use these credentials for the database connection.
This option is only available in the Management Center Server Configuration utility and the Central Statistics Server Configuration utility.
If the service account does not already exist in the SQL Server and the configuration account has securityadmin server privileges, a new account is created.
MANAGEMENT SUITE ARCHITECTURE AND INSTALLATION GUIDE 4 SERVER CONFIGURATION Server Configuration Utility 26
6. Summary — A summary of your settings displaying details of the actions to be taken, such as creating a database with a specific name or updating an existing database. You are also prompted to select to launch the Server Configuration utility.
Server Configuration Utility
The Server Configuration Utility allows you to manage and monitor the status of the product Server and resolve incorrect settings using variance reports, prerequisites checking, database connectivity, website, web services, services configuration and AppSense support mechanisms. Variances
Variances occur when a setting or property on the server differs from the recommended value. The top-level node of the Server Configuration Utilit provides a summary of the status of the Server Configuration. In the event that there are variances, you can click the View button to display the Variance Report which lists all variances in the system and includes details of the issues.
There are three types of variances indicated by different icons and include repairable and non-repairable issues, and warnings about access rights issues when connecting to the SQL database. Hover the mouse over a variance to display details of current and expected values.
Repair Variances
You can automatically repair all variances in the list or select specific variances to repair. Refresh the list to identify any remaining variances. Some variances require manual intervention to fix them and these are noted in the report details for each item. Repeat the process until no other issues are outstanding.
If variances still remain after this process, refer to the support options available in the Support node. If any variances remain, check that a valid SQL database configuration account is connected to the database. You can check the account is available and correctly setup in the Accounts node. Ensure the account is assigned the appropriate product service role:
Management Center – ManagementServerAdministrator Performance Manager – PerformanceManagerAdministrator Personalization Server – ProfileServerAdministrator
The Background Intelligent Transfer Service (BITS) Server Extensions must be manually installed on the Management Server. If this service is not already installed, you are notified int he variances report. Install the BITS Server Extensions and restart the Server Configuration Utility to complete the server configuration setup.
MANAGEMENT SUITE ARCHITECTURE AND INSTALLATION GUIDE 4 SERVER CONFIGURATION Server Configuration Utility 27
Recovery Mode
The default database recovery mode is Simple Mode and can be modified in the Database node.
This recovery mode allows the database to be restored to the point of the last backup. Allow the database to be restored to any point in time by setting the recovery mode to Full. If you use this mode, ensure that the database is backed up regularly to avoid excessive transaction log growth.
If the Microsoft SQL Server recovery mode is different to the default AppSense setting, the Configuration utility detects variances which you can repair using the Variances dialog box. Default Web Site
You can view details of the default website including HTTP/HTTPS port numbers. If necessary, change the default website to a different website which you have set up in IIS. If any exist, you can view and repair variances in the Variances Report.
The product root provides settings for access to the Server. Directory Access can be Windows or Anonymous and provides access for the console user to IIS. Alternatively, you can restrict web directory access to domain users only by changing to Windows authentication.
The database account manages which database account is used by the web service and Windows services to connect to the database. You can change the database to an SQL or Impersonated Windows database account. The database account must exist in the list in Database > Accounts. Only accounts with the appropriate [Product]ServerService role assigned to the account can be used for this purpose.
Management Center Only
The root web directory also contains the web services used to store and retrieve data and hosts the web page for downloading components such as the Management Console, Client Communications Agent (CCA) and product configurations.
The Deployment directory provides hosting for the Server web services used by the CCA to access the database.
Services
Performance Manager
The AppSense Management Suite <product name 2> collates statistics sent from the Local Statistics service on managed computers.
The database account is used by the Windows service code to connect to the database. You can change the database to an SQL or Impersonated Windows database account. The database account must exist in the list in Database > Accounts. Only accounts with the correct PerformanceManagerService role assigned can be used for this purpose.
MANAGEMENT SUITE ARCHITECTURE AND INSTALLATION GUIDE 4 SERVER CONFIGURATION Setup to Configure AppSense Servers using Low SQL Privileges 28
Management Center
The Alerts Service creates alerts based on events and dispatches them to the Management Server. The Events Dispatcher monitors for new events and adds the events to the Management Server database.
The database service account is used by the Windows service code to connect to the database. You can change the database to an SQL or Impersonated Windows database account. The database account must exist in the list in Database > Accounts. Only accounts with the correct ManagementServerService role assigned can be used for this purpose.
Support
This section provides links to information and support for your product installation including, an email link to AppSense support, and links to the AppSense website and the myAppSense support portal.
You can also generate a support report from this location, on request by the AppSense Support team, to help diagnose any issues you may encounter with your installation.
Setup to Configure AppSense Servers using Low SQL Privileges
A user with low SQL privileges configuring the AppSense Management Server and the Performance Manager Central Statistics Server must be supplied with databases names and configuration and service account details from a user with high SQL privileges.
The following procedures show the steps for setting up databases by a high privileged SQL user and installation and configuration of AppSense Servers by a low privileged SQL user:
Create Database on page 28
Install and Configure AppSense Servers on page 29
Create Database
This procedure shows the setup of the server database and configuration and service accounts and must be completed by a high privileged SQL user. This step is repeated for each server and the details must be supplied to the low privileged user installing and configuring the servers. 1. Create a new empty database using SQL Management Studio.
2. On the primary data file, set the auto growth to 20% unrestricted growth, and use a default size of at least 50MB.
3. Create two logins to the SQL Server, one for a configuration account (such as AmcConfig, EmConfig, PmConfig) and another as a service account (such as AmcService, EmService, PmService).
4. Add the configuration account to the database and grant it the role db_owner. 5. Add the service account to the database.
The following procedures do not apply to users setting up the AppSense Personalization Server because users setting up the Personalization Server must have high SQL privileges to perform and complete the server installation and configuration process.
MANAGEMENT SUITE ARCHITECTURE AND INSTALLATION GUIDE 4 SERVER CONFIGURATION Setup to Configure AppSense Servers using Low SQL Privileges 29
6. Make note of the SQL instance name, the database name and the service and configuration account names and passwords.
7. Supply the details of the new SQL instances, databases and configuration and service accounts to the user setting up the AppSense Management Server and the AppSense Central Statistics Server.
Install and Configure AppSense Servers
This procedure follows the setup of databases completed by a high privileged SQL user in Create Database on page 28.
The following steps show the main sequence for a low privileged SQL user to install and configure the AppSense Management Server and the AppSense Central Statistics Server. These steps can be completed using the database instances and names and configuration and service account details supplied by a high privileged SQL user.
1. Run the Server Configuration utility and on the top level node click Run Wizard. 2. Use the database and user account name supplied by the high privileged SQL user as the
configurer and the Service as the service account. 3. After the wizard completes, click the Database node.
4. Click Connect and select the configuration account name supplied by the SQL Administrator.
5. Repeat these steps for each Server.
The Server Configuration Utility can display a variance that the service accounts 'LoginEnabled' and 'EnforcePasswordPolicy' settings are not as expected. This is caused because the configuration account does not have sufficient privileges to query these properties of the accounts. These variances can safely be ignored.
MANAGEMENT SUITE ARCHITECTURE AND INSTALLATION GUIDE 4 SERVER CONFIGURATION Database Maintenance 30
Database Maintenance
It is strongly recommended that you regularly backup and maintain the databases for your AppSense Servers, as they can handle large amounts of data and quickly grow to very large sizes depending on how you set them up.
You can manage the quantities of data which are accumulated using basic functionality in each of the products as a complement to the usual maintenance practices in your organization. AppSense database management features include the following:
Management Center provides the Delete Events dialog box for deleting large amounts of events which can accumulate during the normal running of the Management Center. Environment Manager provides options for archiving and deleting the user cache data. Performance Manager provides a range of statistics collection frequencies on the Central
Statistics Server.
The default database recovery mode is Simple Mode and can be modified in the Server Configuration utility Database node. This recovery mode allows the database to be restored to the point of the last backup.
Allow the database to be restored to any point in time by setting the recovery mode to Full. If you use this mode, ensure that the database is backed up regularly to avoid excessive transaction log growth.
31
5
U p g r a d i n g E n v i r o n m e n t M a n a g e r
This section provides specific details about Environment Manager upgrades and includes the following:
Recommended Upgrade Order on page 31 When to Upgrade on page 31
What to Upgrade on page 32 How to Upgrade on page 33
Recommended Upgrade Order
When to Upgrade
AppSense software is available for upgrade as major, point and patch releases:
Order Components Details
1 All Personalization Servers Must match version with console. No backwards compatibility.
Compatible with earlier versions of the Environment Manager agent, with limitations on functionality support.
2 All Consoles Must match version with servers. No backwards compatibility. 3 All Agents Compatible with all versions of the Personalization Server although
there may be some limitations on functionality support between older agents and newer servers.
Release Type Sample Version Upgrade Type
Major 6, 7, 8, ... Full suite upgrade including features and quality enhancements.
Minor 8.0, 8.1, 8.2 ... Minor version increments.
Multiple component upgrades including features and quality enhancements. Patch 8.0.123.0, 8.0.124.0, ... Sequential version increments.
APPSENSE PRODUCT MANAGER USER GUIDE 5 UPGRADING ENVIRONMENT MANAGER What to Upgrade 32
What to Upgrade
Server on page 32 Database on page 32 Agent on page 33
Server
Server upgrades can be performed in a phased process or all at the same time. Where an upgrade includes a database schema change, all other personalization servers are locked out of the database until they are also upgraded. The database schema is typically changed in a major release or minor release.
Load Balanced Servers
When Personalization Servers are load balanced and operate as individual entities using a common IP address, it is recommended that all Personalization Servers are taken offline before upgrading. When the upgrade is complete, servers can be brought back online and added back to the network load balanced configuration. Otherwise, problems with communication to the Agents can occur, although data in the Database still remains integral and unharmed.
The Server and database versions must match. When upgrading Personalization Servers, the first Personalization Server to be upgraded also upgrades the Database. Any schema change requires an update to both the Server and database. When upgrading a server and the
database, all other Personalization Servers are locked out. However, agents continue to work as normal but it is recommended to upgrade these to benefit from non-database fixes.
Testing Server Upgrades
On completion of the Personalization Server upgrade, test to ensure the server is functioning by visiting the Personalization Server web site at http://localhost/PersonalizationServer/status.aspx. Replace localhost with the server name if you are running the test from a remote location to the Personalization Server.
Following an initial delay at server start up (approximately 30 seconds), a page displays to confirm a successful connection. When connection is complete, the Personalization Server can accept requests from managed endpoint devices.
Database
It is recommended to upgrade the Database where possible. Upgrading the database requires database administrator access rights. If the database is not upgraded following a schema change, the database still works but the SCU reports a variance.
Database scripts can be exported from the SCU and sent to the database administrator to run externally. This does not currently include archiving scripts.
APPSENSE PRODUCT MANAGER USER GUIDE 5 UPGRADING ENVIRONMENT MANAGER How to Upgrade 33
Agent
All Agent and Personalization Server versions within a minor release are compatible and can be mixed and matched.
Improved data transmission and data storage between agents and servers was introduced in Environment Manager version 8.0.725.0. Although compatibility is maintained between different versions of agents and servers within a minor release, it is recommended to upgrade all agents and servers to this version or later to take full advantage of the improvements.
How to Upgrade
Preparation on page 33 Running the SCU on page 33
Preparation
It is recommended that you disconnect all users from the Personalization Servers during the server upgrade process.
Upgrade Personalization Servers individually or all at once. Take servers offline, upgrade and bring back online again.
Run the Whole suite installer to upgrade components on major and minor releases. Run individual MSIs to upgrade specific components on patch releases.
Running the SCU
Depending on which installer is launched, the Personalization Server MSI or AppSense Management Suite Installer MSI prompts to launch the Server configuration Utility (SCU) after the upgrade.
The SCU must be provided credentials with database administrator privileges to upgrade the Database. Server and database versions must match for major and minor releases, but not for patch releases. During an upgrade, the SCU notifies the user that the schema is out of date and requires upgrading.
34
6
U p g r a d e N o t e s f o r R e p l i c a t e d
P e r s o n a l i z a t i o n D a t a b a s e s
This section provides details about the steps for disabling replication on Microsoft SQL databases for AppSense Personalization Servers prior to upgrading the Servers, and includes: Before You Begin on page 35
Upgrade SQL 2005 and SQL 2008 Databases on page 35 Upgrade SQL 2000 Database on page 36
Reset Database – DropRowGuids.sql on page 38
MANAGEMENT SUITE ARCHITECTURE AND INSTALLATION GUIDE 6 UPGRADE NOTES FOR REPLICATED PERSONALIZATION DATABASES Before You Begin 35
Before You Begin
Before upgrading replicated AppSense Personalization Servers, you must disable replication on all the Microsoft SQL databases. The database upgrade process on SQL Server 2008 and SQL 2005 instances is different to the process on SQL Server 2000 instances. On SQL Server 2000 you must run the supplied SQL script, DropRowGuids.sql, to reset the database.
Upgrade SQL 2005 and SQL 2008 Databases
The steps in the following procedure demonstrate disabling replication on a Microsoft SQL Server 2005 database and are identical on Microsoft SQL Server 2008.
1. Ensure all data is replicated before proceeding with the database upgrade.
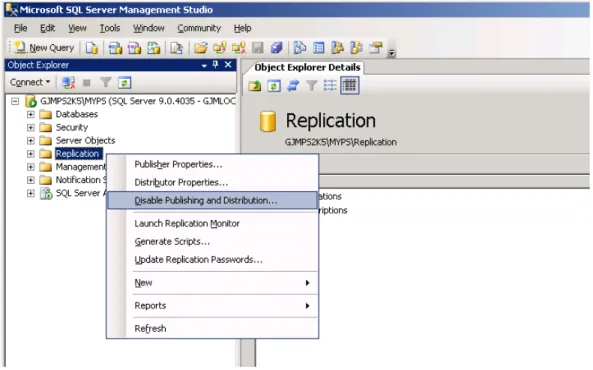
2. On the master (publisher) server, disable replication on the master and all subscribers (Slaves) using Microsoft SQL Server Management Studio.
Highlight Replication and click Disable Publishing and Distribution.
Figure 6.1 SQL 2005: Disable Publishing and Distribution
If the steps in the following procedures are not followed, the replicated Personalization Server upgrade fails.
You can do this in the Environment Manager Console if Synchronize Site Databases is already enabled following the initial installation of replication, by clicking this option in
MANAGEMENT SUITE ARCHITECTURE AND INSTALLATION GUIDE 6 UPGRADE NOTES FOR REPLICATED PERSONALIZATION DATABASES Upgrade SQL 2000 Database 36
3. The Disable Publishing and Distribution wizard prompts you to disable publishing on the server which includes dropping publications and subscriptions, and disabling the server as a distributor.
4. On completion, the databases are ready for upgrading the connected Personalization Servers.
When the upgrade is complete, reinstall replication according to the steps in the AppSense Environment Manager Administration Guide for setting up replication.
Upgrade SQL 2000 Database
1. Ensure all data is replicated before proceeding with the database upgrade.
2. Disable replication on the master (Publisher) by running Microsoft SQL Server Enterprise Manager and deleting from the server all subscriptions in turn, which are in Config and Data under Replication > Publications.
Figure 6.2 SQL 2000: Delete Subscriptions
You can do this in the Environment Manager Console by clicking Synchronize Site Databases in Tools > Replication if this option is already enabled following the initial installation of replication.
Make sure you delete the registration of server (local) in Enterprise Manager and reregister the server with an explicit name.