Context
Copyright © 1987 by Conver~ent Technologies, Inc., San Jose, CA. Pnnted in USA.
Second Edition (May 1987) 09-01050-01
All rights reserved. No rart of this document may be reproduced, trans-mitted, stored in a retrieva system, or translated into any language without the prior written consent of Convergent Technologies, Inc.
Convergent Technologies makes no representations or warranties with respect to the contents hereof and specifically disclaims any implied warranties of merchantability or fitness for any particular purpose. Further, Convergent Technologies reserves the right to revise this pubhcation and to make changes from time to time in its content without being obligated to notify any person of such revision or changes.
Convergent Technologies and NGEN are registered trademarks of Convergent Technologies, Inc.
Art Designer, Chart Designer, ClusterCard, ClusterNet, ClusterShare, Context Manager/VM, Convergent, CT-DBMS, CT-MAIL, CT-Net, CTIX,
CTOS, CTOS/VM, DISTRIX, Document Designer, The Operator, AWS, CWS, IWS, S150, S/120, SI160, S1220, S/320, S/640, SI1280, Multibus,
TeleCluster, Voice/Data Services, Voice Processor, WGS/Calendar, WGS/Desktop Manager, WGS/Mail, and X-Bus are trademarks of
· Contents
1
Before You Begin
What Is Context Manager/VM?... 1-1 Ways to Use Context Manager/VM ... 1-2 Business Tasks. . . 1-2 Programming... 1-2 Communications. . . 1-2 CM Features. . . 1-3 CM and Window Services ... 1-3 How CM Works. . . 1-4 Terms Used in this Manual.. . . .. . . .. 1-4 Manual Organization . . . 1-5 Related Documentation. . . 1-6
2 Experimenting with Context Manager/VM
Using the Mouse. . . .. . . .. .. . . .. .. .. . . .. 2-1 The Context Manager Screen. . . 2-2 The Action Key ... 2-5 Summary of Status Terms Displayed. . . 2-6 An Exercise with CM ... 2-6 Starting CM ... 2-7 Moving the Highlight Bar. . . 2-7 Starting an Application. . . 2-8 Overlaying the CM Screen on an Application
Screen; Returning to the Current Context. . . 2-8 Starting a Second Application . . . 2-9 Switching Contexts Without Using the eM
Screen . . . 2-10
Starting More Contexts. . . 2-11 Finishing from Within a Context. . . 2-11 Eliminating a Context Without Saving. . . 2-12 Ending Your Session with CM (Logging out) . . . . 2-12
3
Basic Concepts
Starting an Application. . . 3-1 Assigning Function Keys. . . 3-2 Function Key Menu. . . 3-2 Function Keys ... 3-2 Preassigned Function Keys ... 3-3 Assigned Function Keys. . . 3-3 Starting Applications that Require Parameters ... 3-4 Contexts You Can Return To ... 3-5 Cycling Through Contexts ... 3-5 Halting a Context. . . 3-6 The Bullet. . . 3-6 Status Terms. . . 3-6 Swapping a Context to Disk. . . 3-7 How Swapping Works. . . 3-7 Contexts that Are Not Swapped. .. . . .. . . 3-8 Time Savings: Swapping Versus Starting ... 3-9 Using the Context Manager to Cut and Paste. . .. . . 3-9 The Cut and Paste procedure ... 3-11 Getting Out. . . 3-13 Finishing a Context . . . 3-13 Eliminating a Context Without Saving . . . 3-13 Ending a Session (Logging out). . .. . . 3-14 CM Version... 3-14 CM Configuration File Name. . . .. . 3-15 Mail Reporting . . . 3-15
4
Using Windows and the Mouse
What Is a Window? . . . 4-2 U sing Windows? ... ~ . . . 4-2 Example ... ,... 4-3 Starting Windows . . . 4-3 The Windows Menu ... 4-3
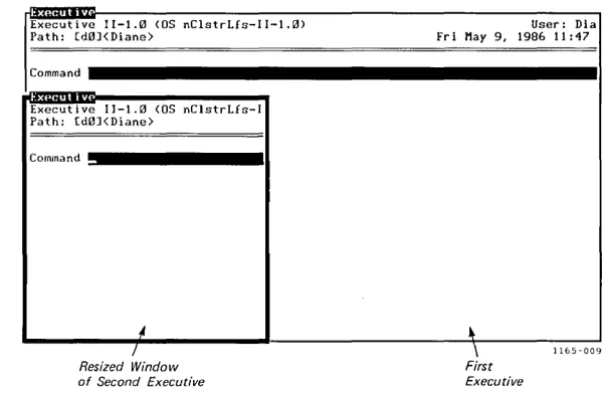
Looking at Windows ... 4-7 Making a Window Current. . . 4-7 Sizing and Moving Windows. . . 4-8
U sing the Mouse with Windows. . . 4-9
What Is a Mouse? ... : . . . 4-9
Using the Mouse ... 4-10
Moving the Mouse . . . 4-11
Using the Mouse Buttons. . . 4-13
Exercises . . . 4-17
Managing Windows Using the Mouse... 4-17
Opening Windows. . . 4-17
Sizing Windows . . . 4-18
Moving Windows. . . 4-20
Activating Commands on the Windows Menu. . . . 4-22
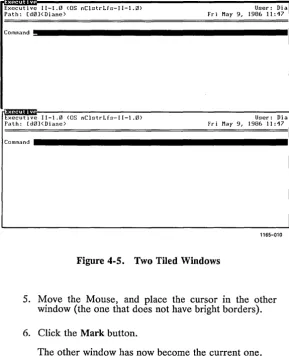
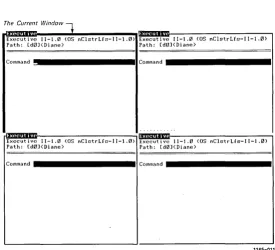
U sing the Tile Command . . . 4-22
U sing the Icon Command ... 4-25
U sing the Full Command and the Restore
Command. . . 4-28
U sing Windows with the Keyboard ... 4-30
Exercises. . . 4-31
Managing Windows Using the Keyboard. . . 4-31
Opening Windows-Activating the Windows
Menu... 4-32
Sizing a Window ... . . . 4-32
Moving Windows. . . 4-35
Using the Tile Command... 4-35
Using the Icon Command... 4-38
U sing the Full Command and the Restore
Command. . . 4-41
5
Setting Up Context ManagerlVM
Overview. . . 5-1
The Swap File ... 5-2
Creating the Swap File. . . 5-2
CM and Installed System Services ... 5-3
Installation and Deinstallation . . . ... . . 5-3
CM Version Number... 5-4 Editing the User Configuration File. . . 5-4 Configuring the Mouse . . . 5-5
A Note About the Number of Contexts... 5-6
Using the CM Configuration File Editor. . . 5-6 Entering from the Executive ... 5-7 Experimenting with the CM Editor. . . 5-8 Screen Areas and Functions. . . 5-8 Message Line ... '. . . . 5-8 Input/Error Line. . . 5-11 Command Editing Area... 5-11 Function Key Menu... ... 5-19 Command List Area... 5-21 Exiting the CM Editor . . . 5-22 Examples. . . 5-22 A Complete New Entry... ... 5-22 Editing a Command... ... 5-25 Removing a Command. . . 5-25 Renaming a Command. . . 5-26 A Common Error: Inconsistent Entries . . . 5-26 Changing a Configuration with Executive
Commands. . . 5-26 CM Add Application ... 5-27 CM Remove Application . . . 5-28 Applications You Can Start from CM ... 5-28 Defining an Executive Submit Command in CM . . . . 5-29 Create a New Command... ... 5-30 Create a Submit File . . . 5-30 Test Your Submit Command... 5-31 Define the Command in the CM Editor. . . 5-31 Finish up . . . 5-31 Invoking the Submit File From CM. . . 5-31 Text of the Configuration File ... 5-32 Allowing for More Contexts. . . 5-33 Example ... 5-34
6
Notes for the Programmer
CM and Its Relationship to the Operating System . . 6-1 What Runs under CM? . . . 6-1 Programs that Write Directly to the Screen Map . 6-2 "Busy Wait" Loops ... '. . . 6-4 Low-Memory Interrupt Vector Table. . . ... 6-4 Positioning the Cursor ... 6-5
Applications Suspended in Background. . . 6-5 Programs That Run Under Windows... 6-6 Exit Run File . . . 6-8 Applications that Cannot Be Swapped. . . 6-8 Communication with CM ... 6-9 Communication Between Applications . . . 6-9 Intercontext Message Server ... . . . 6-9 Procedural Interfaces. . . 6-10 CM as a Server.. . . .. . . . ... . . 6-11 Parent/Child Relationship of Contexts. . . .. . . 6-11 Context Handle ... 6-12 Starting and Switching Contexts ... 6-13 Check for Installation . . . 6-14 CM Screen. . . 6-14 Procedural Interfaces ... 6-15 Placing Information in the CM Configuration File . . 6-16 Invoking Programs that Use Run-Time Libraries. . . 6-16 Using CrashDump.sys as Your Swap File. .. . . 6-17 Estimating Memory Requirements. . . 6-17 Determining the Size of a Partition. . . 6-19 A Variable Sized Partition. . . 6-19 A Fixed Sized Partition. . . 6-20 Note for the System Service Writer. . . 6-21
7
Operations
CMCurrentVersion ... 7-2 CMQueryConfigFile ... 7-4 CMQueryContextHandle ... 7-6 CMQueryErc ... 7-7 CMQueryParent . . . 7-8 CMSetParent. . . 7-10 CMStartAppl ... 7-12 CMStartApplByBlock . . . 7-17 CMStartApplByName . . . 7-20 CMSwitchContext ... 7-23 CMSwitchToExistingContext . . . 7-24 CMTerminateContext ... ~ . . . 7-26 CMTranslateChToPh ... : . 7-28 CMTranslatePhToCh. . . 7-30 ICMSCheck ... 7-32
ICMSCurrentVersion ... 7-34 ICMSFlush ... 7-35 ICMSSend... ... 7-36 ICMSWait... 7-38 NotifyCM ... 7-40
8
Troubleshooting
Status Codes . . . 8-1 Context Manager/VM . . . 8-1 Intercontext Message Server . . . 8-4 Status Messages ... 8-5
Glossary. . . . G-1
Index. .. . ... . ... .. ... ... . .. ... . ... . .. 1-1
List of Figures
Figure 2-1. 2-2. 3-1. 3-2. 4-1. 4-2. 4-3. 4-4. 4-5. 4-6.
The Mouse and the Mark Button ... . Context Manager Screen ... .
The Cut Menu ... . Cutting Text ... .
Three Overlapping Windows ... . The Windows Menu ... . The Mouse Buttons: Mark, Menu, and Bound ... . A Resized Window ... . Two Tiled Windows ... . Four Tiled Windows ... .
viii Context ManagerlVM
Figure 4-7. 4-8. 4-9. 4-10. 4-11. 5-1. 5-2.
A Current Window and an Icon ... . A Resized Window ... . Two Tiled Windows ... . Four Tiled Windows ... . A Current Window and an Icon ... .
CM Editor Screen ... . Example of a Configuration File ... .
List of Tables
Table 4-1. 4-2. 4-3. 4-4. 4-5. 5-1.
Menu Commands ... . Mouse Buttons ... . Summary: Windows and the Mouse ... . Making Hidden Window Contents Visible .... . Summary: Windows and the Keyboard ... .
CM Editor Function Key Menu ... .
Page 4-27 4-34 4-36 4-37 4-40 5-9 5-32 Page 4-5 4-14 4-15 4-21 4-30 5-10
1
Before You, Begin
What Is Context ManagerlVM?
Context Manager/VM is a software product that works with the operating system to allow you to run several applications on your workstation at once.
Without Context Manager/VM (from now on called CM), you worked with one application at a time. Whenever you wanted to start a new application, you had to first finish the application in which you were working.
With CM, when one application is on the screen, you can instantaneously switch to another with a single keystroke. Then you can return to the first one and continue working at exactly the point where you were before.
Ways to Use Context ManagerlVM
BUSINESS TASKS
You may be in a situation where you need to read an electronic mail message from your company's finance department, finish up the spreadsheets you are working on in Extended Multiplan, copy them to a floppy disk using the Executive, write a cover memo in the Document Designer, and send the spreadsheets out to the address supplied in the finance department memo.
With CM, you can do more than one of these tasks at once: Having finished the spreadsheets, you can start the Copy command in the Executive, and then switch to the Document Designer to write your memo while Copy is still running.
PROGRAMMING
You can write code in the current context while another program compiles in a background context. You can check the status of the background context at any time by pressing Action-Go to look at the CM screen.
If you need to see display output from a context that is running in background, many applications allow you to pause the output until you choose to examine it in foreground.
COMMUNICATIONS
You may be logged onto an information data base using Asyn-chronous Terminal Emulator (ATE), or to a mainframe using SNA 3270. You bring up the CM screen and notice that elec-tronic mail has arrived.
You can switch contexts, read your mail, and then return to ATE or SNA without ever having to terminate your communications session.
eM
Features
CM has a single screen of its own, called the CM screen, to which you can return at any time. On the right, this screen lists the applications that you can start. On the left, it shows applications you have started and the status of each one. (See Figure 2-2.)
You can select an application from the CM screen by using either your keyboard or a hand-held pointing device called a Mouse. (The Mouse is an optional feature.) If you have a Mouse, you select an application by clicking one of the Mouse buttons. (See "Using the Mouse" in Chapter 4.)
CM is not limited to a fixed set of applications. You can con-figure your system to run whatever applications are important to you.
Applications may be CTOS-based, or they may run under operating systems hosted by CTOS (for example, MS-DOS).
Because the CM environment is flexible, you can add your own application to it with little or no special programming.
CM AND WINDOW SERVICES
Window Services (from now on called Windows) is a system service that interacts with CM to allow you to manipulate your contexts with windows. (A window is the rectangular portion of your screen within which an application is displayed.)
If you have Windows, you can arrange your applications on the screen so that you can see multiple applications at once. You work with one application while the others remain in view on the screen; you can switch to another by using either the Mouse or keyboard. You can use the Mouse or keyboard to easily change the size of these applications' windows and/or move them to different locations on the screen.
For more information on Windows, see Chapter 4, "Using Windows and the Mouse."
CM, with or without Windows, allows you to run mUltiple copies of the same application. For example, when you are pro-gramming, you can run several copies of the Executive. With Windows, you can view all these copies at the same time.
How CMWorks
Once an application has been started, it is called a context . You
interact with one context at a time. This context is called the
current context. The current context is the only context that responds to the use of the Mouse and keyboard. When you switch contexts, you make the next context the current context.
You may need to start one more application than will fit in workstation memory. When this occurs, one or more applications can be swapped to a hard disk (stored temporarily in a suspended state in a Disk Swap file). If you have an 80286 Processor, applications can be swapped into extended memory. (See the
CTOSIVM Concepts Manual and the CTOS/VM Release Notice
for more information on swapping to extended memory.)
CM can handle as many as 10 contexts at once; the operating system switches them back and forth from workstation memory to disk, as necessary.
Terms Used in this Manual
Some common words and phrases have specific meanings as they are used in this manual. They are italicized in the text when they are defined. These terms (except where noted) are also used with Windows.
To start an application, choose it from the list on the CM screen
and press Go. Once an application is started, it is called a context
and is said to be active. You see and interact with one context on
the screen. It is called the current context and is said to own the
screen. With Windows, although you may see more than one
context, you still interact with only one of them. This context is called the current window and is also said to own the screen.
The context that owns the screen (the current context) is running in foreground. Any other active context is running in background
unless it is swapped. An active context is swapped if it has been
stored temporarily on a hard disk. While a context is swapped, it
is not running, but is suspended.
When you hold down one key and press another, such as Action and Go or Action and a function key (fn) , the combination is symbolized as Action-Go or Action-fn. When you press certain keys to cause one context to be replaced by another on the screen, you are switching contexts. In this way, you can choose to work
in anyone of the active contexts by making it the current context.
Manual Organization
Before you read this manual, you should be familiar with material in the Operator's Guide (including keyboard layout) and in the
manuals for the various applications you plan to run under CM. This manual assumes you have this knowledge.
For memory and operating system requirements and for instruc-tions for placing CM software on your system, see the Context Manager/VM Release Notice.
The rest of this manual consists of the following chapters; each has a different purpose.
Chapter 2, "Experimenting with Context Manager/VM," takes you through a series of exercises designed to show you how eM works.
Chapter 3, "Basic Concepts," gives more specific information about CM.
Chapter 4, "Using Windows and the Mouse," describes the operation of Windows with the Mouse and keyboard. Step-by-step exercises are provided. If you are using Windows and a Mouse for the first time, you need to read this chapter, along with Chapter 2.
Chapter 5, "Setting up Context Manager/VM," tells how to prepare for and configure CM. If you are setting up your own system, read Chapters 3 and 5.
Chapter 6, "Notes for the Programmer," contains information for the programmer writing applications to run under CM. If you are writing such programs, you must read this. You may also find it helpful to read Chapters 3 and 5.
Chapter 7, "Operations," describes procedural interfaces for the CM and ICMS operations.
Chapter 8, "Troubleshooting," describes common errors, along with suggestions for correcting them. Status codes for CM and ICMS are also reported.
Related Documentation
The documents described below provide additional information related to the contents of this manual.
For a complete list of Convergent Technologies publications, see the "Guide to Technical Documentation" in the Executive Manual
or a similar command-line interpreter manual for your operating system.
Introductory
Executive Manual Operator's' Guide Status Codes Manual
Operating System
CTOS/VM Concepts Manual CTOS/VM Reference Manual
Program Development Tools Editor
Linker/Librarian Manual
Office Automation
Document Designer Reference Manual Word Processing Reference Manual
Related System Services Mouse Services Manual Window Services Manual
Release Notices
Release Notice for Context Manager/VM Release Notice for CTOS/VM
The following paragraphs outline the contents of these manuals.
The Executive Manual describes the interactive command
interpreter, the program that first interacts with the user when the system is turned on. It describes available commands and discusses command execution, file management, program invoca-tion, and system management. It also addresses status inquiry and volume management.
The Operator's Guide addresses the needs of the average user for
operating instructions. It describes the workstation switches and controls, keyboard function, and floppy disk handling.
The Status Codes Manual contains a complete listing of all status
codes that can be generated by a CTOS workstation or a Shared Resource Processor (SRP). It includes bootstrap ROM error codes and CTOS initialization codes. The codes are listed in numerical order with messages and explanations. The manual also describes and interprets crash status codes.
The CTOSIVM Concepts Manual and the CTOSIVM Reference
Manual describe the operating system. They specify services for
managing processes, messages, memory, exchanges, tasks, video, disk, keyboard, printer, timer, communications, and files. In particular, they specify the standard file access methods: SAM, the sequential access method; RSAM, the record sequential ac-cess method; and DAM, the direct acac-cess method.
The Editor Manual describes the text editor.
The Linker/Librarian Manual describes the Linker, which links
separately compiled object files, and the Librarian, which builds and manages libraries of object modules.
The Document Designer Reference Manual is a reference tool for
users of the Document Designer. The manual discusses the capabilities of the Document Designer and describes in detail each of its commands. Information is included on integrating application systems with the Document Designer, generating automatic tables of contents, including voice annotations in documents, list processing, text manipulation, and system configuration.
The Word Processing Reference Manual is a reference tool for
users already familiar with the Word Processor. The manual discusses efficient use of the various facilities of the Word Processor and describes in detail each Word Processing com-mand. Information is included on list processing, programmer-specific operations, and printer and print wheel configurations.
The Mouse Services Manual describes the Mouse Server and object
module library for applications programmers. It also includes a short description of end-user commands.
The Window Services Manual describes the procedures that are
necessary to manipulate windows.
2
Experimenting with Context ManagerlVM
This chapter provides a general introduction to CM by taking you through a series of steps that show you how CM works. To learn more about CM, see Chapter 3, "Basic Concepts."
You can select applications from the CM screen by using either your Mouse or keyboard.
Using the Mouse
If you have a Mouse, you can choose an application by high-lighting the selected area with the Mouse cursor.
The Mouse has three buttons. To start an application from the CM screen, click (press and release) the Mark Mouse button. (See Figure 2-1.) The other two buttons, along with the Mark button, are used to manipulate windows, as explained in Chapter 4. (For detailed information on handling the Mouse, see "Moving the Mouse" in Chapter 4.)
(The Mouse is set up for right-handed people, but it can be changed for left-handed use. See "Configuring the Mouse" in Chapter 5, or contact your system administrator.)
Mark Button
[image:22.397.79.295.129.303.2]1165-001
Figure 2-1. The Mouse and the Mark Button
The Context Manager Screen
Figure 2-2 shows an example of the CM screen. The boxed summary"on the next page tells you how to use the screen.
~
"t:; ~
;::!.
3
~
;:::
... 5· OQ
~
§:
~
~
~
;:::
~
=::!...
~
N I
w
Bullet
-Status Contexts you can return to
I Applications you can start
I
S\.1apped
• rg°{£,f@,Wpllm1im
BasicWaiting Document Designer
Executive
Extended Multiplan Floppy Copy Mail
Press GO to return to this context.
..
Message AreaIli'2BIMm_~ lIImim
... ...
.:w.
-~- - -
-~
Function Key Menu [image:23.612.140.516.112.287.2]SUMMARY: USING CM
When the CM screen is up
The Left and Right Arrow keys move the highlight bar between "Applications you can start" and "Contexts you can return to."
The Up and Down Arrow keys move the highlight bar within the lists under "Applications you can start" and "Contexts you can return to."
If the highlight bar is on the right, under "Applications you can start," pressing Go starts a new application. If the highlight bar is on the left, under "Contexts you can return to," pressing Go returns you to the highlighted context.
If you have a Mouse, moving the Mouse cursor highlights a selected area on the CM screen. If the highlight bar is on the right, clicking the Mark Mouse button starts a new application. If the highlight bar is on the left, clicking the Mark Mouse button returns you to the highlighted context.
Pressing Cancel removes the CM screen and returns you to the current context.
The message area, above the function key menu, tells you what you can do or explains what has gone wrong.
Pressing Code-Help displays the CM Configuration file name.
The Action Key
The Action key is used in combination with other keys to manipulate applications. (The same key combinations are also used if you have Windows. See "Using Windows with the Keyboard" in Chapter 4.)
Action-Go
Action-fn
Action-Next
Pressing Action-Go overlays the CM screen on the current context screen.
Pressing Action and an assigned function key (denoted as fn) switches from one context to another, or from the CM screen to a context.
Pressing Action-Next repeatedly cycles through the active contexts without displaying the CM screen.
Action-Minus (-) Pressing Action-Minus (-) (the minus sign on your numeric keypad, not the hyphen) cycles through the active contexts in the opposite order.
Action-S Pressing Action-S stops all processes of the current context. Pressing Action-S again restarts them.
Action-Finish Pressing Action-Finish eliminates a context without saving the files created.
SUMMARY OF STATUS TERMS DISPLAYED
Status terms are found to the left of "Contexts you can return to" on the CM screen. The meanings of these terms are discussed further under "Status Terms," in Chapter 3. (These terms are also used with Windows.)
Running
Waiting
Done
Swapped
Stopped
Halted
This context is running.
This context (other than the Executive) is waiting for keyboard input.
In the Executive, the last command you invoked has been completed; the Executive is waiting for input.
This context has been swapped to disk. It is suspended.
This context is in background, but is not running because it is allowed to run only in foreground.
This context has been halted by the use of Action-S.
An Exercise with
eM
CM is designed to be self-explanatory, so you can learn your way around CM quickly by experimenting.
Do not worry about making mistakes. If you try to do something that is not allowed, a screen message tells you so, but no damage results.
NOTE: If you have Windows installed, first complete the CM
exercises below, and read Chapter 3. Then refer to Chapter 4, "Using Windows and the Mouse. "
Refer to the CM screen in Figure 2-2 and to the boxed summary in the previous section as you do the exercises below.
STARTINGCM
1. Sign on to your workstation (by completing the SignOn form), and press Go. Your system administrator can help you if you do not know your user name or password. (The SignOn form is explained in detail in the Executive Manual.)
In most cases, the first display after you sign on is the CM screen.
If you have a Mouse, notice the Mouse cursor that is now visible on your screen. (Depending on the capabilities of your system, you may notice a small block or arrow.)
2. If the first display after you sign on is the command line of the Executive, type Install Context Manager (or an abbreviation such as I C M ). and press Go to display the CM screen. (See the Executive Manual
for allowed abbreviations.)
3. If the first display is that of an application, press Action-Go to display the CM screen.
(See Chapter 3, "Basic Concepts," for more information on starting CM.)
MOVING THE HIGHLIGHT BAR
1. If you have a Mouse, move your Mouse around so that the Mouse cursor highlights contexts listed under "Applications you can start." (If any contexts are listed under "Contexts you can return to," use the Mouse to highlight these contexts, as well.)
2. If you do not have a Mouse, experiment with the Up and Down Arrow keys to see what they do. (The Arrow keys are located on the upper right-hand corner of your keyboard.) If any contexts are listed under "Contexts you can return to," try the Left and Right Arrow keys, as well.
STARTING AN APPLICATION
1. Move the Mouse cursor to highlight an application to start, and click the Mark Mouse button.
2. If you do not have a Mouse, use the Up and Down
Arrow keys. Move the highlight bar to select an application to start, and press Go.
Any application that has been started is called a
context.
If you have Windows, notice that the context may be surrounded by a highlighted border. For more infor-mation on Windows, see Chapter 4, "Using Windows and the Mouse."
OVERLAYING THE CM SCREEN ON AN APPLICATION SCREEN; RETURNING TO THE CURRENT CONTEXT
1. Press Action-Go.
The CM screen is overlaid on the screen of the application you just started (the current context).
Notice the function key menu at the bottom of your CM screen (see Figure 2-2). The function key menu represents the 10 function keys, Fl through FlO, across the top of your keyboard. An area on the function key menu is now highlighted to reflect the application you selected in the previous step, and an abbreviation for that application appears in the menu. (For detailed information on function keys, see Chapter 3, "Basic Concepts.")
Notice the positions of the highlight bar and the bullet under "Contexts you can return to." (The bullet shows which context is current.)
2. If you have a Mouse, move the Mouse cursor be-tween '''Contexts you can return to" and "Applications you can start."
If you do not have a Mouse, use the Left and Right Arrow keys.
Notice the screen messages as you perform these actions.
3. If you have a Mouse, move the Mouse cursor to the area behind the CM screen where a portion of the current context is displayed. Click the Mark Mouse button to return to the current context.
4. If you do not have a Mouse, when in the CM screen, press Cancel to return to the current context.
STARTING A SECOND APPLICATION
1. Press Action-Go again to see the CM screen.
2. Move the hi~hli~ht bar with the Mouse or Arrow keys to the "ApplIcatIons you can start" area.
3. Choose another application, and either click the Mouse Mark button or press Go.
Depending on the kind of system you have, there may be a small delay, and the message area may tell you at this point that a context is being swapped. This message is normal. (The concept of swappin~ is explained under "Swapping a Context to Disk in Chapter 3.)
NOTE: If you have Windows, when starting several applications, you may notice at some point that your video is replaced with dots. Do not be alarmed. This is normal and indicates that a context has been swapped.
SWITCHING CONTEXTS WITHOUT USING THE CM SCREEN
1. While holding down the Action key, press the func-tion key assigned to the first applicafunc-tion you started (the first context).
If you cannot recall which key is the assigned function key, perform the following steps:
a. Press Action-Go to return to the CM screen.
b. Refer to the function key menu to see which spaces are highlighted.
c. Press Go to return to the context you just left.
d. Hold down the Action key, and press the
appropriate function key. .
From now on, this key combination is denoted as Action-fn.
2. Press Action-fn for the second context.
3. Press Action-Next. (The Next key is on the right side of your keyboard, in the numeric pad.)
Notice that the next context appears on the screen. (When you have several contexts running, if you continue to use the Action-Next key, you can cycle through all your context
4. Now try Action-Minus (-). (Minus is the key above Next in the numeric pad. The hyphen key does not have the same effect.)
When you have several contexts running, if you continue to use the Action-Minus (-) key, you can cycle through all your contexts in the reverse order.
With Windows, you can also switch contexts without returning to the CM screen by using the same action keys described above. When you press these keys, the window you switch to becomes the current window. (See "Making a Window Current," in Chapter 4.)
STARTING MORE CONTEXTS
1. Press Action-Go, and start several more (perhaps three or four) applications.
With each one, note the messages displayed in the message area and the term indicated under Status. At some point, you may see a message concerning swapping, if you did not see one under "Starting a Second Application," above.
2. Now try Action-Next and Action-Minus (-) again.
NOTE: Some applications cannot be started more
than once. This will be indicated by the message
There is already a user named xxxx
FINISHING FROM WITHIN A CONTEXT
1. Press Action-Go.
2. Move the highlight bar with the Mouse or Arrow ker,s to choose an item under "Contexts you can return to.'
3. Click the Mark Mouse button, or press Go to return to the context you selected in step 2.
With this context on the screen, use whatever method is specified to finish the application involved. (When you finish an application in this way, it is automatically saved.) In most cases, you need to press the Finish key. If you want to firush from the Executive, type Finish Executive (or a unique abbreviation, such as f e) in the command field, and press Go.
ELIMINATING A CONTEXT WITHOUT SAVING
If you choose to eliminate a context without saving, follow the steps below.
1. Press Action-Go to return to the CM screen.
2. Move the highlight bar with the Mouse or Arrow keys to the first context that you started (listed under "Contexts you can return to").
3. Press Action-Finish.
Caution: Action-Finish eliminates a context (that is selected from the CM screen) without saving your work. You should only use it for those contexts where there is nothing to save (for example, an Executive with a Done status).
ENDING YOUR SESSION WITH CM (LOGGING OUT)
When you have either finished your contexts from within or eliminated them without saving, you should no longer have any contexts listed under "Contexts you can return to."
Caution: Ending a session without finishing all contexts first is the same as eliminating each context with Action-Finish.
From the CM screen, perform the following steps:
1. Press Finish
2. Press Go.
Your session with CM has ended, and the SignOn form is now on your screen.
This exercise has shown you most of the ways in which you can manipUlate applications using CM. There is more than one way to do some of the things you have done, as you will see in later chapters.
3
Basic Concepts
Starting an Application
In most cases, CM is installed automatically when you sign on to your system, and the first display is the CM screen. (The term "install," as it is used here, means "to place in memory, ready to use." For details about installation, see Chapter 5, "Setting up Context Manager/VM.")
If the first display after you sign on is the command line of the Executive, type Install Context Manager, or an abbreviation such as I C M, and press Go. (The Executive needs only as many characters as are necessary to uniquely identify the command. If
more than one word appears in the command name, each word can be abbreviated. For details on using these abbreviations in the Executive, see the Executive Manual.)
If the first display after you sign on is that of an application, and if you saw the messages
Installing Context Manager ... done.
Autostarting ...
after you signed on, your CM has been configured to autostart (start automatically) one or more applications as soon as it is loaded. You can display the CM screen by pressing Action-Go.
Assigning Function Keys
Under CM, each context is assigned to a function key. You can use the function keys to switch contexts without having to see the CM screen.
FUNCTION KEY MENU
Across the top of your keyboard are 10 function keys, FI through FlO. These keys are redefined to do different things at different times and within different applications. The highlighted strip at the bottom of the CM screen is the function key menu, a set of temporary labels for these keys.
On your system, these labels may all be blank, or some may show abbreviations of certain application names. These labels can be configured (set up) differently for each user. (If you are setting up your own system, see "Function Key (1. .. 10)" in Chapter 5 for details on configuration.)
If labels already appear on your function key menu, they have been preassigned for frequently used applications. This pre-assignment, which is done during configuration, saves time. Every time you use CM, these labels will appear on the same function keys.
FUNCTION KEYS
When the highlight bar in the CM screen is within the list of "Applications you can start," the message area says
Select application, optionally choose function key, then press GO.
Select an application by using the Mouse cursor or Arrow keys to highlight the item you want under "Applications you can start." When you start the application, an area on the function key menu that represents the application becomes highlighted.
A function key may be assigned to an application in any of three ways:
• The key may have been preassigned by a previous user or system administrator.
• You can choose a key and assign it to a context.
• You can let the system assign a key by default.
Preassigned Function Keys
If your function key menu shows an abbreviation for an application, this indicates that a function key already has been preassigned to the application you have chosen. After this appli-cation has been started, you can use this preassigned function key (in combination with Action) to switch to this context from any other context or from the CM screen.
Assigned Function Keys
If no function key has been preassigned for the application you are starting, you can choose your own blank function key from the function key menu and assign it to this context:
1. While in the CM screen, use your Mouse cursor or Arrow keys to highlight the application you are going to start.
2. Decide on which blank function key you want to assign to this application.
3. Press the function key you have chosen, and then press Go, or highlight the area you have chosen with your Mouse cursor, and click the Mark Mouse button.
An abbreviation for the application now appears on that function key in the function key menu.
You do not have to choose a function key: One can be assigned to your application by default. It will be the first available blank area on the function key menu, starting from the left side of the menu.
1. Select an application from the CM screen.
2. Press Go or click the Mark Mouse button.
The screen of your chosen application has appeared and replaced the CM screen.
You can see which function key has been assigned to you by returning to your eM screen and looking at the function key menu.
If there is a preassigned function key for the application you are starting, you do not have to use it. You can assign another function key to this particular context. This feature is useful when you want to start multiple copies of the same application: two Executives, for example.
NOTE: A function key label created within a session exists only for that session. When you finish a session (log out) and sign on again, only the preassigned labels are present.
Starting Applications that Require Parameters
You may choose to start an application, such as Floppy Copy, to which you want to supply the value of a parameter or parameters. Once you have chosen the application name from the list under "Applications you can start" and pressed Go, the first screen displayed is the appropriate form in the Executive:
Floppy Copy
[Number of Copies] [Overwrite ok?] [Dual floppy?]
[Suppress verification?] [Device name(s)] [Device password(sll
After you fill in this form and press Go, the Floppy Copy command is executed.
Contexts You Can Return To
To return to a context from the CM screen, you can do anyone of four things:
1. Press Action-fn.
2. Use the Mouse or Arrow keys to move the highlight bar to the context you want in the list of "Contexts you can return to," and click the Mark Mouse button or press Go.
3. Select an assigned function key, and then press Go.
When you switch from one context to another, you do not finish the first context. It remains active, but moves from foreground to background.
4. Select an assigned function key with the Mouse cursor, and click the Mark Mouse button.
CYCLING THROUGH CONTEXTS
To quickly move from one active context to another without looking at the CM screen and without having to remember which function key is assigned to which context, press Action-Next. Pressing this key combination has the same effect as displaying the CM screen and then pressing Left Arrow, Down Arrow, and Go.
You can press Action-Next repeatedly to cycle through all the active contexts in this way . You can move through the contexts in the opposite order by pressing Action-Minus (-). (Remember, Minus on the numeric pad is not equivalent to the hyphen key on the top row of your typewriter pad.)
If you have Windows, you can get from one active window to another without looking at the CM screen in one of two ways: You can either click the Mark Mouse button in the selected window, or use the keyboard (as described above). For more information, see "Making a Window Current" in Chapter 4.
HALTING A CONTEXT
If you want to stop the current context at any time (for example, if it is displaying a list or drawing a picture and you want it to stop so you can examine the partially complete display), press Action-S. When you do so, all processes of the current context are stopped. A stopped context is described as "Halted" under "Contexts you can return to" in the CM screen.
To restart the context, press Action-S again.
THE BULLET
Notice the small bullet indicator to the left of one item in the Context list. This bullet shows which context is current. You can return to it simply by pressing Cancel, even if you have moved the highlight bar to another place on the screen. (This is useful if you only want to look at the CM screen to check on the status of another context and then go right back to what you were doing.)
STATUS TERMS
The Status column under "Contexts you can return to" may show anyone of six words: Waiting, Running, Done, Swapped, Halted, or Stopped.
A context that is Waiting is doing literally that: waiting for you to type something at the keyboard.
The status Running appears next to a context in which processing is continuing and where no input from you is needed at the moment.
The Executive, unlike other applications, tells CM what com-mand has been invoked and what the status of that comcom-mand is. If, for example, you give a Files command to the Executive and then press Action-Go to return to the CM screen, you see "Files," and not "Executive," on the list of "Contexts you can return to." When the Files command is complete, its status changes from Running to Done. (Notice that Done does not mean that the Executive itself is finished, only that it has completed the command you asked for.)
The status Done refers only to completed tasks in the Executive.
When a long task in any other application is completed, its status is reported as Waiting.
The status Swapped means that the operating system has swapped
that context to disk (stored it there temporarily). If you are using an 80286 Processor, a context may also be swapped to extended memory. (See the CTOS/VM Concepts Manual or the CTOS/VM Release Notice for more information.)
The status Halted indicates that you have stopped all processes of
this context by pressing Action-S.
The status Stopped means that this application is in background in
a partition, but CM does not allow it to continue processing there. (For example, this arrangement can prevent a program that writes directly to the screen from interfering with CM's normal operation. Such a program can run only in foreground.)
Swapping a Context to Disk
HOW SWAPPING WORKS
At some point, you may start one more application than will fit into memory. When this occurs, the operating system may have to swap out one or more contexts; that is, it may be necessary for the operating system to swap one or more contexts to disk. The message area may say
Swapping contexts ...
There is a short pause, during which the operating system clears a space in memory for your new application. The operating system does this by storing one or more contexts temporarily in a Swap file on a hard disk. The screen of the new application then replaces the CM screen. (For more information on the Swap file, see "The Swap File," in Chapter 5.)
If you need to have these two contexts switch places later, there may not be room in the Swap file to swap out the new one before bringing the old one back in. If this situation in fact occurs when you try to switch these two contexts, the following message appears:
There is not enough room in the swap file to swap the context.
You must then finish one or more contexts to make room in memory for the context you want.
A context that has been swapped to disk is not actually running:
It temporarily suspends its activity until it is called back by CM. But it is still a started application. You can use Action-fn to return immediately to the same place within it where you were working.
CONTEXTS THAT ARE NOT SWAPPED
Two kinds of contexts are not swapped: communications appli-cations, such as Asynchronous Terminal Emulator, or SNA RJE and real-time applications, such as direct printing in the Word Processor. (Real-time applications are applications that must respond to events within strict time constraints. If, for example, the Word Processor were swapped during direct printing, it could lose communication with the printer.) If you ask CM to do something that would require CM to swap out such a context, the following message appears:
A context in memory cannot be swapped out.
This situation can arise if, for example, you start Extended Multiplan, then start a communications application that requires Extended Multiplan to be swapped out, and then try to switch back to Extended MUltiplan. Extended Multiplan must come back into the same physical place in memory where it was started, which would require swapping out the communications appli-cation. CM cannot swap Extended Multiplan in because the communications application cannot be swapped out, and the screen message appears. To get Extended Multiplan back into memory, you must finish the communications application.
In addition, you cannot run two programs that share the same communications port. For example, you cannot run simulta-neously two communications programs that both need to use channel A.
CM can keep track of 10 contexts at a time. On most systems, if 10 contexts exist, some of them will be swapped to disk and suspended. Those in memory partitions will be able to run.
TIME SAVINGS: SWAPPING VERSUS STARTING
Part of the benefit of CM to the user lies in the fact that swapping a context from disk to memory is much faster than starting an application. Starting an application often requires opening several files. These files are kept open when a context is swapped to disk.
Using the Context Manager to Cut and Paste
You can copy text from one context to another using the Context Manager's Cut and Paste feature. Characters you select (cut) are stored in a buffer and can be copied (pasted) anywhere you like, in a different context or even within the same context.
For example, you can copy text from a mail message into a text editor document (for example, a Word Processor or Document Designer document). You can copy a file name from an Executive Files display into a parameter field of an Executive command form. You can also copy from an MS-DOS application running under the Context Manager into a CTOS application.
When characters from a cut are pasted into the new context, that context accepts the characters as keyboard input.
Once you make a cut, it is held in memory until you logout. You can paste it several times if you wish.
Sometimes
eM
cannot copy everything you see on the screen into a context. For example, some lines shown on the screen, the highlight bars used in forms, and the rectangles used to show function key menus cannot be copied into a text editor because they are screen attributes, not characters. The text editors cannot display screen attributes as part of a document. In this case, as much information as possible is transferred ..You also cannot cut and paste to or from the Art Designer because it is graphics-based, not character-based.
Caution: You must account for the capabilities of the application into which you paste before you make the paste. Because the application will accept the pasted characters as keyboard input, you should be sure that the application is in a state where the characters can be accepted as if you typed them.
For example, if you paste into a Multiplan or Extended Multiplan spreadsheet in normal mode, any string of alphabetic characters is interpreted as a string of commands. Your spreadsheet could be destroyed. Use Cut and Paste with Extended Multiplan only when the spreadsheet is in Alpha mode.
If you paste into a text editor (for example, the Word Processor or Document Designer) when a menu is on the screen, the application interprets the pasted characters as menu choices and could change characteristics of your document that you do not wish to change.
If you paste a string of characters into an application that can only accept one line of characters at a time, the application may beep at you or do something else that is unpredictable.
THE CUT AND PASTE PROCEDURE
To use Cut and Paste:
1. Start or switch to the context from which you want to copy text. For example, start the Executive.
2. Press Action·C. The Cut menu appears.
Begin Cut-Paste operation
To dismiss form and begin selection, press GO or select GO with Mouse. Use Mouse or MARK, BOUND and cursor keys to specify characters to cut. Then switch to destination context and press ACTION-p to Paste.
Mark Mode:
Add New Line Chars?
Rectangle Yes
Stream No
Figure 3·1. The Cut Menu
(Press R or S) (Press Y or N
Notice that any areas on the screen that were highlighted changed their appearance. This happens so that the characters that are highlighted can still be visible after you make your selection.
3. Press R to choose a rectangle cut or S to choose a stream cut.
A rectangle cut selects only the characters and spaces that appear within the rectangle defined when you press Mark, then Bound.
A stream cut, by contrast, selects characters and blank spaces as they flow across the screen from the character indicated when you press Mark, to the last character in the selection, indicated when you press
Bound. See Figure 3-2 below.
A stream cut would work best to copy text that runs all the way across the screen like this does. It is especially useful when the text lines up this way.
A Rectangle cut is more useful when text lines up this way or when you want to copy a specific area on the screen.
Figure 3-2. Cutting Text
4. If you want line feeds added when you paste the cut, press Y. This will ensure that each line of the cut still starts on a new line when pasted. Otherwise press N.
5. Press Go or select Go on the Cut menu with the Mouse to indicate that you are ready to select the screen area to be cut.
6. Move the cursor to the first character you want included in the cut.
7. Press Mark on the keyboard or Mouse (left button).
8. Move the cursor to the last character you want included in the cut.
9. Press Bound on the keyboard or Mouse (right button).
The cut is highlighted. If you do not want the area selected, just reselect as in steps 5 through 8. Press Cancel if you decide not to make a cut.
10. To finalize the cut, press Go.
Moving to another context in any way, for example by pressing Action-Next or Finish, also fmalizes the cut.
11. Switch to the context where you want to make the Paste.
12. Move the cursor to the point where you want the copied text to begin.
13. Press Action-P. The text from the cut is copied into the new context.
Notice that spaces have been added as place holders for any empty screen space that was included in the original cut.
Getting Out
FINISHING A CONTEXT
If you are working within a context, you can save your work and finish it in the same way as you normally would. When you have given the necessary commands to finish, the CM screen returns, and the message area says
Finishing ...
Then the context is removed from the list of "Contexts you can return to."
If you are working in the Executive and want to finish it and return to CM, type Finish Executive (or a unique abbreviation, such as f e ), and press Go.
At any time during a session, of course, you can finish a context that you no longer need.
ELIMINATING A CONTEXT WITHOUT SAVING
If the CM screen is displayed, you can eliminate any context, including the Executive: Move the highlight bar to the selected context's name on the "Contexts you can return to" list, and press Action-Finish.
NOTE: Action-Finish eliminates the context without saving your work from this session. You should use it only for those contexts where there is nothing to save (for example, an Executive with a Done status).
ENDING A SESSION (LOGGING OUT)
After you have finished all listed contexts from within the applications and the CM screen has returned, press Finish and then Go. Your session with CM is over, and the normal SignOn form returns to the screen.
Ending a session without finishing all contexts first is the same as eliminating each context with Action-Finish. If you press Finish
when there are active contexts, the following screen message appears:
WARNING
There are active contexts, press Go to logout or Cancel to deny.
Caution: If you press Go, your work in any active contexts is not saved. Your session is ended, and you are returned to the SignOn form.
If you have the command line of the Executive on the screen when you decide to end a session, and all other contexts are finished, you can end a session directly from the Executive by typing
Logout in the command line and pressing Go. If you' do .this when there are active contexts, the Executive is finished, the CM screen returns, and the above warning message is displayed.
eM
Version
If you need to see what version of CM is running on your system, press Action-Go, if necessary, to display the CM screen, and then press the Help key. The following message appears:
This is Context Manager version n.n
where n.n is the version number of your eM.
CM Configuration File Name
If you need to see the CM Configuration file name, press Action-Go, if necessary, to display the CM screen, and then press Code-Help.
Mail Reporting
The CM screen reports that electronic mail has arrived for you in the same way that the Executive does, by displaying the messages
You have mail
Urgent mail
in the center of the top border of the CM screen.
4
Using Windows and the Mouse
This chapter introduces you to the interaction between eM and Windows.
eM and Windows also interact with the Mouse Services. The Mouse Services is a system service that allows you to use a Mouse to select items from the eM screen and to manipulate windows.
This chapter also gives you practice in selecting, sizing, and moving windows with either a Mouse or the keyboard. Step-by-step exercises are provided in the following sections, later in this chapter:
• Managing Windows Using the Mouse
• Managing Windows Using the Keyboard
NOTE: To use Windows with CM, you must have the Window Services installed on your workstation. To use a Mouse, you must have the Mouse Services installed. You must also be familiar with
the material in Chapter 2, "Experimenting with Context
ManagerIVM," before you read this chapter.
What Is a Window?
A window is the rectangular portion of your screen within which
an application is displayed. Your
eM
screen is a window. When you start an application fromeM,
the window of that application appears on top, and theeM
screen disappears.Using Windows
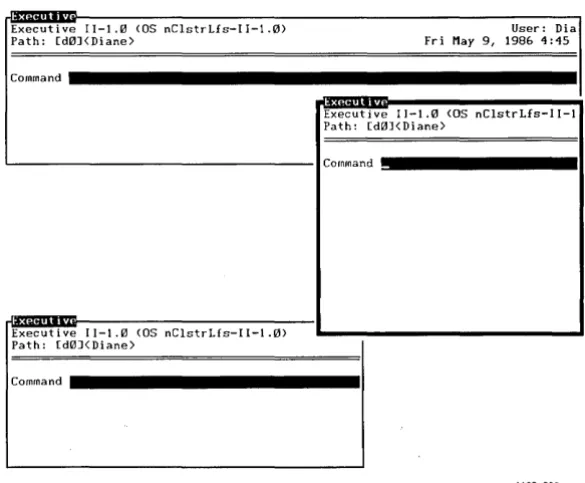
If you have Windows installed on your workstation, your appli-cation does not have to occupy the full screen: You can now vary the size of its window. You can also view more than one application at the same time, move them to different locations on the screen, and make them overlap, if necessary. See Figure 4-1, below.
Executive 11-1.1ll (OS nClstrLfs-II-I.Ill) User: Dia Path: [dlllJ<Diane) Fri May 9, 1986 4:45
Command
Executi ve 11-1.1ll (OS nClstrLfs-II-1 Path: [dIllJ(Diane)
Command
Executive 11-1.1ll (OS nClstrLfs-1 I-I . Ill) Path: [dIllJ(Diane)
Command
1165-003
Figure 4-1. Three Overlapping Windows
[image:50.398.47.340.268.510.2]EXAMPLE
You have just started the Copy command in the Executive and now need to telephone someone about one of your files. With Windows, the Executive can remain visible on your screen (while the Copy continues to run), and at the same time you can scan your files list in another Executive to obtain the information you need. Both applications can remain open, side by side. If you need a larger work area, you can make one Executive smaller and position it in another area on your screen. (You may want to keep it open if you plan to return to it again.)
You can also start a third application and still have the two Executives remain visibly open.
Starting Windows
To start an application using Windows, use your CM screen areas as outlined in Chapter 2. Your CM screen and the way you use it have not changed.
The next few pages provide detailed information and summaries about Windows and the Mouse. A tutorial that gives hands-on instructions follows.
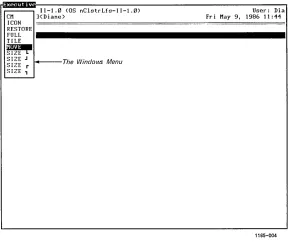
THE WINDOWS MENU
The Windows menu is a small box that "pops-up" on the screen and lists various command options. After you start an application, you can size and move its window by selecting a command from the Windows menu.
With the keyboard, you display the menu by pressing Action-W. (See Figure 4-2.)
Note that you cannot activate the Windows menu from the CM screen.
II 1.~ (OS nClstrLfs-II-l.~) User: Dia
CM ](Diane> Fri May 9, 1986 11 :44
ICON RESTORE FULL TILE
~
SIZE J ~The
Windows Menu
SIZE r SIZE,
1165-004
Figure 4-2. The Windows Menu
If you have a Mouse, display the menu by placing the Mouse cursor on a window border and pressing the middle Mouse button, known as the Menu button. (See "Using the Mouse Buttons," below.) When you use the Mouse to display the menu, five commands are shown: eM, Icon, Restore, Full, and Tile * . (The Size and Move commands, shown on the menu in Figure 4-2, are not listed when you activate the Windows menu with your Mouse: You can size and move windows by using your Mouse buttons.)
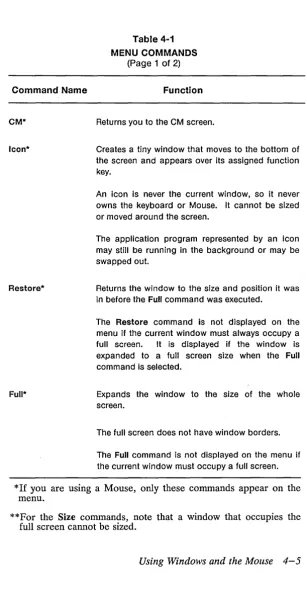
Table 4-1, below, summarizes the commands available to you on the Windows menu.
*On a window that must always occupy the full screen, the Windows menu displays only the eM and Icon commands. (For more information on full screen windows, see "Looking at Win-dows," below.
On a window that occupies the full screen after the Full com-mand is activated, the Windows menu displays only the eM, Icon, and Restore commands.
[image:52.396.44.333.49.301.2]Table 4-1
MENU COMMANDS (Page 1 of 2)
Command Name Function
CM* Returns you to the CM screen.
Icon* Creates a tiny window that moves to the bottom of the screen and appears over its assigned function key.
Restore*
Full*
An icon Is never the current window, so it never owns the keyboard or Mouse. It cannot be sized or moved around the screen.
The application program represented by an icon may still be running In the background or may be swapped out.
Returns the window to the size and position it was in before the Full command was executed.
The Restore command is not displayed on the menu if the current window must always occupy a full screen. It is displayed if the window is expanded to a full screen size when the Full command is selected.
Expands the window to the size of the whole screen.
The full screen does not have window borders.
The Full command is not displayed on the menu if the current window must occupy a full screen.
*If you are using a Mouse, only these commands appear on the menu.
**For the Size commands, note that a window that occupies the full screen cannot be sized.
Table 4-1 MENU COMMANDS
(Page 2 of 2)
Command Name Function
Tile* Divides the screen among the number of contexts that are currently active. You can view each context that is running in one "Tile" of the screen.
Move
Size**
Size**
Size**
Size**
The Tile command is not displayed on the menu if the current window must occupy a full screen.
Moves the window to a new location without changing Its size. A window that occupies the full screen cannot be moved.
Selects the bottom left corner of a window. When you move this corner, the size of the window changes.
Selects the bottom right corner of a window. When you move this corner, the size of the window changes.
Selects the top left corner. When you move this corner, the size of the window changes.
Selects the top right corner. When you move this corner, the size of the window changes.
*If you are· using a Mouse, only these commands appear on the menu.
**For the Size commands, note that a window that occupies the full screen cannot be sized.