May 1999
726+,%$
Telecommunication Systems DivisionDigital Business Telephone Systems
Publication Information
Toshiba America Information Systems, Inc., Telecommunication Systems Division, reserves the right, without prior notice, to revise this information publication for any reason, including, but not limited to, utilization of new advances in the state of technical arts or to simply change the design of this document.
Further, Toshiba America Information Systems, Inc.,
Telecommunication Systems Division, also reserves the right, without prior notice, to make such changes in equipment design or components as engineering or manufacturing methods may warrant.
© Copyright 1999
Toshiba America Information Systems, Inc. Telecommunication Systems Division
All rights reserved. No part of this manual, covered by the copyrights hereon, may be reproduced in any form or by any means—graphic, electronic, or mechanical, including recording, taping, photocopying, or information retrieval systems—without express written permission of the publisher of this material.
Precautions
Before you read anything else, please observe the following:
Rechargeable Nickel-Cadmium Battery Warning
♦ This equipment contains a Rechargeable Nickel-Cadmium Battery. ♦ Cadmium is a chemical known to the State of California to cause cancer.
♦ The Rechargeable Nickel-Cadmium Battery contained in this equipment may explode if
disposed of in a fire.
♦ Do not short circuit the battery.
♦ Do not charge the Rechargeable Nickel-Cadmium Battery used in this equipment in any
charger other than the one designed to charge this battery as specified in this Guide. Using another charger may damage the battery, or cause the battery to explode.
Rechargeable Nickel-Cadmium Batteries Must Be Recycled or Disposed of Properly
♦ Residents of Minnesota should contact 1-800-225-PRBA for information concerning
reclamation and disposal of Rechargeable Nickel-Cadmium batteries.
♦ Residents outside of Minnesota should contact their local authorities for information
concerning reclamation and disposal of Rechargeable Nickel-Cadmium batteries.
CAUTION! To power your Toshiba DKT2004-CB Cordless base unit, use only UL Listed AC Adapter Model AD-9500 Class 2 Power Supply.
Ratings are:
Input: 120VAC 14W Output: 10VDC 500mA
Important! Charge your battery for 10 hours before using your new Cordless Digital Telephone. WARNING! Toshiba does not represent this unit to be waterproof. To reduce the risk of fire,
electrical shock, or damage to the unit, do not expose this unit to rain or moisture.
Contents
i
Contents
Introduction
Organization ... vi
How To Use This Manual ... vi
Conventions ... vii
Important Safety Instructions ... viii
Related Documents ...x
Chapter 1 – The Grand Tour
Applications ...12Benefits ...12
Cordless Digital Telephone Standard Parts ...14
Base Unit Controls and Functions ...15
Features ...16
Chapter 2 – Installation
Removing and Charging Your Battery Pack ...21Charging Extra Battery Packs ...22
Tips on Extending Battery Pack Life ...23
Battery Memory Effect ...23
LCD Low Battery Indicator ...23
Chapter 4 – The Handset
Handset Controls ...29
Handset Volume Level ...29
Ringer Volume Level ...29
Mute ...30
Using the Handset ...30
Charging the Handset ...31
Switching a Call to Your Cordless Digital Telephone ...32
Switching a Call to the Desk Telephone ...33
Using Memory ...34
Chain Dialing ...36
Chapter 5 – Features
Before You Begin ...38Quick Reference ...39
Making an Outside Call ...39
Making an Outside Call to an ISDN Trunk ...40
Making an Internal Call ...40
Answering Calls ...41
Transferring Calls ...41
Conferencing Calls ...42
Placing/Retrieving Calls on Hold ...44
Using Automatic Hold ...45
Calling the Attendant Console ...46
Tone/Pulse Dialing ...46
Account Code Calls ...47
Forced Account Codes ...47
Emergency Override of Forced Account Codes ...47
Voluntary Account Codes ...48
Verified Account Codes ...48
Alarm Reset ...48
Contents
iii
Call Forward-All Calls ...53
Call Forward-Busy ...54
Call Forward-No Answer ...54
Call Forward-Busy/No Answer ...55
Call Forward-Cancel ...56
Call Forward-External ...56
Call Forward-Fixed ...57
Call Park Orbits (Release 3 or later) ...58
Call Park and Page ...59
Call Pickup ...59
Directed Call Pickup ...59
Group Pickup ...60
Calls to Other Groups ...61
Call Waiting ...61
Direct Station Selection Buttons (Hotline) ...62
Do Not Disturb (DND) ...62
Door Lock ...63
Door Telephone ...63
ISDN Outgoing Calling ...64
Subaddress ...65
LCD Name/Number Display ...65
Messaging ...66
Calling Station Messaging ...66
Cancelling a Calling Station Message ...67
Message Waiting ...67
[PhDN/MW] Message Waiting ...69
Off-hook Call Announce (OCA) ...70
Activating Off-hook Announce (OCA) ...70
Handset Off-hook Call Announce (HS-OCA) Calling ...70
Speaker Off-hook Call Announce (SP-OCA) ...71
Override Calls ...72
Busy Override ...72
DND Override ...73
Executive Override ...73
Page Announcements ...73
Privacy On-Line ...74
Privacy Release ...75
Speed Dial ...77
Storing Station Speed Dial Numbers ...77
Stored Station or System Speed Dial Calling ...78
Timed Reminders ...79
Toll Restriction Override ...81
Two (Tandem) Line Connection ...82
Using a [DN] Button ...82
Using Line Buttons ...83
Appendix A – Appendix
Installing Optional Headset ...86Troubleshooting ...87
Range and Performance ...88
Nine Simultaneous Conversation Channels ...89
Radio Interference ...89
Specifications ...90
Available Optional or Replacement Items ...91
Access Codes ...92
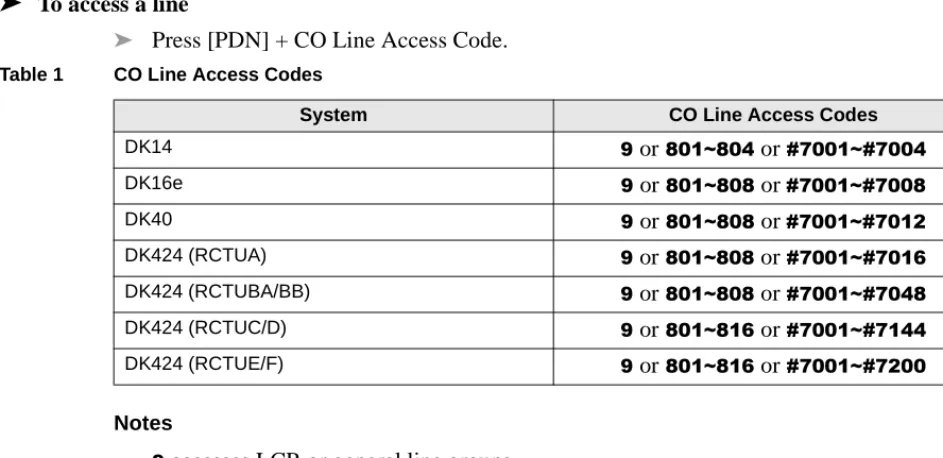
CO Line Access Codes ...95
Feature Access Codes ...96
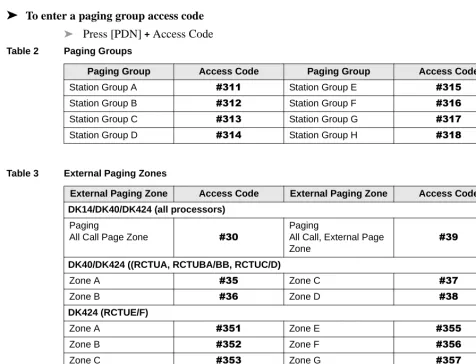
Paging Group Codes ...96
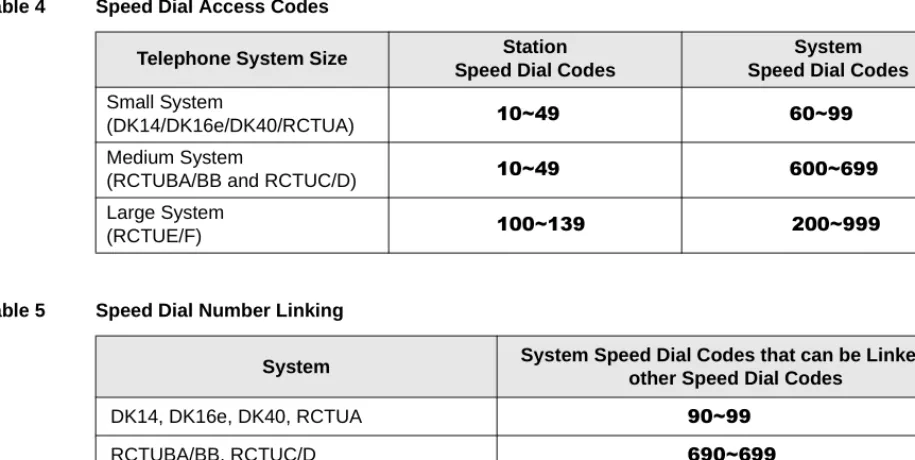
Speed Dial Access Codes ...97
Installing Optional Headset ...100
Troubleshooting ...101
Range and Performance ...102
Nine Simultaneous Conversation Channels ...103
Radio Interference ...103
Specifications ...104
Available Optional or Replacement Items ...105
Access Codes ...106
CO Line Access Codes ...109
Feature Access Codes ...109
Contents
v
Index
...113Tables
1 CO Line Access Codes ... 852 Paging Groups ...86
3 External Paging Zones ...86
4 Speed Dial Access Codes ...87
Introduction v
Introduction
This guide describes the features and operation of the Toshiba DKT2004-CT 900 MHz Cordless Digital Telephone with Strata DK Business Telephone Systems. To get the most from your cordless digital telephone, please read this guide thoroughly. The Strata DK systems which support this equipment are:
♦ DK14
♦ DK16e/DK16
♦ DK40i/DK40
♦ DK424/DK280 (Release 3.0 or higher)
Organization ––––––––––––––––––––––––––––––––––––––––––––––––––––––––––––––––––––––––––––––––––
Organization
This user guide is divided as follows:
♦ Chapter 1—The Grand Tour covers an equipment overview by describing the features
associated with the cordless digital telephone.
♦ Chapter 2—Installation covers instructions for installing your cordless digital telephone
with your Strata DK System.
♦ Chapter 3—Configuration covers the configuration options for optimizing the
performance of your cordless phone.
♦ Chapter 4—Using the Handset covers the various controls and features related to
operating your cordless phone.
♦ Chapter 5—Operation covers the practical operation of the cordless digital telephone
features.
♦ Appendix covers descriptions of the Optional Headset, Installation, Troubleshooting,
Range, Telephone Line Problems, Specifications, Available Optional or Replacement Items, and Access Codes.
Important! Before using your new cordless phone, the battery must be charged continuously for 10 hours.
How To Use This Manual
You can use this guide in a variety of ways, depending on your level of experience with the system and your assigned password level.
If you are a new user of DKAdmin/DKBackup, you should attempt to read this entire guide. It introduces you to all the features and procedures of the system and enables you to work with DKAdmin/DKBackup quickly.
–––––––––––––––––––––––––––––––––––––––––––––––––––––––––––––––––––––––––––––––––– Conventions
Introduction
vii
Conventions
Note Elaborates specific items or references other information.
Important! Calls attention to important instructions or information.
CAUTION! Advises you that hardware, software applications, or data could be damaged if the instructions are not followed closely.
Alerts you to precautions noted both on the equipment and in this guide.
Letters in [brackets]represent buttons which have Directory Numbers on them. For example: [PDN] Primary Directory Number button (the Extension Number for your
telephone).
[SDN] Secondary appearance of a [PDN]. A [PDN]which appears on another telephone is considered an [SDN].
[PhDN] Phantom Directory Number button (an additional Directory Number). [DN] any Directory Number button (also known as an Extension or Intercom
Number).
([WUDEROG letters represent telephone buttons. For example: .
➤ denotes the step in a one-step procedure.
~ means “through”. For example: 5 ~ 10. + is used for multiple key entries.
Example: Press 6SHHG'LDO +;;+ 5HGLDO + 6SNU (;; = 08~60 seconds).
Important Safety Instructions –––––––––––––––––––––––––––––––––––––––––––––––––––––––––––––––––––––
Important Safety Instructions
➤ Read and understand all instructions.
➤ Follow all warnings and instructions marked on the product.
➤ Unplug this product from the wall outlet before cleaning. Do not use liquid cleaners or aerosol cleaners. Use a dry cloth for cleaning.
➤ Do not use this product near water; for example, near a sink or in a wet area.
➤ Do not place this product on an unstable cart, stand, or table. The telephone may fall, causing serious damage to the unit.
➤ To protect the product from overheating, do not block or cover any slots or openings in the base Unit. This product should never be placed near or over a radiator or heat register. This product should not be placed in an enclosed cabinet unless proper ventilation is provided.
➤ Operate this product only from the type of power source indicated on the marking label.
➤ Do not allow anything to rest on the power cord. Do not locate this product where the cord will be damaged by persons walking on it.
➤ Do not overload wall outlets and extension cords, as this can result in the risk of fire or electrical shock.
➤ Never push objects of any kind into this product through the Base Unit slots, as they may touch dangerous voltage points or short out parts that could result in a risk of fire or electric shock. Never spill liquid of any kind on the product.
➤ To reduce the risk of electric shock, do not disassemble this product. Contact qualified service personnel when service or repair work is required. Opening or removing covers may expose you to dangerous voltages or other risks. Incorrect reassembly can cause electric shock when the appliance is subsequently used.
––––––––––––––––––––––––––––––––––––––––––––––––––––––––––––––––––––––Important Safety Instructions
Introduction
ix
♦ If the product has been exposed to rain or water.
♦ If the product does not operate normally when following the operating instructions.
Adjust only those controls that are covered by the operating instructions. Improper adjustment of other controls may result in damage, and will often require extensive work by a qualified technician to restore the product to normal operation.
♦ If the product has been dropped, or the cabinet has been damaged. ♦ If the product exhibits a distinct change in performance.
➤ Do not use the telephone to report a gas leak in the vicinity of the leak.
➤ Use only battery pack model EXP9580 or EXP9586. Use of any other battery may cause a safety hazard.
➤ Do not dispose of the battery pack in a fire. The cell may explode. Under federal, state and local laws, it may be illegal to dispose of old batteries by placing them in the trash. Check with your local government for information on where to recycle or dispose of old batteries. If you cannot find the information you need, contact Toshiba for assistance.
➤ Do not open or mutilate the battery pack. Released electrolyte is corrosive and may cause damage to the eyes or skin, and, if swallowed, may be toxic. Cadmium is a chemical known to the State of California to cause cancer.
➤ Exercise care in handling the battery in order not to short the battery with conducting materials such as rings, bracelets, and keys. The battery or conductor may overheat and cause burns.
➤ Charge the battery pack provided with or identified for use with this product only in accordance with the instructions and limitations specified in the instruction manual provided for this product.
➤ Observe proper polarity orientation between the battery pack and battery charger.
Related Documents ––––––––––––––––––––––––––––––––––––––––––––––––––––––––––––––––––––––––––––
Related Documents
The following documents can be used to reference more information about the Strata DK systems.
➤ Strata DK Programming Manual provides all instructions necessary to program the
system and system record sheets, including ACD. It also contains the user guides in a reduced-size format.
➤ Strata DK Installation & Maintenance Manual provides installation instructions for
The Grand Tour
11
The Grand Tour
1
Your cordless digital telephone is designed and engineered to work with your Toshiba digital telephone system and provide you with reliability, long life, and outstanding performance. The cordless digital telephone is compatible with all Strata DK systems that support digital telephones (except Strata DK24/56/96 Release 3). All it requires for connection is a digital station port.
Your cordless digital telephone uses digital 900 MHz spread-spectrum technology, which represents state-of-the-art design and engineering. This provides unsurpassed range, several times greater than conventional analog or cordless digital telephones. It provides clarity that is so good, it is indistinguishable from corded telephones in most environments. It also provides fully secure communications for up to nine cordless digital telephones within a given
environment.
Fully charged, your cordless digital telephone provides over 3 hours of talk time and 42 hours of standby. There is a fast charger in the handset and a trickle charger in the base.
The cordless digital telephone provides many of the same features as a 2000-series corded digital key telephone (DKT):
♦ 20-character Liquid Crystal Display LCD (displays top 16 characters of DKT)
♦ Four programmable buttons for feature or multiple-line access (same as first four buttons
on DKT station port)
♦ Headset jack
♦ Handset volume adjustment (three levels) ♦ Two ring levels and a vibration mode ♦ &QI7UQ button
Applications ––––––––––––––––––––––––––––––––––––––––––––––––––––––––––––––––––––––––––––––––––
♦ Twenty-speed dial memory (stored in the telephone separate from 40 individual and
system speed dial numbers)
Your cordless digital telephone offers two different modes of operation. You can use it either in conjunction with a 2000-series digital telephone, or on a stand-alone basis. When used with a DKT, both the cordless digital telephone and the DKT share the same digital station port on the PDKU. It also shares the same extension number.
You can switch between use of your DKT and your cordless, just by pressing a button. When used on a stand-alone basis, the cordless digital telephone attaches to its own digital station port on the PDKU.
Several useful accessories are available:
♦ Base wall mount ♦ Headset
♦ Heavy duty 5.5-hour battery ♦ Separate deep cycle charger
Applications
Your cordless digital telephone brings mobility and productivity to office telephones. Greater call access cuts down on “telephone tag” delays. Its compact design makes it easy to take with you.
Benefits
–––––––––––––––––––––––––––––––––––––––––––––––––––––––––––––––––––––––––––––––––––––– Benefits
The Grand Tour
13
The cordless digital telephone provides many advantages over a single-line analog or digital telephone. Some of those advantages are:
♦ Multi-line access is available on up to four programmable buttons. These buttons can be
used for CO line appearances, multiple [DN] appearances, or features. If the cordless telephone is attached to a 2000-series desk telephone, the four programmable buttons are the same as the first four buttons on the desk DKT.
♦ Your cordless digital telephone rings to the same extension number as the regular DKT it
is used with, enabling you to answer via either telephone. Both follow the same
forwarding and hunting regardless of which telephone is in use. This is much simpler than having a separate extension number and standard station port for a single-line cordless, in which, if you use both phones, you must forward the DKT telephone to the single-line telephone (SLT).
An SLT cordless is not only a cumbersome alternative to the Toshiba digital cordless; but also, if you forget to forward your calls, you cannot receive the calls on your SLT cordless. With your cordless digital telephone it is easy. Just press a button, grab your cordless, and go!
♦ Message Waiting LED that is activated just like any regular DKT. This is a big advantage
over a single-line cordless, which, for example, cannot light message waiting from voice mail.
♦ Spread-spectrum technology provides five to seven times greater range than conventional
cordless telephones, making your cordless digital telephone much more useful and valuable.
♦ 900 MHz spread-spectrum operation provides maximum security with a frequency range
that is almost impossible to scan. Regular 900 MHz cordless digital telephones are difficult to scan, but less so than spread spectrum. Analog cordless telephone frequencies are easy to scan and provide virtually no security from the outside. Hackers and thieves can use this to hear conversations and pick up credit card numbers.
♦ Sound quality is better on your cordless digital telephone than non-spread spectrum 900
Cordless Digital Telephone Standard Parts ––––––––––––––––––––––––––––––––––––––––––––––––––––––––––
Cordless Digital Telephone Standard Parts
Your Toshiba cordless digital telephone includes the following items:
CHARGE
BATTCHARGE
POWER
HOLD
PAGE/FIND
––––––––––––––––––––––––––––––––––––––––––––––––––––––––––––––––––Base Unit Controls and Functions
The Grand Tour
15
Base Unit Controls and Functions
1398
Base Unit Antenna
CHARGE LED
BATT CHARGE LED
POWER ON LED
DESK Button/LED
CORDLESS Button/LED
AC Adapter
Line In
Features –––––––––––––––––––––––––––––––––––––––––––––––––––––––––––––––––––––––––––––––––––––
Features
Super Long Range 900 MHz Spread Spectrum 2-line, 10-digit LCD Display
Headset Jack
Ringer Volume Control Handset Volume Control Message Waiting LED
Single button access to Conference, Hold, Message Waiting, and Transfer features Four Flexible Function Keys (First four keys of DKT port in Strata DK)
20-Number Memory Store and Search
Battery Charging System for Optional Standby Battery 2-Way Handset Mounting
Installation
17
Installation
2
Important! Your telephone system must be programmed for Auto Preference for your 7$/. button to work. If there is a shared digital telephone, you receive internal system dial tone automatically after picking up the handset of your deskset. For example, in a DK424 system, Program 32 must have a setting other than “00.” It is best to set Auto Line Preference to access Intercom dial tone.
Step 1: Select Location
1. Select a location for your cordless digital telephone. Avoid excessive heat or humidity. 2. Place the cordless digital telephone’s base unit on a desk or tabletop near a standard 120V
AC outlet and within reach of the digital telephone line connection to your Strata DK system.
3. Keep the base unit and handset away from sources of electrical noise (motors, fluorescent lighting, etc.).
Important! Place the cordless telephone to the right of the DKT. If placed on the left of the DKT, the cordless antenna picks up a tone due to its close proximity to the DKT speaker and electronic parts.
Step 2: Connect Telephone Cords
Your cordless digital telephone can be used as a stand-alone telephone or in conjunction with your deskset.
Step 3: Connect and Apply Power to Base Unit–––––––––––––––––––––––––––––––––––––––––––––––––––––––
➤
To use as a stand-alone telephone➤ Connect the modular jack labeled “Line In” to the telephone wall jack.
➤
To use with a desk telephone1. Unplug the telephone line cord from your desk telephone.
2. Connect this cord to “Line In” of your cordless telephone.
3. Using the two foot modular cord that came with your cordless telephone, connect the jack labeled “Line Out” to the desk telephone.
Step 3: Connect and Apply Power to Base Unit
Note The AC adapter furnished with this telephone may be equipped with a polarized line plug (a plug having one blade wider than the other). This plug fits into the power outlet only one way. If you are unable to insert the plug fully into the outlet, try reversing the plug. If the plug still does not fit, contact your facilities coordinator about replacing the obsolete plug. Do not alter the shape of the blades on the polarized plug.
1. Plug the AC adapter cord into the AC adapter input jack on the base unit.
AC Adapter Wide
Blade
1174
1145
––––––––––––––––––––––––––––––––––––––––––––––––––––––– Step 3: Connect and Apply Power to Base Unit
Installation
19
CAUTION! Use only the AC adapter supplied with your cordless digital telephone.
2. Plug the AC adapter into a standard 120 VAC wall outlet.
3. Route the power cord where it is not a trip hazard, and where it cannot become chafed and create a fire or electrical hazard.
4. Wrap the power cord around the notch on the bottom of the base unit as shown at the right. 5. Check to see that the power LED is on,
indicating the telephone has power.
6. Before using your cordless digital telephone, be sure to raise the antenna to the vertical position.
1175
Raise to Vertical Position
Step 4: Attach Belt Clip to Handset (optional) ––––––––––––––––––––––––––––––––––––––––––––––––––––––––
Step 4: Attach Belt Clip to Handset (optional)
➤
To attach the belt clip to the handset1. Snap the tabs of the belt clip into the notches on the sides of the handset.
2. Use the belt clip to attach the handset to your belt or pocket for convenient portability.
➤
To remove the belt clip1. Pry one tab at a time from the notch on the side of the handset. 2. Carefully lift the belt clip off.
Note The belt clip is designed to fit snugly onto the handset.
Step 5: Install Handset Battery Pack
1. Place a charged battery pack onto the handset so that it slides easily along the ridges.
If your battery is not charged,
see “Removing and Charging
Your Battery Pack” on Page 21.
2. Slide the battery pack up onto the handset until it clicks into place.
You are now ready to configure your cordless digital telephone. See
“Configuration” on Page 25.
Lanyard Clip
R/VOLs MUTE
s
–––––––––––––––––––––––––––––––––––––––––––––––––––––––––– Removing and Charging Your Battery Pack
Installation
21
Removing and Charging Your Battery Pack
Important! Before using your new cordless digital telephone, the battery must be charged continuously for six to eight hours.
➤
To remove the handset’s battery pack1. Press in on the battery pack release latch. 2. Slide the battery pack off the handset.
Note You may have to pull hard to slide the battery pack off, when the handset is new.
➤
To charge the handset’s battery pack1. Place the handset on the base unit.
2. Make sure the CHARGE LED lights. If it does not light, check to see that the AC adapter is plugged in and that the handset is making good contact with the base unit.
Removing and Charging Your Battery Pack ––––––––––––––––––––––––––––––––––––––––––––––––––––––––––
Charging Extra Battery Packs
The base unit of your cordless digital telephone is equipped with a battery charger for charging an extra battery pack. This compartment has a latch that keeps the battery pack in place during charging.
➤
To charge extra battery packs1. Position the battery pack so the inner side is facing toward the top of the base unit.
2. Slide the battery pack into the charging compartment until it clicks into place. 3. Make sure the BATTERY CHARGE
LED lights. If it does not light, check to see that the AC adapter is plugged in, and that the battery pack is seated into the charging compartment.
Note Charge the standard 400 mAh battery pack without interruption for six to eight hours. Charge the optional 730 mAh extended battery pack without interruption for eight to ten hours.
Charging Compartment
Battery Pack
–––––––––––––––––––––––––––––––––––––––––––––––––––––––––––––––– Tips on Extending Battery Pack Life
Installation
23
Tips on Extending Battery Pack Life
Battery Memory Effect
All rechargeable nickel cadmium batteries can develop a “memory” (reduced charge capacity) caused by repeated charge and discharge cycles. Batteries that have developed this effect do not operate to their fullest capacity.
➤
To avoid memory effect➤ Operate the unit until the battery pack is completely discharged before recharging. For example, use the handset off the base all day. Only replace the handset on the base at night after a full day of use. Do not “top off” the charge after using the battery for a short time.
➤
To erase memory effect➤ Operate the unit until the battery pack is completely discharged, then recharge it fully. Repeat this process at least three times.
LCD Low Battery Indicator
When the battery pack in the handset is low and needs to be charged you see this message on the display and the handset beeps.
Low Battery Symptoms
To restore your battery capacity, return the handset to the base unit for charging or replace the handset battery pack with another charged one.
On a Call In Standby Mode
Only the 7$/. key operates. None of the keys operate.
Handset beeps once every three seconds. Handset beeps once.
Complete your call as quickly as possible. Cannot make call.
Replace battery pack. Replace battery pack before making a call.
L O W B A T T
Configuration
25
Configuration
3
You can configure three items in your cordless digital telephone that affect the way it works with the Strata DK business telephone system. These are:
The above three settings default to the ON state.
Your cordless digital telephone can operate in either the DKT or the cordless mode and can be programmed whenever the telephone is idle. When entering the program mode during cordless operation, all calls coming to this station are ringback tone until the program mode is ended. Entering the program mode during DKT operation has no effect on current call status.
SOFT KEY )(On) causes the deskset to turn on the soft keys
whenever the mode is changed from cordless to DKT.
)(Off) causes the deskset to turn off the soft keys whenever the mode is changed from cordless to DKT.
SOFT KEY LOCK (MODE 70/71)
)(On)allows the Soft Key Mode 70/71 (Soft key Off/On) function to pass from the deskset to the Strata DK for controlling the soft key mode.
Do not use this ) (On) setting unless you have Release 3 of Strata DK280. Use with older systems may cause a system malfunction. Use ) (Off).
)(Off) locks the Soft Key (Mode 70/71) function from passing from the deskset to the Strata DK.
RCV LEVEL )(On)sets the receive level to normal level.
Entering Program Mode –––––––––––––––––––––––––––––––––––––––––––––––––––––––––––––––––––––––––
Entering Program Mode
➤
To enter the program mode1. Remove the handset from the base unit.
2. Press and hold
*
and at the same time.3. While holding
*
and, press 7$/..4. Release all three keys.
1178
––––––––––––––––––––––––––––––––––––––––––––––––––––––––––––––––––––––––– Entering Program Mode
Configuration
27
5. Press the 592/ button on the upper right side of the cordless handset until you toggle to the DATA STORE settings screen.
6. Press to toggle the settings for each program step or store (save) the setting when in DATA STORE step. 7. Press 7$/. at any time to
exit PROGRAM without saving changes. To save the changes step to DATA STORE and press before pressing 7$/..
8. Press 087( to step through the program steps in the reverse order.
The LEDs above the )~) buttons indicate the current setting for each of the program steps. Each time the feature is entered and digit is pressed these LEDs change their indication.
You see the following screens on the cordless LCD prompting you to configure your handset:
P R O G R A M
S O F T K E Y O N M O D E
S O F T K E Y O F F M O D E
P A S S M O D E 7 0 / 7 1
R E J E C T M O D E 7 0 / 7 1
R C V . L E V E L N O R M A L
R C V . L E V E L - 4 D B
T A L K - Q U I T 0 - S T O R E
D A T A S T O R E T A L K - Q U I T
R / V O L
F1 ON F1 OFF F2 ON F2 OFF F3 ON F3 OFF
R / V O L M U T E
T A L K
R / V O L M U T E
R / V O L M U T E
0
0
0
0
The Handset
29
The Handset
4
Handset Controls
Handset Volume Level
➤ Press the592/ button on the side of the handset while on a call to select a loud or soft volume level.
Ringer Volume Level
➤ While the telephone is idle, press the 592/ button on
the side of the handset to select ring volume. When the handset is returned to the base, the ring volume automatically switches to RING HIGH.
Note When the display is set for RING OFF, you receive a vibration alert instead of the audible ring tone.
R/VOL
MUTE
1161
1180
R I N G H I G H
R I N G L O W
R I N G O F F
R / V O L
R / V O L
Using the Handset –––––––––––––––––––––––––––––––––––––––––––––––––––––––––––––––––––––––––––––
Mute
➤ Press and hold the 087( button to consult another person in the room without the caller hearing you. Release the 087( button to continue the conversation.
Using the Handset
➤ Pick up the handset and press 7$/..
You may see:
When the cordless digital telephone communicates between the base unit and the handset, the screen goes to standby, and the telephone is ready to use. When talking and the handset is at the range limit of your cordless digital telephone, you may see:
Take the following action:
➤ During a call, move back in range within 20 seconds.
➤ In standby mode, move back within range.
When the display indicates DKT MODE, the telephone was not transferred to
A Q U I R I N G L I N K
1186
1187
N O S E R V I C E
1188
––––––––––––––––––––––––––––––––––––––––––––––––––––––––––––––––––––––––––– Charging the Handset
The Handset
31
Charging the Handset
For more information see Page 21.
➤
To charge your handsetSwitching a Call to Your Cordless Digital Telephone –––––––––––––––––––––––––––––––––––––––––––––––––––
Switching a Call to Your Cordless Digital Telephone
You can switch a call from the deskset to the cordless digital telephone or vice versa whether idle or talking.
Note Transferring while idle or when calls are on hold results in a steady light (skipping the flashing state).
➤
To transfer an active call1. Press &25'/(66 on the base unit.
The CORDLESS LED flashes.
2. Pick up the handset and press 7$/..
The CORDLESS LED lights steady. The DKT LEDs go out and LCD display shows CORDLESS MODE.
1190
––––––––––––––––––––––––––––––––––––––––––––––––––––––––––––– Switching a Call to the Desk Telephone
The Handset
33
Switching a Call to the Desk Telephone
Note If the cordless AC Adapter is unplugged or if the Strata DK system is turned off, the mode automatically changes to the CORDLESS mode.
1. Press '(6. on the base unit. The DESKLED flashes.
2. Pick up the handset on your desk telephone.
The DESK LED lights steady.
3. Hang up your cordless digital telephone handset. 1246 1 TALK MSG HOLD Cnf Trn DIAL 4 7
F1 F2 F3 F4
2 5 8 0 3 6 9 # ABC DEF GHI PRS JKL TUV OPER MNO WXY
F2 F3 F4 F1
1685
Using Memory–––––––––––––––––––––––––––––––––––––––––––––––––––––––––––––––––––––––––––––––––
Using Memory
➤
To store a numberNote After pressing 0HP'LDO the second time, you have 20 seconds to enter the memory location number you wish to use. Otherwise, an error tone sounds and the unit returns to standby.
➤
To erase a stored number1. Remove the handset from the base unit.
2. Press 0HP'LDO. You hear a beep and see:
3. Enter the number (up to 16 digits) you want to store.
4. Press 0HP'LDO. You see:
5. Enter the number (01~20) for the memory location you want to use.
You hear a confirmation beep and see the message. The telephone then returns to standby.
1. Remove the handset from the base unit.
You see:
P H O N E # —
1181
M E M O R Y # —
1182
S T O R E D
––––––––––––––––––––––––––––––––––––––––––––––––––––––––––––––––––––––––––––––––– Using Memory
The Handset
35
➤
To dial a stored number2. Press 0HP'LDO twice. You see:
3. Press the memory location number you want to clear.
You hear a long beep and see a screen confirming that you have erased that number from memory.
1. Remove the handset from the base unit.
2. Press 7$/.
...or press a designated function key with a line assigned to it. For example: Press ).
3. Press 0HP'LDO.
4. Enter the two-digit memory number (01~20) for that number from the keypad.
Your cordless digital telephone then dials the previously stored number. If you select a memory location that does not have a stored number, the handset beeps rapidly and the telephone does not dial.
D E L E T E # —
1184
D E L E T E D
1185
Using Memory–––––––––––––––––––––––––––––––––––––––––––––––––––––––––––––––––––––––––––––––––
Chain Dialing
On certain occasions, after dialing a number, you may be requested by the party or service you are calling to enter a special access code, such as when performing a banking transaction. The access code can be stored in one of the 20 memory locations.
1. Remove the handset from the base unit. 2. Make the call by dialing directly or from
one of the stored numbers in memory. 3. When prompted by the called party,
press 0HP'LDO (as shown) and the memory number of the access code at the appropriate time.
Example:
1. Dial the number for your bank. 2. When the bank requests your account
number press 0HP'LDO.
3. Using the handset, enter the two-digit memory location (01~20) for your account number. Your handset dials the number and you may proceed with your transaction.
Features
37
Features
5
This chapter gives you all of the cordless digital telephone features in alphabetical order beginning on Page 47. Your cordless digital telephone provides many of the same features as a 2000-series corded digital telephone. In addition to the 0VJ+ROG, &RQI7UQ and 0HP 'LDO functions, you can use your cordless digital telephone’s )~) buttons to invoke the features listed below or to gain multiple-line access.
When sharing the same station, your cordless )~) buttons perform the same functions as the first four buttons on a 2000-series telephone. The )~) buttons were preassigned upon system installation. Ask your System Administrator which )~) button functions you may or may not have.
If you are not using the programmable )~) buttons, you can use the alternate steps in this chapter to invoke the features listed below.
There may by some feature operation differences on older version systems - compared to Strata DK424 (e.g., Strata DK280, Strata DK24/56/96 and Strata DK14 & DK40). Please see
♦ 3RROHG/LQH*US
♦ 5HOHDVHDQG$QV
♦ 3DUNLQ2UELW
♦ 3DUNDQG3DJH
♦ 5HGLDO
♦ &DOO)UZG$OO&DOOV ♦ &DOO)UZG%XV\ ♦ &DOO)UZG1R$QVZHU
♦ 6SHHG'LDO
♦ &DOO)UZG%XV\1$QV ♦ &DOO)UZG([WHUQDO ♦ $XWR&DOOEDFN
♦ $FFRXQW&RGH
♦ $XWR%XV\5HGLDO
♦ 'LUHFWHG3LFNXS
♦ *URXS3LFNXS
♦ 'R1RW'LVWXUE
♦ /&'0VJ6HOHFW ♦ 3ULYDF\RQ/LQH ♦ 3ULYDF\5HOHDVH ♦ '66
♦ 7RQH'LDO6HOHFW
♦ 6WDUW
Before You Begin ––––––––––––––––––––––––––––––––––––––––––––––––––––––––––––––––––––––––––––––
“Access Codes” on Page 92 for Feature Access Code sequences that match your Toshiba
telephone system. Also see the Digital Telephone User Guide for more information.
Before You Begin
If you are a new user of the cordless digital telephone, find out if your Strata DK system has Tone or Voice First Signaling. The difference is Tone Signaling rings while Voice First Signaling notifies you with a long tone, and then the caller’s voice. Both signals are enabled in system programming and determine how you make and answer calls on your cordless digital telephone.
You can toggle between Tone and Voice First Signaling on a call-by-call basis.
➤
To change the signaling method➤
To answer a call when you have Voice First signaling➤ Talk in the direction of your telephone ...or answer the call normally.
➤
To answer a call when you have Tone First signalingIf you hear successive ring tones, you have Tone First Signaling.
➤ Lift the handset.
1. Press a [DN] button and dial another station [DN].
If Tone First Signaling is enabled, you hear a ring tone (one second) every four seconds.
If Voice First Signaling is enabled, you hear a tone burst and then you can talk over the called station speaker.
2. Press . After you press , the other method is activated. 3. Speak to your party when
––––––––––––––––––––––––––––––––––––––––––––––––––––––––––––––––––––––––––––––– Quick Reference
Features
39
Quick Reference
The following topics are quick references for using your telephone’s standard features.
Making an Outside Call
You can make calls to or receive calls from telephones outside of the Strata DK system by dialing direct or and using CO Line Access Codes.
➤
To direct dial an outside number➤
To use CO Line Access Codes to dial an outside number1. Press 7$/. The [DN], Line, or Pooled Line Grp LED lights. ...or press any available /LQH
button.
/LQH buttons can be labeled &2/LQH (outside CO Line), /LQH, or 3RROHG/LQH*US. After selecting a Line, you should hear dial tone and the LED lights steady.
2. Dial a telephone number. Dial tone stops after you dial the first digit.
1. Press 7$/.. You hear internal dial tone and the LED lights steady (with INT/PDN automatic off-hook selection
programmed). 2. Dial a CO Line access code.
See “Access Codes” on Page
92.
You hear CO Line dial tone and the LED continues to flash at the in-use rate.
3. Dial a telephone number. Dial tone stops after you dial the first digit.
5 8 3 3 7 0 0
1193
8 0 3 1 7 1
4 5 8 3 3 7 0 0
Quick Reference –––––––––––––––––––––––––––––––––––––––––––––––––––––––––––––––––––––––––––––––
Making an Outside Call to an ISDN Trunk
Making an Internal Call
You can make calls to and receive calls from other stations in the Strata DK system.
➤
To dial an internal call➤
To recall a busy station➤ Press to set Automatic Call Back (ACB).
➤
To override a busy station1. Access an outside CO line
2. Dial the number.
3. Press 6WDUW. The dialed digits will not be sent until you press this button or until the timer expires. See “ISDN Outgoing Calling” on Page 64 for more information on ISDN calls.
1. Press 7$/. or a [DN]. You hear dial tone and the LED lights steady.
2. Dial a [DN]. Notes
● If the system is set for Voice First Signaling, make
a voice announcement when you hear a single tone.
● If the system is set for Tone Signaling, you hear
repeated ring tones and you should wait for the call to be answered.
● If the called station does not answer, you can leave
a message waiting by pressing 0VJ or .
––––––––––––––––––––––––––––––––––––––––––––––––––––––––––––––––––––––––––––––– Quick Reference
Features
41
Answering Calls
➤
To answer a call on a CO Line or [DN]➤
To answer a call on Pooled Line Grp➤
To answer a transferred callTransferring Calls
You can transfer calls to a idle or busy station, but you cannot transfer calls to a station that is in the DND mode.
➤
To transfer a call (using Camp-on)➤ Press the flashing [DN], /LQH, or 7$/. button.
The LED changes from the flashing incoming call rate to steady.
1. Press the flashing 3RROHG /LQH*US or 7$/. button.
The LED changes from the flashing incoming call rate to steady. If another call comes in during the first call, place the call on hold or transfer it, then answer the second call.
Note A warning tone is given when you are on a 3RROHG/LQH*US call which indicates an incoming call.
2. Press 5HOHDVHDQG$QV ...or 7$/.
➤ Press 7$/.
...or the flashing [DN] key.
You hear an internal ringing tone. The cordless digital telephone continues to ring whether the deskset is set for Voice First or Tone Signaling.
The [DN] or Line LED is steady when you are connected to the call.
1. Press&QI7UQ. The Line or[DN] LED flashes at the conference rate. You hear internal dial tone.
2. Dial the [DN] where the call is to be transferred.
Quick Reference –––––––––––––––––––––––––––––––––––––––––––––––––––––––––––––––––––––––––––––––
Conferencing Calls
➤
To conference calls with stations onlyAs many as four stations can be conferenced on one [DN].
3. Announce the call. After dialing, you hear a single tone.
Note If the call was made with Tone Signaling instead of Voice First Signaling, you hear ringing tone.
If the called station does not answer, you receive a recall ring (when your station or[DN] is idle). The ring is set by system programming.
4. Hang up The Line LED changes to steady when the called station connects with the transferred call.
...or press /LQH, [DN] + to reconnect to the transferred line before the call is
answered or busy tone is received.
The Line LED changes to steady red when the called station connects with the transferred call. After you hang up, the Line LED begins to flash at the on-hold rate or if you transferred the call from a [DN], the [DN] LED goes out. The CO Line or [DN] camps onto the called station and the called station receives a warning tone.
You receive a recall ring when your station or [DN]is idle and camp-on is cancelled when the called station user fails to answer within a predetermined time. Repeat the procedure if necessary.
1. Press &QI7UQ. You hear internal dial tone and the LED flashes at the conference rate.
––––––––––––––––––––––––––––––––––––––––––––––––––––––––––––––––––––––––––––––– Quick Reference
Features
43
➤
To add a second Line➤
To add a station to a line call1. Press &QI7UQ. You hear dial tone. The [DN] or Line LED flashes at the conference rate if the call is on a [DN] or /LQH button.
2. Dial the next telephone number.
3. Press &QI7UQ after the party answers.
All parties are conferenced. You can add one more station to a two-line conference.
Note If you receive a busy tone or the second station does not answer, return to the original connection by pressing the original [DN] or Line or hanging up.
If both lines appear on your telephone, both Line LEDs lights steady (if you used /LQH buttons). If you established the two-line call on a single [DN], it lights steady.
1. Press &QI7UQ. You hear dial tone. The [DN] or Line LED flashes at the conference rate.
2. Dial the [DN] of the station to be added.
If you receive a busy tone or no answer, press &QI 7UQ to return to the original connection.
3. Press &QI7UQ after the party answers.
All parties are conferenced. The [DN] or Line LED lights steady.
Up to three stations (including your own) can conference with one line.
Quick Reference –––––––––––––––––––––––––––––––––––––––––––––––––––––––––––––––––––––––––––––––
Placing/Retrieving Calls on Hold
Calls on hold may be released automatically if the held party hangs up and the network provides a hold-release signal. See Page 45 for the Automatic Hold feature.
➤
To hold a call that appears on a Line or [DN] button➤
To place a Handsfree Answerback call on hold➤
To retrieve the held call➤ Press +ROG. The Line or [DN] LED flashes green at the on-hold rate.
You hear recall tone when your station is idle (or two times only when busy) if you do not retrieve the held call before “Hold the recall” time set in system programming expires.
1. Press 7$/.or the flashing [DN] to answer the call.
You are connected to the incoming call.
2. Press +ROG. The Line or [DN] LED flashes green at the on-hold rate.
You hear recall tone when your station is idle (or two times only when busy) if you do not retrieve the held call before “Hold the recall” time set in system programming expires.
➤ Press /LQH or the [DN] which is on hold.
The Line or [DN] LED flashes at the on-hold
rate.
H O L D
N 0 . N N N
––––––––––––––––––––––––––––––––––––––––––––––––––––––––––––––––––––––––––––––– Quick Reference
Features
45
➤
To place a call on Exclusive HoldExclusive Hold enables you to place a call on hold so that only you or somebody using a Call Pickup code at another station can retrieve it.
➤
To retrieve a call on Exclusive HoldUsing Automatic Hold
Automatic Hold enables you to process calls more quickly, because you can automatically place a call on hold by pressing another /LQH or a [DN] button. You do not have to press the +ROG button. You can also switch between a new call and the original call without having to press +ROG. Automatic Hold is assigned on a station-by-station basis in system programming.
➤
To use Automatic Hold➤
To switch between calls➤ Press +ROG twice. The Line LED flashes at the exclusive hold rate.
➤ Press the /LQH button that is on Exclusive Hold.
Another station user can pick up the call by dialing plus your station number, or by dialing plus the CO Line number (a)that the call is held on.
➤ Press another /LQH or [DN] to receive or originate a new call, while on one call.
The original Line or [DN] LED flashes at the on-hold rate and the original call is placed on hold.
The LED of the new call lights steady and the new line is accessed.
➤ Press /LQH or [DN] of the held call.
The Line or [DN] LED just placed on hold flashes at the on-hold rate, and the LED of the Line just accessed lights steady.
E X C H O L D
N 0 . 2 0 5
Quick Reference –––––––––––––––––––––––––––––––––––––––––––––––––––––––––––––––––––––––––––––––
Calling the Attendant Console
There are three ways to call the Attendant Console depending upon system programming. You can call any Attendant Console, a particular Attendant Console, or all Attendant Consoles.
➤
To call any console➤
To call a specific console➤
To make an emergency call to all consolesTone/Pulse Dialing
With some older Central Offices, you may have to make calls using rotary dial pulses on outside lines. To access remote equipment (such as an answering machine) requiring Dual-tone Multi-frequency (DTMF) Dual-tones while on these lines, you must set your telephone for Dual-tone dialing after you have dialed the telephone number. Your telephone must have a 7RQH'LDO 6HOHFW button assigned in system programming to access this feature.
➤
To change to Tone Dialing➤ Press a [DN]+ . The call rings the Attendant Console. Dial 0 calls rotate between the consoles if more than one console is installed.
➤ Press a [DN] + the console’s [DN] ______.
The call rings the console’s Incoming [DN] (,Q'1) button.
Note Your System Administrator can provide the Attendant Console Incoming [DNs].
➤ Press [DN] + the emergency access code .
The call rings all consoles ((PJU button).
1. Dial a telephone number on a line programmed for
–––––––––––––––––––––––––––––––––––––––––––––––––––––––––––––––––––––––––––––Account Code Calls
Features
47
Note When originating or receiving a new call, the system automatically places the line in the dial pulse mode.
Account Code Calls
Account Codes can be entered before or after a call. Some of the code applications include billing, tracking, and line restriction. Account Codes are recorded by the system and can, along with the details of the calls they are associated with, be printed out on a Station Message Detail Recording (SMDR) report.
Forced Account Codes
Some applications may require that you enter a Forced Account Code before dialing the telephone number.
➤
To use a Forced Account CodeEmergency Override of Forced Account Codes
You can bypass Forced Account Codes with three emergency numbers including 911. See your System Administrator for these numbers.
1. Access a line. You hear dial tone after accessing a line. If you dialed with LCR, you do not hear dial tone. See “Access
Codes” on Page 92.
2. Enter the Forced Account Code.
Dial tone stops after you dial the first digit. You hear dial tone after you press the last digit of a valid account code, or busy tone if you dial an invalid code. If you dial with LCR, you do not hear dial tone. 3. Dial a telephone number. Any digits that you dial after entering the code is
Alarm Reset ––––––––––––––––––––––––––––––––––––––––––––––––––––––––––––––––––––––––––––––––––
Voluntary Account Codes
Voluntary Account Codes are optional and can be entered after accessing a CO Line or during a call that you originated or received. The outside party cannot hear the tones you are entering. Voluntary Account Codes can be set in system programming to change the Toll Restriction classification of your station. See your System Administrator for more information. If your station is programmed not to verify Account Codes, you do not hear a confirmation tone.
➤
To use a Voluntary Account CodeVerified Account Codes
If the system is set for Verified Account Codes, you must enter specific codes when entering Forced or Voluntary Account Codes. Verified Account Codes are established in system programming or by designated stations.
1. Press $FFRXQW&RGH Your conversation is not interrupted. Some telephones require that you enter the account code before dialing a telephone number. If a valid account code is not entered, dialing external calls may be restricted. ...or 6SHHG'LDO+
...or
+ .2. Enter the Account Code. You hear confirmation tone (one-half second duration) if the code is valid. If the code is invalid, you hear two short tones.
3. Repeat Steps 1 and 2 to enter another account code (the last code entered is recorded).
Notes
● Any digits dialed after the code has been entered
are treated as part of the outside telephone number.
● Voluntary Account Codes must be entered before
––––––––––––––––––––––––––––––––––––––––––––––––––––––––––––––––––––––––––––––––– Alert Signaling
Features
49
Alert Signaling
Alert Signaling enables you to send an alert sound to a predesignated (partner) station by pressing a single button. This feature is based on the “buzz” key, where, for example, a manager might alert his/her administrative assistant to enter the office.
You can have as many as four $OHUW6LJQDO(s) to send or receive an Alert Signal to/from other telephones. An Alert Signal is sent even if the alerted telephone is busy (on/off-hook) or in the DND or Call Forward mode.
➤
To send an Alert Signal➤ Press $OHUW6LJQDO. An alert tone sounds at the designated station.
Note The signal sounds even if the alerted telephone is busy (on or off hook) or in the DND mode.
Automatic Busy Redial (ABR)
After reaching a busy outside number, you can activate Automatic Busy Redial (ABR) so that the Strata DK system automatically redials that number for you at regular intervals. ABR is an optional feature enabled in system programming. This feature may not be allowed on some (or all) lines in your system depending on the telephone line type connected.
➤
To activate ABR1. Press $XWR%XV\5HGLDO The Auto Busy Redial LED flashes.
...or press &QI7UQ + . You hear confirmation tone after you press &QI7UQ+
.
2. Press 6SNU. The system redials the number every 30 or 60 seconds (depending on system programming), up to 15 times. With each attempt, the:
♦ Line and Spkr LEDs blink when the line is seized. ♦ Dial tone is heard over your speaker.
♦ Telephone number is redialed. If busy, ABR resets
Automatic Callback –––––––––––––––––––––––––––––––––––––––––––––––––––––––––––––––––––––––––––––
➤
To cancel ABR➤ Press $XWR%XV\5HGLDO ...or press[DN]+ .
Automatic Callback
After reaching a busy or Do Not Disturb station, you can set Automatic Callback (ACB) to have the system call you back when the called station becomes available. You can make other calls while waiting for the called station to become available.
➤
To set Automatic Callback (busy or DND stations)If the [DN] or Line is available, the [DN] or Line and Spkr LEDs flash. The called telephone number rings, and your telephone receives ring tone.
Note If your station is busy, ABR does not attempt a recall.
3. Press 7$/. and wait for the party to answer.
If you do not press 7$/. within 30 seconds after a connection is made, you hear a muted ring for another 30 seconds, then the call disconnects.
1. Press $XWR&DOOEDFN Busy tone stops momentarily, then you hear two seconds of dial tone, then busy tone resumes. ...or press .
2. Press7$/.. The LED flashes at the incoming call rate. 3. Answer within three rings to
prevent the callback from being cancelled.
Your telephone rings at a fast rate when the called station becomes idle, and you hear a single tone (LED lights steady).
––––––––––––––––––––––––––––––––––––––––––––––––––––––––––––––––––––––––––––– Automatic Callback
Features
51
➤
To cancel Automatic Callback (busy or DND stations)➤ Press a [DN] + + 7$/..
Line Queuing with Automatic Callback
Automatic Callback enables a waiting queue for an available line after attempting access to a line group when all lines are busy. The system calls you back when a line becomes available.
➤
To set Line Queuing➤
To cancel Line Queuing➤ Press a [DN] + + 7$/..
If you receive a busy tone after answering the callback, the called party has already received or originated another call. Your request is not cancelled.
1. Press $XWR&DOOEDFN The busy tone stops momentarily, then you hear two seconds of dial tone, then busy tone resumes.
... or press .
2. Press 7$/.. You can make other calls while waiting for a line to become available.
The [DN] LED from which you attempted to first access the line flashes at the incoming call rate, and your telephone rings at a fast rate.
Note You must answer within three rings to prevent the callback from being cancelled.
3. Lift the handset immediately or press the flashing [DN].
Auto Redial –––––––––––––––––––––––––––––––––––––––––––––––––––––––––––––––––––––––––––––––––––
Auto Redial
This feature enables you to automatically redial the last number (outside or [DN]) called by pressing 5HGLDO. The 5HGLDO feature button must be programmed as one of the four flexible keys on the telephone.
➤
To redial the last number dialedCall Forward
You can set your telephone [DN] with a variety of Call Forward modes. Call Forward must be set before the call is received. When Call Forward is set, the following types of calls are forwarded.
♦ External calls that ring your station, but lines that ring more than one station are not forwarded except CF-External.
♦ Line calls that are transferred to your station.
♦ Internal calls (Handsfree and OCA calls may or may not). CF-External calls are not forwarded on internal calls.
Call Forward has priority over the Station Hunt feature.
Telephones can have many [DN] buttons, but the telephone must be the designated owner of a [DN] before you can Call Forward to the [DN]. Each telephone is usually the owner of at least one [DN] which is called the Primary Directory Number [PDN].
Your telephone can be programmed to have [PhDNs] in addition to [DNs]. Each [PhDN] can 1. Press an available [DN] or
/LQH.
Make sure that you press the same [DN] or /LQH button that you used to dial the telephone number that you wish to redial.
You hear dial tone.