NOTICE
The information contained in this document is believed to be accurate in all respects but is not warranted by Mitel Corporation (MITEL). The information is subject to change without notice and should not be construed in any way as a commitment by MITEL or any of its affiliates or subsidiaries. MITEL and its affiliates and subsidiaries assume no responsibility for any error or omissions in this document. Revisions of this document or new editions of it may be issued to incorporate any such changes.
Nothing in this document may be reproduced in any manner, either wholly or in part for any use whatsoever, without written permission from Mitel Corporation.
Host Command Interface, HCI, MITEL, MiTAI, NuPoint Messenger, NuPoint Voice, NuPoint Fax, NuPoint Agent, OnePoint Messenger, SUPERSET, SX-200 and SX-2000 are trademarks of Mitel Corporation. Windows 95 and Windows NT are trademarks of Microsoft Corporation. Pentium is a trademark of Intel Corporation. All other product names specified in this document are trademarks of their corresponding owners.
OnePoint Messenger Installation Guide 9164-120-112-NA , Issue 2
December 12, 2000
,, Trademark of MITEL Corporation.
Copyright 2000, MITEL Corporation. All rights reserved.
Table of Contents
1. Introduction ... 11
About This Guide...11
About OnePoint Messenger ...11
Required Skills ...12
Organization of This Guide ...13
The Meaning of Special Terms Used in This Guide ... 14
The Meaning of Formats in This Guide ... 14
Lists... 14
Notes and Cautions ... 14
Other Text Styles ... 15
Type in Commands and Screen Output ... 15
Acrobat Hyperlinks ... 15
Supporting Documentation ...15
Contacting Mitel Technical Publications ... 17
2. Preparing to Install ... 19
What You Need for a OnePoint Messenger System ...19
Hardware Requirements...20
Software Requirements ... 20
OnePoint Messenger Desktop Clients... 21
Administrator Rights ... 21
Choosing a Network Topology ... 22
Choosing Exchange Server Options ...22
3. Installing Telephony Server and Exchange Server Software ... 31
Chapter Overview ...32
What You Need to Complete Chapter 3 ...32
OnePoint Messenger Software License...33
Names and Passwords ...33
Installation Instructions ...35
Procedure 1. Installing Exchange Server Software, and Creating an Exchange Administrator Account ...35
Procedure 2. Installing Microsoft Software on the Telephony Server ...39
Procedure 3. Setting Up an Administrator Account and Outlook on the Telephony Server ...40
Procedure 4. Installing OnePoint Messenger...46
Procedure 5. Running Configuration Wizard to Integrate Telephony Server with Exchange Server...59
Procedure 6. Running Directory Initialization ...64
Procedure 7. Completing the Software Installation ...65
Procedure 8. Sharing Telephony Server Directories...66
Procedure 9. Setting Telephony Server Security Level...67
Configuring the Line Card(s) ...67
Procedure 10. Installing Web Client on the Exchange Server ...68
Procedure 11. Configuring the Test User in Exchange Administrator ...69
Procedure 12. Setting Up and Running the Test User ...69
Procedure 13. Pinging and Checking the Event Log...74
Conclusion ...75
4. Integrating the Telephony Server with a PBX... 77
What Do You Get with PBX Integration?...78
Integrating the Telephony Server with a Switch (PBX)...79
Using MMC to Create a Data Link Integration ...81
Providing a Data Link Template Set...82
Using the SNT Device Mapping Page for Data Link Integration...85
Using Show N Tel Manager for the PBX Integration...88
Configuring Show N Tel for a Mitel PBX ...88
Editing the SNT Parameters Tab...92
Overview of Telephony Applications ...94
Configuring and Testing Notification Server ... 95
Modifying the Phone System Definition in SNT... 97
Editing the Phone System Tone Table... 101
Configuring the Mitel SX-2000 and Notification Server MWI for Mitel MiTAI B-Channel... 102
Assigning Applications to Lines ... 104
Reassigning Lines to Other Applications ... 107
Configuring the Telephone User Interface ...108
Configure, Start, and Monitor Telephony Server ...110
Testing Telephony Server Start and Stop ... 110
5. Making Changes to OnePoint Messenger ... 111
Upgrading from OnePoint Messenger 1.1 ...112
Upgrading the Telephony Server ... 112
Upgrading the Exchange Server ... 113
Upgrading User Systems ...113
Preparing for Service...114
Using TSMon to Start and Stop Telephony Server ... 114
Revising the Network Configuration ...116
Moving the Telephony Server to a New Domain ... 116
Renaming Servers... 118
Renaming the Exchange Server ...119
Removing OnePoint Messenger...119
Removing Server Components ... 119
Removing Client Components ...124
SST Restrictions ... 134
Viewing Information in SST ...134
Service History Database ...135
Service Log ...135
Site Log Personal Notepad...136
Site Info Dialog ...136
Printing SST Output ...136
SST Remote Management...137
Managing Service with System Service Tool...137
Base Release Application and Removal ...138
Preparing for Application or Removal of Service ...139
Applying Service ...140
Applying a Service Pack...145
Removing a Hot Fix or Service Pack ...145
SST Service Log Output Window ...147
Recovering from Interrupted Service ...148
Installing OnePoint Messenger Licenses ...149
Displaying the Server Code ...149
Changing Telephony Server Hardware Components ...150
Getting a New Base License ...151
Getting an Emergency Temporary License ...151
Upgrading OnePoint Messenger Feature Licenses...152
Using the Web Licensing Application to Create a License Diskette ...154
Using License Install to Inspect and Install Licenses ...156
License Install Error Messages ...159
Replacing Telephony Server Hardware ...159
Preparing for Contingencies ...160
Communicating with Multiple Exchange Servers ...160
Emergency License ...161
Parallel Systems ...161
Substituting a Telephony Server ...161
Appendix A. Supported Hardware and Software ... 163
Supported Line Cards ... 164
Server Sizing ... 165
Client Hardware Requirements ...168
Optional Hardware ...168
Software Requirements ...169
Software Options...171
OnePoint Messenger Configuration Options ... 171
PBX Support ...172
Data Link Connections... 173
Appendix B. Adding Line and Fax Cards... 175
Preparing the Telephony Server ...176
Important Safety Information—Earth/Ground ...176
Configuring MVIP and Connecting MVIP Cables...176
Providing the MVIP Clock ... 176
MVIP Termination ...177
The MVIP Cable ... 177
Installing Cards in the Telephony Server...179
Using Windows NT Diagnostics ... 179
Making Line Card and Data Link Connections ...181
Installing and Uninstalling Fax Cards... 182
Fax Card I/O Address ... 183
Installing Natural MicroSystems (NMS) Line Cards... 186
NMS AG Card Base I/O Address ... 187
Installing AG-8 Cards ... 187
Installing AG-0 Cards ... 189
Connecting AG-8 Cards to the PBX...199
Connecting an AG-T1 Card to the PBX ...201
Connecting Fax Cards to the PBX ...201
Enabling MiTAI/AFC...201
Installing the AFC Card...202
Configuring the NMS and CTI Software ...203
Configuring the NMS Card for AFC ...203
Configuring Show N Tel for MiTAI ...205
Appendix C. Installation Checklist ... 207
Figures and Tables
Table 3-1 Names and Passwords ... 34
Figure 3-1 Exchange Administrator, Site Properties ... 45
Figure 3-2 Exchange Administrator, Configuration Properties ... 46
Figure 3-3 OnePoint Messenger Install Screen ... 48
Figure 3-4 Show N Tel Install Key Screen ... 48
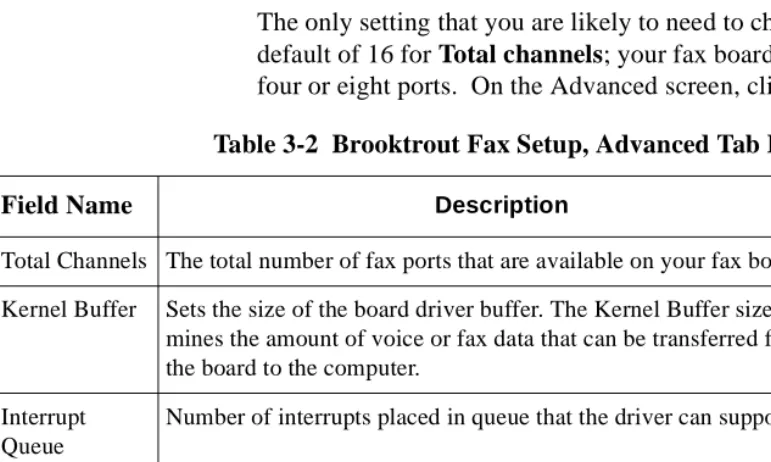
Figure 3-5 Brooktrout Fax Setup Dialog ... 52
Table 3-2 Brooktrout Fax Setup, Advanced Tab Fields ... 52
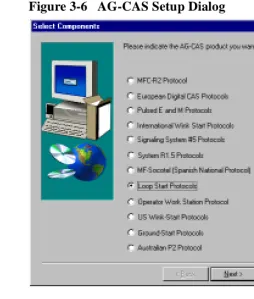
Figure 3-6 AG-CAS Setup Dialog ... 54
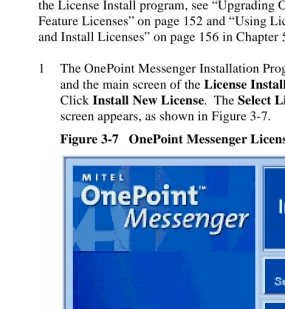
Figure 3-7 OnePoint Messenger License Installation Dialog ... 57
Figure 3-8 ShowNTel Install Key Dialog ... 58
Figure 3-9 Unified Messaging Language Selection Dialog ... 59
Figure 3-9 Configuration Wizard, Configuration Summary ... 62
Figure 3-10 Configuration Wizard, Configuration Status, Start ... 62
Figure 3-11 Configuration Status Screen after Completion ... 64
Figure 4-1 TS Admin, SNT Device Mapping ... 86
Figure 4-2 TS Admin, SNT Device Mapping ... 87
Figure 4-3 Show N Tel Manager, Switch/CTI Tab ... 89
Figure 4-4 SNT Manager, Configure CTI, Device Map Tab ... 91
Figure 4-5 Show N Tel Manager, Parameters Tab ... 92
Figure 4-6 Show N Tel Setup, Phone System Tab ... 98
Figure 4-7 Show N Tel Setup, Phone System Definition, SMDI ... 99
Figure 4-8 Show N Tel Setup, Phone System Definition, DTMF ... 100
Figure 4-9 Show N Tel Setup, Phone System Definition, CTI ... 101
Figure 4-10 SNT Phone System Definition, Tone Table ... 102
Figure 4-11 PBX Configuration for MiTAI MWI ... 103
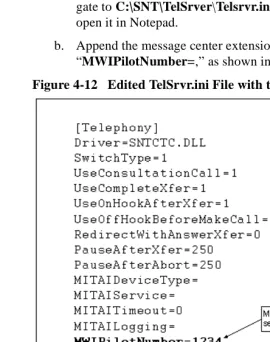
Figure 4-12 Edited TelSrvr.ini File with the MWI Pilot Number ... 103
Figure 5-5 System Service Tool Main Window ... 130
Table 5-2 SST Accelerator Keys ... 131
Figure 5-6 SST, View/Edit Site Info Dialog ... 137
Figure 5-7 Stop Telephony Server Warning ... 141
Figure 5-8 System Restart Message in System Service Tool ... 142
Figure 5-9 SST Apply Service Dialog ... 143
Figure 5-10 Apply Service, View Info Files, Open Dialog ... 143
Figure 5-11 SST Service Log Window, Applying Hot Fix ... 144
Figure 5-12 SST Main Window, Hot Fix Applied ... 144
Figure 5-13 SST Main Window, Service Pack Selected ... 145
Figure 5-14 SST Remove Service Dialog ... 147
Figure 5-15 SST Service Log Output Window ... 148
Figure 5-16 OnePoint Messenger Install Screen ... 150
Figure 5-17 Web Licensing Form ... 155
Figure 5-18 Licensing Website, License Report Page ... 155
Figure 5-19 License Install Main Dialog ... 156
Figure 5-20 Select License Key File Name Dialog ... 157
Figure 5-21 ShowNTel Install Key Dialog ... 158
Table 5-2 License Install Error Messages ... 159
Figure B-1 Windows NT Diagnostics, Resources Tab ... 179
Table B-1 BrookTrout Fax I/O Base Addresses ... 183
Figure B-2 I/O Address Selection Switch (Address 260 Shown) ... 184
Figure B-3 BrookTrout Fax Card IRQ Address ... 184
Table B-2 Recommended I/O Addresses for Multiple Fax Cards ... 184
Table B-4 NMS AG Card I/O Address DIP Switch Settings ... 187
Figure B-4 AG-8 Line Card ... 189
Figure B-5 AG-T1 Side and End View ... 190
Figure B-6 NMS Board Configuration Screen, AG-T1 ... 192
Figure B-7 NMS AG Configurator Main Screen ... 193
Figure B-8 NMS Board Configuration Screen, AG-8 ... 194
Figure B-9 Windows NT Diagnostics, Resources Tab ... 196
Figure B-10 T-Adapter ... 200
Figure B-11 Octopus Cable ... 200
Figure B-12 AFC Card ... 202
1. Introduction
This chapter describes the purpose of this guide, provides an intro-duction to the OnePoint Messenger™ unified messaging system, including its components and supporting documentation. It also dis-cusses skills required of installers. It contains these sections:
About This Guide
This guide covers the installation of line cards and software on two Windows NT Servers to create a OnePoint Messenger 2.0 unified messaging environment. To set up the turnkey Telephony Server (the system shipped from the factory with OnePoint Messenger already installed), see the Getting Started Guide.
The installation procedures here for the essential components sup-plied by other vendors are meant only to supplement the manufactur-ers’ documentation for products not on the OnePoint Messenger CD-ROM. This guide contains a general introduction to the tasks involved in integrating OnePoint Messenger with a PBX. For infor-mation on a specific PBX integration, see the list of integration guides
Section Page
About This Guide 11
About OnePoint Messenger 11
Required Skills 12
Organization of This Guide 13
ing through the Microsoft Exchange mail server, Microsoft Outlook©,
and Web browsers. The OnePoint Messenger server software is installed on two Microsoft Windows NT Server 4.0 systems: • The OnePoint Messenger Exchange Extension is installed on the
computer running Microsoft Exchange (“the Exchange Server”) to support unified messaging on Exchange.
• A large suite of software components providing messaging and maintenance services are installed on the Telephony Server, which handles communication between the telephony network and Microsoft Exchange.
See Chapter 1 in the OnePoint Messenger Administrator Guide for a detailed system overview, a summary of each of the hardware and software components, and an overview list of tasks. Chapter 1 in the
OnePoint Messenger User Guide also has a basic system overview
and a summary of what you can do with OnePoint Messenger clients.
Required Skills
The OnePoint Messenger software product should be installed by a certified Microsoft Certified Systems Engineer (MCSE) technician, certified on NT Server 4.0 and Exchange. Although the OnePoint Messenger documentation covers the basic Windows NT and
Exchange tasks needed to configure and manage a OnePoint Messen-ger environment, installers and administrators should use other sources of information, including Windows NT and Exchange guides, and guides from the other vendors whose products complete your OnePoint Messenger unified messaging environment.
To provide Web browser access to mailboxes by users, you must install and manage Internet Information Server© (IIS). To do so, you must obtain IIS training.
Organization of This Guide
This guide contains five chapters and three appendixes, with hyper-links signalled by blue text for use in the electronic version of the documentation:
• This chapter, Chapter 1, introduces you to OnePoint Messenger and its documentation.
• Chapter 2, “Preparing to Install” on page 19, summarizes the installation process, lists the components you need to complete it, and discusses your installation options.
• Chapter 3, “Installing Telephony Server and Exchange Server Software” on page 31, contains the detailed OnePoint Messenger software installation sequence. The instructions are organized in three levels: main procedures (for example, Procedure 1), task lists, and numbered steps within the task lists.
• Chapter 4, “Integrating the Telephony Server with a PBX” on page 77, completes the installation procedure sequence. It covers how to integrate the OnePoint Messenger Telephony Server line cards and the telephony switch (PBX), including assigning tele-phony applications to particular ports. Additional annotated screen illustrations show various configurations.
• Chapter 5, “Making Changes to OnePoint Messenger” on page 111, contains information on reinstalling, removing, and upgrading OnePoint Messenger, with information about System Service Tool, backups, and details on the License Install utility. • Appendix A, "Supported Hardware and Software” (page 163), contains details on required and optional hardware and software. • Appendix B, “Adding Line and Fax Cards” (page 175), contains
notes on installing line and fax cards in the Telephony Server. • Appendix C, “Installation Checklist” (page 207), contains a
The Meaning of Special Terms Used in This Guide
To provide quick semantic clues to what you should expect to see on-screen, the procedures in this guide use “select,” “clear,” “click,” and “choose” in specific situations:
• “Select” is used where you open and use property pages (tabs) and dialogs, such as for items in a field or for a group of options. • “Clear” or "deselect" is used where you remove a check from a
check box or an entry in a field. For example, while you “select the radio button for xxx to enable xxx,” you “clear the radio but-ton for xxx to disable xxx.”
• “Choose” is used to indicate that you are to invoke a menu item from the Windows Start menu and program menus.
• "Click" indicates graphical buttons, including icons and toolbar buttons, because, although you can generally use the Tab key to access buttons, typically you click buttons with the mouse. Each procedure describes the full sequence of opening its application, usually from the Windows Start button. The consistent form should allow you to quickly recognize the intent so that you do not need to read the complete instruction. Look for the terms in bold type, which signal the selections that you need to make.
The Meaning of Formats in This Guide
This guide presents information using consistent formats to help you more quickly recognize the intent of the presentation.
Lists
Numbered lists present the steps of procedures that you must follow
in the order given.
Bulleted lists present options for which the order is not important.
Notes and Cautions
A “NOTE:” presents information that is of special importance or is relevant only to some users or in some situations.
A “CAUTION!” alerts you to choices with potentially problematic results.
“WARNING!” is more serious than a caution, alerting you to a
Other Text Styles
Italic type is used to introduce terms and for the titles of publications.
In this guide, boldface type is used to emphasize tasks and key words, such as buttons, tab, and menu items, to make them easier for you to spot. For example, a task is presented with the purpose in a separate bold line, followed by the steps, with key words in bold.
Type in Commands and Screen Output
For statements in command syntax format, small mono-spaced bold type like this indicates the characters you should type. Brackets like these < > designate the variables that you are to replace with other information. For example, in the following command, you type the word INSTALL but replace “drive” and “directory” with the names of the drive and directory you are using:
<drive>\<directory>\INSTALL
The same font in regular weight (not boldface) presents screen output.
Acrobat Hyperlinks
This guide is included on the OnePoint Messenger CD-ROM in Acro-bat 3.0 PDF format. AcroAcro-bat Reader version 4.0 is also included on the CD-ROM to view and print the document. This guide contains extensive hyperlinks, indicated on-screen by blue text. The Acrobat bookmark list and thumbnail views also provide hyperlinks. See the Acrobat online help for details.
Supporting Documentation
• OnePoint Messenger User Guide (summarized below)
• PBX integration guides for: • Centrex switches • Fujitsu 9600 • Lucent Definity G3 • Mitel SX-200 • Mitel SX-2000
• NEC NEAX 2400, all versions • Nortel Meridian
• From Brooktrout Technology:
• Getting Started with Show N Tel (installing and using
soft-ware bundled with Show N Tel)
• Show N Tel System Administrator Guide (using Show N Tel
Manager)
The OnePoint Messenger Administrator Guide contains a system and task overview and component details:
• Chapter 1 provides an overview of the unified messaging system and a task list at the end of the chapter that summarizes installa-tion, configurainstalla-tion, maintenance, and performance tuning. • Chapter 2 discusses configuring Exchange to provide unified
messaging services for users. It shows how to edit a user profile, which you do during the installation.
• Chapter 3 details how to use the Unified Messaging Snap-in to Microsoft Management Console (also known as TSAdmin) to set the operation of the telephone interface. The elements that you need to configure to complete the basic installation, including the Message Center pilot and PBX settings, are detailed in Chapter 4, here (see “Using MMC to Create a Data Link Integration” on page 81).
• Chapter 4 details the fax services, which are not needed to get the basic answering services running, but you make choices about assigning fax resources during the installation, so you should understand what services the fax resources support.
• Chapter 5 provides an overview of the operation and maintenance of OnePoint Messenger, summarizing the available utilities. • Chapter 6 covers system validation, and Chapter 7 covers process
• Chapter 8 covers performance reporting.
• Chapter 9 discusses software upgrade and licenses (See Chapter 5 here (page 124) for a more detailed explanation.)
The appendixes in the OnePoint Messenger Administrator Guide that can help you diagnose and correct problems include:
• Appendix B—lists sources of information for the third-party components required for OnePoint Messenger (Appendix A here (page 163) also lists some of those contacts.)
• Appendix C—discusses the Windows NT Event Viewer and Telephony Server event messages.
• Appendix F—discusses the post office processes of Telephony Server, and provides tests and alternative configuration proce-dures for troubleshooting a failed installation.
The OnePoint Messenger User Guide describes how to use OnePoint Messenger client features, including on Outlook additions, fax fea-tures, Web Client, and the Telephone User Interface. The chapters most relevant to installation and troubleshooting are:
• Chapter 2—creating an Outlook profile and installing OnePoint Messenger on the client
• Chapter 3—using OnePoint Messenger client components in Out-look
• Chapter 7—using the Telephone User Interface (TUI)
• Appendix A—testing and using sound recording and playback functions on a PC
Contacting Mitel Technical Publications
2. Preparing to Install
This chapter lists the hardware and software necessary to create a uni-fied messaging environment with OnePoint Messenger version 2. It summarizes the installation process and components. For details on software and hardware requirements and options, see Appendix A (page 163). This chapter contains these sections:
What You Need for a OnePoint Messenger System
To create a OnePoint Messenger environment, you need two
comput-Section Page
What You Need for a OnePoint Messenger System
Hardware Requirements Software Requirements
OnePoint Messenger Desktop Clients Administrator Rights
Choosing a Network Topology
OnePoint Messenger Server Components
19
20 20 21 21 22 23
Installation Summary 24
Testing and Troubleshooting 28
Hardware Requirements
The following minimum requirements apply to both the Exchange Server computer and the Telephony Server computer to support 24 line card ports. For details, see the section “Server Sizing” on page 165 in Appendix A, “Supported Hardware and Software”. • 256 MB
• 550 MHz Pentium III CPU (dual CPU is also allowed) • 3GB disk space
• Network interface card (NIC)
The Telephony Server also requires the following:
• NMS line card(s) (up to 24 ports) to provide voice messaging • Sufficient clearance above the motherboard to place the number
of desired line and fax cards in the backplane • Fax card if you want to provide fax messaging
Software Requirements
To create the unified messaging network with Telephony Server on one computer and Exchange on the second computer, you need: • For the Exchange Server:
• Windows NT Server 4.0 with Service Pack 5
• Windows NT Server Option Pack 4 to install Internet Infor-mation Server (IIS) 4.0
• Exchange 5.5 with its Service Pack 1 or 2 • For the Telephony Server:
• Windows NT Server 4.0 CD-ROM with Service Pack 5 • Outlook 98 with Service Pack 1 (Outlook 97 is no longer
sup-ported)
• OnePoint Messenger version 2.0 CD-ROM, which contains both the server and client components. Install all software on the Telephony Server. You then move certain components to the Exchange Server and client PCs.
• Internet Explorer 4.01 with Service Pack 1 or later • OnePoint Messenger license on floppy diskette—See
OnePoint Messenger Desktop Clients
End-user PCs can run Windows 95, 98, or NT. To access unified messaging through Outlook, users need the OnePoint Messenger cli-ent componcli-ents, which are on the OnePoint Messenger CD-ROM. During the installation of OnePoint Messenger on the Telephony Server, a client folder is created on the Telephony Server. Then the installation instructions guide you through sharing that folder, so that you can install the client to users’ computers over the LAN.
You can provide users access to their mailboxes through supported Web browsers. Currently, those supported browsers are Netscape 4.0 or higher and Internet Explorer 4.0 or higher. To provide Web access, install Exchange 5.5 with Service Pack 1 or 2, Internet Infor-mation Server 4.0 (with Active Server Pages), and Outlook 98 (Out-look 97 is no longer supported.) To access mailboxes, a user can use any supported Web browser and any computer with a network or Internet connection to the Exchange Server. For details on user func-tionality, see Chapter 4 in the OnePoint Messenger User Guide.
Administrator Rights
The installation instructions in Chapter 3 contain several tasks for set-ting up administrator accounts, including:
• Exchange NT administrator: Set up an Exchange administrator
NT account (page 37).
• Exchange forms author: Set permissions for the forms author in
Exchange (page 38).
• Telephony Server NT administrator: Set up an NT
Administrator Account with local rights and Outlook on the Telephony Server (page 40).
Choosing a Network Topology
What administrative accounts you create depends on how you design your network and how you divide responsibilities. The accounts and permissions described in Chapter 3 are based on these presumptions: • You divide responsibilities between at least two administrators. • You give author access to both computers to the administrators. • The Exchange Server is the Primary Domain Controller (PDC). • The Telephony Server is a member server in the same NT domain
as its primary Exchange Server. “Primary Exchange Server” means that the Exchange Server is the one that you designate during the OnePoint Messenger installation as the Exchange Server with which the Telephony Server will directly communicate.
It is not necessary that you create your network hierarchy and permis-sions in exactly the way described. For example, you can set up the Exchange Server as a member server. If you do so, follow the instal-lation directions here, but set up the administrative rights at the local level instead of the domain level. The critical condition for OnePoint Messenger is that installers and administrators have rights to manage Telephony Server and Exchange.
The factors that you must consider when designing your network topology are beyond the scope of this document. The one benefit not usually considered in making the Exchange Server the Primary Domain Controller (PDC) is that users have easier access to Exchange when logging in through the Web. With Exchange as a domain controller, users can simply enter their names and passwords at the logon screen. Otherwise, they must preface their names with the domain name that administers their accounts.
Choosing Exchange Server Options
Call-Me/Meet-Me Conditions
Call-Me and Meet-Me are two ways that users can hear and record voice messages through their telephones while controlling the mes-sages from their PCs. This is accomplished from Outlook by invok-ing a link to the telephone from the PC through the Telephony Server. To provide this facility, the client computer must be either in the same NT domain as the Telephony Server, or in a domain that has a two-way trust relationship with the Telephony Server domain. Follow the directions in Chapter 4 (“Assigning Applications to Lines” on page 104) to enable the applications and ports that provide the Call-Me/Meet-Me service.
For details on client Call-Me/Meet-Me features, see Chapter 3 of the
OnePoint Messenger User Guide. To enable Call-Me on the
Tele-phony Server, you must assign the teleTele-phony application “Notifica-tions” to a port. See Chapter 4 (page 104) in this guide for details.
OnePoint Messenger Server Components
Review the roles and uses of the following OnePoint Messenger com-ponents, which appear during installation. For details on these appli-cations, see the OnePoint Messenger Administrator Guide:
• Directory Initialization provides manual directory updates on the Telephony Server. Directory Access Service (DAS), an
automated update service, caches Exchange directory information on the Telephony Server, so you only need to invoke Directory Synchronization once. The application is called automatically by the OnePoint Messenger Installation Program. For details, see Appendix A of the OnePoint Messenger Administrator Guide. • License Install manages feature license installation and
monitoring. For details, see Chapter 5 of this guide and Chapter 9 of the OnePoint Messenger Administrator Guide.
• The Telephone User Interface (TUI) provides routing menus and prompts, and a messaging interface to callers. You choose which of the available prompt languages to install—one or more of U.S. English, U.K. English, and Latin American Spanish (the use of up to two languages is bundled into the cost of the base system; using a third requires purchasing a license.) If you install more than one prompt language, the Telephony Server administrator can set which language to use for system prompts and which to use as the default for user mailbox menus. Users can override the default mailbox prompt set. For details, see Chapter 3 of the
OnePoint Messenger Administrator Guide.
Other OnePoint Messenger components on the Telephony Server include:
• Post Office Network Gateway (PONG). PONG Server and PONG Client both reside on the Telephony Server. They run transparently as services, providing the messaging interface between the telephone system and Exchange.
• OnePoint Messenger RAS components, including OnePoint Messenger Trace Manager, SNT Trace, System Alert Report, System Reporting Program, System Service Tool, cvNotify, and Version Reader.
• TruVoice© Text-to-Speech, with Text-to-Speech Pronunciation Manager© and TTS Dictionary Editor, for editing the
pronunciation of words spoken by the TUI during e-mail Text-to-Speech conversion
OnePoint Messenger includes several software components that are installed on each end-user client PC to add unified messaging to Out-look. These components also provide fax services and Web access to mailboxes on Exchange. By default, they are stored in
\OnePoint Messenger\Staging.
Installation Summary
oper-ating systems. The instructions do this in order to ensure that you install the operating system options critical to OnePoint Messenger. Variations on the theme include:
• If you already have Windows NT installed, you do not need to reinstall. Compare the recommended Windows NT configuration with yours to make sure that you have what you need. If you need to update the operating system to support OnePoint Messenger, do so before you install OnePoint Messenger unless otherwise noted in the OnePoint Messenger release notes. • If you have a system with OnePoint Messenger 2.0 already
installed and simply need to set it up, see the Getting Started
Guide for that system.
• If you have a system with OnePoint Messenger installed that you want to upgrade, see “Preparing for Service” on page 114 in Chapter 5. When upgrading from OnePoint Messenger 1.1 to OnePoint Messenger 2.0, you must remove OnePoint Messenger 1.1, install Windows NT Service Pack 5 on both the Telephony Server and Exchange Server, and replace Outlook 97 with Outlook 98 on the Telephony Server.
This guide does not detail the installation of Windows NT or Exchange beyond noting the critical components. For details on those products, see your Microsoft documentation. See sources of information for supporting software in Appendix B of the OnePoint
Messenger Administrator Guide.
Installation Sequence Summary
This section provides an overview of the installation procedures. See also the hyperlinked lists at the beginning of Chapters 3, 4, and 5, the complete hyperlinked procedures list in Appendix C (page 207), and the form containing names and passwords in “Names and Passwords” on page 33 in Chapter 3.
• Procedures 1, 2, and 3—These procedures cover the installation
of Microsoft components, including Windows NT, Internet Information Server, Microsoft Exchange, and Microsoft Outlook. If you already have Windows NT and Exchange installed, read this section to make sure you have the necessary optional components, including service packs. For details, see
Appendix A, “Supported Hardware and Software” (page 163). Installing line cards is not critical at this time, but it is the best time to do, so you know what software to install in Procedure 4. See Appendix A, “Supported Hardware and Software”
(page 163) and Appendix B, “Adding Line and Fax Cards” (page 175).
Here, you also create Windows NT administrator accounts and set authoring permissions in Exchange Administrator. For details, see “Administrator Rights” on page 21 in this chapter. • Procedure 4—This is the installation of OnePoint Messenger on
the Telephony Server. The OnePoint Messenger Installation Program includes installing other vendor components bundled on the OnePoint Messenger CD-ROM, such as Show N Tel
Runtime, which itself includes configuration tools for NMS and Brooktrout linecards.
• Procedure 5—The Configuration Wizard integrates Telephony
Server with Exchange. Here, you identify the primary Exchange Server, then the program copies necessary files from the
Telephony Server to the Exchange Server.
• Procedure 6—Run Directory Initialization manually once to
synchronize Telephony Server and Exchange directories.
• Procedure 7—WinFT is installed, the last step in the automated
OnePoint Messenger installation.
• Procedure 8—Share Telephony Server directories for Exchange
• Procedure 9—Set the Telephony Server security level.
Configure line and fax cards, if installed.
• Procedure 10—Install the Web Client server application on
Exchange.
• Procedures 11 through 13—Install a test user and run user and
system tests. For details on testing, see “Testing and Troubleshooting” on page 28 in this chapter.
• Procedures 14 through 19—Chapter 4, “Integrating the
Telephony Server with a PBX” on page 77, contains procedures for integrating the telephone switch with the Telephony Server using Show N Tel Manager. It includes the assignment of telephony applications to individual lines. The examples are for a Mitel SX-2000. For other PBXs, see the specific OnePoint Messenger integration guide.
Chapter 5, “Making Changes to OnePoint Messenger” on page 111, includes a discussion of feature licenses and the use of the License Install utility, used during the OnePoint Messenger installation sequence in Chapter 3.
Installation Overview by Basic Component
This section reviews the installation from the perspective of the basic components.
Microsoft Exchange: Procedure 1 covers installing Windows NT
Server 4.0 and Exchange, creating administrator accounts, and setting Exchange author permissions. In Procedure 5 covers running the Configuration Wizard on the Telephony Server to set the integration between the Telephony Server and the Exchange Server, including adding programs and mailboxes onto the Exchange Server. Proce-dure 10 covers configuring a test user on Exchange.
Telephony Server: Procedure 2 covers installing Windows NT
OnePoint Messenger Client: Procedure 4 includes automatically
copying client setup files to the Telephony Server. Procedure 8 cov-ers sharing the client directory on Telephony Server, so that you can install client components over the network. Procedure 10 covers cre-ating a test user account on Exchange. Procedure 11 covers installing test user software and running messaging tests. Chapter 5 covers uninstalling client components. Chapter 2 in the OnePoint
Messen-ger User Guide also covers installing the Desktop Client software.
Line and Fax Cards: Review and fulfill at least the minimum
requirements in Appendix A for the computers, switch, and cards. Follow the installation directions provided with the telephony hard-ware that you purchased. Appendix B contains installation notes on NMS, and Mitel AFC with NMS DSP cards.
Chapter 3 covers the installation of OnePoint Messenger software, but it also contains two procedures on hardware configuration. • Procedure 4 includes line card and fax card hardware and
software installation.
• Procedure 9 provides another opportunity to configure cards. Telephone Switch (PBX): Follow the instructions in the OnePoint
Messenger integration guide for your PBX. Chapter 4 here provides a generalized version of the instructions. To enhance the telephone user interface, see Chapter 3 of the OnePoint Messenger
Administra-tor Guide.
Testing and Troubleshooting
Depending on whether and from where you plan to manage the mes-saging system remotely, you should consider setting up a telephone connection to the Telephony Server through a modem early in the installation process. If you plan to use the modem to manage the sys-tem, you lose no time by installing it immediately. Then, if you encounter problems during installation, you can get more help from offsite vendor support, enabling them to take over remote control of the Telephony Server to diagnose problems. You would set up a pro-gram like pcAnywhere that provides remote control. pcAnywhere is included with the turnkey version of the Telephony Server. It comes with its own installation and user guide.
communica-tion with Exchange and produces error messages if the integracommunica-tion process is incomplete. If the Configuration Wizard fails to complete its task, one way to diagnose the problem is to simplify the number of potential points of failure. First, test the network connection. Make sure that your Telephony Server logon account has the correct write permissions by testing to see if you can save files on the Exchange Server from the Telephony Server. Then try connecting the Tele-phony Server directly to another Exchange Server that is running a validated setup, possibly even one that already has the OnePoint Mes-senger components installed.
Procedures 11 and 12 cover setting up a test user (“client”) and send-ing OnePoint Messenger unified messages to and from the client. This tests correct installation, unified messaging functionality, and communication between users through Exchange.
Procedure 13 discusses software validation testing on the Telephony Server and on Exchange, and communication between systems. For details on testing and tracing, see Chapter 6 in the OnePoint
Messen-ger Administrator Guide.
If the tests in Chapter 3 indicate problems with the installation, check the Telephony Server Event Log. Even when the installation seems to go well, it is easy and useful to inspect the Event Viewer of both the Exchange and Telephony Server computers to see what messages are generated by the installation. Checking the Event Log before pro-ceeding to the telephony setup in Chapter 4 can save you from need-lessly going through those procedures if the setup is already flawed. Historically, problems at this stage have been the result of incorrectly assigning permissions to administrative accounts or not following special installation notes in the release notes.
lem, generate error messages here. Communication processing errors that appear in the NT Event Log are often simply symptoms of the problems more accurately reflected in the Show N Tel Error Log. Troubleshooting the full array of potential problems is beyond the scope of this manual. For details on individual components, refer to their manufacturers’ documentation. For issues with software com-ponents, refer to the chapter that addresses the particular component in the OnePoint Messenger Administrator Guide. Chapter 1 in that guide provides an overview of the tools and their chapters. See also “Supporting Documentation” on page 15 in Chapter 1 of this guide.
Uninstalling Components
You cannot install OnePoint Messenger 2.0 over OnePoint Messen-ger 1.1 on the Telephony Server and clients, but you can install ver-sion 2.0 over the verver-sion 1.1 Exchange Extenver-sion. Other than upgrading from version 1.1 to 2.0, you can generally install over existing versions of OnePoint Messenger server software. You can-not install client upgrades over existing versions.
For details on removing components, reinstalling, and upgrading OnePoint Messenger components and licenses, see Chapter 5 (page 111).
3. Installing Telephony Server and
Exchange Server Software
This chapter covers installation of all software used on the Exchange and Telephony Servers and client PCs. It contains these sections:
Section Page
Chapter Overview 32
What You Need to Complete Chapter 3 • OnePoint Messenger Software License • Names and Passwords
32 33 33 Procedure 1. Installing Exchange Server Software, and Creating an Exchange Administrator Account
35
Procedure 2. Installing Microsoft Software on the Telephony Server 39 Procedure 3. Setting Up an Administrator Account and Outlook on the
Tele-phony Server
This is a good time to install line and fax cards:
40 46
Procedure 4. Installing OnePoint Messenger 46
Procedure 5. Running Configuration Wizard to Integrate Telephony Server with Exchange Server
59
Procedure 6. Running Directory Initialization 65
Chapter Overview
This chapter contains summary procedures for installing supporting software and detailed procedures for installing OnePoint Messenger software and for testing communication between systems. See the section “Installation Summary” on page 24 in Chapter 2 in this guide for an overview of the installation, including the necessary adminis-trator accounts and components.
The installation sequence in this chapter notes opportunities to install line and fax cards. It also notes the installation of configuration soft-ware for the supported cards. See Appendixes A for required and optional components and Appendix B for notes on installing cards. You must remove OnePoint Messenger 1.1 software from the Tele-phony Server and client PCs before installing OnePoint Messenger 2.0 on them. You do not need to remove the OnePoint Messenger Exchange Extension 1.1 from Exchange. See “Removing OnePoint Messenger” on page 119 in Chapter 5 for instructions on removing OnePoint Messenger.
What You Need to Complete Chapter 3
In addition to the necessary hardware (see “Hardware Requirements” on page 20 in Chapter 2 for a summary. See Appendix A, “Appendix A. Supported Hardware and Software” on page 163, for details), you need the following software:
• For the Exchange Server:
• Windows NT Server 4.0 and Service Pack 5
• Windows NT Option Pack 4 (installs Internet Information Server for client mail access through the Web, if desired) • Exchange 5.5 with Service Pack 1, 2, or 3
• For the Telephony Server:
• Windows NT Server 4.0 and Service Pack 5 • Internet Explorer 4.01 with Service Pack 1 or later
• Microsoft Outlook 98 with Service Pack 1, or Outlook 2000 (Outlook 97 is no longer supported)
• OnePoint Messenger version 2 (includes Show N Tel Man-ager, WinFT, Microsoft Management Console, ADO, and line and fax card software)
• Client PC:
• Windows 95, 98, or NT
• Outlook 98 or Outlook 2000 (Outlook 97 is no longer sup-ported)
• OnePoint Messenger client software (automatically copied to the Staging directory of the Telephony Server from the OnePoint Messenger CD-ROM during the OnePoint Messen-ger installation sequence.)
• You must install DCOM95 1.2 on Windows 95 systems and configure the security level on both Windows 95 and 98. See “Software Requirements” on page 169 in Appendix A.
OnePoint Messenger Software License
In Procedure 4, you load the OnePoint Messenger CD-ROM, both to start the installation and, if necessary, to generate a server code that you use to order a OnePoint Messenger license. The license includes the use of bundled third-party runtime software and levels of access to purchased OnePoint Messenger features. See Chapter 5 for details on licensing. If you do not have the license diskette, you can install up to Procedure “4G. To install the OnePoint Messenger and Show N Tel licenses on the Telephony Server:” on page 57.
Names and Passwords
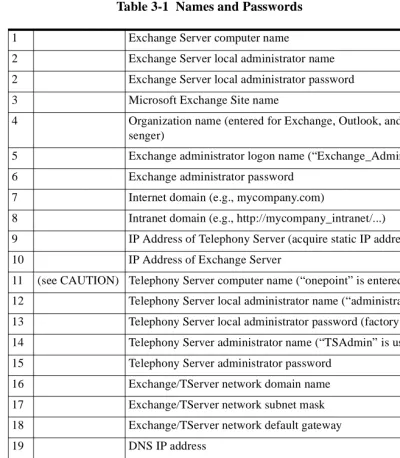
Before starting the installation process, complete the reference list of computer names, account names, and passwords shown in Table 3-1. Ideally, if an installer is coming from offsite, the list should be com-pleted by the onsite systems administrator and sent to the installer so that the installer can be assured that he has the information he needs when he arrives.
CAUTION! If you change the computer name of the
administrator that have Domain Administrator rights. You can have multiple Exchange and Telephony Server administrators to whom you can grant different access levels. If you set up other administrator accounts, you should maintain a record of those names, passwords, rights, and the people that can use those accounts.
Table 3-1 Names and Passwords
1 Exchange Server computer name
2 Exchange Server local administrator name 2 Exchange Server local administrator password 3 Microsoft Exchange Site name
4 Organization name (entered for Exchange, Outlook, and OnePoint Mes-senger)
5 Exchange administrator logon name (“Exchange_Admin” is used here) 6 Exchange administrator password
7 Internet domain (e.g., mycompany.com)
8 Intranet domain (e.g., http://mycompany_intranet/...) 9 IP Address of Telephony Server (acquire static IP address) 10 IP Address of Exchange Server
11 (see CAUTION) Telephony Server computer name (“onepoint” is entered at the factory) 12 Telephony Server local administrator name (“administrator” at factory) 13 Telephony Server local administrator password (factory uses “rmx250”) 14 Telephony Server administrator name (“TSAdmin” is used here) 15 Telephony Server administrator password
16 Exchange/TServer network domain name 17 Exchange/TServer network subnet mask 18 Exchange/TServer network default gateway 19 DNS IP address
20 Exchange/TServer network primary WIN Server 21 Exchange/TServer network secondary WIN Server
Installation Instructions
These instructions assume that you are performing a complete instal-lation on empty boxes. If you are installing a turnkey system (a Tele-phony Server with OnePoint Messenger installed at the factory), see the Getting Started Guide. If OnePoint Messenger is already installed, and you are simply upgrading, see “Upgrading OnePoint Messenger Software” on page 124 in Chapter 5.
If other necessary components are already installed, such as Windows NT Server 4.0 with its Service Pack 5 and Microsoft Exchange with its Service Pack, you do not need to reinstall those components. Read the procedures to make sure the necessary features have been
included in the installation and the correct permissions have been set. If you are not sure that SP 5 is installed, check the Version tab in Windows NT Diagnostics (in the Administrative Tools group). Consider removing any software from the Telephony Server and Exchange Server computers that is not related to the operation of the messaging function. The quality of the messaging services is very sensitive to loss of system resources. However, you might first install remote control software such as pcAnywhere so that you have remote control access to the Telephony Server.
Procedure 1. Installing Exchange Server Software,
and Creating an Exchange Administrator Account
NOTE: See Appendix A in this guide, “Supported Hardware and Software” (page 163), for Microsoft software information and sources.
This procedure has these sub-procedures:
• 1A. To install Windows NT 4.0 with SP 5, IIS 4.0, and Internet Explorer on the Exchange Server:
Do not select Internet Information Server (IIS) at this time. During the NT Server installation, you must choose the NT domain role for the Exchange Server from these options: • Primary Domain Controller (PDC)
• Secondary Domain Controller (“backup server” or BDC) • Stand Alone Server (to become a “member server”)
For OnePoint Messenger, you can select any one of the domain roles listed above for the Exchange Server, but the directions in this guide assume that you make Exchange the Primary Domain Controller. Alternatively, to set up Exchange as a member server, set up the administrator accounts at the local level. See the dis-cussion in the section “Choosing a Network Topology” on page 22 of Chapter 2, and see your Windows NT Server docu-mentation for a full discussion of the options.
2 Shut down. Reboot with NT Service Pack 5 in the CD-ROM drive.
3 Install NT Server 4.0 Service Pack 5.
You have the option of providing Web browser access to mailboxes. To enable Web access, you must install Internet Information Server 4.0 (IIS) and Internet Explorer 4.01 or above (IE).
1 Insert the Windows NT 4 Option Pack 4 CD-ROM. From the setup screen:
a. Choose Custom Installation.
b. Select IIS 4.0. Deselect Index Server. c. Under IIS 4.0, deselect FTP and SMTP.
d. Click Next in all other windows (the other Option Pack com-ponents, such as NNTP and the WWW sample files, are not required for OnePoint Messenger, but you can install them if you want).
e. For the Unified Messaging Player and recorder to appear in the Web Client, set up IIS with the default security setting “Basic Authentication on the Exchange Virtual
Direc-tory.” This guide does not otherwise discuss IIS setup and
2 Install Internet Explorer 4.01 with Service Pack 1, or any version above, through Internet Explorer 5.01. You can download Inter-net Explorer from the Microsoft Web site at:
http://www.microsoft.com/windows/ie/download/default.asp You can also install Internet Explorer from the Outlook CD-ROM or from its own CD-ROM.
NOTE: To support Web access, you also need to install Outlook Web
Access on the Exchange Server from the Exchange Server CD-ROM (see page 38), and purchase and install the OnePoint Messenger Web Client site license and software on the Exchange Server (see “Proce-dure 10. Installing Web Client on the Exchange Server” on page 68.)
1B. To set up an Exchange administrator NT account:
NOTE: For details, refer to the directions in Exchange Server Get-ting Started from Microsoft.
1 Log on to any NT Server in the Exchange domain as a Domain Administrator.
2 From the Windows Start button, choose Programs,
Administra-tive Tools, and User Manager for Domains. The User Manager
for Domains application appears. 3 From the User menu, choose New User.
4 In the User Name field, type Exchange_Admin or whatever name you chose for the Exchange Server administrator account. See your notes in the section “Names and Passwords” on page 33. 5 In the Password field, enter the password for the administrator.
See “Names and Passwords” on page 33. 6 Confirm the password.
13 Log off.
1C. To install Microsoft Exchange Server 5.5:
NOTE: If you are upgrading Exchange, installing more than one
Exchange Server, or installing an Exchange language version other than English, see Exchange Server Getting Started. If Exchange is already installed, you do not need to reinstall it.
1 Log on to the Exchange Server as Exchange_Admin.
2 Install Microsoft Exchange 5.5. To provide Web browser access to mailboxes, select the option to install the Outlook Web Access component (other optional components can be installed but are not required for OnePoint Messenger).
NOTE: Exchange must be shut down while you install Outlook
Web Access.
3 Install Exchange 5.5 Service Pack 1, 2, or 3.
1D. To set permissions for the forms author in Exchange:
1 From the Windows Start button, choose Programs, Microsoft
Exchange, and Exchange Administrator. The Exchange
Administrator application appears.
2 From the Tools menu, choose Forms Administrator.
3 In the list, select Organization Forms. If Organization Forms is not in the list, click New. In the dialog, click OK to add Organi-zation Forms to the Forms Administrator list.
4 Click Permissions.
5 In the list box, select Default.
6 In the Permissions area, select Owner in the Roles list/text box. Click OK.
7 Click Close to close the Forms Administrator dialog.
Do not quit Exchange Administrator. After you set up the Telephony Server Administrator account on the Telephony Server in
Procedure 2. Installing Microsoft Software on the
Telephony Server
This procedure has these sub-procedures:
• 2A. To install Windows NT Server 4.0 on the Telephony Server:
• 2B. To install Windows NT Server 4.0 Service Pack 5 or Service Pack 6a on the Telephony Server:
• 2C. To install Internet Explorer 4.01 with Service Pack 1 on the Telephony Server:
2A. To install Windows NT Server 4.0 on the Telephony Server:
NOTE: If Windows NT 4.0 with Service Pack 5 is already installed,
you do not need to reinstall it.
1 Install Windows NT Server 4.0 on the computer used as the Telephony Server.
2 During the NT Server installation sequence, you must choose an NT domain role for the Telephony Server. To become a “member server” in the Exchange domain, select Stand Alone Server. 3 In the section of the installation sequence called "Installing
Win-dowsNT Networking":
• Deselect Internet Information Server.
• For Network Protocols, select TCP/IP Protocol Only. • For TCP/IP Setup, select NO for "Do you wish to use
DHCP?"
• For IP Address, specify a static IP address.
NOTE: To use VPIM messaging, ensure that your domain name
CHKDSK should respond:
The type of filesystem is NTFS.
5 Recently manufactured computers (such as the TS800) use net-work cards/chips and video cards/chips that can use upgraded
drivers that are not on the Windows NT CD-ROM. If you have
the newer driver on a floppy disk, when the Windows NT instal-lation sequence prompts for a network driver to install, select the option to install the driver from the floppy disk.
Similarly, to install the video driver from a floppy disk, during the reboot after Windows NT is installed, select the VGA video mode. Then go into the Control Panel, Display, Settings tab, click Display Type, and install the new driver.
2B. To install Windows NT Server 4.0 Service Pack 5 or Service Pack 6a on the Telephony Server:
1 After Windows NT is installed on the Telephony Server, and the system reboots, log on as the local administrator.
2 Install Windows NT Server 4.0 Service Pack 5 or Service
Pack 6a.
3 Click Yes at the prompt to restart the system.
2C. To install Internet Explorer 4.01 with Service Pack 1 on the Telephony Server:
1 Log on to the Telephony Server as the local administrator. 2 Install Internet Explorer 4.01 with Service Pack 1 or later on
the Telephony Server.
NOTE: If you need to install cards, this is a good time to record
available IRQs and I/O base addresses from Windows NT Diagnos-tics. Then instead of rebooting, shut down and install the cards, set-ting any jumpers and switches on the cards with the available IRQs. See Appendixes A (page 163) and B (page 175) for details.
3 Reboot.
Procedure 3. Setting Up an Administrator Account
and Outlook on the Telephony Server
“TSAd-min.” here) with broad powers on both the Telephony and Exchange
Servers:
The account creation process is similar to the one you used to create the Exchange administrator account (see page 35.) Here, TSAdmin is given Domain Administrator rights, which is necessary if you set up the Exchange Server as a Primary or Secondary Domain Controller. Otherwise, TSAdmin needs only Domain User rights.
• 3A. To create a Telephony Server administrator account (“TSAdmin”) in the NT domain:
• 3B. To give Telephony Server Local Administrator rights to TSAdmin:
• 3C. To give TSAdmin “Act as Part of the Operating System” right:
• 3D. To install Outlook on the Telephony Server:
• 3E. To give Exchange Server Local Administrator rights to TSAdmin:
• 3F. To give Service Account Administrator rights to TSAdmin in Exchange Administrator:
NOTE: You can use any NT Server that is in the Telephony Server NT domain to set up the Telephony Server administrator account.
3A. To create a Telephony Server administrator account (“TSAdmin”) in the NT domain:
1 Log on to any NT Server in the Exchange domain as a Domain Administrator.
2 From the Windows Start button, choose Programs,
Administra-tive Tools, and User Manager for Domains. The User Manager
7 Confirm the password.
8 Deselect User Must Change Password at Next Log On. 9 Select Password Never Expires.
10 Click Groups.
11 If the Exchange Server is a Primary or Secondary Domain Con-troller, follow these substeps:
a. In the Group Memberships dialog, double-click Domain
Admin in the Not member of list to add it to the “Member
of” list.
b. Click OK in the Group Memberships dialog, then click
Add in the New User dialog to accept the new user and
return to the User Manager for Domains main screen.
12 Alternatively, if the Exchange Server is a member server (that is, a standalone server in the domain, not a domain controller), in the
Group Memberships dialog, make sure that TSAdmin is listed
as a Domain User in the Member of area. If not:
a. Double-click Domain User in the Not Member of list to add Domain User to the Member of list.
b. Click OK in the Group Memberships dialog and Add in the
New User dialog to accept the new user and return to the
User Manager for Domains main screen. 13 Close the User Manager for Domains application. 14 Log off.
3B. To give Telephony Server Local Administrator rights to TSAdmin:
1. Log on to the Telephony Server locally (log on as the Local Administrator, not the Domain Administrator, and select the name of the computer in the Domain field of the logon screen). 2. Click the Windows Start button, then choose Programs, then
Administrative Tools, then User Manager for Domains.
3. On the bottom pane of the User Manager for Domains main screen, double-click Administrators. The Local Group Proper-ties dialog appears.
6. In the Names area, select TSAdmin Add.
7. Click OK to close the Add Users and Groups dialog, then click
OK again to close the Local Group Properties dialog.
Keep User Manager for Domains open.
3C. To give TSAdmin “Act as Part of the Operating System” right:
1. On the User Manager main screen, choose User Rights from the
Policies menu.
2. In the User Rights Policy dialog, select the Show Advanced
User Rights box.
3. In the Right list, click the down arrow, locate and select Act as
Part of the Operating System.
4. Click Add. The Add Users and Groups dialog appears. 5. Click Show Users.
6. Select TSAdmin. 7. Click Add.
8. Click OK in the Add Users and Groups dialog, and again in the
User Rights Policy dialog.
9. On the User Manager main window, choose Exit from the User menu.
10. Log off.
3D. To install Outlook on the Telephony Server:
4 For Outlook 98:
• At the Installation Option dialog for Outlook 98, select
Minimal Installation, then click Next.
• When installing Outlook 98 for the first time, on the E-Mail
Upgrade Options screen that appears at this time, click None of the Above.
• At the E-Mail Service Options dialog box, select Corporate
or Workgroup Option, then click Next.
• At the option to update components or reinstall all compo-nents, select Update Only Newer Items.
5 At the reminder screen, to close any open applications, then click
OK. The system reboots.
3E. To give Exchange Server Local Administrator rights to TSAdmin:
1 Log on to the Exchange Server locally (as the local administra-tor). If the Exchange Server is the primary domain controller, this account is the same as the Domain Administrator. Otherwise, if you set up the Exchange Server as a Stand Alone Server, select its computer name account in the Domain field. In any case, if Exchange is live and supporting e-mail users, logging off and on does not impede that function.
2 From the Windows Start button, choose Programs, then
Admin-istrative Tools, and User Manager for Domains.
3 In the bottom pane of the User Manager for Domains main screen, double-click Administrators. The Local Group
Prop-erties dialog appears.
4 Click Show Full Names in the Local Group Properties dialog. 5 Click Add. The Add Users and Groups dialog appears. 6 In the Names pane of the Add Users and Groups dialog, select
TSAdmin, then click Add.
7 Click OK to close the Add Users and Groups dialog, then click
OK again to close the Local Group Properties dialog.
3F. To give Service Account Administrator rights to TSAdmin in Exchange Administrator:
1 Start Exchange Administrator (Start, Programs, Exchange). 2 Select the Exchange Site name in the Exchange tree view (left
pane).
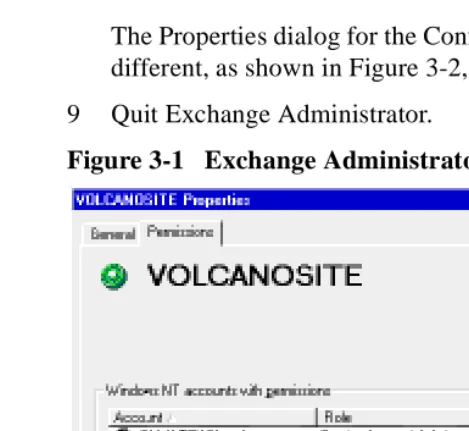
3 From the File menu, choose Properties (or click the Properties button in the toolbar.)
4 On the Properties dialog, click the Permissions tab, as shown in Figure 3-1, below.
5 Click Add. The Add Users and Groups dialog appears.
6 Select the User Account “TSAdmin,” then click Add, then OK. The Add Users and Groups dialog closes.
7 On the Permissions tab, select Service Account Admin from the list in the Roles field, then click OK.
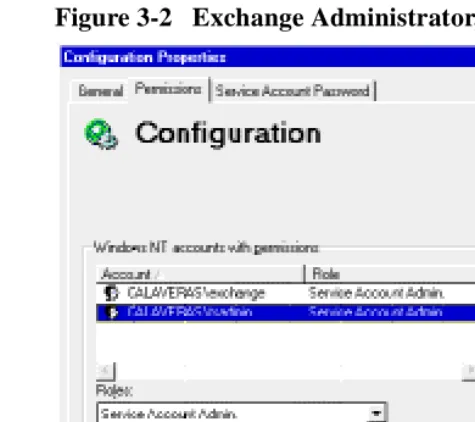
8 In the tree view of the main screen of Exchange Administrator, select the Configuration level, then repeat steps 3 through 7 above.
The Properties dialog for the Configuration level appears slightly different, as shown in Figure 3-2, below.
9 Quit Exchange Administrator.
Figure 3-2 Exchange Administrator, Configuration Properties
This is a good time to install line and fax cards:
The OnePoint Messenger Installation Program installs Show N Tel. The Show N Tel installation guide requires that you have already installed your line cards.
If you are installing an AFC card for integrating with a Mitel SX-2000 PBX, you can run its setup at this time, or after Procedure 9, or after installing OnePoint Messenger. Appendix B contains setup notes for the AFC and other line cards (“Installing the AFC Card” on page 202) and MiTAI (“Configuring Show N Tel for MiTAI” on page 205).
Procedure 4. Installing OnePoint Messenger
In Procedure 4, you run the OnePoint Messenger Installation Pro-gram, which first installs software on the Telephony Server, then installs software from the Telephony Server to the Exchange Server. Procedure 4 is divided into these sub-procedures:
• “4A. To register OnePoint Messenger and select components:” on page 47
• “4B. To install Show N Tel 4.4 SR 2 on the Telephony Server:” on page 49
• “4C. To configure Brooktrout fax cards:” on page 51
• “4D. To set up Natural MicroSystems (NMS) line card AG Access:” on page 53
• “4E. To install the Mail Transport Agent (MTA):” on page 55
• “4F. To install Active Call, the SNT Patch, Borland Database Engine (BDE), and Active X:” on page 56
• “4G. To install the OnePoint Messenger and Show N Tel licenses on the Telephony Server:” on page 57
4A. To register OnePoint Messenger and select components:
1 Log on to the Telephony Server in the domain as TSAdmin. 2 Insert the OnePoint Messenger CD-ROM.
3 If the CD-ROM does not auto-run, click the Windows Start but-ton, then choose Run. Type:
[CD-ROM drive letter]:\installsplash.exe
Click OK.
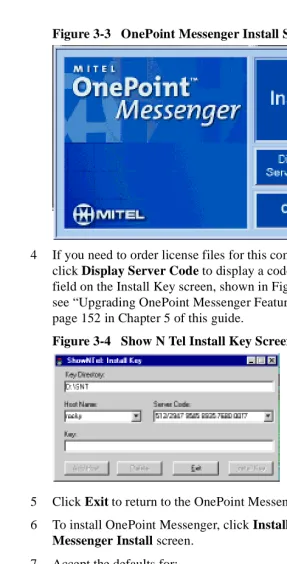
The Install Screen appears, as shown in Figure 3-3.
Figure 3-3 OnePoint Messenger Install Screen
4 If you need to order license files for this computer hardware, click Display Server Code to display a code in the Server Code field on the Install Key screen, shown in Figure 3-4. For details, see “Upgrading OnePoint Messenger Feature Licenses” on page 152 in Chapter 5 of this guide.
Figure 3-4 Show N Tel Install Key Screen
5 Click Exit to return to the OnePoint Messenger Install screen. 6 To install OnePoint Messenger, click Install on the OnePoint
Messenger Install screen.
7 Accept the defaults for:
• The Welcome screen (Click Next.)
• The Software License Agreement screen (Click Yes.) • The Information screen (Click Next.)