This document was prepared with the Xerox 8010 Information System.
Introd uction
How to Use this Guide ... 1 Which Books Should You Read? ... 1 User's Guide Conventions ... 2
The Basics
1. Introduction ... " ... 1-1 1.1 The Workstation ... 1-2 1.2 The Processor ... 1-3 1.3 The Display ... 1-4 1.4 The Keyboard ... , ... 1-5 1.5 The Mouse ... 1-7 1.6 The Network ... 1-8
2. Starting a Session ... 1-9 2.1 An Idle Workstation ... 1-9 2.2 Logging In ... , ... 1-10
3.2.7 Thumbing ... 1-21 3.3 Dynamic Menus ... , ... 1-23 3.3.1 The Window Manager Menu ... 1-26 3.3.2 The Inactive Menu ... 1-32 3.4 Accelerators ... 1-33 3.4.1 Window Manager Accelerators ... 1-33 3.5 Text Editing ... 1-36 3.5.1 Text Files and File Windows ... 1-36 3.5.2 Text Manipulation ... 1-41 '3.5.3 The Text Ops Menu ... 1-43 3.5.4 Pattern Matching: Find and Replace ... 1-46 3.5.5 Apply! and Abort!. ... 1-40 3.6 Property Sheets ... 1-47 3.6.1 Boolean Properties ... ~ ... 1-48 3.6.2 Property Lists ... 1-49 3.6.3 Text Properties ... 1-50 3.6.4 Numeric Properties ... 1-51 3.6.5 Apply! and Abort!. ... 1-51
4. The Documentation Set ... 1-53 4.1 Copying a Documentation Set ... 1-54 4.2 Naming a Documentation Set ... 1-55 4.3 Deleting a Documentation Set ... 1-55 4.4 The Document Operations Menu ... 1-55
6. Ending a Session ... " ... 1-69
7. Booting a Workstation ... 1-71 7.1 The Maintenance Panel ... 1-71 7.2 Diagnostic Boot ... 1-72 7.3 Booting without Diagnostics ... 1-72
8. Index ... 1-73
Schematic Design
1. Introduction ... " .... 2-1
2. Building a Schematic ... 2-3 2.1 The Schematic Window ... 2-3 2.1.1 Enabling Editing ... 2-4 2.1.2 Multiple Page Schematics ... 2-5 2.1. 3 Changing the Scale of a Schematic ... 2-6 2.1.4 Multiple Views ... 2-6 2.1.5 The Schematic Window Property Sheet ... " .... 2-7 2.1.6 Graphic Objects' ... 2-9 2.1. 7 Selection ... 2-1 Q 2.2 Logic Symbols ... 2-14
2.3.6 Net Properties ... 2-36 2.3.7 Naming Nets ... 2-37 2.3.8 Connectivity Symbols ... 2-39 2.4 Annotation ... 2-42 2.4.1 Lines ... , ., ... , ... " ... 2-42 2.4.2 Text ... 2-43 2.5 Clusters ... 2-46 2.5.1 Creating a Cluster ... 2-46 2.5.2 Selecting a Cluster ... " ... 2-47 2.5.3 Cluster Properties ... 2-48 2.6 Editing the Schematic ... 2-49 2.6.1 Delete ... 2-49 2.6.2 J.:>aste ... 2-49 2.6.3 Move ... : ... 2-50 2.6.4 Copy ... , ... , ... 2-52 2.7 Hierarchy ... 2-55 2.7.1 Drawing a Functional Diagram ... 2-55 2.7.2 Defining a Symbol ... 2-56 2.7.3 Expanding the Hierarchy ... 2-60 2.8 Output ... 2-61 2.8.1 The Output Options Window ... 2-61 2.8.2 Plotting the Schematic ... 2-62 2.8.3 Translating the Schematic to COMp80 Format ... 2-62 2.9 Saving and Closing the Schematic ... 2-64 2.10 Recreating Edits ... 2-65 2.11 Editing Schematic Formats ... 2-67
3.5.5 Back-Annotating from SCICARDS·M • • • • • • • • • • • • • • • • • • • • • 2-83
3.6 Interfacing to Computervision'M • • • • • • • • • • • • • • • • • • • • • • • • • • • • • • • • • 2-84 3.6.1 Building a Symbol Library to Interface with Computervision
... 2-84 3.6.2 Building a Schematic to interface with Computervision ... 2-84 3.6.3 Creating a Computervision Wire List ... 2-85 3.6.4 Writing the Computervision Wire List to Magnetic Tape ... 2-86 3.7 Interfacing to LASAR ... , ... 2-87 3.7.1 LASAR Map ... 2-87 3.7.2 Building a Schematic to interface with LASAR ... 2-90 3.7.3 Converting the Net List to LASAR Format ... 2-91 3.7.4 Writing the LASAR Wire List to Magnetic Tape ... 2-92
4. Index ... 2-93
The Library Editor
1. Introduction ... 3-1 1.1 Opening the Library Editor ... 3-2 1.2 Entry Types ... 3-3 1.3 The Entry Identification Number ... 3-3 1.4 Closing the Library Editor ... 3-3
2.5.2 Using the Grid ... 3-14 2.5.3 Selection Mode ... , ... 3-14 2.5.4 Selecting Severalltemsat Once ... 3-15 2.6 Drawing the Symbol .. ~ ... , ... 3-16 2.6.1 Drawing an AND Arc ... , ... 3-16 2.6.2 Drawing an OR Arc ... 3-18 2.6.3 Drawing a Line ... 3-21 2.6.4 Drawing Pin Leads ... 3-23 2.6.5 Text ... 3-30 2.6.6 The Bounding Box ... 3-31 2.6.7 Symbol Property Location Markers ... 3-32 2.7 Editing Symbol Items ... 3-33 2.7.1 Delete ... 3-33 2.7.2 Paste ... " ... 3-33 2.7.3 Move ... 3-34 2.7.4 Copy ... 3-34 2.8 Symbol Characteristics ... 3-35 2.8.1 Entry Identification Number ... 3-35 2.8.2 Displaying Pin Names ... 3-35 2.8.3 Symbol Name ... 3-35 2.8.4 Symbol Function ... , ... 3-36 2.8.5 Assigning Fonts to Textltems ... 3-36 2.9 Writing the Symbol to the Library ... 3-37 2.10 The Abbreviation Map ... 3-37 2.10,1 Listing Abbreviation Map Entries ... 3-38 2.10.2 Adding a Symbol to the Abbreviation Map ... 3-39 2.10.3 Closing the Abbreviation Map ... 3-39 2.11 Resetting the Library Editor ... 3-40 2.12 An Example: Building a NAND Gate ... 3-41
The Expert 1000 User's Guide is your learning guide and reference book for the Expert 1000 system. The User's Guide consists of three books. Book 1 describes the workstation, defines several basic terms and procedures, and tells you how to start and stop the system. Book 2 is a detailed guide to designing schematics. Book 3 describes creating and maintaining Expert 1000 library entries.
How to Use this Guide
Read the User's Guide before you use the system as an introduction to Expert 1000. Try procedures and commands as you read about them; they make more sense when you actually see them work. As you become more skilled, use the User's Guide as a reference guide. The index at the end of each book makes it easy for you to look up a term or a procedure you forget.
Which Books Should You Read?
All users should read Book 1 before reading any other books. Book 1 explains basic procedures not explained elsewhere. Read Book 2 if you want to create schematics with the system. If you've been assigned the task of system
Introduction
User's Guide Conventions
Bullets (e) precede important procedures so that you can easily locate a procedure inside the text. Procedure steps are numbered. For example: .
e To select an object on the display:
1) Move the mouse until the cursor points to that object. 2) Press and release the mouse's left button.
Menu commands appear in boldfa.ce with uppercase letters where they appear in the menu; For example:
Create Net closest
Commands in command subwindows, and property values in property sheets appear in boldface as they appear on the display. For example:
Props! Apply!
Selection Mode: Display Options:
Keyboard keys are bold and all uppercase. MOVE
Please use this form to express your opinion of this manual. Your comments help us to improve our manuals, and make them more useful for you. All comments and suggestions become property of Versatec. Mail this form to Versatec, 2710 Walsh Avenue, Santa Clara, CA 95051.
Manual Title:
Who are you?
Name:
---Company Name: ---Position:---How do you use the manual?
As an introduction to the product it describes
0
As a reference guide
0
As a tutorial
0
Other:
0
How well does the manual meet your needs?
Is it easy to read? Is it easy to understand?
Are the format and organization easy to follow? Is it technically accurate?
Can you easily find the information you need?
Is it complete? Does it tell you everything you need to know? Is it well illustrated?
Technical or editorial errors (please list page number):
Suggestions for improvement:
This document was prepared with the Xerox 8010 Information System.
Versatec Til and Expert Til are trademarks of Versatec.
1. Introduction ... " ... 1-1 1.1 The Workstation ... 1-2 1.2 The Processor ... 1-3 1.3 The Display ... 1-4 1.4 The Keyboard ... 1-5 1.5 The Mouse ... 1-7 1.6 The Network ... " ... 1-8
2. Starting a Session ... ' ... 1-9 2.1 An Idle Workstation ... 1-9 2.2 Logging In ... 1-10
3.5 Text Editing ... 1-36 3.5.1 Text Files and File Windows ... 1-36 3.5.2 Text Manipulation ... 1-41 3.5.3 The Text Ops Menu ... 1-43 3.5.4 Pattern Matching: Find and Replace ... 1-46 3:5.5 Apply! and Abort! ... 1-40 3.6 Property Sheets ... 1-47 3.6.1 Boolean Properties ... 1-48 3.6.2 Property Lists ... 1-49 3.6.3 Text Properties ... 1-50 3.6.4 Numeric Properties ... 1-51 3.6.5 Apply! and AbortL ... 1-51
4. The Documentation Set ... 1-53 4.1 Copying a Documentation Set ... 1-54 4.2 Naming a Documentation Set ... 1-55 4.3 Deleting a Documentation Set ... 1-55 4.4 The Document. Operations Menu ... 1-55
This book gives you an overview of your workstation. It contains an introduction to the workstation components, an explanation of terms and basic procedures common to Expert 1000 tools, and detailed instructions for starting and stopping the system.
Introduction
1.1 The Workstation
Expert 1000's design tools run on a Xerox 8010 professional workstation. The workstation consists of a processor, a disk storage module, a high resolution graphics display, a keyboard, a pointing device called a mouse, and a connection to an Ethernet network.
I( Display
'I( Mouse
Keyboard ~
'I( 29-megabyte Disk
Processor ~ Storage Unit
1.2 The Processor
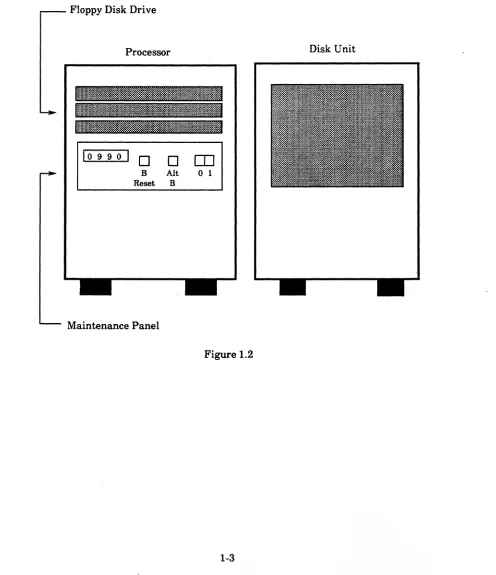
The processor consists of two units that sit on the floor next to your desk. One unit contains the processor itself, and the other contains a rigid disk for storing your work. A floppy disk drive opens onto the front of the processor. A door below the disk drive hides the maintenance panel. The maintenance panel contains a four-character, LED display, two small switches marked "B Reset" and "Alt B," and a larger power switch.
Floppy Disk Drive
Processor Disk Unit
109901
0
0
IT]
B Alt 0 1
Reset B
Maintenance Panel
I Introductiori
1.3 The Display
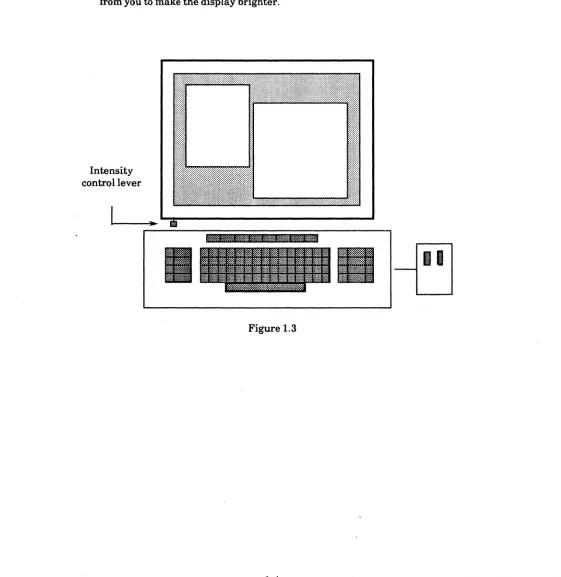
The workstation's special high-resolution display shows both graphics and text. The display screen is your electronic desktop. Working with Expert 1000 tools on the display is similar to working with paper, pencils, rulers, and templates on a desk or drawing board.
Under the left side of the display is an intensity control lever. Pull the intensity control lever toward you to make the display dimmer. Push it away from you to make the display brighter.
Intensity control lever
1.4 The Key board
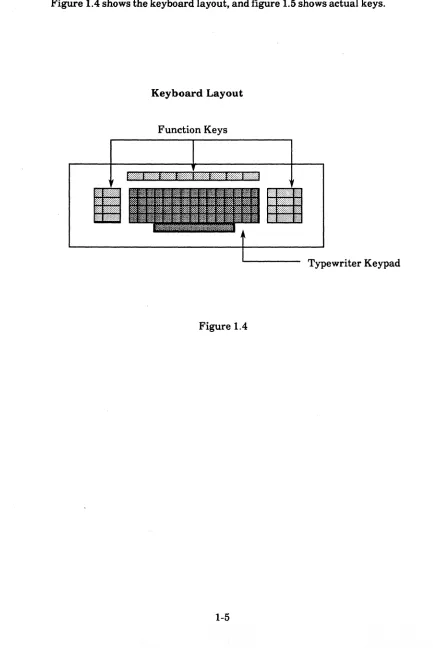
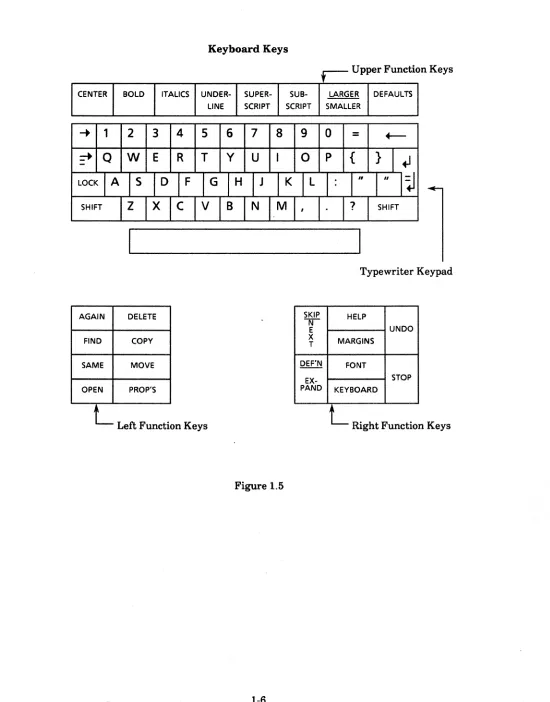
The keyboard is one device you use to communicate with the system. You use the typewriter keypad to add text to your designs. You use the special function keys to the right, left, and above the typewriter keypad to issue commands. Figure 1.4 shows the keyboard layout, and figure 1.5 shows actual keys.
Keyboard Layout
Function Keys
Typewriter Keypad
Introduction
Keyboard Keys
r-
Upper Function Keys CENTER BOLD ITALICS UNDER- SUPER- SUB- LARGER DEFAULTSLINE SCRIPT SCRIPT SMALLER
... 1
2
3 4 5 6
7
8 9 0
=
LOCK SHIFT
Typewriter Keypad
AGAIN DELETE SKIP r;;r HELP
E UNDO
FIND COPY X T MARGINS
SAME MOVE DEF'N FONT
EX- STOP
OPEN PROP'S PAND KEYBOARD
L
Left FunctIon Keys.
L
Right FunctIon Keys.
.
1.5 The Mouse
The mouse is a pointing device attached to the keyboard by a thin, two-foot-long cord. On the top surface of the mouse are two buttons. Like the keyboard, the mouse lets you communicate with the system. You use the mouse both to point to objects on the display, and to issue commands.
II
J
Introduction
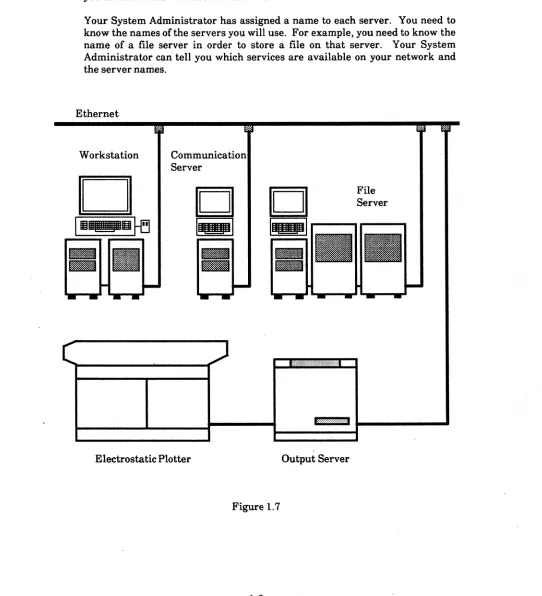
1.6 The Network
Your workstation is connected to others at your installation by an Ethernet local area network. The network gives you access to several resources beyond your own workstation. An output server lets you share an electrostatic printer/plotter and a magnetic tape drive with other users. You also share a file server for storing data bases and libraries. A communication server lets you communicate with users of other networks.
Your System Administrator has assigned a name to each server. You need to know the names of the servers you will use. For example, you need to know the name of a file server in order to store a file on that server. Your System Administrator can tell you which services are available on your network and the server names.
Ethernet
Workstation
Server
Electrostatic Plotter
n n
File= = ... __ ...
Se ... rv_e_r_ ...E·:·?:·:·:···: .... ····{:, .... _ _ _ _ _ _ ..
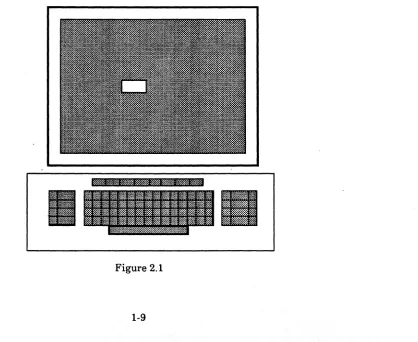
2.1 An Idle Workstation
When you start a session the workstation should be idle. Idle means that the Expert software is running on the workstation and the workstation is ready for you to begin your work. The display should be blank except for a small white box containing the day of the week and the time. The small white box constantly moves from place to place on the display. See figure 2.1.
If your display is blank and you do not see a bouncing box, check the power switch on the maintenance panel; turn the switch to 1 to turn on the workstation, and wait a few minutes for the workstation to become idle. If the power is on, try adjusting the intensity of the display. Push the intensity control lever away from you as far as it will go. If you still do not see the bouncing box, boot your workstation. Chapter 7 of this book tells you how to boot a workstation. When you finish booting the workstation, you should see the bouncing box. If you still don't see the bouncing box, ask your System Administrator for help.
Starting a Session
2.2 Logging In
You log in to tell the system who you are and to which tools and designs you have access. The system recognizes you by your user name, organization,
domain and password. Your System Administrator assigns names and passwords. If your System Administrator has given you access to the system's library tools, he or she will also give you an organization password.
• To log in to an idle workstation:
1) Press the key marked STOP. The system displays the login window. The login window contains fields for entering your name, organization, password, organization password, and domain. Figure 2.2 illustrates the login window. In the login window you see the name and organization of the person who last used the workstation. Frequently that person is you.
Apply!
User: Schultz Password:A
Domain:
Abort!
Organization: TechSysCo Organization Password:
'---- Flashing caret follows the word "Password:" Figure 2.2
2) Notice the flashing caret after the word "Password:" It shows you the
type-in point. The system displays any text you type after the type-in
name. Move the cursor to "Password:," and press the right mouse button. Type your password.
3) If you want to make changes to the system's library, you must also enter an organization password. Usually you skip this step. Point the cursor at the words "Organization Password." Press the right mouse button. Type your organization password.
4) Point the cursor at the word "Apply!." Press either mouse button. The system removes the login window from the display. You see several tiny windows.
This section defines several basic terms and procedures that you must know to use the system.
3.1 The Cursor, Pointing, and Selection
3.1.1 The Cursor
The cursor is a graphic object, initially a small arrow, that appears on the display screen. (See figure 3.1.) The cursor acts like your pencil on the display desktop; you use it to show the system where you want to work and what you want to do.
Cursor
Figure 3.1
Moving the mouse along a flat surface moves the cursor on the display. When the cursor reaches an edge of the display screen it does not track the movements of the mouse.
3.1.2 Pointing
• To point to an object, (for example, a logic symbol in a schematic):
Interacting with the System
3.1.2 Selection
You select an object in order to do something to that object. For example, to delete an object, you select the object and press the key marked DELETE. • To select an object on the display:
1) Move the mouse until the cursor points to that object. 2) Press and release the mouse's left button.
The system. highlights selected objects· in inverse-video; it marks selected objects in black on the white background.
3.1.4 Cursor Shapes
The cursor changes shape to tell you what the system is doing, and what you can tell it to do. When the system is busy, the cursor changes into an hourglass. It is processing your last command. (See figure 3.2.) The system stores commands you issue while the cursor is an hourglass, and processes them immediately after it completes processing the first.
Cursor
When the cursor is an arrow with a cross on its tail, you can select only objects or menu commands.
Cursor
Figure 3.3
When the cursor is an arrow without a cross on its tail, you can select objects or menu commands, or type in text using the keyboard.
Cursor
Interacting with the System
3.2 Windows
A window is a rectangular region on the display framed by a narrow black
border. Windows are the sheets of paper on your display desktop.
You communicate with the system through windows. A window shows you messages from the system, commands available to you, and the actual schematic, net list, or logic symbol you are creating or editing. You interact with the system only when the cursor is within a window's boundary, as though the cursor was a pencil and the window a sheet of paper.
3.2.1 Active and Tiny Windows
Windows have two states: active and tiny. When a window is tiny. a small box
containing only the window's name represents it on the display. Figure 3.5 shows active and tiny windows.
Making a window tiny is like putting a piece of paper aside on your desk; you aren't using it and want to get it out of your way, but you know you'll want to use it again soon. When you make a window tiny, you store its contents. The window looks exactly the same once you make it active again.
Active Window
L
Figure 3.5
Props! Copy!
Net List
Schematic
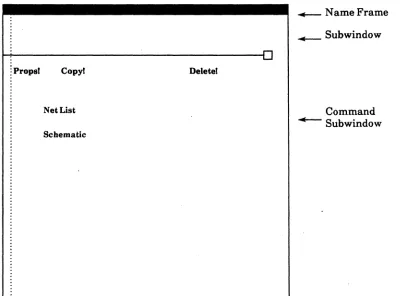
3.2.2 Name Frames
Delete!
Figure 3.6
~ Name Frame ...- Subwindow
Command
~Subwindow
Every active window has a black, rectangular name frame across its top. (See
figure 3.6.) The system displays the name of the window in white letters inside the black name frame.
3.2.3 Subwindows
Horizontal lines ending in a small box on the right divide the window into
subwindows. Each subwindow represents a different function of the window.
Interacting with the System
3.2.4 Command Subwindows
A command subwindow is one type of subwindow common to most windows.
Command subwindows contain lists of commands that affect the entire window, options that change the way the system displays data, and information such as page numbers. (See figure 3.6.)
All commands in a command subwindow end with an exclamation point (!). To issue a command, you select that command.
• To select a command:
1) Point the cursor at the command in the subwindow 2) Press the left mouse button.
The list of commands in a command subwindow may change with the context of your work. The system lists only commands that are relevant to what you are doing at a given time.
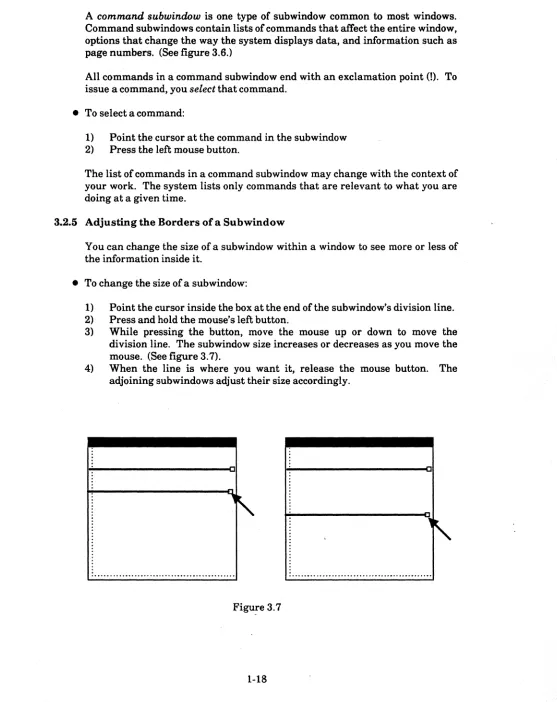
3.2.5 Adjusting the Borders of a Subwindow
You can change the size ora subwindow within a window to see mOfe Of less of the information inside it.
• To change the size of a subwindow:
1) Point the cursor inside the box at the end of the subwindow's division line. 2) Press and hold the mouse's left button.
3) While pressing the button, move the mouse up or down to move the division line. The subwindow size increases or decreases as you move the mouse. (See figure 3.7).
3.2.6 Scrolling
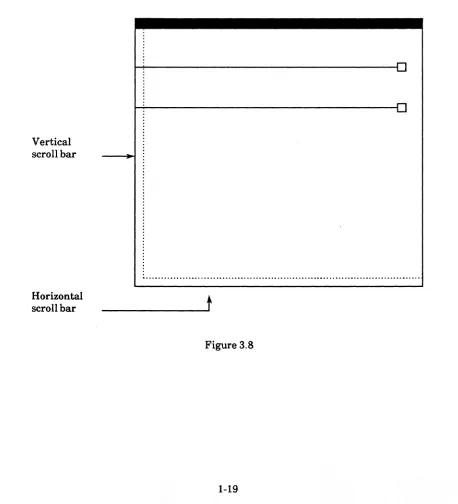
A subwindow can contain more information than its size lets it display at any one time. For example, a schematic page might be much larger than the portion of it you see through the subwindow. You can scroll the schematic in order to display different portions of it through the subwindow. You can scroll vertically (up and down) in all subwindows, and horizontally (left and right) in several subwindows.
You use a scroll bar to scroll a subwindow. Every window has a vertical scroll bar spanning its left border. Some windows also have horizontal scroll bars spanning their lower border. Figure 3.8 shows a vertical and a horizontal scroll bar.
Vertical scroll bar
Horizontal
scroll bar
t
Interacting with the System
• Toscroll:
1) Move the cursor into the scrollbar. You see a shaded rectangle that spans the vertical length of the subwindow, and a smaller, darker rectangle. The lighter area represents the entire subwindow. See figure 3.9. The darker area represents that portion of the information displayed in the subwindow. The cursor changes to a double headed arrow.
2) The cursor's distance from the the corner of the scrollbar tells the system
the amount to seroU. Move the cursor so that its distance from the top or
left corner is the amount you want to scroll.
3) The mouse buttons control the direction of scroUing. In a vertical scrollbar, the left button scrolls up and the right mouse button scrolls down; in a horizontal scrollbar, the left button scrolls to the left, and the right button scrolls to the right. With the cursor inside the scrollbar, press the left or right mouse button to indicate which direction to scroll. As you press the button, the cursor changes to an arrow pointing in that direction.
Cursor
The darker rectangle represents the portion displayed in the
---subwindow
3.2.7 Thumbing
Scrolling is similar to skimming through the text of a book when you are looking for a certain passage. If you knew approximately where that passage was you could find it faster by thumbing through the book page by page. You can also thumb through a subwindow. When you thumb through a subwindow,
you show the system which specific portion of the information inside that subwindow to display .
• To thumb:
1) Move the cursor into the scrollbar.
2) Press both of the mouse's buttons at once.
3) The cursor changes to a thick arrow pointing at the scrollbar. See figure 3.10. Remember, the scrollbar's lighter rectangle represents the entire subwindow, and the darker rectangle represents the portion of the subwindow you are viewing.
4) Use the cursor to point to the portion of the whole document that you want to display in the subwindow.
5) Release both buttons.
The cursor points to the portion you want to display
The darker rectangle represents the portion now displayed in the subwindow - - .
The lighter rectangle represents the entire subwindow.
Interacting with the System
If you move the cursor inside the scrollbar once again, you can see that the darker region moved to where you pointed. See figure 3.11.
The darker area shows the portion
displayed in the subwindow
3.3 Dynamic Menus
A dynamic menu, or pop-up menu, is a list of options or commands. Each
dynamic menu has a name inside a name frame; the menu's name describes the functions of the commands or options inside the menu. Figure 3.12 shows a dynamic menu inside a window.
~Prop8f Copyf
Net List
Schematic
Deletef
Window Manager
Move
Grow
Drag
Size
Top
Bottom
Zoom
Figure 3.12
Dynamic menus are associated with windows, subwindows, and objects inside subwindows. The cursor's position inside a window or subwindow, or pointing at an object tells the system which menus to display. Thus, dynamic menus only list commands or options that are relevent to what you are doing.at a given moment. Dynamic menus appear on the display only when you activate them. When you're not using them, they are out of your way.
• To activate dynamic menus:
1) Position the cursor inside the window or subwindow, or point to the object for which you want to display menus.
Interacting with the System
There is usually more than one menu associated with any cursor position on the display; when this is the case, dynamic menus are stacked on top of each other. The top menu covers all but the name frames of the other menus. Figure 3.13 shows a menu stack.
~Propsl Copy!
Net List
Schematic
Deletel
I
Document Operatio
Window Manager
Move
Grow
Drag
Size
Top
Bottom
Zoom
Figure 3.13
• To select a command from a menu that is not on top of the stack, you must first select that menu from the stack. Selecting a stacked menu brings that menu to the front of the stack. There are two ways to select a menu from the stack.
1) Press and hold both mouse buttons or the CENTER key to activate the stack of menus.
2) The eurS()r changes into an arrow pointing at the menu. Point the cursor at the name frame of the menu you wish to see. The system displays that name frame in inverse-video.
3) Release the mouse buttons or CENTER key.
Or
1) Press and hold both mouse buttons to activate the stack of menus.
2) The cursor changes into an arrow pointing at the menu. Release the left mouse button. As long as you hold the right mouse button, the menus remain active.
3) Point the cursor at the name frame of the menu you wish to see. The system displays that name frame in inverse-video.
3) Press and release the left mouse button.
4) The system displays the menu you selected at the top of the stack. • There are also two ways to select a command from the chosen menu:
1) Press both mouse buttons or the CENTER key to activate the menus. 2) The cursor changes into an arrow pointing at the menu.
3) Point the cursor at the command you want to issue. The system highlights that command.
4) Release the mouse buttons or the CENTER key. Or
1) Press both mouse buttons to activate the menus.
2) The cursor changes into an arrow pointing at the menu. Release the left mouse button.
3) Point the cursor at the command you want to issue. The system highlights that command.
Interacting with the System
3.3.1 The Window Manager Menu
Every window has at least one dynamic menu associated with it: the Window Manager Menu. The Window Manager lets you "shuftle" windows on the
display as you shuffle papers on a desk. Using the Window Manager, you can move a window, change its shape and size, and make it active or tiny. Figure 3.14 shows you the Window Manager Menu.
Copy!
Net List
Schematic
Delete!
I
Document Operatio
Window Manager
Move
Grow
Drag
Size
Top
Bottom
Zoom
Move
• To move a window:
1) Select Move in the window's Window Manager Menu.
2) The cursor changes into the shape of an tOM" inside a corner bracket.
~
3) Move the cursor to show the system where you want to move the window. As you move the cursor from one corner of the display to another, the cursor changes shape. The cursor's position and shape mark the new corner. See figure 3.15.
Figure 3.15
4) When you've determined where you want the window, press the left mouse button.
5) The window moves, and the cursor returns to its normal shape. The size and shape of the window remain unchanged. See figure 3.16.
Interacting with the System
Grow
• The Grow command changes the size of a window by stretching two sides of the window.
1) Select Grow in the Window Manager Menu.
2) The cursor changes into the shape of a ftG" inside a corner bracket.
GI
3) As you move the cursor on the display, it changes shape to show you the new corner. (Figure 3.17).
Figure 3.17
Drag
• The Drag command changes the size of a window by stretching only one side of the window.
1) Select Drag in the Window Manager Menu.
2) The cursor changes into an arrow pointing to a line.
3) Move the cursor across the border you want to stretch. As you move the cursor across the window's border, the cursor changes shape to show you that the system will drag that border. When the arrow points up, the upper border stretches. When the arrow points down, the lower border stretches. When the arrow points to the left, the left border stretches, and when it points to the right the right border stretches. The line to which the arrow points marks the new window border. See figure 3.19.
Figure 3.19
4) Press the left mouse button to stretch the side indicated to the new location (figure 3.20).
Interacting with the System
Size
• To make an active window tiny or a tiny window active:
1) Select Size in the Window Manager Menu. See figure 3.21.
Figure 3.21
Top
• To place a window on top of all other windows on the display:
I} Select Top in the Window Manager Menu. See figure 3.22.
Bottom
• To place a window beneath all other windows on the display:
1) Select Bottom in the Window Manager Menu. Figure 3.23 shows a window before and after you issue the Bottom command.
Figure 3.23
Zoom
• To make a window take up the entire display area, or to return it to its normal size from that state:
1) Select Zoom in the Window Manager Menu. Figure 3.24 shows a window before and after you issue the Zoom command.
:'::.::.,
I
Interacting witH the System
3.3.2 The Inactive Menu
The Inactive Menu is a special dynamic menu associated with the empty (grey) area on the display (figure 3.25). The Inactive Menu contains lists of Expert 1000 tools that you use less frequently, for example the File Tool and the Abbreviation Map. To open one of these tools, you select its name in the Inactive Menu .
• To activate the Inactive Menu:
1) Move the cursor to an empty area on the display, so that the cursor is not in any window.
2) Press both mouse buttons or the CENTER key.
You select an item in the Inactive Menu in the same way that you select an item in any menu. When you select an inactive menu item, the system creates a window displaying the item you selected. To store that window once again, select Close! in the window's command subwindow. Only select Inactive Menu items described in the User's Guide (File Tool. Abbreviation Map, Library Editor, Bye). Do not select other Inactive Menu items.
Command Central
SearchPath Tool
Diagnostics
Abbreviation Map
Library Editor
3.4 Accelerators
Accelerators are "shortcuts" that you use to give the system commands without using a menu. Accelerators are designed for users who are familiar with the system, use it frequently, and want a faster method of issuing commands. Unlike menu commands, accelerators never appear on the display; you must memorize them.
All of the Window Manager commands, for example, have accelerators. Like the Window Manager Menu, Window Manager accelerators are common to all windows.
3.4.1 Window Manager Accelerators
In general, you issue a Window Manager command with an accelerator by positioning the cursor in the left, middle, or right region of the window's name frame and pressing one of the mouse buttons. See the figure 3.26 below.
Left Region Center Region Right Region
Left Button
~
Top/Bottom Zoom TopIBottomRight Button
~
Move/Grow/Drag Size Move/Grow/DragFigure 3.26
• To issue a Window Manager command with an accelerator:
1) Move the cursor to the name frame region corresponding to the command. If the window is tiny, move the cursor to the left, right, or center third of the window near the upper border as if a name frame was there.
2) The cursor changes its shape to a circle with a point in the middle. 3) The system displays the region in inverse-video.
Interacting with the System
Figure 3.27 shows the cursor inside the middle region of the name frame.
Figure 3.27
Top/Bottom
• To place a window that is on top of other windows beneath them, or to place a window that is beneath others on top of them:
Move/Grow/Drag
• To Move, Grow, or Drag an active window:
1) Move the cursor to the left or right region of the name frame. 2) Press the right mouse button; do not release it.
3) The cursor changes to an "M" inside a corner bracket.
4) While holding down the right mouse button, press the left button. 5) The cursor changes to a "0" inside a corner bracket.
Gl
6) Press the left mouse button again.
7) The cursor changes to an arrow pointing to a line.
8) As you continue to press the left mouse button, the cursor continues cycling through the three shapes. Press the left button until you see the cursor corresponding to the Window Manager command (Move, Grow, or Drag) you want to issue.
9) Move the cursor to show the system where to move, grow, or drag the window.
10) Release the right button.
• You can also use the Move/Grow/Drag accelerator to move tiny windows on the display.
1) Move the. cursor to the left or right third of the window below the upper border.
2) Press and hold the right mouse button. 3) The tiny window becomes the cursor.
4) While pressing the right button, move the cursor to the new location for the window.
5) Release the right button.
Zoom
". To make a window take up the entire display, or to make such a window return to normal size:
1) Move the cursor to the center region of the name frame or tiny window.
2) Press the left mouse button. Size
• To make an active window tiny, or a tiny window active:
Interacting with the System
3.5 Text Editing
Some subwindows contain graphic items, and others contain text. You often need to edit text, for example to change a command parameter, alter a property value (section 3.6), or edit a text file. This section explains text files, file windows, and the techniques you use to edit text.
3.5.1 Text Files and File Windows
Text files are files of textual information that you can create and keep at your
workstation. Creating a text file at your workstation is similar to writing a report on a piece of paper ,and keeping it in a file drawer at your desk.
You create and edit text files in a special type of window known as a file
window. A file window has two command subwindowl:l, and a third text
subwindow in which you display the text file. See figure 3.28.
Create Edit Find J. First Load Position Reset Save Split Store Time Break Trace
RF! F"'and! .... Replace! aiD
....
Creating a File Window • To create a file window:
1) Move the cursor to an empty area on the display and press both mouse buttons to activate a menu stack. Select the Exec Ops Menu.
2) Activate the Exec Ops Menu. Select File Window.
3) The system asks you to confirm the File Window command. The cursor changes to the shape of a mouse. Press the left mouse button to confirm the command. The system creates an empty window at the point where you pressed the left mouse button.
The File Window Menu
The File Window Menu is associated with the third subwindow in the file window (the text subwindow). The File Window Menu contains commands for manipulating the text file displayed in the window. Figure 3.29 shows the File Window Menu.
~ Create Edit Find J. First Load Position Reset Save Split Store Time Break Trace
~RF! Find! - : Replace!
IWindowMg
ITextOps
File Window
Create
Destroy
Load
Store
Time
Figure 3.29
I-
r-all! - :
Interacting with the System
Create
The Create command creates a new file window. • To create a file window with the Create command:
1) Bring up the File Window Menu. 2) Select Create.
3) The cursor changes to the shape of a mouse. Press the left mouse button to confirm the Create command, and to indicate the new window's position on the display. The system displays the new file window at the point where you pressed the left mouse button.
Destroy
The Destroy command removes the file window from the display. • To remove a file window:
1) Bring up the File Window Menu. 2) Select Destroy.
3) The cursor changes to the shape of a mouse. Press the left mouse button to confirm the Destroy command. The system removes the file window from the display.
Time
When you select the Time command the system writes the date and time into the text subwindow. For example: 13-May-83 10:23:12.
Store
The Store command instructs the system to store a new text file. To store a file:
1) Select the file name. If the name appears in the text subwindow, select it there; if not create an empty file window, type the file name it the new file window's text subwindow, and select it.
Load
The Load command instructs the system to load an existing text file into the file window.
• To load a file:
1) Type the file name in the file window's text subwindow. 2) Select the file name.
3) Select Load. Edit
After loading an existing file, use the Edit command to tell the system you want to change the text in the file.
• To edit a file:
1) Load the file into a file window. 2) Select the Edit command.
3) Use the text manipulation techniques described in section 3.5.2 to change the text file.
When you finish editing the file, use the Save command to instruct the system to save your changes.
Save
The Save command appears in the File Window Menu only when you are editing a file. It instructs the system to save the changes that you made to the file.
Interacting with the System
Reset
If you are not editing a file, the Reset command removes all text from the text subwindow. If you are editing a text file (you have loaded the file and issued the Edit! command) the Reset! command restores the file to its original state before you began editing it.
• To reset the file window: 1) Select Reset.
The Command Subwindow
The first file window command subwindow lists Text Ops Menu and File Window Menu commands. The command name in the command subwindow acts as an accelerator for the command. For instance, you can Split the text subwindow without activating the Text Ops menu. You simply select Split in the command subwindow.
You cannot issue a command in this subwindow unless the command currently exists in the dynamic menu. For example, the Edit command is available only after you have loaded a file into the window. Therefore, even though the Edit command may appear in the command subwindow, you cannot issue it unless it also exists in the dynamic menu.
You can add menu items to the command subwindow, and delete items from the subwindow.
• To add an item:
1) Hold the PROP'S key and select the type-in point with the left mouse button.
2) Type the File Window Menu or Text Ops Menu command name.
• To remove a command from the list:
1) Hold the PROP'S key and select the type-in point with the left mouse button.
2) Use the backspace or backward key to delete the command name. Creating a New FDe
• To create a new text file:
1) Create a new file window. .
Editing an Existing File
• To edit an existing file:
1) Move the cursor into the third subwindow of the empty window and press the left mouse button.
2) Type the name of the file. 3) Select the letters you typed.
4) Select Load in the empty window's rust subwindow. The system displays the text file.
,5) Select Edit in the first subwindow, and make your changes. 6) When you finish editing the file, select Save.
3.5.2 Text Manipulation
You can edit the text in a text subwindow by selecting a portion of it and adding or deleting characters. In addition, the system supplies you with commands to manipulate the text subwindow, search for and replace patterns in the text.
Selecting Text
• To select a single character in the text body, point the cursor at the character and press the mouse's left button. Press the button twice to select the word, three times to select the line, four times to select the whole body of text, and five times to select just the character once again.
• You can extend a text selection to the left or right two ways:
1) Point to the endpoint of the selection and press the mouse's right button. Or
2) Move the cursor while holding the mouse's right button. Release the button when the cursor points at the endpoint of the selection.
The Current Selection
There is only one current selection at any time (not one per window); the system often uses the current selection as the argument to text editing commands you issue. The current selection applies only to text in text subwindows; a selected command, for example, is not a current selection.
Entering Text
Interacting with the System
• To add text:
1) Select the type-in point, then type the text using the keyboard.
When entering text in an empty file window, move the cursor into the text subwindow and press the left mouse button. The system displays the type-in point at the top of the sub window. Type the text.
Deleting Text
• To delete text, select the text you want to delete, and press the key marked DELETE. If you accidentally delete text, you can replace it by pressing the PASTE key (marked SAME). You can also use the backspace key (above the carriage return key) to delete the character immediately preceding the type-in point. The backword key (Press SHIFT and backspace simultaneously) deletes the word preceding the type-in point. You cannot replace text you delete with the backspace or backword keys.
Copying Text
• There are three ways to copy text within a text subwindow or from one sub window to another:
1) Select the text.
2) Hold down the PROP'S key and use the left mouse button to select the type-in point where you want to copy the text. Release the PROP'S key. 3) Press the STUFF key (marked OPEN).
Or
1) Select the text. 2) Press DELETE.
3) Press the PASTE key (marked SAME) to replace the text.
4) Use the mouse to move the type-in point towhere you want to copy the text.
5) Press SAME once again. Or
1) Move the type-in point to the desired location. 2) Hold down the COPY key.
3.5.3 The Text Ops Menu
The Text Ops Menu provides commands for manipulating text placement inside a text subwindow. Figure 3.30 shows the Text Ops Menu.
~Create Edit Find J. First Load Position Reset Save Split Store Time Break Trace
~RF! Find! +-. Replace! all! +-;
I File Wind
IWindowMg
TextOps
Find
Split
Position
J.
First
J.
Insert
J.
Select
J.
Last
r-Wrap
r-Figure 3.30
• To display the Text Ops Menu:
Interacting with the System
Find
The Find command finds the next occurrence of the current selection in the subwindow. If the current selection is in the subwindow, the search begins at the end of the selection; otherwise it begins at the first character visible in the subwindow. If the search is successful, the next occurrence of the text becomes the new selection. The search continues into text not visible on the screen; if found, the system scrolls the text to the top of the subwindow. If the system finds no further instances of the text, the display blinks.
If you hold down the SHIFT key while selecting the Find command, the system searches backwards from the current selection, or from the last character visible in the window.
Split
The Split command divides a region of the subwindow into two subwindows separated by a dashed line with a small box at the right end of the line. You can scroll the subwindows independently of each other, and move the border to adjust their sizes. Remove the line by moving it off the top. or bottom of a subwindow. Figure 3.31 shows a split text subwindow.
~Create Edit Find J. First Load Position Reset Save Split Store Time Break Trace
~RF! Find! +-. Replacel all!
{J
Position
Use the Position command to position the text in the subwindow so a specific character is at the top. You select a positive number in any text subwindow to specify a character in the file, then select the Position command. For example, to place the 275th character at the top of the subwindow, select the number 275 (either type it in the subwindow or in a second file window), and select Position.
J.First
The J. First command positions the text in a subwindow so that the first line of text is at the top of the subwindow.
J.Insert
The J. Insert command positions the text in the subwindow so that the type-in point is at the top.
J. Select
The J. Select command positions the text in the subwindow so that the line containing the leftmost character ofthe current selection is at the top.
J. Last
The J. Last command positions text in a subwindow so that the last line of text is at the top of the subwindow.
Wrap
Text subwindows have two states of line wrap-around. When wrapping is on, a
Interacting with the System
3.5.4 Pattern Matching: Find and Replace
The file window's second subwindow lets you perform pattern matching and replacement in text subwindows.
• You can instruct the system to look for a partieular pattern of characters, for instance a word.
1) Use the right mouse button to select the arrow following the Find! command. Leave the cursor inside that subwindow.
2) Type the text for which you want to search.
3) Select Find! The system searches for the pattern, and selects it.
The pattern you entered after the arrow is called Find! buffer. If you issue the Find! command while the buffer is empty, the system searches for the current selection instead. In this case, the system fills the buffer with the current selection.
• You can also instruct the system to replace one pattern with another, for example. to substitute one word for another.
1) Select the pattern you want to replace, or enter the pattern you want to replace in the find buffer. (Use the right mouse button to select the arrow following the Find! command. Type the text you want to replace.)
2) Use the right mouse button to select the arrow following the alit command. Type the pattern you with which you want to replace the rust pattern.
3) Select Replace!
The all! command does successive replaces until there are no more matches or until you press the ABORT key (marked STOP).
The Find! and Replace! commands operate on the window you are editing. If you have split the window, they operate on the split that contains the current selection; if the selection is in another window. or if there. is no selection, they operate on the first split.
3.6 Property Sheets
Most graphic and text objects inside subwindows have certain properties associated with them. For example, a logic symbol in a schematic has a library identification number, a library name, a symbol designator, a physical designator, a physical part name, pin numbers, physical device parameters, and a micro-note. Any window that displays a schematic or documentation set also has properties. You can change properties in a special type of window known as a property sheet. Figure 3.32 shows a logic symbol property sheet from an Expert 1000 schematic.
~Applyl Abort! Libraryic:t= 262145 Library name: 2·inputAND
~ Symbol designator: Physical designator: Physical part:
~ Device parameters ••. 1: 2: 3:
~ Micro·note:
... Pin numbers ... .
:In(1); In(2): Out(3):
Figure 3.32
• To display the property sheet for a window:
1) Select the Props! command in the window's command subwindow. • To display the property sheet for a graphic or text object inside a subwindow:
1) Select the object
2) Press the function key marked PROP'S.
Interacting with the System
While you display a property sheet for an item inside a window, the system may not let you issue commands associated with the window. You usually enter the item's properties and close the property sheet before issuing other commands. There are four types of properties. The procedure for changing a property differs for each property type.
3.5.1 Boolean Properties
Some properties are simply listed in the property sheets. These are properties that you can turn on or off, like a toggle switch. Often a description followed by three dots precedes a boolean property. Figure 3.33 shows boolean properties. If the name of the property is in inverse-video, the property is on, otherwise it is off.
Applyl Abort! Coarse Grid Unit: {t inch} Id page defines= 4294967295
Display options: {this View}
Designators: {none} Pin Names: {monoliths} Physical Name Random Text
Device parameters... 1 2 3 Show grid ticks
Default for parameter .••
Capacitor 1: 2: 3:
Coil 1: 2: 3:
Diode 1: 2: 3:
Relay 1: 2: 3:
Resistor 1: 2: 3:
:fr.Q.A$jftWr. . J.:. ., .•..••••••.••.•.••• ~: .••••.••••••.•••.•.... ;:\: ...•.••••.•.•...•...•..•.•• " ..••••.
Figure 3.33
• To turn a boolean property on or off: 1) Point the cursor at the property. 2) Press either mouse button.
3.5.2 Property Lists
A property list consists ofa property name and several possible property values. (See figure 3.34.) You choose a property value from the list of possibilities. There are two ways to do this, depending on how Expert 1000 displays the property list.
Property Lists
--
~Apply! Abort! Coarse Grid Unit: Display options: {thisView} {t inch} Idpagedefines= 4294967295~ Designators: {none} Pin Names: {monoliths} Physical Name
~ Device parameters. •• 1 2 3 Show grid ticks
~ Default for parameter .•.
~ Capacitor 1: 2:
~Coil 1: 2:
~Diode 1:
~Relay 1:
~ Resistor 1:
2: 2: 2: 3: 3: 3: 3: 3: Random Text
1 :fr.~nljlill.t(n: .. 1.: ...•...•... ~: ... iJ.: .•.••.••..•.••••....••••...•...•.•••
Figure 3.34
• If there is only one value inside the brackets, the other possible values are contained in a dynamic menu associated with the property name.
1) Point the cursor at the property name and activate the menu.
2) Select a value from the menu. Notice that Expert 1000 displays the value you selected inside the brackets .
• If the property name is followed by a list of values inside brackets, you can select one value from that list, or select the value from an associated menu. To select the value in the list:
Interacting with the System
3.5.3 Text Properties
A text property consists of a property name followed by one or several words. The text might be the name or a description of the object with which the property sheet is associated. Figure 3.35 shows text properties.
Text Properties
~Applyl Abort! Coarse Grid Unit: {t inch} Id page defines
=
4294967295 Display options: {thisView}~Designators: {none} Pin Names: {monoliths} Physical Name Random Text
~ Device parameters. •• 1 2 3 Show grid ticks
~ Default for parameter •••
~Capacitor 1: 2: 3:
~Coil 1: 2: 3:
~Diode 1: 2: 3:
~Relay 1: 2: 3:
~ Resistor 1: 2: 3:
i
:fr.,"$jl'l.~C)r. .. \~ ... ~~ ... ;J.:. ..••••••.•••.••••••••••••••..•..••••Figure 3.35
Use the text manipulation techniques described in section 3.5.2 to change text properties. You can also use these special text editing techniques for property sheets:
• When you select any character in the property name with the left mouse button, the system automatically selects the whole body of text following the name.
• You can use the SKIP NEXT key in the right function group
to
automatically move the type-in point to the next text or numeric property in the property sheet. The system automatically deletes that property's value. You type the new value.3.5.4 Numeric Properties
Numeric properties are properties whose values may be only numbers. For
example, the width of a line in a schematic is a numeric property. An equal sign (=) following a property name distinguishes a numeric type from a text type (see figure 3.36). Use the text editing techniques above to change the value of a numeric property type.
Apply! Abort! Coarse Grid Unit: {! inch} Id page defines
=
4294967295,Display options: {thisView} ~
Designators: {none} Pin Names: {monoliths} Physical Name Random Text
Device parameters. .• 1 2 3 Show grid ticks Numeric
Default for parameter •••
Capacitor 1: 2: 3:
Coil 1: 2: 3:
Diode 1: 2: 3:
Relay 1: 2: 3:
Resistor 1: 2: 3:
:rr.IJn~jli.~Qr. . J~ ... ~: ... ;1,: ..••••••.••••••.•••.•••••.•••••••••.••
Figure 3.36
3.5.5 Apply! and Abort!
Below the property sheet's name frame are two commands: Apply! and Abort! Both close the property sheet.
• To apply the changes that you made in the property sheet: 1) Select Apply!
A documentation set is the collection of data for a particular design. An Expert 1000 documentation set window resembles a folder in which you place a schematic and its associated net list, parts lists, and other reports. Each Expert 1000 schematic has its own documentation set.
The Documentation Set
~Props! Copy!
Net List
Schematic
Delete!
IWindowM~
Document Operations
Close
Open
Recreate Edits
-. -. -. -. -. -. -. -. -. -. -. -. -. -. -. -. -. -. -. -. -. -. -. -. -. -. -. -. -. -. -. -. -. -. -. -. -. -. -. -. -. -. -. -. -. -. -. -. -. -. -. -. -. -. -. -. -. -. -. -. -. -. -. -. -. -. -. -. -. -. -. -. -. -. -. -. -. -. -. -. -. -. -. -. -. -. -. -. -. -. -. 0 . . . .
, ' ,
Figure 4.1
4.1 Copying a Documentation Set
• To' copy a documentation set:
1) Decide which of th& empty, tiny documentation sets contains a schematic with the format you need. Use the Window Manager Menu or the Window Manager acceI~rators to activate that documentation set window.
4.2 Naming a Documentation Set
• To name a documentation set:
1) Select the Props! command in the documentation set's second subwindow. The system displays the documentation set's property sheet.
2) The property sheet contains only one property: the documentation set name. Use the text editing techniques described in section 3.5 to change the documentation set name. Documentation set names may not include periods, spaces, or brackets.
3) When you finish entering the name, select Apply!. The system closes the property sheet, and displays the new name in the documentation set's name frame.
4.3 Deleting a Documentation Set
• To delete a documentation set:
1) Select the Delete! Command in the documentation set's second subwindow.
2) The system asks you to confirm the Delete! command. The cursor changes into the shape of a mouse. If you are certain that you want to delete the documentation set, press the left mouse button. Press the right mouse button if you do not want to delete the documentation set.
3) The system asks you to confirm the Delete! command again. If you are still certain that you want to delete the documentation set, press the left mouse button. Press the right mouse button if you do not want to delete the documentation set.
4.4 The Document Operations Menu
The Document Operations Menu lets you manipulate the net list and schematic stored in the documentation set.
• To activate the Document Operations Menu:
1) Place the cursor inside the documentation set command subwindow. 2) Press both mouse buttons or the CENTER key.
5. The File Tool and the Tape Tool
5.1 The File Tool
The File Tool lets you transfer files from your local disk to remote servers, and from servers to your local disk. You use the File Tool, for example, to store a completed documentation set on a file server. That file server acts as a large filing cabinet in which there are several drawers known as directories. When you store a documentation set you specify the directory name as well as the file server name.
When you first start the system, the File Tool is a tiny window on your display. Use the Window Manager's Size command to make the File Tool window active.
5.1.1 The File Tool Window
The File Tool and the Tape Tool
: Host: ~Source: ~Dest'n:
~Connect:
Directory: Versatec
LocaiDir: Password:
: Retrieve! Local-List! Copy!
~Storet Remote-List! Close!
~Type ~Create
5.1.2 Command Parameters
Bytes
Write
Figure 5.1
<
=
> :{NS.Pup} Always Verify"Local-Delete! List-Options!
Remote-Delete!
Author Read
Apply!
Abort!
The second, command parameter, subwindow acts as a property sheet containing text and boolean properties. Each text parameter has a name. You enter the parameter value after its name. Use the text editing procedures described in section 3;5 to enter text parameters as if they were ~xt properties. A caret shows you the current type-in point, the point where the system will
• To move the type-in point from one parameter to another:
1) Press the SKIP NEXT key. The system moves the type-in point to the next parameter and deletes the existing parameter value. For im;tance if the type-in point is at Host:, pressing SKIP NEXT moves the type-in point to Directory:.
Or
1) Select any character in the parameter name. The system selects the parameter value.
Or
1) Select the characters you want to change in the parameter name. Delete them, and type the new characters.
Host
The Host parameter is the server with which you want to transfer a file. For example, to store a file on the server named "File Cabinet," you enter "File Cabinet" as the host.
Directory
Servers are partitioned into directories. A directory is similar to a file drawer inside a file cabinet. You enter the directory name for the file you wish to transfer after the word "Directory."
Source
The Source is a list of files (separated by spaces or returns) for the next command to act upon. File names may include expansion characters. Expansion characters tell the system to expand the file name. An asterisk (*) in a file name tells the system to replace the file with a list of files matching that file name where the asterisk matches zero or more characters in the file name. For example, "*.df" matches all files that end with the characters" .df." A single quote (') tells the system to treat the following character as if it were not a file name expansion character. The system removes the single quote from the file list. For example, a single quote before an asterisk tells the system not to treat the asterisk as a file expansion character; "' •. df" specifies the file named "* .df. "
Destination, Local Directory, Connect and Password
The File Tool and the Tape Tool
Boolean Parameters
The parameter subwindow also contains several boolean parameters. Boolean parameters displayed in inverse-video are true. Turn boolean parameters on and ofT as you would tum boolean properties on and ofT.
The
u."
parameter tells the system to treat asterisks in Source as if they werequoted when you issue remote commands, (Retrieve, RemoteList, RemoteDelete). The default value of this parameter is true.
The >,
<,
and=
parameters tell the system to compare creation dates of source and destination files when destination files already exist. The greater-than parameter (» tells the system to store or retrieve the source file only if the destination file exists and the source file is newer than the destination. The default value is false. The less-than parameter ( <) tells the system to store or retrieve the source file only if the destination file exists and the source file is older than the destination. The default value is false. The equal-sign parameter (=) tells the system to store or retrieve the source file only if the destination file exists and the source file is the same as the destination. The default value is false. You can specify "not equal" by turning on both<
and>. The Always parameter tells the system to heed the >.<,
and=
parameters even when the destination file does not exist.The Verify parameter tells the system to request a confirmation of each file transfer. The defaUlt is false.
The NS parameter tells the system that the host server understands Xerox NS protocol. This parameter is always true. The PUP parameter is always false.
5.1.3 File Tool Commands
After entering command parameters in the parameter subwindow, you select a command in the command subwindow. The actual file transfer is a background process. You may enter different parameters in the parameter subwindow, or work with other windows while the system is transfering files. The system clears the command subwindow so that you cannot issue a second File Tool command.
Retrieve!
Local-List!
The Local-List! command lists all files on the local disk corresponding to the Source value. If Source is empty, the Local-List! command lists all local files.
Local-Delete!
The Local-Delete! command deletes all files specified in Source. If, for any reason, the system cannot delete a file, it skips that file and continues processing the rest of the files in the list.
Remote-List!
The Remote-List! command lists all files on the remote file system corresponding to the name in Source.
Remote-Delete!
The Remote-Delete! command deletes the names specified in the Source parameter from the remote file system.
Verification Commands
When the Verify parameter is true, the system displays three additional commands: Confirm!, Deny!, and Stop!. Select Conf"trm! to instruct the system to carry out the command you issued. Select Deny! to cancel the command. Select Stop! to terminate the command.
5.1.4 List Options
The List-Options! command displays the List Options property sheet. List Options properies control the way the system displays file listings in the File Tool's fourth subwindow. All List Option properties are booleans. After changing the options, select Apply! to effect those changes. Select Abort! to restore the commands to their status before you opened the List Options property sheet. Both Apply! and Abort! close the property sheet window. Type
The Type property controls whether the system displays the file type. Create
When Create in on, the system displays file creation dates. Bytes
I
The File Tool and the Tape Tool
Write
Turning on the Write property instructs the system to display the last date the file was read.
Author
When Author is on, the system displays the name of the person who created the file.
Read
Turn on the Read property to display the date the file was last read.
5.1.5 Storing a Documentation Set
You use the File Tool to store documentation sets in your directory on a file server.
• To store a documentation set:
1) Enter the file server name in the Host parameter field. Press the SKIP NEXT key.
2) Enter the name of your directory in the Directory field. Press the SKIP NEXT key.
3) Enter the name of the documentation set followed by the characters" .df." For example, if the documentation set is named NewDesign, you type NewDesign.df.
4) If you want the documentation set on the file server to have a different name, press t