Landscape Design Basics Landscape design can be defined as or-ganizing and enriching outdoor space by placing plants and structures in an agreeable and useful relationship with the natural environment.
Designing landscapes is an art. Merely planting trees and shrubs is not landscaping. Landscaping is creating a plan to make the best use of available space in the most attractive way. It means shaping the land to make the most of a site’s natural features and advantages, and it includes building such neces-sary structures as fences, walls and patios. Finally, landscaping involves selecting and growing plants that best fit the design.
The smaller the house, grounds and budget, the greater the need for effective and complete planning because every square foot of space and every dollar must produce maximum results. Plan for the best use of the site and minimum upkeep as well as a pleasant appearance.
Plan for complete development. There is no need to develop all of the lot at once. However, there should be an overall plan so that when any work is done on the lot, it will be part of the general scheme. Carrying out the landscape plan generally takes several years, since plants need time to grow. Do not allow a spade of earth to be turned until a grading schedule has been prepared from a well-studied plan for house and lot. To do otherwise is to sacrifice other things, such as valuable trees and soil.
Analysis of Site and Family Needs
The fundamental principle of landscape design is that each development should be based upon a specific program. In turn, this program should be based upon the following criteria: the people who will use it, their cultural needs, individual desires and economic
abilities; the climate; the site, its immediate surround-ings, its topographic and ecological conditions and all objects, natural or manmade, that now exist on the site or are planned for the future; and the available materials fabrication methods.
The landscape designer must study the habits of people and what they do and understand their desires and needs. The landscape designer also must deter-mine what space and materials are available and how they may be used to accommodate these goals. The first step in landscape design is to divide the available space into use areas, including the pub-lic area, the private area, and the service or work area (fig.1). The public area is the section seen by passersby. It is generally in front of the house and should present an attractive public view. The living or private area is for the family and may consist of a patio, deck or porch for outdoor sitting, entertain-ing or dinentertain-ing. A play area may be incorporated into the living area, depending on the family’s interest and the ages of any children. A service or storage and work area should provide a place for garbage, garden tools, supplies, etc. It should have convenient access and may be screened from other areas. A cut flower bed or vegetable garden may be conveniently located in or near the service area.
Landscape Design and Horticulture
Adapted from the Texas Master Gardener Manual by
John White, Doña Ana County Extension Agent, and
Curtis W. Smith, NMSU Extension Horticulture Specialist
Factors Influencing Landscape Design The Lot and Its Characteristics
In planning a design, preserve the best natural resources on the site, such as mature trees, ponds, brooks, rock outcroppings, good soil, turf, and interesting variations in the terrain. These natural ele-ments affect the ease of construction and contribute to the overall landscape possibilities. Carefully survey the area to determine whether site conditions will be a deterrent or whether they can be incorporated into a design plan. Thin, overcrowded trees may be a problem and should be removed. Microenvironmental problems may exist on a site, such as low places with cold air drainage or areas with poor soil and inad-equate water drainage.
Changes in elevation can add interest and variety to the home landscape. The character of land and its hills, slope, and trees should determine the basic landscape pattern. A hilly, wooded lot lends itself to an informal or natural design with large areas left in their natural state. In such a setting, large trees can be retained.
Although natural slope variations are an asset, avoid creating too many artificial slopes. Excessive grading of terraces or retaining walls should be avoided. If these features are necessary to facilitate construction or control water drainage, they should be designed to detract as little as possible from the natural terrain.
Neighborhood Sights and Sounds
Keep attractive views visible and screen undesirable views. A shrub or two often will provide necessary screening. Plants also can act as noise barriers. Princi-pal rooms of the house should look out on the lawn or the garden. Design special areas to be viewed from favorite windows.
Climate
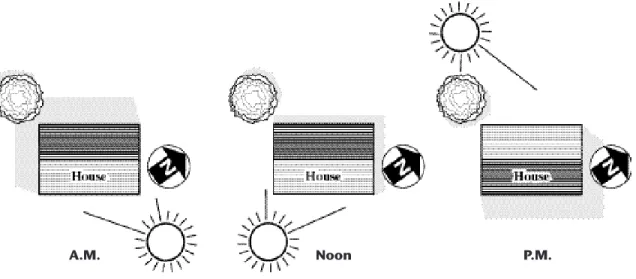
Climate includes sunlight, wind, temperature, and all forms of precipitation. Climate affects the way a house should be placed on a lot, how the land is used and what is planted. In planning the grounds, do not fight the climate. Instead, capitalize on its ad-vantages. In warm regions, enlarge the outdoor liv-ing area. In cold regions, plan the landscape so that winter scenes are enjoyed from indoors. Evergreens and hedges are picturesque when covered with snow. Since people respond differently to sun and shade, it also is important to study the amount and location of each on the lot. Sun and shade patterns change with the seasons and vary each minute of the day (fig. 2). The sun is higher, and shadows are shorter in summer than in winter.
Northern exposures receive the least light and are therefore the coolest. Eastern and western areas receive more light; western exposures are warmer than eastern because they receive afternoon light. Southern orienta-tions receive the most light and tend to be warmest.
Figure 2. Shade patterns at different times of day.
The principal rooms of a house should benefit from winter sun and summer breeze. This means that the house must be correctly oriented. A plan suited to one lot will not be correct for another lot that faces a different direction. Sunlight and shade can be con-trolled by the location of buildings, fences, and trees. Also, consider possible shade from trees and houses on neighboring lots.
Plan future shade from tree plantings with great care in order to keep sunny areas for the garden and summer shade for the house and terrace. Deciduous trees (those that shed their leaves) shade the house in summer and admit the sun in winter. Place trees off the corners rather than the sides of the house, where they will accent the house and not block views and air circulation from windows. Remember that too many trees tend to shut out sunlight and air.
Family Activities
How the land is going to be used should be a deter-mining factor in landscape design. Analyze family activities. For example, small children need an open lawn for playing, and gardeners need space for grow-ing vegetables and flowers. Make allowances for future changes. Consider outdoor living, playing, gardening, and household servicing. Family routines follow a general pattern, but they vary with each family’s way of living.
Cost Effective Maintenance
Decide on maintenance standards. For the person who enjoys puttering about the yard, landscape design may be elaborate. In general, the simpler the site, the less there is to maintain. A low maintenance plan is the goal of most homeowners. This may be achieved to a large extent in the planning stage by careful atten-tion to the nature of the site. Existing trees, eleva-tions, and projected use of the area should be prime considerations. Low maintenance may be achieved by adopting one or more of the following:
•
Have small lawn areas•
Use ground covers or natural pine straw, bark chips and other mulches•
Pave heavily traveled areas•
Provide brick or concrete mowing strips for flower beds and shrub borders•
Use fences or walls instead of clipped formal hedges for screening•
Design raised flower beds for easy access and to help control weeds•
Install an underground irrigation system in areas of low rainfall•
Have small flower beds and use flowering trees and shrubs for color•
Be selective in the choice of plant materials; some plants require little pruning, spraying, and water-ing•
Use native plant materials•
Keep the design simple•
Use mulches for weed control when possible.•
If herbicides are necessary, use caution and followdirections
Definition of Areas and Design Considerations
The residential landscape can be divided into three areas: public, private, and service.
Public Area
This is the area the public sees, which generally is in front facing the street. The landscape in this area should create an illusion of spaciousness. Tall trees in the back-yard and medium-sized trees on the sides and in front will help accomplish this effect. Keep the lawn open and keep shrubs to the side or in foundation plantings. When selecting shrubs to frame the front door, con-sider their texture, color, size, and shape, so they will enhance the total effect of welcoming guests. The house is to be the focal point of the view.
Driveways should be pleasing in appearance, useful, and safe. The landscaping of many homes is spoiled by poorly designed and maintained driveways. Some driveways tend to unnecessarily cut up the yard. Park-ing areas and turnabouts should be provided when practical. If possible, the driveway should be hard-sur-faced, because it is neater and requires less maintenance than unpaved driveways. Do not plant tall shrubbery at a driveway entrance or allow vegetation to grow so tall that it obstructs the view of the roadway in either direction.
In planning the home grounds, give careful consider-ation to foot traffic patterns, so there will be easy access from one area to another. This traffic may be served by walkways, terraces, or open stretches of lawn. In areas of heavy use, a paved surface is best.
The walkway design to the front door often depends on the location of the front door relative to parking and the topography of the land. When guest parking is at the edge of the street, a straight walk is probably
best if the grade is suitable. When the guest parking area is planned for the property, the walk might more logically lead from the guest parking area to the front door. Foot traffic can use the driveway.
Sometimes land topography makes it desirable to have the entrance walkway start at the edge of the property and curve to the front door to take advantage of a gradual grade. However, avoid curved walks that have no apparent reason for curving.
Generally, the walkway to the front door parallels the house and joins the driveway. This design is some-times used if the driveway entrance grade at the street is less steep than the area directly in front of the door. This type of design might eliminate the need for stairs. When the walkway is parallel to the house, be sure sufficient space is left for plant material.
For a residence, make the front walkway at least 4 feet wide. Build safe walkways. Avoid using of materials that are rough or raised that can cause visitors to trip or stumble. Design steps so they will be safe, especially in wet or icy weather. Make the treads wider and the risers less tall than the treads and risers used indoors. Install handrails where needed.
Private or Outdoor Living Area
The private living area or outdoor living room has become an important part of American homes. No yard is too small to have a private sitting area where family and guests can gather. Where possible, there should be easy access from the house to the outdoor area. The ideal arrangement is to have the living room open onto a porch or terrace and have the kitchen near the outdoor dining area. The outdoor living room can be simple. An open, grassy area enclosed by a wall or shrubs enables the homeowner and guests to sit outdoors in private. Alternatively, a more elaborate outdoor living room can be developed by introducing a series of gardens or garden features.
The outdoor private area serves the following func-tions: outdoor entertaining, family relaxation, recre-ation, outdoor eating, and aesthetic enjoyment. When planning major private areas, several factors should be considered.
Privacy
The area should be screened from public view or near-by neighbors using properly grouped shrub borders or
trees. For a small area, use a fence to save space. The private area should be screened from work areas, such as clotheslines, wood piles, garden sheds or other less pleasant views.
Livable Touch
Furniture should be attractive, designed for outdoor use and appropriate for the size of the landscaping. Garden accessories should be kept to a minimum and should be simple and unobtrusive.
Year-Round Interest
The outdoor living area should be planned so that the plant material is varied, and there is interest through-out the year. This is especially true if the area is visible from the house. For winter interest, select shrubs and trees with colorful bark, evergreen foliage, or colorful fruit. During the rest of the year, use flowers, shrubs, and trees to create interest. Pools, stone steps, paving, walls, birdfeeders, and other architectural features will add interest to the garden. Architectural details do not change with the seasons and can give interest and meaning to the garden throughout the year.
Climate Control
Control of climate in the outdoor living area helps extend its period of usefulness. Shade trees screen the area from hot sun, and windbreaks reduce some of the wind in the spring. An awning or trellis-type roof can provide shade or shelter from rain. A garden pool or fountain conveys coolness during the hot summer season.
The Terrace or Sitting Area
The center of activity for a living area often is a space arranged with garden or patio furniture. It may be a porch, deck, or terrace next to the house or a special section of the living area. It may be under the shade of a large tree or in a shady corner. The sitting cen-ter may be either paved or in turf. Flagstone, brick, concrete blocks, or concrete with redwood dividers are materials commonly used for surfacing the outdoor terrace. The size of the paved terrace depends upon its expected use and the type and amount of furniture. A 10- by10-foot area will hold four chairs and is about the minimum size to comfortably accommodate four people. Increase the size if space is desired for a picnic table and a grouping of four to eight chairs. This area also may include a grill or outdoor cooking area.
The Play Area
The play area can be part of the outdoor living area, or it can be separate from it. For very young children, a small area enclosed by a fence near the kitchen or living area is desirable. A swing, sand box, or other playing equipment can be placed here. In yards with a good deal of open lawn space, there is room for cro-quet, badminton, or a portable wading pool. A large tree in the backyard may be ideal for a tree house. A paved driveway or parking area makes an ideal area for badminton, basketball, or shuffleboard for older chil-dren, as well as tricycling or roller skating for younger ones. Since children’s ages and interests always are changing, it is necessary to make design adjustments to meet changing recreational needs.
Enclosed Front Yard as a Private Area
The front yard of most homes is traditionally left open so that the home can be viewed by passersby. How-ever, privacy for the front area can be provided by hedges or a screen of trees and shrubs along the street. For example, privacy in the front yard may be desired if a picture window faces the street or if the front yard is used for outdoor sitting. Where space is limited, a tall fence may provide privacy and may be an attrac-tive background for shrubs and smaller plants. Check city codes and ordinances. Tall front yard fences may not be allowed without a variance.
Service, Work or Production Areas
Space often needs to be provided for permanent clotheslines, garbage cans, trash burners, air- conditioner units, tool storage, wood storage, a vegetable garden, compost bin or pile, a cutting garden, propagating structures, small greenhouses, or a kennel. Service facilities should not be visible from the outdoor living area or from the street. However, an exception might be an attractive greenhouse or storage building designed and constructed so that it blends into the overall setting and has an interesting composition of plants around it. Wood or wire fences, brick or masonry walls, plant material alone or a com-bination of these elements are used most commonly to hide or partially screen service areas.
In a small backyard, it may not be feasible to com-pletely enclose a permanent clothesline. Hiding poles with one or two large shrubs or using a vine-covered trellis will make them less noticeable. Portable clothes-lines are a solution, if there is not enough space for permanent drying areas. When possible, the
perma-nent or portable drying areas should be located near the laundry center so that wet clothes won’t need to be carried far.
Principles of Design
There are no hard and fast rules for landscaping, since each design is a unique creation. As in all art forms, landscaping is based on certain principles of design. These principles are discussed below.
Scale
Scale refers to the proportion between two sets of dimensions. Knowing the eventual or mature size of a plant is critical when locating it near a building. Plants that grow too large will overwhelm a build-ing. Small plantings around a large building may be similarly inappropriate. It is essential, therefore, to know the final size of a particular plant before using it in a landscape. Both the mature height and spread of a plant should be considered.
Balance
Balance in landscaping refers to an aesthetically pleas-ing integration of elements in the landscape. It is a sense of one part being of equal visual weight or mass to another. There are two types of balance, symmetri-cal and asymmetrisymmetri-cal (fig. 3). Symmetrisymmetri-cal balance is formal balance. It has an axis with everything on one side being duplicated or mirrored on the other side. Asymmetrical balance is achieved by using different objects to achieve equilibrium. For example, if there is a very large object on one side of a seesaw, it can be counterbalanced on the other side by using many
Figure 3. Examples of balance.
Symmetrical balance
smaller objects or one object of equal size. In each instance, balance is achieved. This applies to land-scaping when there is a large existing tree or shrub. To achieve visual equilibrium, a grouping or cluster of smaller plants is used to counterbalance the large existing plant. Balance also may be achieved by using color and texture.
Unity
A garden with too many ideas expressed in a limited area lacks unity. Too many showy plants or too many accessories on the lawn claim more attention than the house itself. Using too many accent plants or plants with contrasting textures, forms, or colors violates the principles of unity. In order to achieve unity, it is nec-essary to group or arrange different parts of the design to appear as a single unit. The design should present a pleasant picture from every angle.
Rhythm
Rhythm is the repetition of elements that directs the eye through the design. Rhythm results only when elements appear in regular measures and in a definite direction. Rhythm is expressed in color as well as form.
Simplicity
Every square foot of landscape does not have to have something in it. Objects, such as bird baths or plastic yellow daisies, often are overused in the landscape. One design concept states that “less is more,” and this is especially true regarding landscape design. Keep the landscape simple, and it will look its best. Avoid cluttering the yard with unnecessary objects. This includes plant material, statuary and miscellaneous
objects. When too many extras are introduced, the yard looks messy. Use statuary or specimen plants with discretion. The simplest landscapes often are the most attractive. Remember to create spaces instead of filling them up.
Accent
Accent is important in the total landscape picture and also is referred to as dominance, focalization or climax (fig. 4). Without accent, a design may be dull, static, or uninteresting. When skillfully organized, various parts of the landscape lead the eye toward the focal point. This may be a garden accessory, plant specimen, plant composition, or some use of water. Emphasis also can be obtained by using contrasting textures, colors or forms, or by highlighting portions of a plant composition with garden lights.
Repetition
Do not confuse repetition in the landscape with monotony. A row of sheared hedges lined up in front and down the side of a home is not repetition; it is monotony. Repetition is more subtle. For example, use curves in the landscape design. Curves may begin in bed lines in the front yard, continue in the side yard, and be picked up once more in the backyard. Alternatively, the repeated use of right angles on a grid design can be used to achieve unity in the landscape. Right angles may begin in the front yard, perhaps on the sidewalk and then be used in bed lines, which go around the property and be picked up again in the backyard. To achieve a continuity or flow to the entire landscape, subtly repeat design elements, such as bed lines in the yard (fig. 5).
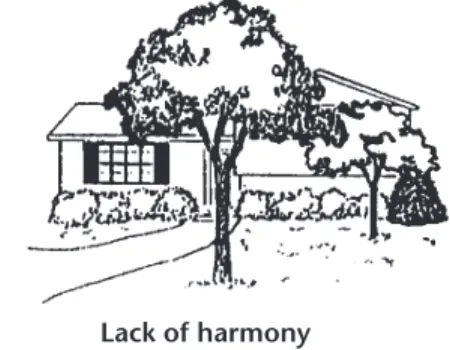
Harmony
Harmony is achieved through a pleasing arrangement of parts (fig. 6).
Space Dividers, Accents and Transitions An easy way to combine plant and architectural char-acteristics is to consider space dividers, accents, and transitions. These three elements are present in all successful landscape compositions.
Space dividers define or give privacy to spaces, create the background for outdoor living activities, and cre-ate dominance. Space dividers can be fences, walls, hedges, or borders. Space dividers must have height, be arranged in groups that border spaces (open lawn or patio area) and contain the most visually uniform characteristics in the composition (fig.7).
Transitions form the connecting link between space dividers and accents, or between the house and the land. To harmonize these elements, the transitions must be composed of characteristics that are found in both the space dividers and accents.
Accents, which are actually a minor part of the com-position, create interest by contrasting characteristics with the space dividers. Accents may be displayed in two ways: hidden in niches within the space dividers, or standing free within the area created by the space dividers. In any design, only one of the two methods should be employed or visual confusion may result.
Dominance and Contrast
In any composition, a majority of dominant or
repeated characteristics are accented by a minority of contrasting characteristics.
For a garden in which little time is spent, the mag-nitude of contrast between the dominant charac-teristics and accents is very strong. Gardens of this type include entrance courts, street-side foundation plantings, entrances to public buildings, or plantings seen from the roadway. The magnitude of contrast refers to the degree of change between visual charac-teristics, such as plant type, height, form, color, and texture.
Generally, the ratio of dominant characteristics to contrasting features should be about 80 to 20 percent or 90 to 10 percent. Also, the accents must be concen-trated in one area. Gardens of this type take on a bold, architectural effect as in many contemporary Califor-nia gardens. The effect can be grasped and understood at a glance.
Lack of harmony Harmony
Figure 6. Lack of harmony versus harmony.
For a garden in which a great deal of time is spent, such as a viewing garden, a private garden adjacent to the home or a dining garden, the magnitude of dominance to contrast should be about 70 to 30 percent. The contrast can be placed rhythmically instead of concentrated in one area. This type of garden is appropriate for relaxing and meditating. It often takes on a Japanese effect, which is con-ducive to contemplative study needed to grasp the garden’s essence.
The ratio of dominance to contrast should never drop to 55 to 45 percent; at this point, dominance is lost and visual confusion results.
An example of a plant composition containing a strong contrast between space dividers, transitions, and accents is described as follows: the space divider is formed by grouping hemlock, spruce, and white pine (all narrow leaf evergreen trees); the accent is formed by a massing of crape myrtles (flowering deciduous trees); and the transition is formed by a massing of firethorn (a broadleaf evergreen shrub). Contrast between space dividers and accents in this example is created by tree types, evergreen and deciduous; form, evergreens are pyramidal, in contrast to the rounded crape myrtle; and height, evergreens grow to at least 40 feet in contrast to crape myrtle, which grows to about 15 feet.
Drawing a Landscape Plan
The following section describes how to draw a land-scape plan that embodies the elements of good design. For the fun and satisfaction of preparing your own landscape plan, follow these steps:
•
Prepare the map•
Decide how the ground area is to be used•
Place use areas on the map•
Develop the landscape plan•
Prepare a planting planBy following these steps, you will be able to develop a final plan that can be implemented over several years as time and money permit.
Step 1 - Preparing a Baseline Map
Prepare a scale map of the home grounds (fig. 8). Use graph paper and let one square equal so many feet, or draw the map to scale using a ruler or an engineer’s scale.
Scale Small Lot Large Lot
Engineer 1 inch = 10 feet 1 inch = 20 feet Ruler 1 inch = 8 feet 1 inch = 16 feet The map should include the following: property lines; undesirable features of home grounds or of adjoining property; north point; views (use arrows to show the direction of each good view); house, garage and other buildings; doors, windows, porches, and room locations; existing trees and rock outcroppings; walks and drive-ways, if already constructed; contour of the land (use an arrow to show the direction of surface water flow); scale used; and location of septic tank or sewer lines.
Step 2 - Deciding the Ground Area
Items listed below are included most often in the final development. Make a list that suits your indi-vidual needs.
• Front lawn area or public area • Outdoor living or private area • Laundry area
• Children’s play area • Vegetable garden • Small fruit garden • Cooking and eating area • Driveway • Guest parking • Turnabouts • Garden pools • Flower beds • Walks • Garage
• Any other items particular to your land area
Step 3 - Placing Use Areas on the Map
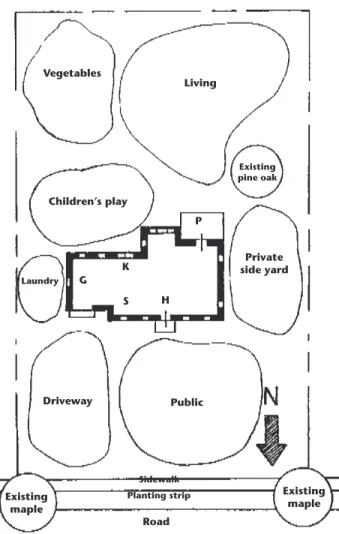
Place use areas on the map (fig. 9). Fit them together with two considerations, traffic flow and use. To decide where things should be, answer the following questions. How will people move from one area to another or from the house to an out-side area? Will movement be comfortable? Will the outdoor area be functional in relation to the house? Will it make use of existing features, such as views or changes in the terrain? Try different combina-tions in relation to rooms of the house, surround-ing areas, and potential views.
Step 4 - Develop the Landscape Plan
Design driveways, parking areas, and walks. Indicate where plant masses are needed to separate areas, screen
undesirable views, and provide shade, windbreaks, and beauty.
At this point, do not attempt to name trees and shrubs. Instead, think in terms of plant masses that will serve a purpose and help tie the various areas together into a unified plan, while considering the design elements previously discussed.
In preparing the plan, use landscape symbols to indi-cate trees and shrub masses (fig.10).
Draw symbols to scale to represent the actual amount of space that will be involved. For example, a white pine tree at maturity will have a spread of approxi-mately 20 feet. Thus, make the scale diameter of the symbol 20 feet. Indicate on the map where paving, plants, and structures will be located (fig.11). When developing the plan, check to see if the pro-posed scheme is practical and if you can answer the following questions satisfactorily:
• Is the driveway design pleasing, useful, and safe? • Does the driveway have a safe entrance? Is there a
turnabout? Guest parking? • Will guests use the front door?
• Are service areas convenient and screened from public view?
• Will the proposed drive be too steep? • Are walkways convenient?
• Will the view be attractive from the indoor liv-ing areas?
• Has a living area been provided and is it screened from the neighbors?
• Is the clothesline close to the laundry?
• Do all the parts fit together into a unified plan? • Have good setting, background and privacy
been provided?
• Are the house and major plants set back in case the highway department or local government decides to widen the road or street?
• Will the proposed location of a septic tank and drainage fields interfere with planting needed
shade trees?
Step 5 - General and Specific Planting Plan
First, for each tree or shrub mass on the plan, make a set of specifications. These specifications should include the following:
Height - low, medium, or tall
Form - spreading, upright, arching, or globe
Purpose - shade, background, hedge, screen, accent, or mass
Seasonal interest - fruit, flowers, or foliage
Type - evergreen, broadleaf evergreen, or deciduous
Maintenance - subject to insects or plant diseases
Cultural needs - shade, sunlight, and moisture re-quirements
Then select a plant or group of plants to meet the specifications. Consult garden books and nursery catalogs or visit a local nursery. Become familiar with plant materials and discuss your plan with nursery staff.
On the map developed in Step 4, designate specific plantings (fig.12).
Selecting of Plant Materials
Well-chosen plantings are necessary to achieve the de-sired landscape effect. There are hundreds of varieties of trees, shrubs, vines, and perennials from which to choose. Remember, plants are not merely ornamental accessories; they make up masses and define space in the yard and garden. Therefore, when selecting plants, consider both their cultural needs and aesthetic values.
Cultural Considerations in Selecting Plants
Several cultural issues need to be considered when selecting plants.
Hardiness
This is the plant’s ability to withstand winter and sum-mer climatic changes. It also refers to plant longevity or permanence. Usually, a fast-growing plant has a
Figure 9. Placement of use areas on the map. Vegetables Living Children’s play Existing pine oak Private side yard Laundry Sidewalk Driveway Existing maple Existing maple Planting strip Road Public P K G S H
short life span and, consequently, needs replacing after a few years.
Soil and Moisture Conditions
These are important aspects of the plant’s environ-ment. Some plants respond unfavorably to changes in soil or moisture. For example, some plants can tolerate extremely dry or wet conditions, while oth-ers cannot.
Degree of Sun or Shade
This depends on where the plant is located in the gar-den. Some plants cannot tolerate the sun, while others
require full sun for best display.
Maintenance
When selecting plant materials, consider the practical aspect of maintenance. Try to choose trees and shrubs that tend to be disease and insect resistant.
Aesthetic Value
This includes texture, color or foliage, flower, fruit, and bark. Select colors related to the house exterior, especially if the plant is used close to the house. Strongly contrasting textures can create interesting effects.
Aesthetic Considerations in Selecting Plants
In addition to cultural considerations, aesthetics are a vital part of selecting plants.
Plant Size
The plant’s mature size must be considered when selections are made for the landscape plan. A common mistake is to select plants that become too large for their location. The drastic pruning that becomes nec-essary adds to the maintenance cost and may reduce the specimen’s grace and beauty. Overgrown plants that are left unpruned will alter the design’s balance and accent and may partially hide the house that they are supposed to complement.
The landscape picture is constantly changing, because the plants that give it form and substance are continu-ally growing. This presents the landscape architect with a challenge not found in most other artistic
media. Great care must be exercised in selecting plants that will immediately create the desired composition and yet retain an appropriate size over many years.
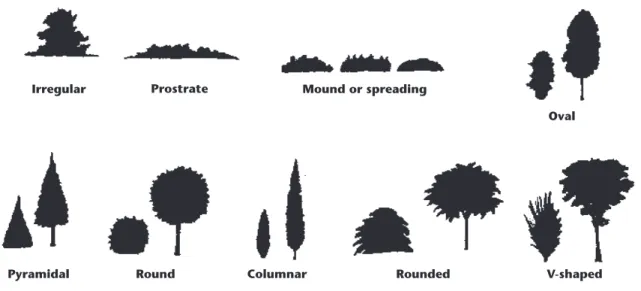
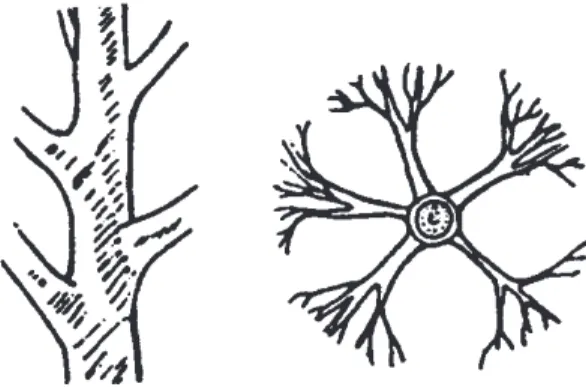
Plant Form
Trees and shrubs used in landscaping develop many distinct forms (fig.13). The more common forms are prostrate or spreading, round or oval, vase, pyramidal, and columnar. Mature shrubs and trees usually are more open and spreading than young plants. For ex-ample, the head of a young oak tree may be pyramidal in shape. During middle age, the head is an irregular oval. During old age, a large, massive oak may have a spreading vase form.
Ground covers, such as turf, low-spreading shrubs, creeping plants, and prostrate vines, are essential materials in landscaping. The principal use of turf is for the lawn area. Other ground cover plants are used commonly on banks that are too rough or steep to mow or under trees where grass will not grow well. Shrubs are woody plants that reach heights up to 15 feet. They may have one or several stems with foliage extending nearly to the ground. The more common shrub forms are low-spreading (juniper species); round or upright (a large majority of shrubs fall into this general form); vase (Spiraea X Vanhouttei); pyramidal (Arborvitae spp.); and columnar (Juniperus spp.).
Trees are woody plants that typically grow more than 15 feet tall and commonly have one main stem or trunk. The head or leafy portion of the tree develops
Figure 10. Landscape symbols. Deciduous tree Deciduous shrub Evergreen tree Combination border Shrubs
Clipped hedge Unclipped hedge Fence and gate
a typical form. Examples include round or oval (most common trees like sycamore, oak and pine); vase (elm); pendulous or weeping (willow, cherry ); pyra-midal (spruce, fir ); and columnar (Lombardy poplar, Italian cypress).
Trees are long-lived and relatively inexpensive in initial cost and maintenance compared to lawns, flower beds, and many other design features. In the past, many builders have committed costly errors by destroying trees when establishing new residential subdivisions. Many real estate developers now ap-preciate the value of trees and try to save them when land is graded prior constructing houses. Regardless of our affection for trees, we must recognize that they do not live forever. Old and improperly located trees should be removed and new, more suitable specimens should be planted.
Plant Texture
The texture of plant materials depends on the foli-age’s size and disposition. Plants with large leaves that are widely spaced have coarse texture. A plant with small, closely spaced leaves has fine texture. Extremes in texture that prevent harmony in the composition should be avoided. On the other hand, some varia-tion in texture is needed to give variety. Texture can be influenced on a seasonal basis, depending on whether the plant is deciduous or evergreen.
Plant Color
Green is the basic color of most plant materials in the landscape picture. Using plants with lighter or darker foliage tones can add variety. Accent may be introduced by the selecting flowering shrubs or those
Figure 11. Map of paving, plants, and structures. Figure 12. Designation of specific plantings. Vegetables Flowers Sandbox Existing pine oak Existing maple Existing maple Lawn
N
Laundry G K S H Sidewalk Road Vegetables K G S H P Laundry Planting Key 1. Japanese yew 2. Japanese holly 3. Boxwood 4. Barberry 5. Azaleas 6. Hemlock 7. English Ivy 8. Pin oak 9. Pink dogwood 10. White dogwood 11. White pine 12. Chinese holly 13. Perennial border 14. Abelia 15. Flowering quince 16. Nandina 17. Flowering crabapple 18. Lilac 19. Existing maple Living area 18 12 15 10 16 10 10 10 17 19 19 1 1 18 3 2 4 5 8 13 2 14 2 11 11 11 11 9 7 6 13 10 5that produce colorful, persistent fruit. Care should be exercised in using particularly showy plants, such as hydrangeas or blue spruce. Such plants may domi-nate the landscape and destroy the composition’s balance and unity.
Woody Landscape Plants
Woody ornamental plants are key components in a well-designed, useful landscape. This large group of plants falls into four categories: vines, ground cov-ers, shrubs, and trees. These categories are defined as follows:
Vines — Climbing or crawling woody plants without self-supporting upright stems.
Ground covers — Very low-growing, spreading vines and shrubs.
Shrubs — Woody plants that remain quite low and produce shoots or stems from the base with usually more than a single trunk (height of 15 feet or less).
Trees — Woody plants that produce one main trunk
and a more or less distinct and elevated head (height of 15 feet or more).
Vines
Vines generally are described as woody or semiwoody climbing or trailing plants. Like shrubs, trees, and ground covers, vines add interest to any garden land-scape. Many vine species or varieties possess
distinc-tive characteristics that make them well-adapted to certain locations in the landscape plan.
Selecting Vines
When selecting vines, trees, and shrubs, carefully review the needs of the area and then select the most suitable plants. Vines can be useful in a variety of sites. Some vines are valued for the shade they pro-vide when trained over an arbor. Others add interest to a planting when trained against a building wall or when used to frame a doorway. Some vines are used to relieve the monotony of a large expanse of wall; they can be trained in a definite pattern or allowed to completely cover a wall with leafy green foliage. Other vines can dramatically change a plain fence. Vines are useful as ground covers, forming a cascade of bloom on rough, steep banks, while holding the soil in place. Most recently, vines have been used as ground covers to replace turf areas in an attempt to reduce irrigation and maintenance needs.
Vines offer diverse visual qualities and are valued for the rich texture of their foliage and their decorative growth habit. They also are desired for their fragranct blooms or their beautiful flowers. Some are valued for the graceful tracery of their simple stems or for the beauty of their leaf pattern. To the landscape profes-sional, vines offer a rich source of material with which to create interesting, exciting, and beautiful plantings. Depending on how they climb, vines usually are segregated into three general groups. Some vines, like Boston ivy, climb by attaching small, rootlike
Figure 13. Plant forms.
Irregular Prostrate Mound or spreading
Oval
holdfasts to the wall as a means of support. These may be modified tendrils with small circular discs at the tips. Others vines, like English ivy, have small rootlets along the stem that firmly attach to either brick or wood.
The second group of vines, such as clematis and grape, climb by attaching and winding tendrils, or leaflike appendages that act as tendrils, around the object on which they are growing.
The third group of vines, including bittersweet and wisteria, climb by twining. It is interesting to note that different vines twine in different directions. As an example, bittersweet vines twine by climbing from left to right, while Hall’s honeysuckle twines by climbing from right to left.
By knowing in advance how each vine climbs, the proper means of support can be selected. It also should be noted that the climbing action of many vines can be quite damaging to wooden structures, such as fences or arbors. Make sure any such struc-tures are designed to withstand the vigorous growth of most vines.
Culture
Most vines quickly revert to a tangled mass of foliage on the ground, if they are not given the proper means of support and a reasonable amount of care and maintenance. The best type of support for vines gives the required structural strength and stability and, at the same time, has a neat appearance. Beware that holdfasts and rootlets, such as those on English ivy, can damage stucco and wood siding on a house. Like most other plants, vines require some mainte-nance. Pruning is necessary to remove old wood and may require several cuts to each stem so they can be untangled. Pruning occasionally is necessary to keep the plant within bounds and to guide future growth. As with other plants, vines also can be pruned to pro-duce better bloom or fruit.
Managing insect and disease pests is required for vines. This involves regular visual inspection for pest damage and, if necessary, use of environmentally sound control measures.
Carefully study the area to determine what type of vine to use. Growth rate is a critical consideration since some vines, such as grapes, wisteria, and trum-petvine, exhibit rampant growth - soon becoming a
nuisance.
Ground Covers
In a broad sense, ground covers include any material that prevents rain from directly striking the ground and covers the ground surface so that it cannot be seen from above. Under this definition, grass, various types of paving, shrubs and even trees could be called ground covers. In this handbook, however, ground covers refer to low, mat-forming or trailing plants (up to 18 inches tall) other than turfgrasses or plants that tolerate walking or mowing. Most ground covers are not intended to be walked upon and may be severely damaged by pedestrian traffic.
When ground covers are carefully chosen and cor-rectly placed, they greatly enhance the beauty of the landscape composition. In addition to their aesthetic value, they fulfill a number of other important func-tions: control erosion on slopes; control traffic with-out impeding view; conserve soil moisture and lower soil temperatures during periods of extreme heat; re-duce lawn maintenance; fill narrow, odd-shaped areas where mowing and edging may be difficult; provide vegetative growth where grass is difficult to maintain; and produce interesting patterns with variation in height, texture and color.
In practice, the most frequently used ground cov-ers are plants that are easily propagated, vigorous and hardy.
Selection
Ground cover selection depends upon the area where it will be used. When selecting a ground cover, con-sider the following questions: Is the area flat or slop-ing? Is it in sun, partially shaded or deeply shaded? Study the soil conditions; some ground covers prefer a moist soil rich in organic matter, while others adapt to dry, sandy situations. Consider color, texture, height, and growth habit, since some ground covers tend to grow rampantly and may become nuisances.
Since large numbers of small, individual plants are re-quired, one problem that may limit the use of ground covers is the cost of installation. A well-prepared planting bed is essential for ground covers to establish, but it can be costly and time-consuming. Weed con-trol in a newly planted ground cover bed can likewise be difficult and labor-intensive.
Significant maintenance is necessary the first 1 to 3 years or until the ground cover becomes established. This includes cultivation to control weeds and other plant invaders; fertilization to encourage fast, vigorous growth and to achieve good cover; irrigation in times of dryness; and disease and pest management. If these maintenance considerations are ignored, the resulting ground cover planting is disappointing.
Ground covers can be used successfully where paving, lawn, or flower beds are not desired. Newly cut banks and any slopes greater than 12 percent are best treated with ground cover plantings. Around buildings, ground covers are superior to paving or structural controls for reducing heat, glare, noise, and dust.
Trees and Shrubs
Because there are so many woody plants available for use in landscaping, carefully consider plants that are appropriate for your needs.
Selecting Trees and Shrubs
Selection should be based on several different factors. The intended purpose should influence the selection of plants for appropriate shape, size, and other physi-cal characteristics. Trees are used for shade, ornamen-tation, screening, and windbreaks. Shrubs are used for screens, barriers, windbreaks, ornamentation, ground covers, and wildlife shelters. Both trees and shrubs can be selected for their edible fruits or nuts.
Providing shade usually requires tall, sturdy, long-living species. Density of foliage determines the amount of shading. A tree that produces very dense shade, such as a mulberry, may prevent other plants from growing beneath it. Other trees, such as a honey locust, produce light or partial shade that does not hinder the growth of other plants below it. Deciduous trees that drop their leaves in winter can be used to shade the southern windows of a home during sum-mer, and thus allow sunlight to penetrate the same windows in winter.
Screens usually require plants that produce dense foli-age. Evergreen plants usually are chosen for screening. In addition, plants used for windbreaks must be able to survive rigorous climatic conditions. Barrier plant-ings usually require sturdy plants with dense growth and, possibly, thorns or spines.
Ornamental attributes are quite varied. Both trees and
shrubs can be used for their colorful flowers or fruit, interesting foliage, fall color, interesting bark, winter foliage or branches for decoration, as well as for the interesting shapes of the plants themselves.
Consider the size of mature trees and shrubs and where they are to be used. Tall trees, such as cedar, elm, and sycamore, are suitable for two-story and taller buildings. They tend to dominate or hide low, flat, one-story buildings. For attractive and proper balance with one-story buildings, select trees that reach maximum heights of about 35 feet. Shrubs that outgrow their spaces can hide windows, block walk-ways or crowd out other plants. Shrubs can sometimes be kept small by pruning, but this requires continuous maintenance. Careful consideration of mature size reduces the need for pruning.
Shape is especially important in selecting trees for ornamental and shade purposes. Tall trees with long, spreading or weeping branches give abundant shade. Small trees and trees of other shapes are useful for ornamental purposes, but they may not give abun-dant shade.
Environmental conditions should influence the selec-tion of plants. Size of the planting area is important, as are other site characteristics, such as full sun or shaded, wet or dry, and exposure to winter winds or pollution. Selected plants should be tolerant of exist-ing conditions and should be hardy in the appropriate climate zone. The United States is defined in a series of zones based on average minimum winter tempera-tures; these zones are illustrated in the U.S. Depart-ment of Agriculture Hardiness Zone Map (fig.14). Remember that a “hardiness zone map” does not reflect information concerning soil type, summer heat, or average rainfall within each zone. It should only be used as a guideline to determine if a plant species can withstand the average minimum winter temperatures of a specific zone. While this map contains the most recently published information, the guidelines may not be accurate enough to guarantee plant survival in extreme cold.
Finally, consider how much maintenance the plant re-quires and any possible disadvantages associated with the species, including susceptibility to diseases and insect pests; soft or brittle wood that is easily dam-aged by wind and ice; fruits and seeds that are large, messy, smelly, or otherwise obnoxious; and plants that abundantly shed twigs and small branches. Some examples of these conditions are the slow death of Ari-zona ash from age and borers, the breaking of Siberian
elm branches by wind and ice, and the production of foul-smelling fruit by the female ginkgo. Fruit production by the mulberry, which attracts birds, also can be undesirable. Since the fruit is soft, dark, and decomposes rapidly when ripe, it is messy on walks and attracts flies and other insects. However, male tree varieties may produce pollen causing allergies. Trees with larger, bee pollinated flowers cause fewer pollen allergy problems.
Purchasing Trees and Shrubs
Once all selection criteria have been considered, it is time to purchase plants. Transplants are grouped into the following three classes according to the way they are dug and/or shipped: bare-root plants, balled-and-burlapped plants, and container-grown plants (fig.15).
Bare-Root Plants
These plants have had the soil washed or shaken from their roots after digging. Plants handled this way are nearly always deciduous trees or shrubs in their dormant stage. Most mail order plants are of this class, because plants in soil are too heavy to ship economically.
Plants in the bare-root class are planted while they are dormant. Therefore, late winter planting is best for these plants. Never let the roots dry out. This is perhaps the most common cause of failure with bare-root plants. Keep bare-roots in moist sawdust or wrapped in plastic or wet paper until you are ready to place the plant in the hole.
Balled-and-Burlapped Plants
These plants are primarily trees and some shrubs. They usually are grown in nursery rows for some time and are root-pruned, so that the root system within the balls is compact and fibrous. Such plants rapidly reestablish themselves. This method is used primarily for plants that never lose their foliage and thus are not amenable to bare-root treatment. These plants include broadleaf
Figure 14. USDA hardiness zone map.
evergreens and conifers of all types. A number of deciduous trees and shrubs that have branching root systems are contained easily in a soil ball and also are sold as balled-and-burlapped plants.
Plants in this class are planted almost any time the ground can be worked. Plants put out in summer will need special attention to keep them adequately watered.
When selecting a balled-and-burlapped plant, be sure that the ball is sound and has not been broken. Avoid plants that feel loose in the soil balls. Be sure the soil ball does not dry out. These plants usually will need very little pruning at planting.
Container-Grown Plants
These plants usually are grown in the container in which they are sold and are becoming a standard in the nursery trade. Container-grown plants can be planted throughout the year. Because of their appear-ance, many home gardeners often are misled into thinking that all they have to do is put these plants into the ground and forget about them. Nothing could be further from the truth.
These plants may have what is called a “container habit.” Their roots are contained in a limited space and may be tightly coiled around one another in the container. Some of the larger roots may have coiled back around the trunk, thus initiating a process known as root strangulation or girdling root.
To solve the problem, split the lower half of the root system and spread the roots horizontally (fig. 16). This practice prunes the roots to encourage new later-als, prevents girdling roots and raises the lower roots closer to the soil surface.
When selecting plants, look for those with a good, natural shape without any thin spots or broken limbs. Make sure the root ball is solid, and the bark has no broken places (fig.17). Avoid container-grown plants if the roots are circling on the surface or coming out of drainage holes. Choose plants that are free of any insects or diseases. Generally, smaller plants cost less and may establish faster. Do not buy plants so small that they are in danger of being walked on or mowed over.
Planting Trees and Shrubs
Installing plants properly in the landscape involves
much more than just digging holes and setting plants in them. The planter is responsible for developing as satisfactory a microclimate as possible for optimum plant growth and development. A healthy and vigor-ous plant is required if the landscape is to have the de-sired effect, and healthy plants need less maintenance in the years following establishment.
The planting hole is important since this is the root system’s environment. Generally, the hole should be twice as wide in diameter and no deeper than the soil ball. In general, research shows that the wider the hole, the better the plant will grow.
A traditional recommendation for preparing plant-ing holes for trees and shrubs has been to incorporate organic matter into the backfill soil before returning it to the hole around the plants. However, recent research indicates that this actually can be detrimental to the long-term establishment of the landscape plant. By backfilling the hole with native soil, the plant is immediately forced to establish new roots in the back-fill and beyond.
Apparently, the addition of organic matter into backfill soil creates an interface between the amended soil and the undisturbed soil around the planting hole that is detrimental to root growth and water move-ment between the two soils. In tests conducted at the University of Georgia, scientists found that the majority of the roots in holes with amended soil were confined to the original planting hole. Therefore, only excavated soil should be used as backfill.
Place the top of the soil ball at a slightly higher level than the surrounding soil. The finished planting depth (after the soil settles) should be such that the plant is exactly the same depth after replanting as it was when grown in the nursery (fig.18). When plant-ing in a poorly drained site, set the plant so that a few inches of the rootball are above the soil level to enhance drainage (fig. 19). More plants probably are
Figure 16. Splitting the rootball of container-grown plants.
lost because they were planted too deeply than for any other reason.
Carefully handle balled-and burlapped plants when they are placed in the hole. With most species, if the soil ball is broken for any reason, many of the roots will be severed from the trunk and the plant will die. Always pick the plant up by the soil ball or container, but never by the trunk or stem. Recently, some nurseries have been using woven plastic or synthetic materials to wrap these plants. These materials do not rapidly decompose and can girdle roots as they enlarge after passing through the material. It is necessary to remove burlap, plastic, and synthetic materials from the soil ball after the plant is placed in the hole and before backfill is placed around the rootball. For all of these plants, cut and remove any strings (plastic or natural fiber) from around the trunk after planting to prevent girdling the plant.
For container-grown plants, always remove plastic or metal containers before planting. Small contain-ers with tapered sides can be removed by turning the plant upside down and giving the top edge of the container a sharp rap. Catch the soil ball in the hands as it slips from the container. Do not let the soil ball break apart. Larger containers (5 gallons or more) should be cut away with special cutters. If plants have become overgrown in the container and the root mass is growing in a tight, compact circle around the soil ball, cut the outer roots out with a sharp knife in two or four places around the soil ball. Make the cut from the top to the bottom of the soil ball. Decomposable containers, such as papier mâche, do not need to be removed from the soil ball.
Bare-root plants should have the packing material and all damaged or dead roots removed. Do not allow roots to be exposed to sunlight or to dry out
Figure 17. Buying quality plants.
Proportion of roots to shoot
Loose rootball is unacceptable
Rootball of acceptable B&B. Plant stays firm
when rocked gently.
Evergreen silhouettes
Good Poor Poor
Good Poor
Shrub symmetry
Broken twigs
are acceptable. Broken branches, gouged trunk are unacceptable.
Vigorous,
before planting. It is best to keep bare roots covered with moist burlap or some reasonable substitute until planting time.
After the balled-and-burlapped or container-grown plant has been placed in the hole, fill the space around the plant with backfill until it is two-thirds full. With bare-root plants, the soil should be worked gently in and around the roots while the plant is being supported. The most satisfactory way to firm the soil and remove air pockets is by filling the hole with water. If it is not practical to use water, firm the soil by hand around the plant ball or roots. However, be sure not to use excessive force since soil compaction should be avoided.
Before finishing the filling process, make certain the plant is straight and at the proper depth. Then complete the filling process with backfill. If it is an individual specimen, construct a ring of backfill 2 to 3 inches high at the outer edge of the hole’s diameter to form a water basin (fig. 20). Bedded plants prob-ably will not require a water basin. Thoroughly water the plant as soon as the water basin is complete. After the water has soaked away, fill the basin with mulch. Organic mulches, such as pine needles, bark and wood chips, provide the best environment for future root development.
Note that fertilizer is not added to the backfill mix-ture. Newly developing roots can be damaged by too much fertilizer. If soil testing indicates that fertilizer is needed, add a water-soluble material at the recom-mended rate during the final watering phase. Large areas should have an established fertility level based on soil test results before individual plant specimens are planted. A fertility program should begin in late fall of the first growing season.
One final activity in planting any plant is to remove
all tags and strings. These items, whether made of wire, plastic or natural fibers, can girdle fast-growing stems and trunks.
Pruning and Supporting Newly Installed Plants
An initial pruning may be needed immediately after planting. However, only remove broken and dam-aged branches (fig. 21). The traditional practice of removing part of the top growth to reduce transpi-ration and to bring the top back in proportion to the root system (for example, bare-root trees) is no longer recommended. With newly planted woody species, it usually is more successful to avoid heavy pruning at planting if the plants can be well-watered during their first 1 or 2 years. Pruning reduces leaf area and limits transpiration, but it also reduces the leaf surface area, which produces photosynthates for root growth. Since the plant will not resume a nor-mal growth rate until the original root system size is reestablished, it is better to avoid wilting by watering than by canopy pruning. This also avoids a prolifera-tion of suckers in the inner canopy.
Most shrubs do not need to be supported after planting unless the bare-root stock is quite large or if very tall balled-and-burlapped specimens are
Figure 18. Proper planting depth. Figure 19. Planting in a poorly drained site.
used. If support is needed, use the same techniques for shrubs that are described in the following para-graphs for trees.
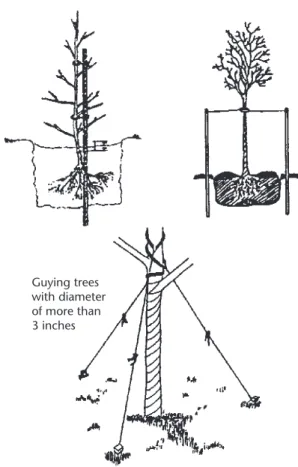
A general rule of thumb is to provide support for all bare-root trees over 8 feet in height. Also, trees that are quite large, 6 inches or more in diameter, should be supported. Smaller balled-and-burlapped or con-tainer-grown trees do not usually need support. There are several methods for supporting smaller trees (fig. 22). A single stake about three-quarters the height of the bare-root tree should be driven 2 to 4 inches from the planting hole’s center so that the stake will be on the tree trunk’s southwest side. This should be done before the tree is placed in the hole. Then plant the tree according to the procedures described in previous paragraphs.
After planting is completed, fasten the tree to the stake with a wire or a suitable substitute formed in a loose loop. Before fixing both ends of the wire to the stake, slip a short length of rubber hose onto the wire. The part of the wire in contact with the trunk should be covered with the rubber hose to prevent injury to the bark as the tree moves in the wind. Two-inch-wide woven strapping can replace the rubber-coated wife where it contacts the tree. This reduces tree trunk damage. With this method of support, the stake is close to the trunk and does not cause maintenance problems. In turf areas, stakes and guy wires outside the perimeter of the planting hole can be trouble-some since they hinder mowing operations. Under no circumstances should this method of support be used on balled-and-burlapped or container-grown stock, because it isn’t usually possible to locate stakes close to the trunks before planting. If driven through the soil ball, the stakes can damage the soil ball and the roots.
A way to support small bare root trees is to use two parallel stakes driven at least 18 inches into firm soil on opposite sides of the tree about a foot beyond the planting hole. The stakes’ height after being driven into the ground should be approximately two-thirds the tree’s height. The tree is then supported by wires attached to both stakes and looped loosely around the trunk. A length of rubber hose or strapping can be used to protect the tree trunk.
A third and most commonly used method, is to fasten three guy wires to stakes that have been firmly fixed in soil around the planting hole’s edge. The stakes should be equidistant from the hole and from each other. Stakes generally are used on smaller plants. They should be driven 18 to 24 inches into the ground at a 45 degree angle away from the tree trunk. It is absolutely essential that all three stakes be firmly fixed so that they will not pull out in high winds. The tops of the stakes are notched to hold the wire. The wire is then fastened two-thirds of the way up the trunk by a loose loop covered with rubber hose, or strapping may be used in contact with the tree trunk. The other
Figure 21. Pruning at planting time.
Figure 22. Guying newly planted trees. 6 5 3 2 1 4 1. Sucker 2. Broken branch 3. Heading back side branch 4. Water sprout 5. Interfering branch 6. Double leader
Head back to a side branch or bud
Leave no stubs Correct Incorrect Guying trees with diameter of more than 3 inches
ends of all wires should be fastened equally tightly to the stakes without putting a strain on the trunk. The wires should be firm but loose enough to allow slight movement of the tree, a factor essential to its proper development.
All support should be removed from the small trees within 1 year after planting. The tree should have become established during this time. It has been reported that growth and trunk strength actually are reduced if the supports are left in place for longer periods.
Landscape plants require periodic maintenance to produce the best results. This includes fertilization, winterizing, mulching, watering, and pruning.
Fertilizing Trees and Shrubs
Ornamental trees and shrubs planted in fertile, well-drained soil or in a regularly fertilized lawn should not require annual fertilization. Trees and shrubs that are growing well don’t require extra nutrients. If trees and shrubs are growing poorly, fertilization may be helpful.
Plants that are growing poorly may exhibit any or all of the following symptoms: light green or yellow leaves, leaves with dead spots, leaves smaller than nor-mal, fewer leaves and/or flowers than nornor-mal, short annual twig growth, branches dying back at the tips, and wilting of foliage.
Poor growth may be caused by inadequate soil aeration, moisture or nutrients; adverse climatic conditions; improper soil pH; and disease or other conditions. Attempts should be made to determine the specific cause in each particular situation so that appropriate corrective measures can be taken. Do not assume that applying fertilizer will remedy quickly any problem encountered. Soil and leaf tissue analyses are necessary to prescribe correct solutions.
The cause of poor growth may or may not be evident. Transplanted ornamentals or those with roots that have been disturbed by construction within the past 5 or 10 years may be in shock. Traditionally, prun-ing has been recommended to brprun-ing the top growth into balance with the reduced root system. However, recent research indicates that such pruning may be detrimental. Efforts should be concentrated on maintaining the existing foliage, which produces the necessary photosynthates to regenerate injured roots. Irrigation, aeration, and fertilization all are
recom-mended to keep leaves on the tree.
Most trees and shrubs tolerate a rather wide range of soil acidity. They usually will grow satisfactorily without special treatment to raise or lower soil pH. However, some plants are exceptions to the rule, such as azalea, blueberry, camellia, laurel, and rhododen-dron. These plants grow best on acid soil with a pH of 5.0 to 5.5. These acid-loving plants may become quite yellow and grow poorly on soils with a pH of 6.0 or higher. Lowering the pH to these levels is very diffi-cult and requires constant monitoring, therefore these plants are not recommended for New Mexico.
Fertilizer for small trees and shrubs should be based on soil analysis. Spread fertilizer evenly under branch-es in late winter or early spring. As with turfgrassbranch-es, fall fertilization is beneficial for plants that grow poorly, but it should be applied after trees are fully dormant.
Large trees that need fertilization require large doses of nitrogen. Research indicates that complete fertil-izers usually are not essential and that the growth response is primarily associated with nitrogen fertiliza-tion. On large trees, fertilizer applications should be concentrated at the dripline of the tree, which is the area directly below the outermost tips of the branches, or beyond. The tree’s feeding root system is in this large perimeter and, consequently, is where fertilizer and water should be applied. Placing fertilizer in small holes in the soil has been tested, and research now indicates that surface fertilizer is sufficient.
Fertilization might be needed each year for large trees. However, a feeding program must be combined with proper cultural practices. For example, neglecting nec-essary insect or disease control and failing to remove deadwood from a large shade tree will negate fertiliza-tion’s positive effects. Fertilizer is not a substitute for water during drought.
A moderate growth rate and good green color are all that is desired of woody plants. Excessive vigor, evidenced by lush green leaves and long shoot growth, is undesirable. Such plants require more maintenance, are more susceptible to winter cold injury and are more likely to break during wind or sleet storms. These plants usually have a shorter life than woody plants with moderate growth rates.
Mulching Plants
compost, shredded bark, or wood chips around shrubs, roses, and recently planted trees. This mulch will conserve moisture, help suppress weeds and grass and moderate soil temperatures. A 2-inch layer should be used under the branches of shrubs and roses of all ages.
A circular area of mulch should be maintained for at least 3 or 4 years around newly planted orna-mental trees. It should extend at least 3 feet from the trunk and be renewed as often as necessary to maintain a layer 2 inches thick. A circle of mulch will make it easier to mow around young trees without damaging the bark.
Both organic and inorganic mulches can be useful in the landscape. Some of the more readily available and more commonly used mulches include sawdust, com-post, pine needles, rock, gravel, and woven plastics.
Watering the Landscape
Of the tremendous amounts of water applied to lawns and landscape, much of it is never absorbed by the plants and put to use. Some water is lost to runoff if it is applied too rapidly, and some water evaporates from exposed, unmulched soil. But the greatest waste of water is applying too much too of-ten. By simply using effective and efficient watering methods, irrigation requirements can be cut by 10 to 30 percent, plus landscape beauty and quality can be increased dramatically.
Correct watering is vital for developing and maintain-ing a landscape plantmaintain-ing. Lack of water can cause a plant to wilt and ultimately dry up and die. Excessive water can cause root rot; the plant wilts because it is oxygen-starved and, consequently, is unable to absorb moisture. As a rule, plants are capable of withstanding moderate drought more easily than too much mois-ture. For this reason, it is important to water thor-oughly, yet allow the soil to become fairly dry between waterings.
Wilting occurs when roots are unable to supply suf-ficient moisture to the stems and leaves. Wilting for short periods may not harm plants. However, over a prolonged period, it will cause permanent damage. Sometimes a plant will wilt on a hot day, because moisture is evaporating from the leaves faster than the roots can supply it. If there is ample soil moisture, the plant will absorb water in the evening to firm up the stems and leaves. However, when the leaves remain wilted the following morning, watering is
recom-mended.
It is difficult to make broad recommendations about when to irrigate due to tremendous variations in climatic conditions. However, during summer, newly planted trees and shrubs should be deeply watered once a week. By allowing the soil surface to dry out somewhat between waterings, major root develop-ment is encouraged at greater depths where soil mois-ture is highest. Plants watered frequently but lightly are more apt to proliferate roots close to the surface, making them more vulnerable to wilting. This hap-pens with automatic overhead sprinkler systems that are designed only to moisten the surface and run for a short period of time.
Remember that environmental conditions are the pri-mary factor affecting plant water needs. During cool seasons, less watering is necessary because evaporation from the leaves and soil is slow. Plant water use under clear blue skies can be twice as high as under cloudy conditions.
The best time to water is in the early morning when air temperatures are lower than they are at midday. In the evening, wet foliage can encourage fungus or mil-dew, making plants unsightly and jeopardizing their health. Be prepared to control diseases if you irrigate at night.
Trees and Shrubs
All trees and shrubs need more frequent watering from planting time until they become well-rooted, which may take two growing seasons. Once estab-lished, water-efficient plants can be weaned to tolerate less frequent watering. Proper weaning develops deep roots and makes the plants more drought enduring. Water established trees, shrubs, and ground covers infrequently, yet thoroughly. In the absence of rain, most trees and shrubs benefit from a twice-a-month thorough watering during the growing season. A tree or shrub’s feeding root system is located within the top 12 to 18 inches of the soil and at the plant’s drip line. The drip line is the area directly below the outermost reaches of the branches. Apply water and fertilizer just inside and a little beyond the drip line, not at the trunk. An effective way to water trees and large shrubs is to simply lay a slowly running hose on the ground at the drip line. Move the hose around the drip line as each area becomes saturated to a depth of 12 to 24 inches.