Richard F. Raposa
Executive Publisher:Robert Ipsen
Vice President and Publisher: Joe Wikert
Senior Editor:Ben Ryan
Editorial Manager:Kathryn A. Malm
Developmental Editor:Jerry Olsen
Production Editor:Vincent Kunkemueller
Media Development Specialist:Angie Denny
Text Design & Composition:Wiley Composition Services Copyright © 2003 by Richard F. Raposa. All rights reserved.
Published by Wiley Publishing, Inc., Indianapolis, Indiana
Published simultaneously in Canada
No part of this publication may be reproduced, stored in a retrieval system, or transmitted in any form or by any means, electronic, mechanical, photocopying, recording, scanning, or otherwise, except as permitted under Section 107 or 108 of the 1976 United States Copyright Act, without either the prior written permission of the Publisher, or authorization through payment of the appropriate per-copy fee to the Copyright Clearance Center, Inc., 222 Rose-wood Drive, Danvers, MA 01923, (978) 750-8400, fax (978) 646-8700. Requests to the Pub-lisher for permission should be addressed to the Legal Department, Wiley Publishing, Inc., 10475 Crosspoint Blvd., Indianapolis, IN 46256, (317) 572-3447, fax (317) 572-4447, E-mail: [email protected].
Limit of Liability/Disclaimer of Warranty: While the publisher and author have used their best efforts in preparing this book, they make no representations or warranties with respect to the accuracy or completeness of the contents of this book and specifically disclaim any implied warranties of merchantability or fitness for a particular purpose. No warranty may be created or extended by sales representatives or written sales materials. The advice and strategies contained herein may not be suitable for your situation. You should consult with a professional where appropriate. Neither the publisher nor author shall be liable for any loss of profit or any other commercial damages, including but not limited to special, inci-dental, consequential, or other damages.
For general information on our other products and services please contact our Customer Care Department within the United States at (800) 762-2974, outside the United States at (317) 572-3993 or fax (317) 572-4002.
Trademarks:Wiley, the Wiley logo and related trade dress are trademarks or registered trademarks of Wiley in the United States and other countries, and may not be used without written permission. The Gearhead Press trademark is the exclusive property of Gearhead Group Corporation. Java is a trademark of Sun Microsystems, Inc. All other trademarks are the property of their respective owners. Wiley Publishing, Inc., is not associated with any product or vendor mentioned in this book.
Wiley also publishes its books in a variety of electronic formats. Some content that appears in print may not be available in electronic books.
Library of Congress Cataloging-in-Publication Data: See Publisher ISBN: 0-471-42314-9
Printed in the United States of America
A Note from the Consulting Editor
Instructor-led training is proven to be an effective and popular tool for training engi-neers and developers. To convey technical ideas and concepts, the classroom experi-ence is shown to be superior when compared to other delivery methods. As a technical trainer for more than 20 years, I have seen the effectiveness of instructor-led training firsthand. 60 Minutes a Day combines the best of the instructor-led training and book experience. Technical training is typically divided into short and discrete modules, where each module encapsulates a specific topic; each module is then fol-lowed by “questions and answers” and a review. 60 Minutes a Day titles follow the same model: each chapter is short, discrete, and can be completed in 60 minutes a day. For these books, I have enlisted premier technical trainers as authors. They provide the voice of the trainer and demonstrate classroom experience in each book of the series. You even get an opportunity to meet the actual trainer: As part of this innova-tive approach, each chapter of a 60 Minutes a Day book is presented online by the author. Readers are encouraged to view the online presentation before reading the rel-evant chapter. Therefore, 60 Minutes a Day delivers the complete classroom experi-ence—even the trainer.
As an imprint of Wiley Publishing, Inc., Gearhead Press continues to bring you, the reader, the level of quality that Wiley has delivered consistently for nearly 200 years.
Thank you.
Donis Marshall
Founder, Gearhead Press
To my wife, Susan, for her motivation and support, and to our children, Megan, Ryan, Katelyn, and Emma, for letting
Acknowledgments xix
About the Author xxi
Introduction xxiii
Chapter 1 Getting Started with Java 1
Why Java? 1
The Java Virtual Machine 2
The Editions of Java 4
J2SE 4 J2ME 5 J2EE 5
Downloading the Java 2 SDK 6
Installing the SDK 7
Running the SDK Tools 8
Running the javac Compiler 9
Running the JVM 10
A Simple Java Program 10
Step 1: Write the Source Code 11
Step 2: Compile the Program 13
Step 3: Run the Program 14
Summary 17
Chapter 2 Java Fundamentals 21
Java Keywords 21
Identifiers 22
Java’s Eight Primitive Data Types 23
Variables 24
Assigning Variables 25
Integral Types 27
Contents
Floating-Point Types 29
Boolean Data Type 30
Char Data Type 31
Strings 33
References versus Primitive Data 35
Constants 37
Java Operators 37
Increment and Decrement Operators 39
Assignment Operators 40
Shift Operators 40
Comparison Operators 42
Boolean Operators 43
Ternary Operator 43
Java Comments 44
Summary 46
Chapter 3 Control Structures 51
Flow of Control 51
Boolean Logic 52
The and Operator 52
The or Operator 53
The exclusive or Operator 54
The not Operator 54
Boolean Operators 55
The if Statement 57
The if/else Statement 59
The switch Statement 61
The while Loop 64
The do/while Loop 67
The for Loop 70
The break Keyword 74
The continue Keyword 76
Nested Loops 78
Summary 80
Chapter 4 Classes and Objects 85
Overview of Classes and Objects 85
Procedural Programming 86
Object-Oriented Programming 87
Object-Oriented Analysis and Design 88
Writing a Java Class 89
Adding Fields to a Class 89
Adding Methods to a Class 90
Instantiating an Object 92
Garbage Collection 94
Accessing Fields and Methods 97
Using the Dot Operator 97
Step 1: Write the Employee Class 97
Step 3: Write the EmployeeDemo Class 98 Step 4: Compile the EmployeeDemo class 99 Step 5: Run the EmployeeDemo program 99
The this Reference 100
Summary 103
Chapter 5 Methods 107
Method Call Stack 107
Invoking Methods 108
Method Signature 111
Arguments and Parameters 113
Call-by-Value 116
Overloading Methods 121
Constructors 125
Default Constructor 128
Using Constructors 129
A Class with Multiple Constructors 130
Using this in a Constructor 131
Summary 136
Chapter 6 Understanding Inheritance 139
An Overview of Inheritance 139
The is a Relationship 144
Implementing Inheritance 145
Instantiating Child Objects 146
Single versus Multiple Inheritance 149
The java.lang.Object Class 150
The Methods of the Object Class 151
Method Overriding 154
The super Keyword 157
The final Keyword 160
final Methods 161
The Instantiation Process 162
Invoking a Parent Class Constructor 165
Summary 170
Chapter 7 Advanced Java Language Concepts 175
An Overview of Packages 175
Adding a Class to a Package 176
The Namespace Created by Packages 178
The import Keyword 180
The Directory Structure of Packages 183
Step 1: Write and Save the Source Code for Vehicle 185 Step 2: Compile the Source Code Using the -d Flag 185 Step 3: Write the CarDealer Class 186
Step 4: Set the CLASSPATH 187
Step 5: Compile and Run the CarDealer Program 188
The Access Specifiers 190
Encapsulation 194
Benefits of Encapsulation 197
Understanding Static Members 198
Accessing Static Fields and Methods 199
Static Initializers 203
Instance Initializers 205
Summary 209
Chapter 8 Polymorphism and Abstraction 213
An Overview of Polymorphism 213
Using Parent Class References to Child Objects 214
Casting References 218
The instanceof Keyword 221
Polymorphic Parameters 225
Heterogeneous Collections 229
Virtual Methods 230
Taking Advantage of Virtual Methods 233
An Overview of Abstraction 238
Abstract Classes 239
Abstract Methods 241
Summary 247
Chapter 9 Collections 253
Arrays 253
Accessing Arrays 255
The length Attribute 255
Arrays of References 256
Array Initializers 259
Copying Arrays 261
Multidimensional Arrays 263
Example of a Heterogeneous Collection 265 Overview of the Java Collections Framework 272
The Vector Class 273
Adding Elements to a Vector 275
Accessing and Removing Elements in a Vector 277
The Hashtable Class 281
Adding Elements to a Hashtable 283
Accessing Elements in a Hashtable 285 Summary 290
Chapter 10 Interfaces 295
An Overview of Interfaces 295
Declaring Interfaces 296
User-Defined Interfaces 298
Write the Interface Source Code 299
Compile the Interface 299
Implementing an Interface 300
Write a Class That Implements Paintable 300 Save and Compile the Rectangle Class 301
Add the paint() Method 302
Using Interfaces 303
Exposing Methods via an Interface 304
Forcing Behavior on a Class 310
Declaring Fields in Interfaces 316
Extending Interfaces 317
Extending Multiple Interfaces 319
Interfaces and Polymorphism 321
Summary 326
Chapter 11 Exception Handling 329
Overview of Exception Handling 329
Flow of Control of Exceptions 330
Throwable Classes 333
Methods of the Throwable Class 333
Catching Exceptions 334
Writing try/catch Blocks 335
Multiple catch Blocks 337
Handle or Declare Rule 341
Declaring Exceptions 343
The throws Keyword 345
Throwing Exceptions 348
The finally Keyword 351
Overridden Methods and Exceptions 354
User-Defined Exceptions 357
Summary 361
Chapter 12 An Introduction to GUI Programming 367
AWT versus Swing 367
Creating Windows 369
java.awt.Frame Class 369
javax.swing.JFrame Class 372
Containers and Components 375
Adding Components to a Container 375
Layout Managers 378
FlowLayout Manager 379
BorderLayout Manager 383
Panels 385
GridLayout Manager 388
BoxLayout Manager 390
Nesting Panels 392
Using No Layout Manager 396
Summary 401
Chapter 13 GUI Components and Event Handling 405
The Delegation Model 405
The Event Listener Interfaces 407
Creating an Event Listener 409
Registering a Listener with an Event Source 410
The Event Adapter Classes 412
Buttons 417
AWT Buttons 417
Swing Buttons 418
Check Boxes 421
AWT Check Boxes 421
Swing Check Boxes 423
Radio Buttons 425
AWT Radio Buttons 425
Swing Radio Buttons 427
Labels 429
Text Components 430
AWT Text Components 430
Swing Text Components 434
Lists 437
AWT Lists 437
Swing Lists 439
Combo Boxes 440
AWT Choice 440
Swing Combo Boxes 442
Progress Bars 445
Menus 445 Summary 452
Chapter 14 Applets 457
An Overview of Applets 457
The java.applet.Applet Class 459
Swing Applets 462
Life Cycle of an Applet 465
Step 1: Write the Applet Class 467
Step 2: Write the HTML Page 468
Step 3: View the HTML Page 468
Step 4: View the Java Console 469
The <applet> Tag 473
Document and Code Base 478
The appletviewer Tool 479
Sandbox Security 481
The Applet Context 485
Displaying Images 488
Playing Audio 490
JAR Files and Applets 494
Summary 500
Chapter 15 Threads 503
Overview of Threads 503
Life Cycle of a Thread 506
Creating a Thread 507
Implementing Runnable 508
Extending the Thread Class 511
Methods of the Thread Class 516
Timer and TimerTask Classes 519
Scheduling Tasks 522
Multithreading Issues 526
synchronized Keyword 530
Deadlock Issues 532
Ordering Locks 534
wait() and notify() Methods 536
Summary 546
Chapter 16 Input and Output 551
An Overview of the java.io Package 551
The Output Streams 552
The Input Stream Classes 553
The Writer Class 553
The Reader Class 554
Low-Level and High-Level Streams 557
Low-Level Streams 557
High-Level Streams 559
Chaining Streams Together 561
Low-Level Readers and Writers 564
High-Level Readers and Writers 564
File I/O 565
The RandomAccessFile Class 566
Using Pipes 570
An Overview of Serialization 574
Serializing an Object 577
Deserializing an Object 578
The Logging APIs 579
An Example of Logging 581
Summary 587
Chapter 17 Network Programming 591
An Overview of Network Programming 591
Transmission Control Protocol 592
User Datagram Protocol 592
Using Sockets 594
The ServerSocket Class 596
Socket Class 599
Communicating between Sockets 600
Java Secure Socket Extension (JSSE) 602
Secure Server Socket 603
Secure Client Socket 607
Communicating over a Secure Socket 610
Overview of Datagram Packets 612
DatagramSocket Class 612
DatagramPacket Class 613
Receiving a Datagram Packet 614
Sending a Datagram Packet 615
Working with URLs 617
URL Connections 619 Summary 625
Chapter 18 Database Programming 629
An Overview of JDBC 629
JDBC Drivers 632
Connecting to a Database 633
Using the DriverManager Class 634
Using the DataSource Class 636
An SQL Primer 637
Creating Data 638
Reading Data 639
Updating Data 640
Deleting Data 641
Creating Statements 641
Simple Statements 642
Working with Result Sets 647
Navigating a Result Set 647
Viewing a Result Set 648
Updating a Result Set 651
Prepared Statements 652
Step 1: Preparing the Statement 652
Step 2: Setting the Parameters 654
Step 3: Executing a Prepared Statement 654
Callable Statements 656
Summary 663
Chapter 19 JavaBeans 669
Overview of JavaBeans 669
Simple Properties 672
Packaging a Bean 675
Step 1: Write the Bean Class 676
Step 2: Write the Manifest File 676
Step 3: Create the JAR File 677
Step 4: Download the Bean Builder 678
Step 5: Run the Bean Builder 678
Step 6: Load the Movie Bean into the Bean Builder 681 Step 7: Using the Movie Bean in the Builder Tool 681
Bound Properties 684
Step 8: Binding Properties in the Bean Builder 687
Constrained Properties 690
Vetoing an Event 693
Overview of Events 694 Step 9: Hooking up Buttons to the Movie Bean 695 Step 10: Viewing Beans in Preview Mode 696
Generating User-Defined Events 698
BeanInfo Class 703
Summary 708
Appendix About the 60 Minutes Web Site 713
Index 717
I would like to thank the editors for their hard work on this book: J.W. (Jerry) Olsen, Nancy Sixsmith, and Susan Hobbs, and everyone at Wiley Publishing who helped in this project, especially Ben Ryan. Thanks also to Donis Marshall for the opportunity to write a book for the 60 Minutes a Day series as well as to Jerry for managing the editors on behalf of Gearhead.
And then there is everyone out there who played a role, whether small or large, in my writing of this book: Susan Raposa, javalicense.com, my Mom (who can read it now), and most importantly, Megan, Ryan, Katelyn, and Emma.
And finally, to all of those who kept asking me when my book would be published: Leo and Linda Schaefbauer; Steve, Beth, Geoffrey, Nathan, and Aurora Venteicher; Michael and Tammy Schaefbauer; David Schaefbauer; Betty Haefner; Mark, Margaret, Marie, Melissa, and Jay VanDerWerff; Michele, Gabe, and Seth Raposa; Allen, Denise, Joseph, Rechele, Kathalena, Kurstin, Joshua, and Kristina Raposa; Dave, Maryann, Daniel, Duke, Davey, Dylan, and Darby Knoll; and Barb and Steve Sachs.
Acknowledgments
Richard F. Raposais a Java instructor for JLicense, Inc., a Java courseware and training firm based in Rapid City, SD. One of the first Sun Certified Java Instructors, Rich has taught courses on Java, J2EE, XML, Web Services, C++, Visual C++/MFC, Win32 Internals, UML, and other object-oriented technolo-gies at companies around the country. He has developed courses on almost every aspect of Java and the J2EE technologies.
About the Author
An Overview of
Java in 60 Minutes a Day
I will never forget taking my first Java class at Sun Microsystems in Dallas, Texas, in May, 1998. I had heard the many promises about Java and how it would revolutionize software development, but I was skeptical and arrogant as I sat in the back of the class anxious to make life hard on the instructor.
At the time, I was programming and teaching C++, mostly Visual C++ and the Microsoft Foundation Classes. For some reason, after I learned C++, I fig-ured that would be the last programming language I would ever need to learn. My boss, on the other hand, had different ideas, because I was slated to become a Sun Certified Java Instructor.
Contrary to my expectations, I was blown away by Java! It was logical, pre-dictable, powerful, and simple (compared to C++). Sun had taken the best of the existing object-oriented programming languages and removed many of the idiosyncrasies and problem areas. And the best part: Java is platform inde-pendent! You write a program once, and it can be executed on different oper-ating systems and devices without your even having to recompile your code.
I have been travelling the country teaching Java now for the last 5 years, and I still get excited about standing up in front of a classroom of students who are seeing Java for the first time. One of my goals was to capture that enthusiasm on the pages of this book. I want you to appreciate why Java has become one of the most popular and widely used programming languages in software development today.
Introduction
xxiv Introduction
How This Book Is Organized
The goal of this book is for you to be able to study each chapter in one hour, like a student sitting through a one-hour lecture. After you finish a chapter, there are labs that solidify what you learned by having you write code. You will also find review questions and answers at the end of each chapter to help you review the key points of the chapter. Also throughout the book are Class-room Q&A sections where I answer questions that I have frequently been asked by students in the classroom.
The book contains 19 chapters. The first eight chapters discuss the funda-mentals of the Java language, and should be read in order. The order of the last 11 chapters isn’t quite as important, although you will find that many of the labs build on the ones from previous chapters. The following sections describe what you will learn in this book’s chapters.
Chapter 1: Getting Started with Java
It just wouldn’t be a programming class if I didn’t start with the “Hello, World” application. In Chapter 1, you will learn what all the hype is about with Java. I will discuss the life cycle of a Java program, then you will see how to write, compile, and execute a Java program using the Java 2 Platform, Stan-dard Edition (J2SE) StanStan-dard Developer Kit (SDK).
Here’s a tip: If you have a slow Internet connection, you might want to start downloading the J2SE SDK before you start reading the chapter.
Chapter 2: Java Fundamentals
This chapter covers the fundamentals of Java, such as keywords, the built-in data types, strings, variables, references, and arithmetic operators. The infor-mation in this chapter establishes the foundation for the remainder of the book, so take your time and make sure you understand everything.
If you are a C or C++ programmer, don’t skip over this chapter thinking you already know what’s in it. Java looks similar to C++, but it behaves quite dif-ferently.
Chapter 3: Control Structures
In this chapter, you will learn the various control structures in Java and the details of how to use them, including if/else, switch, do/while, and if state-ments. I will also cover Boolean operators and the truth tables.
Chapter 4: Classes and Objects
In my opinion, this is the most important chapter in the book, whether or not you are new to oriented programming (OOP). Java is purely object-oriented, so to be a Java programmer is to understand classes and objects. In this chapter, you will learn how to think like an object-oriented programmer, as opposed to thinking procedurally. The basics of OOP are discussed: that objects consist of attributes and behaviors, and that classes describe objects. I will also briefly discuss the Unified Modeling Language (UML) and give you a taste of Object Oriented Analysis and Design (OOAD). The important topic of Java references is also covered in detail.
Spend extra time on this chapter if you need to, because all of the topics require your complete understanding before you can write Java programs.
Chapter 5: Methods
The behaviors of an object becomes methods in a class. By Chapter 5, you will be familiar with writing classes, so it’s time to discuss all of the details about writing and invoking Java methods. Topics covered in this chapter include the method call stack, method signatures, parameters, arguments, method over-loading, constructors, and the always-important discussion of call-by-value in Java.
The labs in this chapter give you the opportunity to really get a feel for objects and OOP. You will write classes, instantiate objects, and invoke meth-ods on those objects.
Chapter 6: Understanding Inheritance
Object-oriented programming has four major aspects: inheritance, encapsula-tion, polymorphism, and abstraction. This chapter focuses on the most impor-tant of the four: inheritance. A new child class can be written that extends an existing class, inheriting the attributes and behaviors of its parent. This chap-ter discusses when and how to use inheritance, including the “is a” relation-ship, the extends keyword, the Object class, method overriding, and a repeat discussion on constructors and how they are affected by inheritance.
If I were to rank chapters in order of their importance, I would put this one second behind Chapter 4, “Classes and Objects.” An understanding of inheri-tance is essential to understanding the remaining chapters of the book.
Chapter 7: Advanced Java Language Concepts
In this chapter, I tie up some loose ends and discuss the details of some of the more advanced topics of Java. Topics covered in this chapter include packages,
the access specifiers, encapsulation, static fields and methods, and the javadoc tool.
Some of these topics, such as packages and the javadoc tool, are of special interest because they are concepts unique to Java. I think javadoc is one of the most impressive features of the Java language, as you may also agree after you see how it works.
Chapter 8: Polymorphism and Abstraction
Polymorphism is the capability of an object to take on different forms. Abstrac-tion refers to the use of abstract classes, classes that cannot be instantiated. In this chapter, I discuss the details of these two object-oriented concepts, includ-ing polymorphic parameters, heterogeneous collections, the instanceof key-word, virtual methods, and abstract methods.
This is likely the most difficult chapter in the book. The concept of polymor-phism is crucial but difficult to explain, so I make an asserted effort to simplify my discussions. Read this chapter carefully, and refer back to it whenever you need to.
Chapter 9: Collections
After eight days of building a foundation for programming in Java, you will now be ready to start using some of the many Java APIs that compose the Java 2 Platform, Standard Edition (J2SE). Chapter 9 covers the classes in the Java Collections API. If you have ever had to write code to create a linked list, hash table, tree, or other data structure, you will be happy to find that the J2SE con-tains classes for all the commonly used data structures.
This is a useful chapter for anyone, no matter what types of problems you will be solving in your Java programming future.
Chapter 10: Interfaces
The Java language contains the concept of interfaces, which allow you to cre-ate data types based on a set of behaviors. A class implements an interface, thereby causing the class to take on the data type of the interface. The class must also implement the methods of the interface, which is how interfaces can be used to force behavior on classes.
This chapter covers the details of writing and implementing interfaces. Knowledge of interfaces is an absolute must in Java, so study this chapter closely.
Chapter 11: Exception Handling
Exception handling is a built-in feature of Java, and you need to know how to catch an exception before continuing further in the book. This chapter dis-cusses the two types of exceptions: runtime and checked. You will learn the details of a try/catch block and how it affects the flow of control of a method. Other topics include the Handle or Declare Rule, the finally keyword, and writing user-defined exceptions.
Chapter 12: Introduction to GUI Programming
Now, we get to the fun part of Java: GUI (graphical user interface) program-ming. I am still impressed with the ability to be able to write a GUI program that runs on different operating systems. In this chapter, you will learn how to lay out GUI components in a container using the various layout managers. You have two options in Java for creating a GUI: AWT or Swing. This chapter compares these two APIs and shows you how to use them both.
The labs in this chapter are the start of a project that has you create an Instant Messaging application. The program will gradually evolve throughout the rest of the book.
Chapter 13: GUI Components and Event Handling
There is a lot of information in creating GUIs and handling the events of the components, so I separated the topics into two days. In this chapter, you will learn how to handle the events from the GUIs you created in the previous chapter. Different components generate different types of events, and my goal in this chapter is to show you how to determine for yourself what types of events a component generates. Event handling is accomplished using the Del-egation Model, which I discuss in detail.
By the end of this chapter, you will be able to write fully functional Java GUI applications.
Chapter 14: Applets
An applet is a Java program that runs in a Web browser. Applets are actually GUI containers, so you will be writing applets in no time, knowing what you learned in the previous two chapters. This chapter discusses the details of writing applets and embedding them in an HTML page.
Don’t worry if you are new to HTML. I will show you enough so that you can create simple Web pages containing your applets.
Chapter 15: Threads
Java has built-in support for threads. In this chapter, I will discuss the details of multithreaded Java applications, including how to write and start a thread, the life cycle of a thread, and a discussion of synchronization. You will learn three techniques for writing and starting a thread: implementing the Runnable interface, extending the Thread class, and using the Timer class. The wait() and notify() methods of the Object class are also discussed in detail.
You can do some fun things with threads, as you will discover by doing the labs in this chapter.
Chapter 16: Input and Output
The java.io package contains some great classes for performing just about any type of input and output you will need to perform in a Java program. This chapter discusses how to find and use the classes you need from the java.io package. Topics covered include a comparison of streams vs. readers and writ-ers, chaining streams together, high-level and low-level streams, and serializa-tion, another one of those subtle but powerful features of the Java language.
J2SE 1.4 introduced new classes for performing error and message logging, the details of which are covered also.
Chapter 17: Network Programming
By this point in the book, you will begin to realize how Java simplifies com-mon programming tasks, allowing you to focus on the problem at hand, and this chapter is yet another example. I will discuss the various classes in the java.net package that allow you to perform network programming. Topics dis-cussed include creating socket connections using TCP/IP, creating secure socket connections using the Java Secure Sockets Extension, sending datagram packets using the User Datagram Protocol (UDP), and how to connect to and read from a URL.
In the labs in this chapter, you will finish up the Instant Message applica-tion, which will allow you to send instant messages between multiple com-puters on a network or over the Internet.
Chapter 18: Database Programming
source, using prepared statements, using callable statements, and working with result sets.
It’s hard to get far in the programming world without needing to access a database, so this is an important chapter and a great reference for using the JDBC API.
Chapter 19: JavaBeans
A JavaBean is a software component written in Java. A software component is a reusable piece of software designed to be “plugged in” to an application, allowing for easier code reuse and faster application development. Topics dis-cussed in this chapter include an overview of JavaBeans, the Bean Builder, properties, events, and hooking beans together in a builder tool.
JavaBeans are used in many of the Java technologies, including an impor-tant role in JavaServer Pages, a popular Java technology for simplifying Web page development.
Who Should Read This Book
This book is targeted towards programmers who want to learn Java. I make very few assumptions about what you already know, but general program-ming knowledge is helpful. This is an introductory book, and I assume you have no prior knowledge of Java.
To be specific, if you are familiar with COBOL, Visual Basic, C, C++, C#, For-tran, Ada, or any other programming language, and if you want to learn Java, this book is for you.
Tools You Will Need
To run the sample code in this book as well as complete the lab assignments, you will need:
J2SE SDK. The compiler, JVM, libraries, and other tools to create and execute Java programs are found in the Java 2 Platform, Standard Edi-tion (J2SE) Standard Developer Kit (SDK). This SDK is freely download-able from the Sun Microsystems Web site at http://java.sun.com/j2se. In Chapter 1, I will show you how to download and install the SDK. A text editor or IDE. You will need a text editor to write and edit the
source code for your Java programs. You can use a text editor that you already have, like Microsoft Notepad, or you can download one of the
dozens of text editors on the Internet, in both free and shareware ver-sions. Alternatively, you can use an IDE that you may already have, such as IBM’s Visual Age, Symantec’s Visual Café, or Borland’s JBuilder, to name only a few.
What’s on the Web Site
Sample code in this book, the book’s labs, and more are provided on the book’s Web site at the following URL: www.Wiley.com/compbooks/60minutesaday
Summary
Reading this book is the next best thing to sitting in on one of my classes. After 5 years of teaching Java to hundreds of students, I have learned what’s impor-tant to new Java programmers and what’s not. The book is written in the first person, as if I am lecturing in front of a class, and it contains notes and tips that I’m sure you will find useful.
I hope you enjoy the book. So now that the introductions are over, let’s get started!
1
When learning a new programming language, students are often anxious to get started, so let’s not waste any time. In this chapter, you will learn why Java has become one of the most popular programming languages being used today, even though it is a relatively new language. You will download and install the necessary software for developing Java programs, and we will go through the steps of writing, compiling, and running a Java program using the Java Standard Developer’s Kit (SDK) provided by Sun Microsystems.
Why Java?
You might ask, “Why Java?” That’s a good question, especially if you are new to the language and have not heard all the buzz about it yet. How does a pro-gramming language that has only been around since 1995 and is quite similar in syntax and design to C++ become so widely adopted? Why not just stick to languages that have been used for decades: C, C++, COBOL, Fortran, and so on? Relative to the other programming languages used today, Java is in its infancy. (Sun Microsystems released the first version of Java in 1995.) Yet Java
Getting Started with Java
C H A P T E R
has become one of the most popular languages used in programming today. Java is an object-oriented programming language with syntax and keywords almost identical to C++, another object-oriented language that has been used extensively for over 20 years.
So why learn a new programming language that is similar to an established programming language? First of all, Java is easier to learn than other object-oriented languages. When developing Java, its creators took all of the good features of the existing object-oriented programming languages such as C++, Ada, and Smalltalk, and removed most of their flaws and peculiarities. There are a lot of aspects of the Java language that are consistent and make sense, thereby making it easier to learn.
When I first learned C++ in college, we spent weeks learning just to manip-ulate and display strings. It was hard to remember which function to use when, and none of it ever made any sense to me. When I first started to learn Java, I was immediately impressed with the ease with which strings are han-dled. It was one of the first simplicities of Java that got me excited about the language.
I want to emphasize that I did not say Java is easyto learn. I said Java is
easierto learn than other object-oriented programming languages, specifically C++. You still have some work ahead of you, but I think you will find that Java is straightforward, powerful, well designed, and an enjoyable language with which to program.
The Java Virtual Machine
The elegance and power of how Java is designed is only part of the reason why Java has become so prevalent in today’s software development. Platform inde-pendence is what Sun boasts the loudest about regarding Java—and with good reason!
A Java program can be written once and then run on many different devices. Sun uses the slogan “write once, run anywhere.” I used the term boast because the validity of the claim to true platform independence has been argued by some; however, in an ideal situation, most Java programs can be moved from one device to another without any modifications to the code.
With Java, you are not concerned with the target platform. The exact same program can run on Windows and the Palm OS, without changing the code at all. This “write once, run anywhere” capability is an exciting feature of Java that makes it appealing for anyone developing software.
Classroom Q & A
Q: So, how is platform independence possible?
A: Well, I have been leading you up to that question. How do you think it is possible?
Q: I am assuming you recompile the program, using a compiler designed for the specific platform you are targeting.
A: Yes and no. You do use a compiler for a specific platform, but there is no recompiling. In fact, compiled Java code, which is referred to as bytecode, is well defined and looks the same no matter what type of device you are targeting. This is because in Java, the platform you target is a Java Virtual Machine, or JVM for short. You do not write Java programs for Windows, Unix, a Palm PC, or any other device. You write Java programs to run on a JVM.
Q: So if I want my Java program to run on Windows, I need a JVM for Windows?
A: Exactly. And if you want your Java program to run on your watch, you need a JVM for your watch. If you want a Java program to run on your cell phone, you need a JVM for your cell phone, and so on.
Q: And the JVMs are written in Java?
A: No. Interestingly enough, most JVMs are written in C or C++. When you run a Java program, you are really running a JVM, and the JVM is interpreting your Java code.
Q: This must make Java programs considerably slower.
A: That is a definite concern. Five years ago, I would have had to con-cede that a Java program was noticeably slower than a C or C++ program. But modern JVMs are much more efficient and include a feature known as a Just-In-Time (JIT) compiler. A JIT compiler actu-ally takes your Java bytecode and translates it into native code. This translated code will run just as fast as any C++ program. There is more overhead at the beginning of the Java program when the code is being translated, but the end result of a JIT com-piler is well worth it.
Q: Can you look at this translated Java code and just use it directly?
A: No. Most JIT compilers do all of their work in RAM, so this transla-tion takes place each time you run the Java program. The point of Java is not to focus on trying to create native code, since native code is inherently non-platform-independent. The point of Java is to write code that will run on a JVM. That way, your Java program can run on any device that has a JVM. Think about this: You can write a Java program, and three years from now that program can run on an electronic device that doesn’t even exist today, as long as the device has a JVM for it.
The Editions of Java
When Java was introduced, it primarily consisted of two components: the pro-gramming language specification, and the Java runtime environment specifi-cation that described the features of a JVM. As the Java language evolved over the years, Sun Microsystems gradually added new specifications and tech-nologies that made Java more than just a programming language.
For example, servlets and JavaServer Pages were introduced to provide a mechanism for using Java to create dynamic Web pages. JavaBeans provide a Java software component architecture. Enterprise JavaBeans provide a mecha-nism for developing distributed applications. Each of these technologies has its own specification.
Soon after the release of Java 2, however, (which coincided with the release of version 1.2 of the Java Development Kit), to create common runtime envi-ronments for Java developers to target, Sun grouped their major Java pro-gramming technologies into three editions:
■■ J2ME: Java 2 Platform, Micro Edition
■■ J2SE: Java 2 Platform, Standard Edition
■■ J2EE: Java 2 Platform, Enterprise Edition
J2SE
J2SE is what I like to call the core Java language. This book focuses on the key elements of this Standard Edition. J2SE provides an environment for develop-ing many different types of Java applications and includes support for GUI programming, threads, input/output, networking, XML, CORBA, applets, JavaBeans, remote method invocation, security, and database access.
If you are interested in eventually taking the exam to become a Sun Certified Java Programmer, you need to become familiar with the J2SE.
J2ME
J2ME is not a slimmed-down version of J2SE. Instead, it establishes a proce-dure for defining what a particular JVM designed for an electronic device will provide. The J2ME technology has two components:
Configurations. Define the type of JVM that is being targeted.
Profiles. Describe specification details about the device that is being tar-geted. Each device has a profile listing the standard Java APIs available for that device.
Configurations are composed of Java APIs and virtual machines designed to run on two different types of devices. The first type of device is those with 128–512K of memory. This configuration is called the Connected Limited Device Configuration (CLDC), and the corresponding JVM is referred to as the K Virtual Machine, or KVM.
The second configuration is for devices with more than 512K of memory. This configuration is called the Connected Device Configuration and uses the standard JVM, with all the same capabilities of a regular desktop computer.
Profiles are defined by the Java Community Process (JCP), which allows for input from any industry interested in a profile for a particular type of elec-tronic device. For example, a profile would be created for wireless phones, with the profile defining the configuration to use for wireless phones and the Java APIs that will be available. Any company that had an interest in wireless phones could join the Java Community Process to help determine which con-figuration to choose and what the Java API would look like for developing Java applications for wireless phones.
J2EE
J2EE is a collection of Java technologies that create a platform for distributed applications. Along with the J2SE (some of the J2EE technologies are actually a part of the Java 2, Standard Edition), J2EE allows for the most complex of mul-titier software applications to be portable across multiple platforms.
J2EE consists of the following technologies:
Enterprise JavaBeans (EJB). An EJB is a component architecture for the development and deployment of object-oriented distributed business applications. Applications written using the EJB architecture are scal-able, transactional, and multiuser secure.
Java Servlets. A servlet is a Java application that runs in a Web server.
JavaServer Pages (JSP). A JavaServer Page is similar to a servlet and allows for the creation of dynamic Web pages.
Java Database Connectivity (JDBC). JDBC allows Java applications to access a database.
Extensible Markup Language (XML). XML provides a mechanism for describing data using tags in a platform-independent manner.
Java Naming and Directory Interface (JNDI). JNDI allows Java applica-tions to access naming services and directory services.
Java Transaction API (JTA). JTA allows Java applications to access a transaction service.
Java Transaction Service (JTS). JTS defines the implementation of a transaction manager that supports the JTA.
Java Messaging Service (JMS). JMS allows for Java applications to access a message service.
Java IDL. The Java IDL allows Java applications to use CORBA implementations.
JavaMail. JavaMail allows Java applications to access an email service. RMI-IIOP. RMI-IIOP is for using Remote Method Invocation over the
Internet InterOrb Protocol.
Connectors. Connectors allow Java applications to access enterprise information systems.
Java Web Services. Java Web Services allow Java applications to take advantage of the emerging Web services technologies.
Similar to J2SE programs run in a JVM, J2EE applications run in a J2EE-compliant application server. The application server implements the J2EE specification, allowing developers to create applications that use any or all of the J2EE technologies, but that still are platform independent. Some of the more popular applications servers are IBM’s WebSphere, BEA Systems’ WebLogic, and Macromedia’s JRun.
Downloading the Java 2 SDK
versions not backward compatible. With the release of JDK 1.2, Sun started referring to the language as Java 2, and the developer’s kit is now called the Standard Developer’s Kit (SDK).
The SDK contains many tools for developing and running Java applications, most importantly a compiler and JVM. The current version of the Java 2 SDK is 1.4, but Sun updates Java 2 frequently; don’t be surprised if you find ver-sions 1.5 or beyond on Sun’s Web site. No matter what the version is, the SDK is free for developers to download and install.
The SDK can be found at http://java.sun.com/j2se. To download the SDK, click the link for J2SE Downloads, and you will taken to the SDK download page. This page has two columns for each platform: one for the JRE and one for the SDK. JRE stands for Java Runtime Environment, which is what you would download if you wanted to just run Java applications. The JRE is essentially the JVM for your platform.
If you are actually going to write Java programs, which is what we are going to do throughout this book, you will need the SDK. The SDK contains the JRE plus all the necessary development tools.
Click the SDK that’s right for you. For example, if you are going to be using Windows to write your Java programs, click the Windows SDK. Notice that there are versions available for Linux and Solaris as well. You need to agree to Sun’s license agreement before downloading.
The SDK is a large download that will take more than an hour for those with a dial-up connection.
Installing the SDK
After you have downloaded the installation file, execute it to install the SDK. The downloaded file will be unpacked and Install Wizard will begin. You will be prompted to accept Sun’s license agreement; then you will be asked to select the folder where the SDK is to be installed.
It is best to install the SDK in the default folder that the Install Wizard dis-plays. For example, for SDK 1.4, the default folder is c:\j2sdk1.4.0. If you do change the install folder, however, be sure not to pick a directory with spaces in the directory name such as Program Files. Spaces in directory names tend to cause problems with the compiler and JVM.
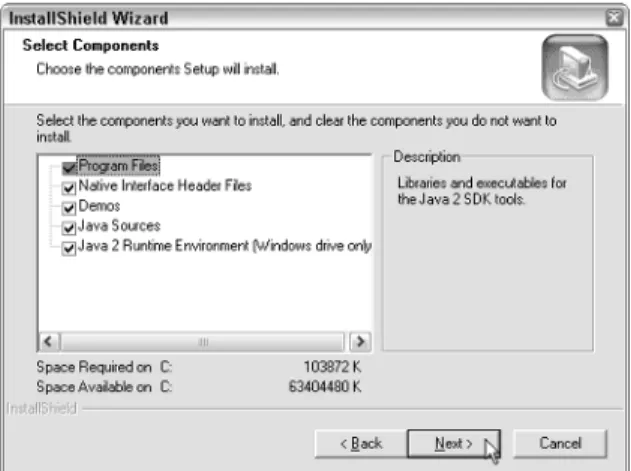
Figure 1.1 shows the step in the Install Wizard where you can choose which components of the SDK to install. If you have plenty of hard drive space, you might as well install all the components; however, if you want to save some hard drive space, you can choose to not install the Native Interface Header Files, Demos, and the Java Sources. These components will not be needed for what we are going to be doing.
Figure 1.1 Choosing the SDK components to install.
The installation is complete when you see the InstallShield Wizard Com-plete page. Click the Finish button to comCom-plete the installation.
Running the SDK Tools
After you have successfully installed the SDK, you need to set your PATH environment variable so the compiler and JVM can be executed easily from a command prompt. The folder to add to your path is the bin folder where you installed the SDK, such as c:\j2sdk1.4.0\bin. Setting the PATH environment variable is different on each operating system. For Windows 2000/NT/XP users, the PATH can be set by clicking the System icon of the Control Panel. (In Windows XP, the System icon is located in the Performance and Maintenance section of the Control Panel.) Select the Advanced tab, and then click the Envi-ronment Variables button to display the EnviEnvi-ronment Variables dialog box. Click on Path in the System Variables list, then click the Edit button to display the dialog box shown in Figure 1.2. Add the \bin folder where you installed the SDK to your PATH.
Figure 1.3 Using the SET command to set the PATH environment.
For other versions of Windows, the PATH environment variable is edited in the c:\autoexec.bat file. You then need to restart your system. In all versions of Windows, you can also set the PATH manually at the command prompt (also called the DOS prompt) by using the SET command, as shown in Figure 1.3.
If you use the SET command as shown in Figure 1.3, the PATH will only be set for that particular DOS window, and the changes will be lost when you close that DOS window.
Running the javac Compiler
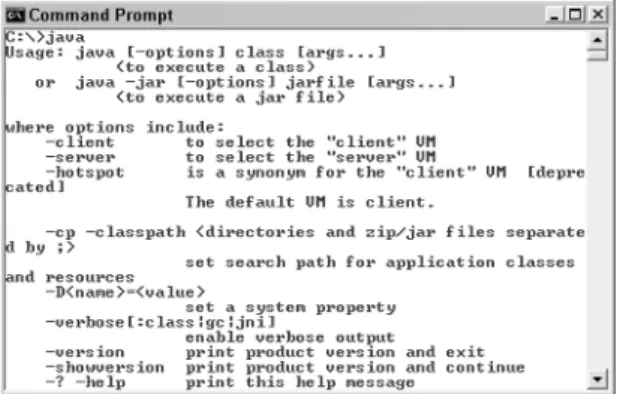
The javac tool is the Java compiler you will use to compile the Java code you write into bytecode. To run javac, type javac at the command prompt and press Enter. Figure 1.4 shows the output that you should see. If an error message occurs along the lines of a file not being found, your PATH might not have been set correctly.
Figure 1.4 The javac tool compiles Java source code into bytecode.
Figure 1.5 Use the java tool to interpret your Java bytecode.
Normally, when you run javac, you enter the name or names of Java source code files that you want to compile. Because you just ran javac without enter-ing any source code files, the help topics for javac were displayed, as shown in Figure 1.4.
Running the JVM
After javac is running successfully, you should be able to type java and then press Enter to run the JVM that comes with the SDK. Figure 1.5 shows the out-put that you should see.
Normally, when you run java, you enter the name of the bytecode file that contains the Java program you want to execute. If you saw an output similar to Figure 1.5, you are ready to compile and run Java programs using the SDK. So let’s get started!
A Simple Java Program
It is common practice when learning a new programming language to start out with a Hello, World program that simply displays the message, “Hello, World.” So, we will now write a simple Java program that displays a greeting at the command prompt.
Here are the steps we will follow in writing our first Java program:
1. Write the source code.
2. Compile the source code.
Step 1: Write the Source Code
The first step is writing the code for our Java program. We will write the Java programs in this book using a simple text editor such as Windows Notepad. (You Unix folks can use emacs or vi.) The Java code is initially text, and the javac tool will compile our text files into bytecode.
Figure 1.6 shows you the Hello, World program typed into Notepad. Open your text editor and then type in the program just as you see it in Figure 1.6. Keep in mind that Java is case sensitive, meaning, for example, that String and string are not the same in Java.
Let’s save this file first and then discuss what the program does. Java is a highly structured and organized language. One of the rules that must be fol-lowed is that the name of a source code file must match the name of the public class defined in that file, and the file extension must be .java.
Create a new directory off your root directory (off your c:\ drive in Win-dows) named javafiles. Save the HelloWorld.java file in that javafiles directory. This way you can access it quickly from the command prompt. The name of the public class in Figure 1.6 is HelloWorld, so this file must be saved as Hel-loWorld.java.
Some programs such as Notepad use a default extension like .txt for text files. Because this won’t work in Java, make sure that you save the source file correctly. One way to ensure a correct filename is to enclose the filename in quotation marks.
Do not save your Java source files in a directory with spaces in the name of the directory. This may cause problems, depending on the version of Windows you are using; therefore, do not save your files in the My Documents folder.
Figure 1.6 The source code of the Hello, World program.
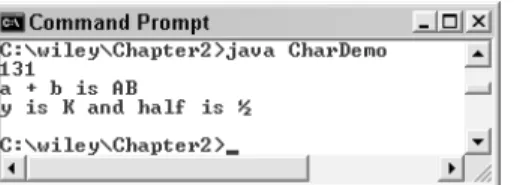
The program in Figure 1.6 contains a single class (see the An Introduction to Classes and Objects sidebar) named HelloWorld. Within HelloWorld is one method: main(). The main() method is declared as public, static, and void, which are Java keywords that are discussed later in the book. The main() method is unique because it is the method invoked by the JVM when this pro-gram is executed.
The main() method must look like:
public static void main(String [] args)
12 Chapter 1
♦
An Introduction to Classes and Objects
You should understand two important object-oriented terms: object and class. A classis a description of an object, and an objectis an instance of a class.
In Java, you writeclasses. Because Java is purely object oriented, all of the statements in your Java programs appear inside a Java class. Notice that the Hello, World program in Figure 1.6 is a public class. We will discuss publicin detail later, but for now I will just say that almost every class you write in Java will be declared public.
The purpose of a class is to describe an object. An object is just what the word means in English: a thing, an item, a noun. For example, a car, a house, an employee of a com-pany, a window that opens on the computer screen, or a TCP/IP socket connection between two computers.
An object consists of two major components: attributes and behaviors. The attributesof an object are what the object consists of, and the behaviorsof the object are what the object does.
You do not write an object in object-oriented programming (OOP); you instantiateone. You get to describe what an object will look like when it gets instantiated by defining the attributes and behaviors of the object in a class. My favorite analogy when explaining classes and objects is to compare blueprints to a class. A blueprint of a house tells you what the house will look like when it is built, but it is clearly not a house—just a description of one. When a contractor follows the blueprints and actually builds an instance of a house, that house is an object.
How many houses can you build from a set of blueprints? As many as you want. How many instances of a class (that is, objects) can you create? As many as you want.
A class contains the attributes and behaviors of the object it is describing. In the Hel-loWorld class in Figure 1.10, there are no attributes and only one behavior, main(). By the way, the behaviors are often referred to as methods, and HelloWorld contains a single method: main().
The only term you can change in this signature of main() is the name of the parameter args, which can be any valid identifier name. The array of strings (String []) will contain the command-line arguments, if any, when the program is executed from the command prompt.
Within main() is a single statement:
System.out.println(“Hello, World”);
This statement is what causes “Hello, World” to appear at the command prompt—or in this case, the standard output. System.out represents the stan-dard output of the device where this program is running, and the println() (short for print line) method displays the given string along with a line feed.
Notice the semicolon at the end of the System.out.println() statement. The Java compiler ignores all whitespace and indenting, so it is necessary to use a semicolon to denote the end of all statements in Java.
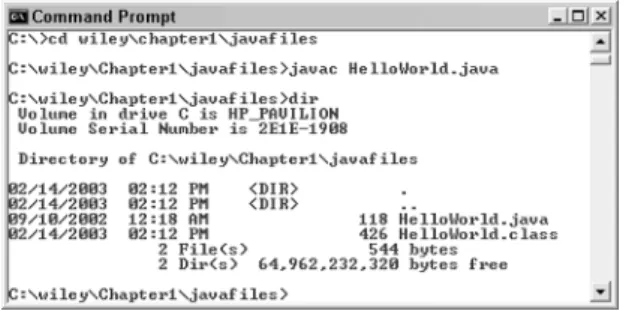
Step 2: Compile the Program
The javac tool compiles Java classes into bytecode. Figure 1.7 shows how to compile the HelloWorld.java class from Figure 1.6. Notice the use of the cd command to change directories to the one where the HelloWorld.java file is located.
If the compiler is successful, no message will be displayed and the com-mand prompt will come back. Notice in Figure 1.7 the use of the dir comcom-mand to display the contents of the current directory. You should see a new file: Hel-loWorld.class. This is the bytecode file generated from the compiler.
All bytecode appears in .class files. The extension is appropriate because within that .class file is the bytecode describing a single class. In this case, Hel-loWorld.class contains the bytecode of the HelloWorld class, which is a class containing one method, main().
Figure 1.7 Use the javac tool to compile HelloWorld.java.
If there are compiler errors, they will be displayed on the command prompt with a description of what the compiler did not understand. For example, Fig-ure 1.8 shows the compiler error that occurs if the word String in FigFig-ure 1.6 was not capitalized.
Be sure to read your compiler errors closely. Many of my students simply glance at a compiler error and quickly jump back to their code to look for the error. However, if you read the error carefully, you will notice that the compiler tells you the name of the file and the line number where the error occurred. In the case of Figure 1.8, line 3 of HelloWorld.java has a problem.
Upon closer examination of the compiler error, it appears that the compiler “cannot resolve symbol,” which happens to be my most common compiler error. The compiler does not know what “string” means. That was my fault, of course, because I changed String to string. The compiler doesn’t know what I meant; all it knows is that it cannot figure what a string is.
Step 3: Run the Program
After you have successfully compiled HelloWorld.java and created the Hello-World.class file, you can now run the program using the java tool. The java tool requires the name of the bytecode file that you want to execute. (The class being executed must contain the main() method within it, or an error will occur.)
Figure 1.9 shows the proper use of the java tool to run the HelloWorld pro-gram. Keep in mind that Java is case sensitive, even though Windows and DOS are not. You need to type in the name of the class using proper case, such as HelloWorld, as shown in Figure 1.9.
Notice also in Figure 1.9 that you do not use the .class extension when run-ning Java programs with the java tool. The JVM only interprets bytecode in .class files, so the .class extension is not needed. An error occurs if you include the extension.
Figure 1.9 Running the Hello, World program.
Lab 1.1: Your First Java Program
In this lab, you will write a Java program that uses the System. out.prinlnt() method to display an email signature (name, title, email address, and so forth).
Perform the following steps:
1. Create a new subdirectory in your javafiles directory, called Lab1_1.
2. Using your text editor, start with a public class called Signature. Add the main() method within the Signature class.
3. Within main(), use the System.out.println() method to print your name at the command prompt.
4. Similarly, print your title on a line, then your email address, Web site URL, or phone numbers. (Display any information you want in your signature. Just remember to use a semicolon after each
println() statement.)
5. Save your Signature source code in the Lab1_1 folder in a file called Signature.java.
6. Compile Signature.java using the javac tool.
7. Run the Signature program using the java tool.
You should see an output similar to that in Figure 1.10.
Figure 1.10 Sample output for Lab 1.1.
Lab 1.2: Using Command-Line Arguments
When you run a Java program from the command prompt, you can input arguments that get passed to the main() method as strings. For example, suppose that you entered the following command to run your Signature program from Lab 1.1:
java Signature hello 27 “Rich Raposa”
This command has three command-line arguments beyond the java Signature command: hello, 27, and Rich Raposa. (Arguments are sepa-rated by spaces unless placed in double quotes.) These three arguments are passed into main() and placed in the args parameter. The args param-eter is an array of strings that can hold as many command-line arguments as you enter.
To access these arguments within main(), you use args with a subscript in square brackets. For example, args[0] is the first argument, args[1] is the second, and so on. In the current example, args[0] will be the string “hello,” args[1] will be “27,” and args[2] will be “Rich Raposa.”
In this lab, you will display the title and author of a book, where the title and author are entered as command-line arguments such as:
Title: Green Eggs and Ham Author: Dr. Seuss
Now, follow these steps:
1. Create a new subdirectory of javafiles, called Lab1_2.
2. Open your text editor, and write a public class called Book.
3. Add main() within your Book class.
4. The title will be args[0] and the author will be args[1]. You need to concatenate “Title: “ with args[0], which is done by using the + oper-ator. For example:
System.out.println(“Title: “ + args[0]);
5. Similarly, use the concatenation operator to display “Author: “ and args[1].
6. Save your Book class in the Lab1_2 directory in a file called Book.java.
7. Compile the Book class.
8. Run the Book program, using two command-line arguments:
java Book “Green Eggs and Ham” “Dr. Seuss”
If you run the Book program and forget to enter two command-line arguments, you will see an “exception in thread main” java.lang.Array IndexOutOfBounds-Exception. This would happen, for example, if you tried to access args[1], and there was no string at that position in the args array.
Summary
■■ Java is an object-oriented programming language that is interpreted by
a Java Virtual Machine (JVM), allowing it to be platform independent.
■■ There are three editions of Java: J2SE, the Java 2 Platform, Standard
Edi-tion, which is covered in this book; J2ME, the Java 2 Platform, Micro Edition, which is for electronic devices with limited resources; and J2EE, the Java 2 Platform, Enterprise Edition, which is a collection of Java technologies that includes servlets, JavaServer Pages, and Enter-prise JavaBeans.
■■ Writing Java code involves writing classes. A class is saved in a .java
file, and only one public class can appear in a .java file. The name of the .java file must be the name of the public class declared in the file.
■■ Compiled Java code is referred to as bytecode. Bytecode appears in a
.class file.
■■ To compile a Java program, you use the javac tool that comes with the
Standard Developer Kit (SDK), which is freely downloadable from Sun’s Web site.
■■ To run a Java program, you use the java tool that comes with the SDK.
The java tool is a JVM.
■■ The JVM invokes the main() method. The signature of main() is public
static void main(String [] args).
Review Questions
1. Name the three editions of the Java 2 platform.
2. Compiled Java code is referred to as ____________.
3. A class is a description of a(n) ___________________.
4. An object is an instance of a(n) ___________________.
5. The main() method has to be declared as ___________________.
6. True or False: A Java program written for Windows needs to be recompiled to run it on Linux or Unix.
7. What are the two major components of an object?
Answers to Review Questions
1. The three editions of the Java 2 platform are J2ME, J2SE, and J2EE.
2. Compiled Java code is bytecode.
3. The answer is object. Classes describe objects.
4. The answer is class. You write a class to define an object, and an instance of the class is an object.
5. public static void main(String [] args). The only term you can change is “args”; other-wise, main() must look like this.
6. No, you do not need to recompile Java code for different platforms because Java only runs on one platform—a Java Virtual Machine implementation.
7. Attributes and behaviors, also referred to as fields and methods.
8. JIT stands for Just-In-Time and refers to a JVM that compiles portions of the bytecode of a Java program into native code when the program is executed.
21
This chapter builds your foundation for using the Java programming language. It discusses the details of the fundamentals of Java. The keywords are discussed as well as how to declare identifiers and variables. The chapter also discusses literals, constants, strings, references, and the Java arithmetic operators.
Java Keywords
The keywords of a programming language are the words that define the lan-guage, have special meaning to the compiler, and cannot be used as identifiers. Table 2.1 displays all the Java keywords.
Table 2.1 Java Keywords
abstract default if private this
boolean do implements protected throw
break double import public throws
(continued)
Java Fundamentals
C H A P T E R
Table 2.1 (continued)
byte else instanceof return transient
case extends int short try
catch final interface static void
char finally long strictfp volatile
class float native super while
const for new switch
continue goto package synchronized assert
The keywords const and goto cannot be used in Java. They were added to the list of keywords so they would generate compiler errors for developers who were converting C and C++ code over to Java. The keyword assert is a new Java keyword added to the J2SE in version 1.4.
There are three more reserved words in Java: true, false, and null. Techni-cally, they are literal values and not keywords. However, they cannot be used as identifiers, and they have a specific meaning to the Java compiler.
Take a look back at the HelloWorld example in Chapter 1. The keywords used are public, class, static, and void. The other words in the HelloWorld class are identifiers, which are discussed next. Notice that main is not a keyword, even though main is a special name used to denote the method in which a Java program starts.
Identifiers
Identifiers are those words in your Java code that you choose. For example, in Lab 1.1, you wrote a class named Signature. Signature is not a Java keyword, nor does it have any special meaning in Java. You had to name the class some-thing, and Signature was chosen to make the code more readable because the program displayed an email signature.
In Java, you will need to identify many elements in your code, including class names, methods, fields, variables, and package names. The names you choose are called identifiers and must adhere to the following rules:
■■ An identifier cannot be a keyword or true, false, or null.
■■ An identifier can consist of letters, digits 0–9, the underscore, or the
dollar sign.
■■ An identifier must start with a letter, an underscore, or a dollar sign.
For example, x, X, x1, x2, HelloWorld, Signature, System, String, age, $color, and _height are valid identifiers. Don’t forget that Java is case sensitive. That means Public is a valid identifier because it is different from the keyword public.
The following are not valid identifiers: 1x because it starts with a digit, public because it is a keyword, a@b or x+y because @ and + are not valid characters for use in identifiers.
Java’s Eight Primitive Data Types
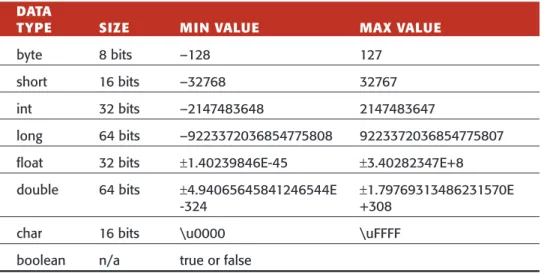
Java has eight data types that are built into the language. These eight data types, often referred to as the primitive types, are the building blocks from which classes are written. Table 2.2 shows the eight data types, the number of bits they consume in storage, and the range of values that can be stored in each type.
Notice that the size of the data types (except for boolean) is strictly defined. For example, an int is a signed, 32-bit data type. The reason Java can define the exact size of its primitive data types, independently of the platform that the program runs on, is because Java programs run on a JVM. The underlying plat-form does not affect the size or range of values of Java’s primitive data types.
We will discuss each of the data types in Table 2.2 in detail. But before we do, I want to discuss declaring variables in Java. For more information on data types, be sure to read the sidebar Understanding Classes and Data Types.
Table 2.2 Eight Primitive Data Types
DATA
TYPE SIZE MIN VALUE MAX VALUE
byte 8 bits –128 127
short 16 bits –32768 32767
int 32 bits –2147483648 2147483647
long 64 bits –9223372036854775808 9223372036854775807
float 32 bits ±1.40239846E-45 ±3.40282347E+8
double 64 bits ±4.94065645841246544E ±1.79769313486231570E
-324 +308
char 16 bits \u0000 \uFFFF
boolean n/a true or false