Wrox’s ASP.NET 2.0
Visual Web Developer™ 2005
Express Edition Starter Kit
Wrox’s ASP.NET 2.0
Visual Web Developer™ 2005
Express Edition Starter Kit
Wrox’s ASP.NET 2.0 Visual Web Developer™ 2005
Express Edition Starter Kit
Published by
Wiley Publishing, Inc.
10475 Crosspoint Boulevard Indianapolis, IN 46256 www.wiley.com
Copyright © 2006 by Wiley Publishing, Inc., Indianapolis, Indiana ISBN-13: 978-0-7645-8807-5
ISBN-10: 0-7645-8807-9
Manufactured in the United States of America 10 9 8 7 6 5 4 3 2 1
1MA/SR/RS/QV/IN
Library of Congress Control Number is available from the publisher.
No part of this publication may be reproduced, stored in a retrieval system or transmitted in any form or by any means, electronic, mechanical, photocopying, recording, scanning or otherwise, except as permitted under Sections 107 or 108 of the 1976 United States Copyright Act, without either the prior written permission of the Publisher, or authorization through payment of the appropriate per-copy fee to the Copyright Clearance Center, 222 Rosewood Drive, Danvers, MA 01923, (978) 750-8400, fax (978) 646-8600. Requests to the Publisher for permission should be addressed to the Legal Department, Wiley Publishing, Inc., 10475 Crosspoint Blvd., Indianapolis, IN 46256, (317) 572-3447, fax (317) 572-4355, or online at http://www.wiley.com/go/permissions.
LIMIT OF LIABILITY/DISCLAIMER OF WARRANTY:THE PUBLISHER AND THE AUTHOR MAKE NO REPRESENTATIONS OR WARRANTIES WITH RESPECT TO THE ACCURACY OR COMPLETENESS OF THE CONTENTS OF THIS WORK AND SPECIFICALLY DISCLAIM ALL WARRANTIES, INCLUDING WITHOUT LIMITATION WARRANTIES OF FITNESS FOR A PARTICULAR PURPOSE. NO WARRANTY MAY BE CREATED OR EXTENDED BY SALES OR PROMOTIONAL MATERIALS. THE ADVICE AND STRATEGIES CONTAINED HEREIN MAY NOT BE SUITABLE FOR EVERY SITUATION. THIS WORK IS SOLD WITH THE UNDERSTANDING THAT THE PUBLISHER IS NOT ENGAGED IN RENDERING LEGAL, ACCOUNTING, OR OTHER PROFESSIONAL SERVICES. IF PROFESSIONAL ASSISTANCE IS REQUIRED, THE SERVICES OF A COMPETENT PROFESSIONAL PERSON SHOULD BE SOUGHT. NEITHER THE PUBLISHER NOR THE AUTHOR SHALL BE LIABLE FOR DAMAGES ARISING HERE-FROM. THE FACT THAT AN ORGANIZATION OR WEBSITE IS REFERRED TO IN THIS WORK AS A CITA-TION AND/OR A POTENTIAL SOURCE OF FURTHER INFORMACITA-TION DOES NOT MEAN THAT THE AUTHOR OR THE PUBLISHER ENDORSES THE INFORMATION THE ORGANIZATION OR WEBSITE MAY PROVIDE OR RECOMMENDATIONS IT MAY MAKE. FURTHER, READERS SHOULD BE AWARE THAT INTERNET WEBSITES LISTED IN THIS WORK MAY HAVE CHANGED OR DISAPPEARED BETWEEN WHEN THIS WORK WAS WRITTEN AND WHEN IT IS READ.
For general information on our other products and services please contact our Customer Care Department within the United States at (800) 762-2974, outside the United States at (317) 572-3993 or fax (317) 572-4002.
Credits
Senior Acquisitions Editor
Jim Minatel Development Editor Kevin Shafer Technical Editors Dan Mahary Richard Purchas Production Editor Pamela Hanley Copy Editor
Foxxe Editorial Services
Editorial Manager
Mary Beth Wakefield
Production Manager
Tim Tate
Vice President & Executive Group Publisher
Richard Swadley
Vice President and Publisher
Joseph B. Wikert
Project Coordinator
Michael Kruzil
Graphics and Production Specialists
Lauren Goddard Denny Hager Barbara Moore Alicia B. South
Quality Control Technicians
Laura Albert Leeann Harney Jessica Kramer
Proofreading and Indexing
TECHBOOKS Production Services
About the Authors
David Sussmanis a hacker in the traditional sense of the word. That’s someone who likes playing with code and working out how things work, which is why he spends much of his life working with beta software. Luckily, this coincides with writing about new technologies, giving him an output for his poor English and grammar. He lives in a small village in the Oxfordshire countryside. Like many programmers everywhere, he has an expensive hi-fi, a big TV, and no life. You can contact Dave through his own company, ipona Limited: [email protected].
Contents
Acknowledgments ix
Introduction xi
Chapter
1: Getting Started
1
About the Example Application
2
Installing Visual Web Developer
3
Step by Step — Using the Setup Wizard
3
Step by Step — Installing the PPQ Example Files
7
Viewing the PPQ Example Database
10
Step by Step — Viewing the PPQ Database
10
Reading and Displaying Data with ASP.NET
20
Summary
30
Chapter 2: Designing a Web Site
31
Designing a Web Site
31
Making Web Sites Accessible
32
Multilingual Web Sites and Globalization
32
Designing the Appearance of the Site
33
Templates and Master Pages 34
Navigation and Menus 35
Text Styles and Style Sheets 35
Designing the Underlying Workings of the Site
36
Data Access 36
Building a Master Page and Content Page
37
Creating the Page Structure as a Master Page
37
Choosing the Correct Element and Control Type
48
Chapter 3: Building the PPQ Database
67
Designing the PPQ Database
68
Storing the Menu Items Data
68
Applying the Rules of Normalization 69
Applying the Remaining Normalization Rules 70
Storing the Orders Data
72
The OrderItems Table 73
The Final Database Design
74
Creating and Modifying Databases in VWD
76
The Table Designer Window
78
The Query Window
80
Creating a New Database
81
Creating the PPQ OrderItems Table
82
Defining Relationships between Tables
88
Defining Relationships in the Table Designer 88 Defining Relationships with a Database Diagram 90
Extracting and Displaying the Menu Items
94
Extracting Data with a Custom SQL Statement
94
Creating a Stored Procedure
101
Using a View Instead of a Table or Stored Procedure
104
Summary 105
Chapter 4: Accessing and Displaying Data
107
Data Source and Data Display Controls
108
The Object-Oriented and Event-Driven Architecture
109
About the GridView Control
110
Using Different Column Types in a GridView
111
Using Data Display Control Templates
117
The DetailsView and FormView Controls
123
Using a DetailsView and FormView Control
123
Summary 127
Chapter 5: Displaying Nested and XML Data
129
Building Nested Data Displays
130
User Controls and Binding to XML Data
157
Building the Delivery Costs Page
158
Building the Text Links User Control
162
Converting the XML with an XSLT Style Sheet 163
Creating the User Control 164
Converting Parts of a Page into a User Control 170
Summary 170
Chapter 6: Managing and Editing Data
173
Data Source Controls
173
Adding New Rows
186
Summary 193
Chapter 7: Placing an Order
195
The Order Process
196
Understanding Classes
197
Creating the Shopping Cart
198
The Shopping Cart Classes
198
The Shopping Cart Data Layer
212
The ObjectDataSource Control 212
The Data Layer Classes 213
Creating the Order Page
219
The Shopping Cart Page
225
Summary 234
Chapter 8: The Checkout Process
235
Paying for the Order
235
Collecting the Delivery Address
239
Collecting the Payment Details
245
Confirming the Order
248
Completing the Order
253
Publishing a Site
276
Summary 278
Acknowledgments
Producing a book like this is a huge development effort that involves a lot of people—many of whom work behind the scenes and never get the public recognition they deserve. In an attempt to recognize this, we would like to thank everyone at the publishers, John Wiley & Sons, who worked so hard to turn our manuscripts into a book.
Introduction
This book shows you just how powerful, and yet easy to use, the new Web development environment from Microsoft really is. Visual Web Developer 2005 Express Edition, along with the relational database SQL
Server 2005 Express Edition, allows you to build great Web sites using drag-and-drop techniques, wizards,
and a huge range of developer-friendly tools and controls. The book demonstrates this by leading you through the creation of a fully featured and highly interactive e-commerce Web application, like those you are used to seeing on the Internet today.
Visual Web Developer is an environment based on the latest release of the Microsoft .NET Framework, version 2.0, which includes the Web programming and runtime features that make up ASP.NET 2.0. ASP.NET has evolved over the previous several years from the original Microsoft Active Server pages (ASP) scripting platform that pioneered many of the current techniques in Web programming.
However, ASP.NET leaves the scripting world behind. It offers a development environment that generates compiled code, includes a full range of tools that enable implementation of even the most complex feature quickly and easily, and provides plenty of resource-based help and code creation assistance. On top of all this, the execution efficiency of the .NET platform means that your Web sites and applications run more quickly and reliably than ever before.
This is not a reference book. You will not find listings of the objects, classes, properties, and methods of each feature in ASP.NET. Instead, this book is task-focused to provide you with the experience of working in Visual Web Developer, quickly getting to grips with the environment and ASP.NET, and learning how to achieve the kinds of requirements you will meet every day as you build your applications. For example, after a brief section on installing Visual Web Developer and an introduction to the development environment, Chapter 1 gets you building pages that display and allow you to edit the data in a database.
As you progress through the book, you will learn about the following:
❑ Designing the structure of your Web site
❑ Implementing the database
❑ Displaying and editing data
Conventions
To help you get the most from the text and keep track of what’s happening, we’ve used a number of conventions throughout the book.
Try It Out
The Try It Out is an exercise you should work through, following the text in the book.
1.
They usually consist of a set of steps.2.
Each step has a number.3.
Follow the steps through with your copy of the database.How It Works
After each Try It Out, the code you’ve typed will be explained in detail.
Tips, hints, tricks, and asides to the current discussion are offset and placed in italics like this.
As for styles in the text:
❑ We highlight important words when we introduce them.
❑ We show keyboard strokes like this: Ctrl-A.
❑ We show filenames, URLs, and code within the text like this: persistence.properties.
❑ We present code in two different ways:
In code examples we highlight new and important code with a gray background.
The gray highlighting is not used for code that’s less important in the present context, or has been shown before.
Source Code
As you work through the examples in this book, you may choose either to type in all the code manually or to use the source code files that accompany the book. All of the source code used in this book is
Errata
We make every effort to ensure that there are no errors in the text or in the code. However, no one is perfect, and mistakes do occur. If you find an error in one of our books, like a spelling mistake or faulty piece of code, we would be very grateful for your feedback. By sending in errata you may save another reader hours of frustration, and at the same time you will be helping us provide even higher-quality information.
To find the errata page for this book, go to www.wrox.com, and locate the title using the Search box or one of the title lists. Then, on the book’s details page, click the Book Errata link. On this page, you can view all errata that has been submitted for this book and posted by Wrox editors. A complete book list including links to each book’s errata is also available at www.wrox.com/misc-pages/booklist.shtml.
If you don’t spot “your” error on the Book Errata page, go to www.wrox.com/contact/techsupport
.shtmland complete the form there to send us the error you have found. We’ll check the information
and, if appropriate, post a message to the book’s errata page and fix the problem in subsequent editions of the book.
p2p.wrox.com
For author and peer discussion, join the P2P forums at p2p.wrox.com. The forums are a Web-based system for you to post messages relating to Wrox books and related technologies and interact with other readers and technology users. The forums offer a subscription feature to e-mail you topics of interest of your choosing when new posts are made to the forums. Wrox authors, editors, other industry experts, and your fellow readers are present on these forums.
At http://p2p.wrox.comyou will find a number of different forums that will help you not only as
you read this book but also as you develop your own applications. To join the forums, just follow these steps:
1.
Go to p2p.wrox.comand click the Register link.2.
Read the terms of use and click Agree.3.
Complete the required information to join as well as any optional information you wish to provide and click Submit.1
Getting Star ted
Developing sites and applications for the Web finally comes of age with the release of Microsoft Visual Web Developer (VWD 2005 Express Edition) and version 2.0 of the .NET Framework. VWD is one of the “Express” products that Microsoft provides as an expansion of the Visual Studio product line. These are lightweight, easy-to-use, and easy-to-learn tools aimed at hobbyists, students, and novice developers.
VWD is a lightweight tool for building dynamic Web sites and Web services. While there have been other tools and technologies around for a long time, the great new features in VWD and .NET 2.0 make it even easier to build, test, deploy, manage, and extend your Web sites and Web applications. This chapter starts the process of demonstrating the capabilities of VWD, and showing you how easy it is to build attractive, high-performance Web sites with ASP.NET 2.0.
In this chapter, you will:
❑ See the completed example application
❑ Install and set up Visual Web Developer 2005 and SQL Server 2005 Express Editions
❑ Install the example application files for this book
❑ View the example database and execute a test query
❑ Generate a simple page that uses the example database
About the Example Application
In this book, you will be building a Web site that displays and sells products — a common scenario for many Web developers today. It is not a complicated site in comparison to many “out there” but is extensive enough to demonstrate most of the features of ASP.NET 2.0 and VWD, as well as showing you the prime techniques and approaches that are used as the foundations for almost all Web sites built using version 2.0 of .NET. The product you will see in the demonstration site is not complicated either. The site is a fictional online pizza parlor that sells and delivers pizzas and drinks to customers.
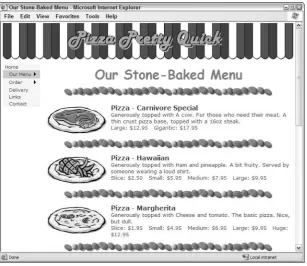
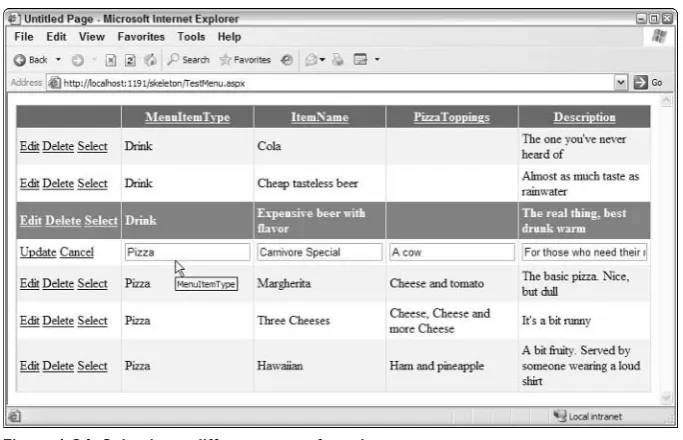
[image:18.533.100.408.238.504.2]Figure 1-1 shows the page in the example application that lists the items available from “Pizza Pretty Quick,” or as you will see it described throughout the book, “PPQ.” The page header and the menu you see at the left are part of a master page. This makes is easy to achieve a consistent look and feel for the whole site, and saves a lot of work both when creating new pages and when updating the site design. Data for the list of available items comes from a database table stored in a local copy of SQL Server 2005 Express Edition running on the same machine as VWD.
Figure 1-1: The completed site, showing the list of items you can order
Installing V isual Web Developer
Visual Web Developer 2005 Express Edition is available along with SQL Server 2005 Express Edition on the CD-ROM included with this book. Both are also available for download (along with other “Express” products) from Microsoft at http://msdn.microsoft.com/express. You can install it on Windows 98, Windows 2000 Professional or Server, Windows XP with Service Pack 2, or Windows Server 2003. In this book, you will see it running on both Windows XP and Windows Server 2003. Installation is easy, as you will see in the following step-by-step guide, and there is no other configuration required after installation.
Step by Step — Using the Setup Wizard
Follow these steps to use the Setup Wizard:
1.
If you are installing from the book’s CD-ROM and the installer doesn’t automatically begin when you insert the CD, double click on setup.exe to start the Setup Wizard. If you downloaded the software, double-click on the downloaded program file to start the Setup Wizard. In the Setup Wizard, step through the screens that concern providing feedback and accepting the license agreement. You may also have to install other updates, such as XP Service Pack 2 or the latest Windows Installer, during this process, and these may require a reboot during the installation. [image:19.533.167.429.348.586.2]3.
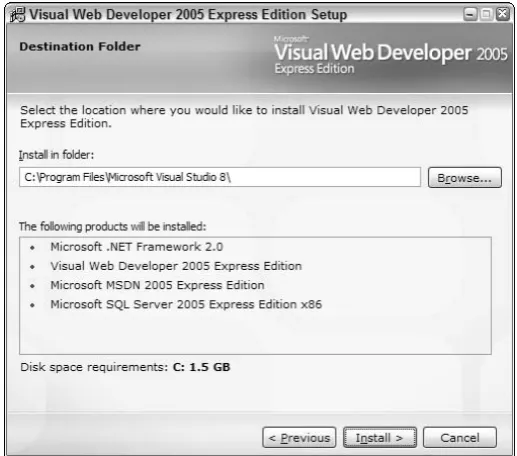
Click Next. In the Destination Folder page (see Figure 1-3), confirm the path where VWD will be installed. It is recommended that you leave it set to the default. This page shows a summary of the products for installation, and the disk space requirements.Figure 1-3: Destination Folder page
4.
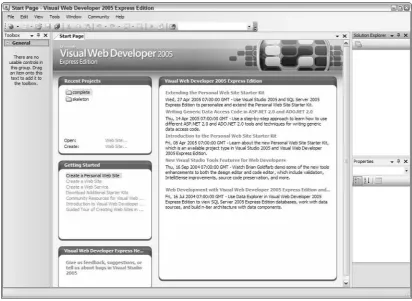
Click Install to start the installation. After it completes, you will find entries in the Programs section of your Start menu for Visual Web Developer and SQL Server. The SQL Server section includes a tool that you can use to set the configuration options for SQL Server if you want to change the services or protocols it uses. This may be necessary if you want to be able to access SQL Server from another machine, but no changes are required when accessing it from the local machine (as you will see in this book).Figure 1-4: Start Page
Figure 1-5: Options dialog box
After installing the Visual Web Developer tool, you should install the example files for the Pizza Pretty Quick application described in the book. To download the examples (or to see the application running online), go to www.daveandal.net/books/8079. You can also download the examples from the Wrox Books Web site at http://eu.wiley.com/WileyCDA/WileyTitle/productCd-0764588079.html.
The examples download file contains two versions of the PPQ application. One is a skeleton site contain-ing the database, the images, and other resources used in the application, but without the ASP.NET pages that you will create by working through the chapters in this book. The other is a completed version of the application that you can run to see what it looks like, how it works, and modify or experiment with as you wish — without having to build the pages yourself first.
The next section describes the process for installing the samples, setting up the file permissions that are required, and testing the application to make sure that it is working properly on your machine.
Step by Step — Installing the PPQ Example Files
Follow these steps for installing the PPQ example files:
2.
If you are running Windows XP and you have Internet Information Services (IIS) installed, you must now grant the accounts named ASPNET and NETWORK SERVICE (under which ASP.NET executes, depending on whether you installed SP2) the required permissions to access the database provided with the example files. (This and the remaining steps are not required in Windows Server 2003, or if you do not have IIS installed.) In Windows Explorer, right-click on the subfolder named App_Datawithin the skeletonfolder and select Properties. In the App_Data Properties dialog, select the Security tab and click the Add button to open the “Select Users or Groups” dialog, as shown in Figure 1-8. Click the Locations button, and select the name of your machine (not the domain it is part of) and click OK; then enter the account nameASPNETin the text box and click the Check Names button. The full account name, including the machine name, is underlined to indicate that is was located.
Figure 1-8: Select Users or Groups dialog
Figure 1-9: Selecting the Write option
If you cannot see a Security tab in the App_Data Properties dialog, you have Simple File Sharing enabled. Select Folder Options from the Tools menu, and select the View tab. At the bottom of the list, uncheck the option named Use Simple File Sharing. This option does not appear in Windows Server 2003 because this operating system does not support simple file sharing.
However, the Use Simple File Sharing option does not appear in Windows XP Home Edition either, because this operating system uses only simple file sharing. In this case, you must restart your machine and hold down the F8 key as it starts, and then select Safe Mode. Log in as Administrator after Windows starts up in safe mode, and navigate to the C:\WebSites\PPQfolder in Windows Explorer. When you right-click on the App_Datafolder and select Properties, you will see that the Security tab has now appeared.
4.
Now, repeat the process from step 2 to give Write permission to the NETWORK SERVICE account for the App_Datafolder within the skeletonfolder of the examples.V iewing the PPQ Example Database
With Visual Web Developer up and running, you can now look at the example database used for the PPQ application. This demonstrates the database access features that VWD provides and will give you a feeling for the way that the sample data is organized and used within the application.
Step by Step — Viewing the PPQ Database
Follow these steps to view the PPQ database:
1.
In VWD, select Open Web Site from the File menu and ensure that the File System option is selected in the left-hand side of the dialog (see Figure 1-10). Select the folder named complete within the examples, and click Open.2.
The Web site is loaded into VWD, and the files that make up the application can be seen in the Solution Explorer window. (If the Solution Explorer window is not visible, open it by selecting Solution Explorer from the View menu.) As shown in Figure 1-11, notice that the database in theApp_Datafolder is also visible.
Figure 1-11: Solution Explorer window
Figure 1-12: Database Explorer window
The Solution Explorer and Database Explorer windows dock at the right-hand side of the main VWD window by default, but you can drag any of the windows to a docked or floating position using their title bars. As you drag, small arrow indicators become visible allowing you drop the window into another one, or dock it at the side of the main VWD window. Use the drop-down menu (the “down-arrow” icon) in the title bar or the Auto-Hide feature (the pin-shaped icon) to set up the window positions you require. If you cannot reorganize windows in the way you want to, you can go back to the original window layout using the Reset Window Layout command on the main Window menu.
Figure 1-13: Selecting New Query
6.
Select the table named MenuItems, and click Add to add this table to the Diagram pane at the top of the Query Editor window. Then click Close. In the list of columns that appears in the Diagram pane, select the columns named MenuItemType, ItemName, ItemSize, andItemPrice. You can either tick the checkboxes to add them to the grid, or drag and drop them
there. Notice how VWD creates the equivalent SQL statement in the section below the grid, as shown in Figure 1-15.
Figure 1-15: Equivalent SQL statement
7.
The Criteria grid section specifies not only the columns for the query, but also any sorting or filtering you require. As a simple example, use the drop-down lists in the Sort Type column of the grid to set the sort order for the rows as Ascending by ItemName, then Descending byItemPrice, as shown in Figure 1-16. Select the columns named MenuItemType, ItemName,
PizzaToppings, and GraphicFileName. Again, you will see the equivalent SQL statement
appear in the SQL pane below the grid.
Figure 1-16: Sorting by ascending and descending order
Figure 1-17: Results of query execution
You can also use VWD to work with data that is located in a remote SQL Server or other database, as well as with local data (as we do in this book). Right-click on the root entry named Data Connections at the top of the Database Explorer window, and select Add Connection. . . . This opens the Add Connection dialog where you specify details of the database server to which you want to connect. At the top of this dialog is the Data source (type), and the default is Microsoft SQL Sever (SqlClient). This is the most efficient way to access a SQL Server database, because it uses the built-in high-speed inter-face called Tabular Data Stream (TDS) that is native and exclusive to SQL Server.
Figure 1-18: Adding a connection to a database server other than SQL Server
Figure 1-19: Connecting to the Northwind database on a remote machine named DELBOY
Figure 1-19 is the option to connect to a SQL Server (MDF) database file. In this case, you specify the file location using the Browse button near the bottom of the Add Connection dialog. As before, you must specify the database server name to which the file will be attached and the authentication type you want to use.
Another feature is the ability to specify the fine details of the connection. Click the Advanced button near the bottom of the Add Connection dialog to open the Advanced Properties dialog. For example, you can turn on or off features such as Multiple Active Results Sets and Asynchronous Processing, which saves resources and increases efficiency, if you do not require these features. Figure 1-20 shows a connection to a database file, and some of the many options available in the Advanced Properties dialog.
Reading and Displaying Data with ASP.NET
Now that you have set up VWD and SQL Server Express, and have seen some of the features that allow you to access data, this chapter concludes by showing you just how quickly and easily you can build an ASP.NET page that uses the values stored in a database. The task is to create a list of the types of pizza and drinks available from Pizza Pretty Quick (PPQ), by extracting and displaying values from the
MenuItemstable in the database.
1.
Start VWD so that the Start Page is displayed (see Figure 1-21), and click the link to Open a Web Site. Alternatively, you can select Open Web Site from the File menu.2.
In the Open Web Site dialog, ensure that File System is selected in the top left of the dialog, and navigate to the skeletonfolder within the C:\Websites\PPQfolder where you installed the example files (see Figure 1-22).Figure 1-22: Navigating to the skeletonfolder
3.
Click OK, and you then see the files that make up the site in the Solution Explorer window. Switch to the Database Explorer window, and you see the database that is in the App_Data folder of the site. VWD automatically attaches any MDF file it finds in the folder namedApp_Datawhen it opens a site, and this is what has happened here. You can expand the tree to
Figure 1-23: Expanding the tree to see the contents of the database
If you cannot see the Solution Explorer or Database Explorer windows, use the options on the View menu to make them visible. Alternatively, select Reset Window Layout from the Window menu. You can also close the Start Page now.
5.
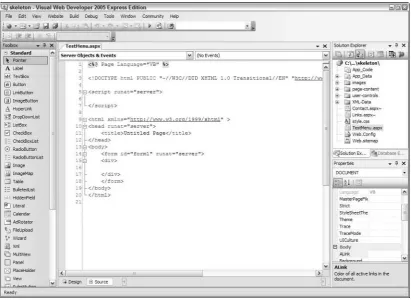
Click Add and the new page is added to the site (it appears in the Solution Explorer window) and is displayed in the main VWD window. At the same time, the Toolbox is populated with a list of all the available ASP.NET controls. At the moment, you are in Source view (as shown by the indicator just below the main editor window shown in Figure 1-25), so the HTML and an empty code section (delimited by <script>tags) is visible.Figure 1-25: Source view
Figure 1-26: Dragging MenuItems onto the main editor pane
7.
Now the magic begins. You will see that VWD creates a grid in the page using the new ASP.NETGridViewcontrol, with columns that match those in the source data table (such as MenuItemID,
MenuItemType, and ItemName). It also adds a control named SqlDataSourceto the page, just
[image:40.533.195.309.60.208.2]below the grid. In addition, to the right of the grid, a Task pane with the title GridView Tasks appears (see Figure 1-27).
Figure 1-27: GridView Tasks pane
8.
The list of checkboxes on the GridView Tasks pop-up is just too tempting to ignore, so go ahead and tick them all to enable paging, sorting, editing, deleting, and selection. At each stage, you’ll see the grid in the page change to reflect the features you specify — such as adding the paging controls below the grid, turning the header text for each column into a hyperlink, and adding the Edit, Delete, and Select links to each row (as shown in Figure 1-28). Then click the Auto Format link at the top of the GridView Tasks pop-up.Figure 1-28: Adding links
The pop-up task panes like the GridView Tasks pane shown in Figure 1-28 can be displayed and hidden by clicking on the small square icon that contains a left- or right-facing arrow. This icon appears at the top right of any control that provides a task pane when you move the mouse over that control.
10.
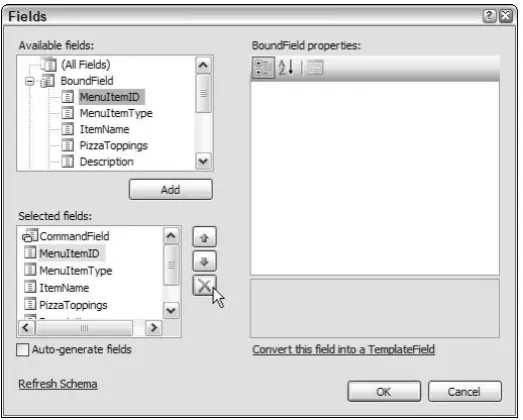
You will see the grid change to reflect the new style. However, before you run the page, there are a few other changes you can make to produce a nicer result. Two of the columns in the grid dis-play information that is not really relevant in this page. The first column, named MenuItemID, contains the ID value for each menu item, while the column named GraphicFileNamecontains the file name of an image for each item. So, in the GridView Tasks pane, click the Edit Columns link to open the Fields dialog (see Figure 1-30). In the Fields dialog, locate the MenuItemID col-umn in the Selected fields list, and remove it by clicking the button marked with a cross next to the list. Then repeat this process to remove the GraphicFileNamecolumn from the grid.Figure 1-30: Fields dialog
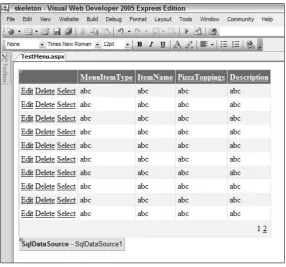
Figure 1-31: Updated GridView
12.
Now you can run the page to see the results. Click the Start Debugging button in the Toolbar above the main editing window, or just press the F5 key. Alternatively, you can select Start Debugging from the Debug menu. At this point, the Debugging Not Enabled dialog appears (see Figure 1-32) because there is no web.configfile in the application folders. VWD needs aweb.configto be able to “turn on” debugging (by setting a value in this file). The best course
[image:43.533.154.441.58.325.2]Figure 1-32
[image:44.533.102.405.343.555.2]14.
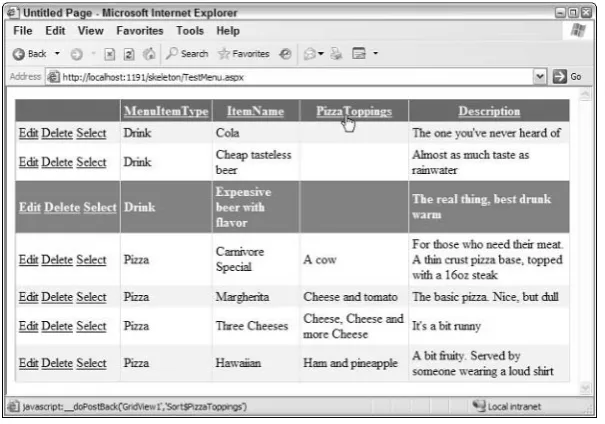
You can also sort the rows in a different order by clicking on the links in the title bar, and if there were more than 10 rows in the table you would be able to change to a different page of results. In this case, paging controls would appear at the bottom of the grid, as you’ll see in later exam-ples (see Figure 1-34).Figure 1-34: Selecting a different page of results
[image:45.533.128.466.410.614.2]Notice that the URL in the address bar, and the icon for VWD’s built-in Web server that appears in the notification area of the Windows taskbar, indicate that the page is running on your local machine (localhost), but using a nonstandard port number (usually port 80 is used for a Web server). You will see a different port number because VWD chooses one at run time. This means that you can run VWD on a machine without a Web server installed to develop your site. And you can also run it on a machine that does have a Web server such as Internet Information Server (IIS) installed without interfering with the operation of that Web server.
Summar y
In this first chapter, you have seen how easy Visual Web Developer (VWD) 2005 Express Edition is to install, configure, and use to create powerful and attractive Web pages — quickly and with very little effort. Because the standard installation also includes SQL Server 2005 Express Edition, you don’t even have to have a database server available to be able to build data-driven pages (although, as you saw, you can use any database server or file-based database such as Microsoft Access if you prefer).
VWD is a remarkable tool for building a whole range of Web sites, Web applications, and Web Services, as you will discover throughout the remainder of this book. You will also see and learn about the amazing new features and capabilities of ASP.NET version 2.0, which make building high-performance Web applications and Web sites so much quicker and easier than ever before.
In this chapter, you installed VWD and used it to access a database through SQL Server Express. You also saw some of the features of the VWD interface and its capabilities. The discussion skipped over much of the detailed working of these features so that you could quickly get a feel for how it works and what it can do. You will, of course, see a lot more detail in later chapters of this book.
In summary, this chapter covered:
❑ A preview of the completed example application
❑ Installation and set up of Visual Web Developer 2005 and SQL Server 2005 Express Editions
❑ Installation of the example application files for this book
❑ Viewing the example database and executing a test query
❑ Generating a simple page that uses the example database
2
Designing a Web Site
In Chapter 1, you saw how easy Visual Web Developer (VWD) 2005 Express Edition is to install and use. You also saw how it includes the SQL Server 2005 Express Edition database server, which you can use to power your Web sites and Web applications. In this chapter, you will move on to start designing and building a simple (but effective) Web site that demonstrates the power of both VWD and ASP.NET 2.0.
The site, Pizza Pretty Quick (PPQ), sells pizzas and drinks online, taking the data about the menu items from a database and storing orders placed by customers in the same database. The design and implementation of the site shows the way that VWD makes working with ASP.NET 2.0 easy and highly productive, without getting too involved in complex issues regarding application architecture.
The topics you will see in this chapter are:
❑ Designing a Web site
❑ Building and using a Master Page and Content Page
❑ Converting an existing page to a Content Page
❑ Checking for accessibility
However, that does not mean you can just throw the pages together with no thought about the layout. You should consider several issues before you start to build any pages. Increasingly, legislation requires Web sites be accessible to all users, including those with sight and movement impairments. You should also think about whether one language is sufficient, or if you may have to translate the site into other languages now or in the future. Moreover, you must decide how data will be stored and accessed in your application.
Making Web Sites Accessible
It is very easy to build a Web site, test it in your favorite browser, and then deploy it without considering how other users might perceive the site. In most countries of the world, governments are implementing legislation that requires commercial and state-sponsored Web sites to provide acceptable access to all users, irrespective of their special requirements. Blind, partially sighted, and color-blind users must be able to access and understand the content, and navigate around the site. Users with movement difficulties (for example those that cannot use a mouse or even a conventional keyboard) should be able to do likewise.
Special browsers (or “user agents,” to give them the correct name) are available that look or work in a completely different way from normal Web browsers such as Internet Explorer, Netscape, or Firefox. They may be page readers that provide only an audible rendering of the page content. Alternatively, the user agents may be character-based, displaying only text and with no images or “active” content. They may even generate Braille or other output through a special console.
To support all these kinds of user agents is not easy, but several things can be done to make it much easier for users, without requiring huge extra development effort. For example, you can implement a standard page structure across the site that makes it easier for unsighted users to appreciate the layout of each page. You can include special links that ease navigation and save time when viewing the page. Moreover, you can provide alternative content and links that make it easier for all nongraphical user agents to impart useful information to the user. You will see many of these techniques used in the example application.
Microsoft provides a series of guides and tutorials for building accessible applications at www.microsoft
.com/enable. The World Wide Web Consortium (W3C) publishes guidelines and recommendations of
the Web Accessibility Initiative (WAI) at www.w3.org/WAI/about.html.
Multilingual Web Sites and Globalization
Many Web sites are available in only one language, which is fine if you can be sure that all your
For more details of globalization and multilingual support within the .NET Framework, search the SDK index for “globalization,” “localization,” and “culture.” Also check out the examples at http://beta
.asp.net/QUICKSTARTV20/aspnet/doc/localization/localization.aspx.
Designing the Appearance of the Site
[image:49.533.142.453.186.454.2]The PPQ example Web site follows a conventional design (see Figure 2-1). It contains a banner image at the top, a navigation bar to the left, and the content of the page to the right. At the bottom of every page is a set of text links to other pages, and there is a “bread-crumb trail” displayed in each page that allows users to see where they are in the site’s hierarchy, and navigate back to a specific section.
Figure 2-1: The Pizza Pretty Quick Web site
Templates and Master Pages
Web developers have found various ways to implement standard sections of content that are common across multiple pages in a site. However, many of these approaches (such as separate text files and user controls in ASP.NET 1.x) cannot really be classed as Master Pages. They are just ways of inserting standard content into multiple pages. Other techniques involve creating a special code class based on the ASP.NET Pageclass, and then using this to implement a template-style solution.
[image:50.533.48.459.219.519.2]ASP.NET 2.0 supports a new feature called Master Pages, which automatically provides all the features you need to create multiple pages based on the same underlying template. VWD also supports the Master Pages approach, and provides a great environment for building such pages and their content.
Figure 2-2 shows how you can see exactly what the result will be, even though the final page is created from two sections (the Master Page and a Content Page).
Navigation and Menus
The left-hand navigation bar or “menu” is ubiquitous in Web sites today, simply because it is the obvious place to locate links to other pages. Irrespective of the browser window size, the links are visible when the page first displays and provide a useful conceptual map of the whole site — which users often glance over before moving to the page content.
The use of the word “menu” on a site that sells fast food is somewhat confusing but difficult to avoid. In this book, the term navigation bar means the left-hand “menu” of page links, while the display of items available for sale is the “pizza menu” page. However, as you will see, Microsoft refers to the main ASP.NET navigation control as a Menucontrol!
ASP.NET 2.0 provides a series of controls that generate both the navigation bar links and the “bread-crumb” links. They use either an XML-formatted text file or a collection of items that lists the pages on the site. However, the text links at the bottom of the page are not generated automatically in this way. Instead, you will use a custom user control to generate these links from an XML file, demonstrating an alternative technique (see Figure 2-3).
Figure 2-3: The text links at the bottom of the pages
Text Styles and Style Sheets
The PPQ site uses the common sans-serif face for the display, as is the case in many Web sites. Microsoft designed certain fonts for use on the Web in a browser, optimized to give an easy-to-read display of small text. Examples are Verdana and Tahoma, as used in the PPQ site. However, for headings and large bold text, Arial provides a better appearance. The example site uses a Cascading Style Sheet (CSS) to specify these styles for all pages, meaning users only download it once — and subsequently reload it from their browser cache. If the user agent does not provide graphical output, it can ignore and not download the style sheet.
However, not all visitors will be using Windows, and so they may not have the specified fonts installed. Therefore, the style sheet must also specify other suitable fonts, and the common technique is to use the standard CSS face style names, such as “sans-serif”. In addition, to allow users to resize the text displayed in their browser window, the font sizes are specified using the standard size names, such as
Figure 2-4: Changing the displayed text size in the browser
Designing the Underlying Workings of the Site
So far, the topics discussed have concentrated on what the site will look like. However, now it is time to consider the underlying “working parts.” Web site and application design, despite much vocal com-plaint from bodies such as the U.S. Architecture Guilds and the U.K. Royal Institute of British Architects, is generally now referred to as “software architecture.” The software architect takes into account all the requirements of the application, balances it against factors such as the technologies available and the cost, and comes up with a design for the working parts of that application. The primary “working parts” in most applications involve data access.
Data Access
Today, the move in software is toward distributed, multitier, and service-oriented architectures. All these place features such as data access in separate “layers” or “tiers,” so that the code can be reused and the physical layout of the application (such as the number and distribution of servers) can be changed without requiring rewriting of the code. At the extreme, the service-oriented architecture (SOA) model makes each component of the process a separate service, which exposes interfaces that other components and services can use irrespective of location, platform, and operating system.
The SOA model is beyond the requirements of the simple PPQ site, and the coverage of this book. However, to demonstrate the possibilities, the example site uses several different data-access approaches. To extract and display data in the pizza menu pages, the controls on the page talk directly to the database. This may be with a parameterized SQL statement or through a stored procedure in the database.
However, to store the data entered by the user when placing an order, the site uses a separate data-access layer that exposes and handles the data as a series of objects. This means that adapting the application to work with other databases (or to integrate with other applications) requires only that the data-access layer be adapted as required. Moreover, the separate data-access layer can be located on separate, and even multiple servers, to provide increased availability and throughput as PPQ becomes a worldwide supplier of high-quality fast food to the public.
Building a Master Page and Content Page
It is now time to start creating some pages, and the obvious place to start is with the Master Page that defines the structure of all the other pages in the site. You will see in this section how you can create a Master Page using VWD, and in it define the common layout structure for the pages of your site. Then, after the Master Page is complete, you will see how to build Content Pages that “plug into” the Master Page to create the final rendered output.
Creating the Page Structure as a Master Page
This section demonstrates how you can create the Master Page for the PPQ site, laying out the content sections and including features that make it easier for all users to access and navigate through the pages and the site.
Figure 2-5: Start page
Figure 2-6: Add New Item page
For this example, we are using the “code inline” model, where the page itself contains the HTML con-tent, the ASP.NET server controls, and the server-side code in a <script runat=”server”> sec-tion. You can change to the “code behind” model by setting the checkbox next to the Language drop-down list. In this case, VWD will place the server-side code into a separate file and use the new partial classes feature of .NET version 2.0 to combine the code with the ASP.NET page and its con-stituent controls when the page is compiled and runs for the first time.
Figure 2-7: Viewing the Master Page
Notice that the first line of the file indicates that this is a Master Page file using the @Masterpage direc-tive. Normal ASP.NET pages contain the @Pagedirective. In a Master Page, the ContentPlaceholder
control defines the areas where the content will come from a separate file (a Content Page). However, before looking at that, the next step is to populate the Master Page with the other controls required for the PPQ site. These include the outline table that will hold the ContentPlaceHoldercontrols, and the images for the top banner and for navigation assistance for nonsighted users.
Figure 2-8: Changing the <body>content
In the future, when you see instructions to set the properties of a control or element, you should do so in the same way as here by using the Properties window. You can add or edit the attributes themselves, directly within the Code Editor window. The Properties window then reflects the changes. However, it is generally better to use the Properties window to ensure that you get the correct attribute name and format — for example, if the value you enter contains double quotation marks, VWD automatically wraps the value in single quotation marks to maintain the correct syntax and well formedness.
Figure 2-9: Dragging the Tablecontrol
6.
This inserts the HTML to generate a three-row, three-column table. Now you can drag and drop, or cut and paste, the controls in the page to match the layout you need. The code in Listing 2-1 shows what is required — notice that there is a <div>control in the second row of the table that will display the navigation links. To add a control to the page, simply drag it from the Toolbox and drop it into the appropriate place in the editor window (in either Source or Design view). VWD automatically generates different values for the ID of each control. Remember to set theColSpanproperties of the first and last <td>elements. You can also add some “dummy”
content to the table so that you can see what it looks like in Design view and can make it easier to drag and drop other controls into the table cells later on.
Listing 2-1: Layout Controls
...
<div>
Links<br />Links<br />Links<br />Links<br />Links </div>
</td> <td>
<asp:contentplaceholder id=”ContentPlaceHolder1” runat=”server”> Content<br />Content<br />Content<br />Content<br />Content </asp:contentplaceholder>
</td> </tr> <tr>
<td colspan=”2”>
Footer and text links go here </td> </tr>
</table> </form> ...
[image:59.533.199.397.290.513.2]Do not use the Imagecontrol in the Standard controls section of the Toolbox.
Figure 2-11: Populating the heading banner
The W3C Web Accessibility Initiative guidelines suggest the use of “Skip To” links where pages con-tain more than just minimal content that is repeated at the top of every page; for example, a series of hyperlinks (such as a list of other branches of your corporation) or multiple images. An alternative approach is to use CSS absolute positioning to place this content later in the flow of the page source but still have it rendered at the top of the page in a normal Web browser. For more details on CSS, see
www.w3.org/Style/CSS.
9.
Now you can set the properties of these Imagecontrols. The first two will be the “Skip To” links, so in the Properties window for each of these, set the values of the properties shown in Table 2-1. If you have trouble selecting the image controls on the page in Design view after resizing them, try using the left and right arrow keys to move through the controls on the page. Alternatively, you can switch back to Source view and select them there to set the property values.Table 2-1: “Skip To” Properties
Property Value
TabIndex 0 for the first Imagecontrol, and 1 for the second Imagecontrol.
Height 1
Width 1
Alt Skip to Navigation Links for the first Imagecontrol, and Skip to Page Content for the second Imagecontrol.
Border 0
HSpace 0
Title Skip to Navigation Links for the first Imagecontrol, and Skip to Page
Content for the second Imagecontrol.
10.
There are some other properties to be set as well. For the “Skip To” link images, go to the Properties window, select the Srcproperty, and click the “...” button to open the Select Project Item dialog. Select the imagessubfolder of the example files, select the image namedblank.gif(a 1-pixel square, transparent GIF image), and then click OK.
Figure 2-12 shows the dialog for selecting the image file.
Figure 2-12: Select Project Item dialog
The idea is that the “Skip To” links will not be visible in a graphical Web browser, but other page readers and text-based browsers will read them and allow the user to follow the links. Using small transparent images helps to hide them.
11.
There is still not much to show for all the work you have done, so select the remaining Image control, and set the Srcproperty to the file named page-header.gifin the imagessubfolder. Then set the Altand Titleproperty values to Pizza Pretty Quick Logo, and the HSpaceandVSpaceproperty values to zero. Notice how VWD automatically detects the size of the image
Figure 2-13: Adding the logo
Setting both the Altand Titleproperties adds extra attributes to the element rendered into the page at run time. This gives the best chance that nonstandard user agents will read and display or use these attribute values.
12.
So far, you have inserted only image controls into the page. Now you must turn the first two, which implement the “Skip To” links, into hyperlinks that target the correct parts of the page. You cannot use the ASP.NET Hyperlinkcontrol for this, because you need to set specific properties ofthe Imageitself — something that is not possible in VWD for a Hyperlinkcontrol. So, switch to
Source view and type in the HTML that is required to implement the two hyperlinks and their target anchors, as shown highlighted in Listing 2-2.
Listing 2-2: HTML for hyperlinking target anchors
<a href=”#content”>
<img src=”images/blank.gif” alt=”Skip to Page Content” border=”0” height=”1” width=”1” title=”Skip to Page Content” tabindex=”1 /> </a>
<img src=”images/page-header.gif” alt=”Pizza Pretty Quick Logo” title=”Pizza Pretty Quick Logo” />
</td> </tr> <tr>
<td>
<a name=”navigation” /> <div>
Links<br />Links<br />Links<br />Links<br />Links </div>
</td> <td>
<a name=”content” />
<asp:contentplaceholder id=”ContentPlaceHolder1” runat=”server”> Content<br />Content<br />Content<br />Content<br />Content </asp:contentplaceholder>
</td> </tr> ...
This just shows how flexible VWD actually is. It can work with existing pages, HTML content, ASP.NET controls, and code, as well as create new pages, HTML content, ASP.NET controls, and code. In addition, as you have just seen, VWD allows you to mix your development approach as you go along to suit the requirements of your site or application.
13.
Unfortunately, the neat layout, including line breaks, as shown in Listing 2-2 causes problems with the final display of the page because this extraneous “white space” (content that is not actually part of the output) adds a space between each image element. Therefore, you need to edit it in Source view to remove this extra white space, as shown in Listing 2-3. It makes it harder to see what the content actually is, but placing the end “/>” of each “Skip To” image element on a new line means that you can more easily find where each element ends and the next one starts. You do not need to worry about the white space at the end of the third image control that displays the banner. If you now switch to Design view, you will see that the banner starts much closer to the left-hand edge of the page.Listing 2-3: Removing White Space
It has taken a while to fully describe each step of the process of starting to build a Master Page. However, this example should give you a feel for the way that the editing features of VWD work, how to create new items, and how to work with the Properties and other windows. You have seen how you can edit a page in a range of ways and while in different views (Source view or Design view). In later sections of this book, you will see somewhat less detail for each step of the examples because you are now familiar with the basics of working with VWD.
Choosing the Correct Element and Control Type
One point to notice is that the content of the page is a mixture of item types. It contains “normal” HTML elements, such as the <body>element and the various <table>, <tr>, and <td>elements you added to generate the page layout structure. Because your ASP.NET code will not manipulate or reference any of these elements, there is no reason for them to be anything other than simple HTML.
Elements that ASP.NET code will manipulate or reference must be declared as server controls. In other words, they must contain the attribute runat=”server”in their declaration — as the
ContentPlaceHoldercontrol in the example does. You will use predominantly server controls
throughout the pages you build in ASP.NET. However, server controls do exert much more load on the server when generating the page, compared to just declarative HTML and other content. Therefore, where they are not required, they should be avoided and the standard HTML controls used instead. This is what happened when you used the Imagecontrol from the HTML section of the Toolbox for the images in the Master Page. The Imagecontrol in the Standard section of the Toolbox is a server control, yet server-side access is not a requirement for these images in the page.
The Master Page you are building cannot be viewed directly. If you try to open it in a Web browser, you will see a message stating that “This type of page is not served.” Later, you will build a Content Page that uses this Master Page, at which point you will be able to see what it looks like in a browser. Before then, however, you will add the navigation controls to the Master Page.
Adding the Navigation Links
The left-hand section of the Master Page will contain a navigation bar that provides links to other pages in the PPQ site. You will add this navigation bar and other navigation features next. ASP.NET can automatically generate sets of navigation links in a range of visual formats. This section of the chapter shows you how.
Figure 2-14: Dragging and dropping the Menucontrol
Figure 2-15: Menu tasks
This option opens a useful Menu Item Editor dialog that allows you to create a list or collection of links for use when ASP.NET generates the menu at run time. You can also open this dialog by selecting the Itemsproperty in the Properties windows when the Menucontrol is selected within the editor window.
3.
In the example application, you will be using an XML sitemap file to define the links for the navigation controls in the page. This means that you also need a SiteMapDataSourcecontrol, which interfaces the Menu— and any other navigation controls — to the XML sitemap file. You can drag a SiteMapDataSourcecontrol from the Data section of the Toolbox onto the editor window, but an easier way to add this control is to use the Menu Tasks pane you saw earlier in step 2. Click on the small arrow that appears at the top right of the Menucontrol when you move the mouse pointer over it to open the Menu Tasks pane. In the Menu Tasks pane, open the drop-down list for Choose Data Source and select the <New Data Source. . .> option (see Figure 2-17).Figure 2-17: Choose Data Source drop-down list
Figure 2-18: Data Source Configuration Wizard
The examples include a Web.sitemapfile containing the links used in the PPQ site. If you want to try creating your own Web.sitemapfile, select New File from the File menu, and select the Site Map option in the Add New Item dialog that appears. This creates a template XML file that you can extend and populate to match your requirements. Open the Web.sitemapfile provided with the examples to see the way that it defines the navigation links.
Figure 2-19: Enabling the second level of links
Notice that the DataSourceIDproperty for the Menucontrol indicates where the data to populate the control comes from. It is set to SiteMapDataSource1, which is the ID of the SiteMapDataSource
6.
Now open the Menu Tasks pane for the Menucontrol again, and select Auto Format. In the Auto Format dialog, choose a scheme for the menu control formatting, as shown in Figure 2-20.Figure 2-20: Auto Format dialog
7.
Finally, go back to the Navigation section of the Toolbox and drag a SiteMapPathcontrol onto the page, dropping it into the table cell at the right-hand side of the page below theContentPlaceHoldercontrol. Click on the small arrow button to open the SiteMapPath Tasks
Figure 2-21: SiteMapPath Tasks pane
That wraps up the task of creating the navigation links for now. You will come back to this throughout the book as you build more pages and implement new features. However, the Master Page as it stands now will be sufficient for the tasks of starting to create some Content Pages. Remember that the whole idea of using a Master Page is that you can change it over time to update your site, and all the Content Pages will automatically reflect these changes.
Building Your First Content Page
1.
With the Master Page in Design view, right-click on the ContentPlaceHoldercontrol and select Add Content Page from the shortcut menu (see Figure 2-22).Figure 2-22: Selecting Add Content Page
2.
This automatically creates a new Content Page, names it Default.aspx(providing that the project does not already contain a page with this name), and opens this new Content Page in Source view. Listing 2-4 shows the entire contents of the new page.Listing 2-4: Contents of new page
<%@ Page Language=”VB” MasterPageFile=”~/PPQ.master” Title=”Untitled Page” %> <asp:Content ID=”Content1” ContentPlaceHolderID=”ContentPlaceHolder1”
Runat=”Server”> </asp:Content>
The attribute MasterPageFile=”~/PPQ.master”in the @Pagedirective shows that this is a Content Page, which will be embedded as a section of output inside a ContentPlaceHoldercontrol in the specified Master Page. The tilde (~) before the path and name of the Master Page is a shortcut way of saying, “starting from the root folder of the application.” All that a Content Page can contain is one or more Contentcontrols, as shown in Listing 2-4. Each Content control must include the
ContentPlaceHolderIDattribute that indicates which ContentPlaceHoldercontrol in the
Master Page it will inhabit. In this case, there is only one and it has the ID value
“ContentPlaceHolder1.”
Figure 2-23: Design view of Master Page
4.
All you need to do now is create the content for the Default.aspxpage. However, to save you time, we have provided this in a file named default.aspx.txt, stored in the page-content folder of the examples. Open this file in VWD, select all the content, and copy and paste it inside5.
Before you run the page, there are a few other “tidying up” tasks to complete. Right-click outside the Contentcontrol, and select Edit Master from the shortcut menu. Add the following reference to the CSS style sheet for the application to the page, inside the <head> element and after the <title> element:<link href=”style.css” rel=”stylesheet” type=”text/css” />
Notice how the pop-up IntelliSense features help you to complete the element by suggesting the available attributes and their values as you type.
6.
Switch the Master Page to Design view, and click near to the Menucontrol. The bottom of the main window (below the editing area) shows the hierarchy of elements that are currently “in scope,” in other words, the containers of the currently selected element (which is the <div> surrounding the Menucontrol). Select the <td>element that contains the <div>and Menucontrol. As you move your mouse over the “<td>, a “drop-down” arrow button appears. (see Figure 2-25).Figure 2-25: Hovering over the <td>to reveal a shortcut menu
8.
Select the Contentcontrol in the right-hand side of the Master Page window, and then repeat the process by selecting this <td>tag and setting the VAlignproperty to top. Set the Style prop-erty values in the Edges section of the Style Builder dialog to the values 3, 3, 5 (not 3), and 5 for the Top, Bottom, Left, and Right selectors. This creates some white space between the Menu con-trol and the content in the right-hand side of the page.10.
Save and close the Master Page (PPQ.master) and go back to the Default.aspxContent Page. Select View in Browser from the File menu, or click the Start Debugging (green arrow) button on the toolbar. Your first page is now part of the PPQ Web site! Figure 2-28 shows the result.Figure 2-28: First PPQ page
Conver ting an Existing Page
to a Content Page
Figure 2-29: The pizza menu page from Chapter 1
Figure 2-31: Selecting PPQ.master
4.
The IntelliSense feature helps you add the appropriate attributes to the Contentcontrol decla-ration, and you should end up with this:<asp:Content runat=”server” ContentPlaceHolderID=”ContentPlaceHolder1”>
A closing </asp:Content>tag is also inserted, and you must move this to the end of the page, after the GridViewand SqlDataSourcecontrol declarations. Then, save the page, and view it in the browser to see the results (shown in Figure 2-33). As you can see, our original page now fits in well with the new PPQ site.
Figure 2-33: Revised PPQ page
The other solution is to deploy the application, as it now stands, to another server that has IIS and SQL Server available — and that can be accessed from any location and by any browser or page reader for testing. The database files, PPQ_Data.MDFand PPQ_Data_Log.MDF, can be attached to a SQL Server 2000 or 2005 database server, and the connection string in the Web.Configfile changed to point to this server.
As an example, after installing the application as it now stands on a separate server and accessing it with the IBM Home Page Reader (HPR), you can see the effects of the accessibility additions to the pages (see Figure 2-34). The “Skip To” links you added to the top of the Master Page are seen as hyperlinks (underlined) in the middle window. This window shows the text that HPR is currently reading aloud to the user. Therefore, if the user is browsing the site and has already grasped the layout of the pages, he or she can skip directly to the navigation bar or to the page content from the top of every page as it loads.
Figure 2-34: Viewing the Example Pages in the IBM Home Page Reader