SCORM BASED LEARNING MANAGEMENT SYSTEM FOR ONLINE TRAINING
by
ANUBHA GARG
B.Tech., Jawaharlal Nehru Technological University, Hyderabad, India,2010
A REPORT
submitted in partial fulfillment of the requirements for the degree
MASTER OF SCIENCE
Department of Computing and Information Sciences College of Engineering
KANSAS STATE UNIVERSITY Manhattan, Kansas
2012
Approved by: Major Professor Dr. Mitchell Neilsen
Abstract
The Biosecurity Research Institute (BRI) facility at Kansas State University is a huge biocontainment facility to conduct research on infectious diseases that pose a threat to plant, animal and human health. The BRI Training and Education Program is currently offline; i.e., classroom sessions are taken to provide this training and education. The objective behind taking up this project was to move the entire training and education module of Biosecurity Research Institute online, instead of having a classroom session for each training course, with an subject matter expert (SME) to come and take the training session.
The aim is to develop an online training system which is synchronized with the information in the BRI Research Project Database. The employees will only have to login to the website, scroll through the list of courses they are enrolled in, take the courses, write the assignments/quizzes assigned to the course and then submit the quizzes. They can also self-enroll themselves into courses, if they are given the permission to do so. The SME’s of the courses can create new courses, upload the course materials, enroll users into the courses, and assign deadlines to course completion. Once the student submits the course quiz or assignments, the SME’s can grade the quiz, assign a final grade to the students, and give feedback on their performance. They can even reassign the course in case of poor performance by the student. The administrators of the website can assign roles to different personnel, give permissions according to need and requirement, add/delete courses, and change the appearance of the website.
The project is to be done using a Learning Management System called Moodle. Moodle (Modular Object Oriented Dynamic Learning Environment) is an online learning management system designed to allow interaction between teachers and students. The back-end database used is SQL Server 2008 R2 and additional tools used are Adobe Presenter (with Microsoft Power Point 2010) to create the courses in SCORM format.
iii
Table of Contents
List of Figures ... v List of Tables ... vi Acknowledgements ... vii Chapter 1 - Introduction ... 1 1.1 Objective ... 1 1.2 Intended Users ... 2 1.3 Motivation ... 2Chapter 2 - Requirements Analysis ... 3
2.1 Requirements Gathering ... 3
2.2 Requirements Specification ... 3
2.2.1 Software Requirements ... 3
2.2.2 Hardware Requirements ... 4
2.2.3 Moodle ... 4
2.2.4 Adobe Presenter/ SCORM ... 4
2.3 Feasibility Study ... 5
2.3.1 Economic Feasibility ... 5
2.3.2 Technical Feasibility ... 5
2.3.3 Behavioral Feasibility ... 5
2.4 Use-Case Diagrams ... 5
Chapter 3 - System Design and Architecture ... 9
3.1 System Architecture ... 9
3.2 System Design ... 10
3.2.1 Database Diagram ... 10
3.3 Synchronizing Moodle Database with BRI Research Database ... 16
3.3.1 Synchronizing the Personnel from BRI Research Database to Moodle ... 17
3.3.2 Synchronizing the Courses from BRI Research Database to Moodle ... 18
3.3.3 Synchronizing the Course Enrollments from BRI Research Database to Moodle ... 19
iv
Chapter 4 - Implementation ... 21
4.1 Screenshots ... 21
4.2 ‘How To’ Documents for Users of the system ... 36
4.2.1 For Students ... 37
4.2.2 For Subject Matter Experts ... 37
4.3 Sending Certificates through Email for all Completed Course Enrollments ... 37
Chapter 5 - Testing... 39
5.1 Unit Testing ... 39
5.2 User Acceptance Testing ... 41
5.3 Performance ... 41
Chapter 6 - Conclusion and Future Work ... 43
6.1 Conclusion ... 43
6.2 Overall Experience ... 43
6.3 Future Enhancements ... 43
v
List of Figures
Figure 2-1 : Use Case Diagram from Administrator point of view ... 6
Figure 2-2 : Use Case Diagram from Instructor point of view ... 7
Figure 2-3 : Use Case Diagram from Student point of view ... 8
Figure 3-1 : System Architecture ... 9
Figure 3-2 : Database Diagram for User Information ... 11
Figure 3-3 : Database Diagram for User Role Information ... 12
Figure 3-4 : Database Diagram for Course Information ... 14
Figure 3-5 : Database Diagram for User Enrollment Information ... 15
Figure 3-6 : Synchronizing the User Information to Moodle ... 17
Figure 3-7 : Synchronizing the Course Details to Moodle ... 18
Figure 3-8 : Synchronizing Course Enrollments to Moodle ... 19
Figure 3-9 : Synchronizing Course Results to BRI Research Database ... 20
Figure 4-1 : Main Page ... 21
Figure 4-2 : Login Page ... 22
Figure 4-3 : Home Page ... 23
Figure 4-4 : Course Categories List ... 24
Figure 4-5 : Add new Category ... 25
Figure 4-6 : List of Courses ... 26
Figure 4-7 : Add new Course ... 27
Figure 4-8 : Enrolling Users into a Course ... 28
Figure 4-9 : Adding a SCORM Package to a Course ... 29
Figure 4-10 : Selecting a Course ... 30
Figure 4-11 : Taking a Course ... 31
Figure 4-12 : List of Users ... 32
Figure 4-13 : Viewing User Profile ... 33
Figure 4-14 : List of Roles ... 34
Figure 4-15 : Adding New User... 35
vi
List of Tables
Table 5-1 : Unit Testing ... 39 Table 5-2 : Performance Evaluation for Triggers ... 42 Table 5-3 : Performance Evaluation for Stored Procedures ... 42
vii
Acknowledgements
I would like to take this opportunity to express my gratitude to Dr. Mitchell Neilsen, my Major Professor for his guidance and support throughout my project, my course work and my Master’s. It has been an honor to work with you.
I would like to express my appreciation to my committee members, Dr. Daniel Andresen and Dr. Torben Amtoft for accepting to serve on my committee.
I wish to place on record, my deep sense of gratitude to my Supervisor, Mr. Will Baldwin, Biosecurity Research Institute, for giving me the opportunity to work on this project. His constant support and guidance has been inspiring and indefatigable in accomplishing the given task.
Finally, I would like to thank the staff of the Computing and Information Sciences Department, my Family and Friends for their support throughout my Graduate Study.
1
Chapter 1 - Introduction
The Biosecurity Research Institute (BRI) on the campus of Kansas State University is a unique Biocontainment Research and Education facility that supports research on infectious diseases which pose a threat to plant, animal as well as human health. The BRI provides an opportunity for shared research including not only researchers and scientists from Kansas State University but also those from other academic, federal, and private research institutions.
The purpose of the BRI Training and Education Program is to develop knowledge, skills and abilities through hands-on curriculum for all BRI employees, researchers, and collaborators also extended to external organizations, customized to fit their needs.
1.1 Objective
The main objective behind doing this project was to move the entire training and education module online, instead of having a classroom session for each training course, with an instructor to come and take the training session. The idea was to develop an online training system which can be easily accessed by the employees as well as the researchers working at BRI. This would reduce the burden on the SME’s to every time take the session and on the employees as well who need to undergo these trainings time and again as per the requirements.
The system was to be developed where employees can login and enroll into courses which are in their training requirement and take these courses and be in compliance if they pass the course or re-take the course if they do not pass. An instructor for the course can enroll personnel into courses, grade their submissions and assign final grades. The system will also synchronize its database with the database of an existing Client Server Application BRI Research Database, which is the current application that stores the training information of all the employees at BRI. All course details, enrollment details and compliance details will be extracted from the Research Database Application and saved in the Learning Management System for use.
2
1.2 Intended Users
Employees: These are the personnel who need to take the training courses as per their job requirements. These employees would also include the Education Officer at BRI who would have to enroll personnel to courses, grade their assignments and quizzes. The Administrators of the system would have full access to the system and can make any changes required.
Researchers: These are the personnel who come to BRI for their research work and use the laboratories available at BRI. They would also need to undergo certain training based on their research requirements, for example equipment they handle and laboratories they have access to etc.
1.3 Motivation
Currently, the researchers and employees have to attend classroom sessions for most of the training offered. At times, this can become a hindrance for the employee or researcher if they are unable to attend the session on the stipulated date and time. If the session is not attended then the personnel can be out of compliance of his/her training need. All training courses have a recurrence period and must be taken repeatedly maybe once every year or every two years etc. It would have been easier if all this could be automated and all the training information saved. Instead of attending a classroom session, it would be more comfortable to login to a training system, take a course which has quizzes included to grade the performance and pass/fail the personnel to check for compliance to a course.
Even the subject matter experts (SME) need not take out time to take a course session for the students at regular intervals of time as the need arises. They can create the course presentation with audio/video support for better understanding of the topics and then enroll the personnel requiring the course with a due date.
3
Chapter 2 - Requirements Analysis
2.1 Requirements Gathering
The development of this system required a little bit of research about what are the needs of the users of this system. There was a need to think from not only the Students (Personnel who would take the courses) point of view as well as the Education Officer and SME point of view. After listing all the features that would be required for this training system, it was needed to decide which Learning Management system (LMS) was to be used to develop the System. The system was to be developed using the Moodle LMS which has lot of features like flexibility, scalability and a good user look and feel interface. The Courses were to be designed in SCORM (Sharable Content Object Reference Model) format, which allow us to add audio, video features as well as allow us to add quizzes to the course package. SQL Server was decided to be used for the back-end database.
2.2 Requirements Specification
2.2.1 Software Requirements
For the development of this project, the following Software Requirements have been considered:
Operating System: Windows 7 Professional Database: SQL Server 2008 R2
Learning Management System: Moodle Web Server: IIS
Web Browser: Internet Explorer 9
For creating the SCORM packages for the Training Courses, the software Requirements are:
Operating System: Windows XP Professional Service Pack 3 Editing Tools: Adobe Presenter 7.0.7, Microsoft PowerPoint 2010
4 2.2.2 Hardware Requirements
For the development of this project, the following Software Requirements have been considered:
VM for LURIA: LDAP (authentication) VM for HENCH: SQL
VM for ROBBINS: Moodle/IIS Space on disk for Moodle: 160MB
Space on disk for Course Materials etc.: up to 5GB RAM: 4GB
RAM for Moodle: minimum 1GB
2.2.3 Moodle
Moodle (Modular Object-Oriented Dynamic Learning Environment) is an open source e-learning software platform, also known as a Course Management System, Learning Management System, or Virtual Learning Environment. Moodle has several features considered typical of an e-learning platform, plus some original innovations. Moodle can be used in many types of environments such as in education, training and development, and business settings. Some typical features of Moodle are assignment submission, discussion forums, files download/upload, grading, instant messages, online calendar, online news and announcement, online quiz, wiki etc.
2.2.4 Adobe Presenter/ SCORM
Sharable Content Object Reference Model (SCORM) is a collection of standards and specifications for web-based e-learning. It defines the interaction between client side content and a host system called the run-time environment, which is commonly supported by a learning management system. SCORM also defines how content may be packaged into a transferable ZIP file called "Package Interchange Format". Adobe Presenter is a Microsoft PowerPoint plug-in that transforms course materials like presentations into interactive and very engaging Flash movies that can be easily shared as regular web pages, PDF documents or converted into zip packages called SCORM packages, which can be uploaded into e-learning websites that support SCORM format.
You can add audio narrations, record webcam video or import existing video clips into your presentation slides. There’s a built in video editor as well to help you add some basic video
5
effects your video clips included inside PowerPoint. You can even add customized quizzes to the course content. The quizzes can comprise multiple choice questions; fill in the blanks, true/false type of questions. The settings of the quiz can also be customized according to the need, like the number of attempts a user is allowed to make on a quiz before passing, shuffling of questions/answer options, grades allotted for each question, minimum pass grades, etc.
2.3 Feasibility Study
2.3.1 Economic Feasibility
The Training System is economically feasible as the intended users would have access to the web server if they have internet available to them and are within the BRI Facility. The Learning Management System (Moodle) used is open source software and need not be purchased.
2.3.2 Technical Feasibility
To develop this system, a desktop with access to the web server, internet was used. All the software’s were installed and tested on the systems at BRI, thus making it technically feasible.
2.3.3 Behavioral Feasibility
To know the correct usage of the system, many ‘How To’ documents were prepared and given for both the SME’s of the courses as well as the Students who would enroll in the courses. This would make their work much easier and comfortable.
2.4 Use-Case Diagrams
A use case diagram describes the usage requirements of a system. It consists of use cases, actors, association relationships and the system itself. A use case describes a list of actions that can be performed between an actor and a system to achieve some particular goal. An actor is a person, organization or a system that interacts with our system.
6
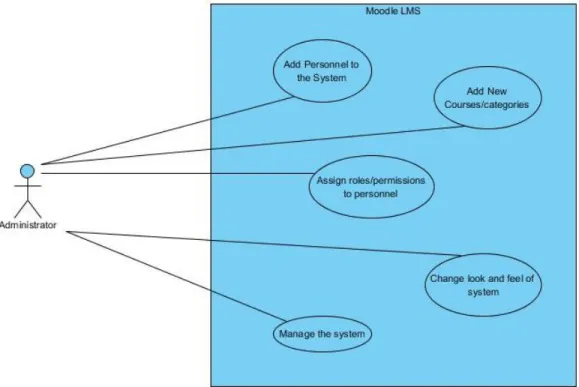
Figure 2-1 : Use Case Diagram from Administrator point of view
The above use-case diagram describes the actions of the administrator of the online learning management system. The system in this diagram is the learning management system itself. The actor is the administrator of the system which has all possible permissions and can switch to any role; i.e., student, instructor etc.
The administrator can perform various functions on the system like add personnel to the system; i.e., allow new people to access the online training system. The administrator can add new courses to the list of courses; add new course categories to the list of categories. The administrator can assign permissions/revoke permissions to/from personnel to increase/decrease their access levels to the system. The administrator can manage the system as per requirements; change the appearance of the pages like alignment etc.
7
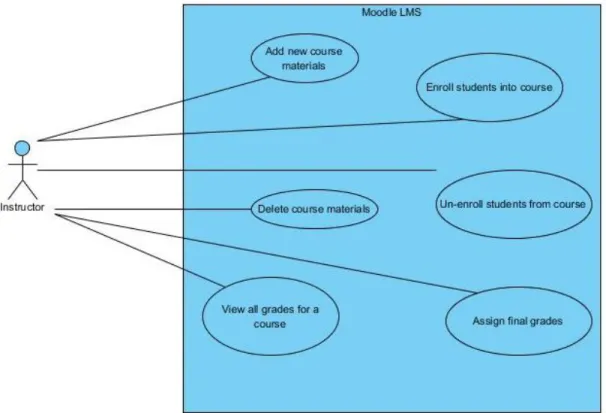
Figure 2-2 : Use Case Diagram from Instructor point of view
The above use-case diagram describes the actions of the instructor of the online learning management system. The system in this diagram is the learning management system itself. The actor is the instructor of courses in the system that has lesser permissions than the administrator and can only make changes to pages and information related to their courses; i.e., the courses for which they have access in the role of instructor.
The instructor of a course can perform various functions on the system like add/delete course materials to existing courses, add/delete courses, enroll students into their courses, and remove enrolled students from courses. Grade any pending assignments for their course, assign final grades to students before the assignments are returned, view the past grades for the students who are/were enrolled into their courses.
8
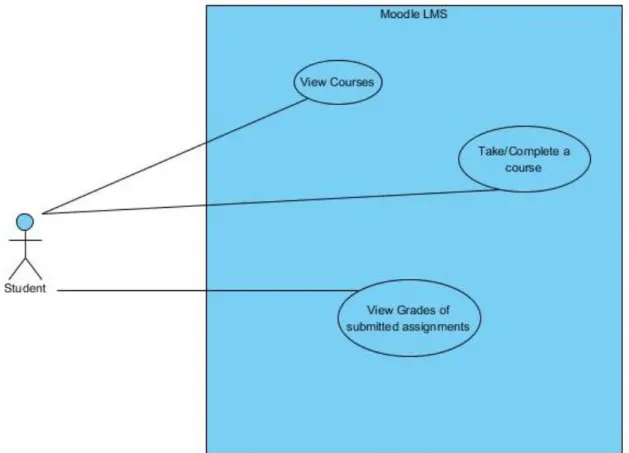
Figure 2-3 : Use Case Diagram from Student point of view
The above use-case diagram describes the actions of the student of the online learning management system. The system in this diagram is the learning management system itself. The actor is the student who takes the courses in the system. The student will have minimum permissions to the system, not allowing him/her to modify the contents of the courses and website.
The student can perform functions on the system like viewing the courses available from the list of courses, complete a course into which he/she is enrolled into by the instructor. They can also view the grades of previous courses which they completed and submitted.
9
Chapter 3 - System Design and Architecture
3.1 System Architecture
Figure 3-1 : System Architecture
The above diagram shows the basic architecture of the Online Training System. It has three main components:
The Moodle LMS: This module is the User Interface for the training system with SQL Server as the back end database. This module contains all the e-learning information like user details, course details, and course enrollment details. This module will have all the information about the courses, their activities, user profiles, access control, role assignment, course completion details etc. Here the users can enroll into courses, take courses, submit grades, view grades etc.
The BRI Research Project Database: This is a client server application which keeps track of all the employees at BRI, their training requirements, their course history, team information etc. This application is used when an employee joins/leaves BRI, courses are added/removed from the training courses list. It uses SQL Server as its back end database. This information
10
is required for the online training system, so a framework is required which will allow this synchronization of information in an easy and reliable manner.
The SQL Server Stored Procedures: This is the middleware which allows us to pass required information from the BRI Research Project database to the Moodle database and vice versa. User information, course information and course enrollment information need to be sent to the Moodle database while the course results need to be sent from the Moodle database to the BRI Research Project database. Many triggers and stored procedures have been written to accomplish this. Further details on these stored procedures are described in the later chapters.
3.2 System Design
3.2.1 Database Diagram
A database diagram depicts the structure of the database to be generated for the system to be built. It shows the list of tables to be created along with their column values and the different relationships between the tables like foreign keys and primary keys. Following are few of the Database diagrams used while designing the database for this system. The database tables present in Moodle have names which begin with “mdl” to identify them as tables for the Moodle Docs.
11
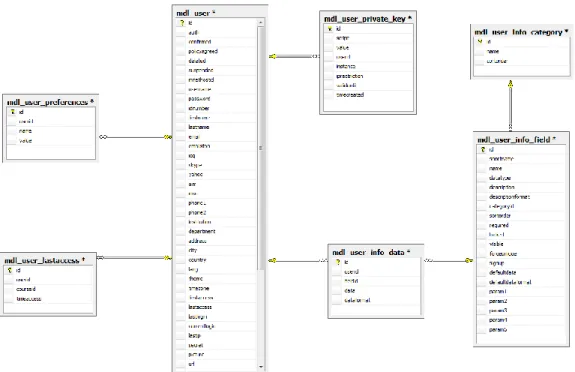
Figure 3-2 : Database Diagram for User Information
The above diagram is the Database diagram for the tables which deal with storing all user information other than the enrollments. These tables contain personal details of the users; i.e., information related to their user accounts etc. The tables used here are:
Mdl_user: This table contains all the user personal details like name, email address, id number, phone number, address, username, password, department, time of first access, time of last access, time of login, time of last login. Here the field id is the primary key and does not have any foreign keys attached to it.
Mdl_user_lastaccess: This table contains the details of the time at which the user last accessed a particular course. It stores the userid which is a foreign key to the table mdl_user, coursed which is a foreign key to the mdl_course table, and the time of access is saved in the form of bigint. Each record has a unique id which is its primary key.
Mdl_user_private_key: This table contains the details of the user private keys like when was it created, till when is it valid. It has a foreign key to the mdl_user table to get the userid. Each record has a unique id which is its primary key.
Mdl_user_info_category: This table contains the user category names. It has no foreign keys and the unique id for each record is the primary key.
12
Mdl_user_info_field: This table contains the fields of the user data that needs to be stored. It contains the categoryid which is a foreign key to the mdl_user_info_category table, datatypes, descriptions, description formats, default data, whether the information must be visible or not.
Mdl_user_info_data: This table contains the upper level information about the data to be stored about the users. It stores the userid which is foreign key to the mdl_user table, the fielded which is foreign key to mdl_user_info_field table. Each record has a unique id as primary key.
Mdl_user_preferences: This table contains the values of the preferences of the user along with their ids. It has a foreign key to the userid in the mdl_user table.
Figure 3-3 : Database Diagram for User Role Information
The above diagram depicts the database structure for the role assignments to the users. This shows all the tables designed to store the role information of all the users and details about each role allowed in the system. The tables used here are:
Mdl_role: This table stores all information about the different roles. It stores the names, description and id of each role available. It has no foreign keys.
13
Mdl_role_names: This table allows changing the name of a role for different courses if needed. This stores the roleid which is foreign key to the id of mdl_role table and the contextid which is a foreign key to the id of mdl_context table.
Mdl_context: A context is a scope in Moodle like the whole system, a course, a particular activity. The type is given by the context level, and depending on this a number of instanceid point to different tables.
Mdl_capabilities: This stores the information of the different permissions that can be granted to the users. It has columns for name, context level id which is a foreign key to the id of mdl_role_context_levels table.
Mdl_role_context_levels: This defines the different context levels at which roles can be assigned.
Mdl_role_capabilities: This table defines the permission for each role capability in either a role definition or a role override.
Mdl_role_assignments: This table stores the information of which user is assigned which role in what context.
Mdl_role_allow_override: This gives the details of which roles can override which other roles like administrator role can override teacher role etc.
Mdl_role_allow_assign: This gives details of which roles can assign users which other roles like a user with administrator role can assign a teacher role to another user.
Mdl_role_allow_switch: This gives details of which roles can switch to which roles like administrator can switch to student role etc.
14
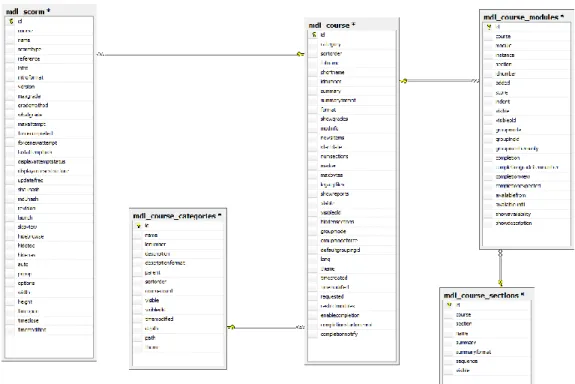
Figure 3-4 : Database Diagram for Course Information
The above diagram depicts the database structure for the course information available in the system. This shows all the tables designed to store the details of the courses in the system.
The tables used here are:
Mdl_course: This table stores all the details of the courses that are uploaded on the LMS. It stores the names of the course, idnumber, full name, short name, summary, summary format, number of sections, group details, time created, time modified etc. Its id is the primary key and is auto generated whenever a new record is added to the table. It has a foreign key to the id field of the mdl_course_categories table.
Mdl_course_categories: This table contains the details of the categories of all the courses. It has the names of each category, short name, description of the categories, description format,
15
number of courses in the category, visibility, time modified, path etc. The id is the primary key which is auto generated and it has no foreign keys in it.
Mdl_course_sections: Each course can be divided into sections and this table contains the information about these course sections. The course id for which the section is created, the section, its name, summary and value is stored in this table. It has a primary key which is the section id.
Mdl_course_modules: This table contains the modules information of each course. It has details like the courseid which is a foreign key to the id in the mdl_course table, moduleid, sectionid which is a foreign key to the id field of the mdl_course_sections table, score, visibility, group details etc.
Mdl_scorm: This is the table where the detail of the SCORM package for each course is stored. Whenever a SCORM package is added to a course, this table is updated. It has all the information of the package like course name, scorm type, introduction, maximum attempts possible, grades etc.
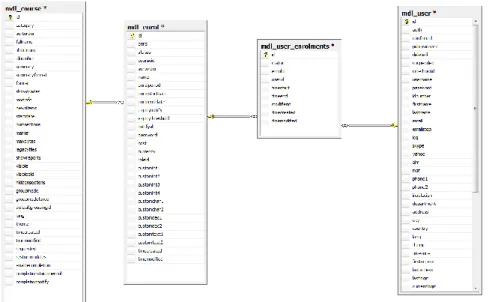
Figure 3-5 : Database Diagram for User Enrollment Information
The above diagram depicts the database structure for the user enrollment information available in the system. This shows all the tables designed to store the details of the user enrollments into various courses in the system. The tables used here are:
16
Mdl_user_enrollments: This table contains all the information of the actual enrollments of the users. Each record has a unique id which is its primary key. This table contains information like userid, the enrolled which is a foreign key to the id field of the mdl_enrol table to know which course is the user enrolled into, status of the enrollment; i.e., if the enrollment is active or suspended, time of creation, time of modification, time of enrollment start and end of enrollment time.
Mdl_enrol: This table contains information about the enrollment of courses. It gives information of which course has which enrollment. For the same course, there can be different enrollment start and end dates, thus this table keeps all this information. Some users may require a course for one period of time but other users may want to enroll in the same course for a different period of time. It has a foreign key to the id field of the mdl_course table to get the coursed. Each record has a unique id as primary key.
Mdl_course: From this table, we can get the id of the course into which the personnel are enrolled. It has all the details of the courses uploaded on the system.
Mdl_user: This helps in getting the id of the user who is enrolled into courses. It has all the details about the user like full name, email address, department, contact number etc.
3.3 Synchronizing Moodle Database with BRI Research Database
The BRI Research Database is a Client Server Application, which stores all the information about the personnel working at BRI, the teams at BRI and the Training courses available at BRI. It stores information like which personnel is in which team, what are the courses available, course enrollments, the training requirements for each team, training history of the personnel, personal information of the employees etc. A lot of this information would be needed in the online training system like personnel information, enrollment details, training history etc.
The database of this project is also done in SQL Server 2008 R2 and is on the same server as Moodle’s database (on Hench). The synchronization of the BRI Research Project database with the database of Moodle has been done by writing some stored procedures and triggers, which copy the data from BRI Research project database to the Moodle database and also, copy some data from Moodle database to the BRI Research Project database.
17
Four main tasks were involved while synchronizing the two databases: Copy all the personnel details from the BRI Research database to Moodle database, copy all the course details from BRI Research database to Moodle database, copy all the course enrollments from BRI Research database to Moodle database and then copy all the course results of personnel from the Moodle database to the BRI Research database.
3.3.1 Synchronizing the Personnel from BRI Research Database to Moodle
Figure 3-6 : Synchronizing the User Information to Moodle
I had to synchronize the Personnel details from the BRI Research database to the Moodle database. The table data had to be copied from the BRI_Research.dbo.Personnel to BRI_Moodle.dbo.mdl_user. I created a stored procedure named SyncPersonnelToMoodle to achieve this. The personal information from the BRI Research database table was extracted and then saved in the Moodle database. Details like full name, phone number, address, department, work location, personnel id number were copied. A trigger similar to the stored procedure was written to allow new entries to be added to the Moodle database automatically instead of executing the stored procedure repeatedly. This trigger was written for the BRI_Research.dbo.Personnel table.
18
3.3.2 Synchronizing the Courses from BRI Research Database to Moodle
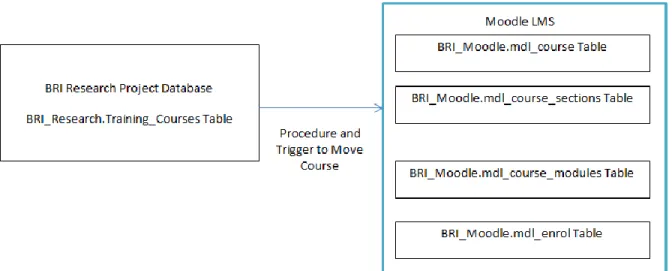
Figure 3-7 : Synchronizing the Course Details to Moodle
Next, I had to synchronize the Course details from the BRI Research database to the Moodle database. The table data had to be copied from the BRI_Research.dbo.Training_Courses to BRI_Moodle.dbo.mdl_course. Additional tables, mdl_course_modules and mdl_course_sections, had to be updated to create a complete course on the LMS. I created a stored procedure named SyncTrainingCoursesToMoodle to perform this task. First, information was extracted from the BRI Research database table and then it was appropriately inserted into the Moodle database tables, mdl_course, mdl_course_sections, mdl_course_modules and then into mdl_enrol.
Details like id number, course name, course category name, were extracted and copied. A trigger similar to the stored procedure was written to allow new entries to be added to the Moodle database automatically instead of executing the stored procedure repeatedly. This trigger was written for the BRI_Research.dbo.Training_Courses table.
19
3.3.3 Synchronizing the Course Enrollments from BRI Research Database to Moodle
Figure 3-8 : Synchronizing Course Enrollments to Moodle
Next, I had to synchronize the Course Enrollment details from the BRI Research database to the Moodle database. The table data had to be copied from the BRI_Research.dbo.Training_Courses_Personnel to BRI_Moodle.dbo.mdl_user_enrolments. Additional tables, mdl_enrol, had to be updated to allow enrollments for the course. I created a stored procedure named SyncPersonnelEnrollmentsToMoodle to perform this task.
The procedure iterates over the records of the Training_Courses_Personnel table, extracts all the needed information and then copy it to the mdl_user_enrolments table along with other details. Details like id number, course id and personnel id were extracted and copied. A trigger similar to the stored procedure was written to allow new entries to be added to the Moodle database automatically instead of executing the stored procedure repeatedly. This trigger was written for the BRI_Research.dbo.Training_Courses_Personnel table.
20
3.3.4 Synchronizing the Course Results from Moodle to BRI Research Database
Figure 3-9 : Synchronizing Course Results to BRI Research Database
Next, I had to synchronize the course results from Moodle to the BRI Research database. The table data had to be copied from BRI_Moodle.dbo.mdl_grade_grades to BRI_Research.dbo.Training_History. The tables, mdl_grade_items, mdl_user and mdl_course were used for information. I created a stored procedure named SyncMoodleResultsToBRIResearch to perform this task. The procedure will compare the personnel id numbers, course id numbers and extract the time the course was completed and this information is saved in the BRI Research database.
21
Chapter 4 - Implementation
4.1 Screenshots
The following are the screenshots of the Online Training System:
Figure 4-1 : Main Page
This page is the Main Page which opens up when we open the url
http://robbins.bri.ksu.edu/ on any web browser on any system at BRI. We can view the list of
courses available in the system on the left side corner and also view the calendar. To perform any task we need to login into our account. To login, we can either click on the login button at the top right corner or select any course from the list. This will take us to the login page.
22
Figure 4-2 : Login Page
The above page is the login page, from where the user can log into the system. We can select the ‘save the username’ option for later access. If the username and password entered do not match, then it will show an error and ask to enter correct details.
23
Figure 4-3 : Home Page
The above screenshot is the home page (from the administrator point of view) of the Online Training System website after the user logs into the system. In the front we can see the list of course categories, which can be expanded to view the list of courses available to be taken. From this page, we can also go to view our profile and our enrolled courses.
The administrator can also see additional menus like changing the front page settings, viewing the list of users, the question bank, view/change profile settings and site administration. From the Site Administration link, the admin can add/edit the courses, add/edit the user
24
information, view/change grades etc. For students, the left-bottom box of settings does not appear as they do not have the permission to make changes to the website.
Figure 4-4 : Course Categories List
The above screenshot is the course category list that appears to the admin, when he/she clicks on the Add/Edit Courses link in the Site Administration. This lists all the course categories present in the website. The first column in the table displays the name of the category. The second column displays the number of courses present in the category.
The third column displays the edit icons which allow the admin to perform different tasks with the categories like edit the details of category, delete the category, add cohorts or move the category up/down in the list. The last column shows under which main category is that category
25
present. Since all these are first level categories, they are on the top of the hierarchy. The buttons at the bottom allow the admin to add a new course or category.
Figure 4-5 : Add new Category
The above screenshot is of the page where new categories can be added to the existing list. Details like category name, parent category, category ID number and brief description of the category will be asked to enter. ID number and Description is not mandatory. I have used the same category names and ID numbers as in the BRI Research Project Database while creating the categories. After entering these details, you can either create the category or cancel the action.
26
Figure 4-6 : List of Courses
The above screenshot is the list of courses that appears to the admin, when he/she clicks on the Add/Edit Courses link in the Site Administration. When the admin selects one category from the list, all the courses present in that category are shown in such a list. The first column in the table displays the name of the course; the second column displays the edit icons which allow the admin to perform different tasks on the courses like edit the details of course, enroll users into the course, delete the course, backup/restore the course details, add cohorts or move the course up/down in the list.
The last column allows the admin to select a particular course to move them to different categories. The buttons at the top allow to edit the current category or to add a new sub-category to it. The buttons at the bottom allow the admin to add a new course or re-sort the course list by names. If there is a long list of courses, you can use the search bar to search for a particular course.
27
Figure 4-7 : Add new Course
The above screenshot is of the page where new courses can be added to the existing list. Details like category name, course ID number, course full name, course short name, brief summary of the course, format in which the course material will be uploaded, number of weeks, course start date etc. will be asked to enter. Few fields are not mandatory while the mandatory fields are marked by an asterisk. Some details can be left to default and changed later if required.
I have used the same course names and ID numbers as in the BRI Research Project Database while creating the courses. Some courses are not available on the BRI Research Project Database but used here. After entering these details, you can either create the course or cancel the action. If you create the course, it will take you to the page where you can enroll users. If you want, you can skip this page. Then it will take you to the page where you can add the SCORM package.
28
Figure 4-8 : Enrolling Users into a Course
This page allows you to enroll users into the particular course. If there are some users already enrolled in the course, it shows the list here, otherwise you can enroll new users. If you click on the “Enroll Users” button, then a pop-up window opens up which displays the list of available users, from which we can select users. Once we have selected all required users, we should click on the “Finished Enrolling Users” button.
29
Figure 4-9 : Adding a SCORM Package to a Course
The above page allows us to add a new SCORM package to a course. Details like package name, brief description of the course package, start and end time of the course, grading details, display details can be entered. The package file can be selected either from a local disk or saved in a folder on the server. Few fields are not mandatory while the mandatory fields are marked by an asterisk. Some details can be left to default and changed later if required.
30
Figure 4-10 : Selecting a Course
The above page opens up when we select a course in which we are enrolled. If we had previously started the course, we can resume it from the point at which we left. Otherwise we can start a new attempt of the course.
31
Figure 4-11 : Taking a Course
When we start to take a course or resume it, a screen similar to above shows up. The course may have only slides, or slides with audio or video along with quizzes. All these courses are stored in SCORM format.
32
Figure 4-12 : List of Users
The above page is where we can see the entire list of users present in the website. Every time a new user is added, the name in the list appears here. The tables has details like name (first name /last name) of the user, email address, city, country, last access time and edit options like deleting the user or updating some information of the user. This page can be reached from the Site Administration on the left bottom, and then clicking on “Browse list of users”.
33
Figure 4-13 : Viewing User Profile
In the user list, if you select a particular user’s name and click on it, the above page opens up. This page displays all the details of the user which had been entered when the user was added to the database. Similarly, if you want to view your own profile details, you can click on the “My Profile” link on the top left corner. Then a sub list will be displayed. In that select “View My Profile”. Clicking on this opens the page which displays all your details. For an administrator, in the Settings block on the bottom left corner, some links will display which will allow him/her to edit the current user profile, roles assigned to it etc.
34
Figure 4-14 : List of Roles
The above page displays the list of defined user roles in the system. The table displays he different roles that are available for use, a brief description about them, the role short name and edit options like moving the roles up/down in the list, editing the details of the roles, or deleting a specific role. The other tasks that can be performed here are allowing role assignments, allowing role switches, allowing role overrides.
35
Figure 4-15 : Adding New User
The above page is where new users can be added to the existing list. Details like username, password, first name, surname, email address, postal address, description etc. will be asked to enter. Few fields are not mandatory while the mandatory fields are marked by an asterisk. Some details can be left to default and changed later if required.
36
Figure 4-16 : Sending Certificates
The above window opens up to any member of the BRI Training Staff, when they attempt to open the BRI Research Project Database application. If some users have completed their course requirement, the table shows their details, otherwise the window does not pop up at all and the current user can continue work as usual. If the window pops up, the user can either go ahead, and select to send the certificates to all people in the list or skip this step if they do not have the authorization to record on-line course completion results and email completion certificates to students.
4.2 ‘How To’ Documents for Users of the system
To make it easier for the users of the system to use it, a few user manuals were written. These documents give the user of the system detailed description with screenshots of how a particular task can be completed. Reading these documents will help users (all students as well as SME’s) to know how they can perform the activities for which they have permission. All these documents were created in Microsoft Word 2010 and then converted into pdf files. The various documents available are:
37 4.2.1 For Students
How to Start/Resume a Course: This document explains in steps, how a student can start or resume a course in which he/she is enrolled.
How to View Course Results: This document explains in steps, how course results of courses taken or enrolled courses, can be viewed by the students.
How to Remove a Course Enrollment This document explains in steps how a student can remove a particular course enrollment.
4.2.2 For Subject Matter Experts
How to add a new Course: This document explains in detail how to add a new course in its category.
How to create a Course in SCORM format: This document explains in detail how a SCORM package can be created for a course. It also explains about adding audio/video/quizzes to the course presentation file.
How to Add/Update a SCORM Package to a Course: This document explains in detail how a new SCORM package can be added to an existing course in the system.
How to Collect Grades: This document gives detailed description of how to collect grades from all the students and view/update them.
How to Add/Remove Enrollment to/from a Course: This document tells in detail how to add or remove enrollments to/from a course.
How to receive notification that a student took a Course: This document tells in detail how an instructor can receive notification that a student took a course.
4.3 Sending Certificates through Email for all Completed Course Enrollments
On the BRI Research Database application, whenever a person completes a course, he/she is sent a certificate of course completion which has details of the student, instructor, date of compliance etc. The same must be done for the Online Training System, whenever a person completes an online course, he/she must be sent the training certificate. This was achieved by creating a new table in the BRI Research Database called Moodle_Results. Whenever a course is completed, the details are saved to this table via a trigger.
38
A new form was created on the BRI Research Database application, which would open up to all team members of the Training Staff team. This form would list out the pending course completion certificates which need to be sent. The team member could then either select to send all the pending certificates via email and save this training history on the BRI Research Project Database or else skip this step if he/she does not have the authorization to record on-line course completion results and email completion certificates to students.
39
Chapter 5 - Testing
5.1 Unit Testing
In Unit Testing, each module of the Online Training System was tested individually without any communication to the other modules. Unit testing is done manually to check for any bugs or errors and to know if all the modules are working as intended. The test cases that were used
Test Case No.
Test Module Input Test Case Expected Result
1 ) Adding a Personnel to database
Entering user details
Adding user user should be added to the database Passed 2) Adding a Course to database Entering course details
Adding course Course details should get added to the database and appear in the list Passed 3) Enrolling users into a course Entering enrollment details Adding course enrollment The enrollment should show up on Moodle Passed 4) Taking a Course Opening the course attempt
Taking Course The course
file/ppt must open up Passed 5) Course Grades Once course taken, grades must be saved
Course Results Results must show on the Grades page
Passed
40
Most of the testing of the software was done by manually entering details, performing tasks and checking if appropriate changes were made.
Adding a new Personnel to BRI Research Database: A new personnel was added in the BRI Research Project Database, and it was then checked if the personnel details got added to the Moodle database or not. Since the user details got added to the tables in Moodle database, and also appeared on the user interface, it was confirmed that the trigger written for this synchronization worked correctly.
Addine a new Course to the BRI Research Database: When a new online course was added to the BRI Research Project database, it was seen that the course details also got added to the Moodle database appropriately and appeared in the list of courses under the correct category on the user interface.
Enrolling a user in a course in BRI Research Database: When some personnel was enrolled into a course from the user interface of BRI Research Project Database, the enrollment details also got added to the Moodle database and appeared correctly in the user interface too. This confirmed that the trigger worked correctly and the information was being passed in the correct format and method.
Course Results from the Moodle database: When a user finished a course requirement on the Moodle interface, the grade information and compliance date were sent to the BRI Research Database correctly and saved in the appropriate table for later use. This showed that the trigger for grade information passing from the Moodle to BRI Research database was occurring in the correct manner.
Sending the Completion Certificates: It was seen that, if some records were present in the Moodle_Results table in the BRI Research Database, when a member of the BRI Training staff opened the application, a new window would open up informing them about the pending certificate emails which need to be sent, and asking them to either send the certificates or to skip the step.
41
5.2 User Acceptance Testing
When the online training software was almost done, I asked some of the employees at BRI to use it and to get their feedback on its functionality and appearance. Since they were going to be the end users, it would be best to get their feedback before the final version of completed and ready to use. I made them login to the system, enrolled them in courses and asked them to take the course. They did not find it difficult to take the course, finish it, come out of the course, view the grades etc. But for convenience, I also gave them the documents I had written to know how to use the website for different tasks. They found that all the information was clearly given on the website, the course information as well as the user information.
5.3 Performance
The performance of the Online Training System has been kept in mind while coding the synchronization of the databases. The code in the stored procedures and triggers has been kept to minimum in order to reduce their processing time and to get the desired results as quickly as possible. The performance of the system has been improved by localizing the code of the synchronization to the database itself. The code was written in the form of stored procedures and triggers so that all the processing is done on the database side, without having to pass data from one place to the other. This reduced the processing time of the task quite a bit. So, instead of writing the code in C# application, it was written in SQL to minimize the time taken to process information.
SQL caching technique was also used to reduce the time taken to execute sql statements. In SQL caching, sql statements which are repeated very often while performing tasks, the data extracted while executing such statements is stored in the SQL cache. This way, every time these statements are called the data is got from the cache instead of the database. This reduces the processing time of the tasks to be performed.
To test the performance of the stored procedures and triggers, I recorded the time taken for each of them to execute and compared them according to the number of records they inserted into the database every time they were executed. The results obtained from this testing are given in the tables below.
42 # Triggers # of Records
Added
Time Taken per
transaction Transactions/time
1 Add Personnel 1 0.003 sec 333/sec
2 Add Course 7 0.263 sec 27/sec
3 Enroll Users 1 0.043 sec 23/sec
Table 5-2 : Performance Evaluation for Triggers
# Stored Procedures # of Records Added
Time Taken per
transaction Transactions/time
1 Add Personnel 93 0.002 sec 474/sec
2 Add Course 453 0.001 sec 991/sec
3 Enroll Users 97 0.002 sec 433/sec
4 Send Grades 1 0.010 sec 100/sec
43
Chapter 6 - Conclusion and Future Work
6.1 Conclusion
This project moves all the training at BRI from the classroom to the internet making it easily accessible by the users. It reduces the burden on the students taking the courses as well as the SME’s of the courses. On this system, any personnel working with BRI can login, view their current course enrollments, take courses, and view their grades online. SME’s can enroll personnel into courses according to their training requirements; they can also grade the assignments and update the final score for the course enrollment, give feedback to the students on their performance.
6.2 Overall Experience
It has been a great pleasure to be given a chance to work on this project. I have learned a lot about learning management systems, their structure, features and working. Working on this project has given me an insight into the working of stored procedures and functions in SQL Server, synchronizing different databases in SQL etc. I have increased my knowledge on SCORM, the set of standards for web based learning systems, also learned how to create courses in SCORM format. The knowledge which I have gained while working on this project would help me in my future work involving these technologies.
6.3 Future Enhancements
Automated functionality testing after Moodle and BRI Research software updates to determine if applied schema changes breaks the functionality of the sync triggers and procedures.
Move course completion certificate generation and email to the SQL Server.
44