User’s Guide
Se e re ve rse sid e forMacintoshver s ionWindows
version
®SMART Board Software
TMfor Windows 98, 2000, ME, XP and Windows NT
SMART Board Interactive Whiteboard
SMART Board Interactive Whiteboard
SMART Board Interactive Overlay
Sympodium Interactive Lectern Rear Projection
for Flat-Panel Displays TM
Trademark Notice
Copyright Notice
SMART Board, Sympodium, DViT, X-Port, Notebook, OptiPro, LinQ and the SMART logo are either registered trademarks or trademarks of SMART Technologies Inc. Microsoft, Windows, Windows NT, PowerPoint and NetMeeting are either registered trademarks or trademarks of Microsoft Corporation in the U.S. and/or other countries. All other third-party product and company names are mentioned for identification purposes only and may be trademarks of their respective owners.
© 1995–2004 SMART Technologies Inc. All rights reserved. No part of this publication may be reproduced, transmitted, transcribed, stored in a retrieval system or translated into any language in any form by any means without the prior written consent of SMART. Information in this manual is subject to change without notice and does not represent a commitment on the part of SMART.
Portions of this software are copyrighted by Intel Corporation.
Portions of this software are copyrighted by ParaGraph, a business unit of Vadem. CalliGrapher® Copyright © 1997–2004 ParaGraph, a business unit of Vadem. U.S. Patent Nos. 5,448,263; 6,141,000; 6,326,954; 6,337,681; 6,741,267 and 6,747,636. Canadian Patent No. 2,058,219. Other U.S., Canadian and foreign patents pending.
Version 9.0 Printed in Canada 12/2004
In the past, we’ve made new software features such as handwriting recognition, USB support and SMART Recorder available as free upgrades. Register your SMART product to be notified of free upgrades like these. If you have a front projection SMART Board interactive whiteboard, you’ll receive an additional three years of warranty coverage when you register.
Keep the following information available in case you need to contact Technical Support:
Register online at: www.smarttech.com/registration
Serial Number Date of Purchase
Registration Benefits
Suite 300, 1207 – 11th Avenue SW Calgary, AB CANADA T3C 0M5
Main Switchboard: 1.888.42.SMART (Canada/U.S.) or +1.403.245.0333 (all other countries) Support Tel: 1.866.518.6791 (Canada/U.S.) or +1.403.228.5940 (all other countries) Support Fax: +1.403.806.1256
Important Information for Owners of Front
Projection Interactive Whiteboards
NOTE: If you own any other SMART interactive product, refer to the installation manual that came with your product for relevant warnings, cautions, maintenance and cleaning instructions.
Safety Warnings and Precautions
For operating safety and to avoid damage, carefully read and observe these instructions.
• Read the guide that came with your projector carefully,
familiarizing yourself with all warnings and cautions.
• If you move an interactive whiteboard that is mounted on a floor
stand, do so with care. Quick stops, excessive force and uneven surfaces may cause the interactive whiteboard to overturn. If your floor stand has anti-tip feet, retract them when you move the interactive whiteboard.
• If you are transporting the interactive whiteboard over a distance,
completely repackage it using the original packaging. If the original packaging is no longer available, pack all components with as much padding as reasonably possible to ensure that they are not exposed to excessive vibration or shock.
• You must connect the USB cable that came with your interactive
whiteboard to a computer that has a USB-compliant port and that
bears the USB logo.In addition, the USB source computer must
be compliant to CSA/UL/EN 60950 and bear the CE mark and CSA and/or UL Mark(s) for CSA/UL 60950. This is for operating
WARNING If you use a projector with your SMART Board
interactive whiteboard, carefully read the guide that came with your projector. Do not stare into the beam of light created by the projector. Instruct children not to look in the direction of, or stare at, this beam of light. WARNING
To reduce the risk of fire or electric shock, do not expose any interactive product to rain or moisture.
ii Important Information Windows Version
safety and to avoid damage to the SMART Board interactive whiteboard.
• Avoid setting up and using the interactive whiteboard in an area
with excessive levels of dust, humidity and smoke.
• Avoid leaving cables on the floor. If you must run a cable over the
floor, lay the cable in a flat, straight line, and secure it to the floor with tape or a cable management strip in a contrasting color. Handle cables carefully and avoid excessive bending. Or eliminate the need for a cable by purchasing a SMART Wireless Serial Connection.
• If you have a floor stand with anti-tip feet, make sure they’re
extended when the interactive whiteboard is in use.
• Don’t add any extra weight or pressure to the interactive
whiteboard or its pen tray, because the brackets are designed only for the weight of the interactive whiteboard.
• If you require replacement parts, make sure the service
technician uses replacement parts specified by SMART Technologies Inc., or parts with the same characteristics as the original.
Safety Tips for Teachers
• Keep your back to the class when you write over a
projected image.
• Step to the side of the interactive whiteboard
before you turn and face the class.
• Supervise your students whenever they use the
interactive whiteboard.
• Tell students not to look directly at the light beam
from the projector. Instead, encourage them to keep their back to the class when working at the interactive whiteboard. Before they turn to face the class, they should take a big step (or even two) sideways.
• Tell your students not to touch the projector, as it can get very hot after it has been on for a few minutes.
• Don’t use a chair to increase a student’s reach. If
your students can’t reach the top of the interactive whiteboard, lower it. You may need to remount a wall-mounted unit in a lower position. If your interactive whiteboard is mounted on a floor stand, lower it with the help of another adult.
• Remind students not to run in the vicinity of the
floor stand, as the floor stand legs may cause them to trip.
Contents
Important Information for Owners of Front Projection Interactive
Whiteboards . . . .i
Safety Warnings and Precautions . . . i
Safety Tips for Teachers . . . ii
Introducing SMART Board Software . . . 1
Which SMART Products Use SMART Board Software . . . 2
What Components Make Up SMART Board Software . . . 3
What “Press” Means on SMART Products . . . 4
What State Your SMART Product Is In . . . 4
Where to Find More Information . . . 6
What Version of This Software Should You Install? . . . 7
What’s New . . . 8
Quick Tour . . . 9
Advanced Features . . . 11
The Next Steps . . . 12
More Training . . . 12
Controlling the Computer . . . 13
Clicking . . . 13
Aligning or Orienting the Interactive Screen . . . 14
Tips for Pressing . . . 15
Tips for Using DViT Technology . . . 16
Controlling a Projector or a Flat-Panel Display . . . 16
Using Video Devices . . . 17
Displaying Your Computer Screen . . . 18
Writing, Typing and Drawing . . . 20
Writing in Ink Aware Applications . . . 20
Drawing in Ink Aware Applications . . . 21
Writing over Applications That Aren’t Ink Aware . . . 21
Writing and Drawing in Notebook Software. . . 23
Writing Over Video . . . 26
Typing Directly Into an Application or a Dialog Box. . . 27
vi Windows Version
Making Other Kinds of Notations . . . 28
Adding Content into Notebook Software . . . .29
Using the Gallery . . . 29
Adding Web Links and File Attachments . . . 32
Adding Images and Flash Files . . . 33
Other Ways of Adding Content to a Notebook Page . . . 34
Erasing . . . .35
Erasing Your Note . . . 35
Quick Erasing of Large Areas. . . 36
Restoring Lost Notes . . . 36
Capturing and Saving . . . .37
Capturing with the Screen Capture Buttons in the Floating Tools38 Inserting Notes into Microsoft Word and Excel Files . . . 39
Inserting Notes into PowerPoint Software . . . 40
Inserting Your Notes into Other Ink Aware Applications. . . 40
Capturing Your Work as a Video . . . 40
Saving the Notes You Make Over Videos . . . 41
Saving in Other Formats. . . 41
Saving Content from a Data or Videoconference . . . 41
Changing How the Software Works for You . . . .42
Changing the Way You Access Tools . . . 42
Adjusting the Notebook Interface . . . 45
Changing the Appearance of Digital Ink . . . 47
Recording a Different Screen Area. . . 48
Changing the Way You Use PowerPoint Software. . . 48
Sharing . . . .49
Sending Your Notes by E-Mail . . . 51
Sharing Content from Other Applications . . . 51
Presenting . . . .53
Preparing Your Presentation . . . 54
Delivering Your Presentation . . . 54
Controlling What Your Audience Sees . . . 55
Presenting Your Notebook File . . . 58
Using PowerPoint Software. . . 60
Presenting Remotely . . . 62
Special Situations . . . 65
Connecting Multiple SMART Interactive Products. . . 65
Using SMART Board Software in Non-Projected Mode . . . 66
Using the Display Control Icon Strip . . . 68
Maintenance of Front Projection Models . . . 69
Cleaning Your Front Projection Interactive Whiteboard . . . 69
Preventing Damage to the Writing Surface . . . 70
General Tips for Trouble-Free Performance . . . 70
Adjusting the Projected Image. . . 71
Contacting SMART Technologies . . . 72
Contacting SMART Technical Support . . . 72
General Inquiries . . . 72
Returning Defective Merchandise . . . 73
Registration . . . 73
Sending Feedback. . . 73
Obtaining More Information . . . 73
Introducing SMART Board Software
From the classroom to the boardroom, SMART products help you deliver dynamic presentations to impress and inspire your audience, whether they’re students, prospective clients or co-workers. With SMART Board software, you can show documents, Web pages and videos on an interactive screen that responds to the touch of your finger or a pen. For example, if you’re a teacher, you can prepare engaging lessons with Notebook software that are full of pictures, Flash files and more, and then present these lessons to inspire students. If you’re a corporate trainer, you can record one session using SMART Recorder, and then make the file accessible on the company intranet so others can review it later. You can also jot down notes during a meeting, take screen captures of the notes and then e-mail them to all participants.
These are just a few examples of how you can use SMART Board software. You’ll save time, resources and paper. And interactive products are fun to use!
Take a few minutes to scan this guide and you’ll discover the many features that are available with SMART Board software. This guide is organized around the tasks commonly performed for preparing and delivering presentations. You may be inspired to use the interactive screen and SMART Board software to perform tasks that you traditionally did on paper or a chalk board.
If you’re a teacher, a professor or a corporate trainer, look for classroom-specific hints beside this picture. when you see it throughout the guide.
When you see the picture on the left in this guide, you’ll find suggestions for meetings and
2 Introducing SMART Board Software Windows Version
Which SMART Products Use SMART Board Software
SMART Board software works with front projection SMART Board, Rear
Projection SMART Board, and SMART Board for Flat-Panel Displays
interactive whiteboards, as well as Sympodium interactive pen displays and interactive lecterns. Because you could be using any of these products, the guide refers to “your SMART product,” instead of a specific one.
While you can install SMART Board software on any computer, you’ll
notice some limitations if you don’t have your SMART product connected to the same computer. Some features or applications may not be
available unless you have an interactive product connected.
Tips in boxes beside this illustration are specific to all interactive whiteboards with a pen tray.
An interactive pen display icon identifies tips specific to Sympodium products.
TIP
Record the serial number of your SMART product(s) in the front of this guide, in case you ever need to call SMART Technical Support for help.
What Components Make Up SMART Board Software
SMART Board software includes many tools and applications that will help you get the most out of your interactive product. This software includes:
• the SMART Start Center, to access tools, applications and files
• handwriting recognition, to convert your notes to typed text
• Notebook software, an application for creating and delivering
presentations
• SMART Gallery Collections, to insert images and templates on
Notebook pages
• SMART Recorder, to save a recording of your actions on the
screen
• SMART Video Player, to create notes over videos
• SMART Keyboard, an on-screen keyboard for inputting text and
notes
• Floating Tools, a set of tools for writing notes and drawing shapes
• the SMART Board Control Panel, to change the software and
hardware settings
• SMART Display Controls, to control your projector or flat-panel
display at the interactive screen. It’s also possible to switch between a resident computer and a laptop with these controls.
• SMART Bulb Saver, a screen saver that preserves the life of your
projector or flat-panel display
• Mobile and Wireless Device Settings, to display the desktops of a
networked laptop computer that’s running SMART LinQ software on the interactive screen
• SMART Notebook Print Capture, to capture files to Notebook
software
• SMART Board Diagnostics, a troubleshooting application
NOTE: If you’re using the Windows XP operating system with Service Pack 2 installed, you must change a setting on Internet Explorer to access the Help Center topics. Press Tools > Internet Options, and press the Advanced button. Under Security, select the Allow active content to run in files from my computer check box. To access the Help Center, press any of the Help buttons in SMART Board software.
4 Introducing SMART Board Software Windows Version
What “Press” Means on SMART Products
By touching the interactive screen, you can use interactive features, control computer applications, and create annotations over these applications in digital ink. However, depending on your SMART product, the method of touch varies.
While interactive whiteboards respond to any physical touch on the interactive surface, interactive pen displays only respond to the special pen tool that comes with the product. In this guide, when you see “press”
in the text—for example, press the button to close the window—the
method of pressing depends on what product you have.
If you have a SMART Board interactive whiteboard, you can touch the button with your finger. However, if you have a Sympodium interactive lectern, press the Left Click button on the pen display and then touch the pen tool tip to the interactive screen.
What State Your SMART Product Is In
This guide assumes that your SMART product is set up and ready to use, which means:
• your interactive product is properly installed. When you look at
the screen, you should see the computer desktop. If your product uses a projector, that projector should be on and properly connected to the computer. If you have a Sympodium lectern, make sure you’ve turned on the interactive pen display and that the video cables are properly connected.
If you’ve turned on the necessary equipment and you still can’t see the computer’s desktop on the screen, read your product’s installation instructions to check that the setup was done correctly. Also check that the interactive product is connected to your computer and a power source (if necessary).
Every SMART product has one or more light-emitting diodes (LEDs) that indicate the state of the product. Interactive whiteboards have a Ready Light and lights for each tool, while Sympodium products have Power and Status LEDs.
For interactive whiteboards, if the Ready Light is a solid green, your system is functioning properly. If it’s red, the pen tray is receiving power but it isn’t communicating with SMART Board software. If you haven’t installed this software, do so before proceeding. If you’ve installed the software, ensure that the cable
between the computer and this interactive whiteboard is secure at both ends. If you’re still having problems, call SMART Technical Support (see page 72) or your dealer.
• SMART Board software has been installed and is
running in projected mode. If it is, you’ll see the SMART Board icon in the system tray. If you don’t
see the icon, check Start > All Program > SMART Board Software and select SMART Board Tools. If this folder isn’t there, you must install SMART Board software. You can do this from the CD, a USB storage device or by downloading it. The projected mode is the default mode for SMART Board
software. You’ll find the mode setting in SMART Board Settings
dialog box, which you can access from the SMART Board Control Panel. If you need more help determining the mode or changing it, open the SMART Board Software Help Center and search for information on Projected Mode.
• the interactive screen is properly oriented. Check the accuracy of
your touch. When you press the interactive screen, you should see the pointer at the exact point of contact. If you don’t, orient the screen so the computer can accurately track your contact. See How To > Orient/Align the Screen in the SMART Board Software Help Center for step-by-step instructions, including changing the orientation level.
This guide is for users running Windows NT® 4.0 or the Windows® 98, 2000 or XP operating systems. If you’re using the Windows 95 operating system, you must use SMART Board software version 7.1.3, which you’ll find on the installation CD or on www.smarttech.com. There, you’ll also
find a matching version of the SMART Board Software User’s Guide.
Check the SMART Board Software Help Center for more system requirements.
To begin the orientation process, simultaneously press the Right Click and the Keyboard buttons on the pen tray.
TIP If you need to log on to your computer, you can do so
right at the interactive screen. Press the Keyboard button on your SMART product to open the SMART Keyboard and then press the virtual keys to enter your user name and password.
6 Introducing SMART Board Software Windows Version
Where to Find More Information
This guide provides an overview of the many features of SMART Board software for a varied audience–from educators to business professionals and from beginner computer users to power users. For detailed
information on the specific features of the software, explore the SMART Board Help Center. There, you’ll find procedures and instructions for each feature.
The Help Center contains links to a wide range of information, including procedures for using each component (How To’s), descriptions of each tool and the concepts around using the components, troubleshooting hints, and more. As a result, you’ll find the level of information that you
need to help you use SMART Board software.
You should also check www.smarttech.com for more resources. At this site, you’ll find information on each product, including setup instructions and specifications. The Training Center of this website has learning resources, free hands-on lessons and information on how to get more training. You’ll find up-to-date, product-specific information in the Support area of this website, including frequently asked questions (FAQs), technical bulletins and resource centers.
You’ll find lesson plans, good practises and other activities specific to teaching with a SMART product
What Version of This Software Should You Install?
You can install the full version of SMART Board software on any computer. When you install SMART Board software, be sure you have the correct privileges for your operating system. Some operating systems only let a user with administrative rights install applications. Read the instructions that came with your operating system for details specific to your setup.
You can also install a condensed version of SMART Board software onto a USB storage device. This scaled-down version is ideal for preparing presentations on laptops. When you’re ready to present, you can open your file on the computer that’s connected to the interactive product, which will be running the full version of SMART Board software. You can install the USB storage device version of SMART Board software (USB Board) from the SMART Board software CD.
If you’re a network administrator, you can simultaneously install SMART Board software on any number of computers from one central location. To do this, use command line arguments that are described in the Help
Center topic Customizing the Installation of the Software.
If you need to uninstall SMART Board software, refer to the Help Center topic entitled Uninstalling the Software for details.
Depending on your operating system and network settings, you might have to log on to the computer before you can access SMART Board software.
If the SMART product is in a shared room, consider creating a meeting room logon identity for the computer that’s connected to the SMART product. Then give this identity access to commonly used applications, such as SMART Board software and Notebook software. This ensures that any user of the meeting room can access the interactive tools and applications of SMART Board software.
8 What’s New Windows Version
What’s New
If you’ve used SMART Board software before, you’ll notice some changes in this version. These changes include:
• the Start Center. This customizable toolbar lets you access
interactive tools or other programs.
• new Floating Tools, such as the Creative Pen, shapes and the
Magnifier
• new views of the SMART Keyboard
• more content in Notebook software, including Macromedia®
Flash® files
• easier access to common actions for objects on a Notebook page
• right-click behavior when you press and hold the interactive
screen for approximately three seconds
• the appearance of a border when you write over non-Ink Aware
applications
• a Web-like list of SMART Board Control Panel options, including
the Mobile and Wireless Device Settings that let you use LinQ software on a laptop computer
• a setting in SMART Recorder for recording only a specific window
or a rectangular screen area
For more details on these and many other features, read What’s New in
Quick Tour
When you touch the interactive screen (with your finger if you’re using an interactive whiteboard, or with the pen tool if you’re using an interactive pen display), the computer interprets your touch as a left-click, just as if you were using your mouse.
If you’re using a SMART Board™ interactive whiteboard, pick up a colored pen from the pen tray and write on the screen. If you’re using a Sympodium™ interactive pen display, press a Colored Ink button and write on the screen with the pen tool. When you start writing, the Floating Tools appear on your screen. You can use Area Capture button to save your notes.
If your product has a pen tray, use the eraser to erase the digital ink. If you’re using a pen display, press the Eraser button and drag the pen tool across the screen.
You can write a note on the screen over any application and convert your note to typed text by pressing and holding the note until you see a menu. Select one of the choices and the typed version of your note appears at the cursor location of your active file or dialog box.
If you prefer to type into an active application or dialog box, instead of converting your handwritten note, use the SMART Keyboard. This on-screen keyboard has different views, so you can select the one that best suits you. To change the view, open the SMART Keyboard from the Start Center and then select the view that you want. For example, you can open the Classic view of the SMART Keyboard to log on right at the interactive screen, or you can open the Number Pad view to type a lot of numbers.
10 Quick Tour Windows Version
You can use the many tools in SMART Board software to impress your audience when you present. Double-press the SMART Board icon in the system tray to open the Start Center. The Start Center is a vertical toolbar for quick access to the SMART Board tools and any other applications you want to add. You can customize the toolbar further by making it smaller or transparent.
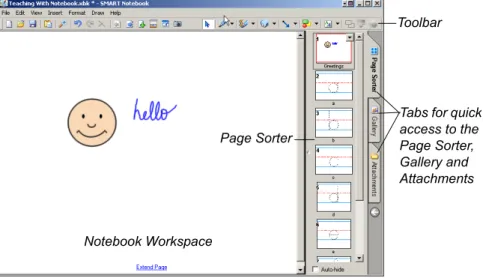
Open Notebook™ software (press the top button in the Start Center) to create a presentation full of colorful clip art, Flash objects, graphics and text from a variety of sources. Drag any of the thousands of images, Flash files and templates available from the Gallery tab onto the pages of your presentation, or capture information from the Internet or any source on your computer. Rearrange your pages using the Page Sorter tab, and add file attachments and website URLs on the Attachments tab. After you’ve created your content, you can also present it with Notebook software. As your audience provides comments and suggestions, write their input on a Notebook page using the pen tray tools or the pen buttons in Notebook software.
System Tray Icon
Start Center
Notebook Workspace
Toolbar
Tabs for quick access to the Page Sorter, Gallery and Attachments Page Sorter
For more help on performing specific tasks, open the Help Center by pressing the Help button on the Start Center. Or visit the Support and Training areas of www.smarttech.com for more ways to learn about SMART Board software.
If you’re a first-time SMART product user, you can practise using the interactive screen with two applications that were specially created for use with a SMART product: SMART Number Cruncher and SMART Speller. You can use these simple programs to practice writing on the screen and to practice converting your writing to typed text. Download
these free programs from www.EdCompass.com.
Advanced Features
SMART Board software is about more than just writing and saving notes over still images on the interactive screen. For example, you can play a video with SMART Video Player and write over the moving images.
Record a file of everything you do at the interactive product with SMART Recorder. If you have a microphone connected, your file can include narration.
You can modify many of the tools in SMART Board software. For example, you can customize the Start Center by adding additional buttons, such as buttons for frequently used applications. When you open the Floating Tools, the Classic tool set opens by default, giving you access to the most commonly used tools. However, if you’re teaching younger students, you might want to try the Creative tool set. Read the
Select a Tool Set, in the How To folder of the Help Center, for more information.
Press the Keyboard button on your interactive product to open the on-screen keyboard. This way, you don’t have to leave the interactive product to enter text.
Press the appropriate button on the bottom of the Sympodium interactive pen display to quickly open Notebook software, the on-screen SMART Keyboard or the Floating Tools.
Keyboard Button Help Button Video Player Button Recorder Button
12 Quick Tour Windows Version
If you’re a guest laptop user who prefers not to install SMART Board software on your computer, you can enable Mobile and Wireless Device settings at the resident computer and use LinQ software to display files on the interactive screen using a network connection. With this software, your files stay on your laptop while you use the interactive tools of SMART Board software on the SMART product to deliver a presentation.
The Next Steps
Challenge yourself to try new ways to do tasks that you normally do with paper and pen. The more you use SMART Board software, the more efficient you’ll become.
For example, SMART Board software helps you to reuse information by encouraging you to save your material and notes on a computer instead of on paper. You can also share your files with others.
Ask yourself: How can I use this tool to make my daily tasks easier? Or What could I use this feature for? Your answers may surprise you.
More Training
If you need more training, go to www.smarttech.com/Trainingcenter and
www.EdCompass.com. You can also use the exercises on these sites to
teach others, or to find out about how to receive more training.
Become a SMART Exemplary Educator by using your SMART product in a valuable way and then sharing your knowledge with others. Check
www.EdCompass.com for information on professional
Controlling the Computer
Think of the interactive screen as an extension of your computer itself. Press the screen to click as you would with a mouse. Anything that you can do at your computer, you can accomplish at the interactive screen. For example, you can use the SMART Keyboard to log on to your computer.
If you can see the SMART Board icon in the system tray, you have access to all the interactive applications and tools included with SMART Board software. Press this icon to see a menu of items or double-click it to open the Start Center.
Press a menu item or a button on the Start Center to open that tool or application. You can also add buttons for other applications that you commonly use, like Microsoft® Internet Explorer®, Word® or PowerPoint® software, to the Start Center. You can have up to 11 buttons on the Start Center.
Clicking
Press on the interactive screen to left click (as you
normally would with a mouse). Before you know it, you’ll be browsing the Internet, moving files and doing everything that you used to do with your mouse.
To double-click, press twice. For example, to open a program, press twice on its desktop icon.
Touch the interactive whiteboard firmly with your finger.
When you get the hang of this, you can take full advantage of SMART Board software.
If your press unintentionally produces digital ink or erases a previous note, check that the pens and the eraser are in their pen tray slots. If one tool isn’t in its slot, the sensors in the pen tray register your touch as if you were using that tool.
SMART Board Icon
14 Controlling the Computer Windows Version
To right-click once, press and hold your finger or the pen tool on the interactive screen. In approximately three seconds, the right-click menu for the desktop or the active application appears. Another way to right-click is to press the Right-Click button on your interactive product and then touch the interactive screen to instantly see the right-click menu. Whenever you right-click, your next press on the interactive screen reverts to a left click.
Aligning or Orienting the Interactive Screen
For your press to appear exactly where you expect it, make sure your SMART interactive product is properly aligned or oriented. This lets SMART Board software know exactly where the image is on the product. Your SMART product comes with a default setting that aligns a standard computer screen image to the product. However, if the pointer appears a slight distance away from where you’ve pressed, you should correct this misalignment by orienting your unit.
To orient the unit, you press specific points on the interactive screen. You access this orientation screen by pressing the SMART Board icon or the More button on the Start Center and then
selecting Orient. This procedure can be four, nine or twenty presses, depending on your Alignment/Orientation Precision setting. You can
Press the Left-Click button on a Sympodium interactive pen display and then touch the pen tool tip to the screen.
Tap twice for a double-click.
If your SMART product uses DViT™ (Digital Vision Touch) technology, you can use hand gestures to right click. Read about them on page 16.
To move objects on the interactive screen, press the object with one finger and, while maintaining pressure on the object, use your other hand to touch the screen at the new location. Then lift the finger that’s holding the object. The object jumps to the new location.
access this setting in the SMART Board Settings dialog box from the SMART Board Control Panel.
Tips for Pressing
Your SMART product interprets your screen presses using a number of default settings. One special setting is the Mouse Assist option. With this feature active, it’s easier to activate items like scroll bars and Close buttons, which may otherwise require precise pressing. With this setting, you can tailor your interactive product to the abilities of its users.
For quick access to the Orientation screen, press the two pen tray buttons at the same time to orient the interactive whiteboard.
Tell your students to press firmly on the interactive screen. If you have an interactive whiteboard, they can use a tool, such as a pointer or a dry-erase marker (with its lid ON), to avoid funny sounds that may emanate from sweaty fingers!
To drag, keep pressing firmly on the interactive screen.
Don’t lean your palm, arm or anything else against the interactive screen. More than one point of contact with the interactive screen can confuse the product’s electronics.
If your students can’t reach the upper portion, you may be able to lower the screen. If you have an adjustable
product such as a Rear Projection SMART Board
2000i interactive whiteboard or an interactive whiteboard on a floor stand, you can lower it. Remember to orient the front projection interactive whiteboard after you move it.
Avoid standing on a chair or a stool to reach the top of the interactive screen. Follow the safety tips outlined on page ii.
16 Controlling the Computer Windows Version
Tips for Using DViT Technology
If you have an interactive whiteboard that uses DViT technology, more than one person can interact with the product at the same time. However, you must first enable this Multiple Touch Mode for SMART Board software to recognize more than one press. You can change any of these
settings through the Mouse Settings in the SMART Board Settings dialog
box, which you access from the SMART Board Control Panel. Read the
Tips section of the Help Center for more hints.
You can also use mouse gestures if your interactive screen uses DViT technology. Gestures are a way of creating common mouse actions right at the screen. For example, you can easily right-click or scroll without having to step away from your screen. As a result, you avoid distracting departures from the interactive screen.
With the gestures feature enabled, you can right-click by pressing the screen with one finger and then pressing with a second finger to the right of the first. In addition, you can scroll by touching the interactive
whiteboard with two fingers and then moving your fingers up or down the screen. To use gestures, you must activate the Enable Mouse Gestures
and the Multiple Touch Mode settings. See How To > Change the
SMART Board Software Settings > Change Mouse Settings, in the SMART Board Software Help Center for more information.
Controlling a Projector or a Flat-Panel Display
If your SMART product uses a projector or a flat-panel display, you can control these devices right at the interactive screen using the SMART Display Control. You can also set up a special screen saver that’s optimized for a SMART Board interactive whiteboard, called the SMART Bulb Saver.
Display Control
SMART Board software comes with Display Controls that work with a screen saver to help preserve the life of your projector lamp or prevent an after-image on your flat-panel display. These controls can save money for you, because bulb and display replacements are expensive. When your screen saver is activated, the Display Control turns off the projector lamp or puts the flat-panel display into sleep mode.
With the Display Control set up, you won’t have to search for the
projector’s or flat-panel display’s elusive remote control, because you can press an on-screen button to control the volume, power and input source. To set up this feature, you’ll need an active screen saver and an
appropriate data cable to connect the computer to the projector or panel display. (This cable often comes with the projector or flat-panel display.) Then activate the Display Control Settings in the
SMART Board Settings window (accessed from the SMART Board Control Panel). An icon appears in your system tray. Press this icon to access a menu of commands for controlling your projector or flat-panel display.
SMART Bulb Saver
Consider using the SMART Bulb Saver as your screen saver. It’s tailored for SMART products and, when you use it with the Display Control, it will help conserve the life of your projector lamp or flat-panel display. You can set the SMART Bulb Saver to activate after a period of computer inactivity or the absence of a video signal. You’ll find this screen saver with your operating system’s display settings. For complete information on setting it
up, see Activate SMART Bulb Saver,in the SMART Board Software Help
Center, for more information.
Using Video Devices
Just like the sportscasters on television, you can play a video clip for your audience in SMART Video Player. As the video plays, you can circle players, draw lines and write comments over the images.
If you connect an external video device to your computer, such as a video camera or a VCR (using a video capture card or a TV tuner card), SMART Video Player automatically detects this hardware and it appears on the Hardware menu. You can adjust your settings for this device and save your adjustments. When you next use this device for your video input, your settings are restored.
The Display Control works with most connected projectors and flat-panel displays.
18 Controlling the Computer Windows Version
Open SMART Video Player to play the movie, using the buttons on the lower portion of the window to play, pause or stop the video.
When you want to draw attention to something in
the movie, you can write a note over it with any interactive pen tool (a physical or a virtual one). Or you can use the Floating Tools to highlight or point out an important detail.
You can set up SMART Video Player to pause the movie as you make your note, or it can continue to play while your note slowly fades away. If you’re showing a video from a video device, such as a VCR, and you press Pause in the Video Player window, the video displayed on the interactive screen pauses while the hardware device continues to play. When you return to the video, it will jump ahead.
Displaying Your Computer Screen
Sometimes when you present, your audience can’t see small details on the screen. To alleviate this situation, use the Magnifier to enlarge an area of your screen.
From the Start Center, press the More button and add the Magnifier tool. Drag the window around your screen to enlarge the area inside it.
TIP
Drag a video file from Windows Explorer to the opened SMART Video Player window to see the video
immediately.
Archive your educational videos in digital form to preserve them. If you are connected to a network, you can open them with SMART Video Player on your SMART interactive product.
Pause and Stop Buttons
Mobile Device Manager
If you’re using a laptop computer, you can display files from your computer on the interactive screen. To do this, you must activate the Mobile and Wireless Device Settings (from the SMART Board Control Panel) to allow a laptop to connect using LinQ software. See page 50 for more information.
To use LinQ software, you must install it on your laptop and your laptop must be connected to the same network as the resident computer for the
interactive product. You can download and read the LinQ Software User’s
Guide. Search for it on www.smarttech.com/support. Guest Laptop Switch
If you prefer to connect a guest laptop with cables and your interactive display supports laptop switching, you can set up the Display Control and use the guest laptop switch to alternate between the laptop and the interactive screen’s resident computer. This guest laptop switch also requires that your computer have two available serial ports and a video
input port. To set this up, read the Help Center topic entitled Configuring
the Guest Laptop Switch, or the overview entitled A Guest Laptop Switch.
Drag this window on your screen to see it enlarged below
20 Writing, Typing and Drawing Windows Version
Writing, Typing and Drawing
No matter which SMART interactive product you have, you can use its
pen(s) to write or draw over or into any computer image.
Open any application by pressing twice on its desktop icon. Then use either the tools of SMART Board software or a pen tray pen (interactive whiteboards) to write or draw, instead of a traditional mouse and keyboard.
Go ahead. Start writing!
Writing in Ink Aware Applications
With a number of applications, you can save your notes in the file that you have open. These integrated applications (e.g., Microsoft Word, Excel, Paint and PowerPoint) are called Ink Aware applications. For a complete list of these applications, the supported version and special functions
within the application, see SMART Board Control Panel > Using Ink
Aware Applications in the SMART Board Software Help Center. When you use an Ink Aware application, write in the active area of the application. For Word, the active area is a page; for Paint, this area is the canvas area. If you move your pen outside of this area, the ink doesn’t appear. This makes it easy for you to press buttons on the toolbar with the
Press a Colored Ink button on the Sympodium interactive pen display and use your pen to create digital ink in that color.
Write with your finger! Pick up a pen with one hand and touch the interactive whiteboard with your other hand. Digital ink appears in the trail of your finger.
Write often on the screen to keep your class interested, attentive and entertained. Let your students write on the screen too. Interacting with the lesson material helps your students learn through discovery, which leads to better retention of your lesson objectives.
pen still in your hand. Also, SMART Board software knows the ink color to display based on the pen that you’re using.
Drawing in Ink Aware Applications
Microsoft Paint is one of several Ink Aware graphics applications. When you open Paint on the interactive screen, you can use a pen tray pen (or your finger) to draw a picture instead of using your mouse to select and then manipulate a tool from the Paint toolbox, as you would normally. Similarly, pick up the pen tray eraser and erase part of the picture. Or use the Paint toolbox to further enhance the object you're creating.
You’ll find you’ve created a bitmap with much greater ease than normal: You have the extra-large canvas of the screen to work on and the fine artistic control that can only be achieved with a pen in your hand. You’ll also find these same advantages when you’re running CorelDRAW® or AutoCAD® software.
Refer to the SMART Board Software Help Center for a complete list of Ink Aware applications and versions.
For details on saving your notes with these Ink Aware applications, see
the chapter on Saving, starting on page 37.
Writing over Applications That Aren’t Ink Aware
If your application is not Ink Aware, your writing appears on a transparency layer over a frozen image of the desktop.
You’ll know the transparency layer is there because a border appears around your screen. Inside this border, you can write or draw with digital ink, erase it, or capture your notes to Notebook software. If you find the border distracting, you can remove it by pressing the Right-Click button on your interactive product, and touching the interactive screen. In the menu that appears, select Show Border.
As you show a spreadsheet on the interactive product, you can might need to amend some numbers based on discussions in a meeting. Open your Excel spreadsheet, press in the appropriate cell and write the new number on your interactive screen. Then press the Insert as Text button.
22 Writing, Typing and Drawing Windows Version
Don’t be alarmed if your computer clock in the system tray doesn’t change when the transparency layer is active. It will return to normal when you return to a left click.
When you write over an application that’s not Ink Aware, the Floating Tools appear. Read the following section for information on using the Floating Tools.
Floating Tools
If you’re preparing your presentation on a computer that’s not connected to the interactive product, you can still write or draw with a pen. Click the Pen button on the Floating Tools and use your mouse to draw a picture or handwrite some notes. Similarly, you can use your mouse to produce highlighter ink, create a variety of shapes or write using the Creative ink button.
The Floating Tools are more than just the virtual counterpart of the physical tools. In the Classic tool set (the default for SMART Board software), you have access to many other tools, including Area Capture and Highlighter. You can also add tools. For example, add the Shape and Creative Pen buttons to the Floating Tools so you can make your notes more engaging. For information on customizing the Floating Tools, turn to page 43.
CAUTION SMART Board software clears your notes if you touch
the screen after you put down a pen (interactive whiteboards) or press the Left-Click button (interactive pen displays). However, you can easily restore the notes, as described on page 36.
Students will better understand how the technology works if you explain to them the concept of the transparent layer over the computer image.
To open the Floating Tools, press the Floating Tools button in the Start Center, or press the SMART Board icon in the system tray and select Floating Tools.
Press the Highlighter button to highlight text with yellow, semi-transparent digital ink, just as you would with a highlighter pen. You can cover words or any area of the screen with this illuminating ink.
Writing and Drawing in Notebook Software
If you’re using Notebook software on a SMART interactive product, the easiest way to write notes is with a pen tray pen (interactive whiteboards) or the Pen tool (Sympodium interactive pen displays). However, you can also create freehand objects using the Pen and Creative Pen toolbar buttons and a range of geometric shapes using the Shape button.
TIP After you open the Floating tools, you can collapse it to
save space. You can also add tools to or remove tools from it. See How To > Add Tools to the Floating Tools
or Change the Floating Tools View in the Help Center for details.
Encourage your students to write on the SMART Board interactive whiteboard by showing them a screen that contains a handwritten note. To create this note when you’re preparing the lesson on your computer, use the Pen tool from the Floating Tools.
Pen Highlighter
Click to shrink
or to customize the toolbar Eraser
Area Capture
Undo
Left-Click
Right-Click Click to add more tools The Classic Tool Set
24 Writing, Typing and Drawing Windows Version
You can write and draw in a myriad of colors, line widths and styles, ranging from artistic to plain. If you like, you can use the Creative Pen to write with a stream of stars, rainbow colors, happy faces or even flowers!
You can also connect your notes with lines that have arrowhead ends using the Line button.
Manipulating and Changing Notebook Software Objects
Whatever you write, draw or type on a Notebook page becomes an object that you can subsequently select and then resize, move, rotate, group with other objects, link and modify in many other ways.
Grouping Objects
When you write several words in the same general vicinity on a page, you’ll notice that they’re already grouped together when you select them. This is called smart grouping, and it occurs automatically when you create handwritten annotations within the same area of the screen. This feature keeps words, sentences and paragraphs together on the screen, so you
TIP If you’re using Notebook software on an interactive
product, and you want to use the more creative tools that are available with SMART Board software, don’t use a pen tray pen! Instead, press the Creative Pen, Line or Shape buttons on the Notebook toolbar, and write with your finger in the workspace.
Click to rotate
Click to resize Click to modify, link, cut, copy, paste, lock in place, group, etc.
can easily move them as a group. This feature also allows you to easily select words and word groups as individual objects, rather than as clusters of the separate, multiple pen strokes that you used to create them.
You can deliberately group individual objects together so you can manipulate them as one object by selecting Group from the Draw menu. Protecting Objects from Editing
You can protect an object or a group of objects from being moved, changed or grouped with other objects with the Draw > Lock in Place command. When selected, a locked object displays a Lock icon in its selection rectangle. Just click that icon to unlock the object. Rearranging Stacked Objects
When you’re copying and pasting multiple objects onto the same page, they often become stacked on top of one another. You may want to rearrange them to reveal an object hidden within the stack.
Select the Bring Forward and Send Backward commands in the Draw > Order menu to rearrange selected overlapped objects, one position at a time, for selective visibility. The Bring to Front and Send to Back commands in the Draw > Order menu take selected objects to the upper and lower limits of the object stack; in other words, these commands move an object all the way to the front or rear of the stack.
TIP If you want to write words on the same line, but don't
want them automatically grouped, write them in a column, use different pens, or briefly return the pen to the pen tray before picking it up again to write another word.
TIP To align objects on your Notebook page, drag the ruler
or any of the ruled paper templates from the Gallery (Professional > Paper Backgrounds and Tools). You can place the ruler in the background or use it as a transparent image.
26 Writing, Typing and Drawing Windows Version
Linking Objects to Websites or Files
You can also link an object to a website or a document on your computer or network. Just select Hyperlink from the selected object’s menu arrow (in the upper-right corner of the selection rectangle), and type the Internet address (URL) to which you want to link. Click OK and a hyperlink button appears with the object when you select it. Click the hyperlink button and your Web browser opens at the specified URL.
Using Notebook Pages
With Notebook software, you can create a series of pages to accommodate even your lengthiest presentation. When you fill up one page with your notes, click the Insert Page button in the toolbar to add another one.
The Page Sorter tab provides a comprehensive overview of all Notebook pages in miniature form, and lets you perform all page-related tasks with ease. Open the Page Sorter to remove, clone and rearrange pages, as well as change the page titles. The Page Sorter is also convenient for moving and copying objects from one page to another.
While you’re working on a page, you can extend it to add room for more notes (click the words Extend Page at the bottom of the page) and you can change the background color.
If you’re preparing your material on a computer that has SMART Board software installed but no SMART product connected, you’ll notice a transparent watermark on the Notebook page. This watermark will disappear when you either connect the computer to a SMART product or open the file on a computer that’s connected to a SMART product. Also, the watermark won’t appear when you print the page.
Writing Over Video
With SMART Video Player, you can annotate over moving or still video from a VCR or DVD player. To do this, you must first connect the VCR or DVD player to a video capture card on the computer. You can write over top of your video, play or freeze frames, and capture or clear your notes. When you capture a note, it’s automatically sent as a screen capture to
Notebook software. See How To > Save > Capture a Note with the
The ability to write over video will help you if you’re analyzing sports plays or investigating details that occur in very quick visual sequence. For example, imagine analyzing clues in a surveillance tape that you’re playing through the computer. You can draw attention to an interesting on-screen event with the pen tool.
For more information about using SMART Video Player, see page 17.
Typing Directly Into an Application or a Dialog Box
In almost every situation involving a computer, you will eventually need to type text with a keyboard, even if it’s only to input text into a dialog box. SMART Board software lets you do this at the screen as easily as if you were sitting at your desktop, typing on the keyboard, and without disrupting the flow of your presentation to access an actual keyboard. SMART Keyboard
Open the SMART Keyboard on the interactive screen and press the virtual keys. When you finish, press the Send button, and the letters that you’ve typed appear in the active application.
You can change the views of the keyboard to make your most commonly used functions available. These views include:
• Classic, with its standard QWERTY keyboard layout
• Simple and Simple Caps, with the keys in alphabetical order
• Number Pad, for number input and mathematical equations
• Shortcut, for writing keyboard shortcuts at the interactive screen
• Write, for quick conversion of your handwritten letters
Press the Keyboard button on the pen tray to open the on-screen keyboard. Drag the SMART Keyboard to a higher spot if you’re typing with 10 fingers. Use a sans-serif font, such as Arial or Comic Sans, because it’s easier for beginner readers to distinguish the letters.
28 Writing, Typing and Drawing Windows Version
Handwriting Recognition
You can inject handwritten words into any file or dialog box as typed text. If your active application isn’t Ink Aware, you can insert a handwritten note (that’s converted to typed text) directly into your file. To convert and insert your note, press and hold your note. When the menu appears, select Inject <your note> Here.
In Ink Aware applications, press the Insert as Text button, which appears either in a three-button Aware toolbar or in your
application’s toolbar.
In Notebook software, select a handwritten word or a series of grouped words, press the menu arrow in the upper-right corner of the selection rectangle, and select a conversion option.
Typing and Formatting in Notebook Software
Just start typing in Notebook software. Text appears inside a resizable text box, along with a Fonts toolbar that lets you change every aspect of the text, including font, font size and style, justification and bulleting. When you resize the text box, the text inside wraps accordingly.
Making Other Kinds of Notations
Your presentation may be complete, but you may still want to draw the audience’s attention to key points or to simply entertain them with color and animation. For more information on other ways to make notes, read
the section on Presenting that starts on page 53.
Floating Tools
You can add geometric shapes to your notes by adding the Shapes button to the Floating Tools. You can customize these buttons so that with one press you can add a star, a circle, a rectangle and more.
You can also add tools that focus the audience’s attention on certain screen areas, such as the Pointer Tool, the Screen Shade and the Spotlight. Or you can add applications such as the Calculator, the SMART Keyboard and the Magnifier to the Floating Tools.
For young students, you might want to show the keyboard keys in alphabetical order instead of using the QWERTY layout. If so, use the Simple view of SMART Keyboard, instead of the Classic view.
Adding Content into Notebook Software
In other sections of this guide, we’ve discussed how to create and modify
objects in Notebook software (Writing and Drawing in Notebook Software
on page 23), as well as how to capture information from other sources (Capturing with the Notebook Software Capture Tools on page 38). In this section, we’ll focus on adding content to your presentation. For example, you can add clip art, templates, images, Flash files, links to files and Internet addresses to your Notebook file.
Using the Gallery
The Gallery consists of several thousand templates, clip art images and Flash files, organized into categories. You can explore and organize the categories in the same way you explore and organize your folders and files in Windows Explorer. To access the Gallery, press the Gallery tab at the side of the Notebook software window. The Gallery is organized into two panes: a list of categories and a contents pane. When you browse through the categories, watch the thumbnail previews in the contents pane. Then drag any thumbnail from the contents pane directly onto your page.
Current Category
Clip Art
Template Drag the content
onto the page The List of Categories Pane
The Contents Pane
30 Adding Content into Notebook Software Windows Version
Gallery Categories
The Gallery is organized into three major categories: Education, Professional and My Content.
If you’re a teacher, browse through the extensive Education category, which is further broken down into subject categories for your
convenience. The Education category is loaded with clip art, templates and Flash files that you can use as visual aids for teaching a wide variety of topics to classes at all grade levels.
If you’re someone who prepares professional presentations, browse through the templates and tools that are available in the Professional category, including variously lined paper, graph paper, rulers and protractors.
About Page Templates
A page template gives you a way to reuse content on your Notebook pages. There are two types of templates in the Gallery: conventional templates that come with the Gallery and customized templates that you can make to reuse the content and images on a page you created. The templates that come with the Gallery, including blank calendar pages, agendas, ruled writing paper, graphic paper, and geographical maps, can serve as the background for many different document types. These are conventional templates that help you to format and present information in a specific way. The content of these templates stays permanently in the background, and can’t be selected or changed. The templates that you create from your Notebook pages can include text, shapes, imported images, Flash content and digital photos— anything you can place on a Notebook page. When you convert a page into a Gallery template, you are simply making its contents conveniently
available for reuse. These templates are not conventional, background
templates. In fact, when you open a self-created template, all the objects on the page are just as you created them: selectable and changeable and
in the foreground. See Adding Your Own Content to the Gallery on
page 31, for more information on creating templates.
NOTE: To make your template behave like a conventional template, select all the objects on the page and select Draw > Lock in Place. Then select Draw > Order > Send to Back. The objects are placed in the background, protected from accidental change.
Templates are represented in the Gallery as an image of a page with a turned-down corner.
When you drag a template onto the current page, Notebook software creates a new page after your current page, and applies the page template to the new page.
Adding Your Own Content to the Gallery
To add your own clip art, flash files and Gallery collections from other Notebook files, click the Add/Import button at the top of the Gallery and select the appropriate command.
Customize the Gallery by adding pictures and text that you’d like to store for later use from just about any source. For example, paste images and text onto a page, and then add the page to the Gallery as a template. To do this, click the Add/Import button and select Add Current Page to Gallery. Although we recommend that you store new content in the My Content category, the new template is added at the bottom of the contents of the currently selected category.
You can import and export categories from other Notebook files as Gallery collection files (with an .xbc extension). A collection file is simply the contents of an entire category saved to a single file. Click the Add/ Import button and select Import Collection File to import collection files from other Notebook files.
To export a category as a collection file, just click the category’s menu arrow button and select Export as Collection File.
Some templates include a Snap To feature. For
example, if you add a map template (e.g., Europe) to a page and then drag an associated clip art, such as the United Kingdom, onto the map, the clip art will snap to position if you put it near the proper place on the map.
32 Adding Content into Notebook Software Windows Version
Organizing Your Gallery Content
You can freely reorganize the contents of the Gallery by clicking on a category and dragging it to another category folder, just as you would rearrange files and folders in Windows Explorer.
As you add more images and templates to the Gallery, you may need to change the file structure. It’s easy to add new subcategories: Just click the Add/Import button and select Add New Subcategory. A text box appears in the list of categories, below the selected category. Enter the name of the new subcategory, and then add templates, images and Flash Files to it.
My Content is a category in which you can place your own clip art, Flash files and templates that you use often. We recommend that you only add content to the My Content category, instead of the other categories. This will make it easier to maintain the Professional and Education categories in their original form.
NOTE: If you try to access the Gallery on a shared resource drive, you’ll find that it’s locked. This means that you can neither add nor remove any of the items from the Professional and Education categories. However, you can still make changes to the My Content category.
For more detailed information on using the Gallery, see the Help Center.
Adding Web Links and File Attachments
Navigating to files or Web sites during a presentation can be awkward and distracting: your presentation can lose its momentum, and participants and students can lose their focus.
Instead, add files, shortcuts to files or the Web addresses into the Attachments tab of Notebook software before your session. Then, during the session, you can open files or sites in no more time than it takes to press on the screen. Everyone remains on track and no time is wasted.
Click the Attachments tab and then click the Import button (located at the bottom of the tab) to browse to a website, file or file shortcut. Then, when your presentation is in progress, press the
Attachments tab and then press on the file, file shortcut or Web link. The target file or website will immediately appear.
If file size is an issue, import a file shortcut to the Attachments tab instead of a file copy. Unlike a file copy, a shortcut will add very little size to the total size of your Notebook file. However, a certain amount of
compression does occur when you import a file copy into the Attachments tab, so the file copy you attach will not be as large as the original file. NOTE: If you add a file shortcut to the Attachments tab, make sure that file is available when you give your presentation. For example, don’t include a shortcut to a file located on your hard drive if you intend to access the file from a network computer during your presentation. Put the file on the network first, and then attach a shortcut to it.
Adding Images and Flash Files
You may want to add images or Flash files to your Notebook presentation from sources other than the Gallery collections. Notebook software also supports .bmp, .jpg, .pcx, .png, .tga, .gif, animated .gif, .tif and .wmf file formats.
Just select Picture/Template > From File from the Insert menu, and browse to the image you want to add. If you prefer, just copy and paste the images.
To import a Flash file, select Flash File from the Insert menu and browse to the file that you want to add to the page. If this is a Flash file that you want to have on hand for future use, add it to your Gallery collection, as
described in Adding Your Own Content to the Gallery on page 31. During
your presentation, you can control the playback of a Flash object by pressing that object’s menu arrow and selecting from the menu that appears.
34 Adding Content into Notebook Software Windows Version
Adding Scanned Images
If you have a scanner connected to your computer, you can scan pictures directly into a Notebook file. Just select Picture from Scanner from the Insert menu, select your scanner from the list, and press the Scan button. You can move, size and rotate the picture as you would any other object.
NOTE: The scanner’s driver and image-editing software must already be installed on your computer. Notebook software can’t use your scanner without this driver and software.
Other Ways of Adding Content to a Notebook Page
• While you’re in other applications, drag selected text or images
onto the minimized Notebook icon on the Windows tool bar. Notebook software will open and you can continue dragging the selection directly onto the Notebook page.
• Use the Print Capture tool that’s described on page 41. You can
import all of the pages in a file from any other source to the end of the current Notebook file, with the original page breaks and formatting preserved.
• Use Notebook software’s Screen Capture tools, described on
page 38, to add screen captured images from any other source on your computer or the Internet. Remember to respect
Erasing
Mistakes are a part of learning. Everyone makes them, and no matter how carefully you’ve prepared your material, your pen may slip, you may spell something wrong, or you may write down the wrong word.
With your SMART interactive product, correcting your error can still impress your audience. Because the eraser tools in SMART Board software are so intuitive, you can effortlessly amend your notes with minimal disruption to the flow of your presentation.
Erasing Your Note
Use the physical eraser to remove digital ink from the interactive screen. At the interactive whiteboard, pick up the eraser and wipe it across the screen. At the interactive pen display, push the Eraser button and drag the pen across the screen.
Floating Tools
You can use the eraser from the Floating tools to erase freehand annotations.
To quickly remove your notes from the screen, press the Undo button on the Floating Tools toolbar. When you press this button, you remove or return the last transparency layer to your screen. So even if you’ve completed other actions at the interactive screen, you can restore the notes that you wrote earlier.
TIP
Depending on your writing, the eraser may be too large or too small. You can change the size of the screen area that it erases by changing its settings. To do this, select Control Panel > Pen Tray Settings.
To erase small areas, pick up the pen tray eraser and then touch the interactive whiteboard with your fingertip.