2550 Garcia Avenue Mountain View, CA 94043
prior written authorization of Sun and its licensors, if any.
Portions of this product may be derived from the UNIX® system, licensed from Novell, Inc., and from the Berkeley 4.3 BSD system, licensed from the University of California. UNIX is a registered trademark in the United States and other countries and is exclusively licensed by X/Open Company Ltd. Third-party software, including font technology in this product, is protected by copyright and licensed from Sun’s suppliers.
RESTRICTED RIGHTS: Use, duplication, or disclosure by the U.S. Government is subject to restrictions of FAR 52.227-14(g)(2)(6/87) and FAR 52.227-19(6/87), or DFAR 252.227-7015(b)(6/95) and DFAR 227.7202-1(a).
Sun, Sun Microsystems, the Sun logo, SunSoft, the SunSoft logo, Solstice, Solstice HelpDesk, and Solaris are trademarks or registered trademarks of Sun Microsystems, Inc. in the United States and other countries. All SPARC trademarks are used under license and are trademarks or registered trademarks of SPARC International, Inc. in the United States and other countries. Products bearing SPARC trademarks are based upon an architecture developed by Sun Microsystems, Inc.
The OPEN LOOK® and Sun graphical user interfaces were developed by Sun Microsystems, Inc. for its users and licensees. Sun acknowledges the pioneering efforts of Xerox in researching and developing the concept of visual or graphical user interfaces for the computer industry. Sun holds a non-exclusive license from Xerox to the Xerox graphical user interface, which license also covers Sun’s licensees who implement OPEN LOOK graphical user interfaces and otherwise comply with Sun’s written license agreements.
X Window System is a trademark of X Consortium, Inc.
THIS PUBLICATION IS PROVIDED “AS IS” WITHOUT WARRANTY OF ANY KIND, EITHER EXPRESS OR IMPLIED, INCLUDING, BUT NOT LIMITED TO ANY WARRANTY OF NON-INFRINGEMENT, OR THE IMPLIED WARRANTIES OF MERCHANTABILITY, OR FITNESS FOR A PARTICULAR PURPOSE.
Action Request System and AR System are trademarks of Remedy Corporation.
Apple and Macintosh are registered trademarks and MacTCP is a trademark of Apple Computer, Inc. AT&T is a registered trademark of American Telephone and Telegraph Company.
CA-OpenINGRES is a trademark of Computer Associates, Inc
ChameleonNFS and NETMANAGE are trademarks of NETMANAGE, Inc.
HP, HP-UX, and OpenView are trademarks of Hewlett-Packard Company. HyperHelp is a trademark of Bristol Technology Inc.
IBM, OS/2, and RISC System/6000 are registered trademarks, and RS/6000, NetView and AIX are trademarks of International Business Machines Corporation.
INFORMIX is a registered trademark of Informix Software, Inc. LAN WorkPlace and Novell are registered trademarks of Novell, Inc.
Microsoft, MS, MS-DOS, and XL design (the Microsoft Excel logo) are registered trademarks, and Windows and Windows NT are trademarks of Microsoft Corporation.
Motif, OSF, and OSF/Motif are trademarks of the Open Software Foundation, Inc. Motorola mc88100 is a registered trademark of Motorola Corporation.
ORACLE and SQL*Plus are registered trademarks, and ORACLE7 is a trademark of Oracle Corporation. PC/TCP is a registered trademark of FTP Software, Inc.
Reflection and Reflection Network Series are registered trademarks of Walker Richer & Quinn, Inc. Silicon Graphics and IRIS are registered trademarks and IRIX is a trademark of Silicon Graphics, Inc. Sun Microsystems, NFS, and PC-NFS are registered trademarks of Sun Microsystems, Inc. SunOS, Solaris,
SunSelect, OpenWindows, and SunNet are trademarks of Sun Microsystems, Inc. SPARCstation is a trademark of SPARC International, Inc., licensed exclusively to Sun Microsystems, Inc.
SuperTCP for Windows is a trademark of Frontier Technologies Corporation. SYBASE is a registered trademark of Sybase, Inc.
UNIX is a registered trademark in the United States and other countries, licensed exclusively through X/Open Company Ltd.
Verity and TOPIC are registered trademarks of Verity, Inc.
All other products mentioned in this document are identified by the trademarks or service marks of their respective companies or organizations. Use, duplication, or disclosure by the Government is subject to restrictions as set forth in subparagraph (c) (1) (ii) of the Rights in Technical Data and Computer Software clause in DFAR 52.227-7013 or the equivalent clause in FAR 52.227-19, whichever is applicable.
Cover design by Carlick Advertising. Part Number: UGW-210-001
Preface. . . xviii
1. Overview of the Action Request System . . . . 1
AR System Users . . . 1 AR System Tools. . . 2 User Tool . . . 2 Notification Tool . . . 3 Administrator Tool . . . 3 Import Tool . . . 4
Action Request System Activities . . . 4
2. Getting Started with the User Tool . . . . 7
Using the Mouse with the AR System. . . 8
Controlling Window Size and Position . . . 8
Windows User Conventions in the AR System . . . 9
The Main Window . . . 16
Making Menu Selections. . . 17
Using the Tool Bar . . . 25
Exiting the User Tool . . . 27
Working with Action Requests. . . 28
Using Schemas . . . 28
Selecting a Schema. . . 30
Login Information . . . 31
Specifying Alternate Login Information . . . 32
Modifying Login Information . . . 35
Copying Login Information . . . 36
Modifying the Default Login Information . . . 37
Deleting Login Information . . . 38
Changing the Current Login Information. . . 39
Sharing Macros and Custom Reports . . . 40
Copying Files . . . 40
Specifying your AR Path Preference . . . 41
Server Information Window . . . 41
Setting User Preferences . . . 42
Displaying Help . . . 60
Displaying Application Help . . . 60
General Steps for Submitting an Action Request. . . 64
When You Can Access Fields . . . 66
Filling in Fields. . . 66
Field Data Types. . . 68
Field Data Entry Operations. . . 70
Using Keywords. . . 72
Special Data Entry Operations . . . 73
Using the Text Editor Dialog Box. . . 73
Using the Diary Editor Dialog Box . . . 75
Text and Diary Editor Operations . . . 77
Using Active Links . . . 78
Setting Submit Window Preferences . . . 81
4. Reviewing and Modifying Action Requests . . . . 83
General Steps for Querying the Database . . . 84
Defining Query Criteria . . . 86
Query-by-Example . . . 86
Query Bar . . . 88
Using Relational Operators in the Query Window . . . 89
Using Wild Card Symbols. . . 90
Using the Query Bar . . . 92
Query Operations . . . 99
Sorting Query Operation Results. . . 102
Specifying a Maximum Number of ARs . . . 106
Listing Action Requests . . . 106
Displaying Action Requests . . . 110
Modifying Action Requests . . . 114
Deleting Action Requests . . . 118
Full Text Search Option . . . 119
What is Full Text Search? . . . 120
Who Can Perform a Full Text Search? . . . 120
How Do I Use FTS? . . . 121
Limits in Doing an FTS . . . 123
Ignore Words List. . . 124
Efficient Full Text Searching . . . 124
Setting Query Window Preferences . . . 125
5. Reports . . . . 127
Generating Reports . . . 127
Designing Reports . . . 129
Selecting Fields. . . 130
Setting the Report Layout . . . 131
Sorting and Grouping Records in a Report . . . 136
Using Custom Reports . . . 147
Saving a Custom Report . . . 148
Using a Custom Report . . . 149
Modifying a Custom Report. . . 150
Modifying the Name or Help Text of a Custom Report . . . 151
Deleting a Custom Report . . . 152
Generating Report Output . . . 152
6. Using Macros . . . . 161
Recording Macros . . . 161
Executing Macros. . . 169
Modifying the Macro Name or Help Text. . . 171
Deleting Macros . . . 172
Sharing Macros with Other Users . . . 173
7. Customizing the Environment . . . . 175
Defining Default Field Values . . . 175
Customizing Your Schema View . . . 177
Changing the Layout. . . 178
Selecting an Alignment Method . . . 180
Changing Field and Active Link Button Properties . . . 180
Restoring Previous Views . . . 183
Changing the Current Login. . . 189
Making Menu Selections . . . 190
Exiting the Notification Tool. . . 191
Receiving a Notification . . . 192
Reviewing the Notification Log . . . 192
Setting Notification Tool Preferences. . . 194
Specifying an Alternate Configuration Directory . . . 196
Displaying Help . . . 197
Displaying Application Help . . . 197
Displaying Version and Environment Information . . . 197
9. Using Electronic Mail. . . . 199
Overview of the AR System’s Use of Electronic Mail . . . 199
The Email Template . . . 200
Querying or Submitting via Electronic Mail. . . 204
Querying via Electronic Mail . . . 204
Formatting a Query via Electronic Mail . . . 205
Submitting Email . . . 205
Responses to Email Submissions . . . 207
Receiving Email Notifications . . . 207
A. AR System File Locations . . . . 209
AR System User Tool Files . . . 209
Chameleon by NetManage . . . 211
LAN WorkPlace by Novell . . . 212
Pathway by Wollongong . . . 212
PC-NFS by SunSelect. . . 212
PC/TCP by FTP . . . 213
TCP/IP by Microsoft . . . 213
Super TCP by Frontier. . . 214
Reflection Network Series by Walker Richer & Quinn . . . . 214
C. DDE Functionality in the AR System . . . . 215
Third Party Applications and Macros . . . 216
DDE Server Name and User Tool Pathname . . . 217
Supported DDE Topic and Function . . . 217
Example Program and Buffer . . . 218
D. List of Procedures . . . . 225
Glossary . . . 229
Table 2-1 Function Keys in the User Tool . . . 10
Table 2-2 User Tool Menu Items. . . 18
Table 2-3 Tool Bar Functions. . . 26
Table 3-1 Field Data Types . . . 68
Table 3-2 Keywords . . . 72
Table 3-3 Text and Diary Editor Menu Items . . . 77
Table 4-1 Relational Operators Used in the Query Window . . . 89
Table 4-2 Wild Card Symbols . . . 90
Table 4-3 Operators Used in the Query Bar . . . 95
Table 4-4 Query Operations . . . 100
Table 5-1 Statistical Operations . . . 139
Table 5-2 Fields Required fordde.ini File . . . 156
Table 8-1 Notification Tool Menu Items . . . 191
Figure 1-1 Flow of AR System Activities . . . 5
Figure 2-1 Login Dialog Box . . . 15
Figure 2-2 User Tool Main Window . . . 17
Figure 2-3 Exiting the Tool . . . 27
Figure 2-4 Sample Trouble Ticket Schema . . . 29
Figure 2-5 Selecting a Schema. . . 30
Figure 2-6 The Login Information Dialog Box . . . 33
Figure 2-7 Servers Dialog Box. . . 34
Figure 2-8 Server Information Dialog Box . . . 42
Figure 2-9 User Preferences - Desktop . . . 43
Figure 2-10 User Preferences - Submit . . . 46
Figure 2-11 User Preferences - Query . . . 47
Figure 2-12 User Preferences - Confirm . . . 49
Figure 2-13 User Preferences - Report . . . 50
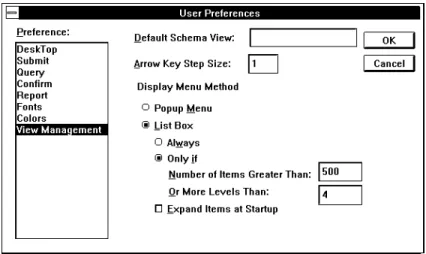
Figure 2-18 User Preferences - View Management . . . 59
Figure 2-19 Field/Schema Help Dialog Box. . . 61
Figure 2-20 The About Dialog Box. . . 62
Figure 3-1 Select Schema - Submit Dialog Box. . . 64
Figure 3-2 Submit Window . . . 65
Figure 3-3 Example of the Submit Window . . . 67
Figure 3-4 Entering Data in Fields . . . 70
Figure 3-5 Text Editor Dialog Box . . . 74
Figure 3-6 Diary Editor Dialog Box . . . 76
Figure 3-7 Active Link Example. . . 79
Figure 3-8 Selection List Dialog Box . . . 81
Figure 4-1 Select Schema - Query Dialog Box . . . 85
Figure 4-2 Specifying Query Criteria. . . 86
Figure 4-3 Using a Relational Operator. . . 90
Figure 4-4 The Query Bar . . . 93
Figure 4-5 Query Menu . . . 100
Figure 4-6 Results of Multiple Query Operations . . . 101
Figure 4-7 Query List Results in Descending Order . . . 103
Figure 4-8 Sorted Report Results . . . 104
Figure 4-9 Field Sort Order Dialog Box. . . 105
Figure 4-10 Query List Window. . . 106
Figure 4-11 Set Polling Interval Dialog Box . . . 110
Figure 4-15 Modify Individual Window. . . 115
Figure 4-16 Diary Editor Dialog Box . . . 118
Figure 4-17 Delete Dialog Box . . . 119
Figure 4-18 Context-sensitive help showing full text options . . . 121
Figure 5-1 Report Window . . . 128
Figure 5-2 Report Design Dialog Box . . . 130
Figure 5-3 Report Formatted by Record . . . 132
Figure 5-4 Report Formatted in Columns . . . 133
Figure 5-5 Report Formatted in Compressed Text Format . . . 134
Figure 5-6 Report Window with Prototype of Formatted Report. . . 136
Figure 5-7 Grouping Query Results in a Report . . . 137
Figure 5-8 Report Field Sort Order Dialog Box . . . 138
Figure 5-9 Specifying Statistics . . . 140
Figure 5-10 Page Setup Dialog Box . . . 143
Figure 5-11 Print Setup Dialog Box . . . 145
Figure 5-12 Report Options Dialog Box . . . 146
Figure 5-13 Save Custom Report Dialog Box . . . 148
Figure 5-14 Custom Report List . . . 149
Figure 5-15 Manage Custom Reports Dialog Box . . . 151
Figure 5-16 Reporting to the Screen. . . 153
Figure 5-17 Report File Dialog Box . . . 154
Figure 6-1 Recording in Progress . . . 163
Figure 6-2 Stop Recording Dialog Box . . . 164
Figure 6-3 Specifying a Variable. . . 166
Figure 6-4 Prompt to Enter Example Value . . . 167
Figure 6-5 Execute Macros Window . . . 169
Figure 6-6 Entering Parameters for a Macro . . . 170
Figure 6-7 Edit Macros Dialog Box . . . 172
Figure 7-1 Customize Defaults Window. . . 176
Figure 7-2 Dragging a Field to a New Location. . . 178
Figure 7-3 Display Attributes Dialog Box. . . 181
Figure 7-4 Export View Menu Command. . . 184
Figure 7-5 Export View Dialog Box . . . 185
Figure 7-6 Choose Views Dialog Box . . . 186
Figure 8-1 Notifier Tool - Login Dialog Box . . . 188
Figure 8-2 Notification Tool Window . . . 189
Figure 8-3 Notification Popup Dialog Box . . . 192
Figure 8-4 Notification Log . . . 193
Figure 8-5 Notifier Tool Preferences Window . . . 195
Figure 8-6 The About Dialog Box. . . 197
Figure 9-1 Sample Email Template . . . 200
The Action Request System User’s Guide for Windows manual is for anyone who uses the Action Request System (AR System) Windows User and Notification Tools. This manual describes the operations that are performed regularly by those using the User Tool and the Notification Tool. It assumes familiarity with MS-DOS and Microsoft Windows.
How This Book Is Organized
Chapter 1, “Overview of the Action Request System,” provides a general description of Action Request System Tools and how they are used.
Chapter 2, “Getting Started with the User Tool,” tells you how to install, start, and be productive with the User Tool. (See Chapter 8, for information on starting the Notification Tool.)
Chapter 3, “Submitting an Action Request,” tells you how to submit a new action request (AR) to the Action Request System database.
Chapter 4, “Reviewing and Modifying Action Requests,” tells you how to perform queries to retrieve specific ARs and list, review, modify, or delete them.
Chapter 5, “Reports,” describes how you can generate reports and statistics from the AR System database.
Chapter 8, “Using the Notification Tool,” tells you how to start and use the Action Request System Notification Tool.
Chapter 9, “Using Electronic Mail,” tells you how electronic mail works with the AR System.
Appendix A, “AR System File Locations,” tells you where the AR System files are located.
Appendix B, “Networking Notes,” tells you about the supported network stacks and requirements for their use.
Appendix C, “DDE Functionality in the AR System,” tells you how to use DDE (dynamic data exchange) to communicate with third party Windows applications.
Appendix D, “List of Procedures,” lists the location and the type of procedure available in this book.
Glossary lists and describes terms that you need to be familiar with as you use the AR System.
Action Request System Documents
The Action Request System Installation Guide provides instructions for installing the AR System software on several operating environments. There are separate installation chapters in the guide for the UNIX and Windows NT
environments.
The Action Request System User’s Guide (this document) is a how-to description of the operations that most AR System users perform. There are separate User’s Guides for environments supporting the Motif, Windows, and Macintosh graphical user interfaces (GUIs) as well as for ASCII terminals. Make sure that you are using the guide that is appropriate for your environment.
The Action Request System Getting Started Guide and Sample
Schemas provides an online demonstration showing the use of the AR System
in a sample help desk environment and describes how you can use the sample schemas provided with the AR System.
System concepts. There are separate Administrator’s Guides for the Motif and Windows environments.
The Action Request System Distributed Server Option Administrator’s Guide provides information about operating the AR System in a distributed, multi-server environment. Included are instructions for creating all of the necessary mappings and filters that you use along with the Distributed Server Option to keep AR System entries synchronized across multiple servers.
The Action Request System Help Desk Template Guide describes the Helpdesk application that runs in conjunction with the AR System to help you manage your internal help desk organization. The template takes full advantage of the rich feature set of the AR System and implements workflow and reporting mechanisms to simplify the task of working in or managing a help desk. The ARWeb Administrator’s Guide provides details about installing, using, and customizing the ARWeb application, so that you can provide access to your company’s AR System applications through the World-Wide Web.
The Action Request System Programmer’s Guide is a reference guide for
programming with the Application Programming Interfaces (APIs) that come with the AR System.
The Action Request System Troubleshooting and Error Messages Guide provides information to help you identify and solve problems with the AR System. The Action Request System Workflow Demonstration and Guide to Sample Schemas leads you through an online demonstration showing the use of the AR System in a sample help desk environment and describes how you can use the sample schemas supplied with the AR System.
The Action Request System Help Desk Template Guide describes the Help Desk application that runs in conjunction with the AR System to help you manage your internal help desk organization.
The Action Request System Accessories binder provides a place to keep documentation for utilities and peripheral add-ons to the AR System. As shipped, the Accessories binder includes the documentation for the Network
compatible running MS-DOS 3.3 or higher and Microsoft Windows 3.1 or Windows for WorkGroups 3.11 with the following minimum configuration:
•
At least 8MB RAM.•
At least 4MB of hard disk space available for the AR System software.•
A mouse. While a mouse is not required for the AR System, it is a convenient tool to use when interacting with the AR System.•
A monitor with a minimum screen resolution of 600 x 800 (SVGA).•
Any of the network adapter cards needed by the networking software.•
One of the following networking stacks:• Windows Sockets certified on one of the following: - Chameleon NFS by NetManage.
- LAN WorkPlace by Novell. - Pathway by Wollongong. - PC-NFS by SunSelect. - PC/TCP by FTP.
- Super TCP/NFS by Frontier. - TCP/IP by Microsoft.
- Reflection Network Series 4.0 by Walker Richer & Quinn.
See either the Release Notes that came with this product or Appendix B for specific information about network stacks.
Conventions Used in this Manual
bold fontIndicates that a word is a new or important term. Example: filters.
Initial Caps
Button and menu names and items have the first letter capitalized. Example: File.
bold computer font
Indicates data to be entered by the user. Example:A: (or B:)\SETUP.
<italic computer font>
Indicates a variable directory, file name, or string that you replace with an appropriate directory, file name, or string.
Example: <ar_config_dir>.
italics
Indicates a reference to another manual or to a different section within the current manual.
Example: see “Action Request System Documents.” Italic type is also used for emphasis.
Example: All users will be affected.
Shell Prompts in Command Examples
The following table shows the default system prompt and superuser prompt for the C shell, Bourne shell, and Korn shell.
Table P-1 Shell Prompts
Shell Prompt
C shell prompt machine_name%
C shell superuser prompt machine_name# Bourne shell and Korn shell
prompt
$
Bourne shell and Korn shell superuser prompt
System
1
The Action Request System (AR System) provides you with all the tools you need to quickly and easily manage support requests and problems. Using the AR System, your AR System administrator can create a flexible, customizable workflow process for you. As you make entries in the AR System, you are automatically capturing a database of problem solving experience. You can efficiently track and report a variety of issues, information, and problems. Both end users and support staff can take advantage of interactive access to the AR System database.
This chapter introduces all users to the concepts and features of the AR System. It provides an overview of:
•
The roles that various people play in the operation of the AR System.•
The tools provided by the AR System.•
The activities that users of the AR System are involved in.AR System Users
There are four types of users who are involved with the operations of the AR System:
•
AR System administrators.AR System administrators are responsible for the management of the AR System. They set up database schemas (the definitions of AR System databases), set access rights for users, and design the workflow process.
AR System Subadministrators are responsible for the set up, design, and access rights of a given set of schemas as permitted by the AR System Administrator.
Members of the support staff resolve action requests (ARs) using the AR System as set up by the AR System administrator. They assign and are assigned ARs, and log their progress in the appropriate fields. Support staff members are able to use information stored in previous ARs to avoid redundant effort and to expedite the resolution of current ARs.
End users are individuals with problems and support requests who initiate ARs. End users ideally have direct access to the AR System, although it is not a requirement. End users with direct access submit ARs using the User Tool.
AR System Tools
The Action Request System provides four tools that help administrators, support staff, and end users perform their jobs: the User Tool, the Notification
Tool, the Administrator Tool, and the Import Tool.
User Tool
The User Tool is generally used by everyone involved in the workflow process. It allows you to:
•
Submit ARs describing problems or support requests.•
Query AR System databases either for information or to keep track of previously submitted ARs.•
Modify one or multiple previously submitted ARs.•
Report on and calculate statistical information on ARs that share similar query criteria (information).•
Delete ARs (if you are an AR System administrator or subadministrator).•
Run macros to help automate the steps involved in complex queries and other operations.•
Customize schema views.•
Define default field values.The User Tool is described in this document.
Notification Tool
Like the User Tool, the Notification Tool can be used by anyone involved in the workflow process. The Notification Tool provides a means of alerting users of progress being made in the resolution of an action request. Through filters built into the AR System schemas by the administrator, users may be notified of any change in an AR. For example, the administrator may have defined a filter that sends a notification to the support staff when new ARs are assigned and another filter that notifies end users when an AR is closed. (In a user environment that does not run the Notification Tool, users can be notified through electronic mail.)
The Notification Tool is described in Chapter 8 of this document.
Administrator Tool
The Administrator Tool is used exclusively by AR System administrators to set up the AR System for use by support staff and end users. This includes:
•
Setting up schemas (the definitions of AR System databases).•
Setting access permissions on the fields within the schemas.•
Setting up access on schemas themselves.•
Creating both dynamic and static menus.•
Setting up AR System filters, escalations, and active links that define the workflow processes.•
Creating administrator commands. (Administrator commands only work on UNIX workstations.)Import Tool
The Import Tool allows users to transfer data from databases on other servers to the AR System database on the local server.
If the data you want to import already exists in a AR Export file, you can use the AR System Import Tool to import data into your server.The Import Tool can handle files in CSV or ASCII format.
The Import Tool is described in the Action Request System Administrator’s Guide.
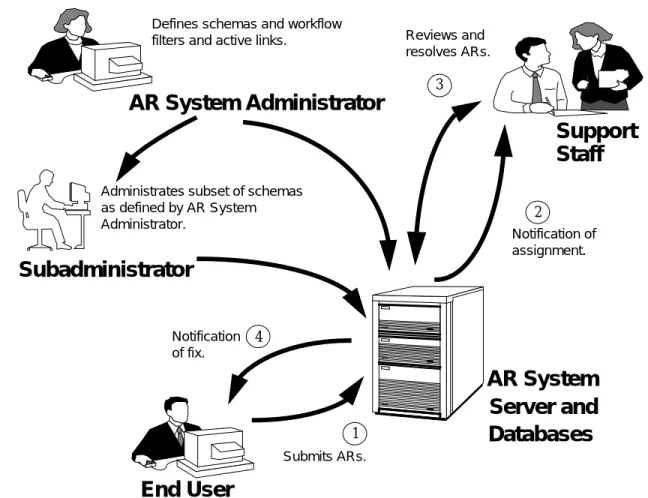
Action Request System Activities
AR System activities include setting up schemas, submitting ARs, querying the database to find similar ARs or to check on the progress being made on a specific AR, and resolving ARs. Figure 1-1 shows the flow of these activities through the AR System.
Figure 1-1 Flow of AR System Activities
The AR System administrator is responsible for setting up schemas.
Subadministrators are users that have been granted administrator permission to a subset of schemas by hear System administrator. Once a schema is established, end users and support staff can submit ARs and query the database as needed, within their allowed permissions.
ARs can enter the system in several ways:
AR System
Server and
Defines schemas and workflowfilters and active links.
End User
AR System Administrator
Support
Staff
Databases
1 2 3 4 Reviews and resolves ARs. Notification of assignment. Submits ARs. Notification of fix.Subadministrator
Administrates subset of schemas as defined by AR System Administrator.
•
Directly from the end user’s desktop through the Submit window of the User Tool.•
Through electronic mail. For more information, see Chapter 9, “Using Electronic Mail.”•
Through APIs that allow integration with other processes (like network management platforms). APIs are only available as UNIX clients.Typically end users notify support staff of problems and service requests by submitting ARs. Submitters can be notified of actions taken on their request and can also query the database for the status of their request. Support staff can be alerted at their workstation (or any workstation where they are logged in) of the arrival of new ARs. Incoming ARs are assigned by the manager, or they can be automatically assigned based on field values in the AR. The assignment of ARs can be changed if necessary.
The query facility assists support staff in resolving ARs by providing a versatile tap into a growing knowledge and experience base. As problems are resolved, the staff can keep a history in diary fields. This history can help provide answers to future problems.
The AR System macro facility lets the support staff automate frequently performed operations, such as creating daily reports or performing a query that produces a list of high priority problems.
When an AR is resolved, the end user can be notified through either the Notification Tool, electronic mail, or the telephone. The AR is now part of an experience base to be drawn upon in the future.
The Action Request System (AR System) User Tool is the tool you use to perform most of the day-to-day AR System functions. You use the tool to submit information to the AR System in the form of action requests (ARs) and to find specific ARs so that you can view or modify them. You also use the tool to create and run reports as your needs require. Given the proper permissions, you may also be able to use the tool to customize what you see when you look at a particular schema (that is, customize your view of the schema).
This chapter helps you get started in the daily operations of the User Tool. It covers the following topics:
•
User conventions in the AR System.•
Installing the AR System tools on a Windows-based client.•
Starting and exiting the User Tool.•
Working in the User Tool Main window (includes information on making menu selections and using the tool bar).•
Using Schemas.•
Modifying your login information.•
Defining login information for multiple users.•
Sharing macros and custom reports.See Chapter 8 for information on the Notification Tool.
Using the Mouse with the AR System
Mouse operations in the AR System tools are much like those in other Windows applications. The following terminology is used in this manual to describe the operations you perform using the mouse.
Select means to click once on an item with the left mouse button.
Double-click means to click the left mouse button twice in quick succession.
Drag means while pointing on an object, hold down the left mouse button and move the mouse.
Press means hold down the left mouse button without moving the mouse.
Pull-right means to click and hold the left mouse button on the character menu symbol (to the right of a field) to display the items. Continue to hold the mouse button as you move the pointer over the menu items. (An arrow to the right of a selection means that there are sub-menu items for that selection. To display and select the items from a sub-menu, move the mouse to the right with that choice highlighted.) When your choice is highlighted, release the mouse button and your selection is made. (If you release the mouse button with the cursor on the character menu symbol and the menu is small, the menu remains displayed until either you select an item or select outside of the menu. If you release the button outside of the menu, the menu closes and nothing is selected.)
Controlling Window Size and Position
You can manipulate windows in the AR System in the same way that you can for most Windows applications. Use the maximize and minimize buttons to control whether or not a window is iconized and whether or not it fills the entire screen. You can also control the size of a window by clicking on the edge or corner of the screen and dragging with the mouse.
The Control-menu box in the top left hand corner of each screen also provides options that let you control the size and location of windows.
You can also set options that cause the size of all User Tool windows of the same type (all Submit, Query, Modify Individual windows) or that cause the position of all Submit and Query windows to be saved when closed or exited
by selecting Preferences from the File menu. Select Desktop in the User Preferences dialog box, then select the option or options you want. See “Setting User Preferences” on page 42 for more information.
Windows User Conventions in the AR System
Remember the rules that follow as you work with the Action Request System Windows User and Notification Tools:
•
The AR System is case-sensitive. The only exceptions where the AR System isnot case-sensitive is if you are using the Sybase database configured to be
case insensitive or if you are using the full text search (FTS) option configured case-insensitive.
•
Within the Main window of the User Tool, the window (or dialog box) that is active (selected) is the one whose title bar is highlighted.•
In a dialog box with selection buttons, pressing the Return/Enter key performs the default action. The default action is the action performed by the button that has a heavy black border (the focus rectangle) around it.•
In a dialog box, pressing escape (Esc) closes the dialog box. (Pressing Esc is the same as selecting Close on the File menu when a window is active, and Esc is the same as selecting the Cancel button when a dialog box is active. PressingEsc also closes a menu.)Using Function Keys
You can use the following function keys to perform actions in schemas in the AR System Windows User Tool:
Installing the AR System Tools for Windows
Before you install the AR System User and Notification Tools, make sure you have all of the following information from your AR System administrator:
•
Your registered AR System user name and password.•
The names of the AR System and Notification servers. Most likely, the AR System server and the Notification server are on the same machine.•
The directory where Windows is installed.•
The network stack you are using.Note –Before installing, it is a good idea to make a backup copy of your AR System for Windows floppy disks. (Refer to the
DISKCOPY command in your DOS manual for instructions.)
Table 2-1 Function Keys in the User Tool
Key Action
F1 Opens a window that contains a list of the application help topics for selection. Each help topic may have one or more levels of subtopics available.
F5 Performs the same action as pressing the Return/Enter key only for schema window. If an active link is set up to activate when the Return key is entered in a multi-line field, you must use theF5 key instead. TheF5 key does not function as an Enter key in dialog boxes.
F6 In a field with a menu, causes the menu to appear. This is the same as selecting the character menu symbol.
F7 Opens a Text Editor dialog box in a text field or a Diary Editor dialog box in a diary field. This is the same as selecting the text edit or diary edit symbols to the right of the fields.
To install the AR System:
Note –When you install the PC client tool, your old ar.inifile is copied into ar.ini in the<ar_config_dir>\backup directory.
1. Scan the entire Release Notes before installing. Make sure that you have a supported network stack already installed.
2. Start Windows, if it is not already running.
3. Insert the AR System for Windows floppy Disk #1 (3.5") in theA: orB:
floppy drive.
4. Select the Run command on the Program Manager’s File menu. In the Run dialog box, typeA: (or B:)\SETUP and select the OK button.
This starts the installation program and a note window appears indicating that the Setup program is initializing.
Setup searches your local drives for a previous Action Request System installation.
5. The Action Request System installation welcome dialog box appears. After reading the greeting, select the Exit button to stop the installation process or select the Continue button to proceed.
The Installation Options dialog box appears displaying your currentHome andWindows directories and disk space information.
6. If you want to change the default directories for the AR System
installation, your AR System configuration file, or for your Windows files, select the Directories button on the Installation Options dialog box.
The Directories dialog box appears letting you specify alternate directories. The default directories areC:\Remedy,C:\Home, and
C:\Windows for the AR System installation directory, AR System Home (configuration) directory, and Windows respectively.
7. To find out how much space is available on one of your drives, select the drive from the Drive drop down list box. The Disk Space Information reflects the available space on the disk.
8. To change the directories in the Install Directory, Home Directory and Windows Directory fields, either type directly in the fields or press the
display the Browse Directories dialog box. The Browse Directories dialog box allows you to browse through and select from all available directories on the different drives on your system.
Note –While you can edit the Windows Directory field, if you specify a directory that does not already contain thewin.ini file, the Windows Directory field returns to the default directory.
9. Select the OK button on the Directories dialog box to return to the Installation Options dialog box. Select the Exit button to stop the installation procedure. Select the Cancel button to go back to the Installation Options dialog box and not apply any changes.
10. On the Installation Options dialog box, select the Continue button to continue. Select the Exit button to stop the installation procedure.
If you selected the Continue button, the Time Zone dialog box appears.
11. In the Time Zone field, select the appropriate time zone for your region from the drop down list box. Ensure that the Daylight Savings Time checkbox is checked if Daylight Savings Time is observed in your region. 12. When you are satisfied with the Time Zone settings, click on the Continue
button.
13. The Server Locations dialog box appears allowing you to add servers. The Server List in the lower portion of the dialog box is a list of AR System servers which your User and Notification Tools can connect to.
14. To add a server, enter a server name in the Server Name field and select the AR System Server and Notification Server check boxes as appropriate. 15. Select the Add button to add each server to the list.
16. To delete a server from the Server List, select the server in the Server List, and then select the Delete button.
17. Once your server list is correct, select the Continue button to continue with the installation procedure. Select the Exit button to stop the installation procedure.
18. A message box appears which displays the progress of loading the AR System executables.
The Configuration Files dialog box appears allowing you to modify your win.ini and any existing Action Request System files either now or later.
19. Select the Make Changes now and backup current version radio button to have the installation process backup the current version of yourwin.ini
and Action Request System files and to make the changes now to the original files.
20. Select the Write modified version to another location radio button to have the installation process save your modifications in another location allowing you to update yourwin.ini and Action Request System files at a later time.
21. Select the Continue button to continue with the installation procedure. Select the Exit button to stop the installation procedure.
22. A Modified Files dialog box appears providing the location of the unmodified versions ofwin.ini and any existingAR andar.ini files. Select the OK button to complete the installation process.
The Setup Complete dialog box appears telling you setup has successfully installed the Action Request System Version 2.1.
23. Select the OK button to complete the installation process.
Starting the User Tool
Once the AR System is installed, your desktop automatically displays the “Remedy AR System” group window containing the User Tool icon. To start the tool, simply double-click on the User Tool icon. (Note that you may only run one instance of the User Tool at any one time on each machine.)
User Name and Password
Your user name and password identify you to the AR System and give you the appropriate access permissions. Whenever you use the AR System, you should make sure you are logged in with the correct user name and password to assure that you have access to the fields, schemas, and functions required to
Users are set up in the AR System by the AR System administrator. If you do not know the login you should be using for the AR System, see your AR System administrator before you continue.
Note –If you are not a registered user, and unregistered users are allowed at your site, the User Tool starts with a “guest” set of capabilities. A guest user can retrieve any public information in the system. In addition, a guest user may be allowed to submit ARs, record a macro, generate a report, specify user defaults, and review ARs.
To start the User Tool:
•
From the “Remedy AR System” window icon, double-click on the User Tool icon.If you are starting the User Tool for the first time (or if you have set preferences so that the AR System always asks you to login), the Login dialog box appears as shown in Figure 2-1. Enter your registered user name and password, then select the OK button.
If you do not select the preference that causes the user to always prompt for login, your user name and password are saved in yourar.inifile and you are automatically logged in when you start the User Tool.
Figure 2-1 Login Dialog Box
If the name and password you entered are valid, the Login dialog box is exited. You are in the AR System User Tool Main window and ready to begin working.
If this is the first time you are logging into the User Tool, your login information consists of the default configuration directory and server list on your PC. For information on how to change these, see the section entitled . If you enter a valid user name but an invalid password, you receive an error message and are not logged in. If you enter an unknown or invalid user name and guests are allowed use of your AR System, you are successfully logged in with a warning telling you that you only have guest privileges. If you enter an unknown or invalid user name and guests are not allowed use of your AR System, you receive an error message and are not logged in. The kind of license that your user name is allowed determines what you can do in the User Tool. If you have a Read license, you can read and submit ARs within the limitations specified by your AR System administrator, but will not be allowed to update existing entries.
If you have a Fixed license, you can read, submit and update existing ARs within the limitations specified by your AR System administrator. Fixed licenses are permanently associated with a single user name. With this type of license, you can always access the User Tool.
If you have a Floating license, you have the same privileges as with the Fixed license. Floating licenses are not attached to any single user name. With Floating licenses, there are only a certain number of licenses available for use. If no license is available when you try to log in, you will receive a warning
available, it will be allocated to you. You will receive a note indicating you have been allocated a token when it becomes available. (The default “timeout” value for Floating licenses is two hours. For information on specifying
timeouts, see the Action Request System Administrator’s Guide.)
You may also be assigned a Fixed or Floating Full Text license. A Full Text License grants you the ability to use the full Text Search capacity supported by the AR System. If you are assigned a Floating license, you will grab one of the tokens available in the license pool. If no license is available, you will receive a warning and be allowed to access the system without using the full text search capability (the system will use the default database search capability). When a token becomes available, it will be allocated to you; you will receive a note, and will then be able to perform full text searches. (The default “timeout” value for Floating Full Text licenses is two hours. For information on specifying timeouts, see the Action Request System Administrator’s Guide.)
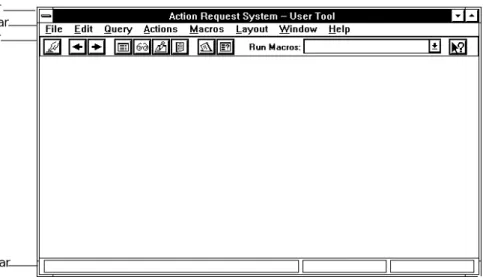
The Main Window
The User Tool Main window is the basic window of the AR System Windows User Tool, as shown in Figure 2-2. You use the menus and options available from the Main window to select and control the operations you need to perform. From the Main window, you can open and close the other windows that let you display, modify, and submit action requests, or generate reports on action requests that match specific query criteria.
The Main window includes a title bar at the top, a menu bar, an optional tool bar, and an optional status bar. The menu bar provides access to the User Tool menus that allow you to select the operations you want to perform. The optional tool bar provides shortcuts to performing some of the most common User Tool operations. The optional status bar, at the bottom of the window, displays messages that let you know the status of the operation in progress. You can determine whether or not to display the tool bar and the status bar by setting preferences for your desktop. See “Setting User Preferences” on page 42 for information.
Figure 2-2 User Tool Main Window
Making Menu Selections
You can choose options from the menu bar at the top of the Main window in any of three ways:
•
Use the mouse to display the menu and select the desired item.•
Hold down theAlt key as you press the key that corresponds to the letter that is underlined in the menu, then press the key that corresponds to the letter that is underlined in the menu item. For example, to choose Open Query from the File menu, typeAlt,F,Q.•
Type the shortcut key sequences that are shown beside many of the items in the menu. These key sequences are also called accelerator keys. Forexample, to choose Open Query from the File menu, typeCtrl+O.
Note –The Cut, Copy, Paste, and Clear accelerator keys work in any text entry field, including those in the Login dialog box and the query bar.
Table 2-2 on page 18 shows the options available from each Main window Title bar
Menu bar Tool bar
Table 2-2 User Tool Menu Items (1 of 8)
Menu Item Function
Key Sequence
File Login Opens a Login dialog box.
Open Query Displays the Select Schema Query window so that you can display a particular schema for query.
Ctrl+O
Open Submit
Displays the Select Schema Submit window so that you can display a particular schema for submit.
Ctrl+S
Close Closes the active window. Ctrl+F4
Export View Exports the current customized view to the server as a new Administrator View. (This menu item is available only to users with Administrator or Subadministrator capabilities.) Server
Information
Displays list of servers, licensing information, and whether you are connected to the servers.
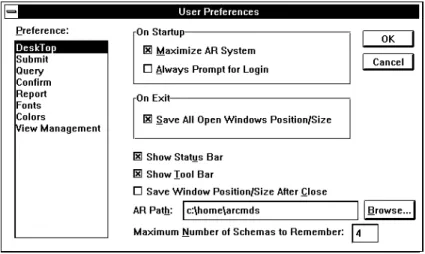
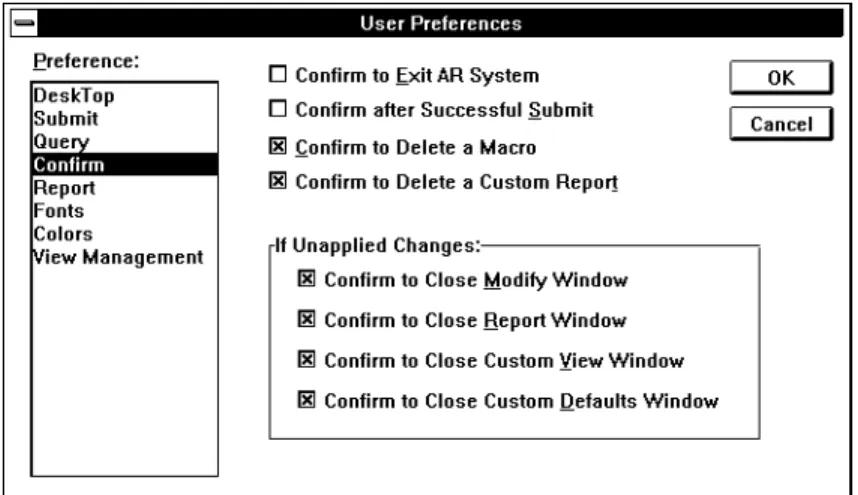
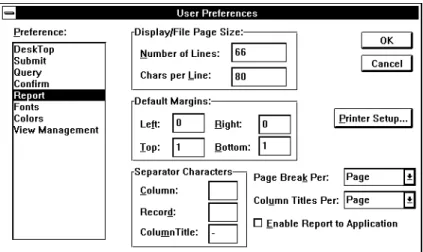
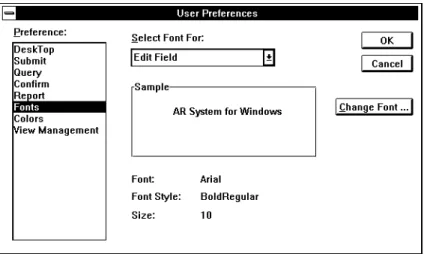
Preferences Sets options that control the
appearance and behavior of the User Tool for your user login. Preference categories are: Desktop, Submit, Query, Fonts, Colors, Confirm[ation], Report, and View Management.
Exit Exits the User Tool. Alt+F4
‘Active Schema List’
Lists your most recently used schemas for Query and Submit windows allowing you to quickly return to a schema by selecting its name displayed in the lower portion of the File menu. You can specify the maximum number of schemas that can be displayed in this list at any one time by using the Maximum Number of Schemas to Remember desktop preference on the
Edit Cut Deletes highlighted text and moves it to the clipboard.
Ctrl+X Copy Copies highlighted text to the
clipboard.
Ctrl+C Paste Pastes current clipboard contents at
the location of the cursor.
Ctrl+V
Clear Deletes highlighted text. Del
Copy All Copies all field contents from the active window to the clipboard. Clear All Clears the contents of all fields in the
active window.
Ctrl+E Set To Defaults Sets the value of the fields in the
active window to the default values.
Ctrl+U
Query List Opens a Query List window
containing a one-line summary of ARs meeting current query criteria.
Ctrl+L
Display Opens a Display window to show the ARs that meet current query criteria or were selected. ARs are displayed one at a time. Use Next and Previous to move from one AR to another.
Ctrl+D
Modify Individual
Opens a Modify window to make changes to each AR that meets the current query criteria or were selected. ARs are displayed for modification one at a time. Use Next and Previous to move from one AR to another.
Ctrl+M
Modify All Opens a Modify window that contains a blank copy of the current schema so that you can make bulk changes that affect every AR that meets the current query criteria or were selected.
Table 2-2 User Tool Menu Items (2 of 8)
Menu Item Function
Key Sequence
Query (continued)
Refresh Reissues the query that produced a Query List window to keep the query list up-to-date.
Ctrl+ Home Polling
Interval
Displays the Set Polling Interval dialog box which lets you
automatically reissue the query of the database that produced a Query List window. You specify in minutes how often you want the query to be reissued.
Report Displays the Report dialog box to generate a report for the entries that meet current query criteria or that are selected in an active Query List window. You can send the report to the screen, to a printer, to a file, or to an application that supports DDE (Dynamic Data Exchange).
Ctrl+R
Delete Deletes all ARs that meet current query criteria or were selected. This function is available only to users with Administrator or
Subadministrator permission.
Table 2-2 User Tool Menu Items (3 of 8)
Menu Item Function
Key Sequence
Actions Previous In the Modify or Display window, moves to the AR before the one currently in the window. If the first AR is showing, Previous moves to the last AR.
Ctrl+P
Next In the Modify or Display window, moves to the AR after the one currently in the window. If the last AR is showing, Next moves to the first AR.
Ctrl+N
Apply Applies the current change or performs the current operation. Use to submit a new AR, modify an existing AR, and save customized views or defaults.
Ctrl+A
Customize Defaults
Sets default values for a schema. These default values are stored in a file saved in yourHome directory. Customize
View
Customizes the appearance of a schema. This customized view is stored in a file saved in yourHome directory.
Display Attributes
Opens a Display Attributes dialog box showing the properties (such as location and length) of the current field or active link button when in a Customize View window.
View Restores the default administrator view or the previous user view for a schema when in a
Customize View window. Sort
Options
Specifies sorting for the results of all Query menu operations. Sorting can include up to five fields and you can specify whether each field is sorted in
Table 2-2 User Tool Menu Items (4 of 8)
Menu Item Function
Key Sequence
Actions (continued)
Show Query Displays the query operation that resulted in the current set of action requests.
Ctrl+B
Copy to Submit
Opens a Submit window that contains the same field values as the currently active Query, Display, or Modify Individual window.
Ctrl+T
Show Status History
Opens a dialog box that displays the status history for the action request in the active window.
Ctrl+H
Macros Start
Recording
Begins recording a macro for later execution. Actions you perform after selecting Start Recording and before selecting Stop Recording from the Macros menu are recorded as part of the macro.
Stop Recording
Stops recording a macro that you are recording for later use. The Stop Recording dialog box appears so that you can name and save the macro you have just recorded.
Edit Macros
Opens the Edit Macro dialog box. You can then select an existing macro to modify its name or help text or to delete the macro.
Run Macros
Selects and execute an existing macro. The Execute Macro dialog box appears.
Ctrl+I
Table 2-2 User Tool Menu Items (5 of 8)
Menu Item Function
Key Sequence
Layout Drag
Alignment to Grid
Aligns to an active grid when Alignment to Grid is on. Pull to the right to choose from the following options:
* Left. Aligns the left edge of the field, including the field label, to the grid line.
* Value Left. Aligns the left edge of the data entry portion of the field to the grid line.
* Right. Aligns the right edge of the field, including any associated field icons, to the grid line.
* Value Right. Aligns the right edge of the data entry portion of the field to the grid line.
Alignment To Grid
Enables the alignment to grid feature during a move operation. A check mark next to the menu selection means this feature is on.
Expand Expands or contracts the spacing of the fields on the schema. A dialog box appears so you can specify a percentage of the current spacing, horizontally, vertically, or both. Enter percentages greater than 100 to move the fields farther apart. Enter percentages less than 100 to pull the fields closer together.
Show Grid Makes the grid lines visible in the Customize View window. A check mark next to the menu selection means this feature is on.
Grid Size Specifies the distance between lines in an active grid.
Select All Selects all fields in the Customize
Table 2-2 User Tool Menu Items (6 of 8)
Menu Item Function
Key Sequence
Window Tile Vertically
Arranges open windows vertically so that each is visible.
Shift+F4 Tile
Horizontally
Arranges open windows horizontally so that each is visible.
Cascade Arranges open windows so that they overlap with the title bar of each window visible.
Shift+F5
Arrange Icons Arranges the icons in a group. Close All
Windows
Closes all open User Tool windows. ‘Open
Windows List’
Lists all open windows. The selected window becomes active.
Table 2-2 User Tool Menu Items (7 of 8)
Menu Item Function
Key Sequence
Using the Tool Bar
For many of the most commonly performed menu items, a corresponding icon is available from the optional tool bar located below the menu bar on the Main window. To select a function from the tool bar, simply click the mouse on the
Help Index Opens a window that contains a list of help topics for selection. Each help topic may have one or more levels of subtopics available.
F1
Procedures Displays help on the most commonly performed User Tool procedures. A list of available procedures appears so that you can select the procedure in which you are interested. Tool Bar Displays a summary of the
operations performed when you select each of the tool bar icons. Accelerator
Keys
Displays a list of operations that you can perform using shortcut key sequences.
Menu Items Displays a list of options available for each of the menus in the Main window menu bar.
Using Help Displays help on using the help system.
Field/Schema Help
Displays context-sensitive help on the schema, selected field or active link. This includes any help text supplied by your AR System administrator.
Shift+F1
About Displays information about the AR System
Windows User Tool.
Table 2-2 User Tool Menu Items (8 of 8)
Menu Item Function
Key Sequence
Table 2-3 Tool Bar Functions (1 of 2)
Icon Function
Apply. Applies the current change or performs the current operation. Use to submit a new AR, modify an existing AR, and save customized views or defaults. Previous. In the Modify or Display window, moves to the AR before the one currently in the window. If the first AR is showing, Previous moves to the last AR. Next. In the Modify or Display window, moves to the AR after the one currently in the window. If the last AR is showing, Next moves to the first AR.
List. Opens a Query List window containing a one-line summary of ARs meeting current query criteria. Display. Opens a Display window to show the ARs that meet current query criteria or were selected. ARs are displayed one at a time. Use the Next and Previous menu items (or the Next and Previous tool bar icons) to move from one AR to another.
Modify Individual. Opens a Modify window to make changes to each AR that meets current query criteria or were selected. ARs are displayed for modification one at a time. Use the Next and Previous items (or the Next and Previous tool bar icons) to move from one AR to another.
Report. Generates a report for the entries that are selected in the active window. You can send the report to the screen, to a printer, to a file, or to an application that supports DDE.
Open Submit.Opens a Select Schema - Submit dialog box allowing you to select the schema to display and then opens a Submit window.
Exiting the User Tool
You can exit the User Tool by any one of the following ways:
•
Select Exit from the File menu, as shown in Figure 2-3.•
TypeAlt+F X.•
TypeAlt+F4.•
Select Close from the Control menu box in the upper left hand corner of the Main window.•
Double-click on the Control menu box.Figure 2-3 Exiting the Tool
If you have selected the Confirm to Exit AR System confirm preference, a dialog box appears asking you if you really want to exit the AR System. Select the OK button to exit the User Tool. Select the Cancel Exit button to cancel the exit operation.
Open Query.Opens a Select Schema - Query dialog box allowing you to select the schema to display and then opens a Query window.
Run Macros. Executes a macro listed in the drop down list box.
Help.Changes the cursor to an arrow and a question mark so that you can display context-sensitive help on a field, active link or on the schema itself.
Table 2-3 Tool Bar Functions (2 of 2)
Note –If your User Tool is in the middle of a transaction with the server, you will not be able to exit the User Tool.
Working with Action Requests
An action request (AR) is a collection of information that describes a single event or incident, such as a problem or a service request. Each AR represents a single entry in an AR System database.
As a user of the Action Request System, you are involved in two primary activities:
•
Creating and submitting new action requests.•
Looking at or modifying existing action requests.You create ARs by opening a Submit window. See Chapter 3, “Submitting an Action Request, for detailed instructions on using the Submit window. You look at or modify ARs by opening a Query window for the schema that holds the information you want to view. See Chapter 4, “Reviewing and Modifying Action Requests, for detailed instructions on using the Query window.
Using Schemas
A schema is the definition of an AR System database. Each schema is designed to help you perform a different type of activity. The schemas that you can select from were implemented by your AR System administrator to help you manage the workflow of your daily operations.
For example, your AR System administrator may have implemented one schema to help keep track of calls coming in to the help desk. The
administrator may have also implemented a schema that contains a record of the equipment that each user has. You may use one or both of these schemas to perform your job tasks.
The administrator can implement as many (or as few) schemas as needed. The administrator can also control whether or not a specific user has full, limited, or no access to a schema and to the information it contains. If you do not have access to the schema at all, it does not appear in your list of available schemas.
Each schema contains a set of fields. The fields contain various pieces of information that are part of the schema. Each field contains a certain type of information and has its own set of rules about who can look at or modify the information in the field.
Note –Since it is possible for you to have access to a schema but not to any of its fields, you could display a schema that appears to not have any fields. For more information on fields see Chapter 3, “Submitting an Action Request. Figure 2-4 on page 29 shows the fields that you might see in a typical schema designed to track trouble reports. The schema shown is one of the schemas supplied as sample schemas with the AR System. Your AR System
administrator may have implemented this schema for use at your job site. (Each sample schema may be used as it exists or modified to fit local requirements.)
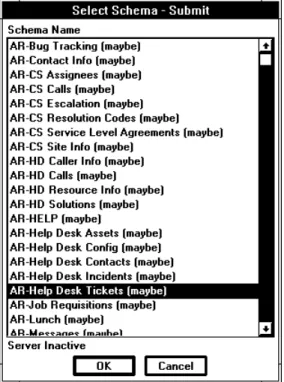
Selecting a Schema
Each time you open a new Query window, Submit window, Customize View window, or Customize Default window, you need to select the schema that you want to use in that window. You can display a different schema in each window you open. The number of windows that you can open at one time depends on the amount of memory that is available on your system.
The instructions that follow describe how to select a schema and then open a Submit window.
To select a schema:
1. Select Open Submit from the File menu. (You could also typeCtrl+S or select the Open Submit tool bar icon.)
The Select Schema - Submit dialog box is shown in Figure 2-5.
2. In the Select Schema dialog box, select the schema that you want from the Schema Name list, then select the OK button, Return/Enter key, or double-click on the schema name. By default, the last schema used is selected when the Select Schema - Submit dialog box appears. If you choose a schema that is already being displayed on your screen, then a new copy of that schema will be displayed in a separate window.
Like other Windows applications, you can use the up and down arrow keys and the Page Up and Page Down keys to display different portions of the Schema Name list.
Each schema is uniquely identified by a name and the server where it resides. (The same schema name may appear on more than one server.) If the schema is unavailable, the user will not see its name.
The Submit window appears containing the selected schema. Any actions you perform with this window active affect the schema you have selected. To select a schema for a Query window, you follow the same steps except that you select Open Query from the File menu (or typeCtrl+Q or select the Open Query tool bar icon).
To select a schema for a Customize View or Customize Defaults window, select Customize View or Customize Defaults respectively from the Actions menu.
Note –If a schema is larger than the window, you can use the scroll bars to view the portions of the form that are not displayed or you can resize the window.
Login Information
Your login information consists of a login name, configuration directory (AR Home Directory), and a server list. The configuration directory is a directory that the AR System uses to hold your personalized configuration information for both the User and Notification Tools. If you do not specify alternate configuration directories and more than one person logs into your User and Notification Tools, your customizations (preferences) may be overwritten and notifications stored in the notification log may be both yours and theirs. If
PC, you may want to specify an alternate configuration directory for each user. This allows each user to have their own customizations (preferences,
customized defaults, and customized views) and notification log.
Note –You should only add a user that the AR System administrator has already added as a registered user of the AR System. Otherwise, if they are not a registered user, and unregistered users are allowed on the servers in the server list, the User Tool starts with a “guest” set of capabilities. A guest user can retrieve any public information in the system. In addition, a guest user may be allowed to submit ARs, record a macro, generate a report, specify user defaults, and possibly review ARs.
If they are not a registered user, and unregistered users are not allowed on the servers in the server list, they will not be able to log in at all.
We provide default login information for any user who logs into the User Tool who does not specify any alternate login information. When first installing the AR System, the default login’s configuration directory is namedHome. Throughout this manual, we refer to your configuration directory as either <ar_config_dir> orHome.
Note –If you change your configuration directory for the User Tool, you are also changing it for the Notification Tool.
The server list is the list of servers that you can connect to with your User and Notification Tools. The server name must be a name that is known on the network. You supply the default server list when first installing the Action Request System.
Note –Any user can change any other user’s login information.
Specifying Alternate Login Information
You can specify alternate login information for any user name from within the User Tool. When you do this, you add the user name to the User Name drop down list box on the Login dialog boxes for both the User and Notification Tools. This makes it easier to log into the User and Notification Tools.
Use the following instructions to specify alternate login information after logging into the User Tool.
To specify alternate login information:
1. Select Login from the File menu.
The Login dialog box (shown in Figure 2-1) appears.
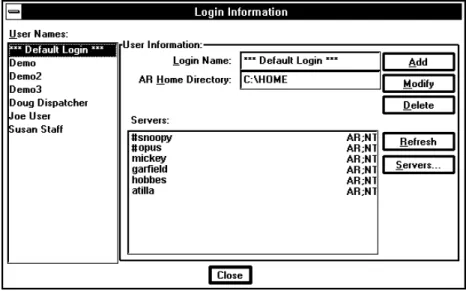
2. Select the Login Information button.
The Login Information dialog box appears, as shown in Figure 2-6.
Figure 2-6 The Login Information Dialog Box
3. To use the default configuration directory and server list, select
***Default Login*** in the User Names list.
*** Default Login *** appears in the Login Name field and the default configuration directory and server list appear in the AR Home Directory and Servers fields.
4. To copy someone else’s configuration directory and server list, select that person’s user name in the User Names list.
5. To change the configuration directory, in the AR Home Directory field enter a new directory path.
6. To make changes in the server list, select the Servers button.
The Servers dialog box appears, as shown in Figure 2-7.
Figure 2-7 Servers Dialog Box
7. To add a server to the server list, enter a server name in the Name field and select the User and Notification check boxes as appropriate and select the Add button.
8. To modify a server in the server list, select the server name in the Servers list and make any changes in the Name field, or in the User and
Notification check boxes and select the Modify button.
9. To delete a server from the server list, select the server name in the Server list and select the Delete button.
10. To comment out a server from the server list without deleting it, place a number sign (#) in front of the server name and select the Modify button. 11. Select the OK button to close the Servers dialog box and return to the
Login Information dialog box.
12. To go back to the last saved server list for the given AR Home directory, select the Refresh button.
All changes that you have made to the server list are lost.