Contents
Trademarks vii
License ix
Preface xiii
1 Introduction 1
1.1 How to read this document . . . 1
1.1.1 Coming up next . . . 2
1.2 Other documentation . . . 3
1.2.1 Manual pages . . . 4
1.2.2 Papers . . . 5
1.3 Introduction to Plan 9 . . . 6
1.4 Source code . . . 7
1.4.1 Notes on C . . . 7
1.4.2 mk . . . 16
1.5 PC hardware facilities . . . 17
1.5.1 Registers . . . 17
1.5.2 Instructions and addressing modes . . . 18
1.5.3 Memory . . . 19
1.5.4 Interrupts and exceptions . . . 20
2 System source 23 2.1 Quick tour to the source . . . 23
2.1.1 Interesting include files . . . 23
2.1.2 Interesting source files . . . 23
2.2 System structures . . . 26
3 Starting up 27 3.1 Introduction . . . 28
3.2 Running the loader . . . 29
3.2.1 Preparing for loading . . . 29
3.2.2 Loading the kernel . . . 34
3.3 Booting the kernel . . . 37
3.4 Processors and system configuration . . . 41
3.5 I/O ports . . . 44
ii CONTENTS
3.5.1 Port allocation . . . 44
3.5.2 Back to I/O initialization . . . 46
3.6 Memory allocation . . . 46
3.7 Architecture initialization . . . 55
3.7.1 Traps and interrupts . . . 56
3.7.2 Virtual Memory . . . 59
3.7.3 Traps and interrupts (continued) . . . 61
3.8 Setting up I/O . . . 64
3.9 Preparing to have processes . . . 66
3.10 Devices . . . 66
3.11 Files and Channels . . . 68
3.11.1 Using local files . . . 70
3.11.2 Starting to serve files . . . 72
3.11.3 Setting up the environment . . . 74
3.12 Memory pages . . . 75
3.13 The first process . . . 77
3.13.1 Hand-crafting the first process: The data structures . . . 78
3.13.2 Hand-crafting the first process: The state . . . 85
3.13.3 Starting the process . . . 91
4 Processes 99 4.1 Trap handling continued . . . 100
4.2 System calls . . . 104
4.3 Error handling . . . 106
4.3.1 Exceptions in C . . . 106
4.3.2 Error messages . . . 109
4.4 Clock, alarms, and time handling . . . 110
4.4.1 Clock handling . . . 110
4.4.2 Time handling . . . 112
4.4.3 Alarm handling . . . 114
4.5 Scheduling . . . 117
4.5.1 Context switching . . . 118
4.5.2 Context switching . . . 118
4.5.3 FPU context switch . . . 122
4.5.4 The scheduler . . . 123
4.6 Locking . . . 127
4.6.1 Disabling interrupts . . . 127
4.6.2 Test and set locks . . . 129
4.6.3 Queuing locks . . . 133
4.6.4 Read/write locks . . . 135
4.7 Synchronization . . . 138
4.7.1 Rendezvous . . . 139
4.7.2 Sleep and wakeup . . . 140
4.8 Notes . . . 142
4.8.1 Posting notes . . . 142
4.8.2 Notifying notes . . . 144
CONTENTS iii
4.9 Rfork . . . 149
4.10 Exec . . . 157
4.10.1 Locating the program . . . 157
4.10.2 Executing the program . . . 160
4.11 Dead processes . . . 164
4.11.1 Exiting and aborting . . . 164
4.11.2 Waiting for children . . . 168
4.12 The proc device . . . 170
4.12.1 Overview . . . 170
4.12.2 Reading under/proc . . . 173
4.12.3 Writing under/proc . . . 175
4.12.4 A system call? A file operation? Or what? . . . 179
5 Files 181 5.1 Files for users . . . 182
5.2 Name spaces . . . 185
5.2.1 Path resolution . . . 187
5.2.2 Adjusting the name space . . . 194
5.3 File I/O . . . 210
5.3.1 Read . . . 210
5.3.2 Write . . . 212
5.3.3 Seeking . . . 214
5.3.4 Metadata I/O . . . 216
5.4 Other system calls . . . 217
5.4.1 Current directory . . . 217
5.4.2 Pipes . . . 217
5.5 Device operations . . . 219
5.5.1 The pipe device . . . 220
5.5.2 Remote files . . . 230
5.6 Caching . . . 243
5.6.1 Caching a new file . . . 245
5.6.2 Using the cached file . . . 248
5.7 I/O . . . 253
5.7.1 Creating a queue . . . 253
5.7.2 Read . . . 254
5.7.3 Other read procedures . . . 256
5.7.4 Write . . . 257
5.7.5 Other write procedures . . . 259
5.7.6 Terminating queues . . . 260
5.7.7 Other queue procedures . . . 261
5.7.8 Block handling . . . 261
5.7.9 Block allocation . . . 262
5.8 Protection . . . 263
5.8.1 Your local kernel . . . 263
iv CONTENTS
6 Memory Management 265
6.1 Processes and segments . . . 266
6.1.1 New segments . . . 267
6.1.2 New text segments . . . 269
6.2 Page faults or giving pages to segments . . . 272
6.2.1 Anonymous memory pages . . . 272
6.2.2 Text and data memory pages . . . 278
6.2.3 Physical segments . . . 280
6.2.4 Hand made pages . . . 280
6.3 Page allocation and paging . . . 281
6.3.1 Allocation and caching . . . 281
6.3.2 Paging out . . . 285
6.3.3 Configuring a swap file . . . 290
6.3.4 Paging in . . . 290
6.3.5 Weird paging code? . . . 291
6.4 Duplicating segments . . . 292
6.5 Terminating segments . . . 296
6.6 Segment system calls . . . 299
6.6.1 Attaching segments . . . 299
6.6.2 Detaching segments . . . 301
6.6.3 Resizing segments . . . 302
6.6.4 Flushing segments . . . 303
6.6.5 Segment profiling . . . 303
6.7 Intel MMU handling . . . 304
6.7.1 Flushing entries . . . 304
6.7.2 Adding entries . . . 305
6.7.3 Adding and looking up entries . . . 306
Trademarks
Plan 9 is a trademark of Lucent Technologies Inc.
The contents herein describe software initially developed by Lucent Technologies Inc. and others, and is subject to the terms of the Lucent Technologies Inc. Plan 9 Open Source License Agreement. A copy of the Plan 9 open Source License Agreement is available at: http://plan9.bell-labs.com/plan9dist/download.html or by contacting Lucent Technologies at http: //www.lucent.com. All software distributed under such Agreement is distributed on an ”AS IS” basis, WITHOUT WARRANTY OF ANY KIND, either express or implied. See the Lucent Technologies Inc. Plan 9 Open Source License Agreement for the specific language governing all rights, obligations and limitations under such Agreement. Portions of the software developed by Lucent Technologies Inc. and others are Copyright (c) 2000. All rights reserved.
License
Copyright c2001 by Francisco J. Ballesteros. This material may be distributed only subject to the terms and conditions set forth in the Open Publication License, v1.0 or later (the latest version is presently available athttp://www.opencontent.org/openpub/).
xi
Preface
The very first time I understood how an operating system works was while reading the source code of Minix. Years after, I had the pleasure of reading John Lions “Commentary on UNIX” along with the source code of UNIX v6.
Although time has passed, I still feel that the best way to learn how an operating system works is by reading its code. However, contemporary UNIX (read Linux, Solaris, etc.) source code is a mess: hard to follow, complex, full of special cases, plenty of compiler tricks and plenty of bugs. When Plan 9 source code was released to the public on its 3rd edition, I knew it was just the material I needed for my Operating Systems Design course. This commentary is an attempt to provide a guide to the source code of Plan 9 3rd edition.
The concepts included are those covered on the “Operating Systems Design” course of 4th year at Universidad Rey Juan Carlos de Madrid [2].
Any reader, specially when following the course, is encouraged to read the source along with the commentary as well as to modify and enhance the system.
Chapter 1
Introduction
An OS does mainly two things: it multiplexes the hardware and provides abstractions built on it. Plan 9 does it for a network of machines. The nice thing of Plan 9 is that it is centered around a single abstraction: the file. Almost everything in the system is presented as files. Therefore, most of the complexity lies on the “multiplexes the hardware” part, and not on the “provides abstractions” part. By not optimizing the system where it is not necessary, even the “multiplexes the hardware” part is kept simple (You should compare the source code with that of Linux if you don’t believe this).
Before proceeding with the source code, I give you a piece of advice regarding how to read this document, which shouldn’t be read as a regular book.
1.1
How to read this document
This commentary is that, a commentary to the Plan 9 kernel source. I have used the source for the June release of the third edition. It should be read like any commentary of a program, by keeping both the commentary and the source side by side. In fact, you should try to read the system code without reading the commentary. If while you are reading the code and the commentary, you feel curiosity about what else is done at a particular file, you should go read it all: remember that nobody can teach you what you don’t want to learn.
The final goal is to understand the system, how it is built, what services it provides and how are them provided. As with any program, it is better to focus on the tasks the system has to carry out. Most of the commentary will be centered on them. Before understanding the code of the system, it is wise to take a view to the system as a user. You are strongly advised to read the manual pages relevant for each chapter, as well as to use the system either at the Plan 9 laboratory, at home, or at both. Ask for help if feel you can’t install Plan 9 at home. Once you know the set of services provided, you also know that has to be implemented, and you will understand the code better.
While you read the commentary, you will see that I refer to the authors of the source code as “the author”. Each time I mention the author, I am referring to the author(s) of the particular piece of code discussed. Plan 9 is the joint result of many
2 CHAPTER 1. INTRODUCTION
people. The main authors of the code are Rob Pike, Dave Presotto, Sean Dorward, Bob Flandrena, Ken Thompson, Howard Trickey, and Phil Winterbottom. As far as I know, Rob Pike and Dave Presotto were the system architects; and Ken Thompson was the architect for the file server.
Also, whenever I say “he” or “his”, you should understand that I am saying “he or she” and “his or her”. I do not like typing so much and for me it is hard to find impersonal sentences where “he” and “his” can be avoided. So excuse me, no offense intended.
1.1.1
Coming up next
In the next section, I give you some pointers you should follow. They are mostly research papers about Plan 9. You should read them (well, at least you are expected to read the first one) to learn more about the system before looking at its internals. It is good to learn to follow the documentation pointers “on demand”, as you feel you need to know more about a particular topic to understand the code.
What remains of this chapter is whatever I think is the bare minimum to under-stand the source code. Next section gives a quick introduction to reading code written in C, the language used for the Plan 9 kernel. You can skip this whole section but take a loot at it when you find something that is not “ANSI C” in the code. The following one is a quick introduction to PC hardware facilities.
Remaining chapters describe different topics of the system and can be read ran-domly, although it would be good to read chapter 2, about system source code or-ganization, and chapter 3, on system startup, before proceeding with the following ones. Besides describing how the system boots, chapter 3 describes several important concepts to understand the design of Plan 9.
To save trees, the source code is not printed on paper. All chapters refer to code using pointers like/dir/file.c:30,35. They focus on a given line (or lines). These pointers can be used as “addresses” on the Plan 9 editors you will be using during the course. It is very convenient to print this commentary, open theacmeeditor1
full-screen, and then follow the commentary giving the pointers to acme as they appear. It is even better to use a text version of the manuscript and open it on acme. Then you can jump to the source by clicking button 3 on the pointer. What? you don’t know how to use acme? Don’t worry, forget this and the next couple of paragraphs and reread them when you get started with acme. To get started you can read the paper on acme from volume 2 of the Plan 9 manual [7].
If you open the text version on acme, I suggest you execute these commands by using button 2 on them:
Local bind -a . /sys/src/9/port Local bind -a . /sys/src/9/pc
If you used button 2 to execute them, your namespace in acme will have been arranged so that the files in this directory appear to be also in the directories with the Plan 9 source code. This way, by using button 3 on file pointers acme will jump to the given location in a different window. So, now that your namespace is ready,
1
1.2. OTHER DOCUMENTATION 3
close this file, go to/sys/src/9/pcand open this file there. This document will be jumping to code in other directories (e.g. port); in that case, I suggest you simply edit the tag of the Acme window for this file to update its directory (e.g. so that the tag is /sys/src/9/pc/9.txt while reading files in the pc directory, and it is
/sys/src/9/port/9.txtwhile reading files in the portdirectory). Do notPutthis file.
More on acme advice, to get line numbers on a file, select it all by typing :,and using button 3; then type| awk ’{printf("%-5d\t%s\n",NR,$0)}’(or|cat -nif you are on UNIX), select it and use button 2. Don’tPutthe file. To locate identifiers through the source you can create a script to grep the parameter in*.[ch]. For your convenience, a copy of the kernel source with line numbers is installed both at the Linux laboratory and at the Plan 9 laboratory.
Whenever we refer to a file, a relative path has as the working directory the directory where we are looking source files on Plan 9. Absolute path names start always at the Plan 9 root. If you are browsing on Linux, and Plan 9 is installed at
/plan9, that means /plan9/absolute path name instead. Remember that if you use Linux you still havewily, an acme look-alike. You have also Inferno, where you haveacme(See the web page for the “Advanced Operating Systems” course [1]).
I suggest you install Plan 9 on your PC and then use it to read the source code as I said before. By using the system you will “feel” how it works better, and you will use something that is neither UNIX nor Windows. There are excellent pieces of advice regarding how to install Plan 9 in volume 2 of the manual [10].
If you feel emotionally attached to Linux, you can at least install wily, an acme-look-alike for UNIX; but you will be missing something great.
When discussing a particular data structure or function, it is good to see where is it used through the system. To find that, you can use thegrepprogram. By using it within acme, you can simply click with your (three button) mouse jump through the occurrences found bygrep -n.
When a particular section of a classical OS textbook would further discuss a topic being addressed, a pointer of the form[n]/sectionwill appear, where the “[n]” part is a reference to the bibliography. You do not need to follow this kind pointer immediately, although that might help you if you feel lost.
Several times I will be discussing code implementing a system call or used by a popular command. References such likeman(1)instruct you to read the manual page on “man” on section “1” of the manual as a definitive reference on the program or system call discussed. You should at least browse the manual pages as they are cited; and you can skip parts that you don’t understand there.
One of the abilities you are expected to learn is that of browsing through a rea-sonably sized piece of code or documentation. While doing that, remember that it is important to ignore at first things we don’t understand and try focus on what you can understand. Of course, unless you know the not-understood part is not relevant for you, you should try to understand that part too, and ask for help if you can’t.
1.2
Other documentation
4 CHAPTER 1. INTRODUCTION
pages are packaged into sections. There are several sections, including a section on commands and another on system calls and library functions. Manual pages are similar to that of the “man” command on UNIX, although the set of sections vary.
The second Plan 9 programmer’s manual volume, “the documents” is a set of papers relevant for Plan 9. They discuss one aspect or another of the system. I expect you to read at the very least several ones, and I highly recommend you read all of them. You will find that papers on volume two are not like typical research papers these days, on the contrary, they are simple, show a new idea or a new way of doing something, and can be understood by themselves; moreover, they are implemented. Reading Plan 9 papers is a fine way of get a kind introduction to the system.
1.2.1
Manual pages
The manual [9] is divided in sections. When you refer to a manual page likeman(1), you are referring to the manual page for “man” on section 1 of the manual. Manual pages can be found at several places:
• Using themancommand on Plan 9, like inman 1 man.
• Writing the name of the page (e.g. “man(1)”) on the acme editor, and clicking on it with mouse button-2.
• running nroff on Linux for the manual page found at/sys/man/manX/xxxx. For example, if your Plan 9 tree is at /plan9, you can:
nroff -man /plan9/sys/man/1/man
On the Linux laboratory, you have also the 9mancommand that refers to the manual of Plan 9 installed on the Linux file system; and ignores Linux manual pages.
• Using your favorite web browser and looking athttp://plan9.bell-labs.com/sys/man
If, as I recommended, you are using acme to read the source, method 2 is the most convenient one.
Now go, read intro(1), and drink some coffee. Give yourself enough time to assimilate what you read there.
Done? Ok, if you are really done, you should now know that
• Section 1 of the manual is for general user commands. You type them on a shell, or click on their names with button 2 in acme.
• Section 2 is for library functions and system calls. This is the programatic interface to the system. You are studying how the system calls described here are implemented.
1.2. OTHER DOCUMENTATION 5
• Section 4 has manual pages on file systems that you can mount. They are supplied usually by user programs that implement some service. For instance, access to FAT file systems is provided through a program that services a FAT file system—using the FAT partition as the storage medium.
• Section 5 shows how you talk to files on Plan 9. Plan 9 is a distributed system that permits remote access to files. This section shows the 9P protocol used for that purpose. It is at the very heart of the system. During the chapter on file systems, you should be reading this section.
• Section 6 discusses several file formats. For example, the format of manual pages is shown atman(6).
• Section 7 addresses databases and programs that access them.
• Section 8 is about system administration. Commands needed to install and maintain the system are found here. Some of them will appear while reading the code, and you should read their manual pages.
Too many things to read? I recommend you read manual pages on demand, as they are mentioned on the commentary, or as you use the tools described on them. The very first time you use a new Plan 9 program or tool, it is good to take a look to its manual page. In that way, as you use the system, you will be learning what it has to offer.
1.2.2
Papers
Documents from the manual [10] can be found at several places too. You can usepage
on Plan 9 (orgvon Linux) with postscript files in the Plan 9 directory/sys/doc. You can also use your favorite web browser and look athttp://plan9.bell-labs.com/sys/doc. These are the papers:
Plan 9 From Bell Labs is an introductory paper. It gives you an overview of the system. Reading it you will find that Plan 9 is not UNIX and also that networks are central to the design of Plan 9.
You are expected to read this one soon.
The Use of Name Spaces in Plan 9 gives you more insight into one key feature of Plan 9: every process has its own name space. You can think that every process has a “UNIX mount table” for itself; although that is not the whole truth.
You are expected to read this one.
Getting Started with Plan 9 is an introductory document with information you need to know to start running Plan 9.
6 CHAPTER 1. INTRODUCTION
How to Use the Plan 9 C Compiler will be helpful for you to do your assign-ments. Once you know how to use C, this paper tells you how to do it on Plan 9. More on this on the next section.
Maintaining Files on Plan 9 with Mk describes a tool similar tomake. It is used to build programs (and documents) on Plan 9. This paper will be also of help for doing your assignments; as you are expected to use both C and mk. More on this on the next section.
The conventions for using mk in Plan 9 is also good to read. It shows how mk is used to build the system. This paper can save you some time.
Acid: A Debugger Built From A Language is an introduction to the debugger. You will find that it is not similar to the kind of debuggers you have been using, and it is highly instructive to debug using Acid.
Acid Manual is the reference manual for the debugger.
Rc The Plan 9 Shell shows you the shell you will be using. If you have used a UNIX shell that is probably all you need. You can learn more of rcas you use it. Remember that rcis installed also on Linux.
The Text Editor sam describes the editor used on Plan 9. It is a fine editor al-though you can go with acme instead. Indeed, I heavily suggest you start by using Acme. Of course, it is healthy to try sam too. Thesameditor is installed on Linux too.
Acme: A User Interface for Programmers describes the Acme editor. Well, as the title says, it is more like an environment. You have a clone for Linux called
wily. I used Emacs for years until I found acme, and the same may happen to you. You should read this document and play with acme or wily, to navigate the source code. By the way, it is named “acme” because it does everything.
Installing the Plan 9 Distribution is something to print and keep side by side with the keyboard if you intend to run Plan 9. The title says it all.
Lexical File Names in Plan 9 or Getting Dot-Dot Right describes how file name resolution works despite the existence of the bind(2) system call. Read this before you read the chapter on Plan 9 files.
There are several other papers, good to read too, that I have omitted here for the sake of brevity.
I recommend you fork now another process in your brain and read all of them in background. Whenever I feel its better for you to read first any of them, I will let you know.
1.3
Introduction to Plan 9
This section intentionally left blank2
2
1.4. SOURCE CODE 7
1.4
Source code
Plan 9 is written in assembly (only a few parts) and C. You must read C code to understand how the system works. Moreover, you are expected to write your own C code to modify the kernel in your assignments.
This section will introduce you to C to let you read it. Nevertheless, you should read the following two books if you have not done so:
The C programming Language, 2nd ed. is a good, kind, introduction to the language [5]. It is easy to read and it pays to do so. The compiler used on the book is the UNIX C compiler. You can find how to use the Plan 9 C compiler on the paper “How to use the Plan 9 C compiler” [8]—these guys use descriptive titles, don’t do them?
The practice of programming is a “must read” [4]. It will teach you those things you should have been taught during the programming courses.
Now that you have pointers, I will first comment a bit of Plan 9 C, then a bit of how to usemkto avoid the need to manually call the C compiler.
1.4.1
Notes on C
I include this section on C mostly to document a few differences with respect to ANSI C, and for the sake of completeness. But I really recommend you to read The C programming Language [5] if you don’t know C yet.
Where is the kernel C code?
The system source code is structured as a set of directories contained on/sys/src/9. Although there are valuable include files at/386/include(and similar directories for other architectures) and/sys/include. You will be using mostly these directories:
/sys/src/9/pc contains machine dependent code for PC computers. This code as-sumes that you are running on a PC.
/sys/src/9/port contains portable code. This code is shared among different ar-chitectures.
/sys/src/9/boot contains code used to bring up the system.
8 CHAPTER 1. INTRODUCTION
C and its preprocessor
If you take a look to any of those directories, you will find files named “xxx.c”, “xxx.h”, and “sss.s”. Files terminated on “.s” are assembly language files. They contain low-level glue code and are used where either C is not low-level enough to let the programmer do the job, or where it is more natural to use assembler than it is to use C. Files named “xxx.c” and “xxx.h” are the subject of this section: they contain C source code.
The C language has a compiler proper, and a preprocessor. Files are first fed to the preprocessor, which does some work, and the result is finally sent to the compiler. The compiler generates assembly code that will be translated to binary and linked into an executable file. On Plan 9, the compiler is usually in charge of preprocessing the source too, so a single program is run on the source; nevertheless, you better think that source is first fed into the preprocessor and the result goes automatically to the compiler proper.
C source files can be thought as “implementation modules” or package bodies. H source files can be thought as “definition modules” or package specs. When someone writes a C module to be used on a program, the module has a header file (a “.h” file) with declarations needed to interface to the module and a C file (a “.C” file) with the implementation.
Consider these three files:
/* this is main.c */ /* this is msg.h */ /* this is msg.c */ #include "msg.h" typedef char *Msg; #include "msg.h" main() void set(Msg *m,char*s);
{ char *get(Msg m); void set(Msg*m,char*s){
Msg m; *m=strdup(s);
set(&m,"Hi world!"); }
char*get(Msg m){
print(get(m)); return m;
} }
The point to get here, is thatmsg.hhas the interface tomsg.c. It contains a type definition forMsgand the header of a couple of functions. The main program (always calledmainin C) can include these definitions and then use them. Files “main.c” and “msg.c” can be compiled separately into object files and then linked together.
When compilingmain.c, the preprocessor will notice the#includedirective and replace it by the set of lines found in the named file (msg.hin the example). It is textual substitution. The preprocessor knows nothing about C. The resulting (pre-processed) file would be sent to the C compiler proper. In the example, some includes must be missing since there is no prototype for the printfunction (and the same happens withstrdup).
Another useful preprocessor directive is #define, which lets you define symbols. Note that again, this is textual substitution—the preprocessor knows nothing about C.
1.4. SOURCE CODE 9
void hi() {
if (lang == SPANISH) print("hola"); else print("hello"); }
After the #definelines, the preprocessor will replace any “SPANISH” text with “0” and “ENGLISH” with “1”. The compiler will see none of these symbols.
Functions
C has no procedures: every subroutine is a function. The result of a function may be ignored though. Look at this function:
int add(int c, int l) {
return c+l; }
It receives two integer parameters named “c” and “l”—parameters are always passed by value on C. It returns an integer value (the first “int” before the function name). The “return” statement builds the return value for the function and transfers control back to the caller routine.
A function can return “void” (which means “nothing”) is provided to let a function return nothing. There is another use of void, a pointer tovoidis actually a pointer to anything.
When a parameter passed to a function is not used, you can declare it without a name, as in
int add3(int c, int) {
return c+3; }
This is not allowed by ANSI C. In this example, of course, it is silly to declare a parameter and not to use it. However, when a function should present a generic interface, and a concrete implementation of the function does not need a particular parameter, it is wise to leave the interface untouched and not to use the parameter.
For instance, imagine that to open a file you should use a function with this prototype:
int open(char *name, int just_for_read);
Now imagine a particular file on a CDROM is opened. In the implementation, it is not necessary to specify the open mode because it has to be “read-only”. Now look at this function:
int open_cdrom_file(char *name, int) { ...
10 CHAPTER 1. INTRODUCTION
It implements the above interface, and has an unused parameter.
To use a function it suffices to know its header. We can know it because we
#included a file where the header is kept, or because we are calling the function after its implementation.
Of course, functions can be (mutually) recursive.
Data types
There are several primitive data types: charfor characters, intfor integers, long
for long integers,long longfor longer integers,doublefor real numbers. These are signed, and you have types defined with a leading “u” for the unsigned versions (e.g.:
ulong, which is actuallyunsigned long).
Arithmetic operators are as usual, with the addition of++and--which increment and decrement the operand. They may be used either prefix or postfix. When prefix, the argument is incremented (or decremented) prior to its use in the expression; when postfix, the argument is modified after used for the expression. For instance,i++=j++
means:
i=j; i++; j++;
whereas++i=++jmeans
i++; j++; i=j;
The modulus operator is “%”. Assignment is done with=. Assignment is sometimes “folded” with another operator. For instance, i%=3 means i=i%3, x|=0x4 means
x=x|4, which does a bitwise OR with for. ‘&’ is the bitwise AND operator. The operator “~x” negates each bit inx, sox=~xinverts every bit inx.
Booleans and conditions
There is no boolean in C, any non-zero integer value (or convertible to integer) is understood as “TRUE”. Zero, means false.
Relational operators are ==, !=, <=, >=, <, >, where != means “not equal”. You can use!to negate a boolean expression. More complex boolean expressions can be built using&&(and),||(or) and!(not). Once the compiler knows that a boolean expression will be true (or false) it will not evaluate the rest of the expression. Some would say that C has shortcut evaluation of boolean expressions. For those of you how know Ada, in C you are always using “and then” and “or then”. For instance: on
1 || f(), function fwould never be called. The same would happen to 0 && f(). This is very useful because you can check at a pointer is not nil and dereference it within the same condition.
1.4. SOURCE CODE 11
symbol, hence the name (some languages use symbols for words, or lexems). Remem-ber that char has only 256 values which are not enough to accommodate symbols on all languages. The character encoding system is called Unicode, encoded using UTF-8. UTF-8 is compatible with the first 128 ASCII characters, but beware that it will use several bytes when needed. And beware too that it is not compatible with ISO.8859.1 that you use on Linux.
Given primitive types, you can build more complex types as follows.
pointers A pointer to a given type is declared using *; e.g. char *pis a pointer to character. You refer to the pointed-to value by using also *, like in*p—which is the character pointed byp.
The operator &gives the address of a variable; hence, given int i, the decla-ration int *p=&i would declare a pointer p and initialize it to point toi. A function name can be used as a pointer to the function, like in
int (*f)(int a, int b) = add3; /* the previous add3 function */ ...
g=(*f)(1,2);
arrays An array in C is simply a pointer with some storage associated, do not forget this. For instance, char s[3] declares an array named s of three charslots. The slots are s[0], s[1], ands[2]. Array indexes go from zero to the array length minus one.
Arrays can be initialized as in
int arry[3] = { 10, 20, 30 };
int tokens[256] = { [’$’] DOLLAR, [’/’] SLASH };
The last example is an array of 256 integers. We plan to index it using a char-acter (which is a small integer in C). And we only initialize slots corresponding to characters’$’and’/’. This initialization style is an addition to ANSI C in Plan 9, and it is very useful: instead of using conditionals to check for dollars and slashes and generate a number, we can spend a few extra bytes and allocate one array holding an entry for every character; for those of interest, we place there the values desired; for others, we don’t care.
Because arrays are actually pointers with some storage, C has pointer arith-metic. Assume this
int a[3]; int *p=a;
12 CHAPTER 1. INTRODUCTION
Also, ifppoints toa[1]andqpoints toa[0], thenp-qwould be1: the number of elements between the two pointers.
As you can imagine, these to expressions are equivalent: a[i]and*(a+i).
Beware,p=awill copy pointers, not array contents. Usememmoveto do that.
structures An struct is the equivalent of a record in Pascal. It is declared by giving a set of field declarations. E.g.:
typedef struct Point Point; struct Point {
int x; int y; };
Point p = (Point){3,2};
Point q = (Point){ .x 3, .y 2 };
declares a new struct tag,Point; declares a pointpof typePoint; initializes it with a copy of the Point {3,2}. “Literals” of structures are called “structure displays” in Plan 9’s C. They are an extension to ANSI C.
In the example above, struct Point {...} declares the structure with an structure tag Point, so that you can saystruct Point p. But it is custom-ary to give a synonymous for the new type “struct Point” by usingtypedef.
Typedef defines a new name (the Point on the right in the example) for an existing type (struct Pointin the example).
Once phas been declared,p.xandp.yare names for the members (i.e. fields) of thepstructure.
Structures can be nested like in:
struct Line { Point origin; Point end; };
And we would sayl.origin.x, provided thatlis aLine.
If a struct, member of another struct, has no name its members are “promoted” to the outer struct. That is to save some typing. For example:
typedef struct Circle Circle; struct Circle {
Point; /* has no name! */ int radius;
};
1.4. SOURCE CODE 13
And we could say things likec.x,c.y, andc.radius. Bothxandycome from
Point! You can even say c.Point, although it would be tasteless on this case. Member promotion and unnamed fields are an extension to ANSI C.
When you have a pointer to an structure, you can refer to members of the structure in several ways:
/* The way that you should know by now: */ Point *p;
(*p).x =3;
/* A more convenient way */ p->x = 3;
Everybody uses the ->form, and nobody uses the(*x).yform.
Unions A union is a struct whereonly one of its fields will be used at a time. It is used to build variant records, although it is a bit more flexible. For instance:
typedef struct Vehicle Vehicle; struct Vehicle {
#define CAR 0 #define SHIP 1
int kind; union {
int number_of_wheels; char can_go_underwater; };
};
Note how we used an anonymous union (one with no name) within Vehicle. We can use either one field or another of the union: they will be sharing storage. We cannot use both at the same time.
More examples:
/* array of 4 points; to use like in: arry[3].x, arry[2].y, etc. */ Point arry[4];
/* A polygon that contains the number of points, and an array with them. */ struct Polygon {
int npoints;
Point points[MAXPOINTS]; };
Control structures
14 CHAPTER 1. INTRODUCTION
while To repeat while the condition holds:
while(*p){ *q++ = *p++; }
A variant tests the condition at the end and iterates at least once:
do {
x[i]++; x[j]--; } while(i != j);
for is a generic iteration tool.
for (i=0; i<n; i++){ x[i]=i; }
means
i=0;
while(i<n) { x[i]=i; i++; }
You specify the initialization, the continuation condition, and the re-initialization to prepare for the next iteration.
conditionals Well, you know
if (condition) { then-part; }
if (condition) { then-part; } else {
else-part; }
switch (variable) { case A_VALUE:
do this; break;
case OTHER_VALUE: do that; break; default:
1.4. SOURCE CODE 15
On the switch, you need to placebreaks at the end of every branch to avoid “falling through” the next branch.
Gotos are easy, you define a label and then can branch there. They are used inside a function. The label here iserror.
while(getinput()){ processit(); if (haserror())
goto error; }
return result(); error:
abortprocessing();
Storage classes
When the compiler gets a new symbol, either a function or a global variable it attaches an “storage class” to it. The storage class determines among other things whether the symbol should go in the symbol table for the object file or not. In other words, you can export a symbol to the rest of the program, or keep the symbol private to a given file by using a particular storage class.
Symbols declared extern(they will be by default) are exported to other object (read “source”) files. If they are not initialized, they are initialized to all-zeroes (by the loader). For instance:
/* this is file a.c */ /* this is b.h */ /* this is b.c */ #include "b.h"
extern int a; int a=3; int f()
{
return a; }
The functionfwill return3, unlessabe modified.
On the other hand, if a symbol is declaredstatic, its scope will go from the place of the declaration to the end of the file. Globals and functions to be used just within a source file, are declaredstatic.
How to compile?
Ok, but how do you compile source code on Plan 9? The compiler is actually a compiler suite. When you compile you use one of the compilers, according to your target architecture (usually, $objtype). The compilers making the suite are named
Xc, where theXidentifies the architecture. For instance, you will be using8c, which is the compiler for386machines. But you could usekc(for the sparc) instead.
The assembler and the linker follow the same convention: 8ais the 386 assembler and8lthe linker.
16 CHAPTER 1. INTRODUCTION
As you will see in the next section,mkis used to automatically compile the source for your$objtype, or for the whole set of supported platforms.
By following simple naming conventions ( “8c”, “8a”, “8l”) the compiler enhances portability, rather than enlarging the differences between different machines. Con-ventions are important in that they can simplify your life and allow the automation of tasks. I hope you will appreciate it on Plan 9.
1.4.2
mk
The program mk is a successor of make. If you don’t know make, don’t worry. mk
simply instructs the machine to build certain “products” by means of source files.
mkuses a file namedmkfileto learn what product(s) should be built, and how it should be done. For each directory with sources to build a product there use to be a
mkfile. If you want to build the product for that directory, you only need to callmk
there.
This is an (edited) excerpt from
/sys/src/9/pc/mkfile, themkfileused to build the kernel for the pc:
CONF=pc #defines the variable CONF to have the value "pc" objtype=386 #building on intel
</$objtype/mkfile #use the variable just defined to include the mkfile #that contains machine dependent definitions
#(e.g. which one is the C compiler for this platform)
DEVS=‘{rc ../port/mkdevlist $CONF}
#defines the variable DEVS with the string printed #by the shell command within brackets. The command #uses the variable CONF defined above.
#The string will be the list of object files for #drivers on this platform
OBJ=$DEVS
# several lines deleted here...
# defines the variable OBJ with the list of object files, # which includes the list of object files for drivers.
#see below what this means.... plan9pc: $OBJ
$CC $CFLAGS $CONF.c
$LD -o $target -l $OBJ $CONF.$O
#other rules follow....
1.5. PC HARDWARE FACILITIES 17
not by modifying the existing ones3 .
The last three lines of the excerpt are a rule. Rules tell mk how to build things using other things. In this case, the target of the rule (the product) isplan9pc. To build this, mk will need those files listed in $OBJ. Should those files be missing, mk
will look in themkfilehow to build them. Once the dependencies are satisfied (i.e. the files in$OBJdo exist, and are up-to-date with respect to their sources), mk will use the two last lines to build the product. The rule says that we need $OBJ, and indeed the commands used within the rule do use$OBJ. The rule also uses variables to specify which C compiler ($CC) should be used, and the same for the linker.
The variable$targetis defined bymkto be the current target for the rule being processed.
If you go to the directory
/sys/src/9/pc and call mk, it will see the first rule in the mkfile. As its target is
plan9pc, it will try to build it by recursively obtaining targets following the rules. You will not need to write mkfiles until you start with your lab assignment; therefore, what I said aboutmkis enough for you to proceed. Nevertheless, I recom-mend you put the paper onmk early in your list of “to-read-things” so you know it well before you need it.
1.5
PC hardware facilities
In this section, I will briefly describe the hardware facilities found at modern Intel based PCs. The aim is to let you know enough of what the hardware provides so you could understand the software. For a complete description, I suggest you refer to the Intel manuals [3]. What I am describing here applies for processors from the i386 up to the most recent (32 bit) one. If you already know how the Intel 386 works, you will notice that I am oversimplifying many things: forgive me, but I am most interested in the the software.
When it is reset, the processor operates into what Intel calls “Real-address mode”. On this mode, the Intel is emulating an old 8086, a 16bit machine. In real mode, the only virtual memory facility is segmentation: no paging. One of the first things all modern OSes do on Intels, is to quickly set the processor into what intel calls “protected mode”, which is the native mode of the processor. In protected mode, the machine is using 32bit words, as it should. Most of the processor structures a describe below are used while in protected mode.
1.5.1
Registers
The processor has eight 32 bits “general purpose” registers calledeax,ebx,ecx,edx,
esi,edi,ebpandesp. They are not really “general purpose” as there are instructions that operate on some of them. For example,espis the stack pointer register, andebp
is used as a frame pointer register (to point to the activation frame for functions in the stack). eaxis generally used as the “accumulator” register.esiandediregisters are used by string processing instructions, which repeat a given operation on a series
3
18 CHAPTER 1. INTRODUCTION
of bytes in memory; they are used as indexes into memory (source index/destination index). Because the processor also has real mode, there are register names ax, bx,
cx, anddxwhich refer to the 16 bit version of the (actually 32 bits) registers. Bytes within this 16 bit registers, can be addressed by using names such likeahandal.
Two other registers are eip (the program counter) and eflags (status flags).
eflags is used both to keep arithmetic and logic flags (e.g. to control conditional tests) and also to keep status bits for the processor (e.g. interrupt-enable). I will mention some flags later.
There are also six segment registers: cs is the code segment register, ds is the data segment register,ssis the stack segment register. The other three ones (es,fs, and gs) are not so tied to instruction execution as the first three ones. Instruction fetching is done from the segment described by cs, operands and data is fetch from the segment described from the ds register (unless specified otherwise), and stack instructions work using thessregister.
Other registers are the tr (task register), used to point to a TSS (task state segment); cr2, used to place there the faulting address on page faults; cr3, used to point to the page table; gdt (global descriptor table) used to point to a table with segment descriptors; idt (interrupt descriptor table) used to point to a table with interrupt descriptors; and other ones that I omit.
1.5.2
Instructions and addressing modes
The paper on volume 2 of the manual, “A manual for the Plan 9 assembler” [6], can be of help here. I suggest you read that paper when you have problems following assembly code. Nevertheless, to help you a bit, I reproduce here the information you are likely to need just to understand the code.
The assembler uses 32bit registers, named ax, bx, cx, dx, sp, bp, si, and di. Note the convention! which is different from the one I used while describing the Intel register set4.
Several registers are invented by the assembler. An important one is fp, which appears as the “frame pointer” register, and points to local storage area to keep procedure parameters. For example, 0(fp) is the first parameter (int), 1(fp) the next, and so on. If you don’t understand what “0(fp)” means, read it likefp[0]by now.
The set of instructions is the set found at the intel manual (see [3]), with b, w, or lappended for operations using bytes (8bits), words (16bits), and longs (32bits). You can use names likeah,bh, etc. to access the high part of the 16bit version of ax. Assignment order is left to right. For example:
movl ax, bx Move ax into bx.
movb ax, bx Move low 8bits from ax into low 8bits at bx.
movb ah, bx Move high 8bits in the low 16bits of ax to bx.
Although Intel forgot to implement instructions for several combinations of “movs”, the Plan 9 compiler suite emulates such instructions, and you can forget about that.
4
1.5. PC HARDWARE FACILITIES 19
Some instructions are “invented” by the assembler. For example, textis used to define a procedure. Its parameters are the procedure name and the number of cells to be used for local variables in the procedure stack frame. Parameters are passed in the stack, and the result value from the function is passed inax.
There are several addressing modes used in the Intel.
ax The registerax.
$b Immediate valueb.
(ax) The cell whose address is in ax.
10(ax) The cell whose address is found by adding 10 to contents of ax.
(ax)(bx*4) A cell in a table starting at the address in bx, with 4 cells per entry, using the contents of axas an index.
2(ax)(bx*4) Works in the same way, but adding 2 as an offset.
Although Intel allows you to specify which segment to use for a given address, the Plan 9 assembler uses alwayscsfor the code segment,dsfor the data segment, and
ssfor the stack segment—usually,ssis the same of ds. Things are simple!
Beware that names for conditional branch operations follow the names of the 68020, and not the Intel ones. But this should be clear while you read the code.
1.5.3
Memory
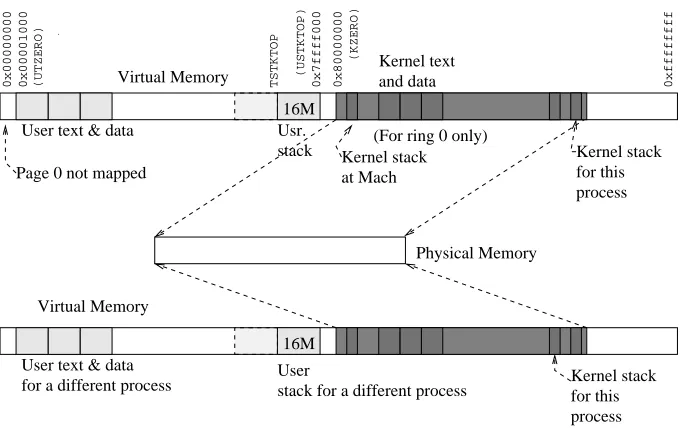
An Intel address is specified as a 32 bit address (4G address space) on a given segment. To specify a segment, you must tell the instruction which one to use (cs, ds, etc.). You can tell the instruction either by defaulting tocs,dsorss, or by specifying the segment register to use.
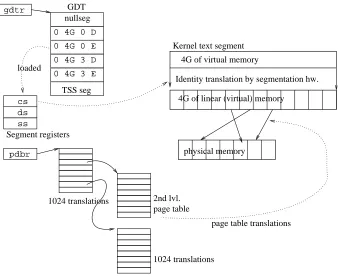
To load a segment register to specify a particular segment, you use a load instruc-tion that is given a “segment selector” as its operand. The selector is an offset into the GDT (global descriptor table). Each entry in the GDT specifies a segment base address, limit, and protection. These descriptors are loaded (by using that offset) into segment registers, which are used later by the instructions. The whole picture is shown at figure 1.1.
In Plan 9, there are segment descriptors in the GDT for kernel and user text (code) and data. The stack segment is usually set like the data segment (same protections). The processor runs at a given privilege level, from 0 to 3, as specified by the privilege level of the running text segment. As segment descriptors include a privilege level, they can be used to prevent a non-privileged segment (e.g. ring 3) from using code/data placed at a privileged segment (e.g. ring 0). Plan 9 keeps the kernel within protection ring 0, and user code and data within protection ring 3.
Apart from protection, segments are not used. This means that their base address is usually set to zero, and their limit set to the maximum. As an address is resolved by adding the segment base to the 32 bit offset, it turns out that the address is actually the 32 bit offset.
20 CHAPTER 1. INTRODUCTION
gdtr
0 4G 0 D 0 4G 0 E 0 4G 3 D 0 4G 3 E
pdbr
GDT nullseg
TSS seg
1024 translations 2nd lvl. page table
physical memory
4G of linear (virtual) memory
Identity translation by segmentation hw. 4G of virtual memory
Kernel text segment
cs ds ss
loaded
Segment registers
page table translations
[image:36.482.60.398.54.333.2]1024 translations
Figure 1.1: Virtual memory in the Intel processor. GDT entries contain base, limit, ring, and kind for all segments. GDT segment descriptors can be loaded into segment registers. The processor applies segmentation using segment registers and then applies paging.
A linear address is later fed into the paging unit, which uses a two-level page table pointed to by cr3. Pages (therefore page frames too) are 4K bytes long. The first-level page table (PD, or page directory) keeps 1024 entries, mapping 4Mbytes each. The Intel can use a PD entry to map a whole 4Mbyte page” to a 4M “super-page-frame”. The second level page table has 1024 entries too, mapping 4Kbytes each.
1.5.4
Interrupts and exceptions
1.5. PC HARDWARE FACILITIES 21
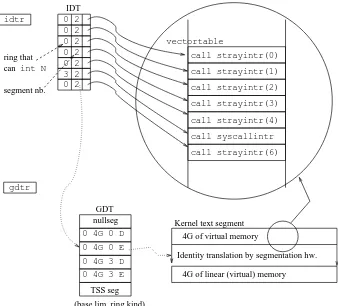
ring can use intinstructions to cause a trap. After the int, the system is running in ring 0, where the kernel executes. See figure 1.2 to get a glance of the structures involved.
ring that can int N
gdtr
4G of virtual memory IDT
0 0 0 0 0
0 3
call strayintr(0) call strayintr(1) call strayintr(2)
call strayintr(3) call strayintr(4)
call strayintr(6) vectortable
2 2 2 2 2 2 2
call syscallintr idtr
segment nb.
GDT
TSS seg nullseg
0 4G 0 D 0 4G 0 E 0 4G 3 D 0 4G 3 E
Identity translation by segmentation hw.
4G of linear (virtual) memory Kernel text segment
[image:37.482.59.397.101.407.2](base,lim.,ring,kind)
Figure 1.2: The idtr register points to an IDT table, used to vector interrupts. Each interrupt handler runs in a segment as described by a field in the IDT entry, which selects a descriptor from the GDT table. The IDT table shown here has been simplified (less entries than the real one).
Chapter 2
System source
I will give you a quick tour through the source code first, and then, in the next chapter we will start to see the set of data structures used through the system as we learn how it boots. Therefore, in this chapter we are going to study the overall distribution of the source code of Plan 9.
2.1
Quick tour to the source
The source code of the kernel for the PC can be found in the/sys/src/9/pcdirectory (machine dependent part) and also in the/sys/src/9/portdirectory (portable part). The code for the kernel loader on PCs is at/sys/src/boot/pc.
2.1.1
Interesting include files
Almost every source file includesu.h, found at/386/include. It contains definitions for common data types and symbols for the 386 (e.g. uint,ulong, etc. It includes also several macros to handle variable argument lists on function calls (e.g. like that of print). It is defined here below/386because it assumes a particular stack layout which is only guaranteed to work for the Plan 9 compiler on the 386.
Another interesting file here isureg.h. It contains the definition of the 386 register set.
The directorysys/includecontains include files for users the system. The most interesting one islibc.h. This file contains definitions for the set of available system calls and utility functions of the C library. There are others, but the most important are placed here. The set of function prototypes starting at_exitsis the set of system calls. You can look at section 2 of the manual to see what they do.
2.1.2
Interesting source files
The machine dependent part of the system is the one that “boots” it and uses services provided by the portable part. The same holds for the compilation. The machine de-pendent part contains themkfilenecessary for compiling the kernel. As compilation
24 CHAPTER 2. SYSTEM SOURCE
proceeds, it uses both headers and C files from the portable part to build a kernel image. The best way to see this is to compile a kernel:
Compiling a kernel
Go to /sys/src/9/pc, and typemk CONF=9pcdisk. You will see how a new kernel is built. The CONF=9pcdisk sets a variable for mk. It tells mk that 9pcdisk is the configuration file to be used for the kernel.
The configuration file contains a description of the devices that should be linked into the system. An rcscript uses this file to generate source code that initializes and starts these drivers. Themkfileincludes also a list of relevant object files to link into the system.
If you take a look to themkfileyou will see how it includes the portable codemk
file,../port/portmkfile. Theportmkfilefound there assumes it will be used from a machine dependent directory. In that way, different kernels can be built that pull up code from the ../port directory. Again, the machine generates (first two rules of ../port/portmkfile) the list of files to be built into the kernel. This includes also the source of tcp/ip, found in../ip. Because all compilation process from the machine dependent directory, both port and ip have a leading ../ when used to locate files.
The rules using the variable CONFin portmkfilegenerate source code from the configuration file usingmkdevcand compile it.
Lesson: whenever the machine can do something for you, like generating the source code that you should write by hand, let the machine do the job.
You can see how there are a bunch of rcscripts namedmk..., that generate source code which can be generated mechanically. Let the machine do the job!
The machine dependent directory
Go now to pc. files named dev... contain device code. The code for the device namedetherin the configuration file goes intodevether.c. Naming conventions are important in Plan 9, they allow the automation of tasks, like generating the list of file names where drivers configured are to be found. Other files likecga, dma, etc. contain code to handle machine dependent facilities like the video card.
Two important files aredat.handfns.h. To avoid the problem of circular include files, data structure and function definitions for the machine dependent part are placed here. The common and crucial stuff is found here. There are other definitions, more self-contained, that have their own include files. For example, memory management definitions are found atmem.h.
2.1. QUICK TOUR TO THE SOURCE 25
Part of the low level glue is in plan9l.s, although it could go perfectly on l.s.
plan9l.s contains the couple of routines that call to user code and return from a system call.
Another important source file is main.c. Once the assembly code has things set up enough, it callsmainto start the system. Most of system initialization goes here. We will be looking throughl.sandmain.cin the next chapter.
Regarding memory handling,memory.c is in charge of allocating memory within the kernel for different purposes, andmmu.cis in charge of handling paging (virtual memory) facilities.
The file trap.c contains C code to handle traps. That code is called from l.s
once the hardware jumps into l.scode to handle traps. Although trap could call
syscallto handle system calls,plan9l.scallssyscalldirectly. It dispatches to the appropriate system call.
Most other files can be ignored by now.
The portable directory
Most system services are found here.“Abstract” devices that do not operate on real hardware, processes, virtual memory, and files along with several other things.
Several files contain portable utilities: alloc.c and xalloc.ccontains portable memory allocation routines,alarm.calarms,cache.cis in charge of caching,taslock.c
andqlock.cimplements locks,qioimplement queues for block IO, etc.
There are also “portable” devices like pipes, the console, etc. defined in files named dev.... We will detail some of them, but you can ignore them by now. As it happens with machine dependent device files, an important part of the code provides hierarchies of files to export the devices to the user. For example,devproc.c
implements files seen on/proc, which represent system processes.
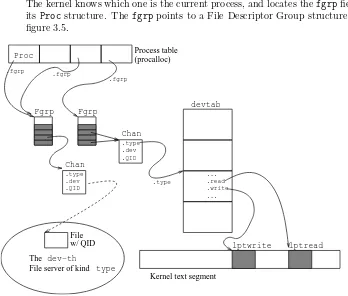
Communication channels are implemented in chan.c. Channels are central in Plan 9. They represent an IO endpoint to a file. In other words, channels are “files begin used”. Remember that everything is a file, therefore, this abstraction is really important.
Files portdat.h and portfns.c contain portable common data structures and functions. They are the portable counterpart of pc/dat.handpc/fns.h. This is the place where to start searching for the definition of data structures used within the kernel. For example,Chan, is defined here. Another interesting file defining common functions islib.hwhich defines routines from the C library used within the kernel. The kernel uses this instead of the real include file for the C library I mentioned above. It is common that kernels use part of the library used for user code as a convenience.
Processes are implemented at proc.c.
Files fault.c, page.c, segment.cand swap.c have to do with virtual memory handling. Their names give an idea of what they have to do with it.
Network interfaces are handled at netif.c. Note that tcp/ip code is not here, but at/sys/src/9/ipinstead.
26 CHAPTER 2. SYSTEM SOURCE
2.2
System structures
As you proceed through next chapters, remember, the code mostly follows from the data structures. Therefore, try to imagine what the system will do with the informa-tion kept within the structures. Ask yourself what is each field for. Try to grepthe source for declarations of the structures and see how they are used.
Lesson: When you implement anything, plan for your algorithms but pay special attention to your data structures. If can do anything with a data structure, don’t do it with code.
Chapter 3
Starting up
Plan 9 starts with the bare hardware, and it must provide a bunch of services. If you did read your assignments, you should know which ones.
During this chapter, you will be reading these files:
• Files at/sys/src/boot/pc:
l.s Low-level assembly routines and entry points. load.c main procedure for9load.
dat.h data structures.
devfloppy.c floppy device driver.
dosboot.c Code for using FAT formatted floppies. conf.c configuration (plan9.ini).
console.c Console I/O for the PC. boot.c Kernel loading and boot.
• Files at/sys/src/9/pc:
l.s Low-level routines, including entry points (the main program, and interrupt handlers).
main.c PC system initialization.
dat.h Machine dependent data structures.
devarch.c archdevice driver, which has also routines to start some hardware services.
memory.c Physical memory allocation.
trap.c Trap and interrupt handling procedures.
plan9l.s handler for system call trap and code to jump to user code. mmu.c Memory management unit code.
i8259.c Programmable Interrupt Controller code. io.h I/O data structures.
28 CHAPTER 3. STARTING UP
pcdisk.c (generated) initialization for configured devices.
• Files at/sys/src/9/port:
xalloc.c memory allocator for long lived allocated structures. alloc.c dynamic (kernel) memory allocation.
qio.c Queues for I/O.
portdat.h Portable data structures. proc.c Processes.
pgrp.c Process groups and file descriptor groups. sysfile.c System calls for files.
devroot.c root device. page.c Page allocator.
• Files at/sys/src/9/libc:
pool.c memory pools (to support malloc style memory allocation).
. . . and several other files used as examples.
3.1
Introduction
In Plan 9, there are different kernels for terminals, CPU servers, and file servers. The CPU server is very much like the terminal, however, the file server is optimized to serve files, and not to run user programs. Indeed, the few programs you need to run at the file server are executed from the file server console with a lot of help from the kernel.
I will be considering only terminals in what follows.
The boot process starts when you press the power button on your PC. The BIOS (a program in ROM) is instructed to search for several devices to boot from. Usually, it will search for a floppy disk unit, a cdrom unit, and a hard disk. Once the boot device is located, the BIOS loads a block from the device. For hard disks, it loads the Master Boot Record (MBR), for floppies, it loads the boot sector (PBS).
Once either the MBR or the PBS get loaded, the BIOS jumps to its starting address. The BIOS is done. Both MBR and PBS contain a tiny program that proceeds the loading process. The MBR scans the partition table for active partitions and loads the PBS sector of the active partition. Thus, all in all, we end up with the PBS loaded in memory. Plan 9 supplies its own PBS program. It will load the program9loadwhich will continue the job. To keep the PBS program small,9load
is stored contiguously on disk; i.e. to load it, the PBS only needs to load a bunch of contiguous disk blocks. Keep in mind that PBS needs to fit in a sector. That is why
9loadis a different program, to be bigger than a sector. The source formbr,pbs, and
9loadis insys/src/boot/pc. If you want to know what programs are generated on that directory, look at themkfileand see what are the targets.
3.2. RUNNING THE LOADER 29
would not fit in a boot sector. Another reason is that perhaps the code in9loadhas been compiled into a DOS COM file, which can be at most 64K. That file must obey the limits of DOS (if Plan 9 is being started from DOS), but it may load a real kernel bigger than 64K.
It is9loadthat loads the Plan 9 kernel and jumps to it. But9loaddoes a bunch of useful things apart of loading the kernel. For instance, it parses the MBR and partition table to locate a configuration file (plan9.ini) and maybe a kernel to boot. That information is read in-memory and kept there, together with the information about existing partitions that9loadgot.
9load parses a file plan9.ini on a specified FAT partition. That file makes a provision to boot different kernels with different options. Again, simplicity demands,
9loadonly knows how to read FAT partitions. Therefore,plan9.inimust be kept on a FAT partition. The standard Plan 9 disk partitions include a small9fatpartition, guess why?
I now proceed with the source code. Relevant manual pages are booting(8)
(bootstrapping procedures),9load(8)(PC bootstrap program), andplan9.ini(8).
3.2
Running the loader
Where does9loadstart? Look at the mkfile, the first object file linked isl.8(for intel). The PBS simply jumps to the first instruction so let’s look atl.s.
3.2.1
Preparing for loading
• /sys/src/boot/pc/l.s:/origin
This is the entry point, running on real mode (emulating an old 8086, yes, ask Intel).
• l.s:80,81
the data segment is set to be the same that the text segment. The text segment is ok because we are executing right now, but we know nothing about our data segment, yet.
• l.s:83,113
set the video mode, say hi. What does it say when it says hi? Look at line101
and lines:755,764. The author uses the bios to write on the screen, henceint 0x10. That’s a procedure call into the bios code.
• l.s:121,179
skip this. We are not usingb.com.
• l.s:181
Now we go into protected mode, loading a GDT and selectors for code and data segments.
• l.s:240,251
30 CHAPTER 3. STARTING UP
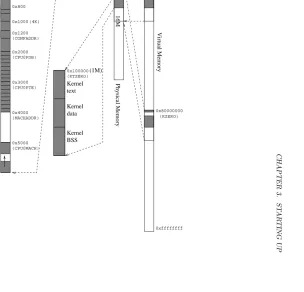
0x00000000 Virtual Memory 0x80000000 (KZERO) 0xffffffff
Physical Memory
9load
tokzero
[image:46.482.58.395.53.158.2]16M
Figure 3.1: Virtual memory layout while booting.
• l.s:257,285
Identity mapping for the first 16M of memory, and also a mapping at address
KZERO(kernel address 0), which is 2G—the last 2G are conventionally used to keep the kernel code, and 9loadfollows that convention. The page table is at
tpt, which is at0x6000.
• l.s:289,292
Now we have paging. This looks more like a reasonable machine with virtual memory, and not like an old 8086. C code can do its job now. Virtual memory looks now like shown in figure 3.1.
• l.s:298
Jump to the address of routinetokzerostarting at line:301. The absolute jump leaves us with the EIP pointing to the address oftokzeroin the virtual memory mapping at KZERO. Note that until now, jumps were relative. This is the first absolute jump and9loadwas linked to execute at address 0x80010000. There-fore, although 9loadwas executing at addresses below KZERO(using physical addresses—and the identity map at 0 after enabling paging), it is now executing at its proper location.
• l.s:311
Just call main and C code will do everything else. If it ever returns, we loop forever. By looping, the author hopes to be able to read at least any interesting message on the console. Don’t loop and you will get a reboot and miss any message with clues about the boot failure.
main() C entry point for the loader.
• load.c:/^main
This is the entry point of 9load, well, the C entry point—there was some assembly before. As you see, lines :251,255 are initializing trap handling, clock, etc. More on that when we see the real kernel.
• load.c:261
3.2. RUNNING THE LOADER 31
of types? Hmmm, there is /sys/src/boot/pc/dat.hfile, and there is where the author likes to put data structure declarations. At line:143there is a decla-ration forType(the initial capital tells us that it is a type or a constant name). Pay attention to the set of pointers to functions, depending on the value oftype
they will point to a function or another. This is how the most useful feature of object-orientation (polymorphism) is brought to C. And it was brought to C back in the days of UNIX 6th edition!
• load.c:264
Back to the loop, we call probefor every type (not for ether). The flags mean “we want aplan9.ini” and “any device will be good for us”.
That routine returns a Medium pointer with information about the probed medium, including the plan9.ini file. When the returned medium has a
plan9.inifile (known by theFiniflag) we got it. Then line:266callsdotini
to read and parse the just loaded.inifile.
main
probe() Probe devices for media, seeking forplan9.ini.
• load.c:178,241
Probe iterates again through the array of known boot device types. Why? The author wants to call probe with things like Tany, to specify “them all”. Therefore, we iterate in line :188. If line:192is reached, we are interested on this device type.
• load.c:192
As initially the flag is not 0, we enter here now. This if is used to retrieve information found on previous runs about media for this device type. No such information by now, so the loop is doing nothing now.
• load.c:199
Interesting stuff happens. The flag does not have theFprobebit set: this means the device was not probed and must be probed now. initmust be called for the device type; remember thatinitpoints to a function or another depending on the typesarray entry—looks like polymorphism. If you look to the array declaration (:10,31), you notice afloppyinitas the value for floppies.
floppyinit()Initialize the floppy devices.
• devfloppy.c:133
has the entry for floppyinit. I won’t tell you how to probe for a floppy. But you can feel how I/O proceeds (e.g. :163is stopping the drive motor).
• load.c:201
Themaskis set with a set of bits given byinit. The bits are used in the loop at line :204to scan for different media on this device type. For instance, you may have different floppies installed.
• load.c:205,207
32 CHAPTER 3. STARTING UP
calls to probe, that media is not scanned. The idea is to link the information wanted into Mediastructures hanging from the typesarray entry. Once the information has been obtained, it is not interesting obtaining it again; hence the bit mask.
• load.c:215
The call toinitdevsimple builds a string with the name for the device repre-senting this media, e.g. “fd0”.
• load.c:217,233
Remember that the types array had Fini set as a flag? Line :213 set the media flag to the value of the device flag. That means that the device media may contain aplan9.ini. now going to check if that is the case. By now, clear
Fini.
• load.c:219,220
Try to locate a partition with namedosor 9fat. The routine doing the work isgetdospart, which again points to one function or another depending on the device type. For floppies, it isfloppygetdospartatdevfloppy.c:330. In the case of a floppy, locating a partition is easy: if it is nameddos, it is there. No matter the device, the partition withplan9.inimust be eitherdosor9fat—to keep9loadsimple.
floppygetdospart()Prepare to use a dos partition.
• devfloppy.c:330
It gets a filled-upDosstructure, which allows us to read/seek a FAT partition. How? well,getdospartfills aDosstructure with pointers to functions that know how to read and write it. For instance, floppygetdospartis placing pointers tofloppyreadandfloppyseek. Probeis learning to load aplan9.ini(and a kernel) from a device step by step.
Besides, floppygetdospart calls dosinit, which reads the first block of the floppy and initializes structures like the one for the root directory in the parti-t