An Oracle White Paper
June, 2012
Provisioning & Patching Oracle Database using
Enterprise Manager 12c.
Provisioning & Patching Oracle Database using Enterprise Manager 12c
Table of Contents
Executive Overview ... 2
Introduction ... 2
EM Readiness: ... 3
Installing Agent
... 3
Setting Up Privilege Delegation in Enterprise Manager
... 6
Creating Named Credentials in Enterprise Manager
... 8
Setting Up Software Library
... 10
Provisioning Grid Infrastructure and Oracle RAC Database: ... 11
Creating Installation Media Components
... 11
Patching Grid Infrastructure and Oracle RAC Database: ... 18
Executive Overview
Oracle Enterprise Manager is Oracle’s integrated enterprise IT management product line and provides the industry’s first complete cloud lifecycle management solution. Oracle Enterprise Manager’s business-driven IT Management capabilities allow you to quickly set up, manage, and support enterprise clouds and traditional Oracle IT environments from applications to disk. Enterprise Manager allows customers to achieve:
Best service levels for traditional and cloud applications through management from a business perspective including Oracle Fusion Applications
Maximum return on IT management investment through the best solutions for intelligent management of the Oracle stack and engineered systems
Unmatched customer support experience through real-time integration of Oracle’s
knowledgebase with each customer environment
Introduction
This whitepaper intends to cover the all the steps required to automate provisioning and patching via Enterprise Manager. It also covers the various prerequisites for administrators before they actually start using the Database Provisioning and Patching functionality in 12C. This whitepaper covers provisioning & patching of database systems such as Single Instance Databases, Oracle Real Application Clusters (Oracle RAC) Databases, database clients and others, a. Some of the key areas covered are as follows:
1. EM readiness: “Is my EM ready to provision/patch my targets?” 2. Provisioning Grid Infrastructure and Oracle RAC Database
Provisioning & Patching Oracle Database using Enterprise Manager 12c
EM Readiness:
Setup Step Details
Install Agent Steps on how to discover new targets push agent
Privilege Delegation settings Steps for PDP setting when a proxy user is to be used. Example : Use oracle to sudo as root & run root.sh scripts
Named & Preferred credentials Named & Preferred credentials are to be stored in Cloud Control before provisioning. These are then used during the deployment procedures.
Setting up software library Software library setup is needed for any of patching or provisioning activity.
Creating Installation Media Components
This step covers on how to download bits from OTN & upload to Cloud Control so that these can be used for provisioning. (Provisioning Specific topic)
Install Agent
One of the initial steps for automation is discovery of hosts and targets. You can do this by installing an agent on the host. With Enterprise Manager12c, an agent can be pushed from the OMS so that the hosts become managed hosts in Enterprise Manager.
In Cloud Control, follow these steps:
1. In the Cloud Control home page, from the Setup menu, select Add Target, and then click Add Targets Manually. (Figure 1)
2. In Add Targets Manually page, select Add Host Targets and click Add Host.
Figure 2: Add Targets Manually Page
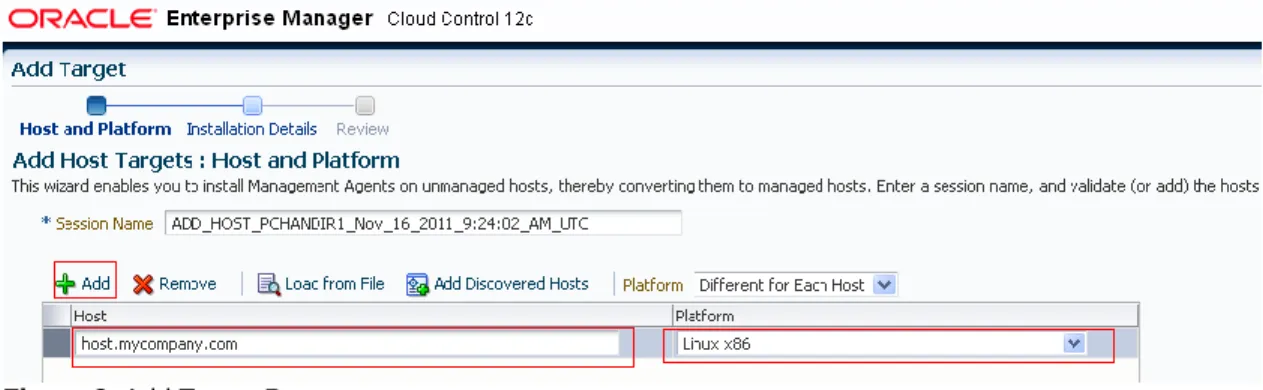
3. In the Add Hosts page, provide host and platform details to install agents.
Figure 3: Add Target Page.
Provisioning & Patching Oracle Database using Enterprise Manager 12c
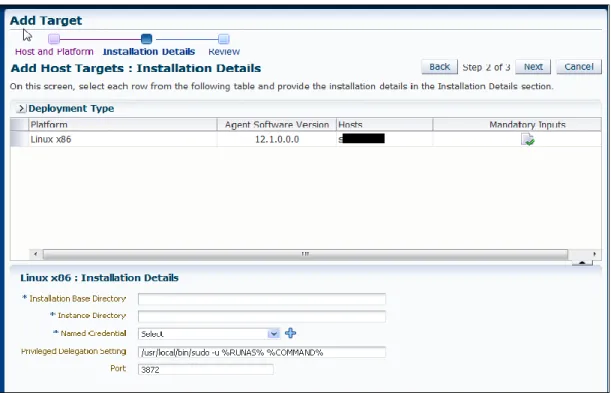
Figure 4 : Add Host Targets: Installation Details Page
5. Once all details are completed , review the information and click Deploy Agent .
Fig ure 5: Review
Setting Up Privilege Delegation in Enterprise Manager
As both provisioning and patching require some of the tasks such as execution of root scripts to run as super user, make sure the host user has privileges to become root user. This can be done via ‘sudo’ setting or ‘PBrun’.
Setting up PDP is a 2 step process as follows:
1) Host level Setup :This can be done by PDP setup ,e.g. , user executing the procedure (say ABC) can have access to run SUDO as Oracle user and ROOT user by adding the
following commands (add privileges to these commands into the SUDOERS file): From $AGENT_HOME, the following entry must be added to sudoers file:
./agent_inst/bin/nmosudo
Sample sudoersfile should have following entry: Oracle ALL= (root)
/u0a/app/oracle/agenthome/agent_inst/bin/nmosudo
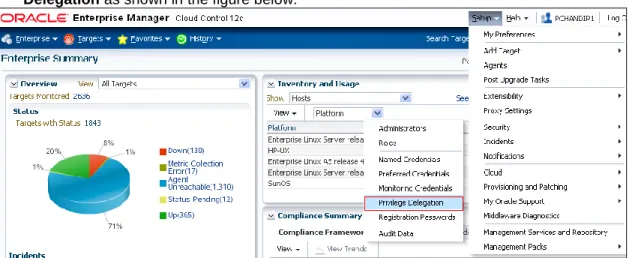
2) In Enterprise Manager : To setup PDP,, go to Setup - > Security -> Privileged Delegation as shown in the figure below:
Figure 6 : For setting PDP Goto Setup->Security->PDP
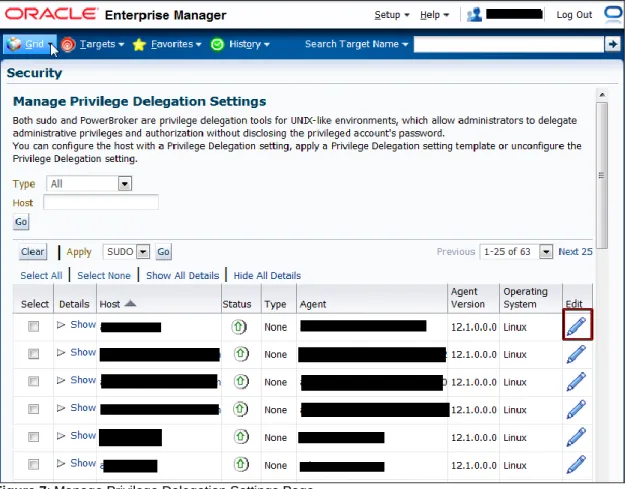
3) In the Manage Privilege Delegation Settings page, click Edit to setup the Privilege Delegation for your hosts as show in figure below:
Provisioning & Patching Oracle Database using Enterprise Manager 12c
Figure 7: Manage Privilege Delegation Settings Page
Figure 8: Host PRIVILEGE Delegation Setting Page
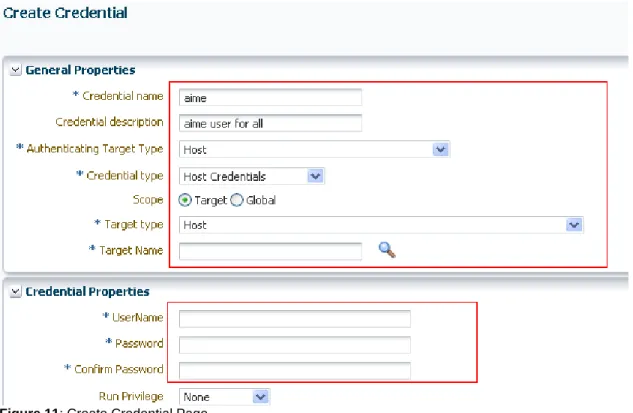
Creating Named Credentials in Enterprise Manager
Provisioning and Patching require Named Credentials for executing various jobs on the host in order to run root scripts needed for Oracle products. To do so, go to Setup -> Security -> Named Credentials and create at least two set of named credentials, one for running jobs with host user credential and other for running jobs with ‘root’ user.
Follow these steps:
Provisioning & Patching Oracle Database using Enterprise Manager 12c
Figure 9: Navigation Details for Named Credentials
2. Click Create as shown in the figure below:
Figure 10 : Security Page
Figure 11: Create Credential Page
Similarly create Privileged Credentials by following the similar wizard by going to Setup->Security->Privileged Credentials.
Setting up Software Library
System Administrators are responsible for configuring an upload storage location. Only after the storage location is configured, you can start uploading the entity files.
To configure an OMS Shared File System storage location that can be used for uploading Software Library entity files, perform the following steps:
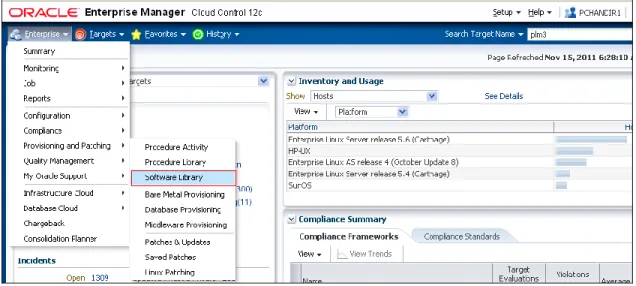
1. In Cloud Control, from the Setup menu, select Provisioning and Patching and then, click Software Library.
Alternately, from Grid menu, select Provisioning and Patching and then, click Software Library. On the Software Library Console page, from Actions menu, select
Provisioning & Patching Oracle Database using Enterprise Manager 12c
Ensure that the storage location that you configure is a shared file system location accessible to all the OMS hosts. For a multi OMS setup, you must set the Normal Preferred Credentials for all the OMS(s).
Note: When you are configuring an upload location for the first time, a progress dialog appears as the metadata files are imported from the Enterprise Manager Oracle home. This operation may take some time for the first location being configured and cannot be cancelled. However, this delay will not be there while configuring new storage locations henceforth.
Provisioning Grid Infrastructure and Oracle RAC Database:
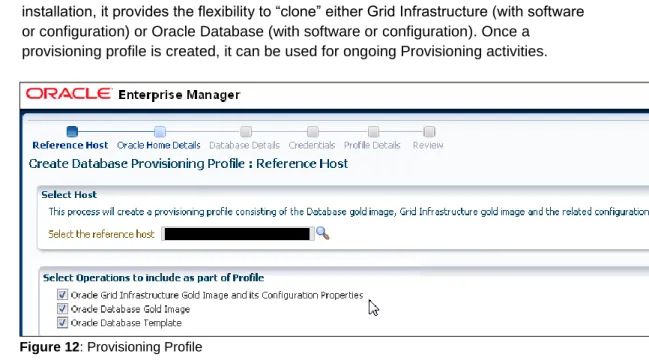
Note: For more details, viewlets, and screenwatches on Provisioning, visit OTN. There are various options using which one can provision grid infrastructure as well as database:1. Using Provisioning Profiles: A Provisioning Profile is an entity which contains both the software bits and configuration. When a provisioning profile is created from an existing installation, it provides the flexibility to “clone” either Grid Infrastructure (with software or configuration) or Oracle Database (with software or configuration). Once a
provisioning profile is created, it can be used for ongoing Provisioning activities.
Figure 12: Provisioning Profile
2. Using Installation Media: Provisioning can also be done by using installation media, which can be pre-staged into the software library. The following section explains the procedure to do the same.
Creating Installation Media Components
1. Create a temporary location2. Open a Browser and go to www.oracle.com Downloads->Database 11g or
http://www.oracle.com/technetwork/database/enterprise-edition/downloads/index.html
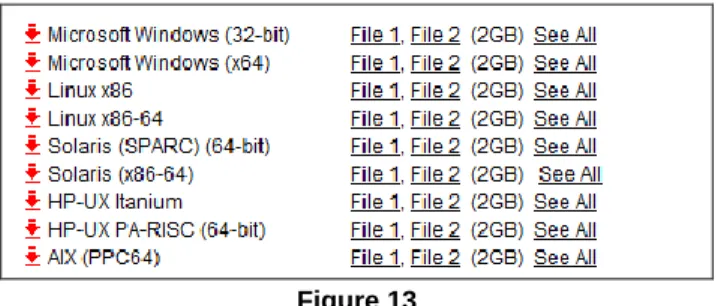
Depending on the OS that is going to be used click on the corresponding See All link. For example Linux x86.
Figure 13
3. Accept the License Agreement.
4. Download Files 1 and 2 for the database and the grid infrastructure to the temporary file that was previously created.
Figure14
5. Navigate to the temporary folder that was created. 6. Unzip database files.
Unzip linux_11gR2_database_1of2.zip Unzip linux_11gR2_database_2of2.zip
7. Create a zip file with the complete unzipped database. Zip linux_11gR2_database.zip database/ -r
Provisioning & Patching Oracle Database using Enterprise Manager 12c
Figure 15 : Navigate to Software Library
11. Select to create a component by clicking. Actions-> Create Entity -> Component.
Figure 17 : Create Component
Provisioning & Patching Oracle Database using Enterprise Manager 12c
Figure19 : Create Installation Media Wizard
14. Select Product Version, Platform, and Product from the list.
Figure 20 : Create Installation Media : Configure Page.
In Product, Select Oracle Database for Database, Oracle Client for Oracle Database Replay Client and Oracle Grid Infrastructure for Grid Infrastructure Files.
15. Click Next.
16. Select Upload Files Option & In Specify Destination -> Select a configured Software Library.
Figure 21: Create Installation Media: Select Files
Figure22: Select Destination software library location
Provisioning & Patching Oracle Database using Enterprise Manager 12c
18. Select Host from where the files are being uploaded. Click Select.
Figure 24 Select Host
19. Click Add.
Figure 25 Specify Source Page 20. Click Login As
Figure26: Host Credentials
22. Go to temporary file directory and select the database zip file that was created.
Figure27 Select Database Zip File
Provisioning & Patching Oracle Database using Enterprise Manager 12c
Enterprise Manager provides two modes of connections to My Oracle Support for patching Oracle software:
1. Online - If you select this, it means that you have an Internet connection and can access My Oracle Support. Now, run the RefreshFromMetalink job. This job will download all metadata from My Oracle Support, analyze the data, update tables in the repositories, and calculate policy violations if any.
2. Offline - If there is no Internet connection to My Oracle Support, select this option. This means that you will have to get the metadata required for patching and then apply the patches.
To setup the patching mode, go to Setup->Provisioning & Patching ->Offline Patching.
Figure28: Offline Patching: Setup -> Provisioning & Patching ->Offline Patching
On the Patching Setup page, change the connection to offline and upload all xmls. Once all xmls are uploaded, run the RefreshFromMetalink job.
Figure 30: Upload xml files for offline patching
As now there is no connection to MOS, one needs to upload all the patches manually. Navigate to Enterprise ->Provisioning & Patching ->Saved Patches and upload patches.
Provisioning & Patching Oracle Database using Enterprise Manager 12c
Figure 32: Upload patch
On the Patch Upload page, browse to patch and its metadata to upload them.
Figure 33: Upload Patch & Metadata
Other Resources
Note Id: Metalink Note Id: 1361588.1 (Diagnostics and Troubleshooting for Provisioning and Patch Automation through Enterprise Manager 12c)
Provisioning & Patching Oracle Database using Enterprise Manager 12c
June, 2012
Copyright © 2011, Oracle and/or its affiliates. All rights reserved. This document is provided for information purposes only and the contents hereof are subject to change without notice. This document is not warranted to be error-free, nor subject to any other warranties or conditions, whether expressed orally or implied in law, including implied warranties and conditions of merchantability or