HP 3PAR Recovery Manager 4.6.0 Software
for Microsoft SQL Server
User Guide
This document is designed for System Administrators and Microsoft SQL Server Administrators who are experienced in using Microsoft™ Windows™ and Microsoft SQL Server™ and responsible for backing up Microsoft SQL Server databases.
HP Part Number: QL226-97330a Published: February 2015 Edition: 1.1
© Copyright 2006 – 2014 Hewlett-Packard Development Company, L.P.
Confidential computer software. Valid license from HP required for possession, use or copying. Consistent with FAR 12.211 and 12.212, Commercial Computer Software, Computer Software Documentation, and Technical Data for Commercial Items are licensed to the U.S. Government under vendor's standard commercial license.
The information contained herein is subject to change without notice. The only warranties for HP products and services are set forth in the express warranty statements accompanying such products and services. Nothing herein should be construed as constituting an additional warranty. HP shall not be liable for technical or editorial errors or omissions contained herein.
Acknowledgements
Intel®, Itanium®, Pentium®, Intel Inside®, and the Intel Inside logo are trademarks or registered trademarks of Intel Corporation or its subsidiaries in the United States and other countries.
Microsoft®, Windows®, Windows® XP, and Windows NT® are U.S. registered trademarks of Microsoft Corporation. Adobe® and Acrobat® are trademarks of Adobe Systems Incorporated.
Java and Oracle are registered trademarks of Oracle and/or its affiliates. UNIX® is a registered trademark of The Open Group.
SQL Server is a trademark of Microsoft Corporation.
All other trademarks and registered trademarks are owned by their respective owners.
Documentation
For the latest version of this document, go tohttp://www.hp.com/go/3par/, navigate to your product page, clickSupport for your product, and then clickManuals.
Revision History
Edition Notes Publication date
Document part number
Initial publication for 1.0 September 2014
QL226-97330
Removed the sectionSupport for GeoCluster for Microsoft Windows.
February 2015 QL226-97330a
Contents
1 Overview of Recovery Manager...7
System Requirements...7
Windows Server Requirements...7
Windows Server 2008...7
Windows Server 2008 (Enterprise or Datacenter edition), Windows Server 2008 R2 (Enterprise or Datacenter edition), Windows Server 2012 (Datacenter edition), or Windows Server 2012 R2 (Datacenter edition)...7
Additional System Requirements...7
Recovery Manager Requirements...8
Running Recovery Manager on a Japanese or a Chinese OS...8
Features Supported...8
Features Not Supported...10
Microsoft Volume Shadow Copy Service...11
Supported VSS Components...12
How HP 3PAR VSS Software Works with Microsoft SQL Server...12
Recovery Manager Layout...13
2 Installing and Uninstalling HP 3PAR Recovery Manager for SQL...15
Installing HP 3PAR Recovery Manager for SQL...15
Verifying the Installation...16
Understanding the Registry...17
Upgrading to Recovery Manager 4.6.0 for SQL ...17
Upgrading from Recovery Manager 4.4.0 for SQL, Recovery Manager 4.4.1 for SQL, Recovery Manager 4.4.2 for SQL, or Recovery Manager 4.5.0 for SQL to Recovery Manager 4.6.0 for SQL...18
Upgrading the Backup Server...18
Upgrading the Production Server...18
Verifying the Upgrade...19
Uninstalling HP Recovery Manager for SQL...19
3 Configuring Recovery Manager...20
Configuring the SQL Database...20
Configuring Recovery Manager...20
Installation Location...20
Search Path...20
Changing the Recovery Manager TCP/IP Port...20
Changing a Production Server Port from the Backup Server...21
Configuring Recovery Manager Policies...21
Configuring Mount Functionality...21
Managing SQL Servers across Multiple Active Directory Domains...21
Configuring Recovery Manager for Availability Group...21
Grouping Volumes into Autonomic Groups...23
Domain Sets...23
Volume Sets...24
Host Sets...24
Testing SQL Connectivity...24
Troubleshooting SQL Connectivity...25
Configuring the Host Computer and the HP 3PAR StoreServ Storage System...25
4 Configuring Backup Software...26
Overview...26
Before You Begin...26
Setting Up Symantec NetBackup...26
Configuring HP Data Protector ...27
Requirements ...27
Setting Up the HP Data Protector Backup Specification...27
Setting Up HP Data Protector Cell Manager Access...28
Configuring Backup Exec...28
Requirements...28
Setting Up the Symantec Backup Exec ...31
Using Your Backup Software ...32
Using Symantec NetBackup...32
Using HP Data Protector...32
Using Symantec Backup Exec ...32
5 Using the Recovery Manager GUI...34
Overview of the Recovery Manager GUI...34
Menu Bar...34
Node Tree Pane...34
Informational Pane...34
Status and Summary Information...35
Opening the Recovery Manager GUI...35
Closing the Recovery Manager GUI...35
Registering the Server...35
Updating Registration after Server Modification...37
Unregistering a SQL Server Instance...37
Setting the Recovery Manager Policy...38
How Recovery Manager Policies Work...38
Numeric-Based Policies...38
Expiration-Based Policies...38
Retention Time Restrictions...38
Setting Recovery Manager Policies...39
Modifying the Policy for a Virtual Copy...39
Configuring Email Notifications...40
Deleting Email Configurations...41
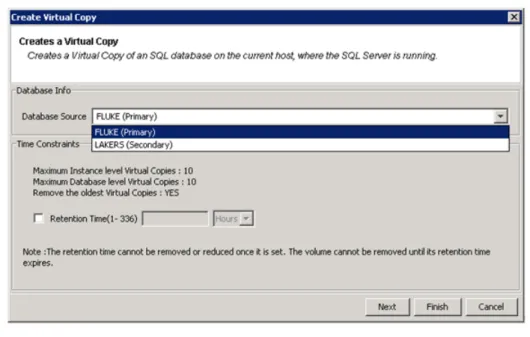
Creating Virtual Copies...41
How Virtual Copy Creation Works...41
Manually Creating a Virtual Copy...41
Creating Remote Virtual Copies...43
How Remote Virtual Copy Works...43
Manually Creating a Remote Virtual Copy...43
Displaying Remote Virtual Copies...43
Scheduling Automatic Virtual Copies...43
Automating Tasks...44
Scheduling Automated Tasks with Task Scheduler...44
Managing Automated Tasks with Task Manager...45
Prerequisites for Attach and Detach Operation...45
Mounting a Virtual Copy...46
Unmounting a Virtual Copy...46
Backing Up a Virtual Copy...46
Manually Creating Backups at the Instance or the Database Level...47
Scheduling Automatic Backups of an Instance or a Database...48
Creating a Backup of a Virtual Copy...49
Removing a Backup from the Repository...49
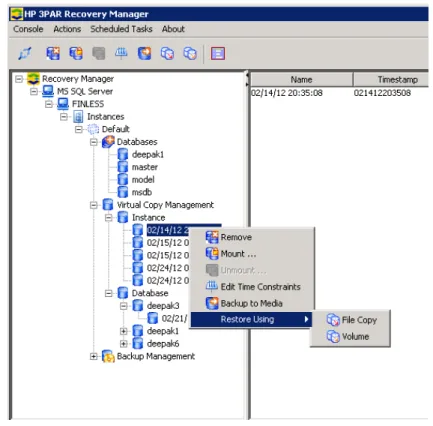
Restoring Instances, Databases, and Volumes...49
Restoring an Instance or a Database with Volume Restore...50
Analyzing and Synchronizing the Repository...52
Removing a Virtual Copy...52
Viewing Event Message Descriptions...52
Viewing Online Help...53
6 Using the Recovery Manager CLI...54
HP 3PAR Recovery Manager for Microsoft SQL Server Command Line Interface (CLI)...54
Recovery Manager Commands...55
HpRmCli Sql analyze...55
HpRmCli Sql backup...56
HpRmCli Sql create...57
HpRmCli Sql deletebackup...60
HpRmCli Sql display...61
HpRmCli Sql listbackup...62
HpRmCli Sql mount...63
HpRmCli Sql policy...65
HpRmCli Sql portconfig...67
HpRmCli Sql remove...68
HpRmCli Sql report...68
HpRmCli Sql repository...69
HpRmCli Sql rescan...69
HpRmCli Sql restore...70
HpRmCli Sql setvc...73
HpRmCli Sql timeconfig...75
HpRmCli Sql unmount...76
Running Recovery Manager as a Scheduled Job...76
Scheduling an Automated Task in Windows...76
7 Recovery for Microsoft SQL Server...78
Microsoft SQL Server Recovery Models...78
Recovering Data with HP 3PAR Recovery Manager...78
Preparing for the Recovery Process...78
Recovering from Logical Errors with Point-in-Time Recovery...79
Restoring an SQL Instance in an Failover Cluster Environment Using File Copy Restore...79
Restoring a Volume in Failover Cluster Environment Using Volume Restore...79
Recovering All Data with Point-of-Failure Recovery...80
Determining Whether You Can Perform a Point-of-Failure Recovery...80
Performing a Point-of-Failure Recovery...80
Recovering Data with Auto-Restore...81
Performing a File Copy Restore...82
Performing a Volume Restore...84
Performing volume and file copy restore for availability databases...84
8 Coexistence of HP 3PAR Recovery Manager for SQL and HP 3PAR Recovery
Manager for Exchange...86
Prerequisites...86
9 Using HP 3PAR Peer Motion Manager Software with Recovery Manager...87
10 Using HP 3PAR CLX with Recovery Manager...88
11 Remote Copy for Recovery Manager...90
Overview...90
How Remote Copy Works...90
Setting Up Remote Copy...91
Support for Remote Copy Modes and Policies...92
Setting Up Remote Copy Volume Groups...92
Setting Up a Remote Copy Volume Group for Databases...92
Setting Up a Remote Copy Volume Group for Instances...92
Recovering an SQL Database from a Remote Copy Backup Server...93
12 Support and Other Resources...94
Related Documents...94
Typographical Conventions...94
Advisories...95
13 Documentation feedback...96
A Server Virtualization Environments...97
VMware and Microsoft Hyper-V Environments...97
B Troubleshooting...98
Known Issues...98
Troubleshooting...99
1 Overview of Recovery Manager
System Requirements
Windows Server Requirements
Microsoft Windows Server 2008, Windows Server 2008 R2, Windows Server 2012, or Windows Server 2012 R2
Windows Server 2008
x86-based computer:
• 2 GHz processor • 2 GB or more RAM • 40 GB hard disk space
x64-based computer:
• 1.4 GHz processor • 2 GB or more RAM • 40 GB hard disk space
Windows Server 2008 (Enterprise or Datacenter edition), Windows Server 2008 R2 (Enterprise
or Datacenter edition), Windows Server 2012 (Datacenter edition), or Windows Server 2012 R2
(Datacenter edition)
• Either 1.4 GHz (x64) or 1.3GHz (Dual Core) processor • 2 GB or more RAM
• 32 GB or more hard disk space
Additional System Requirements
• Microsoft SQL Server 2005, Microsoft SQL Server 2008, Microsoft SQL Server 2008 R2, Microsoft SQL Server 2012, or Microsoft SQL Server 2014.
For more information on Microsoft SQL Server versions and patches supported, see the Single Point of Connectivity Knowledge (SPOCK) website:http://www.hp.com/storage/spock
• SQL Server client utilities must be installed on the backup server. • All SQL instances must be TCP/IP enabled.
• To automatically display the SQL server name and the instance name in the server-registration wizard, turn on the corresponding SQL Server Browser Services.
• Microsoft .NET framework v4.0 or later.
NOTE: Microsoft .NET framework v3.5 is required for installation on Windows 2012. • Microsoft Visual C++ 2010 Redistributable Package.
• HP 3PAR Recovery Manager for SQL Software license for the HP 3PAR StoreServ Storage System.
• Virtual copy (snapshot) space must be available on virtual volumes where the SQL Server database resides.
• To create virtual copies on the base volume, you must associate virtual copy space with the base volume itself. For more information on creating a base volume with virtual copy space,
or assigning virtual copy space after the base volume is created, see the HP 3PAR Command
Line Interface Reference.
NOTE: For platform-specific information and release levels, refer to“Related Documents” (page 94).
NOTE: If any of the components mentioned in the additional system requirements are not installed, HP 3PAR Recovery Manager might not function properly.
Recovery Manager Requirements
• Backup server
• Install the same version of HP 3PAR VSS Provider and HP 3PAR Recovery Manager for SQL Software on all backup and production systems.
• Install the same version of the HP 3PAR CLI software on both the backup and the production systems.
• Ensure that the same StoreServ is registered as a default in production server and backup server.
• Instance and all of its database (system and user databases) must reside on volumes belonging to the same StoreServ.
• Using the SQL Server VSS Writer service.
Running Recovery Manager on a Japanese or a Chinese OS
CAUTION: For full compatibility with Recovery Manager, you must use English-language naming conventions in your SQL Server setup (for example, for domain names, instance and database names, path names, and so on).
Recovery Manager does not function correctly when any language other than English is used, even for areas in which SQL Server itself supports Japanese or Chinese characters.
• Windows Server 2008 R2, Windows Server 2012, or Windows Server 2012 R2 Japanese or Chinese OS
• Microsoft SQL Server 2008 R2, Microsoft SQL Server 2012, or Microsoft SQL Server 2014 Japanese or Chinese
• HP 3PAR VSS Provider Software 2.4.0 • HP 3PAR StoreServ Storage System
NOTE: For information about the HP 3PAR StoreServ versions supported, refer the latest
Single Point of Connectivity Knowledge for HP Storage Products (SPOCK) document. To obtain
a copy of this documentation, seehttp://www.hp.com/storage/spock. • HP 3PAR CLI
Features Supported
• Windows Enterprise or Datacenter edition Server
For detailed OS version support, see the Single Point of Connectivity Knowledge for HP Storage Products (SPOCK) website:http://www.hp.com/storage/spock.
• Microsoft SQL Server
• Recovery Manager for SQL supports English, Japanese, and Chinese version of Microsoft Windows operating system
• Recovery Manager for SQL supports English, Japanese, and Chinese version of Microsoft SQL Server
For more information on localization support, see Single Point of Connectivity Knowledge for HP Storage Products (SPOCK) websitewww.hp.com/storage/spock
• Support for HP 3PAR OS 3.2.1, HP 3PAR OS 3.1.3, HP 3PAR OS 3.1.2 MU2, and HP 3PAR OS 3.1.1 MU3
• Volume Shadow Copy Service supportsFullbackup type, copy-only backup type for secondary AlwaysOn databases
• Virtual copy creation using HP 3PAR VSS Provider Software for Microsoft Windows • Virtual Copy creation of Availability Group databases in Microsoft SQL Server 2012 • Scheduling and management of automated tasks
• Mount virtual copies locally or remotely • Mount virtual copies in read-write mode • Unmount virtual copies
• Delete virtual copies • Environment Report • File Copy restore
• Database-level file restore in “No Recovery” mode
• Selective restore of databases from instance level virtual copy • Automate the Point of failure restoration process
• Attach or detach a database to any SQL server during mounting or unmounting operations • Restore from virtual copies
• Backups using HP Data Protector or Symantec NetBackup, or Symantec Backup Exec • Database cloning
• Restore from backup using HP Data Protector, Symantec NetBackup, or Symantec Backup Exec
• Recovery Manager GUI • Recovery Manager CLI • Volume restore
• Virtual copy creation of local and remote Microsoft SQL Server instances and databases • Failover Cluster environment
• Remote Copy in synchronous mode or asynchronous periodic mode • Virtual copy operations on SQL instance and database level
• Virtual Lock of an instance and its virtual copies
• Autonomic groups (domain sets, volume sets, and host sets)
• Manage production servers having different versions of SQL Servers with single backup server • Support for Virtual Fiber Channel in production server and backup server
• Support for Virtual Machines running on Microsoft Hyper-V Hypervisor and VMware ESX(i) with SQL
• Support for backup server and production server on Microsoft Hyper-V and VMware ESX(i) Virtual Machine in iSCSI environment
• Support for HP 3PAR Cluster Extension (CLX) configuration
• Support for coexistence with HP 3PAR Recovery Manager for Exchange software
• Support for backup server and production server running in VMware VM Direct Environment • Support for basic GUID Partition Table (GPT) disks
• Support for SQL database residing on a mount point (HP 3PAR volume mounted on a system drive or another HP 3PAR volume)
• Support for concurrent virtual copy or remote virtual copy creations, concurrent backup jobs, and concurrent virtual copy or remote virtual copy creation with backup jobs.
NOTE:
◦
Backup of different databases with same policy cannot be taken using Symantec NetBackup. Concurrent backups with different policies can be taken.◦
Backup of different databases with same datalist can be taken using HP data protector.◦
Backup of different databases using Symantec NetBackup, Symantec Backup Exec, orHP Data Protector can be taken concurrently. For example, Backup of databasedb1 using Symantec NetBackup and backup of database db2using HP Data Protector can execute in parallel.
◦
Backup of different databases with same Device name cannot be taken using Symantec Backup Exec.◦
A database backup is not allowed when a backup of its instance is in progress. Similarly, an instance backup is not allowed when a backup of the database is in progress. NOTE: Due to an SQL instance limitation, the recommended maximum number of databases for which you can create snapshot backups at the same time is 35.For more information, see Microsoft KB 943471:http://support.microsoft.com/kb/943471
NOTE: For information about the versions supported, refer the latest Single Point of Connectivity
Knowledge for HP Storage Products (SPOCK) document. To obtain a copy of this documentation,
seehttp://www.hp.com/storage/spock.
Features Not Supported
• Microsoft SQL Server offline backup
• VSS backup types “Incremental,” “Differential,” and “Log”
• All backup tools except HP Data Protector, Symantec NetBackup, and Symantec Backup Exec • Access to HP 3PAR StoreServ Storage System via SSH
• Taking a snapshot of the SQL servers created withSQL Server Authenticationset to Mixed-mode authentication mode
• Taking a snapshot of a database residing on a network mapped volume • Virtual copy ownership transferring
For example, you can remove virtual copies only if you created them, and you can unmount virtual copies only if you mounted them.
• Mounting virtual copies to a Windows Fibre channel (FC) based host that resides in virtual environment
• Performing a restore on a Windows Fibre channel based host that resides in virtual environment • Performing a mount, an unmount, or a restore function in RDM (Raw Device Mapping) disk
and passthrough disk • Customizing date format
Recovery Manager supports date format in month/day/year
• Windows auto-mount feature if the database or an instance LUN is on a mountpoint residing on a mountpoint volume.
NOTE: Virtualization support • Windows Hyper-V:
◦
Only iSCSI LUNs are supported.◦
Pass-through Disks are not supported.◦
Virtual fiber channel is supported. • VMware ESX◦
Only iSCSI and VM Direct path is supported.◦
Raw device mapping is not supported.Microsoft Volume Shadow Copy Service
Microsoft includes Volume Shadow Copy Service (VSS) in Windows to simplify the enterprise’s storage environment. VSS provides a framework for creating a point-in-time copy of either a single volume or multiple volumes.
Microsoft Windows Server VSS works with VSS-aware applications that are used to determine when a volume shadow copy (snapshot) can be made. (A snapshot is a virtual copy: a copy of some data set—for example, a disk volume—at a point in time.) Before making a snapshot, VSS communicates with the operating system and applications to freeze computing tasks, which enables an application-consistent snapshot to be taken. The shadow copy volume is then used for the actual backup. After VSS saves the shadow copy volume on the backup device, it deletes the shadow copy.
VSS coordinates between Requestors (backup applications such as Recovery Manager), Writers (applications in windows services such as Microsoft SQL Server) and Providers (components that create the shadow copies).
VSS Component Description VSS Component
The requestor is the backup software that initiates the creation of the shadow copy.
Requestor
The writer is any application software that participates in the shadow copy process and whose files and data are included in the process.
Writer
The provider is the storage technology that does the actual shadow copy.
Provider
Supported VSS Components
Requestor:
• Recovery Manager
• Symantec NetBackup for Microsoft Windows • HP Data Protector for Microsoft Windows • Symantec Backup Exec for Microsoft Windows Writer:
• Microsoft SQL Server 2005, 2008, 2008 R2, and 2012 with SQL Server VSS Writer
NOTE: For platform-specific release levels, refer the latest Single Point of Connectivity Knowledge
for HP Storage Products (SPOCK) document. To obtain a copy of this documentation, seehttp:// www.hp.com/storage/spock.
How HP 3PAR VSS Software Works with Microsoft SQL Server
Figure 1 HP 3PAR VSS provider software for Microsoft Windows operation overview
1. The requestor (HP 3PAR Recovery Manager) sends a command to the Volume Shadow Copy service to take a shadow copy of the selected Microsoft SQL Server database.
2. Volume Shadow Copy service communicates with SQL Writer on the Microsoft SQL Server to flush the current log files to disk and suspend any writes to the transaction log files and to the database file. However, HP 3PAR VSS Software allows read-only access so the client can access any data that is already in the SQL Server database.
3. Volume Shadow Copy service communicates with the provider to initiate the shadow copy process for the disk volumes that contain the Microsoft SQL Server data.
4. Volume Shadow Copy service then communicates with the writers and providers to start creating the shadow copy. The provider actually creates the shadow copy.
5. After the shadow copy is created, Volume Shadow Copy service communicates with the Microsoft SQL Server with MSDE writer or SQL writer to indicate that it can resume writing to disk.
6. The queues of the SQL transactions are written to the logs.
The shadow copy is now available to the requestor for backing up.
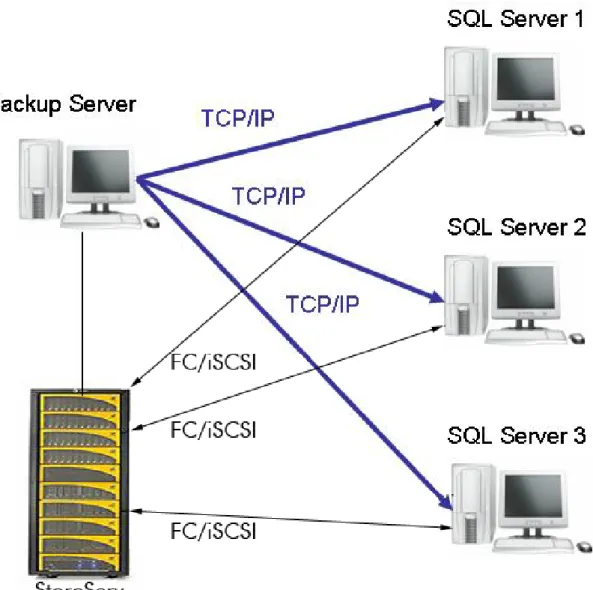
Recovery Manager Layout
Figure 2 Centralized Backup Configuration
HP 3PAR Recovery Manager Software for SQL provides off-host backup and mounting capabilities. These features reduce the impact on the production server and also provide centralized management for the backup and restore functions across all SQL servers.
• Backup Server
A backup server is the central control point for Recovery Manager. It controls and manages the backup and restore on different SQL servers.
• SQL Server
An SQL Server can be a standalone server or a clustered server. An SQL Server version must be 2005, 2008, 2008 R2, 2012, or 2014. Versions prior to SQL Server 2005 are not supported.
• Connectivity
Both the backup server and SQL Server must be connected to the same HP 3PAR StoreServ Storage System.
2 Installing and Uninstalling HP 3PAR Recovery Manager
for SQL
During the installation, an automated installer verifies the correct user authority before analyzing all components required for installation. To start the installation, you must have Microsoft 2008, Microsoft 2008 R2, Microsoft 2012, or Microsoft 2012 R2 administrative privileges and the following required components:
• Microsoft .NET Framework v4.0 or later
• Microsoft Visual C++ 2010 Redistributable Package • HP 3PAR CLI 3.1.3 or later
• HP 3PAR VSS Provider 2.4.0 for Microsoft
NOTE: For details on system requirements, refer the latest Single Point of Connectivity Knowledge
for HP Storage Products (SPOCK) document. To obtain a copy of this documentation, seehttp:// www.hp.com/storage/spock.
CAUTION: Do not install Recovery Manager on a clustered drive. If you continue with the installation, Recovery Manager allows you to proceed with the installation, but after the install is complete, the process stops responding and evicts the clustered disk.
NOTE: The active StoreServ (volumes on which SQL database or Instance reside) must be configured as a default StoreServ in HP 3PAR VSS Provider.
Installing HP 3PAR Recovery Manager for SQL
1. Log on as the system administrator to the Microsoft SQL Server host computer. NOTE: You can perform the installation from a remote desktop connection, but HP recommends that you install the application directly from the system console.
2. Insert the Recovery Manager CD.
3. Open Windows Explorer window and click the CD-ROM drive to view the files on the CD. 4. Select the package corresponding to your OS version.
Table 1 Operating system packages
Package Operating System
RMS_x86 Win 2008 32-bit
RMS_x64 Win 2008 64-bit/ Win 2008 R2/ Win 2012/ Win
2012 R2
5. Select the appropriate package and double-clickSetup.exeto launch the installation wizard. When the installation begins, the system prerequisites are validated to ensure that all the components required to run HP 3PAR Recovery Manager for Microsoft SQL are installed. If any of the required component is missing, you are guided through the steps to perform the
necessary installation and the overall progress is shown for completing that step in the process. There are two options for using the installation wizard to load the prerequisite components: • You can perform the installation by clicking the start/retry button and the required
components are automatically installed one by one where you only have to supply the correct path for the application.
If necessary, refer to the user guide of the respective components for installation instructions. • You can perform the installation by clicking on the hyperlink for a given step and you
are then led through the process one step at a time with your confirmation. You have to click next available install hyperlink if that product is missing on your system.
NOTE: In some cases, you may be prompted to remove a previous version of HP 3PAR Recovery Manager for Microsoft SQL, the HP 3PAR CLI, or HP 3PAR VSS Provider for Microsoft. In this case, you need to manually remove the previous version since the older versions are not automatically removed. If necessary, refer to the user guide of the respective components for uninstalling instructions.
When all of the necessary components have been installed, you are prompted with a message to install HP 3PAR Recovery Manager Software for Microsoft SQL.
6. ClickInstall. The HP 3PAR Recovery Manager Software for Microsoft SQL InstallShield Wizard interface appears.
7. To start the wizard, clickNext. Accept the license agreement and then clickNext. You are asked to supply the destination folder.
8. Accept the default location, or to specify the installation directory, clickChangeand choose an alternate destination. ClickNextafter you provide the destination to advance to the features selection.
NOTE: Only use a local drive directory for installation. Do not use a network shared directory when installing the application.
9. Select the default features, or make any alterations that are necessary before installation. To change a feature installation option, click the icon feature.
10. ClickNextto confirm the feature selections.
11. ClickInstallto start the installation. A status bar shows the installation progress. A message appears to indicate whether the installation is completed successfully.
12. When the installation is completed, clickFinish.
When the installation is complete, the system displays the configuration information in a text fileRMSCfgChk.txt. Use this information to verify all the required installation components are present on the system.
13. Continue with the remaining messages for the prerequisite interface and then clickCloseto complete the installation.
NOTE: If you are using a remote desktop session to install Recovery Manager, log off all connected remote sessions after the installation is complete to apply the newly added environmental variables.
NOTE: If you are installing HP 3PAR Recovery Manager for SQL on a system which is using Symantec NetBackup service in the background, restart the NetBackup service after Recovery Manager installation is complete to register the environmental path in the NetBackup service.
2. ClickStart→Control Panel→Programs→Programs and Features.
3. Verify Recovery Manager appears in theCurrently installed programscolumn.
4. Verify that theHP 3PAR Recovery Manager for Microsoft SQL Servericon appears on the desktop when using theRecovery Manager for Backup Serveroption to install the application.
Understanding the Registry
After Recovery Manager is successfully installed, information is written into the registry database under:HKEY_LOCAL_MACHINE\SOFTWARE\3PAR\RM_SQL
CAUTION: DO NOT edit the registry key value unless asked by your local service provider for support purposes.
Table 2 System Registry Values for Recovery Manager
Value Name
Interval in minutes between automatic synchronization of the repository with HP 3PAR. The default interval is 60 minutes.
AnalyzeInterval
Backup process timeout value in minutes to confirm that NetBackup has received the backup request.
BackupTimeout
Build number of the installed version of Recovery Manager for SQL.
Build
Location of the XML repository. DataFilePath
HP 3PAR Recovery Manager for SQL installation path. InstallPath
Tracing log files. LogFilePath
Specifies installed features of Recovery Manager. PackageType
Number of trace files to keep before deleting. TraceHistory
Trace level for the log file. TraceLevel
Information used to generate the trace file name. TraceLog
Size of the log files. TraceLogSize
Port used by Recovery Manager for SQL. PortNo is set to 9932 by default.
PortNo
Time interval in seconds to monitor the status of volume restore operation.
PromoteTimeout
Current version of HP 3PAR Recovery Manager for Microsoft SQL Server.
Version
The maximum number of retries to find the restored disks after a volume restore operation.
VolumeRestoreMaxRetry
NOTE: TheDataFilePathfield is created in the registry database only after you launch the Recovery Manager GUI for the first time.
NOTE: An installation log file, calledRMS_4.6_InstallerLog.txt, is created in the %HOMEPATH% folder for troubleshooting purposes.
Upgrading to Recovery Manager 4.6.0 for SQL
This section provides instructions for upgrading HP 3PAR Recovery Manager Software for Microsoft SQL from version 4.4.0, version 4.4.1, version 4.4.2, or version 4.5.0 to version 4.6.0.
NOTE: When upgrading to Recovery Manager 4.6.0 from any of its earlier versions, SQL Server 2012 availability database properties are not updated. It requires RESCAN or re-registration of the SQL server.
Upgrading from Recovery Manager 4.4.0 for SQL, Recovery Manager 4.4.1 for
SQL, Recovery Manager 4.4.2 for SQL, or Recovery Manager 4.5.0 for SQL to
Recovery Manager 4.6.0 for SQL
You can upgrade to HP 3PAR Recovery Manager 4.6.0 Software for Microsoft SQL Server from Recovery Manager 4.4.0 for SQL, Recovery Manager 4.4.1 for SQL, Recovery Manager 4.4.2 for SQL, or Recovery Manager 4.5.0 for SQL Server.
Upgrading the Backup Server
1. On each HP 3PAR Recovery Manager for Microsoft SQL Backup Server:
• Stop HP 3PAR Recovery Manager for Microsoft SQL service from Windows Services Panel.
• Stop HP 3PAR VSS Provider service from Windows Services Panel.
• Close the HP 3PAR Recovery Manager for Microsoft SQL GUI and CLI.
• Close windows event viewer window.
• Ensure that no other user is logged on to the system and managing the HP 3PAR Recovery Manager for Microsoft SQL application.
• Disable any HP 3PAR Recovery Manager for Microsoft SQL task fromWindows Scheduled Tasks.
2. To backup the repository, move the folderC:\Program Files\3par\RM\SQL\Dataand all directories and files under it to another location.
TIP: Thehprmcli sql repositorycommand provides the path of the repository. 3. Uninstall HP 3PAR VSS Provider from the Control Panel. Reboot the server, if required. 4. Uninstall HP 3PAR CLI from the Control Panel. Reboot the server, if required.
5. RunSetup.exe.
a. Install HP 3PAR CLI, HP 3PAR VSS Provider.
b. While registering HP 3PAR StoreServ, if you are prompted to accept the certificate, click
YESand proceed.
c. While upgrading to HP 3PAR Recovery Manager for Microsoft SQL 4.6.0, user is prompted for upgrade confirmation. Confirming to do so will uninstall the older version and install HP 3PAR Recovery Manager for Microsoft SQL 4.6.0 on the backup server.
d. Reboot the server, if required.
6. Verify that old virtual copies can be seen from the HP 3PAR Recovery Manager for Microsoft SQL GUI or CLI.
7. Register the SQL Servers again, if required.
8. Enable the scheduled tasks fromWindows Scheduled Tasks.
Upgrading the Production Server
1. On each HP 3PAR Recovery Manager for Microsoft SQL Production Server:
• Stop HP 3PAR Recovery Manager for Microsoft SQL service from Windows Services Panel.
• Close windows event viewer window.
• Ensure that no other user is logged on to the system and managing the HP 3PAR Recovery Manager for Microsoft SQL application.
• Uninstall HP 3PAR VSS Provider from the Control Panel.
• Uninstall HP 3PAR CLI from the Control Panel. Reboot the server, if required. 2. RunSetup.exe.
a. Install HP 3PAR CLI, HP 3PAR VSS Provider.
b. While registering HP 3PAR StoreServ, if you are prompted to accept the certificate, click
YESand proceed.
c. While upgrading to HP 3PAR Recovery Manager for Microsoft SQL 4.6.0, user is prompted for upgrade confirmation. Confirming to do so will uninstall the older version and install HP 3PAR Recovery Manager for Microsoft SQL 4.6.0 in backup server.
d. Reboot the server, if required.
NOTE: For Microsoft SQL Server Cluster production upgrade, first perform the upgrade on the passive nodes. Failover and move the SQL server group in the cluster from the current active node to any of the upgraded passive nodes. Then, perform the upgrade on the remaining node.
Verifying the Upgrade
1. VerifyHP 3PAR Recovery Manager for SQLis listed as a service that is currently running. 2. Check whether you can see the previously created virtual copies in the GUI. Register the SQL
servers again, if necessary.
3. If you used theRecovery Manager for Backup Serveroption to install the application, verify that the HP 3PAR Recovery Manager for Microsoft SQL Servericon appears on the desktop. 4. Verify the registry key. For more information, see“Understanding the Registry” (page 17).
Uninstalling HP Recovery Manager for SQL
1. Log on as the system administrator.
2. ClickStart→Control Panel→Programs and Features.
3. SelectHP 3PAR Recovery Manager for Microsoft SQL Server. 4. ClickUninstall.
NOTE: After uninstalling Recovery Manager, virtual copies and scheduled tasks still reside locally in theDatafolder as well as on the system. You can remove virtual copies and scheduled tasks later, if desired.
3 Configuring Recovery Manager
Configuring the SQL Database
When you configure the SQL database:
• Use database files and transaction logs created on basic disks using the NTFS file system. Recovery Manger for SQL Server does not support other types of disks.
• Maintain a 1:1 relationship between databases and volumes.
Avoid adding more than one database plus its transaction log files to a volume.
◦
◦
Avoid adding files from a database to multiple volumes.CAUTION: Be sure to maintain a single database:single volume relationship.
If you add multiple databases to one volume, backup and disaster recovery operations on one database can result in conflicts between the databases in the volume.
Configuring Recovery Manager
Installation Location
By default, Recovery Manager installs in:
<system drive>:\Program Files\3PAR\RM\SQL
Search Path
After installation, you can instantly issue Recovery Manager CLI commands from any directory. Although the Recovery Manager executable is installed in a fixed location that is specified during installation, the location is automatically added to the WindowsPATHenvironment variable.
Changing the Recovery Manager TCP/IP Port
By default, HP 3PAR Recovery Manager for SQL uses port 9932 for cross-server communication. As long as port 9932 is available, no extra port configuration is necessary.
If port 9932 is not available or is occupied by another system process, you must change the Recovery Manager TCP/IP port.
1. Select an available port. The valid TCP/IP port range is 1024 to 65535.
2. To set the desired port number, run the Recovery Manager CLIHpRmCli Sql portconfig command.
For example, to change the port number to 9999, use:HpRmCli Sql portconfig -n 9999
CAUTION: If you are changing ports from the backup server, be sure to change the Recovery Manager ports on the production servers first. If you change the backup server port first, then you cannot then access the production servers to change their ports.
3. From the Windows Service console, restart theHP 3PAR Recovery Manager for SQLservice. 4. Repeat these steps for all production servers and the backup server.
Changing a Production Server Port from the Backup Server
1. On the backup server, run the following Recovery Manager CLI command:
HpRmCli Sql portconfig -s <production_server> -n <port_number> 2. On the production server, restart theHP 3PAR Recovery Manager for SQLservice.
Configuring Recovery Manager Policies
• To use the Recovery Manager GUI to set database policies, see“Using the Recovery Manager GUI” (page 34).
• To use the Recovery Manager CLI to set database policies, see“Using the Recovery Manager CLI” (page 54), for information about using theHpRmCli Sql policy command.
Configuring Mount Functionality
The Windows automount feature is not compatible with Recovery Manager. To ensure that the Windows automount feature is disabled:
1. Open a command prompt (cmd) window. 2. Enter:diskpart
3. At theDISKPARTprompt, enter:automount disable
4. Exit the command prompt window.
Managing SQL Servers across Multiple Active Directory Domains
If you are configuring Recovery Manager to work with SQL Servers across multiple Active Directory domains, you must store the appropriate login and password in the Windows user account on the backup server.
1. On the backup server:
• In Windows 2008, clickStart→Control Panel→User Accountsand click Manage your network passwords.
In theStored User Names and Passwordsdialog box, clickAdd.
• In Windows 2008 R2, clickStart→Control Panel→User Accountsand then clickManage your credentials→Add a Windows credential.
2. In theLog on tofield (or, for Windows 2008 R2, theInternet or network address field), enter the network location to which you want automatic access.
You can use a wildcard if you want access to multiple computers on a domain. For example:
*.<domain_name>
3. Enter the appropriate login and password.
4. Repeat these steps for all SQL Server domains in the Recovery Manager configuration. NOTE: Make sure that you add the FQDN while registering the server.
Configuring Recovery Manager for Availability Group
HP 3PAR Recovery Manager for SQL supports Microsoft SQL Server 2012 Availability Group databases. In this configuration, each availability group replica is connected to only one StoreServ and the StoreServ can be same or different from that of other replicas.
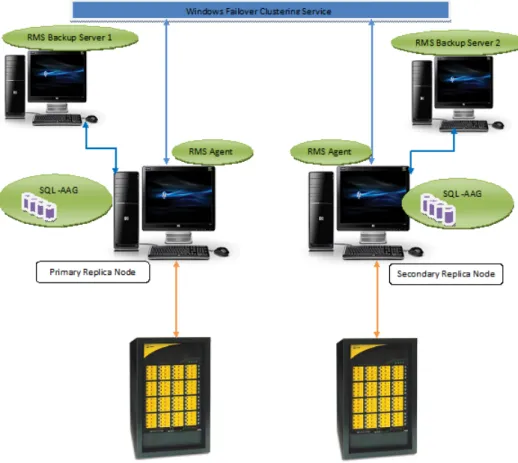
Figure 3 HP 3PAR Recovery Manager for SQL with Two Availability Replica Nodes
InFigure 3 (page 22), HP 3PAR Recovery Manager for SQL is configured with two availability replica nodes. The configuration can be extended up to five replica sites, one primary replica node and up to four secondary replica nodes. Virtual copy can be created for availability database on primary replica node only through the RMS backup server 1 and virtual copy for availability database on secondary replica node can be created only through RMS backup server 2. If both primary and secondary replica nodes are connected to same StoreServ, then any backup server can be used to create virtual copy.
NOTE: Connecting more than one StoreServ to backup server or production server is not supported and must be set as a default StoreServ for the HP 3PAR hardware provider.
Before you start configuring Recovery Manager for Availability Group:
• Make sure all the prerequisites for Availability Group are met before discovering Availability Group in the Recovery Manager for SQL. For list of prerequisites, seehttp://
msdn.microsoft.com/en-us/library/ff878487%28v=SQL.110%29.aspx.
• Make sure all the nodes participating in the Availability Group are part of the same Windows cluster and user has a Domain account and is an administrator for the system.
WARNING!
• HP 3PAR Recovery Manager for SQL does not support Availability Group databases received from multiple StoreServs.
• Do not make any change in the Availability Group configuration while HP 3PAR Recovery Manager for SQL operations are in progress. Otherwise, the results may be unpredictable. • Remote copy is not supported for availability databases.
• HP 3PAR Recovery Manager for SQL does not support Availability databases when any of the Availability Group replicas is a part SQL cluster.
NOTE: If there is any change in the configuration of Availability Group, user must perform a manual rescan in Recovery Manager for SQL.
Grouping Volumes into Autonomic Groups
You can group virtual volumes into autonomic groups (domain sets, volume sets, or host sets).
Domain Sets
If your SQL Server configuration involves multiple database servers that belong to different HP 3PAR Virtual Domains, you can use the domain set feature to group these virtual domains into one HP 3PAR StoreServ Storage System domain set. This configuration allows to use just one Recovery Manager backup server to manage all database servers.
• All hosts, users, and virtual volumes, including the backup server, must belong to the same HP 3PAR Virtual Domain.
• To mount a virtual copy or media backup to a server that is in a different HP 3PAR Virtual Domain than the domain in which it was created, you must use the Recovery Manager CLI commandHpRmCli Sql mount -ts. For more information about the command, see
“HpRmCli Sql mount” (page 63)
• To create a Remote Copy group for a virtual volume that is in a user-defined domain, the associated virtual volume on the Remote Copy backup server must be in the same user-defined domain.
To configure domain sets, use HP 3PAR CLI commands to:
1. Ensure you are running HP 3PAR Operating System Software 3.1.1 MU3 or later. 2. Ensure you have access to all domains.
3. Create a domain set that contains all HP 3PAR Virtual Domains for all the database servers. 4. Create a Common Provisioning Group (CPG) belonging to the new virtual domain.
5. Create a virtual volume belonging to the CPG created as in step 4. 6. Create a host belonging to the virtual domain.
7. Export the VLUN to the host.
8. On the Recovery Manager backup and production servers, set the user for the HP 3PAR VSS Provider Software.
9. Ensure the HP 3PAR StoreServ Storage System connection is good.
NOTE: For more information on HP 3PAR CLI commands, see the HP 3PAR Command Line
Interface Reference. For more information on HP 3PAR VSS Provider Software, see the HP 3PAR VSS Provider Software for Microsoft Windows User’s Guide.
Volume Sets
To configure volume sets:
• In a volume set, place one of the following:
◦
one database and its log files◦
one instance and its related filesNOTE: Do not place one volume in more than one volume set. Do not place unrelated volumes in a volume set.
Host Sets
You can configure your system with host sets and volume sets, or with host sets only. You can add all nodes of a cluster to one host set.
Testing SQL Connectivity
To verify that your SQL instances are reachable after you install and configure Recovery Manager on the backup server and all of the production servers:
1. Log onto the backup server as the system administrator. 2. Launch SQL Server Management Studio.
3. In theConnect to Serverwindow, enter or select the following:
Server type:Database Engine
Server name:Enter the server and instance name as follows:
• For the default instance, enter the name of your SQL server. For example:
Server name:Bottlenosed
• For a named instance, enter the name of your SQL server and the name of your SQL instance in the format:<SQLserverName>\<instanceName>. For example:
Server name:Bottlenosed\MSDE_VC Authentication:Windows Authentication
4. ClickConnect. A window appears as follows:
If you are able to connect, the installation and configuration is complete.
If the connection cannot be made, you must check the SQL configuration. For more information, see“Troubleshooting SQL Connectivity” (page 25).
Troubleshooting SQL Connectivity
1. Log onto the SQL production server as system administrator and check connectivity: • From the SQL production server, launch SQL Server Management Studio to make sure
the connection can be made locally.
• From Management Studio, right-clickSQL server→Properties→Connections. Make sure theAllow remote connections to this serverbox is selected.
• Make sure the SQL server for that instance has a status ofstarted.
• For named instances, make sure the SQL server browser has a status ofstarted. • Double-check the settings underProperties→Security.
• Double-check the settings underProperties→Permissions.
2. After you have checked the SQL configuration on the production server, log onto the backup server and run the SQL connectivity test again.
NOTE: Your backup server must pass this SQL connectivity test before you can use HP 3PAR Recovery Manager Software for Microsoft SQL Server.
3. Verify that theSQL Server Browserservice is running. Start the service if it is not running.
Configuring the Host Computer and the HP 3PAR StoreServ Storage System
For information about configuring the HP 3PAR StoreServ Storage System to communicate with the host computer, see the HP 3PAR StoreServ Storage Concepts Guide (OS 3.1.3) and the HP 3PAR
Command Line Interface Administrator’s Manual.
NOTE: The HP 3PAR StoreServ Storage System source volumes used by Recovery Manager must be base volumes. Recovery Manager cannot use physical copies or virtual copies as source volumes.
4 Configuring Backup Software
Overview
HP 3PAR Recovery Manager Software for Microsoft SQL Server can be used with either HP Data Protector, Symantec NetBackup, or Symantec Backup Exec to back up and restore the virtual copies created by Recovery Manager.
If you are using backup software in the backup environment, you must install a backup master or a backup client or a backup media on the backup server.
NOTE: For information about the supported versions of HP Data Protector, Symantec NetBackup, and Symantec Backup Exec; refer the latest Single Point of Connectivity Knowledge for HP Storage
Products (SPOCK) document. To obtain a copy of this documentation, seehttp://www.hp.com/ storage/spock.
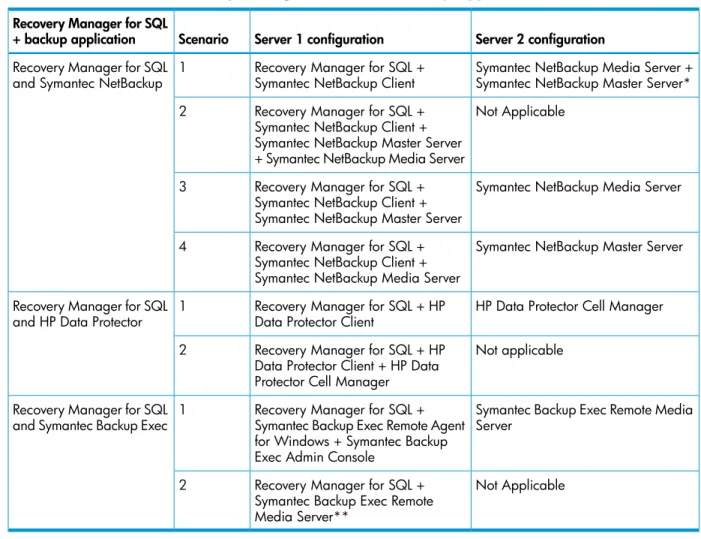
Table 3 (page 26) provides details of possible server combination scenarios for coexistence of Recovery Manager for SQL and backup applications such as HP Data Protector, Symantec NetBackup, or Symantec Backup Exec.
Table 3 Coexistence of Recovery Manager for SQL and Backup Applications
Server 2 configuration Server 1 configuration
Scenario Recovery Manager for SQL
+ backup application
Symantec NetBackup Media Server + Symantec NetBackup Master Server* Recovery Manager for SQL +
Symantec NetBackup Client 1
Recovery Manager for SQL and Symantec NetBackup
Not Applicable Recovery Manager for SQL +
Symantec NetBackup Client + 2
Symantec NetBackup Master Server + Symantec NetBackup Media Server
Symantec NetBackup Media Server Recovery Manager for SQL +
Symantec NetBackup Client + Symantec NetBackup Master Server 3
Symantec NetBackup Master Server Recovery Manager for SQL +
Symantec NetBackup Client + Symantec NetBackup Media Server 4
HP Data Protector Cell Manager Recovery Manager for SQL + HP
Data Protector Client 1
Recovery Manager for SQL and HP Data Protector
Not applicable Recovery Manager for SQL + HP
Data Protector Client + HP Data Protector Cell Manager 2
Symantec Backup Exec Remote Media Server
Recovery Manager for SQL + Symantec Backup Exec Remote Agent 1
Recovery Manager for SQL and Symantec Backup Exec
for Windows + Symantec Backup Exec Admin Console
Not Applicable Recovery Manager for SQL +
Symantec Backup Exec Remote Media Server**
2
Before You Begin
Ensure that you have set up a storage unit for storing virtual copy backups. For more information, see the documentation for the backup software you are using.
To configure Symantec NetBackup to function with Recovery Manager for SQL, set the following parameters during the configuration process:
Setting Backup Policy Parameter
MS-Windows-NT Policy type
Select the machine on which the Recovery Manager Backup Server component is installed.
Clients
Add the client to backup policy by entering NetBIOS name. Ensure that this option is not selected.
Collect disaster recovery information for Bare Metal Restore
Full backup Type of backup
Activate all the time slots: Starting times for backups
• Modify Day: Mon
• Start Time: 12:00:00AM
• End Day: Sun
• End Time: 12:00:00AM
• Duration (days): 7
NOTE:
• If the backup server is running the NetBackup client interface, NetBackup cannot validate the policy.
• If you add the NetBackup path to the system’sPATHenvironment variable after you install HP 3PAR Recovery Manager Software for Microsoft SQL Server, you must restart Recovery Manager for the changes to take effect.
• Recovery Manager supports full backups when running on a NetBackup master server. Recovery Manager also supports user-defined backups when running on a NetBackup client machine. • If Recovery Manager for SQL is running under the workgroup, then the client added in the
Symantec NetBackup Policy supports only host name. Fully Qualified Domain Name (FQDN) is not supported.
Configuring HP Data Protector
Requirements
• HP Data Protector Software
• Each data list name (also known as the backup specification) must be unique across the entire system
Setting Up the HP Data Protector Backup Specification
To use HP Data Protector with Recovery Manager, you must set up a default backup specification. The backup specification specifies the default mount point and the necessary devices for tape backup.
1. Open the Data Protector GUI. 2. SelectBackup→Add Backup.
3. In theCreate New Backupdialog box, selectBlank_Filesystem_Backupand click OK. 4. ClickNext(do not select any items).
5. Select the device that Data Protector is to use for backups. 6. ClickNextuntil theManual add... appears.
7. ClickManual add...
8. SelectWindows filesystemand clickNext.
9. Enter the appropriate client system, mount point, and description. HP recommends:
<server_used_as_backup_client>
Client system
C:
Mount point
default
Description
NOTE: Recovery Manager uses this information only to create a backup template. Recovery Manager does not use the actual data entered.
10. ClickNextuntil theFinish button is enabled. 11. Save the backup specification.
When you issue theHpRmCli Sql backupcommand with the-dloption, use the name with which you saved the backup specification (e.g.,DPbackup) as the value of the-dl option.
Setting Up HP Data Protector Cell Manager Access
NOTE: HP Data Protector Cell Manager 8.0 is not supported on Microsoft Windows x86 hosts. To use HP Data Protector with Recovery Manager, you must enable the system accounts on the registered client system to access the Data Protector Cell Manager.
1. Open the Data Protector GUI. 2. In the tool bar menu, selectUsers.
3. Under theUsersfolder in the left pane, selectadmin→SYSTEM.
4. In theClient systemmenu on theGeneraltab in the right pane, select<Any>.
For more information on installing HP Data Protector, see HP Data Protector documentation.
Configuring Backup Exec
Requirements
• Symantec Backup Exec Media server on HP 3PAR Recovery Manager for SQL backup server Symantec Backup Exec software
1.
2. Symantec Backup Exec Media server user name and password must be same as the HP 3PAR Recovery Manager for SQL Backup Server, or you must add the current user to Backup Exec.
• Symantec Backup Exec Remote Media server
Symantec Backup Exec Remote media server must be installed on the same domain.
1.
2. HP 3PAR Recovery Manager for SQL backup server must be installed with Symantec Backup Exec remote agent for windows and Symantec Backup Exec administrator console. To do this:
a. Install media server on Recovery Manager for SQL production server.
b. Install remote agent from production server to the backup server.
c. Install Symantec Backup Exec remote administrator console on the backup server.
3. From the Symantec Backup Exec media server, Symantec Backup Remote administrator console install path must be accessible with network path. For example, if Symantec
Backup Exec is installed onC:\Program Files\Symantec\Backup Exec then \\hostname\c$\ Program Files\Symantec\Backup Execmust be accessible
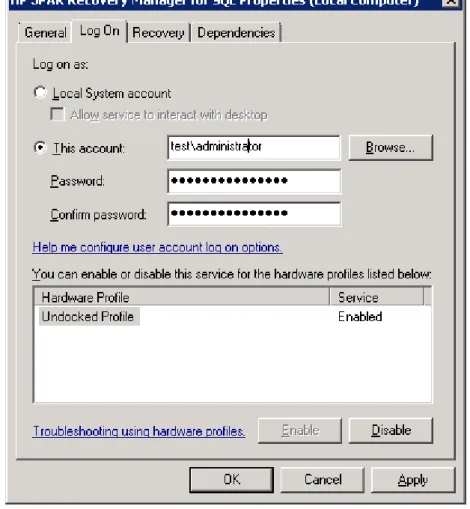
4. To support Symantec Backup Exec Remote media server, HP 3PAR Recovery manager for SQL must be running with domain administrator privileges. To run the HP 3PAR Recovery manager for SQL with domain administrator privileges:
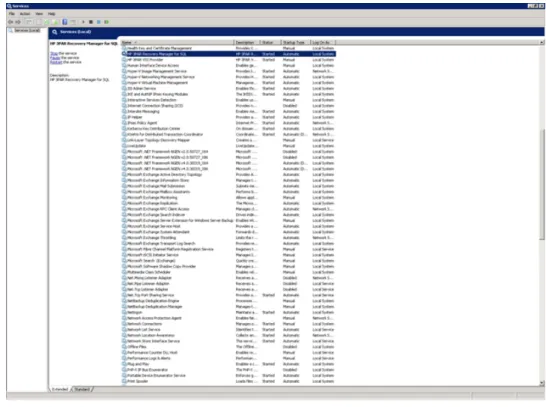
a. To open the services, selectWindows→Control Panel→Administrative Tools→Services.
b. Locate and double-clickHP 3PAR Recovery Manager for SQL service. Figure 4 HP 3PAR Recovery Manager for SQL service
c. SelectLog Ontab.
Figure 5 HP 3PAR Recovery Manager for SQL Properties
Figure 6 HP 3PAR Recovery Manager for SQL Properties Account
e. ClickApplyand then selectOK. You must restart the service when asked for.
NOTE: These changes must be done on all the servers wherever the HP 3PAR Recovery Manager for SQL is running.
• Symantec Backup Exec
• Media server user name and password must be same as the Backup Server, or you must add the current user to Backup Exec
Setting Up the Symantec Backup Exec
NOTE: To use Symantec Backup Exec with Recovery Manager, either remote administrator console or typical setup (that is mediaserver, administrator console) must be installed on Recovery Manager for SQL backup server. Device must be configured in Backup Exec for backup.
1. Open Symantec Backup Exec administrator console. 2. From the tool bar, select the device you want to backup.
3. To configure the device for backup, follow the onscreen instructions.
Using Your Backup Software
• The default mount point for virtual copy backups is:
<system drive>:\3parSnapshot
• You must manually synchronize backups. If a backup expires in your backup software, you must manually remove the backup from Recovery Manager. If you remove a valid backup from Recovery Manager, you must manually remove it from your backup software.
• Recovery Manager does not track restore progress. You must use backup software to monitor restore progress.
• For more information about using CLI commands with your backup software, seeHpRmCli Sql backup,HpRmCli Sql deletebackup,HpRmCli Sql listbackup, andHpRmCli Sql restorein“Using the Recovery Manager CLI” (page 54).
• For more information about using your backup software to back virtual copies up to media, see“Backing Up a Virtual Copy” (page 46).
• For more information about using your backup software to restore virtual copies from media, see“Restoring Instances, Databases, and Volumes” (page 49).
Using Symantec NetBackup
• Symantec NetBackup supports Master, Client, and Media modes for tape backups. • Symantec NetBackup software is case-sensitive. If you are using NetBackup, make sure all
information entered pertaining to the policy is supplied with the proper case.
• When you are using NetBackup to back up to media or restore from media, monitor the progress using the progress log:
<RM installation location>\log\nbulog\database_timestamp.log
• To modify the timeout value for NetBackup software initialization, see “Understanding the Registry” (page 17).
Using HP Data Protector
For each HP Data Protector backup you create, a postscript (.bat) file is created in the$DP_HOME\ binfolder (where $DP_HOME is the Data Protector install location; for example,C:\ program files\Omniback). This script cleans up after the associated backup is complete.
NOTE: Recovery Manager does not clean these postscripts. After a backup is complete (either successfully or with failures), you can manually remove the associated postscript batch file if desired.
Using Symantec Backup Exec
Symantec Backup Exec supports Media server and remote administrator console for backups. When using the Backup Exec to backup to media or restore for media, monitor the progress using the administrator console.
NOTE: While performing concurrent backup operations:
• Backup of different databases with different policies is allowed while using Symantec NetBackup.
• Backup of different databases is allowed, while using HP Data Protector or Symantec Backup Exec.
• Backups of different databases can be taken concurrently using Symantec NetBackup, HP Data Protector, or Symantec Backup Exec. For example, backup of database db1 using Symantec NetBackup and database db2 using HP Data Protector can execute simultaneously.
5 Using the Recovery Manager GUI
Overview of the Recovery Manager GUI
HP 3PAR Recovery Manager Software for SQL Server provides a Graphical User Interface (GUI) for managing SQL servers.
The Recovery Manager GUI enables you to create, remove, mount, unmount, back up, or restore a virtual copy of an individual database or an entire instance (that is, all databases within an instance). In addition, the Recovery Manager GUI enables you to configure automatic email notifications, schedule automatic creation and backup of virtual copies, view event messages, and synchronize the backup repository.
NOTE: Only NetBIOS names should be used when specifying values for any server type such as production server, backup server, mount server, target server, media server, master server. The Recovery Manager GUI contains a menu bar, a node tree pane on the left, an informational pane on the right, and a command log window.
Menu Bar
The menu bar consists of the following menu options: • Console- allows you to exit the GUI.
• Actions- provides access to virtual copy functionality, includes create, email notification, mount, policies, register, remove, rescan, restore, refresh, remote copy, and unmount. • Scheduled Tasks- provides access to the Task Manager.
• Help- This contains the following sub menu items:
Event Messages- This provides the descriptions for event messages that may be generated during Recovery Manager operations.
◦
◦
Help- This is available for quickly accessing relevant information.◦
About- This provides anAbout HP 3PAR Recovery Manager screen which gives the product version information.Node Tree Pane
After you register the SQL server, the node tree pane displays the SQL server’s instances, databases, virtual copies, and backup records as a nested tree. Servers configured in a non-cluster environment are represented by blue icons; servers configured in a cluster environment are represented by orange icons. For more information about registering SQL servers, see“Registering the Server” (page 35).
NOTE: An Availability Group database is indicated by icon in the Node Tree Pane. For an Availability Group database, Availability Group Database Name and its node are displayed in the database detail pane. This information is also displayed in the detail pane for the Virtual Copies and Backup Copies created for the Availability Group databases.
Informational Pane
When a tree node is selected, the informational pane displays detailed information about the node. If the content exceeds the width of the pane, a scroll bar appears at the bottom of the pane. When viewing information, to sort the content click the applicable table headings.
Status and Summary Information
After launching HP 3PAR Recovery Manager for SQL, you can click the MS SQL Server node to see a detailed status and summary of relevant information in a tabular format:
• Sever Name • Cluster (True/False) • Version
• Number of Instances • Instance Names • Database Count
• Virtual Copy Count for each instance • Backup Count for each instance
Table management features like Sorting are available for each column in the table.
• Columns having timestamp values in date/time format (MM/dd/yy hh:mm:ss) are left justified. • Columns having numeric values and timestamp values in Unix time (number format), are right
justified.
Opening the Recovery Manager GUI
To open the Recovery Manager GUI, double-click theHP 3PAR Recovery Manager for Microsoft SQL Servericon on your desktop. Alternatively, in the taskbar, click Start→All
Programs→3PAR→Recovery Manager for SQL Server.
NOTE: If only production server is installed, you might not see any icons on the desktop or any menu in the start menu of windows.
Closing the Recovery Manager GUI
To close the Recovery Manager GUI, do one of the following: • SelectConsole→Exit.
• Close the entire window.
Registering the Server
For the Recovery Manager GUI to manage SQL servers, the SQL Server instances must be registered. When registering an SQL server instance in the Recovery Manager GUI, sysadmin role is required. To configure the sysadmin role before registering the SQL server instance in the Recovery Manager GUI:
1. Connect to the SQL instance through the SQL Management Studio.
2. Select theSecurityoption and clickNT AUTHORITY\SYSTEMfromLoginoption. 3. TheLogin properties - NT AUTHORITY\SYSTEMwindow appears.
4. ClickServer Roles, selectsysadminrole and click OK.
5. Register the SQL server again with HP 3PAR Recovery Manager Software for SQL. To register an SQL instance:
1. Right-click theMS SQL Server node and selectRegister Server.
NOTE: If backup server and SQL production servers reside on different networks, theHP 3PAR Recovery Manager for Microsoft SQL Server Registerwindow may not display all of the available SQL servers.
In addition, the displayed list of SQL servers can vary depending on factors such as network traffic, timeouts, routers, lost broadcasted packets, and other network issues.
NOTE: In Microsoft SQL 2008, Microsoft SQL 2012, or Microsoft SQL 2014, thesysadmin role is not selected for NT account (NT AUTHORITY\SYSTEM ), by default. For HP 3PAR Recovery Manager for SQL to work, user must explicitly configure the sysadmin role if it is not enabled.
2. Depending on whether theHP 3PAR Recovery Manager for Microsoft SQL Server Register
window displays the SQL server to be registered, do one of the following:
• If the list displays the SQL server to be registered, Recovery Manager discovered the server instance, Do as follows:
a. Select theRegistercheckbox for the server instance.
b. ClickOK.
• If the list does not display the SQL server to be registered, you must manually register the instance. To manually register the instance:
1. In theServer Nametext box, enter the SQL server name and instance name. Use the formatSQLServerName\instanceNameas follows:
◦
To register the default instance, either enter the SQL server name only, or enter the SQL server name anddefault, separated by a backslash.For example, AztecorAztec\default.
◦
To register a named instance, enter the SQL server and instance name, separated by a backslash. Multiple server names can be added simultaneously byseperating server names with a comma (,).
For example:Aztec\Bld2.
◦
Multiple server names can be added simultaneously by separating server name or instance name with a comma (,).NOTE: Do not use the following characters when naming a server: `~!@#$%^&* ( ) + = _ [ ] { } | \” ‘ ,< > / ?
Do not use the following characters when naming an instance:`~!@%^&* ( ) + = [ ] { } | \” ‘ ,< > / ?
Do not use$as the first character in an instance name and the names are limited to 16 characters.
2. ClickAdd. Recovery Manager adds the new SQL server and instance to the list and automatically selects theRegistercheckbox for the entry.
3. ClickOKto start the registration.
NOTE: Depending on the network traffic, it may take up to several minutes for the Recovery Manager GUI to register a SQL server instance.
3. Depending on the success of the registration, do one of the following:
• If Recovery Manager displaysUpdate Success in the entry'sStatuscolumn, Recovery Manager successfully registered the instance. Click OK. You can now use the Recovery Manager GUI to manage the instance.
• If Recovery Manager displaysUpdate Failedin the entry'sStatuscolumn, Recovery Manager was not able to connect to the instance.
a. To fix any connectivity issues, see“Troubleshooting SQL Connectivity” (page 25). The instance must pass the SQL connectivity test before the Recovery Manager GUI can successfully register the instance.
b. Repeat the registration steps for the SQL server until Recovery Manager successfully registers the instance.
Updating Registration after Server Modification
If configuration of registered instance is modified (for example, a new database is created under that instance), the instance must be rescanned to update the registration.
To rescan an instance:
1. Right-click theMS SQL Server node. 2. SelectRescan Server Configuration.
If Availability Group databases are configured on Microsoft SQL Server 2012, rescan is recommended in following instances:
• There is a change in Availability Group configuration.
• An SQL Server is migrated to SQL 2012 from its previous versions.
NOTE: When a database is removed from Availability Group, running the RESCAN command will remove Availability Group information from the database information list.
Unregistering a SQL Server Instance
To remove a server instance from the list of registered servers: 1. Right-click the MS SQL Server node.
2. SelectRegister Server.
3. Clear theRegister checkbox for the server instance you are deleting.
4. ClickOK.
Setting the Recovery Manager Policy
Recovery Manager applies policy settings at the instance level; therefore, each instance can have its own policy. In addition, you can configure individual virtual copies with their own policy settings.
How Recovery Manager Policies Work
The Recovery Manager policy-setting feature allows you to:
• Specify either a numeric-based or expiration-based policy for each instance and database on a selected SQL server
• Specify a retention time during which the instance or database and its virtual copies cannot be removed (if you have a Virtual Lock license)
NOTE: Modifications made to an existing policy are not retroactive. Virtual copies created under a previous policy (whether numeric or expiration-based) retain the policy setting under which they were created.
Numeric-Based Policies
If you specify a numeric-based policy, you can modify the maximum number of virtual copies allowed per database and per instance. By default, Recovery Manager allows you to create a maximum of 10 virtual copies per database and 10 virtual copies per instance.
The numeric-based policy also enables you to set Recovery Manager to automatically remove the oldest virtual copy for each database and instance, after the maximum limit of virtual copies is reached, before creating a new virtual copy. If you do not choose to automatically remove virtual copies when required to create a new virtual copy, you must manually delete old virtual copies before you can create new copies.
NOTE: A virtual copy must be unmounted to be removed. If the oldest virtual copy is mounted, a new virtual copy is not created until the oldest virtual copy is unmounted.
Expiration-Based Policies
If you choose an expiration-based policy, you can set Recovery Manager to automatically remove virtual copies after a specified period of time has elapsed.
If you specify an expiration time for a remote virtual copy:
• If Remote Copy is set up in periodic mode, Recovery Manager sets the expiration time for the remote virtual copy on the Remote Copy backup server.
• If Remote Copy is set up in synchronous mode, Recovery Manager sets the expiration time for both the virtual copy on the primary server and the remote virtual copy on the Remote Copy backup server.
For more information, see the HP 3PAR Remote Copy Software User’s Guide.
The expiration-based policy option is only available if HP 3PAR StoreServ Storage System is running HP 3PAR Operating System Software 3.1.1 MU3 or later and a valid Virtual Lock license is available on the storage system.
Retention Time Restrictions
If you have a Virtual Lock license, you can set a retention time for virtual copies. The instance or the database and the associated virtual copies created within the retention period cannot be removed during the retention period.