Symantec™ Endpoint
Protection Small Business
Edition Client Guide
Symantec Endpoint Protection Small Business Edition
Client Guide
The software described in this book is furnished under a license agreement and may be used only in accordance with the terms of the agreement.
Documentation version 12.01.00.00
Legal Notice
Copyright © 2011 Symantec Corporation. All rights reserved.
Symantec, the Symantec Logo, Bloodhound, Confidence Online, Digital Immune System, LiveUpdate, Norton, Sygate, and TruScan are trademarks or registered trademarks of Symantec Corporation or its affiliates in the U.S. and other countries. Other names may be trademarks of their respective owners.
This Symantec product may contain third party software for which Symantec is required to provide attribution to the third party (“Third Party Programs”). Some of the Third Party Programs are available under open source or free software licenses. The License Agreement accompanying the Software does not alter any rights or obligations you may have under those open source or free software licenses. Please see the Third Party Legal Notice Appendix to this Documentation or TPIP ReadMe File accompanying this Symantec product for more information on the Third Party Programs.
The product described in this document is distributed under licenses restricting its use, copying, distribution, and decompilation/reverse engineering. No part of this document may be reproduced in any form by any means without prior written authorization of Symantec Corporation and its licensors, if any.
THE DOCUMENTATION IS PROVIDED "AS IS" AND ALL EXPRESS OR IMPLIED CONDITIONS, REPRESENTATIONS AND WARRANTIES, INCLUDING ANY IMPLIED WARRANTY OF MERCHANTABILITY, FITNESS FOR A PARTICULAR PURPOSE OR NON-INFRINGEMENT, ARE DISCLAIMED, EXCEPT TO THE EXTENT THAT SUCH DISCLAIMERS ARE HELD TO BE LEGALLY INVALID. SYMANTEC CORPORATION SHALL NOT BE LIABLE FOR INCIDENTAL OR CONSEQUENTIAL DAMAGES IN CONNECTION WITH THE FURNISHING,
PERFORMANCE, OR USE OF THIS DOCUMENTATION. THE INFORMATION CONTAINED IN THIS DOCUMENTATION IS SUBJECT TO CHANGE WITHOUT NOTICE.
The Licensed Software and Documentation are deemed to be commercial computer software as defined in FAR 12.212 and subject to restricted rights as defined in FAR Section 52.227-19 "Commercial Computer Software - Restricted Rights" and DFARS 227.7202, "Rights in Commercial Computer Software or Commercial Computer Software Documentation", as applicable, and any successor regulations. Any use, modification, reproduction release, performance, display or disclosure of the Licensed Software and Documentation by the U.S. Government shall be solely in accordance with the terms of this Agreement.
Symantec Corporation 350 Ellis Street
Mountain View, CA 94043 http://www.symantec.com
Technical Support
Symantec Technical Support maintains support centers globally. Technical Support’s primary role is to respond to specific queries about product features and functionality. The Technical Support group also creates content for our online Knowledge Base. The Technical Support group works collaboratively with the other functional areas within Symantec to answer your questions in a timely fashion. For example, the Technical Support group works with Product Engineering and Symantec Security Response to provide alerting services and virus definition updates.
Symantec’s support offerings include the following:
■ A range of support options that give you the flexibility to select the right amount of service for any size organization
■ Telephone and/or Web-based support that provides rapid response and up-to-the-minute information
■ Upgrade assurance that delivers software upgrades
■ Global support purchased on a regional business hours or 24 hours a day, 7 days a week basis
■ Premium service offerings that include Account Management Services For information about Symantec’s support offerings, you can visit our Web site at the following URL:
www.symantec.com/business/support/
All support services will be delivered in accordance with your support agreement and the then-current enterprise technical support policy.
Contacting Technical Support
Customers with a current support agreement may access Technical Support information at the following URL:
www.symantec.com/business/support/
Before contacting Technical Support, make sure you have satisfied the system requirements that are listed in your product documentation. Also, you should be at the computer on which the problem occurred, in case it is necessary to replicate the problem.
When you contact Technical Support, please have the following information available:
■ Hardware information
■ Available memory, disk space, and NIC information ■ Operating system
■ Version and patch level ■ Network topology
■ Router, gateway, and IP address information ■ Problem description:
■ Error messages and log files
■ Troubleshooting that was performed before contacting Symantec ■ Recent software configuration changes and network changes
Licensing and registration
If your Symantec product requires registration or a license key, access our technical support Web page at the following URL:
www.symantec.com/business/support/
Customer service
Customer service information is available at the following URL:
www.symantec.com/business/support/
Customer Service is available to assist with non-technical questions, such as the following types of issues:
■ Questions regarding product licensing or serialization
■ Product registration updates, such as address or name changes
■ General product information (features, language availability, local dealers) ■ Latest information about product updates and upgrades
■ Information about upgrade assurance and support contracts ■ Information about the Symantec Buying Programs
■ Advice about Symantec's technical support options ■ Nontechnical presales questions
Support agreement resources
If you want to contact Symantec regarding an existing support agreement, please contact the support agreement administration team for your region as follows:
[email protected] Asia-Pacific and Japan
[email protected] Europe, Middle-East, and Africa
[email protected] North America and Latin America
Additional enterprise services
Symantec offers a comprehensive set of services that allow you to maximize your investment in Symantec products and to develop your knowledge, expertise, and global insight, which enable you to manage your business risks proactively. Enterprise services that are available include the following:
Managed Services remove the burden of managing and monitoring security devices and events, ensuring rapid response to real threats.
Managed Services
Symantec Consulting Services provide on-site technical expertise from Symantec and its trusted partners. Symantec Consulting Services offer a variety of prepackaged and customizable options that include assessment, design, implementation, monitoring, and management capabilities. Each is focused on establishing and maintaining the integrity and availability of your IT resources. Consulting Services
Education Services provide a full array of technical training, security education, security certification, and awareness communication programs.
Education Services
To access more information about enterprise services, please visit our Web site at the following URL:
www.symantec.com/business/services/
Technical Support
... 4Chapter 1
Getting started on the client
... 11About the Symantec Endpoint Protection Small Business Edition client ... 11
Getting started on the Status page ... 12
About alert icons on the Status page ... 14
Scanning your computer immediately ... 15
Pausing and delaying scans ... 16
Where to get more information ... 17
Chapter 2
Responding to alerts and notifications
... 19Types of alerts and notifications ... 19
About scan results ... 21
Responding to a virus or risk detection ... 21
About removing a virus or risk from an infected file ... 23
Responding to Download Insight messages that ask you to allow or block a file that you try to download ... 24
Responding to messages that ask you to allow or block an application ... 25
About expired license messages ... 26
Chapter 3
Making sure that your computer is protected
... 29Managing your computer's protection ... 29
Updating the computer's protection ... 31
Updating the content immediately ... 32
Updating the content on a schedule ... 33
How to determine whether the client is connected and protected ... 33
Hiding and displaying the notification area icon ... 34
About managed clients and unmanaged clients ... 35
Checking whether the client is managed or unmanaged ... 36
About enabling and disabling protection ... 37
Enabling or disabling protection on the client computer ... 38
Enabling or disabling Auto-Protect ... 39
Contents
Enabling, disabling, and configuring Tamper Protection ... 40
About the logs ... 41
Viewing the logs ... 43
Enabling the Packet Log ... 44
Exporting log data ... 44
Chapter 4
Managing scans
... 47Managing scans on your computer ... 47
How virus and spyware scans work ... 52
About the types of scans ... 53
About the types of Auto-Protect ... 55
About viruses and security risks ... 57
How scans respond to a virus or risk detection ... 60
How Symantec Endpoint Protection Small Business Edition uses reputation data to make decisions about files ... 61
Scheduling a user-defined scan ... 62
Scheduling a scan to run on demand or when the computer starts up ... 65
Managing Download Insight detections on your computer ... 66
Customizing Download Insight settings ... 69
Customizing virus and spyware scan settings ... 70
Configuring actions for malware and security risk detections ... 71
About excluding items from scans ... 75
Excluding items from scans ... 76
Managing quarantined files on your client computer ... 78
About quarantining files ... 79
Quarantining a file from the Risk or Scan Log ... 79
Manually submitting a potentially infected file to Symantec Security Response for analysis ... 80
About submitting information about detections to Symantec Security Response ... 80
Submitting information about detections to Symantec Security Response ... 81
About the client and the Windows Security Center ... 83
Managing SONAR on your client computer ... 84
About SONAR ... 85
About the files and applications that SONAR detects ... 86
Chapter 5
Managing the firewall and intrusion prevention
... 87About Network Threat Protection ... 87
Managing firewall protection ... 88
How a firewall works ... 89
Contents 8
Viewing network activity ... 90
About the firewall rule, firewall setting, and intrusion prevention processing order ... 91
Changing the order of firewall rules ... 92
How the firewall uses stateful inspection ... 93
Setting up firewall rules ... 93
Adding a firewall rule ... 94
Exporting and importing firewall rules ... 94
Managing intrusion prevention ... 95
How intrusion prevention works ... 96
Enabling or disabling intrusion prevention ... 97
Configuring intrusion prevention notifications ... 98
Index
... 999 Contents
Contents 10
Getting started on the client
This chapter includes the following topics:■ About the Symantec Endpoint Protection Small Business Edition client
■ Getting started on the Status page
■ About alert icons on the Status page
■ Scanning your computer immediately
■ Where to get more information
About the Symantec Endpoint Protection Small
Business Edition client
The Symantec Endpoint Protection Small Business Edition client combines several layers of protection to proactively secure your computer against known and unknown threats and network attacks.
Table 1-1describes each layer of protection.
1
Chapter
Table 1-1 Types of protection
Description Layer
This layer combats a wide range of threats, including spyware, worms, Trojan horses, rootkits, and adware. File System Auto-Protect continuously inspects all computer files for viruses and security risks. Internet Email Auto-Protect scans the incoming and outgoing email messages that use the POP3 or SMTP communications protocol over the Secure Sockets Layer (SSL). Microsoft Outlook Auto-Protect scans incoming and outgoing Outlook email messages.
See“Managing scans on your computer”on page 47. Virus and Spyware Protection
Proactive threat technology includes SONAR, which offers real-time protection against zero-day attacks. SONAR can stop attacks even before traditional signature-based definitions detect a threat. SONAR uses heuristics as well as file reputation data to make decisions about
applications or files.
See“Managing SONAR on your client computer” on page 84.
Proactive Threat Protection
This layer comprises firewall and intrusion prevention protection. The rules-based firewall prevents
unauthorized users from accessing your computer. The intrusion prevention system automatically detects and blocks network attacks.
See“Managing firewall protection”on page 88. Network Threat Protection
Your administrator manages which types of protection the management server should download to your client computer. The client automatically downloads the virus definitions, IPS definitions, and the product updates to your computer. Users who travel with portable computers can get virus definitions and product updates directly from LiveUpdate.
See“Updating the computer's protection”on page 31.
Getting started on the Status page
When you open the client, the main window and the Status page appear.
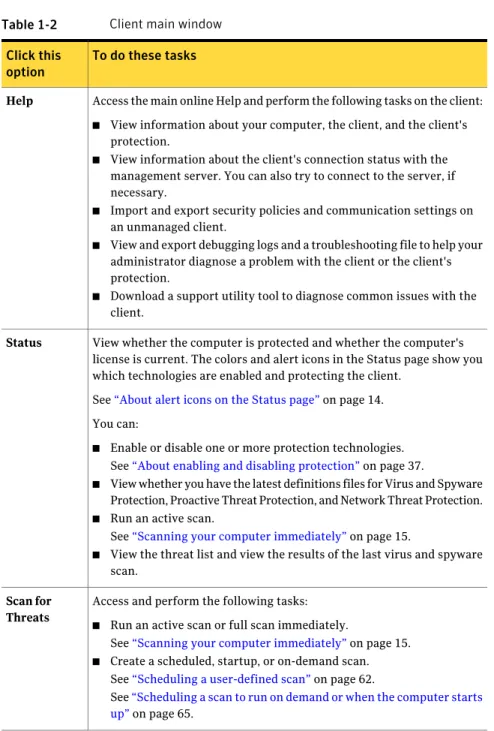
Table 1-2displays the main tasks that you can perform from the client's menu bar and Help option.
Getting started on the client
Getting started on the Status page
Table 1-2 Client main window
To do these tasks Click this
option
Access the main online Help and perform the following tasks on the client:
■ View information about your computer, the client, and the client's protection.
■ View information about the client's connection status with the management server. You can also try to connect to the server, if necessary.
■ Import and export security policies and communication settings on an unmanaged client.
■ View and export debugging logs and a troubleshooting file to help your administrator diagnose a problem with the client or the client's protection.
■ Download a support utility tool to diagnose common issues with the client.
Help
View whether the computer is protected and whether the computer's license is current. The colors and alert icons in the Status page show you which technologies are enabled and protecting the client.
See“About alert icons on the Status page”on page 14. You can:
■ Enable or disable one or more protection technologies. See“About enabling and disabling protection”on page 37.
■ View whether you have the latest definitions files for Virus and Spyware Protection, Proactive Threat Protection, and Network Threat Protection.
■ Run an active scan.
See“Scanning your computer immediately”on page 15.
■ View the threat list and view the results of the last virus and spyware scan.
Status
Access and perform the following tasks:
■ Run an active scan or full scan immediately.
See“Scanning your computer immediately”on page 15.
■ Create a scheduled, startup, or on-demand scan. See“Scheduling a user-defined scan”on page 62.
See“Scheduling a scan to run on demand or when the computer starts up”on page 65.
Scan for Threats
13 Getting started on the client
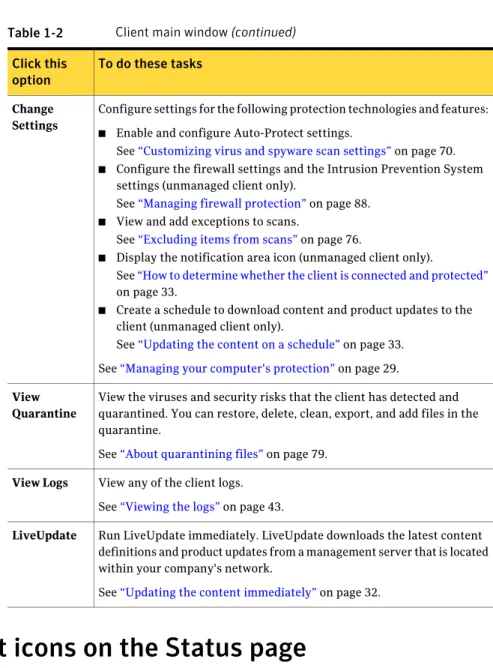
Table 1-2 Client main window (continued)
To do these tasks Click this
option
Configure settings for the following protection technologies and features:
■ Enable and configure Auto-Protect settings.
See“Customizing virus and spyware scan settings”on page 70.
■ Configure the firewall settings and the Intrusion Prevention System settings (unmanaged client only).
See“Managing firewall protection”on page 88.
■ View and add exceptions to scans.
See“Excluding items from scans”on page 76.
■ Display the notification area icon (unmanaged client only).
See“How to determine whether the client is connected and protected” on page 33.
■ Create a schedule to download content and product updates to the client (unmanaged client only).
See“Updating the content on a schedule”on page 33. See“Managing your computer's protection”on page 29.
Change Settings
View the viruses and security risks that the client has detected and quarantined. You can restore, delete, clean, export, and add files in the quarantine.
See“About quarantining files”on page 79.
View Quarantine
View any of the client logs. See“Viewing the logs”on page 43.
View Logs
Run LiveUpdate immediately. LiveUpdate downloads the latest content definitions and product updates from a management server that is located within your company's network.
See“Updating the content immediately”on page 32.
LiveUpdate
About alert icons on the Status page
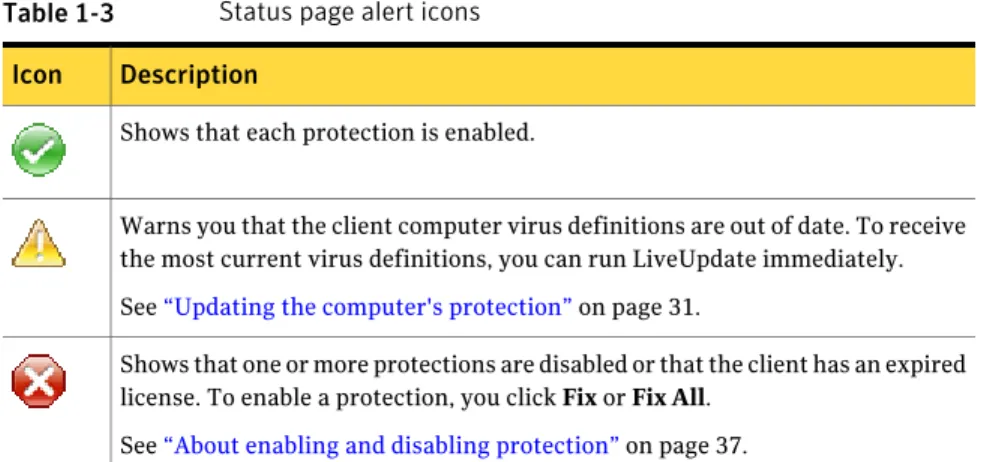
The top of the Status page displays various alert icons to indicate the protection status of the computer.
Getting started on the client
About alert icons on the Status page
Table 1-3 Status page alert icons
Description Icon
Shows that each protection is enabled.
Warns you that the client computer virus definitions are out of date. To receive the most current virus definitions, you can run LiveUpdate immediately. See“Updating the computer's protection”on page 31.
Shows that one or more protections are disabled or that the client has an expired license. To enable a protection, you click Fix or Fix All.
See“About enabling and disabling protection”on page 37.
Scanning your computer immediately
You can manually scan for viruses and security risks at any time. You should scan your computer immediately if you recently installed the client, or if you think you have recently received a virus.
See“Scheduling a scan to run on demand or when the computer starts up”
on page 65.
See“Updating the computer's protection”on page 31.
For more information on the options on each dialog box, click Help.
To scan your computer immediately
◆ Do one of the following actions:
■ In the client, on the Status page, next to Virus and Spyware Protection, click Options > Run Active Scan.
■ In the client, in the sidebar, click Scan for threats. Do one of the following actions:
■ Click Run Active Scan. ■ Click Run Full Scan.
■ In the scan list, right-click any scan, and then click Scan Now. The scan starts.
You can view the scan progress unless your administrator disables the option. To view scan progress, click the message link that appears for the current scan: scan in progress.
See“About scan results”on page 21.
15 Getting started on the client
You can also pause or cancel the scan. See“Pausing and delaying scans”on page 16.
To scan your computer from Windows
◆ In the My Computer window or the Windows Explorer window, right-click a file, folder, or drive, and then click Scan For Viruses.
This feature is supported on both 32-bit and 64-bit operating systems.
Note:Insight Lookup does not scan a folder or a drive when you perform this type of scan. Insight Lookup does run if you select a file or group of files to scan.
Pausing and delaying scans
The pause feature lets you stop a scan at any point during the scan and resume it at another time. You can pause any scan that you initiate.
Your administrator determines whether you can pause an administrator-initiated scan. If the Pause Scan option is not available, your administrator disabled the pause feature. If your administrator has enabled the Snooze feature, you can delay an administrator-scheduled scan for a set interval of time.
When a scan resumes, it starts from where the scan stopped.
Note:If you pause a scan while the client scans a compressed file, the client might take several minutes to respond to the pause request.
See“Managing scans on your computer”on page 47.
To pause a scan you initiated
1
When the scan runs, in the scan dialog box, click Pause Scan.The scan stops where it is and the scan dialog box remains open until you start the scan again.
2
In the scan dialog box, click Resume Scan to continue the scan.To pause or delay an administrator-initiated scan
1
When an administrator-initiated scan runs, in the scan dialog box, click PauseScan.
2
In the Scheduled Scan Pause dialog box, do one of the following actions: ■ To pause the scan temporarily, click Pause.Getting started on the client
Scanning your computer immediately
■ To delay the scan, click Snooze 1 hour or Snooze 3 hours.
Your administrator specifies the period of time that you are allowed to delay the scan. When the pause reaches the limit, the scan restarts from where it began. Your administrator specifies the number of times that you can delay the scheduled scan before this feature is disabled. ■ To continue the scan without pausing, click Continue.
Where to get more information
The product includes several sources of information.
Table 1-4displays the Web sites where you can get additional information to help you use the product.
Table 1-4 Symantec Web sites
Web address Types of information
http://www.symantec.com/business/products/downloads/ Symantec Endpoint Protection Small
Business Edition software
http://www.symantec.com/business/support/overview.jsp?pid=55357 Public knowledge base
Releases and updates
Manuals and documentation updates Contact options
http://securityresponse.symantec.com Virus and other threat information and
updates
http://enterprisesecurity.symantec.com Product news and updates
http://go.symantec.com/education_septc Free online technical training
http://go.symantec.com/education_sep Symantec Educational Services
http://www.symantec.com/connect/security/forums/ endpoint-protection-small-business
Symantec Connect forums:
17 Getting started on the client
Getting started on the client
Where to get more information
Responding to alerts and
notifications
This chapter includes the following topics: ■ Types of alerts and notifications
■ About scan results
■ Responding to a virus or risk detection
■ Responding to Download Insight messages that ask you to allow or block a file that you try to download
■ Responding to messages that ask you to allow or block an application
■ About expired license messages
Types of alerts and notifications
The client works in the background to keep your computer safe from malicious activity. Sometimes the client needs to notify you about an activity or to prompt you for feedback.
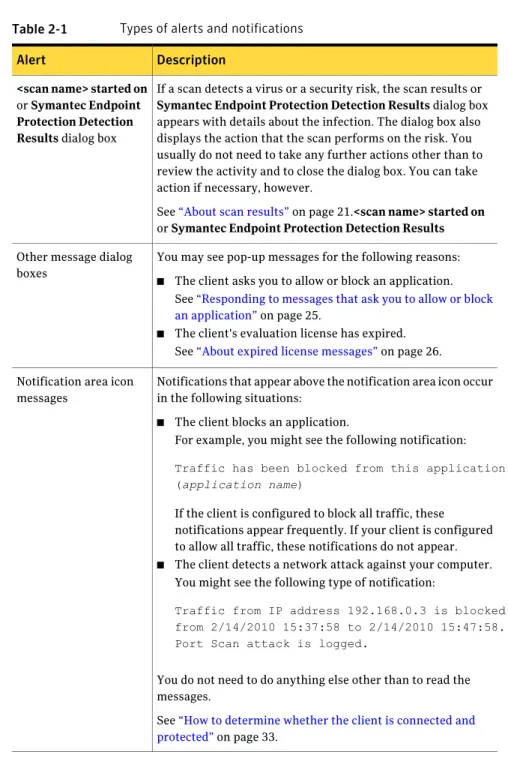
Table 2-1displays the types of messages you might see and need to respond to.
2
Chapter
Table 2-1 Types of alerts and notifications
Description Alert
If a scan detects a virus or a security risk, the scan results or
Symantec Endpoint Protection Detection Results dialog box
appears with details about the infection. The dialog box also displays the action that the scan performs on the risk. You usually do not need to take any further actions other than to review the activity and to close the dialog box. You can take action if necessary, however.
See“About scan results”on page 21.<scan name> started on or Symantec Endpoint Protection Detection Results
<scan name> started on
or Symantec Endpoint
Protection Detection Results dialog box
You may see pop-up messages for the following reasons:
■ The client asks you to allow or block an application. See“Responding to messages that ask you to allow or block an application”on page 25.
■ The client's evaluation license has expired. See“About expired license messages”on page 26. Other message dialog
boxes
Notifications that appear above the notification area icon occur in the following situations:
■ The client blocks an application.
For example, you might see the following notification:
Traffic has been blocked from this application: (application name)
If the client is configured to block all traffic, these notifications appear frequently. If your client is configured to allow all traffic, these notifications do not appear.
■ The client detects a network attack against your computer. You might see the following type of notification:
Traffic from IP address 192.168.0.3 is blocked from 2/14/2010 15:37:58 to 2/14/2010 15:47:58. Port Scan attack is logged.
You do not need to do anything else other than to read the messages.
See“How to determine whether the client is connected and protected”on page 33.
Notification area icon messages
Responding to alerts and notifications
Types of alerts and notifications
About scan results
For managed clients, your administrator typically configures a full scan to run at least one time each week. For unmanaged clients, an automatically generated Active Scan runs when you start up your computer. By default, Auto-Protect runs continuously on your computer.
When the scans run, a scan dialog box appears to report progress and to show the results of the scan. When the scan is completed, the results appear in the list. If the client detects no viruses or security risks, the list remains empty and the status is completed.
If the client detects risks during the scan, the scan results dialog box shows results with the following information:
■ The names of the viruses or security risks ■ The names of the infected files
■ The actions that the client performs on the risks
If the client detects a virus or security risk, you might need to act on an infected file.
Note:For managed clients, your administrator might choose to hide the scan results dialog box. If the client is unmanaged, you can display or hide this dialog box.
If you or your administrator configures the client software to display a scan results dialog box, you can pause, restart, or stop the scan.
See“About managed clients and unmanaged clients”on page 35. See“Responding to a virus or risk detection”on page 21. See“Pausing and delaying scans”on page 16.
Responding to a virus or risk detection
When an administrator-defined scan, a user-defined scan, or Auto-Protect runs, you might see a scan results dialog box. You can use the scan results dialog box to act on the affected file immediately.
For example, you might decide to delete a cleaned file because you want to replace it with an original file.
You can also use the Quarantine or the Risk or Scan log to act on the file later. See“Managing quarantined files on your client computer”on page 78.
21 Responding to alerts and notifications
To respond to a virus or risk detection in the scan results dialog box
1
In the scan results dialog box, select the files on which you want to act.2
Right-click the selection, and then select one of the following options:Removes the virus from the file. This option is only available for viruses.
Clean
Excludes the file from being scanned again.
Exclude
Deletes the infected file and all side effects. For security risks, use this action with caution. In some cases, if you delete security risks you might cause an application to lose
functionality.
Delete Permanently
Reverses the action taken.
Undo Action Taken
Places the infected files in the Quarantine. For security risks, the client also tries to remove or repair the side effects. In some cases, if the client quarantines a security risk, it might cause an application to lose functionality.
Move To Quarantine
Displays the information about the virus or security risk.
Properties
In some cases, the action might not be available.
3
In the dialog box, click Close.You might not be able to close the dialog box if the risks that are listed require you to take action. For example, the client may need to terminate a process or an application, or it may need to stop a service. In that case, a Remove
Risks Now dialog box appears.
4
If the Remove Risks Now dialog box appears, click one of the following options:■ Yes
The client removes the risk. The removal of the risk might require a restart. Information in the dialog box indicates whether or not a restart is required. ■ No
The results dialog box reminds you that you still need to take action. However, the Remove Risks Now dialog box is suppressed until you restart your computer.
5
If the results dialog box did not close in step3, click Close.Responding to alerts and notifications
Responding to a virus or risk detection
See“How scans respond to a virus or risk detection”on page 60. See“Viewing the logs”on page 43.
See“Managing scans on your computer”on page 47.
About removing a virus or risk from an infected file
If the client needs to terminate a process or application or stop a service, the
Remove Risks Now option is active. You might not be able to close the dialog box
if risks in the dialog require you to take action.
Table 2-2describes the options in the results dialog box.
Table 2-2 Options in the results dialog box
Description Option
Closes the results dialog box if you do not need to take action on any of the risks.
If you need to take action, one of the following notifications appears:
■ Remove Risk Required
Appears when a risk requires process termination. If you choose to remove the risk, you return to the results dialog box. If a restart is also required, the information in the risk's row in the dialog box indicates that a restart is required.
■ Restart Required
Appears when a risk requires a restart.
■ Remove Risk and Restart Required
Appears when a risk requires process termination and another risk requires a restart.
Close
Displays the Remove Risk dialog box.
In theRemove Riskdialog box, you can select one of the following choices for each risk:
■ Yes
The client removes the risk. The removal of the risk might require a restart. Information in the dialog box indicates whether or not a restart is required.
■ No
When you close the results dialog box, the Remove Risk dialog box appears. The dialog box reminds you that you still need to take action. However, the Remove Risk dialog box is suppressed until you restart your computer.
Remove Risks Now
23 Responding to alerts and notifications
If a restart is required, the removal or repair is not complete until you restart the computer.
You might need to take action on a risk but choose not to take action right now. The risk can be removed or repaired at a later time in the following ways: ■ You can open the risk log, right-click the risk, and then take an action. ■ You can run a scan to detect the risk and reopen the results dialog box. You can also take action by right-clicking a risk in the dialog box and by selecting an action. The actions that you can take depend on the actions that were configured for the particular type of risk that the scan detected.
See“Responding to a virus or risk detection”on page 21.
Responding to Download Insight messages that ask
you to allow or block a file that you try to download
When Download Insight notifications are enabled, you receive messages about the malicious and the unproven files that Download Insight detects when you try to download them.Note:Regardless of whether or not notifications are enabled, you receive detection messages when the action for unproven files is Prompt.
You or your administrator can change how sensitive Download Insight is to malicious files. Changing the sensitivity level might change the number of notifications that you receive.
Download Insight uses Insight, Symantec's technology that evaluates and determines a file rating that is based on its global community of millions of users. The Download Insight notification shows the following information about the detected file:
■ File reputation
The file reputation indicates the trustworthiness of a file. Malicious files are not trustworthy. Unproven files may or may not be trustworthy.
■ How common the file is in the community
The prevalence of a file is important. Files that are not common might be more likely to be threats.
■ How new the file is
The newer a file is the less information Symantec has about the file.
Responding to alerts and notifications
Responding to Download Insight messages that ask you to allow or block a file that you try to download
The information can help you to decide whether to allow or block the file. See“Managing scans on your computer”on page 47.
See“How Symantec Endpoint Protection Small Business Edition uses reputation data to make decisions about files”on page 61.
To respond to a Download Insight detection that asks you to allow or block a file
1
In the Download Insight detection message, do one of the following actions: ■ Click Remove this file from my computer.Download Insight moves the file to the Quarantine. This option only appears for unproven files.
■ Click Allow this file.
You might see a permission dialog that asks whether or not you are sure that you want to allow the file.
If you choose to allow an unproven file that was not quarantined, the file runs automatically. If you choose to allow a quarantined file, the file does not automatically run. You can run the file from your temporary Internet folder.
Typically the folder location is \\Documents and Settings\username\Local Settings\Temporary Internet Files.
2
On unmanaged clients, if you allow a file, Symantec Endpoint Protection Small Business Edition automatically creates an exception for the file on this computer. On managed clients, if your administrator lets you create exceptions, Symantec Endpoint Protection Small Business Edition automatically creates an exception for the file on this computer.Responding to messages that ask you to allow or
block an application
When an application on your computer tries to access the network, the client might ask you to allow or block the application. You can choose to block an application that you think is unsafe from accessing the network.
This type of notification appears for one of the following reasons: ■ The application asks to access your network connection.
■ An application that has accessed your network connection has been upgraded. ■ Your administrator updated the client software.
■ The client switches users through Fast User Switching.
25 Responding to alerts and notifications
You might see the following type of message, which tells you when an application tries to access your computer:
IEXPLORE.EXE is attempting to access the network. Do you want to allow this program to access the network?
To respond to a message that asks you to allow or block an application
1
Optionally, to suppress the message the next time the application tries to access the network, in the dialog box, click Remember my answer, and donot ask me again for this application.
2
Optionally, to learn more about the connection and the application, clickDetail >>.
3
Do one of the following actions:■ To allow the application to access the network, click Yes. ■ To block the application from accessing the network, click No.
About expired license messages
The client uses a license to update the virus definitions for scans and to update the client software. The client may use an evaluation license or a paid license. If either license has expired, the client does not update any content or the client software.
Table 2-3 Types of licenses
Description License type
If an evaluation license has expired, the top of the client's Status pane is red and displays the following message:
Evaluation License has expired.
All content download will discontinue on date. Please contact your Administrator to purchase a full Symantec Endpoint Protection Small Business Edition License.
You can also view the expiration date by clicking Help > About. Evaluation license
If a paid license has expired, the top of the client's Status pane is yellow and displays the following message:
Virus and Spyware Protection definitions are out of date.
Paid license
Responding to alerts and notifications
About expired license messages
For either type of license, you must contact your administrator to update or renew the license.
See“Types of alerts and notifications”on page 19. See“Viewing the logs”on page 43.
27 Responding to alerts and notifications
Responding to alerts and notifications
About expired license messages
Making sure that your
computer is protected
This chapter includes the following topics: ■ Managing your computer's protection
■ Updating the computer's protection
■ How to determine whether the client is connected and protected
■ About managed clients and unmanaged clients
■ Checking whether the client is managed or unmanaged
■ About enabling and disabling protection
■ Enabling or disabling protection on the client computer
■ Enabling or disabling Auto-Protect
■ Enabling, disabling, and configuring Tamper Protection
■ About the logs
■ Viewing the logs
■ Exporting log data
Managing your computer's protection
By default, your client computer is protected and you should not need to configure the client. However, you may want to monitor your protection for the following reasons:
3
Chapter
■ Your computer runs an unmanaged client.
Once an unmanaged client is installed, only you have control over your computer's protection. An unmanaged client is protected by default. But you may need to modify the computer's protection settings.
See“About managed clients and unmanaged clients”on page 35. ■ You want to enable or disable one or more protection technologies. ■ You want to verify that you have the latest virus definitions. ■ You have heard of a recent virus and want to run a scan.
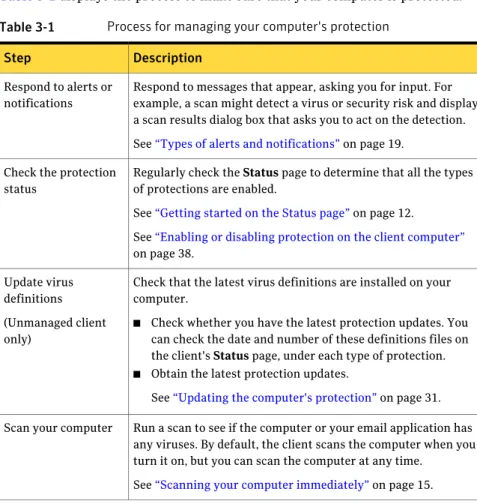
Table 3-1displays the process to make sure that your computer is protected.
Table 3-1 Process for managing your computer's protection
Description Step
Respond to messages that appear, asking you for input. For example, a scan might detect a virus or security risk and display a scan results dialog box that asks you to act on the detection. See“Types of alerts and notifications”on page 19.
Respond to alerts or notifications
Regularly check the Status page to determine that all the types of protections are enabled.
See“Getting started on the Status page”on page 12.
See“Enabling or disabling protection on the client computer” on page 38.
Check the protection status
Check that the latest virus definitions are installed on your computer.
■ Check whether you have the latest protection updates. You can check the date and number of these definitions files on the client's Status page, under each type of protection.
■ Obtain the latest protection updates.
See“Updating the computer's protection”on page 31. Update virus
definitions (Unmanaged client only)
Run a scan to see if the computer or your email application has any viruses. By default, the client scans the computer when you turn it on, but you can scan the computer at any time.
See“Scanning your computer immediately”on page 15. Scan your computer
Making sure that your computer is protected
Managing your computer's protection
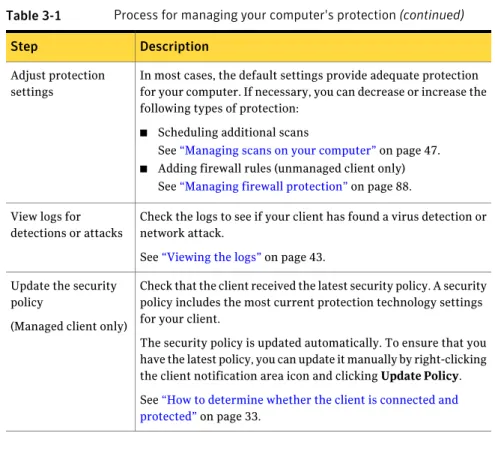
Table 3-1 Process for managing your computer's protection (continued)
Description Step
In most cases, the default settings provide adequate protection for your computer. If necessary, you can decrease or increase the following types of protection:
■ Scheduling additional scans
See“Managing scans on your computer”on page 47.
■ Adding firewall rules (unmanaged client only) See“Managing firewall protection”on page 88. Adjust protection
settings
Check the logs to see if your client has found a virus detection or network attack.
See“Viewing the logs”on page 43. View logs for
detections or attacks
Check that the client received the latest security policy. A security policy includes the most current protection technology settings for your client.
The security policy is updated automatically. To ensure that you have the latest policy, you can update it manually by right-clicking the client notification area icon and clicking Update Policy. See“How to determine whether the client is connected and protected”on page 33.
Update the security policy
(Managed client only)
Updating the computer's protection
Symantec products depend on current information to protect your computer from newly discovered threats. Symantec makes this information available through LiveUpdate.
Content updates are the files that keep your Symantec products current with the latest threat protection technology. LiveUpdate retrieves the new content files from a Symantec Internet site, and then replaces the old content files. The updates that you receive depend on which products are installed on your computer. How your computer receives the updates depends on whether your computer is managed or unmanaged, and on how your administrator has configured updates.
The following types of files are examples of content updates: ■ Virus definition files for Virus and Spyware Protection.
■ Heuristic signatures and commercial application lists for Proactive Threat Protection.
■ IPS definition files for Network Threat Protection.
31 Making sure that your computer is protected
See“About Network Threat Protection”on page 87.
LiveUpdate can also provide improvements to the installed client. These improvements are usually created to extend the operating system or hardware compatibility, adjust performance issues, or fix product errors. These
improvements to the client are released on an as-needed basis. A client computer can receive these improvements directly from a LiveUpdate server. A managed client computer can also receive these improvement updates automatically from a management server at your company.
Table 3-2 Ways to update content on your computer
Description Task
By default, LiveUpdate runs automatically at scheduled intervals.
On an unmanaged client, you can disable or change a LiveUpdate schedule.
See“Updating the content on a schedule”on page 33. Update the content on a schedule
Based on your security settings, you can run LiveUpdate immediately.
See“Updating the content immediately”on page 32. Update the content immediately
Updating the content immediately
You can update the content files immediately by using LiveUpdate. You should run LiveUpdate manually for the following reasons:
■ The client software was installed recently. ■ It has been a long time since the last scan.
■ You suspect you have a virus or other malware problem. See“Updating the content on a schedule”on page 33. See“Updating the computer's protection”on page 31.
To update your protection immediately
◆ In the client, in the sidebar, click LiveUpdate.
LiveUpdate connects to the Symantec server, checks for available updates, then downloads and installs them automatically.
Making sure that your computer is protected
Updating the computer's protection
Updating the content on a schedule
You can create a schedule so that LiveUpdate runs automatically at scheduled intervals. You may want to schedule LiveUpdate to run during a time that you do not use your computer.
See“Updating the content immediately”on page 32.
You can configure LiveUpdate to run on a schedule on an unmanaged client only.
To update your protection on a schedule
1
In the client, in the sidebar, click Change settings.2
Beside Client Management, click Configure Settings.3
In the Client Management Settings dialog box, click LiveUpdate.4
On the LiveUpdate tab, check Enable automatic updates.5
In the Frequency and Time group box, select whether you want the updates to run daily, weekly, or monthly. Then select the day or week and time of day you want the updates to run.The time settings depend on what you select from the Frequency group box. The availability of the other options on this dialog box also depends on the frequency that you select.
6
In the Retry Window group box, check Keep trying for, and then specify the time interval during which the client tries to run LiveUpdate again.7
In the Randomization Options group box, check Randomize the start timeto be + or - 9in hours), and then specify the number of hours or days.
This option sets a range of time before or after the scheduled time for the update to start.
8
In the Idle Detection group box, check Delay scheduled LiveUpdates untilthe system is idle. Overdue sessions will eventually run unconditionally.
9
Click OK.How to determine whether the client is connected
and protected
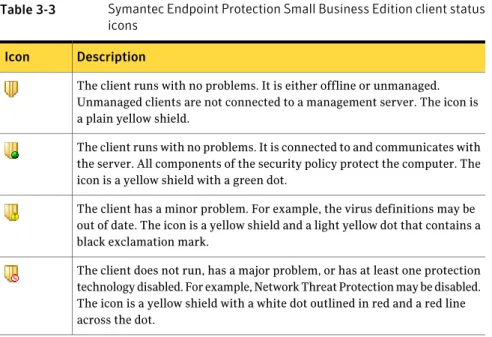
The client uses a notification area icon to indicate whether the client is online or offline and whether the client computer is adequately protected. You can right-click this icon to display frequently used commands. The icon is located in the lower-right hand corner of the client computer desktop.
33 Making sure that your computer is protected
Table 3-3 Symantec Endpoint Protection Small Business Edition client status icons
Description Icon
The client runs with no problems. It is either offline or unmanaged. Unmanaged clients are not connected to a management server. The icon is a plain yellow shield.
The client runs with no problems. It is connected to and communicates with the server. All components of the security policy protect the computer. The icon is a yellow shield with a green dot.
The client has a minor problem. For example, the virus definitions may be out of date. The icon is a yellow shield and a light yellow dot that contains a black exclamation mark.
The client does not run, has a major problem, or has at least one protection technology disabled. For example, Network Threat Protection may be disabled. The icon is a yellow shield with a white dot outlined in red and a red line across the dot.
See“Hiding and displaying the notification area icon”on page 34.
Hiding and displaying the notification area icon
You can hide the notification area icon if necessary. For example, you can hide it if you need more space on the Windows taskbar.
See“How to determine whether the client is connected and protected”on page 33.
Note:On managed clients, you cannot hide the notification area icon if your administrator has restricted this functionality.
To hide or display the notification area icon
1
In the main window, in the sidebar, click Change settings.2
On the Change Settings page, for Client Management, click ConfigureSettings.
3
In the Client Management Settings dialog box, on the General tab, underDisplay Options, uncheck or check Show Symantec security icon in notification area.
4
Click OK.Making sure that your computer is protected
How to determine whether the client is connected and protected
About managed clients and unmanaged clients
Your administrator can install the client as either a managed client (administrator-managed installation) or an unmanaged client (standalone installation).Table 3-4 Differences between a managed client and an unmanaged client
Description Client type
A managed client communicates with a management server in your network. The administrator configures the protection and the default settings, and the management server downloads the settings to the client. If the administrator makes a change to the protection, the change is almost immediately downloaded to the client.
Administrators can change the level at which you interact with the client in the following ways:
■ The administrator manages the client completely.
You are not required to configure the client. All the settings are locked or unavailable, but you can view information about what the client does on your computer.
■ The administrator manages the client, but you can change some client settings and perform some tasks. For example, you may be able to run your own scans and manually retrieve client updates and protection updates.
The availability of the client settings, as well as the values of the settings themselves, can change periodically. For example, a setting might change when your administrator updates the policy that controls your client's protection.
Managed client
An unmanaged client does not communicate with a management server and an administrator does not manage the client. An unmanaged client can be one of the following types:
■ A standalone computer that is not connected to a network, such as a home computer or a laptop. The computer must include a Symantec Endpoint Protection Small Business Edition installation that uses either the default option settings or administrator-preset settings.
■ A remote computer that connects to the corporate network that must meet security requirements before it connects.
The client has default settings when it is first installed. After the client is installed, you can change all the client settings and perform all the protection tasks.
Unmanaged client
35 Making sure that your computer is protected
See“Checking whether the client is managed or unmanaged”on page 36.
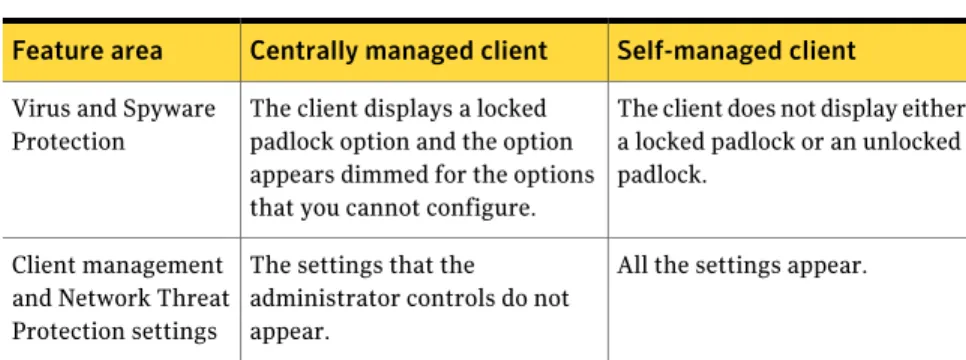
Table 3-5describes the differences in the user interface between a managed and unmanaged client.
Table 3-5 Differences between a managed client and an unmanaged client by feature area
Self-managed client Centrally managed client
Feature area
The client does not display either a locked padlock or an unlocked padlock.
The client displays a locked padlock option and the option appears dimmed for the options that you cannot configure. Virus and Spyware
Protection
All the settings appear. The settings that the
administrator controls do not appear.
Client management and Network Threat Protection settings
Checking whether the client is managed or
unmanaged
To check how much control you have to configure protection on your client, you first check whether your client is managed or unmanaged. You can configure more settings on a unmanaged client than on a managed client.
See“About managed clients and unmanaged clients”on page 35.
To check whether the client is managed or unmanaged
1
On the Status page, click Help > Troubleshooting.2
In the Troubleshooting dialog box, click Management.3
In the Management panel, under General Information, next to Server, look for the following information:■ If the client is managed, the Server field displays either the management server's address or the text Offline.
The address can be an IP address, DNS name, or NetBIOS name. For example, a DNS name might be SEPMServer1. If the client is managed but not currently connected to a management server, this field is Offline. ■ If the client is unmanaged, the Server field is Self-managed.
4
Click Close.Making sure that your computer is protected
Checking whether the client is managed or unmanaged
About enabling and disabling protection
In general, you always want to keep the protection technologies enabled on the client computer.
You might need to temporarily disable either all the protection technologies or individual protection technologies if you have a problem with the client computer. For example, if an application does not run or does not run correctly, you might want to disable Network Threat Protection. If you still have the problem after you disable all protection technologies, you know that the problem is not the client.
Warning:Be sure to enable any of the protections when you have completed your troubleshooting task to ensure that the computer remains protected.
Table 3-6describes the reasons why you might want to disable each protection technology.
Table 3-6 Purpose for disabling a protection technology
Purpose for disabling the protection technology Protection
technology
If you disable this protection, you disable Auto-Protect only.
The scheduled or startup scans still run if you or your administrator has configured them to do so.
You might enable or disable Auto-Protect for the following reasons:
■ Auto-Protect might block you from opening a document. For example, if you open a Microsoft Word that has a macro, Auto-Protect may not allow you to open it. If you know the document is safe, you can disable Auto-Protect.
■ Auto-Protect may warn you about a virus-like activity that you know is not the work of a virus. For example, you might get a warning when you install new computer applications. If you plan to install more applications and you want to avoid the warning, you can temporarily disable Auto-Protect.
■ Auto-Protect may interfere with Windows driver replacement.
■ Auto-Protect might slow down the client computer.
Note:If you disable Auto-Protect, you also disable Download Insight, even if Download Insight is enabled. SONAR also cannot detect heuristic threats. SONAR detection of host file and system changes continues to function.
See“Enabling or disabling Auto-Protect”on page 39.
If Auto-Protect causes a problem with an application, it is better to create an exception than to permanently disable the protection.
See“Excluding items from scans”on page 76. Virus and Spyware
Protection
37 Making sure that your computer is protected
Table 3-6 Purpose for disabling a protection technology (continued)
Purpose for disabling the protection technology Protection
technology
You might want to disable Proactive Threat Protection for the following reasons:
■ You see too many warnings about the threats that you know are not threats.
■ Proactive Threat Protection might slow down the client computer. See“Enabling or disabling protection on the client computer”on page 38. Proactive Threat
Protection
You might want to disable Network Threat Protection for the following reasons:
■ You install an application that might cause the firewall to block it.
■ A firewall rule or firewall setting blocks an application due to an administrator's mistake.
■ The firewall or the intrusion prevention system causes network connectivity-related issues.
■ The firewall might slow down the client computer.
■ You cannot open an application.
See“Enabling or disabling intrusion prevention”on page 97.
See“Enabling or disabling protection on the client computer”on page 38.
If you are not sure that Network Threat Protection causes the problem, you might need to disable all the protection technologies.
On a managed client, your administrator might lock Network Threat Protection completely so that you cannot enable or disable it.
Network Threat Protection
Typically you should keep Tamper Protection enabled.
You might want to disable Tamper Protection temporarily to make sure that you do not get false positive detections.
See“Enabling, disabling, and configuring Tamper Protection”on page 40. Tamper Protection
Enabling or disabling protection on the client
computer
On the client, when any of the protections are disabled: ■ The status bar at the top of the Status page is red.
■ The client's icon appears with a universal no sign, a red circle with a diagonal slash. The client icon appears as a full shield in the taskbar in the lower-right corner of your Windows desktop. In some configurations, the icon does not appear.
Making sure that your computer is protected
Enabling or disabling protection on the client computer
See“How to determine whether the client is connected and protected”
on page 33.
On a managed client, your administrator can enable any protection at any time. You can also disable Auto-Protect, Proactive Threat Protection, or Network Threat Protection for troubleshooting purposes. On a managed client, your administrator might lock a protection so that you cannot disable it.
See“About enabling and disabling protection”on page 37. See“Enabling or disabling Auto-Protect”on page 39.
To enable protection technologies from the Status page
◆ On the client, at the top of the Status page, click Fix or Fix All.
To enable or disable protection technologies from the taskbar
◆ On the Windows desktop, in the notification area, right-click the client icon, and then do one of the following actions:
■ Click Enable Symantec Endpoint Protection Small Business Edition. ■ Click Disable Symantec Endpoint Protection Small Business Edition.
To enable or disable Proactive Threat Protection or Network Threat Protection
◆ In the client, on the Status page, beside protection type Protection, do one of the following tasks:
■ Click Options > Enable protection type Protection.
■ Click Options > Disable all protection type Protection features.
Enabling or disabling Auto-Protect
You can enable or disable Auto-Protect for files and processes, Internet email, and email groupware applications. When any type of Auto-Protect is disabled, the virus and spyware status appears red on the Status page.
See“About alert icons on the Status page”on page 14. See“About enabling and disabling protection”on page 37.
Note:On a managed client, your administrator might lock Auto-Protect so that you cannot disable it. Also, the client enables Auto-Protect automatically five minutes after you disable Auto-Protect.
If you have not changed the default option settings, Auto-Protect loads when you start your computer to guard against viruses and security risks. Auto-Protect
39 Making sure that your computer is protected
checks programs for viruses and security risks as they run. It also monitors your computer for any activity that might indicate the presence of a virus or security risk. When a virus, virus-like activity (an event that can be the work of a virus), or a security risk is detected, Auto-Protect alerts you.
Note:If you disable Auto-Protect, you also disable Download Insight even if Download Insight is enabled. SONAR also cannot detect heuristic threats; however, SONAR continues to detect host file and system changes.
To enable or disable Auto-Protect for the file system
◆ In the client, on the Status page, next to Virus and Spyware Protection, do one of the following actions:
■ Click Options > Enable Virus and Spyware Protection.
■ Click Options > Disable all Virus and Spyware Protection features.
To enable or disable Auto-Protect for email
1
In the client, in the sidebar, click Change settings.2
Next to Virus and Spyware Protection, click Configure Settings.3
Do one of the following actions:■ On the Internet Email Auto-Protect tab, check or uncheck Enable Internet
Email Auto-Protect.
■ On the Outlook Auto-Protect tab, check or uncheck Enable Microsoft
Outlook Auto-Protect (unmanaged client only).
4
Click OK.Enabling, disabling, and configuring Tamper
Protection
Tamper Protection provides real-time protection for Symantec applications that run on servers and clients. It prevents non-Symantec processes such as worms, Trojan horses, viruses, and security risks, from affecting Symantec resources. You can configure the software to block or log attempts to modify Symantec resources.
If Tamper Protection is enabled, you can choose the action that it takes when it detects an attempt to tamper with Symantec software. You can also have Tamper Protection display a message to notify you of tamper attempts. If you want to
Making sure that your computer is protected
Enabling, disabling, and configuring Tamper Protection
customize the message, you can use the predefined variables that Tamper Protection fills in with the appropriate information.
Note:On a managed client, your administrator might lock the Tamper Protection settings.
For information about the predefined variables, see the Help on the Tamper
Protection tab.
See“About enabling and disabling protection”on page 37.
To enable or disable Tamper Protection
1
In the client, in the sidebar, click Change settings.2
Next to Client Management, click Configure Settings.3
On the Tamper Protection tab, check or uncheck Protect Symantec securitysoftware from being tampered with or shut down.
4
Click OK.To configure Tamper Protection
1
In the client, in the sidebar, click Change settings.2
Next to Client Management, click Configure Settings.3
On the Tamper Protection tab, in the Action to take if an applicationattempts to tamper with or shut down Symantec security software list box,
click Block it and log the event or Log the event only.
4
If you want to be notified when Tamper Protection detects suspicious behavior, check Display a notification message when tampering is detected.If you enable these notification messages, you may receive notifications about Windows processes as well as Symantec processes.
5
To customize the message that appears, update the text in the message field.6
Click OK.About the logs
Logs contain information about client configuration changes, security-related activities, and errors. These records are called events. The logs display these events with any relevant additional information.
Security-related activities include information about virus detections, computer status, and the traffic that enters or exits your computer. If you use a managed client, its logs can be regularly uploaded to the management server. An
41 Making sure that your computer is protected
administrator can use their data to analyze the overall security status of the network.
Logs are an important method for tracking your computer’s activity and its interaction with other computers and networks. You can use the information in the logs to track the trends that relate to viruses, security risks, and attacks on your computer. If several people use the same computer, you might be able to identify who introduces risks, and help that person to use better precautions. For more information about a log, you can press F1 to view the help for that log.
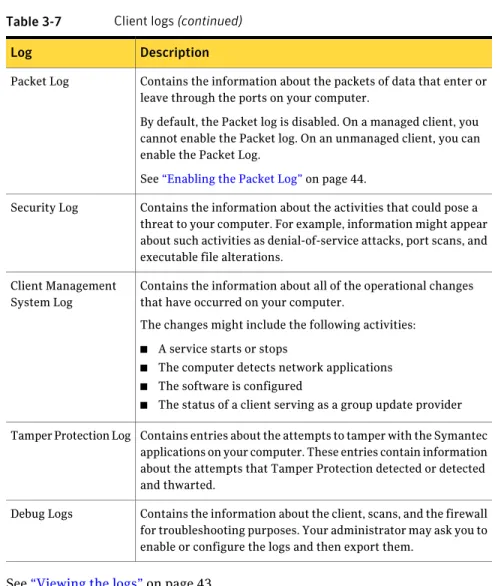
Table 3-7describes the event types that each log displays.
Table 3-7 Client logs
Description Log
Contains entries about the scans that have run on your computer over time.
Scan Log
Contains entries about viruses and security risks, such as adware and spyware, that have infected your computer. Security risks include a link to the Symantec Security Response Web page that provides additional information.
See“Quarantining a file from the Risk or Scan Log”on page 79. Risk Log
Contains the information about system activities on your computer that are related to viruses and security risks. This information includes configuration changes, errors, and definitions file information.
Virus and Spyware Protection System Log
Contains the information about the threats that SONAR detected on your computer. SONAR detects any files that act suspiciously. SONAR also detects system changes.
Threat Log
Contains information about system activities on your computer that are related to SONAR.
Proactive Threat Protection System Log
Contains the events that concern firewall traffic and intrusion prevention attacks. The log contains information about the connections that your computer makes through the network. The Network Threat Protection logs can help you to detect potentially threatening activity such as port scanning. They can also be used to trace traffic back to its source. You can also use Network Protection logs to help troubleshoot connectivity problems or possible network attacks. The logs can tell you when your computer has been blocked from the network and help you to determine why your access has been blocked.
Traffic Log
Making sure that your computer is protected
About the logs
Table 3-7 Client logs (continued)
Description Log
Contains the information about the packets of data that enter or leave through the ports on your computer.
By default, the Packet log is disabled. On a managed client, you cannot enable the Packet log. On an unmanaged client, you can enable the Packet Log.
See“Enabling the Packet Log”on page 44. Packet Log
Contains the information about the activities that could pose a threat to your computer. For example, information might appear about such activities as denial-of-service attacks, port scans, and executable file alterations.
Security Log
Contains the information about all of the operational changes that have occurred on your computer.
The changes might include the following activities:
■ A service starts or stops
■ The computer detects network applications
■ The software is configured
■ The status of a client serving as a group update provider Client Management
System Log
Contains entries about the attempts to tamper with the Symantec applications on your computer. These entries contain information about the attempts that Tamper Protection detected or detected and thwarted.
Tamper Protection Log
Contains the information about the client, scans, and the firewall for troubleshooting purposes. Your administrator may ask you to enable or configure the logs and then export them.
Debug Logs
See“Viewing the logs”on page 43.
Viewing the logs
You can view the logs on your computer to see the details of the events that have occurred.
To view a log
1
In the main window, in the sidebar, click View Logs.2
Click View Logs next to one of the following items:■ Virus and Spyware Protection
43 Making sure that your computer is protected
■ Proactive Threat Protection
■ Network Threat Protection
■ Client Management
Some items might not appear depending on your installation.
3
In the drop-down menu, select the log that you want to view. See“About the logs”on page 41.Enabling the Packet Log
All Network Threat Protection logs and Client Management logs are enabled by default, except for the Packet Log. On unmanaged clients, you can enable and disable the Packet Log.
See“About the logs”on page 41.
To enable the Packet Log
1
In the client, on the Status page, to the right of Network Threat Protection, click Options, and then click Change Settings.2
In the Network Threat Protection Settings dialog box, click Logs.3
Check Enable Packet Log.4
Click OK.Exporting log data
You can export the information in some logs into a file with comma-separated values (.csv) or into an Access Database (*.mdb) format. The .csv format is a common file format that most spreadsheet and database programs use to import data. After you import the data into another program, you can use the data to create presentations, graphs, or to combine with other information. You can export the information in the Network Threat Protection logs and the Client Management logs into tab-delimited text files.
See“About the logs”on page 41.
Note:If you run the client software on Windows Server 2008 Server Core, you cannot export log data to an .mdb file. The .mdb format requires some Microsoft applications that are not available on Server Core.
You can export the following logs to a .csv or .mdb file:
Making sure that your computer is protected
Exporting log data