85
Introducing Visual Studio 2005
B
efore .NET was released, ASP developers overwhelmingly favored simple text editors such as Notepad for programming web pages. Other choices were available, but each suffered from its own quirks and limitations. Tools such as Visual InterDev and web classes for Visual Basic were useful for rapid development, but often they made deployment more difficult or obscured important features. The standard was a gloves-off approach of raw HTML with blocks of code inserted wherever necessary.Visual Studio changes all that. First, it is extensible and can even work in tandem with other straight HTML editors such as Microsoft FrontPage or Macromedia Dreamweaver. Second, it inherits the best features from other code editors, such as the ability to drag and drop web page interfaces into existence and troubleshoot misbehaving code. In its latest release, Visual Studio 2005 is even better—by finally allowing developers to create and test websites without worrying about web server settings.
This chapter provides a lightning-fast tour that shows how to create a web application in the Visual Studio environment. You’ll also learn how IntelliSense can dramatically reduce the number of errors you’ll make and how to use the renowned single-step debugger that lets you look under the hood and “watch” your program in action.
The Promise of Visual Studio
All .NET applications are built from plain-text source files. VB code is stored in .vb files and C# code is stored in .cs files, regardless of whether this code is targeted for the Windows platform or the Web. Despite this fact, you’ll rarely find VB or C# developers creating Windows applications by hand in a text editor. The process is not only tiring, but it also opens the door to a host of possible errors that could be easily caught at design time. The same is true for ASP.NET programmers. Although you can write your web page classes and code your web page controls manually, you’ll spend hours developing and testing your code.
Integrated error checking: Visual Studio can detect a wide range of problems, such as data type conversion errors, missing namespaces or classes, and undefined variables. As you type, errors are detected, underlined, and added to an error list for quick reference.
The web form designer: To create a web page in Visual Studio, you simply drag ASP.NET controls to the appropriate location, resize them, and configure their properties. Visual Studio does the heavy lifting: automatically creating the underlying .aspx template file for you with the appropriate tags and attributes and adding the control variables to your code-behind file.
An integrated web server: To host an ASP.NET web application, you need web server software such as IIS (Internet Information Services), which waits for web requests and serves the appropriate pages. Setting up your web server isn’t difficult, but it is inconvenient. Thanks to the integrated development web server in Visual Studio, you can run a website directly from the design environment. (Of course, you’ll still need to deploy your application to a real web server when it’s finished, as you’ll see in Chapter 12.)
Productivity enhancements: Visual Studio makes coding quick and efficient, with a collapsible code display, automatic statement completion, and color-coded syntax. You can even create sophisticated macro programs that automate repetitive tasks.
Fine-grained debugging: Visual Studio’s integrated debugger allows you to watch code execution, pause your program at any point, and inspect the contents of any vari-able. These debugging tools can save endless headaches when writing complex code routines.
Easy deployment: When you create an ASP.NET project in Visual Studio, all the files you need are generated automatically, including a sample web.config file. When you compile the application, all your page classes are compiled into one DLL for easy deployment.
Complete extensibility: You can add your own add-ins, controls, and dynamic help plug-ins to Visual Studio and customize almost every aspect of its appearance and behavior.
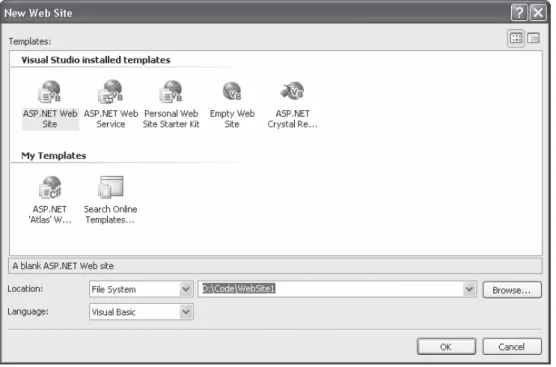
Figure 4-1. The New Web Site dialog box
Creating a Website
You start Visual Studio by selecting Start ➤Programs ➤Microsoft Visual Studio 2005 ➤ Microsoft Visual Studio 2005. When the IDE (integrated development environment) first loads, it shows an initial start page. You can access various user-specific options from this page and access online information such as recent MSDN Help articles.
To create your first Visual Studio application, follow these steps:
1. Select File ➤New Web Site from the Visual Studio menu. The New Web Site dialog box (shown in Figure 4-1) will appear.
2. Choose the type of application. In the New Web Site dialog box, select the ASP.NET Web Site template.
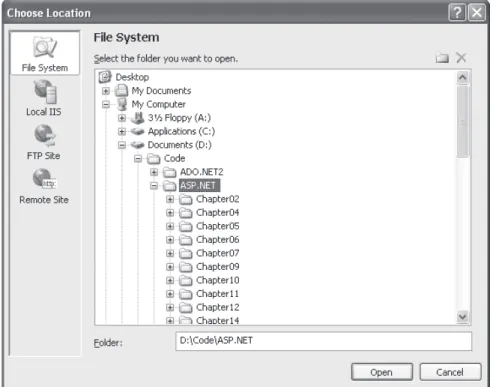
3. Choose a location for the website. The location specifies where the website files will be stored. Typically, you’ll choose File System and then use a folder on the local computer (or a network path). You can type in a directory by hand in the Location text box and skip straight to step 5. Alternatively, you can click the Browse button, which shows the Choose Location dialog box (see Figure 4-2).
4. Using the Choose Location dialog box, browse to the directory where you want to place the website. Often, you’ll want to create a new directory for your web appli-cation. To do this, select the directory where you want to place the subdirectory, and click the Create New Folder icon (found just above the top-right corner of the directory tree). Either way, once you’ve selected your directory, click Open. The Choose Location dialog box also has options (represented by the buttons on the left) for creating a web application on an IIS virtual directory or a remote web server. You can ignore these options for now. In general, it’s easiest to develop your web application locally and upload the files once they are perfect.
■
Tip
Remember, the location where you create your website probably isn’t where you’ll put it when you deploy it. Don’t worry about this wrinkle—in Chapter 12 you’ll learn how to take your development website and put it on a live web server so it can be accessible to others over a network or the Internet.Figure 4-3. Creating other files when needed
5. Click OK to create the website. At this point, Visual Studio generates an empty website with one web page—Default.aspx. This page is the entry point for your website.
Unlike previous versions of Visual Studio, Visual Studio 2005 doesn’t create project and solution files to track the contents of your projects. Instead, Visual Studio does its best to keep the website directory clean and uncluttered, with only the files you actually need. This change simplifies deployment, and it’s especially handy if you’re developing with a team of colleagues, because you can each work on separate pages without needing to synchronize other project or solution files.
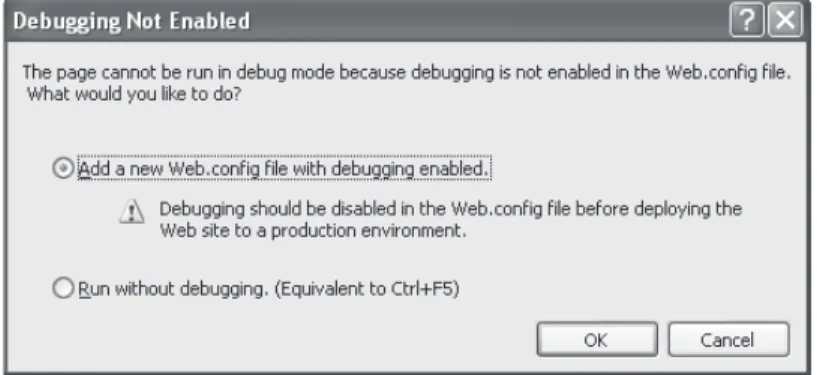
Occasionally, Visual Studio will prompt you to let it create additional files and direc-tories if they’re needed. To see one example, select Debug ➤Start Debugging to launch your website, and then surf to the default page using your computer’s web browser (typi-cally Internet Explorer). Before Visual Studio completes this step, it will inform you that you need to add a configuration file that specifically allows debugging, or you need to modify the existing configuration file (see Figure 4-3). When you click OK, Visual Studio will create a new file named web.config and add it to the web application directory. (You’ll learn about the web.config file in Chapter 5.)
■
Note
When you run a web page, you’ll notice that the URL in the browser includes a port number. For example, if you run a web application in a folder named OnlineBank, you might see a URL like http:// localhost:4235/OnlineBank/Default.aspx. This URL indicates that the web server is running on your computer (localhost), so its requests aren’t being sent over the Internet. It also indicates that all requests are being transmitted to port number 4235. That way, the requests won’t conflict with any other applications that might be running on your computer and listening for requests. Every time Visual Studio starts the integrated web server, it randomly chooses an available port.The Solution Explorer
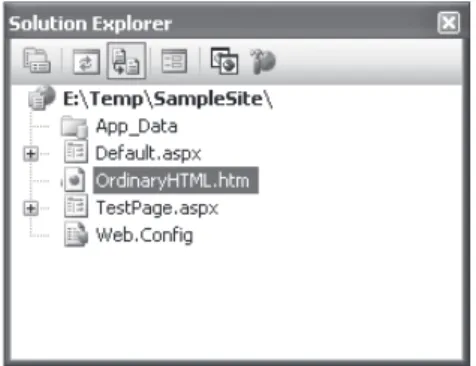
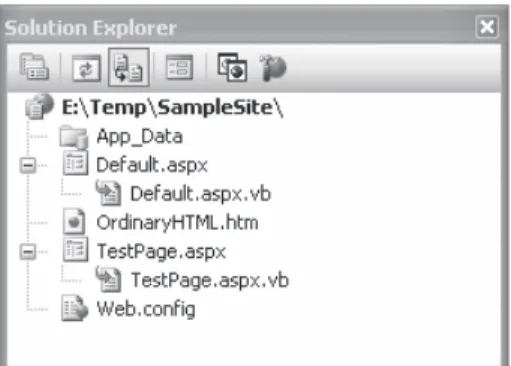
To take a high-level look at your website, you can use the Solution Explorer—the window at the top-right corner of the design environment that lists all the files in your web appli-cation directory (see Figure 4-4). The Solution Explorer reflects everythingthat’s in the web application directory—no files are hidden. This means if you add a plain HTML file, a graphic, or a subdirectory in Windows Explorer, the next time you fire up Visual Studio you’ll see the new contents in the Solution Explorer. (If you add these same ingredients while Visual Studio is open, you won’t see them right away, because Visual Studio scans the directory only when you first open the project.)
Of course, the whole point of the Solution Explorer is to save you from resorting to using Windows Explorer. Instead, it allows you to perform a variety of file management tasks within Visual Studio. You can rename, delete, or copy files with a simple right-click. And, of course, you can add new items by choosing Website ➤Add New Item.
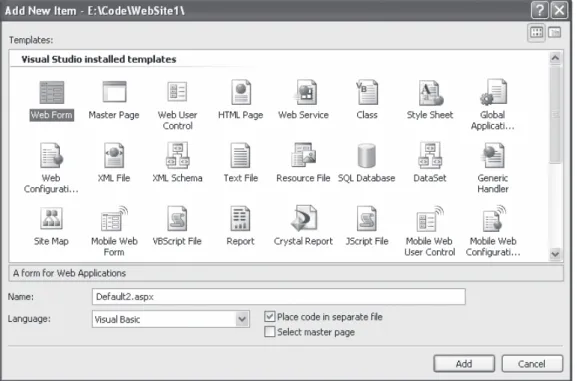
You can add various types of files to your project, including web forms, web services, stand-alone components, resources you want to use, such as bitmaps and text files, and ordinary HTML files. Visual Studio even provides some basic designers that allow you to edit these types of files directly in the IDE. Figure 4-5 shows some of the file types you can add to a web application.
Figure 4-5. Supported file types
■
Tip
In the downloadable samples, you’ll find that many of the web pages use a style sheet named Styles.css. This style sheet applies the Verdana font to all elements of the web page. To learn more about the CSS (Cascading Style Sheets) standard, you can refer to the tutorial at http://www.w3schools.com/css. CSS is a standard supported by almost all browsers.When you add a new web form, Visual Studio gives you the choice of two coding models. You can place all the code for the file in the same file as the HTML and control tags, or you can separate these into two distinct files, one with the markup and the other with your VB code. This second model is closest to earlier versions of Visual Studio, and it’s what you’ll use in this book. The key advantage of splitting the web page into separate files is that it’s more manageable when you need to work with complex pages. However, both approaches give you the same performance and functionality.
You can also add files that already exist by selecting Add ➤Add Existing Item. You can use this technique to copy files from one project into another. Visual Studio leaves the original file alone and simply creates a copy in your web application directory. However, don’t use this approach with a web page that has been created in an older version of Visual Studio. Instead, refer to the sidebar “Migrating an Older Visual Studio .NET Project.”
MIGRATING AN OLDER VISUAL STUDIO .NET PROJECT
If you have an existing web application created with Visual Studio .NET 2002 or 2003, you can open the project or solution file using the File ➤Open Project command. When you do, Visual Studio opens a conversion wizard.
The conversion wizard is exceedingly simple. It prompts you to choose whether to create a backup and, if so, where it should be placed. If this is your only copy of the application, a backup is a good idea in case some aspects of your application can’t be converted successfully. Otherwise, you can skip this option.
When you click Finish, Visual Studio performs an in-place conversion, which means it overwrites your web page files with the new versions. This conversion won’t change the code you’ve written, but it does modify the web pages and code classes to use Visual Studio’s new code model and event handling approach. Any errors and warnings are added to a conversion log, which you can display when the con-version is complete. A typical concon-version doesn’t produce any errors but generates a long list of warnings informing you of the changes that were made.
Designing a Web Page
Now that you understand the basic organization of Visual Studio, you can begin design-ing a simple web page. To start, in the Solution Explorer, double-click the web page you want to design. (Start with Default.aspx if you haven’t added any additional pages.) A blank designer page will appear.
Figure 4-7. The Design view for a page
■
Note
There are two ways to look at a .aspx page—in Design view (which shows a graphical representation of what your page looks like) and in Source view (which shows the underlying HTML markup). You can switch between these two views freely by clicking the Design or Source buttons at the bottom of the designer window.Adding Web Controls
To add a web control, drag the control you want from the Toolbox on the left and drop it onto your web page. The controls in the Toolbox are grouped in numerous categories based on their functions, but you’ll find basic ingredients such as buttons, labels, and text boxes in the Standard tab.
■
Tip
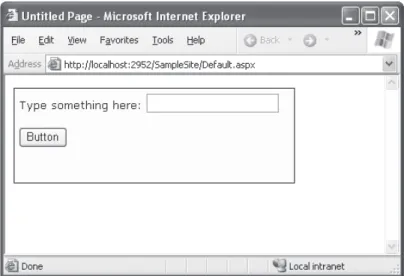
By default, the Toolbox is enabled to automatically hide itself when your mouse moves away from it, somewhat like the AutoHide feature for the Windows taskbar. This behavior is often exasperating, so you may want to click the pushpin in the top-right corner of the Toolbox to make it stop in its fully expanded position.In a web form, controls are positioned line by line, like in a word processor document. To add a control, you need to drag and drop it to an appropriate place. To organize several controls, you’ll probably need to add spaces and hard returns to position elements the way you want them. Figure 4-7 shows an example with a TextBox, a Label, and a Button control.
THE MISSING GRID LAYOUT FEATURE
If you’ve used previous versions of Visual Studio .NET, you may remember a feature called grid layout, which allowed you to position elements with absolute coordinates by dragging them where you wanted them. Although this model seems convenient, it really isn’t suited to most web pages because controls can’t adjust their positioning when the web page content changes (or when text is resized based on user preferences). This leads to inflexible layouts (such as controls that overwrite each other). To gain more control over layout, most web developers use tables.
That said, Visual Studio 2005 has a backdoor way to use grid layout. All you need to do is add a style attribute that uses CSS to specify absolute positioning. This attribute will already exist in any pages you’ve created with a previous version of Visual Studio .NET in grid layout mode.
Here’s an example:
<asp:Button id="cmd" style="POSITION: absolute; left: 100px; top: 50px;" runat="server" ... />
Once you’ve made this change, you’re free to drag the button around the window at will. Of course, you shouldn’t go this route just because it seems closer to the Windows model. Most great web pages use absolute positioning rarely, if at all, because it’s just too awkward and inflexible.
As you add web controls, Visual Studio automatically adds the corresponding control tags to your .aspx file. You can even look at the .aspx code or add server control tags and HTML tags manually by typing them in. To switch your view, click the Source button at the bottom of the web designer. You can click Design to revert to the graphical web form designer.
Figure 4-8 shows what you might see in the Source view for the page displayed in Figure 4-7.
The Properties Window
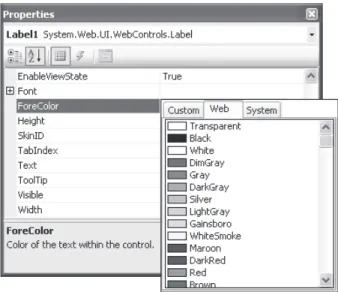
To configure a control in Design view, you must first select it on the page or choose it by name from the drop-down list at the top of the Properties window. Then, you can modify any of its properties. Good ones to try include Text (the content of the control), ID (the name you use to interact with the control in your code), and ForeColor (the color used for the control’s text).
■
Note
If the Properties window isn’t visible, you can pop it into view by choosing View ➤Properties Window.Every time you make a selection in the Properties window, Visual Studio translates your change to the corresponding ASP.NET control tag attribute. Visual Studio even pro-vides special “choosers” that allow you to select extended properties. For example, you can select a color from a drop-down list that shows you the color (see Figure 4-9), and you can configure the font from a standard font selection dialog box.
Finally, you can select one object in the Properties window that needs some explanation—the DOCUMENT object, which represents the web page itself. These set-tings have different effects. Using this object, you can set various options for the entire page, including the title that will be displayed in the browser, linked style sheets, and support for other features that are discussed later in this book (such as tracing and session state).
Adding Ordinary HTML
Not everything in your web page needs to be a full-fledged web control. You can also add the familiar HTML tags, such as paragraphs, headings, lists, divisions, and so on. To add an HTML element, you can type it in using the Source view, or you can drag the element you want from the HTML tab of the Toolbox.
Visual Studio also provides an indispensable style builder for formatting any static HTML element. To test it, add a Div to your web page from the HTML tab of the Toolbox. Then, right-click the panel, and choose Style. The Style Builder window (shown in Figure 4-10) will appear, with options for configuring the colors, font, layout, and border for the element. As you configure these properties, the web page HTML will be updated to reflect your settings.
■
Note
A Div is a <div> tag, or division, which is an all-purpose HTML container. A <div> doesn’t have any default representation in HTML. However, it’s commonly used in conjunction with styles. Using a <div>, you can group together several other elements. You can also specify a default font or color that will be applied to the group or add a border that will be displayed around that entire section of your web page.With the right changes, you can transform a <div> tag into a nicely shaded and bor-dered box, as shown in Figure 4-11. You’re then free to add other HTML and web controls inside this box. This is a technique you’ll see in examples throughout this book.
Figure 4-10. Building styles
The following code shows the style that was built in the style builder for the example in Figure 4-10. Note that here the style attribute is split over several lines in a way that isn’t legal in HTML in order to fit the bounds of the printed page.
<div style="border-right: 1px solid; padding-right: 5px; border-top: 1px solid; padding-left: 5px; font-size: smaller; padding-bottom: 5px;
border-left: 1px solid; width: 318px; padding-top: 5px; border-bottom: 1px solid;
font-family: Verdana; height: 100px; background-color: #ffffcc">
<asp:Label ID="Label1" runat="server"
Text="Type something here:" Width="144px"></asp:Label> <asp:TextBox ID="TextBox1" runat="server">
</asp:TextBox><br /> <br />
<asp:Button ID="Button1" runat="server" Text="Button" />
</div>
Visual Studio also allows you to convert HTML elements into server controls. If you want to configure the element as a server control so you can handle events and interact with it in code, you need to right-click it and select Run As Server Control. This adds the required runat="server"attribute to the control tag. Alternatively, you could switch to Source view and type this in on your own. Keep in mind that HTML server controls are really designed for backward compatibility, as you’ll learn in Chapter 6. When creating new interfaces, you’re better off using the standardized web controls instead, which you’ll find on the Standard tab of the Toolbox.
HTML Tables
• To move from one cell to another in the table, press the Tab key or use the arrow keys. The current cell is highlighted with a blue border. Inside each cell you can type in static HTML or drag and drop controls from the Toolbox.
• To add new rows and columns, right-click inside a cell, and choose from one of the many options in the Insert submenu to insert rows, columns, and individual cells.
• To resize a part of the table, just click and drag away.
• To format a cell, right-click inside it, and choose Style. This shows the same style builder you saw in Figure 4-10.
• To work with several cells at once, hold down Ctrl while you click each cell. You can then right-click to perform a batch formatting operation.
• To merge cells together (in other words, change two cells into one cell that spans two columns), select the cells, right-click, and choose Merge Cells.
Figure 4-12 shows a table in Visual Studio, complete with several controls in different cells of the first row.
Figure 4-12. Using an HTML table
Writing Code
Many of Visual Studio’s most welcome enhancements appear when you start to write the code that supports your user interface. To start coding, you need to switch to the code-behind view. To switch back and forth, you can use two buttons that appear just above the Solution Explorer window. The tooltips identify these buttons as View Code and View Designer, respectively. Another approach that works just as well is to double-click either the .aspx page in the Solution Explorer (for the designer) or the .aspx.vb page (for the code view). The “code” in question is the VB code, not the HTML markup in the .aspx file.
When you switch to code view, you’ll see the page class for your web page. Inside your page class are methods, most of which are directly wired to control events. The following section explains how you can create these event handlers.
Adding Event Handlers
Most of the code in an ASP.NET web page is placed inside event handlers that react to web control events. Using Visual Studio, you have four ways to add an event handler to your code:
Type it in manually: In this case, you add the subroutine directly to the page class. You must specify the appropriate parameters, and you’ll need to add the Handles keyword at the end to specifically connect the event handler to the appropriate event.
Double-click a control in Design view: In this case, Visual Studio will create an event handler for that control’s default event, if it doesn’t already exist. For example, if you double-click the page, it will create a Page.Load event handler. If you double-click a button or input control, it will create an event handler for the Click or Change event.
Choose the event from the Properties window: Just select the control, and click the lightning bolt in the Properties window. You’ll see a list of all the events provided by that control. Double-click next to the event you want to handle, and Visual Studio will automatically generate the event handler in your page class. Alternatively, if you’ve already created the event handler, just select the event in the Properties window, and click the drop-down arrow at the right. You’ll see a list that includes all the meth-ods in your class that match the signature this event requires. You can then choose a method from the list to connect it. Figure 4-13 shows an example where the Button.Click event is connected to the Button1_Click method in the page class.
No matter which approach you use, the event handler looks (and functions) the same.
For example, when you double-click a Button control, Visual Studio creates an event handler like this:
Protected Sub Button1_Click(ByVal sender As Object, ByVal e As EventArgs) _ Handles Button1.Click
' Your code for reacting to the button click goes here. End Sub
The important part is the Handles clause at the end. This tells ASP.NET to wire up the Click event from the Button1 control to this event handler. (If you want to disconnect your event handler, just remove this part of the code.)
Inside your event handler, you can interact with any of the control objects on your web page using their IDs. For example, if you’ve created a TextBox control named TextBox1, you can set the text using the following line of code:
Protected Sub Button1_Click(ByVal sender As Object, ByVal e As EventArgs) _ Handles Button1.Click
TextBox1.Text = "Here is some sample text." End Sub
This creates a simple event handler that reacts when Button1 is clicked by updating the text in TextBox1. You’ll learn much more about the ASP.NET web form model in the next two chapters.
■
Note
You might wonder why your code file includes the event handlers, but it doesn’t actually define the controls (like the Button1 and TextBox1 objects in the previous example). The reason is that ASP.NET gener-ates the declarations for these controls automatically and makes them a part of your class. That’s also why every page class you create is defined with the Partial keyword. This allows ASP.NET to merge your code with the portion it generates automatically. The end result is that you can easily access all the controls on your page by name, but you don’t need to bother with extra code to create and initialize these objects.IntelliSense and Outlining
Visual Studio provides a number of automatic time-savers through its IntelliSense tech-nology. They are similar to features such as automatic spell checking and formatting in Microsoft Office applications. We introduce most of these features in this chapter, but you’ll need several hours of programming before you’ll become familiar with all of Visual Studio’s time-savers. We don’t have enough space to describe advanced tricks such as the intelligent search-and-replace features and Visual Studio’s programmable macros. These features could occupy an entire book of their own!
Outlining
Outlining allows Visual Studio to “collapse” a method, class, structure, namespace, or region to a single line. It allows you to see the code that interests you while hiding unimportant code. To collapse a portion of code, click the minus (–) symbol next to the first line. To expand it, click the box again, which will now have a plus (+) symbol (see Figure 4-14).
You can hide every method at once by right-clicking anywhere in the code window and choosing Outlining ➤Collapse to Definitions.
Member List
Visual Studio makes it easy for you to interact with controls and classes. When you type a class or object name, it pops up a list of available properties and methods (see Figure 4-15). It uses a similar trick to provide a list of data types when you define a variable or to provide a list of valid values when you assign a value to an enumeration.
Figure 4-15. IntelliSense at work
■
Tip
Forgotten the names of the controls in your web page? You can get IntelliSense to help you. Just type the Me keyword followed by the dot operator (.) Visual Studio will pop up a list with all the methods and properties of the current form class, including the control variables.Error Underlining
One of the code editor’s most useful features is error underlining. Visual Studio is able to detect a variety of error conditions, such as undefined variables, properties, or methods; invalid data type conversions; and missing code elements. Rather than stopping you to alert you that a problem exists, the Visual Studio editor underlines the offending code. You can hover your mouse over an underlined error to see a brief tooltip description of the problem (see Figure 4-17).
Figure 4-16. IntelliSense with overloaded methods
Visual Studio won’t necessarily flag your errors immediately. But when you try to run your application (or just compile it), Visual Studio will quickly scan through the code, marking all the errors it finds. If your code contains at least one error, Visual Studio will ask you whether it should continue. At this point, you’ll almost always decide to cancel the operation and fix the problems Visual Studio has discovered. (If you choose to continue, you’ll actually wind up using the last compiled version of your application, because Visual Studio can’t build an application that has errors.)
Whenever you attempt to build an application that has errors, Visual Studio will display the Error List window with a list of all the problems it detected, as shown in Figure 4-18. You can then jump quickly to a problem by double-clicking it in the list.
Figure 4-18. The Error List window
You may find that as you fix errors and rebuild your project, you discover more prob-lems. That’s because Visual Studio doesn’t check for all types of errors at once. When you try to compile your application, Visual Studio scans for basic problems such as unrecog-nized class names. If these problems exist, they can easily mask other errors. On the other hand, if your code passes this basic level of inspection, Visual Studio checks for more subtle problems such as trying to use an unassigned variable.
You can also configure the level of error checking Visual Studio performs for HTML content in the Source view of your web pages. By default, Visual Studio expects HTML 4.01 content, but you can tighten up the rules so that Visual Studio will generate a warning whenever you use HTML that deviates from the strict rules of XHTML. To change the validation mode, choose View ➤Toolbars ➤HTML Source Editing. Then, choose XHTML 1.0 Transitional or XHTML 1.1 instead of HTML 4.01 in the drop-down box.
■
Note
XHTML is a stricter form of HTML that will eventually replace it. You won’t gain much, if anything, by using XHTML today. However, some companies and organizations mandate the use of XHTML, namely, with a view to future standards. In the future, XHTML will make it easier to design web pages that are adaptable to a variety of different platforms, can be processed by other applications, and are extensible with new markup fea-tures. (For example, you could use XSLT, another XML-based standard, to transform an XHTML document into another form.) If you want to create pages that are XHTML-compliant, you can start with the XHTML tutorial atAutoCorrect
In Visual Studio 2005, IntelliSense keeps getting smarter. Not only will it help you code and catch mistakes you make, but it can also suggest corrections with a feature called AutoCorrect.
To see AutoCorrect in action, enter this line of code inside an event handler:
Dim fs As New FileStream("newfile.txt", FileMode.Create)
This line creates an instance of the FileStream class, which resides in the System.IO namespace. However, if you haven’t imported the System.IO namespace, you’ll run into a compile-time error and the line will be underlined in blue. Unfortunately, the error sim-ply indicates that no known class named FileStream exists—it doesn’t indicate whether the problem is a misspelling or a missing import, and it doesn’t tell you which namespace has the class you need. However, AutoCorrect can help.
To see AutoCorrect in action, hover over the error. A red exclamation mark icon will appear that, when clicked, shows a window with the suggested correction (see Figure 4-19).
Figure 4-19. Fixing an error with AutoCorrect
Auto Format and Color
Visual Studio also provides some cosmetic conveniences. It automatically colors your code, making comments green, keywords blue, and normal code black. The result is much more readable code. You can even configure the colors Visual Studio uses by select-ing Tools ➤Options and then choosing the Environment ➤Fonts and Colors section.
In addition, Visual Studio is configured by default to automatically format your code. This means you can type your code lines freely without worrying about tabs and position-ing. Visual Studio automatically applies the “correct” indentposition-ing. Fortunately, if you have a different preference (for example, you want five spaces instead of four spaces of indent-ing, or you want to use tabs instead of spaces), you can configure this behavior. Just select Tools ➤Options, and find the Text Editor ➤Basic ➤Tabs group of settings.
Assembly References
By default, ASP.NET makes a small set of commonly used .NET assemblies available to all web pages. These assemblies (listed in Table 4-1) are configured through a special machinewide configuration file (called the machine.config). You don’t need to take any extra steps to use the classes in these assemblies.
Table 4-1. Assemblies Available to All Web Pages
Assembly Description
mscorlib.dll and System.dll Includes the core set of .NET data types, common exception types, and numerous other fundamental building blocks. System.Configuration.dll Includes classes for reading and writing configuration information
in the web.config file, including your custom settings.
System.Data.dll Includes the data container classes for ADO.NET, along with the SQL Server data provider.
System.Drawing.dll Includes classes representing colors, fonts, and shapes. Also includes the GDI+ drawing logic you need to build graphics on the fly.
System.Web.dll Includes the core ASP.NET classes, including classes for building web forms, managing state, handling security, and much more. System.Web.Services.dll Includes classes for building web services—units of code that
can be remotely invoked over HTTP.
System.Xml.dll Includes .NET classes for reading, writing, searching, transforming, and validating XML.
System.EnterpriseServices.dll Includes .NET classes for COM+ services such as transactions. System.Web.Mobile.dll Includes .NET classes for the mobile web controls, which are
If you want to use additional features or a third-party component, you may need to import more assemblies. For example, if you want to use an Oracle database, you need to add a reference to the System.Data.OracleClient.dll assembly.
To add a reference, follow these steps:
1. Choose Website ➤Add Reference. This shows the Add Reference dialog box, with a list of assemblies that are registered with Visual Studio.
2. In the Add Reference window, select the component you want to use. If the compo-nent isn’t located in the centralized compocompo-nent registry on your computer (known as the GAC, or global assembly cache), you’ll need to click the Browse tab and find the DLL file from the appropriate directory.
3. Once you’ve selected the assembly, click OK to add the reference to your web application.
When you add a reference, Visual Studio modifies the web.config file to indicate that you use this assembly. If you add a reference to an assembly that isn’t stored in the GAC, Visual Studio will create a Bin subdirectory in your web application and copy the DLL into that directory so it’s readily available. This step isn’t required for assemblies in the GAC because they are shared with all the .NET applications on the computer. You’ll learn more about this model in Chapter 5.
■
Tip
You can create your own component assemblies. This technique allows you to share functionality between several web applications or between several types of .NET applications. You’ll learn more about this feat in Chapter 24. To brush up on assemblies and review the difference between assemblies and namespaces, refer back to Chapter 3.Namespace Imports
Conveniently, Visual Studio imports several commonly used namespaces for your entire project, so that you don’t need to add the corresponding Imports statements. For example, you get easy access to System (the namespace that defines core .NET classes like the data types) and System.Web.UI.WebControls (the namespace that contains the controls that you’ll use when designing web pages).
These projectwide imports are defined in the web.config file that’s automatically generated for your web application. Although the web.config is covered in more detail in Chapter 5, you’ll have little trouble finding the section that imports the namespaces you need. It looks like this:
<pages>
<namespaces>
<add namespace="System" />
<add namespace="System.Collections" />
<add namespace="System.Collections.Specialized" /> <add namespace="System.Configuration" />
<add namespace="System.Text" />
<add namespace="System.Text.RegularExpressions" /> <add namespace="System.Web" />
<add namespace="System.Web.Caching" /> <add namespace="System.Web.SessionState" /> <add namespace="System.Web.Security" /> <add namespace="System.Web.Profile" /> <add namespace="System.Web.UI" />
<add namespace="System.Web.UI.WebControls" />
<add namespace="System.Web.UI.WebControls.WebParts" /> <add namespace="System.Web.UI.HtmlControls" />
</namespaces> </pages>
If you want, you can add more namespaces to this list to save yourself the trouble from typing the Imports statement in multiple web pages.
Visual Studio Debugging
Once you’ve created an application, you can compile and run it by choosing Debug ➤ Start Debugging from the menu or by clicking the Start Debugging button on the toolbar. Visual Studio launches your default web browser and requests the page that’s currently selected in the Solution Explorer. This is a handy trick—if you’re in the middle of coding SalesPage1.aspx, you’ll see SalesPage1.aspx appear in the browser, not the Default.aspx home page.
Visual Studio’s built-in web server also allows you to retrieve a file listing. This means if you create a web application named SampleSite, you can request it in the form http://localhost:port/SampleSite (omitting the page name) to see a list of all the files in your web application folder (see Figure 4-20). Then, just click the page you want to test.
This trick won’t work if you have a Default.aspx page. If you do, any requests that don’t indicate the page you want are automatically redirected to this page.
Single-Step Debugging
Single-step debugging allows you to test your assumptions about how your code works and see what’s really happening under the hood of your application. It’s incredibly easy to use. Just follow these steps:
1. Find a location in your code where you want to pause execution, and start single-stepping. (You can use any executable line of code but not a variable declaration, comment, or blank line.) Click in the margin next to the line code, and a red breakpoint will appear (see Figure 4-21).
Figure 4-21. Setting a breakpoint
2. Now start your program as you would ordinarily (by pressing the F5 key or using the Start button on the toolbar). When the program reaches your breakpoint, exe-cution will pause, and you’ll be switched to the Visual Studio code window. The breakpoint statement won’t be executed.
3. At this point, you have several options. You can execute the current line by pressing F8. The following line in your code will be highlighted with a yellow arrow, indicat-ing that this is the next line that will be executed. You can continue like this through your program, running one line at a time by pressing F8 and following the code’s path of execution.
4. Whenever the code is in break mode, you can hover over variables to see their cur-rent contents (see Figure 4-22). This allows you to verify that variables contain the values you expect.
Table 4-2. Commands Available in Break Mode
Command (Hot Key) Description
Step Into (F8) Executes the currently highlighted line and then pauses. If the currently highlighted line calls a method, execution will pause at the first executable line inside the method (which is why this feature is called stepping into). Step Over (Shift-F8) The same as Step Into, except it runs methods as though they are a single
line. If you select Step Over while a method call is highlighted, the entire method will be executed. Execution will pause at the next executable statement in the current method.
Step Out (Ctrl-Shift-F8) Executes all the code in the current procedure and then pauses at the statement that immediately follows the one that called this method or function. In other words, this allows you to step “out” of the current procedure in one large jump.
Continue (F5) Resumes the program and continues to run it normally, without pausing until another breakpoint is reached.
Run to Cursor Allows you to run all the code up to a specific line (where your cursor is currently positioned). You can use this technique to skip a time-consuming loop.
Set Next Statement Allows you to change the path of execution of your program while debugging. This command causes your program to mark the current line (where your cursor is positioned) as the current line for execution. When you resume execution, this line will be executed, and the program will continue from that point. Although this technique is convenient for jumping over large loops and simulating certain conditions, it’s easy to cause confusion and runtime errors by using it recklessly.
Show Next Statement Brings you to the line of code where Visual Studio is currently halted. (This is the line of code that will be executed next when you continue.) This line is marked by a yellow arrow. The Show Next Statement command is useful if you lose your place while editing.
You can switch your program into break mode at any point by clicking the Pause button in the toolbar or selecting Debug ➤Break All. This might not stop your code where you expect, however, so you’ll need to rummage around to get your bearings.
Advanced Breakpoints
Choose Debug ➤Windows ➤Breakpoints to see a window that lists all the breakpoints in your current project. The Breakpoints window provides a hit count, showing you the num-ber of times a breakpoint has been encountered (see Figure 4-23). You can jump to the corresponding location in code by double-clicking a breakpoint. You can also use the Breakpoints window to disable a breakpoint without removing it. That allows you to keep a breakpoint to use in testing later, without leaving it active. Breakpoints are automatically saved with the Visual Studio project files, although they aren’t used when you compile the application in release mode.
Figure 4-23. The Breakpoints window
Visual Studio allows you to customize breakpoints so they occur only if certain con-ditions are true. To customize a breakpoint, right-click and a pop-up menu will appear with several options:
• Click Delete Breakpoint to remove it or Disable Breakpoint to render it temporarily inactive (in the same way that you can through the Breakpoints window).
• Click Location to see the exact code file and line where this breakpoint is positioned.
• Click Condition to set an expression. You can choose to break when this expression is true or when it has changed since the last time the breakpoint was hit.
• Click Hit Count to create a breakpoint that pauses only after a breakpoint has been hit a certain number of times (for example, at least 20) or a specific multiple of times (for example, every fifth time).
• Click When Hit to choose another action that Visual Studio should take when the breakpoint is reached, such as running a macro or printing a debug message. If you choose to take one of these actions, you can also specify whether the break-point should force Visual Studio into break mode, or whether your code should continue executing.
Variable Watches
In some cases, you might want to track the status of a variable without switching into break mode repeatedly. In this case, it’s more useful to use the Autos, Locals, and Watch windows, which allow you to track variables across an entire application. Table 4-3 describes these windows.
Table 4-3. Variable Watch Windows
Window Description
Autos Automatically displays variables that Visual Studio determines are important for the current code statement. For example, this might include variables that are accessed or changed in the previous line.
Locals Automatically displays all the variables that are in scope in the current method. This offers a quick summary of important variables.
Watch Displays variables you have added. Watches are saved with your project, so you can continue tracking a variable later. To add a watch, right-click a variable in your code, and select Add Watch; alternatively, double-click the last row in the Watch window, and type in the variable name.
Each row in the Autos, Locals, and Watch windows provides information about the type or class of the variable and its current value. If the variable holds an object instance, you can expand the variable and see its members and properties. For example, in the Locals window you’ll see the variable Me (see Figure 4-24), which is a reference to the current page class. If you click the plus (+) sign next to the word Me, a full list will appear that describes many page properties (and some system values).
If you are missing one of the Watch windows, you can show it manually by selecting it from the Debug ➤Windows submenu.
■
Tip
The Autos, Locals, and Watch windows allow you to change simple variables while your program is in break mode. Just double-click the current value in the Value column, and type in a new value. This allows you to simulate scenarios that are difficult or time-consuming to recreate manually and allows you to test specific error conditions.The Last Word
In this chapter, you took a quick look at Visual Studio 2005. If you’ve programmed with earlier versions of Visual Studio, you’ll appreciate the new cleaner project model, which refrains from generating extra files you won’t want to manage. You’ll also appreciate the new built-in web server, which makes debugging a website painless on any computer.