Proliphix
Installer
Remote Management
Guide
Rev 2.0 Page
2 of 21
Table of Contents
1.
Intended Audience... 3
2.
Remote Management Overview... 4
3.
Installer Profile Modification... 5
4.
Remote Management Administration ... 6
4.1.
Client Account Creation ... 6
4.2.
Initial Thermostat Configuration ... 7
4.3.
Router Configuration ... 7
4.4.
Final Thermostat Configuration... 8
5.
Remote Management Interface... 9
5.1.
Login Page ... 9
5.2
Client List Page... 11
5.3.
Installer Profile Page... 13
5.4.
Add Client Page ... 14
5.5.
Downloads Page... 15
5.6.
Edit Client Profile Page ... 16
5.7.
Device List Page ... 17
5.8.
Device Statistics Page ... 19
5.9.
TMI Page ... 20
Rev 2.0 Page
3 of 21
1. Intended Audience
The Remote Management Installer Guide is intended to be used by Authorized Proliphix Dealers/Installers who wish to establish Proliphix Remote Management accounts for their clients. An authorized Proliphix Dealer/Installer will be able to;
1. Configure clients’ thermostats for Remote Management.
2. Administer and modify clients’ Remote Management accounts on the Proliphix web site. 3. Remotely manage their client’s thermostats and diagnose HVAC problems.
The clients of Proliphix Authorized Dealers/Installers should receive a copy of the Proliphix Remote Management User Guide, for them to consult while remotely managing their thermostats.
! Note !
If a VPN is used to access the thermostats remotely, they will appear to reside on your “local” network. You will therefore not need to control them through the Proliphix Remote Management Service via the Proliphix web site. However, email notification due to alarm conditions will NOT be available with VPN use.
Rev 2.0 Page
4 of 21
2. Remote Management Overview
The Proliphix Network Thermostats were designed specifically to communicate directly over the Internet using the Internet Protocol (IP). This capability allows the user to securely access, manage and control their thermostats from anywhere in the world with the use of common web browser.
To provide this Remote Management capability, Proliphix has invested significantly to develop a software application running on a secure and highly reliable web server which intercommunicates to registered Proliphix Thermostats on a periodic interval to ensure that each thermostat is “reachable” by any web browser throughout the internet.
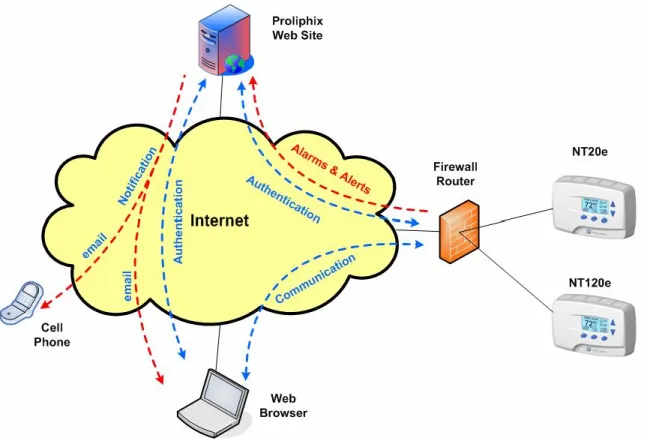
This Remote Management Server Software provides user authentication, IP address independence and email alarm notification. In Figure 1 below, a user on a web browser somewhere accessible to the Internet, logs onto the Proliphix web site. After the user has authenticated as a registered Proliphix thermostat owner, the server communicates to the thermostat to open a secure channel between the user’s web browser and the desired thermostat. Communication between the user and their thermostat can then be invoked by the user through the Remote Management GUI. The user simply clicks on links in the browser to access his/her thermostats with no knowledge of IP addressing.
Figure 1 – Remote Management and Control
Additionally, alarms or alerts detected at the thermostats are communicated immediately to the Proliphix Remote Management Server for processing. Notification of these alarms and exception conditions are then communicated to the user (or their agents) via email to either their cell phones or standard email accounts.
Rev 2.0 Page
5 of 21
3. Installer Profile Modification
As an authorized installer of the Proliphix Internet-enabled Network Thermostat, you have been uniquely assigned the following from Proliphix;
a. Installer ID
b. Remote Management Username = Installer ID (default) c. Remote Management Password = randomly assigned
In addition, Proliphix has created an Installer/Dealer account with the information you have provided.
If you have not received this information in a confirmation email, please contact Proliphix Customer Service to obtain Dealer/Installer authorization. You should not
proceed until this information has been obtained.
If you have received your account information, you may modify your account profile to change your contact information or username and password.
1. Proceed to the Proliphix Web Site (www.proliphix.com) 2. Press the Customer Login button.
3. Login to Remote Management.
4. Click Installer Profile on Client List Page.
5. Verify the information which has been entered in your account. 6. Update your contact information (if necessary)
7. Change your username / password (if desired) 8. Complete all required fields.
Rev 2.0 Page
6 of 21
4. Remote Management Administration
As an authorized installer of the Proliphix Internet-enabled Network Thermostat, you will need to administer the Remote Management Service for your clients by completing the following sections;
1. Client Account Creation
You must repeat the following steps for every thermostat. 2. Initial Thermostat Configuration
3. Router Configuration
4. Final Thermostat Configuration
Once you have installed the thermostat(s) and administered the Remote Management Service for your client, your client should consult the Proliphix Remote Management User Guide for instructions and details on managing the thermostats.
4.1.
Client Account Creation
You must establish accounts for each client to receive a uniquely assigned Customer ID required for configuring their thermostats.
1. Proceed to the Proliphix Web Site (www.proliphix.com) 2. Press the Customer Login button.
3. Login to Remote Management. 4. Click Add Client on Client List Page. Enter client contact information;
5. Enter client’s email address. 6. Enter client’s address.
7. Change client’s username (if desired) 8. Change client’s password (if desired) 9. Complete all required fields.
10. Copy down the Customer ID for this client. 11. Uncheck the “Disabled” box.
12. Press Add Account.
Your clients’ account has now been established. You will want to communicate both the account username and password to the client for them to use for Remote Management. They should refer to the Proliphix Remote Management User Guide to access their thermostats.
Rev 2.0 Page
7 of 21
4.2.
Initial Thermostat Configuration
After you have established your client’s account and prior to configuring their router, you will need to set some basic parameters in your client’s thermostat. Repeat the following steps for each of your client’s thermostats which will be remotely managed;
1. Access the General Settings Page through the TMI (See NT100e/h and NT120e/h Configuration Guide).
2. Enter a meaningful Zone Name (if not already done). 3. Press Submit.
4. Login to the Administration Pages of the thermostat (NT100e/h and NT120e/h only). 5. Access the Network Settings Page through the TMI.
6. Set the IP Address Method to Static. 7. Select a unique;
a. IP address - local network address b. Subnet Mask - local subnet
c. Gateway address - address of local firewall router
d. HTTP port number - incoming port number, must be unique for each thermostat! 8. Copy down the IP Address (e.g. 192.168.111.124)
9. Copy down the HTTP Port Number (default is 8081) 10. Press Submit.
4.3. Router
Configuration
The client’s local firewall router must be configured to accept communication from the Proliphix Server Software. To allow this, you must enable port forwarding in the router. Port forwarding is the generic term used to define how incoming network traffic, received from the Internet, will be passed through the router to a device expecting to receive the information. The Proliphix thermostat is such a device which will expect to receive traffic from the Proliphix Server Software. You must therefore configure the router to receive incoming information from Proliphix and forward it to the thermostat.
The Proliphix Network Thermostat is programmed to receive instructions only from the Proliphix Server Software. All other attempts to access the thermostat by malicious
individuals or software on the Internet will be rejected by the Proliphix Thermostat.
Therefore;
1. Access the Inbound Port Forwarding table in the local router. (Note: Routers are available from many different manufacturers and may therefore identify the “port forwarding” function by many different terms. Please consult the user guide of the router to properly configure these settings.)
2. Set the router’s Incoming/Inbound Port Number to the HTTP Port number retrieved from the Network Settings Page above.
3. For this HTTP Port number, set the router to forward to the local IP Address retrieved from the Network Settings Page above (i.e. the IP address of the thermostat).
Rev 2.0 Page
8 of 21
4.4.
Final Thermostat Configuration
In this section you will enable the thermostat to intercommunicate with the Proliphix Web Server Software to establish an operational Remote Management connection between a single thermostat and the
Proliphix Server Software. Only after completion of the previous two sections should you; 1. Login to the Administration Pages of the thermostat (NT100e/h and NT120e/h only). 2. Access the Remote Access Page through the TMI.
3. Enter a meaningful Site Name (could be the name or location of the property). 4. Enter your assigned Customer ID into the Customer Information field.
5. Set the Remote Discovery State to Enabled. 6. Press Submit.
7. Press Discover Now.
After pressing the Discover Now button the thermostat will attempt to communicate with the Proliphix web site Server Software to identify itself and declare it eligible to be remotely managed over the Internet. The Proliphix Server Software will attempt to call back to the thermostat to exchange information relevant to establishing secure remote connections.
After you have invoked the Remote Discovery (i.e. pressed Discover Now), you must wait at least 5 minutes before remotely managing the thermostats. During this interval, the thermostat and the Server Software are establishing an initial connection and transferring
Rev 2.0 Page
9 of 21
5. Remote Management Interface
After the thermostats which you have installed have successfully connected with the Proliphix Server Software, you may access the Proliphix web site (www.proliphix.com) with your dealer/installer account information (administered by Proliphix) to manage your clients’ thermostats over the Internet. Use the Login button in the Remote Management button group on the Proliphix home page.
5.1. Login
Page
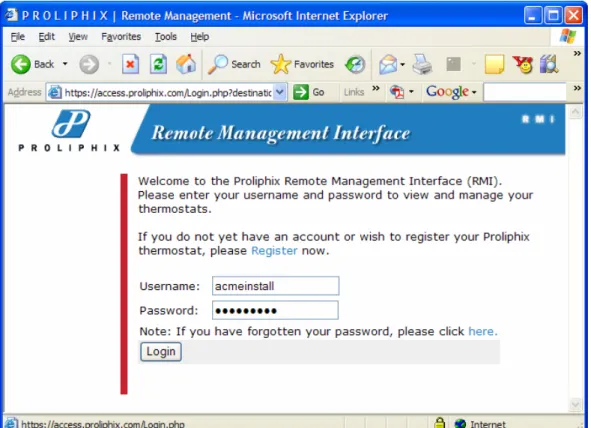
The Login Page for the Remote Management Interface is shown below;
Figure 2 – Remote Management Login Page
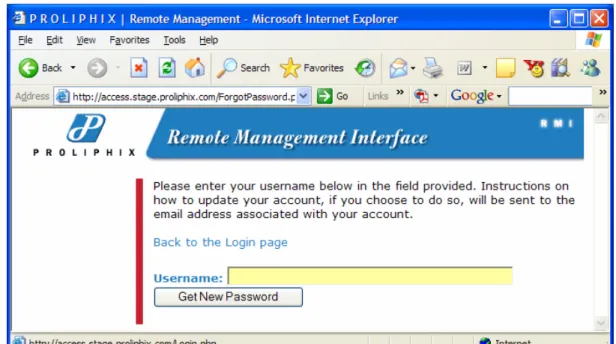
Note that in Figure 2 you have an option to have the Server Software re-issue another password if your password has been forgotten. A new password is administered after the directions in Figure 3 have been followed.
Rev 2.0 Page
10 of 21
Figure 3 – New Password Administration Page
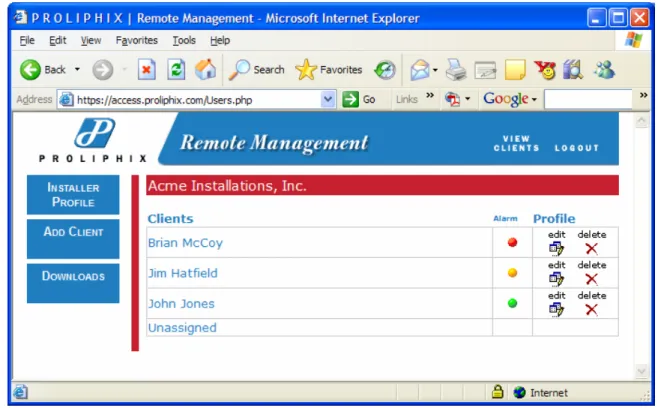
After a successful login, the user is immediately directed to the Client List Page. It is on this page that all thermostats registered and successfully communicating with the Proliphix Server Software are displayed.
Rev 2.0 Page
11 of 21
5.2 Client
List
Page
The Client List Page includes the Installer’s customers listed in a Client table. For each client listed in the table, the alarm information from that client is readily visible. In addition, the clients’ account profile may be edited or deleted.
In the example in Figure 4, Acme Installations has three clients which are Proliphix Network Thermostat customers; Brian McCoy, Jim Hatfield, and John Jones. Each client occupies a row in the Client Table. The name of each client is a link to that client’s thermostats and can be “clicked” to access that client’s Device List Page.
Figure 4 – Client List Page
Button Definitions Installer Profile:
Page which includes the Installer’s (e.g. Acme Installations) editable account information. Add Client:
Page which allows the installer to administer new clients whose thermostats will be configured for Remote Management.
Downloads:
Page which includes utilities for downloading software upgrades for the thermostat. View Clients:
Displays Client List (this) Page. Logout:
Rev 2.0 Page
12 of 21
Client List Field Definitions (see Figure 4 above) Client Name: (e.g. Brian McCoy)
- Name given to each Installer customer who has thermostats which will be remotely manageable. The coloring of the name represents its status;
Blue – The client has thermostats which have communicated with the Server Software and are capable of being remotely managed. Clicking on this name will advance you to the client’s Device List.
Black – The client’s account has been established but no client thermostats have yet to communicate with the Server Software for Remote Management. You will not be able to access this client’s Device List.
Alarm: (or alert notification)
- Color indicator signifying type of alarm received from any thermostat from this client. Currently there are two classes of alarms communicated by the thermostat to the Server Software. The colors of this thermostat include;
Green - There are no alarms pending.
Red – This is the highest severity level alarm. A Low Temperature Alarm is an example of an alarm at this severity level. If any thermostat from this client experiences a Low Temperature Alarm this indicator will be Red and take precedence over a Yellow indicator.
Yellow - This is the lowest severity level alarm. A Filter Change Reminder alert is an example of this severity level. This alarm will be pre-empted by a Red alarm condition.
Edit {Client} Profile:
- Directs the user to the Client Profile Page. Information on this page includes the client contact information, and notification email accounts. (See Section 3.5)
Rev 2.0 Page
13 of 21
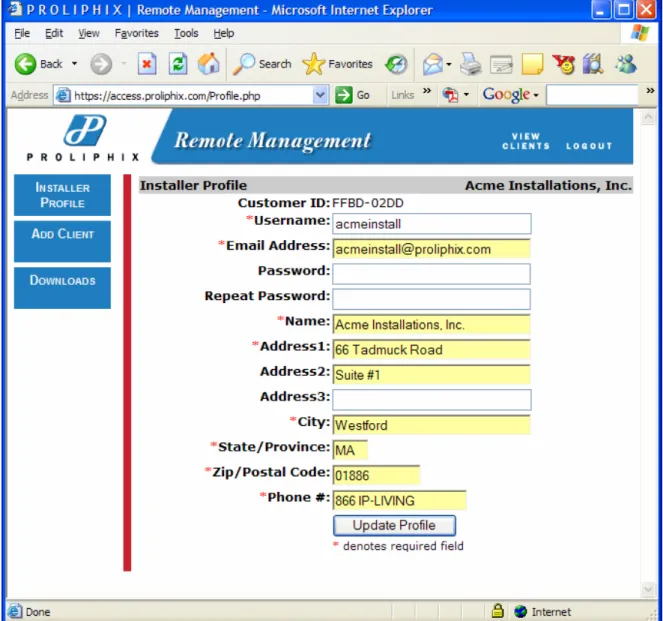
Installer Profile Page
It is within the Installer Profile Page that the installer can change his/her account username and password. The Installer’s contact information is also required to provide Remote Management privileges to the clients. Note that the Customer ID noted on this page is synonymous with the Installer’s ID.
Figure 5 – Installer Profile Page
5.4.
Rev 2.0 Page
14 of 21
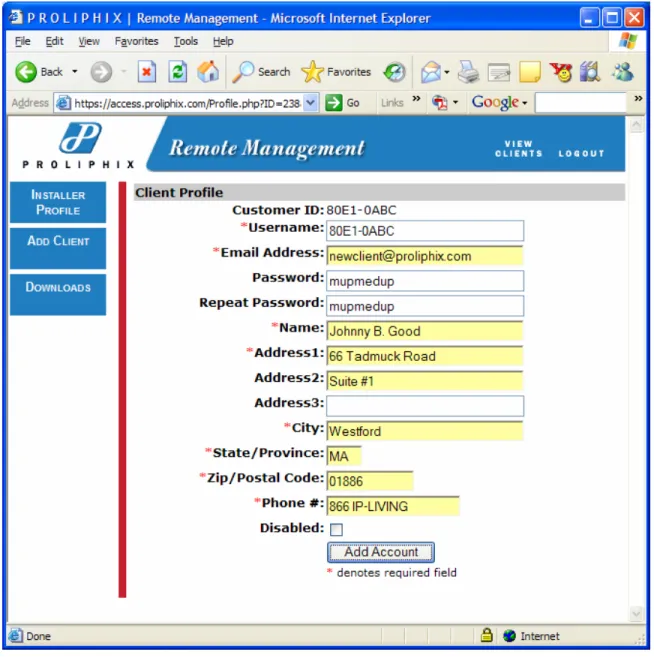
Add Client Page
Prior to installing Proliphix Thermostats for a new client, an installer should create a new client account by entering the information within this page. Note that upon entering this page, a unique Customer ID is created automatically by the Server Software. This Customer ID is required to properly configure the client’s new thermostats to communicate with the Server Software. (See the Proliphix Remote Management Setup Guide). Note also that the unique Customer ID is assigned to the initial (default) username. The Server Software assigned password is random.
Figure 6 – Add Client Page
The client account may be enabled or disabled by the Installer. The “Disabled” box must be unchecked to maintain an active account and access the client’s thermostats remotely.
Rev 2.0 Page
15 of 21
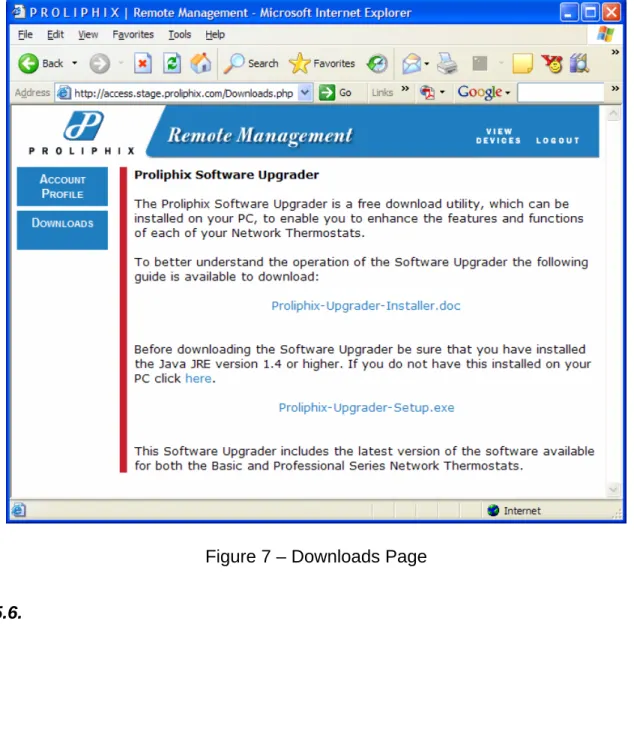
5.5. Downloads Page
The Downloads page contains links to both the Proliphix Upgrade Utility and its software installer. The Upgrade Utility is a Proliphix application which allows the user the ability to upgrade their thermostats with the latest software features and functions either locally on the same network, or remotely via the Internet.
Figure 7 – Downloads Page
5.6.
Rev 2.0 Page
16 of 21
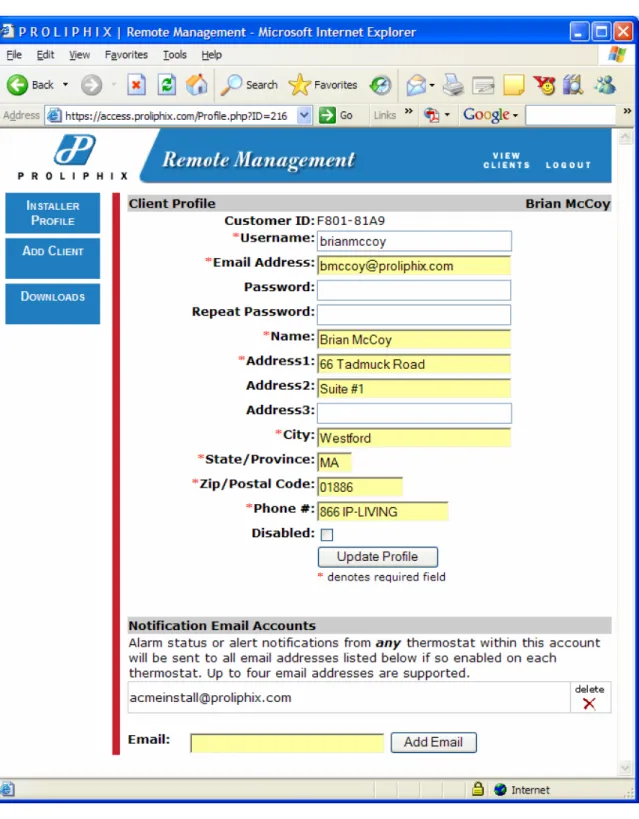
Edit Client Profile Page
The Edit Client Profile Page displays the client account information required for thermostat Remote Management. The Installer may; change the client’s username and password, enable/disable the client’s account, and administer up to four Notification Email Accounts.
Rev 2.0 Page
17 of 21
5.7.
Device List Page
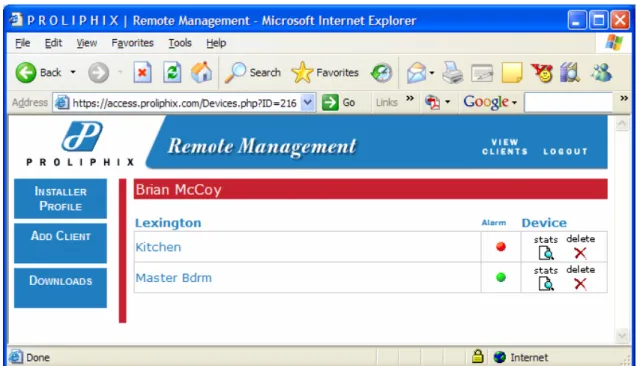
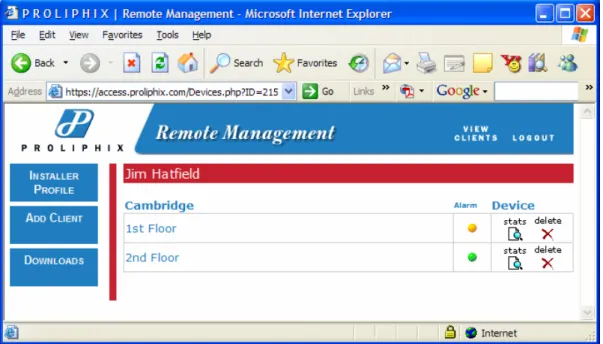
The Installer may view each client’s thermostats by clicking on that client (Section 3.1). Figures 8a and 8b below, illustrate the Device Lists for each of Brian McCoy and Jim Hatfield respectively. The
thermostats for each client are organized in tables headed by the thermostat Site Name. In the example below, Brian McCoy has two thermostats (i.e. Kitchen, Master Bedroom) in one property, Lexington and Jim Hatfield has two (i.e. 1st floor, 2nd Floor) in his Cambridge property.
Figure 8a – Device List (McCoy)
Device List Field Definitions (see Figure 4 above) Zone Name: (e.g. Kitchen)
- Name given to each thermostat within the Thermostat Management Interface (TMI). The coloring of the name represents its status;
Blue – The thermostat is reachable for remote management. It continues to successfully intercommunicate with the Proliphix Server Software. If this name is blue, the link is active and the TMI Status & Control (default) page for that thermostat will be viewed.
Orange – The thermostat is unreachable. The thermostat has successfully notified the server of its existence, but the Server Software is unable to respond to the thermostat. This is usually an indication that the user’s firewall router has inhibited access to the thermostat.
Red – The thermostat is unreachable. The Server Software has not received periodic messaging from the thermostat. It is likely that the thermostat and the Server Software maintained a connection at one time but now that connection has been lost.
Rev 2.0 Page
18 of 21
Alarm: (or alert notification)
- Color indicator signifying type of alarm received by this thermostat. Currently there are two classes of alarms communicated by the thermostat to the Server Software. The colors of this thermostat include;
Green - There are no alarms pending.
Red – This is the highest severity level alarm. Currently only a Low Temperature Alarm has a severity of this level. If the thermostat experiences a Low
Temperature Alarm this indicator will take precedence over a Yellow indicator. Yellow - This is the lowest severity level alarm. Currently only a Filter Change Reminder
alert has this severity. This alarm will be pre-empted by a red alarm condition. Device Stats:
- Directs the user to the Device Statistics Page. Information on this page includes thermostat statistics, remote management statistics, notification email accounts and alarm status details. (See Figure 7 below.)
Figure 8b – Device List (Hatfield)
Note that both the Red and Yellow Alarms illustrated in Figures 8a and 8b respectively propagate up to be visible at the Client List Page as shown in Figure 4.
Rev 2.0 Page
19 of 21
5.8. Device Statistics Page
This Page displays pertinent thermostat specific Remote Management information. Specifically, it contains the thermostat serial number, its last know WAN IP address and port number, the last known discovery exchange, and the time the thermostat was remotely managed.
In addition, pending alarms are described more specifically and email accounts for alarm notification can be added.
Rev 2.0 Page
20 of 21
5.9.
TMI Page
The Thermostat Management Interface (TMI) Page contains two components, the Remote Management Header and the thermostat TMI. The remote Management Header allows the user to be able to return back to the Device List Page (“View Devices” button) to continue viewing other thermostats. The TMI is the same TMI used to manage the thermostat on the local network.
The Nantucket Kitchen NT20e thermostat (TMI) is shown in Figure 8 below.
Figure 8 – Thermostat Management Interface
6. Customer Assistance
When contacting Proliphix for technical assistance, please have the following information available:
Rev 2.0 Page
21 of 21
¾ Type of heating/cooling system (example: gas, oil, or electric; warm air, hot water, heatpump, steam or gravity)
¾ Location and number of wires attached to thermostat
For additional assistance, please contact Proliphix Technical Support using the following: