Ultimate Protection Suite
Trademarks and Copyright Trademarks
Windows is a registered trademark of the Microsoft Corporation in the United States and other countries. All other brand and product names are trademarks or registered trademarks of their respective owners.
Protected trademarks are not marked as such in this manual. This does not mean, however, that they may be used freely. Copyright information
Code provided by third party providers was used for Avira Ultimate Protection Suite. We thank the copyright owners for making the code available to us.
For detailed information on copyright, please refer to "Third Party Licenses" in the program help of Avira Ultimate Protection Suite. End User License Agreement - EULA
https://www.avira.com/en/license-agreement Privacy Policy
Table of Contents
1.
Introduction
... 10
1.1 Icons and emphases ... 10
2.
Product information
... 12
2.1 Delivery scope ... 12
2.2 System requirements ... 14
2.2.1 System requirements Avira Ultimate Protection Suite ... 14
2.2.2 System requirements Avira SearchFree Toolbar ... 14
2.2.3 Administrator rights (since Windows Vista) ... 15
2.2.4 Incompatibility with other programs ... 15
2.3 Licensing and Upgrade ... 16
2.3.1 Licensing ... 16
2.3.2 Extending a license ... 16
2.3.3 Upgrading ... 17
2.3.4 License manager ... 17
3.
Installation and uninstallation ... 19
3.1 Preparing for installation ... 19
3.2 Installing from CD when offline ... 20
3.3 Installing software downloaded from the Avira website ... 20
3.4 Removing incompatible software ... 20
3.5 Choosing an installation type ... 21
3.5.1 Performing an Express Installation ... 21
3.5.2 Performing a Custom Installation ... 22
3.6 Installing Avira Ultimate Protection Suite ... 22
3.6.1 Choosing a destination folder ... 23
3.6.2 Installing Avira SearchFree Toolbar ... 24
3.6.3 Choosing installation components ... 25
3.6.4 Creating shortcuts for Avira Ultimate Protection Suite ... 27
3.6.5 Activating Avira Ultimate Protection Suite ... 28
3.6.6 Defining Proxy settings ... 29
3.6.7 Configuring the heuristic detection level (AHeAD) ... 31
3.6.8 Selecting extended threat categories ... 32
3.6.10 Assigning a password ... 33
3.6.11 Starting a scan after installation ... 34
3.7 Changing the installation ... 35
3.7.1 Changing an installation under Windows 8 ... 35
3.7.2 Changing an installation under Windows 7 ... 36
3.7.3 Changing an installation under Windows XP ... 37
3.8 Uninstalling Avira Ultimate Protection Suite ... 37
3.8.1 Uninstalling Avira Ultimate Protection Suite under Windows 8 ... 37
3.8.2 Uninstalling Avira Ultimate Protection Suite under Windows 7 ... 38
3.8.3 Uninstalling Avira Ultimate Protection Suite under Windows XP ... 39
3.8.4 Uninstalling Avira SearchFree Toolbar ... 40
4.
Overview of Avira Ultimate Protection Suite ... 43
4.1 User interface and operation ... 43
4.1.1 Control Center ... 43
4.1.2 Configuration ... 46
4.1.3 Tray icon ... 50
4.2 Avira SearchFree Toolbar ... 51
4.2.1 Use ... 52
4.2.2 Options ... 55
4.2.3 Uninstalling Avira SearchFree Toolbar ... 58
4.3 How to...? ... 59
4.3.1 Activate license ... 59
4.3.2 Activate product ... 59
4.3.3 Perform automatic updates ... 61
4.3.4 Start a manual update ... 62
4.3.5 Using a scan profile to scan for viruses and malware ... 63
4.3.6 Scan for viruses and malware using drag & drop ... 65
4.3.7 Scan for viruses and malware via the context menu ... 65
4.3.8 Automatically scan for viruses and malware ... 65
4.3.9 Targeted scan for Rootkits and active malware ... 67
4.3.10 React to detected viruses and malware ... 67
4.3.11 Handling quarantined files (*.qua) ... 72
4.3.12 Restore the files in quarantine ... 74
4.3.13 Move suspicious files to quarantine ... 76
4.3.14 Amend or delete file type in a scan profile ... 76
4.3.15 Create desktop shortcut for scan profile ... 77
4.3.16 Filter events ... 77
5.
Detection ... 79
5.1 Overview ... 79
5.2 Interactive action mode ... 79
5.2.1 Alert ... 80
5.2.2 Detection, Errors, Warnings ... 80
5.2.3 Context menu actions ... 81
5.2.4 Special features when infected boot sectors, rootkits and active malware are detected . 82 5.2.5 Buttons and links ... 82
5.2.6 Special features when malware is detected while Web Protection is inactive ... 83
5.3 Sending files to Protection Cloud ... 83
5.3.1 Displayed information ... 84
5.3.2 Buttons and links ... 84
5.4 Real-Time Protection... 84
5.5 Suspicious behavior ... 86
5.5.1 Alert of Real-Time Protection: Suspicious application behavior detected ... 86
5.5.2 Name and path of the currently detected suspicious program ... 86
5.5.3 Options ... 86
5.5.4 Buttons and links ... 87
5.6 Incoming emails ... 87
5.6.1 Alert ... 88
5.6.2 Detections, Errors, Warnings... 88
5.6.3 Options ... 88
5.6.4 Buttons and links ... 90
5.7 Outgoing emails ... 90
5.7.1 Alert ... 91
5.7.2 Detections, Errors, Warnings... 91
5.7.3 Options ... 91
5.7.4 Buttons and links ... 92
5.8 Sender ... 92
5.8.1 Alert ... 93
5.8.2 Program used, SMTP server used and address of the sender of the email ... 93
5.9 Server ... 93
5.9.1 Alert ... 94
5.10 Web Protection ... 94
6.
System Scanner ... 97
6.1 System Scanner ... 97
6.2 Luke Filewalker ... 97
6.2.1 Luke Filewalker: Scan status window ... 98
6.2.2 Luke Filewalker: Scan Statistics ... 101
7.
Control Center ... 103
7.1 Control Center Overview ... 103
7.2 File ... 107
7.2.1 Exit ... 107
7.3 View ... 107
7.3.1 Status ... 107
7.3.2 Game Mode ... 118
7.3.3 System Scanner ... 119
7.3.4 Manual selection ... 121
7.3.5 Real-Time Protection ... 124
7.3.6 FireWall ... 125
7.3.7 Web Protection ... 126
7.3.8 Mail Protection ... 127
7.3.9 Safe Browsing ... 130
7.3.10 Avira Android Security ... 132
7.3.11 Quarantine ... 132
7.3.12 Scheduler ... 138
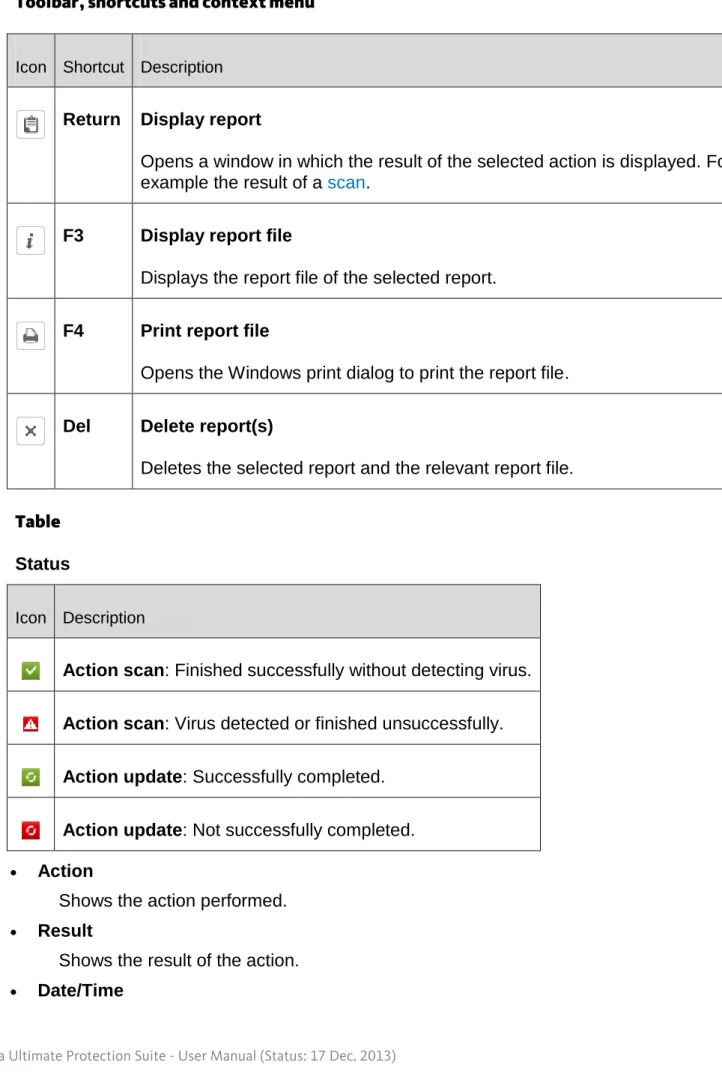
7.3.13 Reports ... 141
7.3.14 Contents of a report for a scan ... 143
7.3.15 Events ... 144
7.3.16 Refresh ... 146
7.4 Extras ... 147
7.4.1 Boot records scan ... 147
7.4.2 Detection list ... 147
7.4.3 Download rescue CD ... 148
7.4.4 Configuration ... 148
7.5 Update ... 148
7.5.1 Start update... ... 148
7.6 Help ... 149
7.6.1 Topics ... 149
7.6.2 Help me ... 149
7.6.3 Live Support ... 149
7.6.4 Forum ... 149
7.6.5 Download manual ... 149
7.6.6 License management ... 150
7.6.7 Recommend product ... 151
7.6.8 Send feedback ... 151
7.6.9 About Avira Ultimate Protection Suite ... 151
7.7 Experts Market ... 152
7.7.1 Experts Market Overview ... 152
7.7.2 Ask for help ... 152
7.7.3 Offering help ... 153
8.
Child Protection ... 155
8.1 Social Networks ... 155
8.1.1 Creating a Social Network Protection account ... 155
8.1.2 Logging in to an existing Social Network Protection account... 156
8.2 Safe Browsing ... 156
8.2.1 Enabling Safe Browsing ... 157
8.2.2 Assigning a Safe Browsing role ... 157
8.2.3 Changing a role's properties ... 158
8.2.4 Adding or removing a role ... 159
9.
Mobile Protection ... 160
10.
Configuration ... 161
10.1 Overview of configuration options ... 161
10.1.1 Buttons... 162
10.2 System Scanner ... 163
10.2.1 Scan ... 163
10.2.2 Report ... 172
10.3 Real-Time Protection... 173
10.3.1 Scan ... 173
10.3.2 Report ... 183
10.4 Update ... 184
10.5 FireWall ... 187
10.5.1 Windows Firewall ... 187
10.6 Web Protection ... 189
10.6.1 Scan ... 190
10.6.2 Report ... 197
10.7 Mail Protection ... 198
10.7.1 Scan ... 198
10.7.2 General ... 204
10.7.3 Report ... 206
10.8 Safe Browsing ... 207
10.8.1 Role properties ... 209
10.8.2 Usage duration ... 211
10.8.3 Usage period ... 211
10.9 General ... 212
10.9.1 Threat categories ... 212
10.9.2 Advanced protection... 213
10.9.3 Password ... 216
10.9.4 Security ... 219
10.9.5 WMI ... 220
10.9.6 Events ... 221
10.9.7 Reports ... 221
10.9.8 Directories ... 222
10.9.9 Acoustic alerts ... 222
10.9.10 Alerts ... 223
11.
Tray Icon ... 225
12.
In Product Messages ... 226
12.1.1 Product Message Subscription Center ... 226
13.
FireWall ... 227
13.1 Windows Firewall ... 227
14.
Updates ... 228
14.1 Updates ... 228
14.2 Updater ... 229
15.
FAQ, Tips ... 231
15.1 Help in case of a problem ... 231
15.2 Shortcuts ... 235
15.2.1 In dialog boxes ... 235
15.2.2 In the help ... 236
15.2.3 In the Control Center ... 237
15.3 Windows Security Center ... 239
15.3.1 General ... 239
15.3.2 The Windows Security Center and your Avira product ... 240
15.4 Windows Action Center ... 242
15.4.1 General ... 242
15.4.2 The Windows Action Center and your Avira product ... 243
16.
Viruses and more ... 248
16.1 Threat categories ... 248
16.2 Viruses and other malware ... 251
17.
Info and Service ... 256
17.1 Contact address ... 256
17.2 Technical support ... 256
17.3 Suspicious files ... 257
17.4 Reporting false positives ... 257
1.
Introduction
Your Avira product protects your computer against viruses, worms, Trojans, adware and spyware and other risks. In this manual these are referred to as viruses or malware (harmful software) and unwanted programs.
The manual describes the program installation and operation. For further options and information, please visit our website:
http://www.avira.com
The Avira website lets you:
access information on other Avira desktop programs
download the latest Avira desktop programs
download the latest product manuals in PDF format
download free support and repair tools
access our comprehensive knowledge database and FAQs for troubleshooting
access country-specific support addresses.
Your Avira Team
1.1
Icons and emphases
The following icons are used: Icon /
designation
Explanation
Placed before a condition which must be fulfilled prior to execution of an action.
Placed before an action step that you perform.
Warning Placed before a warning when critical data loss might occur.
Note Placed before a link to particularly important information or a tip
which makes your Avira Ultimate Protection Suite easier to use. The following emphases are used:
Emphasis Explanation
Italics File name or path data.
Displayed software interface elements (e.g. window section or error message).
Bold Clickable software interface elements (e.g. menu item,
2.
Product information
This chapter contains all information relevant to the purchase and use of your Avira product:
see Chapter: Delivery scope
see Chapter: System requirements
see Chapter: Licensing and Upgrade
see Chapter: License Manager
Avira products are comprehensive and flexible tools you can rely on to protect your computer from viruses, malware, unwanted programs and other dangers.
Please note the following information:
Warning
Loss of valuable data usually has dramatic consequences. Even the best virus protection program cannot provide one hundred percent protection from data loss. Make regular copies (Backups) of your data for security purposes.
Note
A program can only provide reliable and effective protection from viruses, malware, unwanted programs and other dangers if it is up-to-date. Make sure your Avira product is up-to-date with automatic updates. Configure the program accordingly.
2.1
Delivery scope
Your Avira product has the following functions:
Control Center for monitoring, managing and controlling the entire program
Central configuration with user-friendly standard and advanced options and context-sensitive help
System Scanner (on-demand scan) with profile-controlled and configurable scan for all known types of virus and malware
Integration into the Windows User Account Control allows you to carry out tasks requiring administrator rights.
Real-Time Protection (on-access scan) for continuous monitoring of all file access attempts
ProActiv component for the permanent monitoring of program actions (for 32-bit systems only)
Mail Protection (POP3 Scanner, IMAP Scanner and SMTP Scanner) for the permanent
checking of emails for viruses and malware, including the checking of email attachments
Avira SearchFree Toolbar, a search toolbar integrated in the web browser providing quick and convenient search options. It also includes widgets of the most common Internet functions.
Web Protection for monitoring data and files transferred from the Internet using the HTTP protocol (monitoring of ports 80, 8080, 3128)
Avira Social Network Protection, a monitoring tool, informs parents of their children's online activities. It checks their social network accounts for comments, photos etc. that may influence the child's reputation in a negative way or may indicate that the child is in danger.
Parental control component for role-based filtering of undesirable websites and limiting Internet use.
Avira Android Security app is not only focused on anti-theft measures. The app helps you to get back your mobile device once you have misplaced it, or even worse: if it has been stolen. Furthermore the app allows you to block incoming calls or SMS. Avira Android Security protects cell phones and smartphones running with the Android operating system.
Integrated quarantine management to isolate and process suspicious files
Rootkits protection for detecting hidden malware installed in your computer system (rootkits)
(Not available under Windows XP 64 bit)
Direct access to detailed information on the detected viruses and malware via the Internet
Simple and quick updates to the program, virus definitions, and search engine through Single File Update and incremental VDF updates via a web server on the Internet
User-friendly licensing in License Manager
Integrated Scheduler for planning one-off or recurring jobs such as updates or scans
Extremely high virus and malware detection via innovative scanning technology (scan
engine) including heuristic scanning method
Detection of all conventional archive types including detection of nested archives and smart extension detection
High-performance multithreading function (simultaneous high-speed scanning of
2.2
System requirements
2.2.1
System requirements Avira Ultimate Protection Suite
Avira Ultimate Protection Suite has the following requirements for successful use of the system:
Operating system
Windows 8, newest SP (32 or 64 bit) or
Windows 7, newest SP (32 or 64 bit) or
Windows XP, newest SP (32 or 64 bit)
Hardware
Computer with Pentium processor or later, at least 1 GHz
At least 150 MB of free hard disk memory space (more if using quarantine for temporary
storage)
At least 1024 MB RAM under Windows 8, Windows 7
At least 512 MB RAM under Windows XP
Other requirements
For the program installation: Administrator rights
For all installations: Windows Internet Explorer 6.0 or higher
Internet connection where appropriate (see Preparing for installation)
2.2.2
System requirements Avira SearchFree Toolbar
The following requirements have to be met for a proper use of the Avira SearchFree Toolbar:
Operating system
Windows 8, newest SP (32 or 64 bit) or
Windows 7, newest SP (32 or 64 bit) or
Windows XP, newest SP (32 or 64 bit)
Web browser
Windows Internet Explorer 6.0 or higher
Mozilla Firefox 3.0 or higher
Note
If necessary, please uninstall any previously installed search toolbars before you install the Avira SearchFree Toolbar. Otherwise you will not be able to install the Avira SearchFree Toolbar.
2.2.3
Administrator rights (since Windows Vista)
On Windows XP, many users work with administrator rights. However, this is not desirable from the point of view of security because it is then easy for viruses and unwanted
programs to infiltrate computers.
For this reason, Microsoft introduced the "User Account Control" (UAC). The User Account Control is part of the following operating systems:
Windows Vista
Windows 7
Windows 8
The User Account Control offers more protection for users who are logged in as administrators. Thus an administrator only has the privileges of a normal user at first. Actions for which administrator rights are required are clearly marked by the operating system with an information icon. In addition, the user must explicitly confirm the required action. Privileges will only then be increased and the administrative task will be performed by the operating system after this permission has been obtained.
The Avira Ultimate Protection Suite requires administrator rights for some actions. These actions are marked with the following symbol: . If this symbol also appears on a button, administrator rights are required to carry out this action. If your current user account does not have administrator rights, the Windows dialog of the User Account Control asks you to enter the administrator password. If you do not have an administrator password, you cannot carry out this action.
2.2.4
Incompatibility with other programs
Avira Ultimate Protection Suite
Avira Ultimate Protection Suite cannot currently be used with the following products:
PGP Desktop Home
PGP Desktop Professional 9.0
CyberPatrol
An error in the aforesaid products may cause the Avira Mail Protection (POP3 scanner) in Avira Ultimate Protection Suite not to function or the system to become unstable. Avira is working with PGP and CyberPatrol to resolve the problem. Until a solution is found, we
strongly recommend that you uninstall the aforesaid products before installing Avira Ultimate Protection Suite.
Avira Web Protection
Avira Web Protection is not compatible with the following products:
Teleport Pro from Tennyson Maxwell, Inc
CHIPDRIVE® Time Recording from SCM Microsystems
MSN Messenger from Microsoft
Any data sent or requested by these products will therefore be ignored by Avira Web Protection.
Note
Avira Mail Protection will not function if a mail server (e.g. AVM KEN, Exchange) is already installed on the computer.
2.3
Licensing and Upgrade
2.3.1
Licensing
In order to be able to use your Avira product, you require a license. You thereby accept the license terms.
The license is provided in the form of an activation code. The activation code is a code comprising letters and numbers that you will receive after purchasing the Avira product. The activation code contains the exact data of your license, i.e. which programs have been licensed for which period of time.
The activation code will be sent to you by email, if you have purchased your Avira product on the Internet or it is indicated on the product packaging.
In order to license your program, please enter your activation code to activate the
program. The product activation may be performed during installation. However, you can also activate your Avira product after the installation in the License Manager, under Help > License management.
2.3.2
Extending a license
When your license is about to expire, Avira will send a slide-up reminding you to extend your license. To do so, you only have to click a link and you will be forwarded to the Avira online shop. However, it is also possible to extend the license of your Avira product
If you have registered in the licensing portal of Avira, you can additionally extend your license directly online via the License Overview or select the automatic renewal of your license.
2.3.3
Upgrading
In the License Manager, you have the option of launching an upgrade for a product from the Avira desktop product family. Manual uninstallation of the old product and manual installation of the new product is not required. When upgrading from the License Manager, you enter the activation code for the product you want to upgrade into the License
Manager input box. The new product is automatically installed.
To achieve high reliability and security for your computer, Avira sends a pop-up item to remind you to upgrade your system to the newest version. Just click the Upgrade link on the pop-up item and you will be guided to your product specific upgrade site.
You have the possibility to upgrade your current product, or you may obtain a more comprehensive product. The product overview page shows what kind of product you are using right now and offers the chance to compare your product to other Avira products. If you need more information click the information icon right beside the product name. If you want to remain on the same product, click Upgrade and the download of the new version starts immediately. If you would like to obtain a more comprehensive product, click the Buy button at the bottom of the product column. You will be automatically forwarded to the Avira online shop where you can do your purchase order.
Note
Depending on your product and your operating system you may need
administrator rights to perform the upgrade. Login as an administrator before performing an upgrade.
2.3.4
License manager
The Avira Ultimate Protection Suite License Manager enables very simple installation of the Avira Ultimate Protection Suite license.
Avira Ultimate Protection Suite License Manager
You can install the license by selecting the license file in your file manager or in the activation email with a double click and following the relevant instructions on the screen.
Note
The Avira Ultimate Protection Suite License Manager automatically copies the corresponding license in the relevant product folder. If a license already exists, a note appears as to whether the existing license file is to be replaced. In this case the existing file is overwritten by the new license file.
3.
Installation and uninstallation
This chapter contains information relating to the installation of Avira Ultimate Protection Suite.
Preparing for installation
Installing from CD when offline
Installing downloaded software
Removing incompatible software
Choosing an installation type
Installing Avira Ultimate Protection Suite
Changing the installation
Uninstalling Avira Ultimate Protection Suite
3.1
Preparing for installation
Before installation, check whether your computer fulfills all the minimum System Requirements.
Close all running applications.
Make sure that no other virus protection solutions are installed. The automatic protection functions of various security solutions may interfere with each other (for the automatic options see Removing incompatible software).
If necessary, please uninstall any previously installed search toolbars before you install the Avira SearchFree Toolbar. Otherwise you will not be able to install the Avira SearchFree Toolbar.
Establish an Internet connection.
The connection is necessary for performing the following installation steps:
Downloading the current program file and scan engine as well as the latest virus definition files via the installation program (for Internet-based installation)
Activating the program
Registering as a user
Where appropriate, carrying out an update after completed installation
Keep the activation code or license file for your Avira Ultimate Protection Suite handy for the time when you want to activate the program.
For product activation or registration, your Avira Ultimate Protection Suite uses the HTTP protocol and Port 80 (web communication), as well as encryption protocol SSL and port 443, to communicate with the Avira servers. If you are using a firewall, please ensure that the required connections and/or incoming or outgoing data are not blocked by the firewall.
3.2
Installing from CD when offline
Insert the Avira Ultimate Protection Suite CD.
If autostart is enabled, click Open folder to view files. OR
Navigate to your CD drive, right-click on AVIRA and select Open folder to view files. Double-click the file autorun.exe.
In the CD menu choose the offline version to install.
The program scans for incompatible software (more information here: Removing incompatible software).
The installation file is extracted. The installation routine is started. Continue with Choosing an installation type.
3.3
Installing software downloaded from the Avira website
Go to www.avira.com/download.
Select the product and click Download. Save the downloaded file on your system.
Double-click the installation file avira_ultimate_protection_suite_en.exe. If the User Account Control window appears, click Yes.
The program scans for incompatible software (more information here: Removing incompatible software).
The installation file is extracted. The installation routine is started. Continue with Selecting an installation type.
Note
You can cancel the installation and resume it later, if needed. A shortcut will be created on your desktop. To resume the installation you just have to double-click the Resume installation shortcut with the Avira logo on it.
3.4
Removing incompatible software
The Avira Ultimate Protection Suite will search for any possible incompatible software on your computer. If potentially incompatible software is detected Avira Ultimate Protection Suite generates a list of these programs. It is recommended to remove these software programs in order not to endanger the stability of your computer.
Select from the list the check boxes of all those programs that should be removed automatically from your computer and click Next.
For some products the uninstallation has to be confirmed manually. Select those programs and click Next.
The uninstallation of one or more of the selected programs may require a restart of your computer. After rebooting the installation will begin.
3.5
Choosing an installation type
During installation you can select a setup type in the installation wizard. The installation wizard is designed to smoothly guide you through the installation.
Related Topics:
see Performing an Express Installation
see Performing a Custom Installation
3.5.1
Performing an Express Installation
The Express installation is the recommended setup routine.
It installs all the standard components of Avira Ultimate Protection Suite. The Avira recommended security level settings are used.
As default one of the following installation paths is chosen: C:\Program Files\Avira (for Windows 32bit versions) or
C:\Program Files (x86)\Avira (for Windows 64bit versions)
Here you can find all files related to Avira Ultimate Protection Suite.
If you choose this installation type, you can perform an installation by simply clicking
Next until completion.
This installation type is designed especially for those users who do not feel comfortable with configuring software tools.
3.5.2
Performing a Custom Installation
The Custom installation enables you to configure your installation. This is only
recommended for advanced users who are well acquainted with matters of hard- and software as well as security issues.
You can choose to install individual program components.
A target folder can be selected for the program files to be installed.
You can disable Create a desktop icon and program group in the Start menu.
Using the configuration wizard, you can define custom settings for your Avira Ultimate Protection Suite. Also you can choose the security level that you feel comfortable with.
After installation you can initiate a short system scan that is performed automatically after installation.
If you do not wish to participate in the Avira Community, unmark the I want to improve my protection using Avira ProActiv and Protection Cloud check box, preset by default.
If you confirm your participation in the Avira Community, Avira Ultimate Protection Suite sends data on detected suspicious programs to the Avira Malware Research Center. The data is used only for an advanced online scan and to expand and refine detection technology.
You can click the links ProActiv and Protection Cloud to obtain more details on the expanded online and cloud scan.
Confirm that you accept the End User License Agreement. For reading the
detailed text of the End User License Agreement, click the link.
3.6.1
Choosing a destination folder
The custom installation allows you to choose the folder where you want to install Avira Ultimate Protection Suite.
Click Browse and navigate to the location where you want to install Avira Ultimate Protection Suite.
Select the folder where you want to install Avira Ultimate Protection Suite in the
Choose Destination Folder window. Click Next.
3.6.2
Installing Avira SearchFree Toolbar
At the end of the setup you can install the Avira SearchFree Toolbar.
Avira SearchFree Toolbar includes two main components: Avira SearchFree and the Toolbar.
With Avira SearchFree you can search the Internet for any number of terms. This search engine displays all hits in the browser windows rating their level of safety. This allows Avira users a safer Internet navigation.
The Toolbar offers you three widgets to the most important Internet-related functions. With one click you have direct access to Facebook and your email, or you can ensure safe web browsing (Firefox and Internet Explorer only).
If you do not wish to install the Avira SearchFree Toolbar unmark the checkboxes of the
options Set and keep Ask as my default search provider and Set and keep Avira
SearchFree (avira.search.ask.com) as my browser homepage and the browser new tabs page.
If you decline, only the Avira SearchFree Toolbar setup is aborted. The installation of Avira Ultimate Protection Suite, however will be completed.
3.6.3
Choosing installation components
In a custom installation or a change installation, the following installation components can be selected, added or removed.
Select or deselect components from the list in the Install components dialog.
Avira Ultimate Protection Suite
This contains all components required for successful installation of Avira Ultimate Protection Suite.
Real-Time Protection
The Avira Real-Time Protection runs in the background. It monitors and repairs, if possible, files during operations such as open, write and copy in "on-access mode". On access mode means that, whenever a user carries out a file operation (e.g. load document, execute, copy), Avira Ultimate Protection Suite automatically scans the file. Renaming a file, however, does not trigger a scan by Avira Real-Time Protection. Mail Protection
Mail Protection is the interface between your computer and the email server from which your email program (email client) downloads emails. Mail Protection is
connected as a so-called proxy between the email program and the email server. All incoming emails are routed through this proxy, scanned for viruses and unwanted programs and forwarded to your email program. Depending on the configuration, the program processes the affected emails automatically or asks you for a certain action. Windows Firewall (starting from Windows Vista)
Rootkits Protection
Avira Rootkits Protection checks whether software is already installed on your computer that can no longer be detected with conventional methods of malware protection after penetrating the computer system.
ProActiv
The ProActiv component monitors application actions and alerts users to suspicious application behavior. This behavior-based recognition enables you to protect yourself against unknown malware. The ProActiv component is integrated into Avira Real-Time Protection.
Protection Cloud
The Protection Cloud component is a module for dynamic online detection of still unknown malware. This means that the files are uploaded to a remote location and compared to known files as well as other files that are being uploaded and analyzed in real-time (unscheduled and without delay). This way the database is constantly updated, therefore an even higher level of security can be provided.
If you have chosen to install the Protection Cloud component, but you want to confirm manually, which files should be sent to the Cloud for analysis, you can
enable the option Confirm manually when sending suspicious files to Avira.
Web Protection
When surfing the Internet, you are using your web browser to request data from a web server. The data transferred from the web server (HTML files, script and image files, Flash files, video and music streams, etc.) will normally be moved directly into the browser cache for display in the web browser, meaning that an on-access scan as performed by Avira Real-Time Protection is not possible. This could allow viruses and unwanted programs to access your computer system. Web Protection is what is known as an HTTP proxy which monitors the ports used for data transfer (80, 8080, 3128) and scans the transferred data for viruses and unwanted programs.
Depending on the configuration, the program may process the affected files automatically or prompt the user for a specific action.
Shell Extension
The Shell Extension generates an entry Scan selected files with Avira in the
context menu of the Windows Explorer (right-hand mouse button). With this entry you can directly scan files or directories.
Related Topics:
Changing an installation
If you have decided to take part in the Avira Community, you can choose to manually confirm the upload each time a file is to be sent to the Avira Malware Research Center.
For Avira Ultimate Protection Suite to ask for confirmation each time, enable the
option Confirm manually when sending suspicious files to Avira.
3.6.4
Creating shortcuts for Avira Ultimate Protection Suite
A desktop icon and/or a program group in the Start menu help you to access Avira Ultimate Protection Suite more quickly and easily.
To create a desktop shortcut for Avira Ultimate Protection Suite and/or a program group in the Start menu leave the option(s) activated.
3.6.5
Activating Avira Ultimate Protection Suite
If you have already received an activation code, enter the activation code in the fields provided.
If you still need to obtain an activation code, click the link purchase an activation code.
You are forwarded to the Avira website where you can acquire an activation code. If you only want to test the product, select Test product and insert your data into the
required fields of registration.
Your evaluation license is valid for 31 days.
If you have already activated a product and want to re-install your Avira product, select the option I already have a valid license file.
A browser window opens and you can navigate to the hbedv.key file on your system.
3.6.6
Defining Proxy settings
Defining the Proxy settings is only recommended for advanced users who are well acquainted with matters of hard- and software as well as security issues.
If Avira Ultimate Protection Suite is not supposed to connect to the Internet via a proxy server, activate the option Don't use a proxy server.
If you would like Avira Ultimate Protection Suite to connect to the internet the same
way as any other installed application, leave Use Windows system settings
(activated by default) enabled.
You can configure the Windows system settings to use a proxy server under
Control panel > Internet options > Connections > LAN settings. You can also access the Internet options in the Extras menu in Internet Explorer.
Note
If you are using a proxy server which requires authentication, enter all the required data under the option Connections via this proxy server. The Use Windows system settings option can only be used for proxy servers without authentication.
To set up a proxy server especially associated with Avira Ultimate Protection Suite activate Connections via this proxy server and enter the relevant information:
Address
Enter the computer name or IP address of the proxy server you want to use to connect to the web server.
Examples:
Address: proxy.domain.com Address: 192.168.1.100
Port
Enter the port number of the proxy server you want to use to connect to the web server.
Examples: Port: 8080 Port: 3128
Login name
Enter a user name to log in on the proxy server.
Login password
Enter the relevant password for logging in on the proxy server here. The password is saved in encrypted form. For security reasons, the actual characters you type in this space are replaced by asterisks (*).
Click OK.
3.6.7
Configuring the heuristic detection level (AHeAD)
Avira Ultimate Protection Suite contains a very powerful tool in form of Avira AHeAD (Advanced Heuristic Analysis and Detection ) technology. This technology uses pattern recognition techniques, so it can detect unknown (new) malware from having analyzed other malware previously.
Select a detection level in the Configure AHeAD dialog box and click Next.
The detection level selected is used for the System Scanner (On-demand scan) and Real-Time Protection (On-access scan) AHeAD technology settings.
3.6.8
Selecting extended threat categories
Virus and malware are not the only threats that pose a danger to your computer system. We have defined a whole list of risks and sorted those into extended threat categories for you.
A number of threat categories is already pre-selected by default.
Where appropriate, activate further threat categories in the dialog box Select extended threat categories.
If you change your mind, you can revert to the recommended values by clicking the
Default values button.
Continue the installation by clicking Next.
3.6.9
Activating Safe Browsing
You can use the Safe Browsing function to filter undesirable or illegal Internet content and to limit the duration of Internet usage. The Safe Browsing function is part of the CHILD PROTECTION component.
If you have selected the Web Protection installation module you can:
assign the roles child, young person or adult to computer users for Internet use
disable Safe Browsing in the Enable Safe Browsing dialog box
Click Next.
3.6.10
Assigning a password
If you have enabled Safe Browsing, you can set a password to protect your configuration settings from being changed by your children or another user of your computer.
Enter a password in the dialog box. Repeat the password.
Click Next.
3.6.11
Starting a scan after installation
To check the current security state of the computer, a quick system scan can be performed after the configuration has been completed and before the computer is
rebooted. The System Scanner scans running programs and the most important system files for viruses and malware.
If you want to perform a quick system scan, leave the Quick system scan option activated.
Click Next.
Complete the configuration by clicking Finish.
If you have not deactivated the Quick system scan option, the System Scanner performs a quick system scan.
3.7
Changing the installation
If you wish to add or remove modules of the current installation, you can do this without having to uninstall Avira Ultimate Protection Suite. Here is how:
Changing an installation under Windows 8
Changing an installation under Windows 7
Changing an installation under Windows XP
3.7.1
Changing an installation under Windows 8
You have the option of adding or removing individual program components of the Avira Ultimate Protection Suite installation (see Choosing installation components).
If you wish to add or remove modules of the current installation, you can use the option
Uninstall Programs in the Windows control panel to Change/Uninstall programs. Right-click on the screen.
The All apps symbol appears.
Click on the symbol and look in the Apps - Windows System section for Control Panel.
Double-click the Control Panel symbol. Click Programs - Uninstall a program.
Click Programs and Features - Uninstall a program.
Select Avira Ultimate Protection Suite and click Change.
In the Welcome dialog of the program, select the option Modify. You will be guided through the installation changes.
Related Topics:
Choosing installation components
3.7.2
Changing an installation under Windows 7
You have the option of adding or removing individual program components of the Avira Ultimate Protection Suite installation (see Choosing installation components).
If you wish to add or remove modules of the current installation, you can use the option
Add or Remove Programs in the Windows control panel to Change/Remove
programs.
Open the Control Panel via the Windows Start menu. Double click on Programs and Features.
Select Avira Ultimate Protection Suite and click Change.
In the Welcome dialog of the program, select the option Modify. You will be guided through the installation changes.
Related Topics:
Choosing installation components
3.7.3
Changing an installation under Windows XP
You have the option of adding or removing individual program components of the Avira Ultimate Protection Suite installation (see Choosing installation modules).
If you wish to add or remove modules of the current installation, you can use the option
Add or Remove Programs in the Windows control panel to Change/Remove
programs.
Open the Control Panel via the Windows Start > Settings menu.
Double click on Add or Remove Programs.
Select Avira Ultimate Protection Suite and click Change.
In the Welcome dialog of the program, select the option Modify. You will be guided through the installation changes.
Related Topics:
Choosing installation components
3.8
Uninstalling Avira Ultimate Protection Suite
Should you ever feel the need to uninstall Avira Ultimate Protection Suite, here is how:
Uninstalling Avira Ultimate Protection Suite under Windows 8
Uninstalling Avira Ultimate Protection Suite under Windows 7
Uninstalling Avira Ultimate Protection Suite under Windows XP
3.8.1
Uninstalling Avira Ultimate Protection Suite under Windows 8
To uninstall Avira Ultimate Protection Suite from your computer use the option Programs and Features in the Windows Control Panel.
Right-click on the screen. The All apps symbol appears.
Click on the symbol and look in the Apps - Windows System section for Control Panel.
Double-click the Control Panel symbol. Click on Programs - Uninstall a program.
Click on Programs and Features - Uninstall a program.
Select Avira Ultimate Protection Suite in the list and click Uninstall.
When asked if you really want to remove the application and all its components, click Yes to confirm.
All components of the program will be removed. Click Finish to complete uninstallation.
If a dialog box appears recommending that your computer be restarted, click Yes to confirm.
Avira Ultimate Protection Suite is now uninstalled and all directories, files and registry entries for the program are deleted when your computer is restarted.
Note
The Avira SearchFree Toolbar is not included in the uninstallation program and must be uninstalled separately.
3.8.2
Uninstalling Avira Ultimate Protection Suite under Windows 7
To uninstall Avira Ultimate Protection Suite from your computer use the option Programs and Features in the Windows Control Panel.
Open the Control Panel via the Windows Start menu. Click Programs and Features.
Select Avira Ultimate Protection Suite in the list and click Uninstall.
When asked if you really want to remove the application and all its components, click Yes to confirm.
All components of the program will be removed. Click Finish to complete uninstallation.
If a dialog box appears recommending that your computer be restarted, click Yes to confirm.
Avira Ultimate Protection Suite is now uninstalled and all directories, files and registry entries for the program are deleted when your computer is restarted.
Note
The Avira SearchFree Toolbar is not included in the uninstallation program and must be uninstalled separately.
3.8.3
Uninstalling Avira Ultimate Protection Suite under Windows XP
To uninstall Avira Ultimate Protection Suite from your computer use the option Change or Remove Programs in the Windows Control Panel.
Open the Control Panel via the Windows Start > Settings menu.
Double click on Add or Remove Programs.
Select Avira Ultimate Protection Suite in the list and click Remove.
When asked if you really want to remove the application and all its components, click Yes to confirm.
All components of the program will be removed. Click Finish to complete uninstallation.
If a dialog box appears recommending that your computer be restarted, click Yes to confirm.
Avira Ultimate Protection Suite is now uninstalled and all directories, files and registry entries for the program are deleted when your computer is restarted.
Note
The Avira SearchFree Toolbar is not included in the uninstallation program and must be uninstalled separately.
3.8.4
Uninstalling Avira SearchFree Toolbar
Uninstalling Avira SearchFree Toolbar
Should you ever feel the need to uninstall Avira SearchFree Toolbar, here is how:
Uninstalling Avira SearchFree Toolbar under Windows 8
Uninstalling Avira SearchFree Toolbar under Windows 7
Uninstalling Avira SearchFree Toolbar under Windows XP
Uninstalling Avira SearchFree Toolbar via the web browser
Uninstalling Avira SearchFree Toolbar via Add-On Manager
Uninstalling Avira SearchFree Toolbar under Windows 8
To uninstall your Avira SearchFree Toolbar: Close the web browser.
Right-click in one of the bottom corners of the screen. The All apps symbol appears.
Click on the symbol and look in the Apps - Windows System section for Control Panel.
Double-click the Control Panel symbol. Click Programs - Uninstall a program.
Click Programs and Features - Uninstall a program.
Select Avira SearchFree Toolbar plus Web Protection in the list and click Uninstall. You will be asked if you really want to uninstall this product.
Click Yes to confirm.
Avira SearchFree Toolbar plus Web Protection is uninstalled and all directories, files and registry entries for the Avira SearchFree Toolbar plus Web Protection are
deleted when your computer is restarted.
Uninstalling Avira SearchFree Toolbar under Windows 7
Close your web browser.
Open the Control Panel via the Windows Start menu. Double click on Programs and Features.
Select Avira SearchFree Toolbar plus Web Protection in the list and click Uninstall. You will be asked if you really want to uninstall this product.
Click Yes to confirm.
Avira SearchFree Toolbar plus Web Protection is uninstalled and all directories, files and registry entries for the Avira SearchFree Toolbar plus Web Protection are
deleted when your computer is restarted.
Uninstalling Avira SearchFree Toolbar under Windows XP
To uninstall your Avira SearchFree Toolbar: Close your web browser.
Open the Control Panel via the Windows Start > Settings menu.
Double click on Add or Remove Programs.
Select Avira SearchFree Toolbar plus Web Protection in the list and click Remove. You will be asked if you really want to uninstall this product.
Click Yes to confirm.
Avira SearchFree Toolbar plus Web Protection is uninstalled and all directories, files and registry entries for the Avira SearchFree Toolbar plus Web Protection are
deleted when your computer is restarted.
Uninstalling Avira SearchFree Toolbar via the web browser
You also have the option of uninstalling the Avira SearchFree Toolbar directly in the browser. This option is only available for Firefox and Internet Explorer:
Open your web browser.
In the search toolbar open the Options menu. Click Uninstall toobar from browser.
When you are asked if you want to uninstall the product, click Yes to confirm. You will now be asked to close your web browser.
Close the web browser and click Retry.
Avira SearchFree Toolbar plus Web Protection is uninstalled and all directories, files and registry entries for the Avira SearchFree Toolbar plus Web Protection are
Note
To uninstall the Avira SearchFree Toolbar, the toolbar must be enabled in the Add-On Manager.
Uninstalling Avira SearchFree Toolbar via Add-On Manager
Because the toolbar is installed as an add-on, it can also be uninstalled as one:
Firefox
Click Tools > Add-ons > Extensions. From there you can manage the Avira Add-on: activate or deactivate the toolbar and uninstall.
Internet Explorer
Go to Manage Add-ons > Toolbars und Extensions. Here you can either activate and deactivate your Avira SearchFree Toolbar, or uninstall it.
Google Chrome
Click Options > Extensions and manage easily your toolbar: activate, deactivate or uninstall it.
4.
Overview of Avira Ultimate Protection Suite
This chapter contains an overview of the functionality and operation of your Avira product.
see Chapter User interface and operation
see Chapter Avira SearchFree Toolbar
see Chapter How to...?
4.1
User interface and operation
You operate your Avira product via three program interface elements:
Control Center: monitoring and controlling the Avira product
Configuration: Configuring the Avira product
Tray Icon in the system tray of the taskbar: Opening the Control Center and other functions
4.1.1
Control Center
The Control Center is designed to monitor the protection status of your computer systems and control and operate the protection components and functions of your Avira product.
The Control Center window is divided into three areas: The Menu bar, the Navigation area and the detail window Status:
Menu bar: In the Control Center menu bar, you can access general program functions and information on the program.
Navigation area: In the navigation area, you can easily swap between the individual sections of the Control Center. The individual sections contain information and functions of the program components and are arranged in the navigation bar according to activity.
Example: Activity PC PROTECTION - Section Real-Time Protection.
Status: The Control Center opens with the Status view, where you can see at a glance, if your computer is safe, and you have an overview of the active modulesand the date of the last system scan. The Status view also contains buttons for starting features or actions, such as starting or stopping the Real-Time Protection.
Starting and closing of Control Center
To start the Control Center the following options are available:
Double-click the program icon on your desktop
Via the program entry in the Start > Programs menu.
Close the Control Center via the menu command Close in the menu File or by clicking on the close tab in the Control Center.
Operate Control Center
To navigate in the Control Center
Select an activity in the navigation bar.
The activity opens and other sections appear. The first section of the activity is selected and displayed in the view.
If necessary, click another section to display this in the detail window.
Note
You can activate the keyboard navigation in the menu bar with the help of the [Alt] key. If navigation is activated, you can move within the menu with the
arrow keys. With the Return key you activate the active menu item.
To open or close menus in the Control Center, or to navigate within the menus, you can also use the following key combinations: [Alt] + underlined letter in the menu or menu command. Hold down the [Alt] key if you want to access a menu, a menu command or a submenu.
To process data or objects displayed in the detail window: Highlight the data or object you wish to edit.
To highlight multiple elements (elements in columns), hold down the control key or the shift key while selecting the elements.
Click the appropriate button in the upper bar of the detail window to edit the object.
Control Center overview
Status: Clicking on the Status bar gives you an overview of the product's functionality and performance (see Status).
The Status section lets you see at a glance which modules are active and provides information on the last update performed.
PC PROTECTION: In this section you will find the components for checking the files on your computer system for viruses and malware.
The System Scanner section enables you to easily configure and start an on-demand scan. Predefined profiles enable a scan with already adapted default options. In the same way it is possible to adapt the scan for viruses and unwanted programs to your personal requirements with the help of manual selection (will be saved) or by
creating user-defined profiles.
The Real-Time Protection section displays information on scanned files, as well as other statistical data, which can be reset at any time, and enables access to the
report file. More detailed information on the last virus or unwanted program detected can be obtained practically "at the push of a button".
INTERNET PROTECTION: In this section you will find the components to protect your computer system against viruses and malware from the Internet, and against
unauthorized network access.
The FireWall section enables you to configure the basic settings for the FireWall. In addition, the current data transfer rate and all active applications using a network connection are displayed.
The Web Protection section displays information on scanned URLs and detected viruses, as well as other statistical data, which can be reset at any time and enables access to the report file. More detailed information on the last virus or unwanted program detected can be obtained practically "at the push of a button".
The Mail Protection section shows you all the emails scanned by Mail Protection, their properties and other statistical data. You can alsoexclude email addresses from future scanning for malware. Emails can also be deleted from the Mail Protection buffer.
CHILD PROTECTION: In this section you will find the components to ensure a safe Internet experience for your children.
Social Networks: This section redirects you to the Social Network Protection application. Social Network Protection informs parents of their children's activities online. It checks their social network accounts for comments, photos etc. that may influence the child's reputation in a negative way or may indicate that the child is in danger.
In the Safe Browsing section, the computer's users can be assigned user roles. A user role is configurable and includes a set of allowed and blocked URLs, prohibited URL categories, Internet usage duration and, if necessary, permitted weekday usage periods.
MOBILE PROTECTION: From this section you will be redirected to the online access for Android devices.
Avira Android Security manages all your android-based devices.
ADMINISTRATION: In this section you will find tools for isolating and managing suspicious or infected files, and for planning recurring tasks.
The Quarantine section contains the so-called quarantine manager. This is the central point for files already placed in quarantine or for suspect files that you would like to place in quarantine. It is also possible to send a selected file to the Avira Malware Research Center by email.
The Scheduler section enables you to configure scheduled scanning and update jobs as well as backup jobs and to adapt or delete existing jobs.
The Reports section enables you to view the results of actions performed. The Events section enables you to view events generated by certain program
modules.
4.1.2
Configuration
You can define settings for your Avira product in the Configuration. After installation, your Avira product is configured with standard settings, ensuring optimal protection for your
computer system. However, your computer system or your specific requirements for your Avira product may mean you need to adapt the protective components of the program.
The Configuration opens a dialog box: You can save your configuration settings via the
OK or Apply buttons, delete your settings by clicking the Cancel button or restore your default configuration settings using the Default values button. You can select individual configuration sections in the left-hand navigation bar.
Accessing the Configuration
You have several options for accessing the configuration:
via the Windows control panel.
via the Windows Security Center - from Windows XP Service Pack 2.
via the Tray Icon of your Avira product.
in the Control Center via the menu item Extras > Configuration.
in the Control Center via the Configuration button.
Note
Center, go to the Configuration register of the section which is active in the Control Center.
Configuration operation
Navigate in the configuration window as you would in Windows Explorer:
Click an entry in the tree structure to display this configuration section in the detail window.
Click the plus symbol in front of an entry to expand the configuration section and display configuration subsections in the tree structure.
To hide configuration subsections, click on the minus symbol in front of the expanded configuration section.
Note
To enable or disable Configuration options and use the buttons, you can also use the following key combinations: [Alt] + underlined letter in the option name or button description.
If you want to confirm your Configuration settings: Click OK.
The configuration window is closed and the settings are accepted. - OR -
Click Apply.
The settings are applied. The configuration window remains open. If you want to finish configuration without confirming your settings:
Click Cancel.
The configuration window is closed and the settings are discarded. If you want to restore all configuration settings to default values:
Click Default values.
All settings of the configuration are restored to default values. All amendments and custom entries are lost when default settings are restored.
Overview of configuration options
The following configuration options are available:
Scan options
Action on detection
Archive scan options
System scan exceptions
System scan heuristics
Report function setting
Real-Time Protection: Configuration of on-access scan
Scan options
Action on detection
Further actions
On-access scan exceptions
On-access scan heuristics
Report function setting
Update: Configuration of the update settings
Download via web server
Proxy settings
Web Protection: Configuration of Web Protection
Scan options, enabling and disabling the Web Protection
Action on detection
Blocked access: Unwanted file types and MIME types, Web filter for known unwanted
URLS (malware, phishing, etc.)
Web Protection scan exceptions: URLs, file types, MIME types
Web Protection heuristics
Report function setting
Mail Protection: Configuration of Mail Protection
Scan options: Enable the monitoring of POP3 accounts, IMAP accounts, outgoing
emails (SMTP)
Actions on detection
Further actions
Mail Protection scan heuristics
AntiBot function: Permitted SMTP servers, permitted email senders
Mail Protection scan exceptions
Configuration of cache, empty cache
Configuration of a footer in sent emails Report function setting
Child Protection:
Safe Browsing: Parental control function with role-based filter and role-based time limitation of Internet use
Threat categories for System Scanner and Real-Time Protection
Advanced protection: Options to enable the ProActiv and Protection Cloud features. Application filter: Block or allow applications
Password protection for access to the Control Center and the Configuration Security: block autostart function, product protection, protect Windows hosts file
WMI: Enable WMI support
Event log configuration
Configuration of report functions Setting of directories used
Configuration of acoustic alerts when malware is detected
4.1.3
Tray icon
After installation, you will see the tray icon of your Avira product in the system tray of the taskbar:
Icon Description
Avira Real-Time Protection is enabled
Avira Real-Time Protection is disabled
The tray icon displays the status of the Real-Time Protection service.
Central functions of your Avira product can be quickly accessed via the context menu of the tray icon. To open the context menu, click the tray icon with the right-hand mouse button.
Entries in the context menu
Enable Real-Time Protection: Enables or disables the Avira Real-Time Protection.
Enable Mail Protection: Enables or disables the Avira Mail Protection.
Enable Web Protection: Enables or disables the Avira Web Protection.
Enable Windows Firewall: Enables or disables the Windows Firewall (this feature is available starting from Windows 8).
Start Avira Ultimate Protection Suite: Opens the Control Center.
Configure Avira Ultimate Protection Suite: Opens the Configuration.
My messages: Opens a slide-up with the current information about your Avira product.
Start update: Starts an update.
Help: opens the Online Help.
Experts Market - Ask for help: opens the Experts Market - Ask for help website where you can ask for help or offer your help to other users.
About Avira Ultimate Protection Suite: Opens a dialog box with information on your Avira product: Product information, Version information, License information.
Avira on the Internet: Opens the Avira web portal on the Internet. The condition for this is that you have an active connection to the Internet.
Note
The User Account Control (UAC) will ask for your permission to enable or disable the Real-Time Protection, Web Protection and Mail Protection services in operating systems as of Windows Vista.
4.2
Avira SearchFree Toolbar
Avira SearchFree Toolbar includes two main components: Avira SearchFree and the Toolbar.
The Avira SearchFree Toolbar is installed as an add-on. When the browser is first accessed (in Firefox and Internet Explorer) a message will pop-up, asking you for
permission to install the toolbar. You will have to accept in order to complete a successful installation of Avira SearchFree Toolbar.
Avira SearchFree is a search engine and contains a clickable Avira logo linked to the Avira website and web, image and video channels. This allows Avira users a safer Internet navigation.
The toolbar, integrated in your web browser, consists of a search box, an Avira logo linked to the Avira website, two status displays, three widgets and the Options menu.
Search toolbar
Use the search toolbar for free to quickly search the Internet using the Avira search engine.
Status display
The status displays provide information on the status of the Web Protection and the current update status of your Avira product and helps you identify which actions you need to take to protect your PC.
Widgets
Avira offers you three widgets to the most important Internet-related functions. With one click you have direct access to Facebook and your email, or you can ensure safe web browsing (Firefox and Internet Explorer only).
Options
toolbar help and information and also uninstall the Avira SearchFree Toolbar directly via the web browser (Firefox and Internet Explorer only).
4.2.1
Use
Avira SearchFree
You can use Avira SearchFree to define any number of terms to browse the Internet. Enter the term in the search box and press the Enter key or click on Search. The Avira SearchFree engine then searches the Internet for you and displays all hits in the browser window.
To find out how to custom configure Avira SearchFree in Internet Explorer, Firefox and Chrome, go to Options.
Status display Web Protection
You can use the following icons and messages to identify which actions you need to take to protect your PC:
Icon Status display Description
Web Protection If you move the cursor over the icon, the
following message appears: Avira Web
Protection is active. Your browsing is protected. No further action is necessary.
Web Protection is inactive
If you move the cursor over the icon, the
following message appears: Avira Web
Protection is off. Click to find out how to turn it on.
You will be redirected to one of our Knowledge Base articles.