Vi-System Installation &
Administration Guide
Version 4.1
Contents
1 Installing Vi-System ... 3
1.1 Before Installing ... 3
1.1.1 Verify Your System Configuration ... 3
1.1.2 Install .NET 3.5 SP1 ... 3
1.1.3 Install Microsoft Windows Media Player ... 3
1.1.4 Remove Software Debugging Tools ... 3
1.1.5 Downloading Vi-System ... 3
1.2 Main Vi-System Components ... 4
1.2.1 Vi-Agent Proxy (VAP) Component ... 5
1.3 System Requirements ... 5
1.4 Supported Operating Systems ... 5
1.5 All-In-One Installation ... 6
1.6 Installing Vi-Sentry on a Separate PC ... 9
1.7 Installing VAP on a Separate PC ... 9
1.7.1 Uninstalling VAP ... 11
1.8 Installing the Database on a Different Machine to the LBS & AS ... 12
1.9 Upgrading Versions ... 13
1.10 Installing Vi-Agent Version Upgrades on Edge Devices ... 13
1.11 Integrating 3rd Party VMSs with the VAP ... 13
2 Activating Agent Vi Software ... 14
3 Installing a Codec for Playing Clips ... 16
3.1 Windows 7 ... 16
3.2 Windows Server 2008 R2 ... 16
4 Database Management ... 17
4.1 Getting Started ... 17
4.2 Backing up the Database ... 18
4.3 Restoring the Database ... 18
4.4 Resetting the Database ... 18
4.5 Obtaining the Database Version ... 19
Appendix A Troubleshooting ... 20
Contents
Vi-System Installation & Administration Guide 2 October 2011
Figures
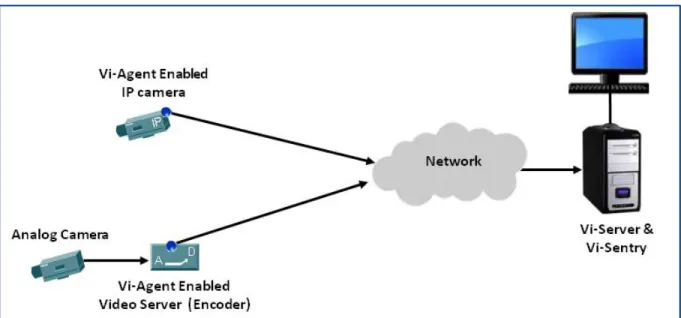
Figure 1-1: Vi-System Components: Vi-Agent (Embedded in Edge Device), Vi-Server & Vi-Sentry ... 4
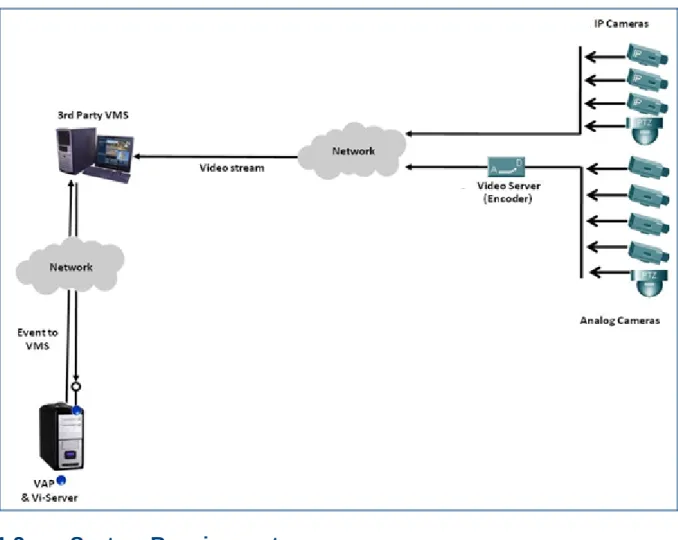
Figure 1-2: VAP Component ... 5
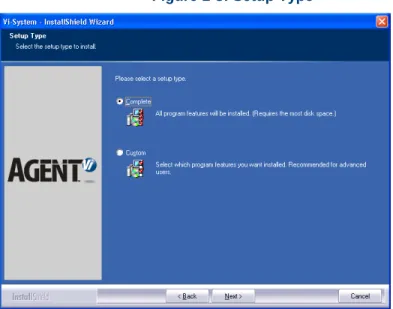
Figure 1-3: Setup Type ... 6
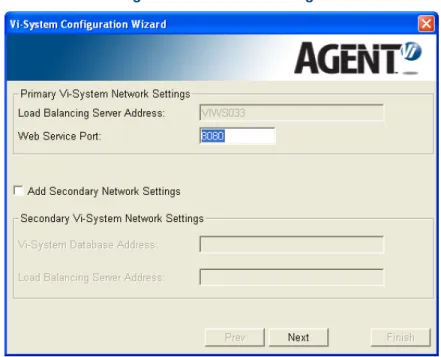
Figure 1-4: Network Settings ... 7
Figure 1-5: SQL Server Configuration ... 8
Figure 1-6: Select Components – Choosing VAP Only... 10
Figure 1-7: Vi-Agent Proxy Configuration Wizard ... 10
Figure 1-8: Excluding all Components Except Database ... 12
Figure 1-9: SQL Server Configuration ... 12
Figure 2-1: Licensing Prompt ... 14
Figure 2-2: Machine ID Generator... 14
Figure 2-3: Load License ... 15
Figure 4-1: Vi-System Database Management ... 17
Figure 4-2: Credentials ... 18
Figure 4-3: Database Management – Show Version ... 19
Tables
Table 1-1: Primary Vi-System Network Settings ... 71 Installing
Vi-System
1.1
Before Installing
1.1.1
Verify Your System Configuration
For minimum hardware, operating system and network requirements see the Agent Vi Equipment Requirements Reference Guide.
1.1.2
Install .NET 3.5 SP1
.NET 3.5 SP1 must be installed on any PC that Vi-Sentry client applications are running on. Installation of .NET 3.5 SP1 differs from one operating system to another:
1. On Windows 7, .NET 3.5 SP1 is installed automatically by the operating system. If, however, the Vi-System installer indicates that it’s missing, install from the Microsoft Download Center (see link above).
2. On Windows Server 2008 R2, add .NET 3.5 SP1 to your PC via:
Start Æ Server Management Æ Features Æ Add Features Æ Select .NET 3.5 SP1
1.1.3
Install Microsoft Windows Media Player
Verify the installation of Windows Media Player version 11 or later. If needed, download it
Note that after installing WMP you must run its initial configuration wizard. On Windows 2008 Server, WMP is added by enabling the Desktop Experience feature via:
Start Æ Server Management Æ Features Æ Add Features Æ Select Desktop Experience.
1.1.4
Remove Software Debugging Tools
Ensure that the PC on which you install Vi-System does not have Visual Studio, WinDbg or any other debugging tool installed on it. If any of these are installed and a Service crashes, the Service manager will not restart the service; the debugger will take control of the Service and will wait for the user’s intervention.
1.1.5
Downloading Vi-System
For general information and software download links, refer to:
• For purchased permanent versio
• For temporary evaluation versi
Note
If your existing deployment also contains Vi-Search version 1.0, 1.1 or 1.2 and you are upgrading to Vi-System v4.1, simultaneously upgrade your Vi-Search installation to version 2.0.
1. Installing Vi-System
Vi-System Installation & Administration Guide 4 October 2011
1.2
Main Vi-System Components
Three main components comprise Vi-System:
1. Vi-Agent embedded in edge devices, or Vi-Agent Proxy (VAP) installed on a PC 2. Vi-Server (comprising a Load Balancing Server, Application Server & Database) 3. Vi-Sentry (comprising applications Vi-Setup, Vi-Config and Vi-Monitor)
1.2.1
Vi-Agent Proxy (VAP) Component
Install the VAP if you are using edge devices that do not support an embedded Vi-Agent or in cases that a VAP is used for sending analytics events to the integrated VMS.
Figure 1-2: VAP Component
1.3
System Requirements
Hardware: Minimal system requirements for a demo environment or for a small pilot (usually up to 10 cameras) are Intel Core 2 Duo 2.6 GHz PC, or Intel i3, with 2GB RAM and 20 GB or free disk space.
For other deployments, see the Agent Vi Equipment Requirements Reference Guide.
1.4
Supported Operating Systems
Vi-System v4.1 supports the following operating systems:
Windows 7 (32 bit and 64 bits)
1. Installing Vi-System
Vi-System Installation & Administration Guide 6 October 2011
1.5
All-In-One Installation
Depending on the size and scope of your deployment and on the PC type in your possession, you can choose to apply an all-in-one installation, where all system components are installed on a single PC.
See the Equipment Requirements Reference Guide or co
if you can choose to apply the all-in-one installation.
¾ To install all components:
1. After obtaining installer file supplied by Agent Vi, save it on your desktop and then run it; the InstallShield Wizard guides you through an intuitive setup process.
Click Next until the Setup Type screen opens.
Figure 1-3: Setup Type
2. Leave radio button Complete checked and continue with the installation steps until the Network Settings screen opens.
Figure 1-4: Network Settings
Table 1-1: Primary Vi-System Network Settings
Setting Description
Web Service Port Some Vi-System components maintain communication using the Web Service standard over port 8080. If your server machine is already using port 8080 for other services, change this default value.
Add Secondary Network Settings
Secondary network settings are only required when installing a redundant Vi-Server. For detailed information on installing a redundancy server, see the Redundant Vi-Server Installation Guide.
Vi-Systtem Installatio 4. Che of M call 5. Che
be In t
• • • 6. Clic
that
To
a. b. 7. Clic
Opt • • 8. Clic
on & Adminis
F
eck radio butt Microsoft SQ ed VIDATAB eck the radio installed on a his configurat The Host on Is Windows option and d Check the b case, indica ck Next; the in
t you defined install an SQ
Run the inst component When instal component, ck Next until t tionally apply If your deplo ‘Manual’. If your deplo of VAP serv ck Next until F
tration Guide
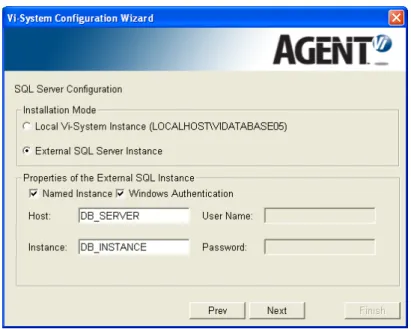
Figure 1-5: SQ
ton Local Vi-S QL Server Ex BASE05 will b
button Exter an existing ext
tion, you mus n which the S s Authentica define the app box Named In ate the instanc nstaller valida are valid and L server insta taller on the s (see Installin lling all other specifying th the Vi-Agent these setting oyment does oyment requir vices. Finish.
e 8
QL Server C
System Insta press bundle be installed on nal SQL Serv ternal SQL in st also define: SQL instance tion used to propriate Use nstance if you
ce name in th ates whether d notifies in ca ance on a sep separate mac
g the Databa components, he relevant da
Proxy config gs:
not require a res more than
onfiguration
ance (default ed with Vi-Sys
n the local ma ver Instance nstance that is
is installed access the da er and Passw
ur external SQ he Instance fi
the SQL Serv ase of an issu parate machin chine, selectin se on a Differ run the insta atabase Host uration scree VAP compon n a single VA
1. In
n
t option) to tak stem. A new n achine.
for the Vi-Sy s deployed in
atabase? If no word to acces
QL instance is ield.
ver Configur ue.
ne (if required ng only the da rent Machine aller without th t, Instance an n is shown. nent, set the S P, specify the
nstalling Vi-Sy October ke advantage named instan ystem databas your network
ot, uncheck th ss the databas s named. In t ration setting d):
atabase to the LBS & he database nd Credentia
Service mode e required num
ystem 2011 e nce se to k. his se. his s & AS). als. e to mber
Note
During the installation process, Vi-System installer may notify you that the 3rd party
WinPcap application is about to be installed. When notified, approve it and you'll be guided to the WinPcap Installation Wizard. No special settings are required by the WinPcap Installation Wizard. Confirm all its default settings.
1.6
Installing Vi-Sentry on a Separate PC
When installing Vi-System, users can opt to distribute different Vi-System components on different PCs, based on equipment considerations.
This section describes how to install Vi-Sentry (Vi-System client applications) on a separate PC.
¾ To install Vi-Sentry on a separate PC:
1. Run the installer file supplied by Agent Vi on the PC; the InstallShield Wizard guides you through an intuitive setup process (described under All-In-One Installation). Follow it until the Setup Type screen opens (see Figure 1-3).
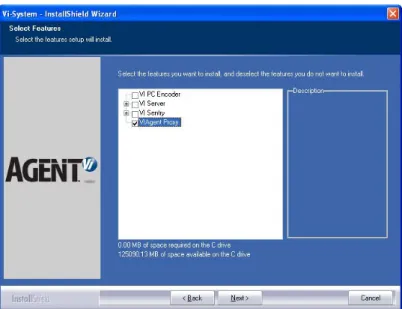
2. Check radio button Custom and proceed (click Next) until the Select Features screen opens.
3. In the Select Features screen, uncheck components to exclude from the installation. Leave Vi-Sentry (including Vi-Monitor, Vi-Setup and Vi-Config) checked and click Next; only Vi-Sentry (and its 3 sub-components) will be included in the installation. Unchecked components will be excluded. The installation status is displayed. Wait for the installation to complete; the Network Settings screen opens (see Figure 1-4). 4. Click Next until Finish; you’ve installed the Vi-Sentry component of Vi-System on a
separate PC.
1.7
Installing VAP on a Separate PC
When installing Vi-System, users can opt to distribute different Vi-System components on different PCs, based on equipment considerations. This section describes how to install VAP on a separate PC.
¾ To install VAP on a separate PC:
1. Run the supplied installer file; the InstallShield Wizard guides you through an intuitive setup process (described under All-In-One Installation). Follow it until the Setup Type screen opens).
2. Check radio button Custom and proceed (click Next) until the Select Features screen opens.
3. Leave Vi-AgentProxy checked and uncheck components to exclude from the installation.
1. Installing Vi-System
Vi-System Installation & Administration Guide 10 October 2011
Figure 1-6: Select Components – Choosing VAP Only
4. Click Next until the Vi-Agent Proxy Configuration Wizard opens.
Figure 1-7: Vi-Agent Proxy Configuration Wizard
5. Select from the drop-down the number of VAP instances to run; multiple VAPs can automatically be installed on the same PC.
Table 1-2: VAP Proxy Settings
Setting Description
Running Instances Number
The # of VAPs to configure depends on:
• The # of cameras deployed
• Your hardware; the number of VAPs you can install on a PC depends on how many processor cores your PC features
For design considerations see the Agent Vi Equipment Requirements Reference Guide.
6. Click Next until Finish and restart the PC for the installation configuration to take effect.
1.7.1
Uninstalling VAP
¾ To uninstall VAP:
1. Installing Vi-System
Vi-System Installation & Administration Guide 12 October 2011
1.8
Installing the Database on a Different Machine to the LBS &
AS
¾ To install the database on a different machine to the LBS & AS:
1. Run the installer file on the machine on which you want to install the database; the InstallShield Wizard guides you through an intuitive setup process (click Next) until the Setup Type screen opens.
2. Check radio button Custom and click Next; the Select Features screen opens.
Figure 1-8: Excluding all Components Except Database
3. Exclude all program components and sub-components except Database, as shown in Figure 1-8, and click Next until the SQL Server Configuration screen:
4. Check the radio button External SQL Server Instance for the Vi-System database to be installed on an existing external SQL instance that is deployed in your network. In this configuration you must also define:
• The Host on which the SQL instance is installed
• Is Windows Authentication used to access the database? If not, uncheck this option and define the appropriate User and Password to access the database. • Check the box Named Instance if your external SQL instance is named. In this
case, indicate the instance name in the Instance field.
5. Click Next; the installer validates whether the SQL Server Configuration settings that you defined are valid. If not, you’re notified.
Note
If the Windows Authentication option was chosen, the VILBS and VIAS services settings should be modified since Vi-System services are installed using the Local System
account, i.e., the service works with a default user who might not have sufficient privileges to work with the chosen SQL Server instance.
To modify the services settings:
Open Log On tab in the service’s Properties.
Set the field This account with the domain user who has sufficient privileges for the SQL Server instance, specified in step 4 above.
1.9
Upgrading Versions
Upgrading to v4.1 is supported from v3.3 or later. If you have an earlier version than
v3.3, contac
1.10
Installing Vi-Agent Version Upgrades on Edge Devices
Vi-Agent embedded in edge devices can be version-upgraded.
For information on supported edge devices and the availability of updated Vi-Agent versions, see Agent Vi’s web site or contact
1.11
Integrating 3
rdParty VMSs with the VAP
If an edge device does not support an embedded Vi-Agent, Vi-System can nonetheless be integrated with 3rd party VMSs for a video analytics solution, using its VAP component. The following guides to integrating Vi-System (VAP) with VMSs are available from Agent Vi:
9 Guide to Powering Agent Vi Analytics on Cisco's VSM 9 Guide to Powering Agent Vi Analytics on Genetec Omnicast 9 Guide to Powering Agent Vi Analytics on Milestone's XProtect 9 Guide to Powering Agent Vi Analytics on OnSSI Ocularis 9 Guide to Powering Agent Vi Analytics on Vicon's ViconNet
2. Activating Agent Vi Software
Vi-System Installation & Administration Guide 14 October 2011
2
Activating Agent Vi Software
After installing the software, activate Vi-System and - if applicable - Vi-Search. Important
Before activating, enable all communication channels (LAN, WiFi, etc.).
¾ To activate Agent Vi software:
1. Launch Vi-Config using the default credentials (User = Admin; Password = Master). You’re prompted with:
Figure 2-1: Licensing Prompt
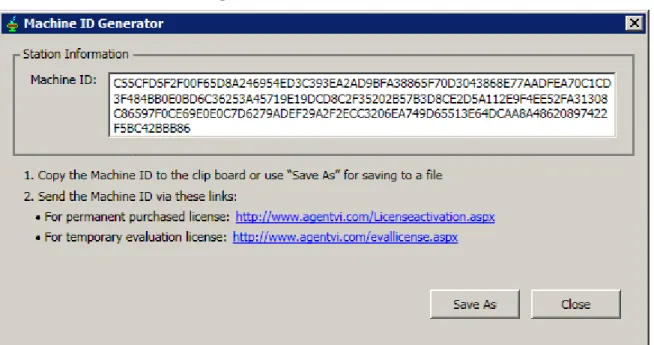
2. Select the first option (to generate the Machine ID) and click Accept; you’re prompted with:
3. Copy the Machine ID to the clipboard or use Save As to save in a file.
4. Click the web link matching your required license type, to submit the Machine ID to Agent Vi. If your PC is not presently connected to the Internet, save the Machine ID to a text file for you to later submit to the web site.
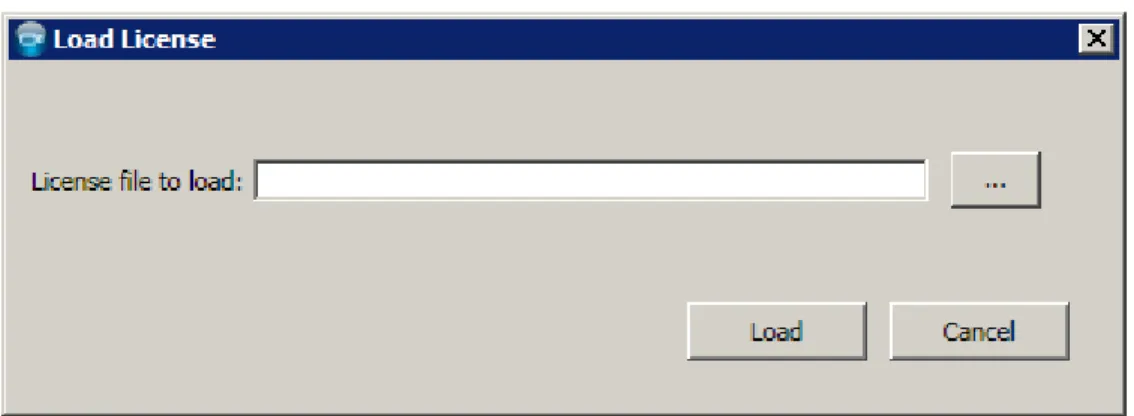
5. After receiving your license file, re-launch Vi-Config and when prompted by the licensing prompt (see Figure 2-1), select the second option in order to load your new license file; you’re prompted with:
Figure 2-3: Load License
6. Click the file browse button, choose the license file you received and click Load; the license is loaded.
Note
If at later stage you need to re-generate your Machine ID (e.g., as a result of a hardware configuration change), access the Machine ID Generator via either Windows Start menu (Start Æ Programs Æ Agent Vi Æ Administrator Tools Æ Machine ID Generator) or from Vi-Config Tools menu (Tools Æ License Æ Machine ID Generator). Later, load your new license from Vi-Config (Tools Æ License Æ Load License).
3. Installing a Codec for Playing Clips
Vi-System Installation & Administration Guide 16 October 2011
3
Installing a Codec for Playing Clips
If you plan to use Vi Demo Setup to get acquainted with Vi-System, demonstrate
Vi-System, or test it using your own clips, a codec package should be installed on the PC that runs Vi PC Encoder. Installing a codec package on a PC varies from operating system to operating system.
For details on installing and using Vi Demo Setup, see the Agent Vi document Demonstrating Vi-System and Vi-Search.
3.1
Windows 7
On Windows 7, the default installation of Windows Media Player includes the required codec pack so no action is required.
3.2
Windows Server 2008 R2
On Windows Server 2008 R2, enable Desktop Experience within Microsoft Server Management:
4 Database
Management
Use DBManage to manage Vi-System database. The utility enables you to perform the following management actions:
1. Back up the database
2. Restore the database
3. Reset the database
4. Obtain the database version
4.1
Getting Started
¾ To open DBManage (before performing a management action):
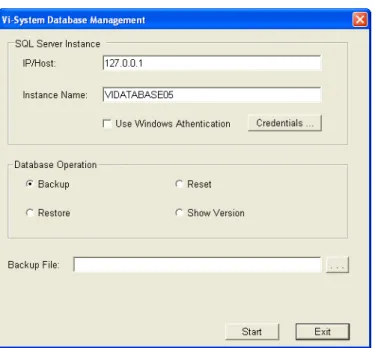
1. Click Start > All Programs > Agent Vi > Administrator Tools > DBManage; the Vi-System Database Management screen opens with Backup selected by default.
Figure 4-1: Vi-System Database Management
1. In the field IP/Host, specify the host of the database if it’s on another machine, or leave it at the default.
2. In the field Instance Name, specify the instance name of the SQL Server in the case of a named instance, or leave the field blank in the case of a default instance.
3. Check the check box Use Windows Authentication for Windows Authentication to be used for the database instance (that you defined above) rather than specific user access.
4. To specify specific user access, click button Credentials; the Credentials screen opens.
4. Database Management
Vi-System Installation & Administration Guide 18 October 2011
Figure 4-2: Credentials
4.2
Backing up the Database
¾ To back up the database:
1. In the Vi-System Database Management screen, click the button adjacent to the field Backup File and navigate to the backup file. The extension of the backup file is bak. The filename must include the full path.
2. Click Start; the backup operation starts; a progress bar shows its progress.
3. When the operation is completed, click Exit or perform another operation.
4.3
Restoring the Database
Before restoring the database back up the previous one. The restore operation restores a
backed-up database.
¾ To restore the database:
1. In the Vi-System Database Management screen, check radio button Restore; the field Backup File becomes field Restore File.
2. Click the button adjacent to the field Restore File and navigate to the restore file. The extension of the restore file is bak. The filename must include the full path.
3. Click Start; the restore operation starts; a progress bar displays its progress.
4. When the operation is completed, click Exit or perform another operation. Note
The restore operation overwrites the current database with the old database.
4.4
Resetting the Database
¾ To reset the database:
1. In the Vi-System Database Management screen, check radio button Reset.
2. Click Start; the reset operation starts; a progress bar displays its progress.
3. When the operation is completed, click Exit or perform another operation. Note
The reset operation deletes all tables in the database with the exception of the login table. The reset operation reinitializes the database.
4.5
Obtaining the Database Version
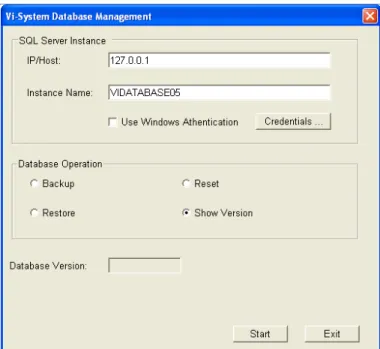
¾ To obtain the database version:
1. In the Vi-System Database Management screen, check radio button Show Version.
2. Click Start; the field Database Version in the screen Vi-System Database Management displays the version of the current database.
Appendix A Troubleshooting
Vi-System Installation & Administration Guide 20 October 2011
Appendix A Troubleshooting
This section shows you how to proceed if you receive an error message when operating Vi-System.
Error Message Description Corrective Action
Failed to parse license key
The LBS cannot parse the license key in the license file. The bits in the license key may have been changed.
Ask your support team to send you a new license file.
Failed to parse license file
Similar to ‘Failed to parse the license key’ only in this case the license file itself may have been changed.
Ask your support team to send you a new license file.
Empty license key Similar to ‘Failed to parse license key’ but in this case no license key is found in the license file.
Ask your support team to
regenerate the license file and to send you the new one.
Duplicated license key found
Two license files with different filenames contain the same license key. A copy may have been made of the original license file received from support, and renamed.
Delete the copy.
Supported product was not found
The license file may have been generated incorrectly.
Ask your support team to
regenerate the license file and to send you the new one.
Machine ID mismatch The ID of the machine on which Vi-System is installed and the machine ID contained in the license file are different.
Generate your machine’s ID again using the Machine ID
Generator and resend it to your
support team. Make sure that you generate the ID of the machine that Vi-System is installed on and no other.
License type is not valid
Same as ‘Supported product was not found’.
Ask your support team to
regenerate the license file and to send you the new one.
License expired Your license has become invalid and requires updating.
Ask your support team to send you an extended license. General error A nondescript error has occurred. Send the LBS log files to your
support team. You can find them in path:
C:\Program
Error Message Description Corrective Action The database instance
machine-name\vidatabase05 is down
The corresponding database instance is down.
• Check that one of the databases (primary or secondary) is up and available.
• Make sure that a firewall is not preventing proper connection between the server and the database The LBS is connected
to database at
machine-name\vidatabase05
The system is now connected to the corresponding database instance (primary or secondary) after a disconnection.
• No corrective action is required
• Indicates that the secondary
server is connected (after an
error message is received indicating that the primary
server is down
• Indicates that the primary
server is connected (after an
error message is received indicating that the secondary
server is down
A licensing issue has been encountered
Something is wrong with your license installation files
• Verify the problem by opening the ‘Tools’ menu in Vi-Config and choose License>License Error Report
• Check the \License folder under the Vi-System installation folder
• Copy the license file to the directory if it isn’t there
Appendix B Required Firewall Settings
Vi-System Installation & Administration Guide 22 October 2011
Appendix B Required Firewall Settings
When a firewall is used (including Microsoft Windows Firewall), the following ports must be opened and enabled in the communications path:
TCP Port # Description
8080 Some Vi-System components maintain communication using the Web Service standard over port 8080. If either your server or client machine is already using port 8080 for other services, you can change this default value during the installation process.
15000 Enables communication between the Load Balancing Server (VILBS_Service) and the application server (VIAS_Service)
15030 Enables communication between Vi-Server and Vi-Agent 15031 Enables video streaming between Vi-Gateway and Vi-Agent
15036 Enables communication between the GUI applications (via Vi-Gateway) and Vi-Server
15072 Enables communication between two LBS machines. Valid only when redundancy is used.
15050-15060 Enables communication between VAP instances and Vi-Server
For your convenience, it is possible to open a range of ports, between 15000 and 15060, for the system to use. Note that if you are distributing your installation on multiple PCs, you must open these ports on each PC.
Notice
Copyright © 2003-2011 by Agent Vi.
Agent Vi holds the copyright to this manual. All rights reserved. No part of this publication may be reproduced or transmitted in any form or by any means without prior written consent from Agent Vi, Ltd.
Disclaimer
The information in this manual was accurate and reliable at the time of its release for this specific version. However, Agent Vi, Ltd. reserves the right to change the specifications of the product described in this manual without prior notice at any time.
The customer should note that in the field of video there are a number of patents held by various parties. It is the responsibility of the user to assure that a particular implementation does not infringe on those patents. Agent Vi Ltd. does not indemnify the user from any patent or intellectual property infringement.
Trademarks
Agent Vi™, Vi-System™, Vi-Agent™, Vi-AgentProxy™, Vi-Gateway™, Vi-Server™, Vi-Sentry™, Vi-Config™, Vi-Setup™, Vi-Monitor™, Vi-Search™, Vi™, VI-ZONE™, VI-LINE™, VI-TLGT™, VI-CRWD™, VI-LOIT™, VI-GRPG™, VI-CNTG™, VI-STCK™, VI-SOBJ™, VI-ASST™, VI-TOBS™, VI-STOP™, VI-VSSL™, VI-RPT, VI-DISP, VI-TOUR™, VI-TRCK™ and VI-PTZ-BNDL™ are trademarks of Agent Vi, Ltd.
All other proprietary names mentioned in this manual are the trademarks of their respective owners. Version 4.1