June 2012 R1 Release
4.0
Copyright © 2012, Juniper Networks, Inc.
Junos Pulse Mobile Security Dashboard
ii Copyright © 2012, Juniper Networks, Inc. .
Junos® Pulse Mobile Security Dashboard Juniper Networks, Inc.
1194 North Mathilda Avenue Sunnyvale, California 94089 408-745-2000
www.juniper.net
Copyright © Juniper Networks, Inc. June 2012
Juniper Networks, Junos, Steel-Belted Radius, NetScreen, and ScreenOS are registered trademarks of Juniper Networks, Inc. in the United States and other countries. The Juniper Networks Logo, the Junos logo, and JunosE are trademarks of Juniper Networks, Inc. All other trademarks, service marks, registered trademarks, or registered service marks are the property of their respective owners. Juniper Networks assumes no responsibility for any inaccuracies in this document. Juniper Networks reserves the right to change, modify, transfer, or otherwise revise this publication without notice. Products made or sold by Juniper Networks or components thereof might be covered by one or more of the following patents that are owned by or licensed to Juniper Networks: U.S. Patent Nos. 5,473,599, 5,905,725, 5,909,440, 6,192,051, 6,333,650, 6,359,479, 6,406,312, 6,429,706, 6,459,579, 6,493,347, 6,538,518, 6,538,899, 6,552,918, 6,567,902, 6,578,186, and 6,590,785. Copyright © 2011, Juniper Networks, Inc. All rights reserved.
Junos Pulse Mobile Security Dashboard iii
Table of Contents
Audience . . . v
What’s In This Guide. . . v
Typographical Conventions . . . v
Contacting Technical Support . . . v
Chapter 1 Introduction. . . 1
Junos Pulse Mobile Security Dashboard Features . . . 1
Chapter 2 Using the Mobile Security Dashboard . . . 3
Overview . . . 3
Home Tab Information and Commands . . . 5
Email Validation and Alerts Notification . . . 5
Anti-Theft Protection. . . 5
Lock Device/Reset Passcode. . . .6
Unlock Device/Reset Passcode . . . 7
Wipe Device . . . .8
Scream. . . .8
Locate Your Device . . . .9
Device Monitoring . . . 10
Anti-Virus Activity . . . 10
Backup Your Data . . . 11
Custom Button . . . 11
Settings Link Information and Configuration . . . 11
Account Management. . . 11
Handset Management. . . 12
Reports Tab Information and Configuration . . . 13
History . . . 14
Alert Setup Tab Information and Configuration . . . 14
Support/Help Tab Information and Configuration . . . 15
Chapter 3 Junos Pulse FAQ . . . 17
:
Copyright © 2012, Juniper Networks, Inc. Audience v
About This Guide
This guide describes how to use the Junos® Pulse Mobile Security Dashboard to manage registered mobile devices and to enable features such as remote wipe and remote lock in case a device is lost or stolen.
Informational Note: For information on installing and configuring Junos Pulse on individual mobile devices, refer to the Junos Pulse documentation for that device type.
Audience
This guide is intended for users who wish to configure controls for device users, providing security features and access control features.
What’s In This Guide
This guide contains the following chapters: Chapter 1, “Introduction” on page 1
Chapter 2, “Using the Mobile Security Dashboard” on page 3 Chapter 3, “Junos Pulse FAQ” on page 17
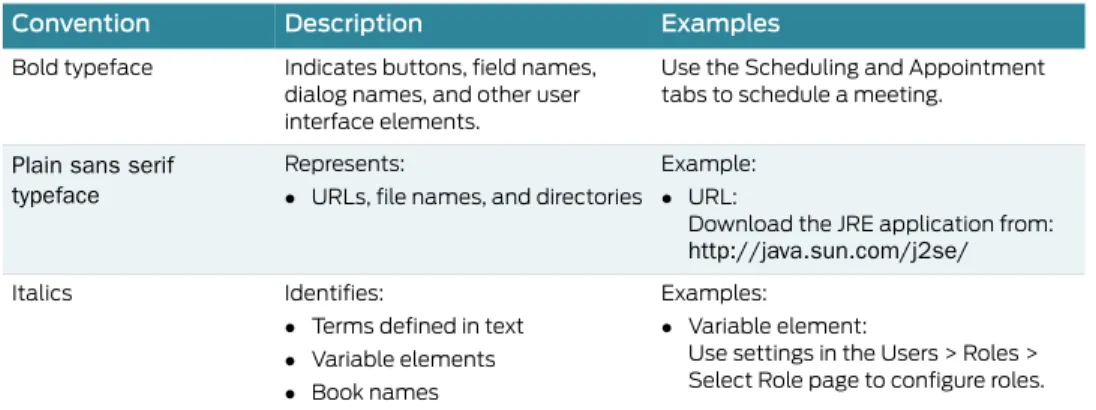
Typographical Conventions
Table 1 describes the text conventions used throughout this manual.
Contacting Technical Support
Technical product support is available through the Juniper Networks Technical
AssistanceCenter (JTAC). If you are a customer with an active J-Care or JNASC support contract,or are covered under warranty, and need post-sales technical support, you can access our tools and resources online or open a case with JTAC.
Table 1: Typographical Conventions
Convention Description Examples
Bold typeface Indicates buttons, field names, dialog names, and other user interface elements.
Use the Scheduling and Appointment tabs to schedule a meeting.
Plain sans serif typeface
Represents:
URLs, file names, and directories
Example: URL:
Download the JRE application from:
http://java.sun.com/j2se/
Italics Identifies:
Terms defined in text Variable elements Book names
Examples:
Variable element:
Use settings in the Users > Roles > Select Role page to configure roles.
vi Contacting Technical Support Copyright © 2012, Juniper Networks, Inc. JTAC policies—For a complete understanding of our JTAC procedures and policies,
review the JTAC User Guide located at
http://www.juniper.net/us/en/local/pdf/resource-guides/7100059-en.pdf. Product warranties—For product warranty information, visit
http://www.juniper.net/support/warranty/.
JTAC hours of operation—The JTAC centers have resources available 24 hours a day, 7 days a week, 365 days a year.
Copyright © 2012, Juniper Networks, Inc. Junos Pulse Mobile Security Dashboard Features 1
Chapter 1
Introduction
The Junos® Pulse Mobile Security Dashboard collects data from designated mobile devices and uploads that data to the dashboard that is accessible from the Internet with a username and password. Using the Junos Pulse Mobile Security Dashboard, you can manage registered mobile devices and enable features such as remote wipe in case a device is lost or stolen. You can also configure email alerts for suspicious messages received by or sent from the device. In this case, messages containing customized keywords, such as drugs, alcohol, or messages that originate from, or are destined to specific addresses, are automatically emailed to you.
Junos Pulse Mobile Security Dashboard Features
The Junos Pulse Mobile Security Dashboard provides both control and security for registered mobile devices.
Control features include: Monitor activity on the device.
View pictures taken by the device camera and sent or received via text or email. View the content of all text messages and email messages.
Automatically receive alerts when keywords are found in messages sent or received. List all applications and software installed on the device.
Display the location of the device in an online map. Sound an alarm on the device.
Use GPS to help locate a lost or stolen device. (GPS functionality on Verizon BlackBerry Curve and the Storm 1 smartphones may not be available. If you receive GPS Longitude and Latitude coordinates of 0.0, this functionality may have been blocked by the service provider or the device may be out of range of a satellite.) Security features include:
Antivirus—This feature provides real-time protection against malware threats by automatically scanning devices to ensure files are not infected with malware. The on-demand scanning ability lets you scan selected files and folders to ensure the device and memory card are clean and protected. The automatic update capability ensures that the device possesses the latest antivirus signatures.
Backup and restore—This feature lets you backup contact and calendar information. Firewall—The firewall security features let you block or allow data traffic to and/or
from your device using rule lists that control traffic based on port number and ip addresses.
2 Junos Pulse Mobile Security Dashboard Features Copyright © 2012, Juniper Networks, Inc. Anti−theft—This set of features includes remote commands you can send to the
device if it is lost or stolen. Those commands include: lock device, wipe device, locate device, and backup device.
Copyright © 2012, Juniper Networks, Inc. Overview 3
Chapter 2
Using the Mobile Security Dashboard
This chapter describes how to access and use the Junos Pulse Mobile Security Dashboard to configure monitoring and security features for registered devices.Overview
Informational Note: Before you can login to the Mobile Security dashboard, you must install and register Junos Pulse on your mobile device. Please refer to the Junos Pulse User Guide for your device type (Android, BlackBerry, iOS, Windows Mobile, Symbian) for Junos Pulse installation, registration, and configuration details.
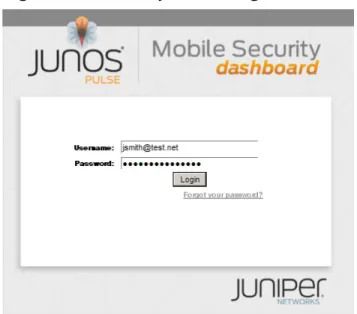
Once the Junos Pulse application is installed on the device and you have setup an email address and password as part of the device installation and registration process, you can use that email address and password to login to the Mobile Security dashboard. You access the dashboard by entering the URL you received from your administrator or service provider. See Figure 1 on page 4.
You can also login using your phone number and password. When you enter the phone number, it must appear exactly as it was entered during the device registration process. You cannot use characters that were not used as part of the phone number during registration.
Informational Note: When you login using a phone number, you can only view that device information on the dashboard. But if you have multiple registered devices under one username, you can view them all when you login with that username.
Password Reset
If you forget your dashboard login password, you can reset it by clicking the Forgot your password? link on the login page. When you click this link, you are taken to a new window where you must do the following:
1. Enter your Email Address.
2. Enter the last four digits of your phone number. 3. Click Reset Password.
Once you click the Reset Password button, a new password is generated for you and sent to you in an email. Use this new password the next time you login. Once you successfully login, you can change your password to something you prefer. See Account Management on page 11.
4 Overview Copyright © 2012, Juniper Networks, Inc. Figure 1: Mobile Security Dashboard Login Window.
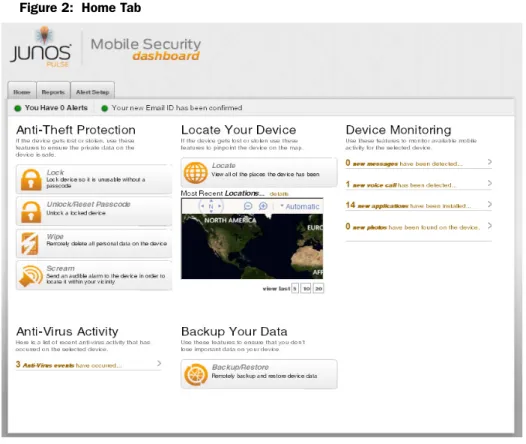
Once you login, the Home tab is displayed. See Figure 2 on page 5. Next to the Home tab, you can find tabs and links for each functional area of the dashboard. Those tabs and links are as follows:
Informational Note: Junos Pulse can be deployed with all available features or with a subset of features based on your usage needs. You may not have all of the Junos Pulse features described here visible on your dashboard.
Home—Once you have configured the dashboard, the Home tab provides all the information and commands you need at a glance. It provides links to anti−theft commands, logged messages and calls, found viruses, events, installed applications, and photos. It also provides recent GPS locations, and the ability to backup and restore data to the selected device.
Reports—Configure report filters to look for certain senders or keywords in a range of messages, based on dates.
Alert Setup—Configure parameters for triggering alerts. (You can also find Alert status and configure alerts by clicking the Alert message, when available, as it appears below the tabs on the Home tab.)
Settings—Configure different user accounts and devices you wish to monitor from the Settings link that is always available at the top of the dashboard window.
Copyright © 2012, Juniper Networks, Inc. Home Tab Information and Commands 5 Using the Mobile Security Dashboard
Figure 2: Home Tab
Home Tab Information and Commands
The Home tab provides all the information and commands you need at a glance for the selected device. You select a device using the pulldown menu in the top right corner of the dashboard window. The Home tab may provide the following:
Email Validation and Alerts Notification
The notification section on the Home tab, beneath the row of tabs, provides information for the selected device. The information provided here can include:
Alert notifications: If there are any alerts for a device, that information is posted here. See Alert Setup Tab Information and Configuration on page 14 for more details. Email validation status: Once users have successfully registered a device, after they
first login to the dashboard, they receive an email requesting that they validate their email address. This email contains a link that users must click to validate their email address. After the link is clicked, a web page notification appears to inform the user that the email address has been validated.
Informational Note: An email validation request is also sent if an email address is updated on the dashboard. See Account Management on page 11.
Anti-Theft Protection
Click the available Antι −Theft command buttons to send the command in question. When you click a command button, a pop−up window appears asking you to verify the command you have chosen before it is sent, and in some cases, to enter additional information.
6 Home Tab Information and Commands Copyright © 2012, Juniper Networks, Inc.
Lock Device/Reset Passcode
When you click this button for the selected device, a pop−upwindow appears. From this window, you can send a command that locks the device if it is lost or stolen, or if you wish to stop the use of the device for any other reason.
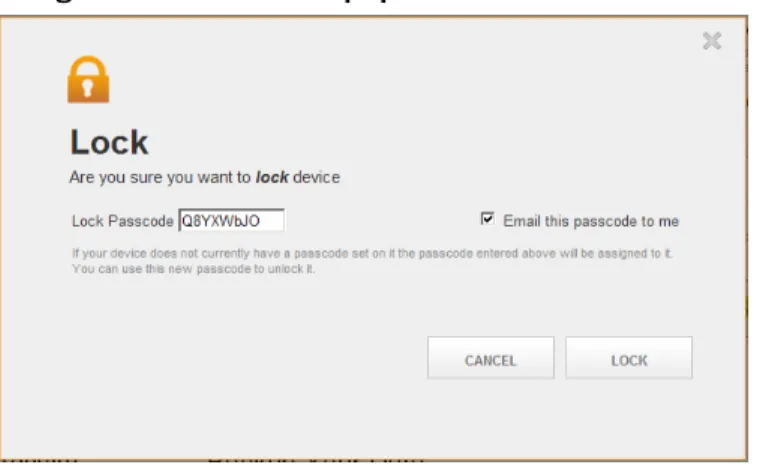
For Android and BlackBerry devices, the pop−upwindow provides a randomly generated lock passcode that can be sent to the device along with the lock command (see Figure 3 on page 7). You can edit this lock passcode before sending the command. If you do send a new passcode, with the provided check box, you can select to email this passcode to the device user. The lock passcode command works in the following manner:
On Android Devices:
If the Device Administrator is enabled and the device already has a password configured:
− When a lock command is sent with a new password, the device is locked with the existing password. The new password from the server is not used. − When a lock command is sent with an empty password, the device is locked
with the existing password. The password from the server is not used. If the Device Administrator is enabled and the device does not have a password
configured:
− When a lock command is sent with a new password, the device is locked with this new password.
− When a lock command is sent with an empty password, the device is NOT locked.
If the Device Administrator is disabled and the device is automatically registered: − When a lock command is sent with a new password, the device is locked
with this new password. (Irrespective of password configured on the device.) − When a lock command is sent with an empty password, the device is NOT
locked.
If the Device Administrator is disabled and the device is registered manually: − When a lock command is sent with a new password, the device is locked
with this new password. (Irrespective of password configured on the device.) − When a lock command is sent with an empty password, the device is NOT
locked. On BlackBerry Devices:
If the device was automatically registered:
− When a lock command is sent with a new password, the device is locked with this new password.
− When a lock command is sent with an empty password, the device is locked with the random password generated at the device. This password is not emailed.
If the device was manually registered:
− When a lock command is sent with a new password, the device is locked with this new password.
Copyright © 2012, Juniper Networks, Inc. Home Tab Information and Commands 7 Using the Mobile Security Dashboard
− When a lock command is sent with an empty password, the device is locked with the password used during registration. This password is not emailed.
Informational Note: On all other devices, once a Lock command has been sent, an Unlock command must be sent to unlock the device.
Click the Lock button to send the lock command or click Cancel to send no command.
Figure 3: Lock Device Pop−up Window
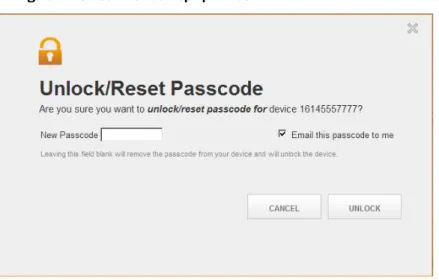
Unlock Device/Reset Passcode
When you click this button for the selected device, a pop−upwindow appears. From this window, you can send a command that unlocks the locked device or clears the
passcode on iOS devices so that users can enter a new password to unlock the device. For Android and BlackBerry devices, the pop−upwindow provides a randomly generated passcode that can be sent to the device along with the unlock command (see Figure 3 on page 7). You can edit this unlock passcode before sending the command. If you do send a new passcode, with the provided check box, you can select to email this passcode to the device user. The user must enter the new passcode to unlock the device.
Informational Note: For Android devices, if the Device Administrator is enabled and a passcode is defined on the device, the new passcode replaces the existing one only if it satisfies the device passcode policy. A blank passcode unlocks the device only if the device allows an empty passcode and encryption is not enabled.
Refer to the previous section Lock Device/Reset Passcode on page 6 for details on how a device is locked based on various conditions.
Informational Note: On all other devices, an unlock command unlocks the device. The passcode field is not supported.
Click the Unlock button to send the unlock command or click Cancel to send no command.
8 Home Tab Information and Commands Copyright © 2012, Juniper Networks, Inc. Figure 4: Unlock Device Pop−up Window
Wipe Device
When you click this button for the selected device, a pop−upwindow appears. From this window, you can send a command that wipes the device. Different devices support different wipe capabilities. In some case, a wipe command resets the device to factory settings. In other cases, a wipe commands removes only personal data from the device such as contacts, calendar events, notes, call history, message folders, and all data on the SD card. The manner in which wipe works on individual devices is not configurable. Please refer to the Junos Pulse User Guide device documentation to understand what a wipe command does on that device type.
Click the Wipe button to send the wipe device command or click Cancel to send no command (see Figure 5 on page 8). When you click Wipe, another pop−up window appears asking you to confirm the Wipe.
Figure 5: Wipe Device Pop−up Window
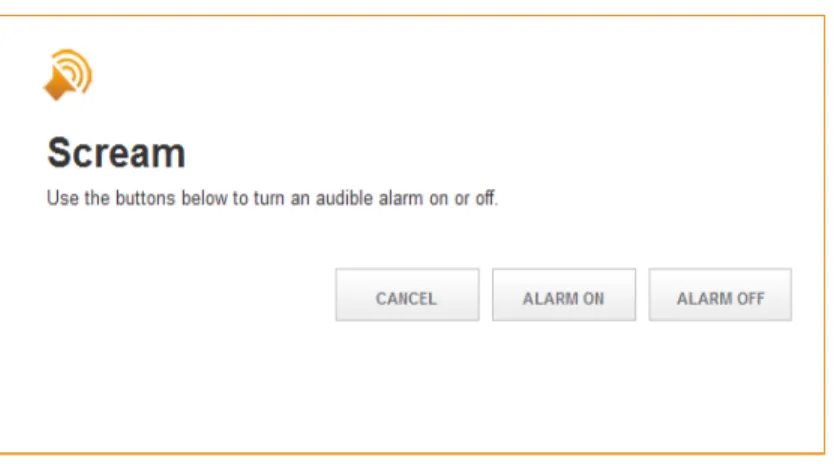
Scream
When you click this button for the selected device, a pop−upwindow appears. From this window, you can send a scream command to the device which allows the device user to audibly locate a misplaced device within hearing distance, even if the speakers and ringer are muted.
Copyright © 2012, Juniper Networks, Inc. Home Tab Information and Commands 9 Using the Mobile Security Dashboard
From the Scream pop−up, click Alarm On to send a scream command. Click Alarm Off to send a command to turn the scream off. Click Cancel to send no command (see Figure 6 on page 9).
Figure 6: Scream Pop−up Window
Locate Your Device
From the Home tab, click the Locate button to access the Locate pop−up window. From this window, you can send a command to determine the GPS location of the device. The result is displayed in the Locate pop−up window and on the Home tab.
In the Locate pop−up window, click Locate to send a locate command, click Close to send no command (see Figure 7 on page 9).
Figure 7: Locate Pop−up Window
Informational Note: GPS is not supported on the iPod Touch and on iOS devices that do not have cell service.
Informational Note: There are no commands available for iOS devices that do not have an associated APNS certificate. When no APNS certificate is present, GPS location is the only available feature.
10 Home Tab Information and Commands Copyright © 2012, Juniper Networks, Inc.
Device Monitoring
When there are events present for any of the available monitoring categories for the selected device, the number of events appear for each category under Device Monitoring as clickable links.
When you click one of those event links, it takes you to a window that lists the events for that category. In each individual event type window, you can manage events by
selecting the check box next to the item you want to remove and clicking the Delete button. You can also select the check box at the top of the check box column and click the Delete button to delete all events in that event category.
Click the Refresh button to query the device. This causes the device to upload new events that have not yet been sent to the dashboard.
The available events may include one or more of the follow:
New messages—View messages (voice, email, text) received on the device. New voice calls—View voice calls received on the device.
New applications—View new applications that have been installed on the device. You can remotely uninstall an application by selecting the check box beside the application and clicking the Uninstall specific application on the handset button. New photos—View new photos stored on the device. The photo event window
displays photos as 20 pictures per window.
Informational Note: New applications is the only event type available for iOS devices at this time.
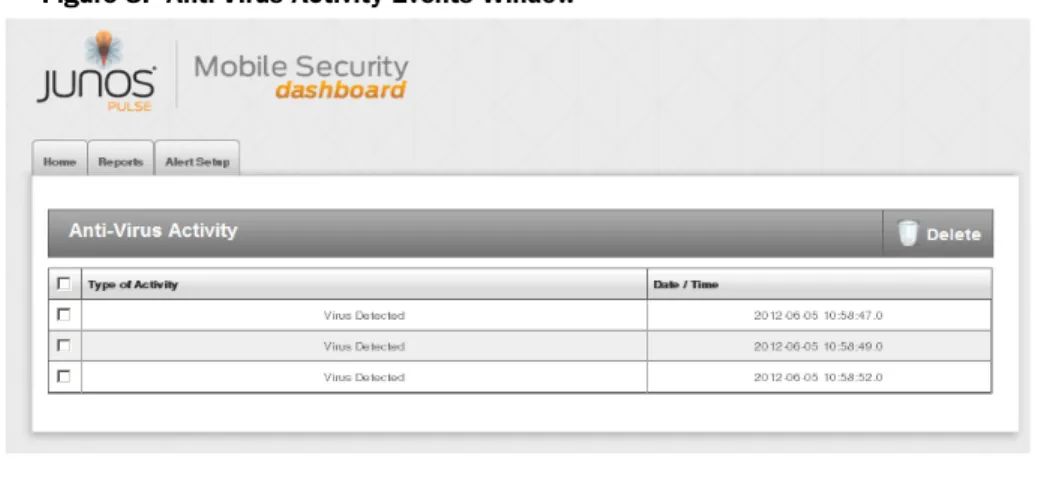
Anti-Virus Activity
When there are anti−virus events present for the selected device, those events appear as a clickable link in the Anti−Virus Activity section of the Home tab (see Figure 2 on page 5). When you click the <#> Anti_Virus events occurred link from the Home tab, you open the Anti−Virus Activity event list window where you can view more details and manage anti−virus events (see Figure 8 on page 10).
You can manage anti−virus events by selecting the check box next to the item you want to remove and clicking the Delete button. You can also select the check box at the top of the check box column and click the Delete button to delete all anti−virus events. Click the Refresh button to query the device. This causes the device to upload new events that have not yet been sent to the dashboard.
Copyright © 2012, Juniper Networks, Inc. Settings Link Information and Configuration 11 Using the Mobile Security Dashboard
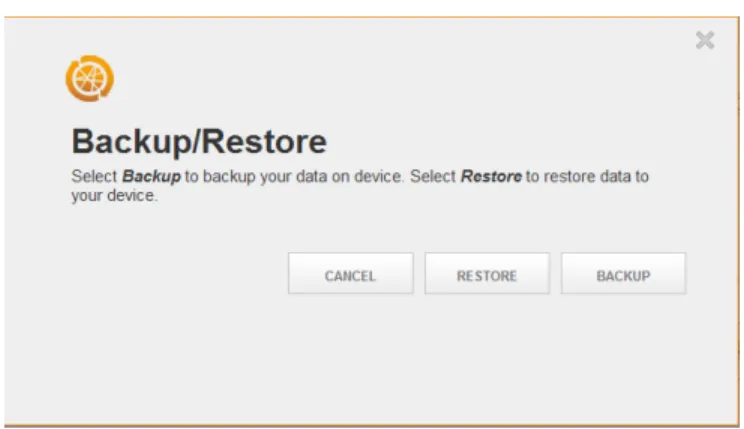
Backup Your Data
When you click this button from the Home tab for the selected device, a pop−upwindow appears. From this window, you can remotely backup or restore data to the selected device. A backup command creates a copy of the device’s contact and calendar information. This is useful if a device is lost or stolen.
In the Backup Your Data pop−up window, click the Backup button to send a backup command. Click the Restore button to send a restore command. Click the Cancel button to send no command (see Figure 9 on page 11).
Figure 9: Backup Your Data Pop−up Window
Custom Button
If your device administrator or service provider makes this feature visible to you, an additionalcustomized button appears on your Home tab. When you click this button, a customized URL takes you to a web page that is set up by your service provider. This page may offer the purchase of additional features or it may provide additional information. This will vary by service provider.
Settings Link Information and Configuration
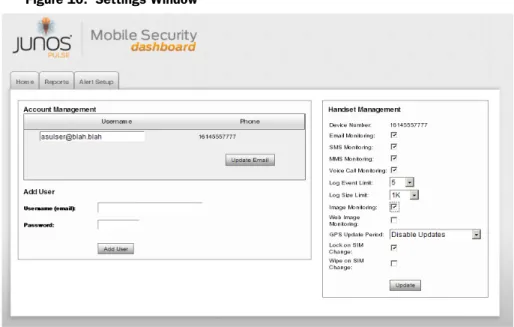
From the Settings link at the top of the dashboard window, you can configure Account Management and Handset Management. See Figure 10 on page 13.
Account Management
You can remove, edit or add a new email address to a device account. To add an email address and corresponding password,
1. Click the Settings link.
2. From the Select phone to view pulldown in the top right corner, select the device you want to manage.
3. To add a new email address for handset account management, enter the email address in the Username (email) edit field.
4. Enter the new password in the Password edit field. 5. Click the Add User button.
12 Settings Link Information and Configuration Copyright © 2012, Juniper Networks, Inc.
To edit an address, make your edits in the edit field and click Update Email. It is important to note that changing this address also changes the login username for the account.
Handset Management
With Handset Management, you can update specific device monitoring functions, change the GPS update period, control log file size limits, and determine data wipe parameters. Note that updates are not received until the device reports in at the next scheduled time.
Informational Note: Handset Management is not available for iOS devices. From the Settings link, you can view Handset Information for the selected iOS device such as phone number, device type, device name and UDID. See Figure on page 13.
To update or change the available settings, do the following,
1. If it isn’t already selected, from the Select phone to view pulldown in the top right corner, select the phone number for the device you want to manage.
In the Handset Management column on right side of the window, set the following: 2. Next to Email Monitoring, select the check box to enable this feature for the
selected device.
3. Next to SMS Monitoring (Short Messaging Service), select the check box to enable messaging monitoring for the selected device.
4. Next to MMS Monitoring (Multimedia Messaging Service), select the check box to enable monitoring of messages containing pictures, video, sound or other
multimedia types for the selected device.
5. Next to Voice Call Monitoring, select the check box to enable this feature for the selected device. Voice Monitoring provides a time-stamp for a conversation. 6. Next to Log Event Limit, select an available event limit from the pulldown list. We
recommend that you do not set this limit lower than 25.
7. Next to Log Size Limit, select an available size limit from the pulldown list. We recommend that you do not set this limit to Off.
The Log Event Limit and Log Size Limit work together in that whichever setting is triggered first is the one that takes effect. The event limit causes the device to send the specified amount of events (email, voice, SMS, MMS) each as one combined event when the event limit is achieved. This is preferable to sending each individual event in real-time. If the device sends or receives a large number of messages, you should set this limit higher rather than lower. Otherwise, the device could be constantly sending events to the dashboard which could hinder device
performance. The Log Size Limit restricts the amount monitored data this is sent from the device. The limit that is achieved first is the one that is used.
8. Next to Image Monitoring, select the check box to enable this feature for the selected device.
9. Next to Web Image Monitoring, select the check box to enable this feature for the selected device.
10. Next to GPS Update Period, select an available update time frame from the pulldown list. With this setting, you can configure GPS updates to occur automatically every fifteen minutes, 30 minutes, hourly, or daily.
Copyright © 2012, Juniper Networks, Inc. Reports Tab Information and Configuration 13 Using the Mobile Security Dashboard
11. Next to Lock on SIM Change, select the check box to enable this feature. With this feature selected, if the SIM is changed, the device switches on GPS Theft Mode and Locks the device. You can unlock the device with a password.
Informational Note: Lock on SIM Change is only available if a Lock command is available as part of the device profile.
12. Next to Wipe on SIM Change, select the check box to enable this feature.This check box is only available when the Lock on SIM Change check box is enabled. With this feature selected, if the SIM is swapped for another, sensitive device information is automatically wiped.
Informational Note: Wipe on SIM Change is only available if a Wipe command is available as part of the device profile.
13. Click the Update button to apply your settings.
Figure 10: Settings Window
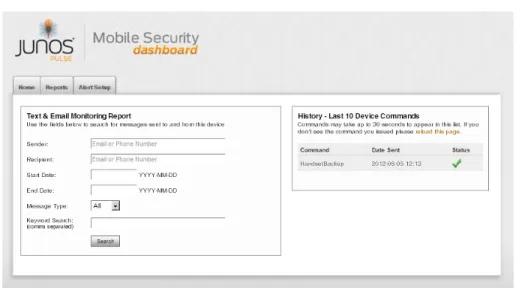
Reports Tab Information and Configuration
You can run customized reports against collected device data by entering criteria into the fields provided in this window.
To run a customized report, enter report criteria in one or more fields described here. 1. Select the Reports tab. See Figure 11 on page 14.
2. If it isn’t already selected, from the Select phone to view pulldown in the top right corner, select the phone number for the device on which you want to run a report. 3. If you want the report to include sender information, enter the Sender email
address or phone number in the corresponding field. Note that the address or number you enter must match the sender address or number as it appears in the Messages display.
14 Alert Setup Tab Information and Configuration Copyright © 2012, Juniper Networks, Inc.
4. If you want the report to include recipient information, enter the Recipient email address or phone number in the corresponding field. Note that the address or number you enter must match the recipient address or number as it appears in the Messages display.
5. In the Start Date field, enter a start date parameter for the report you are creating. Format the date as
Year-Month-Day
as in the following example: 2010-11-24.
6. In the End Date field, enter an end date parameter for the report you are creating. Format the date as
Year-Month-Day
as in the following example: 2010-11-24.
7. From the Messages pulldown list, select the type of message for which you are running this report. Your options are All, SMS, MMS, Email, Voice.
8. In the Keyword Search edit field, enter a keyword or phrase you want to search for within messages. Messages containing this keyword are used to build your report. 9. Click the Search button to run the report.
History
On the right side of the Reports window, there is a History column. Here you can view the last ten commands sent to the device and their send dates.
Figure 11: Reports Tab
Alert Setup Tab Information and Configuration
By using unique identifiers, such as keywords or addresses, messages that meet a defined criteria are identified and viewed by clicking on the Alerts message(if available) that appears beneaththe Home tab in the Home window (see Figure 2 on page 5). Alerts can also be configured to be sent via email to you; for example, an SMS message that contains the keyword you designate can be automatically emailed to you.
To configure an alert, do the following.
1. Select the Alert Setup tab. See Figure 12 on page 15.
2. If it isn’t already selected, from the Select phone to view pulldown in the top right corner, select the phone number for the device for which you want to configure an alert.
Copyright © 2012, Juniper Networks, Inc. Support/Help Tab Information and Configuration 15 Using the Mobile Security Dashboard
3. In the Add Keyword edit field, enter a keyword you want to trigger an alert if this word is found in a message sent or received by the device. Click the Add button. The keyword now appears in the Keyword list in the field below.
4. The Keywords field also has a check box that allows you to use suggested
keywords from the column on the right side of the window. These are keywords that are often used as shorthand in messages. To use suggested keywords in place of or in addition to keywords you enter, select the Use Suggested Keywords check box. When this check box is selected, the Suggested Keywords that are enabled are used as part of the alert.
You can scroll through the Suggested Keywords list and enable check boxes besides keywords you want to trigger an alert if found.
5. If you are selecting to Send the event as an Email Message by enabling the check box in the Sender/Recipient Address field, enter the email address or phone number to check for alerts. Use this feature to flag any communication with a particular contact as an alert.
6. From the Select what to do with an event options, you can choose to, Report the event as an Alert message
Send the event as an Email message Select one or both check boxes.
7. Click the Update button to enable the alert.
Figure 12: Alert Setup Tab
Support/Help Tab Information and Configuration
If you have questions or need technical support, select the Support/Help tab. Enter the required information in the available fields and click Submit.
16 Support/Help Tab Information and Configuration Copyright © 2012, Juniper Networks, Inc.
Informational Note: Your dashboard may not have a Support/Help tab. Your service provider can remove this tab or customize it for your deployment.
Copyright © 2012, Juniper Networks, Inc. Junos Pulse FAQs 17
Chapter 3
Junos Pulse FAQ
This chapter provides answers to commonly asked questions.
Junos Pulse FAQs
I do not want the device user to see the Junos Pulse application on his/her device. Can I hide it?
We are aware that on some devices icons can be hidden from view, but you cannot hide the Junos Pulse application. In addition to control and monitoring, Junos Pulse provides security features that require end user access for configuration.
What happens if the device user modifies the Junos Pulse settings on the device? Depending on the modification made, the modification may not display on the Mobile Security Dashboard. For example, if the device user uninstalls Junos Pulse from the device, this event is not displayed in the Mobile Security Dashboard. You will simply notice an absence of events.
Why would my GPS coordinates be inaccurate?
There could be several reasons for this inaccuracy. First, confirm that you have a GPS enabled device and that GPS is a part of your carrier's data plan. If you do not have GPS functionality as a part of your network service, the GPS feature will not work. Also, check the GPS feature on the device to make sure there are no restrictions and that all features are set to enabled. Calibrate your location with the device through Google maps from a location with good carrier signal strength. The premier location for testing is outdoors. GPS can also be gathered via satellite or network, with varying degrees of accuracy.
What does it mean when the GPS coordinates are 0.0?
Usually 0.0 identifies that GPS on the device needs to be activated by the carrier or that this feature is blocked by the carrier for use by 3rd party applications. (Note that we cannot guarantee GPS functionality on Verizon BlackBerry Curve and the Storm 1 devices.)
18 Junos Pulse FAQs Copyright © 2012, Juniper Networks, Inc. How long does it take for the Mobile Security Dashboard to update with the device user’s activities?
This is configurable from the dashboard. See “Handset Management” on page 12 for information and guidelines. (Note that if the device user sends and receives a high volume of texts, sending these texts to the dashboard in real-time is not advised.)
Can I use Junos Pulse to monitor or block URLs?
No, Junos Pulse does not provide that functionality at this time.
How many devices can I monitor using the Mobile Security Dashboard?
There is no limit to the number of devices you can monitor on an account. To add a new device to the account, you must first download the software to the additional device. Once the device registers with the dashboard, you can monitor it.
I want to monitor several devices, but each device uses a different carrier. The carrier does not matter. As long as the device is running a supported operating system, you can use Junos Pulse.
Copyright © 2012, Juniper Networks, Inc. 19
Index
A Account management . . . .11 account management . . . .11 alert setup. . . .14 alerts notification. . . .5 anti-theft protection. . . .5 anti-virus activity . . . .10 APNS certificate. . . .9 B backup your data. . . .11C custom button. . . .11 D device monitoring. . . .10 E email monitoring . . . .12 email validation. . . .5 F features control overview. . . .1 security overview . . . .1 G GPS support information for iOS. . . .9
update period. . . .12 H handset management . . . .12 History commands . . . .14 I Image monitoring. . . .12 K Keywords, messaging shorthand. . . .15
L locate your device. . . .9
lock device . . . 6
Lock on SIM change. . . 13
Log event limit. . . 12
Log size limit. . . 12
M MMS monitoring . . . 12
Mobile Security Dashboard overview. . . 3 P password reset . . . 3 R refresh button. . . 10 reports . . . 13 S scream. . . 8 settings . . . 11 SMS monitoring . . . 12 U unlock device . . . 7 username/password change . . . 11 V voice call monitoring . . . 12
Voice monitoring. . . 12
W Web image monitoring. . . 12
wipe device. . . 8