Document Manager
User Guide
For Version 2.7 Enterprise Edition
Trademarks
Document Manager and Document Manager Administration are trademarks of Document Logistix Ltd. TokOpen, TokAdmin, TokImport and TokExRef are registered trademarks of Document Logistix Ltd. All other trademarks acknowledged.
Copyright Statement
Copyright © 1999 to 2013 by Document Logistix Ltd. All rights reserved. Document Manager User Guide (Enterprise Edition), 2013.
No part of this document may be reproduced, copied or transmitted in any form or by any means without the written permission of Document Logistix Ltd.
Document Logistix Ltd believes that the information in this document is accurate at the date of release but accepts no responsibility for any loss arising from omissions or inaccuracies contained herein. Information within this document is subject to change without notice.
For more information on this or other Document Logistix products, please contact Document Logistix Ltd.
Contact Details
Document Logistix Ltd – UK
Main Address: 8 Copperhouse Court Caldecotte
Milton Keynes MK7 8NL United Kingdom
Telephone Main Lines: (United Kingdom) (+44) (0)1908 366388 Telephone Support Lines: (United Kingdom) (+44) (0)1908 366722
Email Information:
Email Support: [email protected]
Fax: (United Kingdom) (+44) (0)1908 367700
Web:
Document Logistix LLC – USA
Main Address: 3616 Far West Boulevard Suite 117-309
Austin TX 78731 USA
Telephone Main Lines: (USA) 1-512-345-4600
Email Information:
Email Support:
Software Release
This guide describes version 2.7 Enterprise Edition of Document Manager software. As the software evolves, this guide may not reflect exact screen layout changes, but core functionality remains the same.
Change Record
This table lists the changes in the Document Manager features since the previous version:
Software Version
Software
Release Date
Feature Changes
Document Manager 2.6 EE 01-May-2010
• AD Manager added
• Enhanced Full Text Search
• OCR Assisted Indexing
• Enhanced Screen Scrape Integration
• Document Logistix Print Driver (print and store from any application)
• Microsoft Office Add-In
• Document Logistix Filing Assistant (monitors a folder for new files and saves them)
• Windows® 7 Support
• Sending emails from Document Manager using Microsoft Outlook® adds signatures to emails
• Speed improvements in searching and displaying result lists
• Speed improvements in WAN configuration Document Manager 2.6 EE 21-May-2010 • Support for Kofax Express 2 added
Document Manager 2.6 EE 31-Oct-2010 • Sub-domain functionality added
• Integration with Document Logistix Update Service added
Document Manager 2.6 EE 28-Feb-2011
• Allow Multiple Logins permission added
• Windows 7 Integration added
• Old Style Image Selector setting added
• Automatic Smoothing and Sharpen Images settings added
• Copy Part of Image to Clipboard feature added Document Manager 2.6 EE 09-Mar-2011 • Document Logistix rebranding
Document Manager 2.6 EE 27-Oct-2011
• New Document Preview feature.
• New Mono OCR image settings on the User Settings Integration tab.
Software Version
Software
Release Date
Feature Changes
Document Manager 2.7 EE 29-Jun-2012
• New tabbed format for Document Manager display.
• File tab replaces logo menu.
• Increased Workspace functionality.
• Ability to filter document and folder lists added.
• ‘Search within Search Results’ feature added.
• Number of document index fields increased to unlimited.
• Encryption methods Triple DES and AES added.
• Document types can force ‘New Version’ on Check-In.
• Customisable splash screen.
• Edit multiple document indexes at once.
• Support for PNG image type when saving colour images.
Contents
1 PREFACE ... 1
1.1 About this Guide ... 1
1.2 Intended Audience ... 1
1.3 Related Documents ... 1
1.4 Conventions ... 2
1.4.1 Definitions ... 2
2 SUPPORT CALL ESCALATION ... 4
3 OVERVIEW AND CORE CONCEPTS ... 5
3.1 An Overview of Document Manager ... 5
3.2 Document Manager Licenses ... 5
3.3 The Document Manager Hierarchy ... 6
3.3.1 Databases ... 6
3.3.2 Drawers ... 6
3.3.3 Folders ... 6
3.3.4 Sub-Folders ... 6
3.3.5 Documents ... 7
3.4 Storage Location ... 7
3.5 Document Types... 7
3.6 Indexing ... 8
3.7 Searching ... 10
3.8 Saved Searches ... 11
3.9 Document Preview... 11
3.10 Security ... 11
3.10.1 Login ... 11
3.10.2 Access Control ... 12
3.11 Permissions ... 12
3.12 References ... 13
3.13 Auditing ... 13
3.14 Screen Scrape ... 14
3.15 ‘Read-Only’ Documents ... 14
3.16 Version Control ... 15
3.18 Check Out/In ... 15
3.19 Workflow ... 15
3.20 Web Access to Document Manager Documents ... 16
3.21 COM API ... 17
3.22 Document Retention ... 17
4 TYPES OF USERS ... 18
5 STARTING DOCUMENT MANAGER ... 19
5.1 Document Manager Views ... 21
5.1.1 Changing Document Manager Views ... 22
5.2 Tool Tabs ... 23
5.3 Ribbon ... 23
5.4 Groups ... 24
5.5 Controls/Buttons ... 24
5.6 Lists and Columns ... 25
5.7 Pop-Up Menus ... 25
5.8 The Tool Tabs ... 26
5.8.1 Main Tab ... 26
5.8.2 Drawer Tab ... 27
5.8.3 Folder Tab ... 27
5.8.4 Document Tab ... 28
5.8.5 View Tab ... 32
5.9 Application Menu ... 34
5.10 Quick Access Toolbar ... 35
5.10.1 Customise Quick Access ... 36
5.10.2 Show Below the Ribbon ... 37
5.10.3 Show Above the Ribbon ... 37
5.10.4 Minimizing the Ribbon ... 38
5.11 Options ... 38
5.11.1 Styles ... 38
5.11.2 Large Icons ... 38
5.12 Context-Sensitive Help and Keyboard Operation ... 39
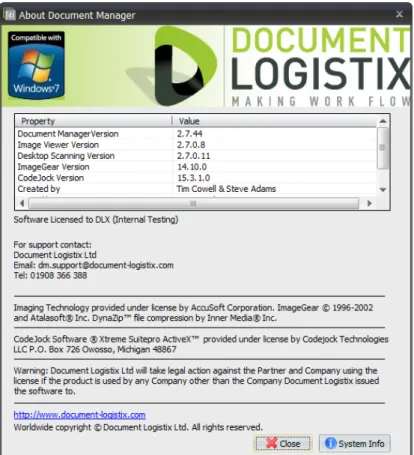
5.13 About ... 40
5.14 The Status Bar ... 40
6 ACCESS CONTROL AND PERMISSIONS ... 44
6.1 Access and Permission Levels ... 44
6.2 Types of Permissions ... 44
6.3 Access Rights ... 45
6.4 Access and Permissions at Different Levels ... 45
6.5 Group Access Rights and Permissions ... 46
6.6 Folder Permissions ... 46
6.7 Document Permissions ... 47
7 GROUPS ... 50
7.1 Group Administrator ... 50
8 DRAWERS ... 51
8.1 Drawer Permissions ... 51
9 INDEX FIELDS ... 52
9.1 Indexing Documents and Folders ... 52
9.2 Common Fields in Drawers ... 53
9.2.1 Searching Across Drawers ... 53
9.2.2 Screen Scraping Across Drawers ... 53
10 FOLDERS ... 54
10.1 Creating New Folders ... 54
10.1.1 Creating Folders Using the Pop-Up Menu ... 57
10.1.2 Creating Folders by Searching ... 58
10.2 Filtering Folder Lists ... 58
10.3 Folder Properties ... 58
10.3.1 Modifying Folder Properties ... 58
10.3.2 Viewing Folder Properties... 59
10.3.3 Access From ... 60
10.4 Sub-Folders ... 61
10.4.1 Modify Sub-Folders ... 62
10.4.2 Delete Sub-Folders ... 62
10.5 Deleting Folders... 62
10.6 Finding a Parent Folder ... 63
11 DOCUMENTS ... 64
11.1 Understanding Document Types ... 64
11.3 Creating a New Document ... 66
11.3.1 Read-Only Documents ... 68
11.4 Importing Documents ... 69
11.4.1 Using the Import Button and Pop-Up Option ... 70
11.4.2 Dragging and Dropping from Windows Explorer ... 73
11.4.3 Assisted Indexing/OCR On-the-Fly ... 74
11.4.4 Using the ‘Send To’ Feature ... 76
11.5 Importing Documents via XML ... 78
11.6 Previewing Documents ... 80
11.6.1 Displaying the Preview Pane... 81
11.6.2 Customising the Document Preview Feature ... 82
11.6.3 Closing the Document Preview ... 89
11.7 Filtering Document Lists ... 89
11.8 Opening Documents ... 89
11.8.1 Viewing PDFs or Application Documents in Image Viewer ... 90
11.9 Editing Document Indexes ... 90
11.9.1 Access From ... 91
11.10 Check Out/Check In Documents ... 91
11.10.1 Opening a Checked-Out Document ... 92
11.10.2 Checking In a Document ... 93
11.10.3 Undo Check Out ... 93
11.11 Version Control ... 94
11.11.1 Creating a Minor Version ... 94
11.11.2 Creating a Major Version ... 95
11.11.3 Setting Image and Application Documents as the Same Version ... 95
11.11.4 Viewing the Latest Version Only ... 95
11.11.5 Finding All Versions ... 96
11.12 Workspaces ... 96
11.12.1 Workspaces Dialog Box ... 100
11.13 Exporting Documents ... 101
11.13.1 Exporting Images from Document Manager ... 101
11.13.2 Exporting Images Using Advanced Options ... 102
11.13.3 Exporting Application Documents ... 104
11.14 Document References ... 109
11.14.1 Create Document References ... 109
11.14.2 Find All References ... 109
11.15 Emailing Documents ... 110
11.15.1 Emailing a Document File ... 111
11.15.2 Emailing a Zipped Document ... 111
11.15.3 Emailing a Document Reference ... 112
11.15.4 Opening a Document Reference in an E-Mail ... 113
11.15.5 Web Reference ... 113
11.16 Deleting Documents ... 113
11.17 Additional Document Utilities ... 114
11.17.1 Drag-and-Drop to a New Location ... 114
11.17.2 Appending an Image Document ... 115
11.17.3 Copy/Paste ... 115
11.17.4 Cut/Paste ... 116
11.17.5 Move Document ... 116
11.17.6 Printing ... 116
11.17.7 Faxing ... 117
11.17.8 COM API ... 117
12 SEARCHING ... 118
12.1 Folder Search ... 118
12.1.1 Saved Folder Shortcut ... 122
12.2 Document Search ... 123
12.3 Filtering Folder and Document Lists ... 127
12.4 Content Searches (Full Text Search) ... 129
12.4.1 Performing a Content Search ... 130
12.4.2 Viewing Text Search Hits ... 131
12.4.3 Reprocess ... 132
12.5 Quick Searches ... 133
12.5.1 Prompt ... 134
12.6 Search Results ... 135
12.6.1 Paging Through Search Results ... 135
12.6.2 Saving Search Results as Data ... 136
12.6.4 Searching Within Search Results ... 137
12.7 Saved Searches ... 138
12.7.1 Frequently Used Searches Tab ... 139
12.7.2 All Available Searches Tab ... 142
13 USER-CONFIGURABLE SETTINGS ... 143
13.1 Drawers Tab... 146
13.2 Integration Tab... 147
13.3 Capture Tab ... 148
13.4 Printing Tab ... 149
13.5 Check-Out Tab ... 150
14 THE SCANNING MODULE ... 151
14.1 Thumbnails ... 152
14.2 Scanning Module Application Menu ... 152
14.3 Scanning Module Quick Access Toolbar ... 153
14.3.1 Show Below the Ribbon ... 154
14.3.2 Show Above the Ribbon ... 154
14.3.3 Minimizing the Ribbon ... 154
14.4 Scan Tab... 154
14.5 About Scanners ... 156
14.6 Preparation ... 157
14.7 Scanning for the First Time ... 157
14.8 Profiles ... 159
14.8.1 Add New Profile ... 159
14.8.2 Rename Profile ... 160
14.8.3 Remove Selected Profile... 160
14.9 Scanning Documents ... 160
14.9.1 Sheet Feeder Scanning ... 161
14.9.2 Scanning Using Disk Import ... 161
14.10 Rescanning a Page... 162
14.11 Deleting a Page ... 162
14.12 Inserting a Page ... 162
14.13 Saving Scanned Documents ... 163
14.13.1 Closing the Scanning Module without Saving a Batch ... 166
14.14 Indexing Held Batches ... 168
15 THE IMAGE VIEWER ... 169
15.1 Thumbnails ... 170
15.1.1 Setting the Thumbnail Size ... 171
15.2 Image Viewer Application Menu... 172
15.3 Image Viewer Quick Access Toolbar ... 173
15.3.1 Show Below the Ribbon ... 173
15.3.2 Show Above the Ribbon ... 174
15.3.3 Minimizing the Ribbon ... 174
15.4 Tools in the Image Viewer ... 174
15.4.1 Customising the Tabs ... 174
15.4.2 Shortcut Keys ... 175
15.5 The Home Tab Tools ... 176
15.5.1 Adding Pages/Appending an Image Document ... 180
15.5.2 Printing a Document from Image Viewer ... 181
15.5.3 Emailing a Document from Image Viewer ... 182
15.5.4 Exporting a Document from Image Viewer ... 183
15.5.5 Modifying the Image Document Index Fields ... 185
15.5.6 View Audits ... 185
15.5.7 Saving Audit Records... 186
15.6 The Annotation Tab Tools ... 187
15.6.1 Annotation Attributes ... 191
15.6.2 Annotation Actions ... 195
15.6.3 Sticky Notes ... 199
15.6.4 Image Stamps ... 200
16 AUDITING ... 203
16.1 Viewing Audit Records ... 203
16.2 Saving Audit Records ... 204
APPENDIX A: MENU DEFINITIONS ... 206
A.1 Drawer Tab and Pop-Up Menu ... 206
A.2 Folder Tab and Pop-Up Menu ... 206
A.3 Document Tab and Pop-Up Menu ... 207
A.4 Scanning Module Tab and Pop-Up Menu ... 211
A.5.1 Thumbnails ... 213
A.5.2 Image ... 214
APPENDIX B: BULK EXPORT/IMPORT ... 216
B.1 Exporting Documents with an IPT File ... 217
B.1.1 Using Folder and Document Searches to Export Documents ... 217
B.1.2 Using Export with Indexes for Documents, Drawers or Storage Location Contents ... 218
B.1.3 Explanation of the Different Files Exported with IPT Files... 218
B.2 Importing Documents Using External Media Import... 219
B.2.1 What to do if the Required Drawer does not Exist ... 222
B.2.2 Recommended Best Practice for Managing the Import Log File ... 223
APPENDIX C: MICROSOFT OFFICE ADD-IN ... 224
C.1 Using the Office Add-In ... 224
C.1.1 Saving to Document Manager ... 224
C.1.2 Opening Documents from Office ... 226
C.1.3 Attaching Copies of Document Manager Documents to Emails ... 227
C.1.4 Attaching Document Manager References to Emails ... 228
C.2 Office Add-In Settings ... 229
APPENDIX D: UPDATE SERVICE ... 230
D.1 Checking for Updates ... 230
D.1.1 Installing Available Updates ... 231
APPENDIX E: ADDITIONAL MODULES ... 232
E.1 Document Manager Web ... 232
E.2 Document Logistix Batch Scan ... 232
E.3 Document Logistix Mail Archive Service ... 233
E.4 Document Logistix Alerter ... 233
E.5 Document Logistix Import Service ... 234
E.6 Document Logistix Print ... 234
E.7 Filing Assistant... 234
E.8 Office Add-in ... 234
APPENDIX F: INSTALLING SCANNER DRIVERS ... 235
F.1 Installing TWAIN Scanner Drivers ... 235
F.2 Installing Kofax Scanner Drivers ... 235
APPENDIX G: KOFAX EXPRESS IMPORT ... 236
1
Preface
This section provides an introduction to this guide.
1.1
About this Guide
This guide describes Document Manager Enterprise Edition document management system.
1.2
Intended Audience
This guide is intended for end-users of Document Manager Enterprise Edition.
1.3
Related Documents
For more information on using Document Manager, refer to the following:
•
Document Manager Quick Start GuideFor information on installing and configuring Document Manager, refer to:
•
Document Manager Installation GuideTo find information on setting up and administrating Document Manager, refer to:
•
Document Manager Administration GuideIn addition to the above, there are a number of guides on major features in Document Manager. See the following for more information:
•
Screen Scrape Guide – Screen Scraping is used to automate searching in Document Manager based on information displayed in an external application.•
Workflow and Approvals Guide – these are features that assist in the processing of documents within an organisation.•
Retention Policy Module Admin and User Guide – a guide to the Retention feature, which enables organisations to implement policies to determine how long documents are kept. If you want to find out more about document management policies in general, you can read the following document:1.4
Conventions
Throughout this manual, a number of conventions are used. The list below details these conventions:
•
On-screen items, including buttons, tabs, menu items, field names and dialog box names are shown in bold, for example, click the Save button.•
Keys or key combinations that you have to press on the keyboard are shown in upper case and in angled brackets, for example: <CTRL> + <X>.•
User input (information that you have to enter), object names and references to completed fields are in single quotation marks, for example, enter the value ‘%PROMPT’.•
Cross-references are in italics; for example, see 1.4 Conventions on page 2 for more information.•
Variables are displayed in italics in angled brackets, for example, select Delete <annotationtype> (in this instance, <annotation type> should be replace by the name of the selected
annotation).
Additional information is provided using icons to draw attention to them:
NOTE: Notes are used to give supplemental or important information about the subject matter.
WARNING: Warnings are used to provide important pieces of information.
TIP: Tips are used to suggest shortcuts or things to do to make using Document Manager products easier.
1.4.1
Definitions
The following terms are used in this guide:
•
Document Manager: The Document Logistix Document Manager program.•
Ribbon: The ribbons display the tabs containing buttons (for example, the Main tab), which enable access to the Document Manager features.•
Document Manager Administration Module: The Document Manager Administration Module enables system administrators to configure Document Manager. See the Document Manager Administration Guide for more information.•
Scanning Module: The Document Scanning Module enables users to scan documents and add them to Document Manager.•
Image Viewer: The Document Manager Image Viewer allows users to work with images and add annotations, if required.•
Document Manager Workspace: The Document Manager Workspace is a temporary location for files that enables actions to be performed on multiple items.•
Document Manager Explorer: The Explorer displays drawers, folders and documents in an explorer view to enable easy navigation.•
Application Documents: Refers to documents within Document Manager that are associated with a PC application, for example a Microsoft® Office Word document. Thesedocuments will open in their associated application on a user’s computer.
•
Image Documents: Refers to documents in Document Manager that are saved in image file formats. These documents will open in the Document Manager Image Viewer.•
Pop-up Menus: A context-sensitive pop-up menu is displayed when you right-click on an object in Document Manager, containing commonly-used options.Additional Document Logistix products are available to further enhance the document management process. For more information about them, please refer to our Website,
2
Support Call Escalation
For questions or assistance with Document Manager software, the first point of contact is the local System Administrator.
If the local System Administrator is unable to resolve the problem, the second level support contact can be displayed in the application by clicking the blue question mark in the upper right corner. If this contact is not able to resolve the problem, contact Document Logistix via one of the contact methods listed in Contact Details on page i. A Document Logistix System Engineer will be assigned responsibility for the call. If the support issue is not being serviced adequately, contact the
Document Logistix Support Service directly on (+44) 1908 366722 (UK) or (+1) 866 865-2476 (USA), or by any of the other methods listed on page i.
Prior to calling for assistance, please have the following information available. Failure to supply the information could result in a poorer quality of support service and additional costs incurred.
•
Contact details•
Application version•
Operating System version•
Any affected hardware•
Description of the problem3
Overview and Core Concepts
Document Manager enables the central management of company documents while allowing users to quickly access the documents they require. Document Manager can also be used to enforce the company’s document management policy.
3.1
An Overview of Document Manager
A typical business process for using Document Manager is as follows:
1. Hard-copy papers get scanned into the Document Manager system.
2. Once scanned, a document is indexed and saved to a folder in the required drawer.
3. Users can then search in Document Manager to find and work on folders and documents. As well as being scanned into Document Manager, documents can be imported and then indexed, and, providing the relevant document types and templates have been set up, they can also be created from Document Manager. See section 11 Documents on page 64 for more on working with documents.
All aspects of Document Manager are set up by the local System Administrator, who uses the administration software tool called ‘Document Manager Administration’. See the Document Manager Administration Guide for more information.
The Document Manager features and core concepts are described below to provide an understanding of Document Manager.
NOTE: Please note that examples may not reflect the sample database structure but are designed to communicate the way certain features work within the application.
3.2
Document Manager Licenses
There are two license models for Document Manager:
•
Named User – You can only log in on one workstation at any given moment. If a user tries to log in to Document Manager at two different workstations, the user will be asked if he or she wants to delete the existing session.•
Concurrent User – This allows a number of concurrent users to log in and an unlimited number of users to be defined. Unlike Named User licensing, concurrency allows a user to log in to more than one session; however, the total concurrent sessions cannot exceed the number of licensed concurrent users. Most companies purchase this license option. In order to log in to more than one session, a user must be granted the ‘Allow Multiple Logins’ permission in the Administration Module. Refer to the Document Manager Administration Guide for more on user permissions.Certain features of Document Manager have license requirements (such as Workflow). Speak to your System Administrator about your requirements prior to contacting your reseller.
If you are not sure what kind of user license you have, see your Document Manager System Administrator.
3.3
The Document Manager Hierarchy
Document Manager’s design for document management is a structural hierarchy of databases, drawers, folders and documents.
3.3.1
Databases
Consider an organisation that has offices in London, New York and Paris. Each is an organisation in its own right, whose staff mostly require access to their own documents, but they may also require access to documents at the other offices. In this scenario, a Document Manager database would be created for each office. Staff at the London office would access the London database, but also have access to New York and Paris when required. There is no limit to the number of databases defined in Document Manager subject to licensing and provided the required space is available on the server.
3.3.2
Drawers
The Document Manager drawers operate just like a filing cabinet containing folders with categories for the different types of documents a department might need. Whether Personnel, Finance, or Sales, each department will have their own preferred way of indexing and finding the documents they require. Similarly in Document Manager, each drawer can have a different, user-defined indexing structure that best suits its users. More information on drawers can be found in 8 Drawers on page 51.
3.3.3
Folders
Continuing with the filing cabinet analogy, folders in Document Manager are similar to the
suspension (hanging) files found within filing cabinet drawers. They are used to group documents based on some common criteria, such as invoices in a supplier’s folder. In a paper-based
environment, these ‘hanging files’ are normally indexed by one criterion, typically ‘Supplier Name.’ In the Document Manager environment, it is possible, and easy, to have many criteria for the folders (indexes). These folder indexes are typically set up by the local System Administrator. More information on folders can be found in 10 Folders on page 54.
3.3.4
Sub-Folders
A sub-folder is a folder created within a parent folder, to group either documents or more sub-folders together logically. A sub-folder can have a description (for example, ‘Literature’) and will inherit all the folder attributes from its parent (for example, a ‘Product’ index field). Sub-folders
can aid in the logical grouping of documents when a folder would otherwise have hundreds or thousands of documents; however, they can also cause confusion if not managed consistently throughout an organisation. More information can be found in 10.4 Sub-Folders on page 61.
3.3.5
Documents
The last item in the filing cabinet analogy is the document. Documents are the papers stored in folders inside filing cabinets. Examples of documents are Invoices, Letters, Purchase Orders, Proof of Delivery, and so on.
In Document Manager, a document can be virtually any digital file: electronic application files, scanned (digital) images, emails with attachments, media clips, pictures (for example, .jpg files), and so on. Just like folders, documents can have many index fields associated with them to make them easier to find. These document indexes are typically set up by the local System Administrator. More information on documents can be found in 11 Documents on page 64.
3.4
Storage Location
Unlike Microsoft® Windows®, the documents displayed in a folder are not typically held in the
same place. The folder view is a ‘logical view’ that groups documents related by common indexes. Document Manager manages the location of these files and their file names in a manner decided by the System Administrator and the Company’s Document Policy. Typically, physical storage locations will differ for different document types as the nature of the documents may vary. However, whether dealing with scanned images of invoices saved to optical media, or live Word Processor files saved to hard disk, all can be displayed logically to the user in the one Document Manager folder.
3.5
Document Types
Document Manager supports many types of documents; essentially a document is any electronic file that can be opened by an application. Your System Administrator is responsible for defining the document types that you work with.
A folder contains a group of related documents within the drawer they are stored in. Each
document is associated with their respective Document Type. These document types can determine where that document is physically stored on the Document Manager storage server. For more information on document types, refer to 11.1 Understanding Document Types on page 64. When referring to documents in Document Manager, this guide uses the terms ‘application documents’ and ‘image documents’. Application documents are documents associated with an application, for example a text file that opens in Notepad, and ‘image documents’ refers to documents stored in image file formats, for example, those that have been scanned into the system.
3.6
Indexing
In order for the ‘Search and Retrieval’ aspect of Document Manager to work, users are required to index every folder and every document that gets added into Document Manager. When indexing, determine what information will be helpful in retrieving documents. Not only can index fields be data already in use (for example, information written or typed on a suspension file or folder label), additional fields can be added to folders or documents (for example, vendor or invoice number) to facilitate more efficient folder and document searches. Entering values into the index fields in Document Manager assists in the accurate searching and retrieval of documents.
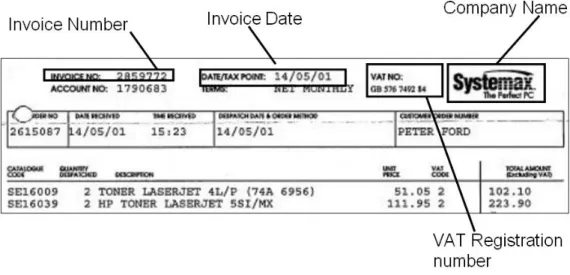
Consider the example shown in Figure 1 below of a scanned invoice being entered into Document Manager. The index information for an invoice that a company would want to know could be the Invoice Number, the Invoice Date, VAT (TAX ID) Number, Company Name and the Total Amount.
Figure 1: Example Invoice
When the invoice is scanned, enter the pertinent information into the system in the index fields:
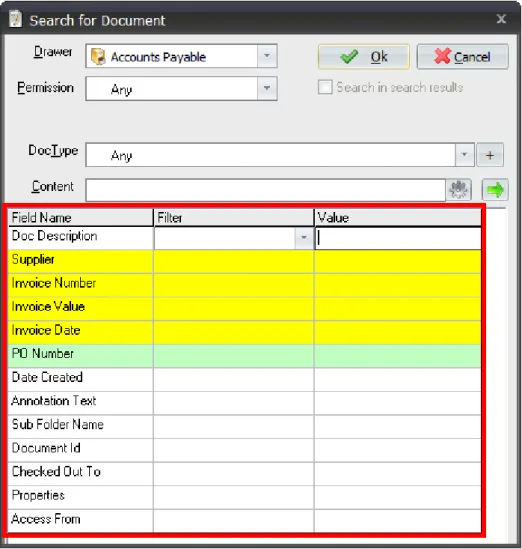
The index fields are colour-coded based on the following key:
•
Yellow indicates a required user-defined field; this cannot be left blank. Index fields are defined in the Document Manager Administration Module.•
Green indicates an optional, user-defined field, which can be left blank.•
White indicates a System Default Field, such as ‘Doc Description.’ More information on indexing can be found in 9 Index Fields on page 52.The result of indexing these documents is to allow searching in Document Manager for all documents:
Figure 3: Search for Document Dialog Box
You can search on any of the fields displayed. A blue field indicates a common field, used to search across all drawers. These only display when you select ‘Any’ in the Drawer drop-down list. You can click the right arrow ( ) to expand the screen to filter the index fields shown in the search results.
3.7
Searching
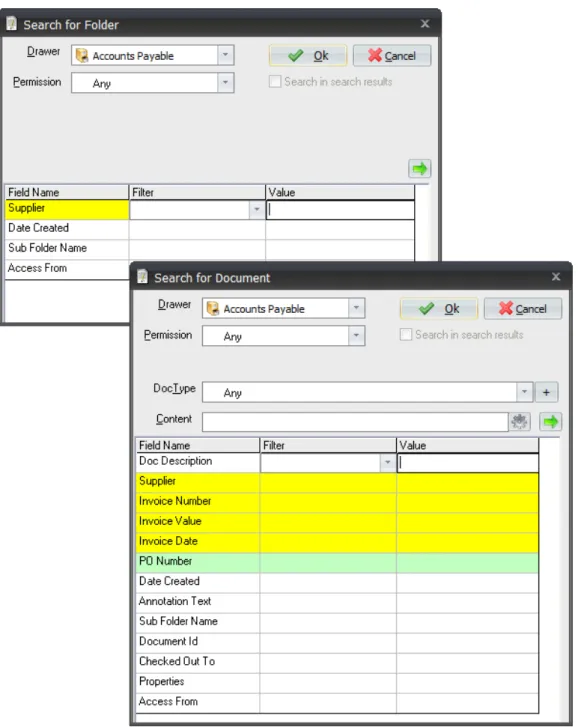
Two types of search can be run in Document Manager: a Folder Search and a Document Search (see Figure 4 below). Depending on what drawer is selected, the index fields change because they reflect the folder or document fields used in that particular drawer.
Figure 4: Folder and Document Search Dialog Boxes
If Full-Text Searching is enabled, searches can also be performed on the content of a document, for example, searching for a document that contains the words ‘first aid’. See the Document Manager Administration Guide for more on enabling Full-Text Searching.
3.8
Saved Searches
Searches can be saved with a logical name. For example, a search can be performed for all documents in the ‘Accounts Payable’ drawer with a Document Type of ‘Invoice’ and a Status of ‘Received’. The search results can be saved as a saved search called ‘Invoices to be processed.’ To run the saved search, select it from the Saved Searches button on the Main tab. Another way to execute the search is to use the shortcut key associated with that saved search. The user can elect to have certain saved searches automatically run when they log in to Document Manager or at specified times. For more information on Saved Searches, refer to 12.7 Saved Searches on page 138.
3.9
Document Preview
The Document Preview feature in Document Manager enables users to quickly preview documents, which is useful when searching for specific documents to open or edit. Both image documents and application documents (for example Word files) can be previewed.
NOTE: To preview application documents, the ‘Application Document Preview’ license option is required. Image documents and PDF documents do not require an additional license option.
This feature enables you to annotate application documents and also to export and email them as image files (see 15 The Image Viewer on page 169 for more on annotations and using the Image Viewer tools). If an application document is large, it may take some time to generate an image preview and the exported file size is also likely to be large.
To use the Document Preview feature, click the Toggle Document Preview icon in the lower right corner of the Document Manager window. See 11.6 Previewing Documents on page 80 for more information.
3.10
Security
Security within Microsoft Windows is usually configured by the Network Administrator, who typically creates shared folders on the network with access rights to groups of users. Document Manager adds to the Network Security by allowing all files stored on the network to be encrypted (license dependent). When documents are opened within Document Manager, the files are
decrypted for use.
3.10.1
Login
A Document Manager user must be authenticated by logging in with a user name and password. It is possible that a user account may be disabled due to an incorrect password. The System
Passwords can be tightly controlled. System Administrators can require users to enter passwords that are case-sensitive. They can also require users to change their own passwords, and at predetermined intervals.
If your organisation uses Active Directory, the Active Directory user credentials can be used to log in to Document Manager. If Active Directory is integrated with Document Manager, single sign-on can also be used, which enables users to bypass the login dialog box. To use Active Directory Integration and Single Sign-On, an additional license option is required. Contact Document Logistix or your reseller for more information. See the Document Manager Administration Guide for more information about integrating Active Directory with Document Manager.
3.10.2
Access Control
The ability of users and groups to see drawers, folders and documents in Document Manager depends on the access granted to them. In order for a user or group to see a document, they must be able to access the folder in which the document is filed, as well as the drawer storing the folder. The System Administrator configures which users and groups can access each drawer in the
Document Manager Administration Module. The System Administrator can also determine which users and groups can apply folder-level and document-level access restrictions within the drawer. If users have been given access to the drawer by the System Administrator, and those users have been granted the ‘Modify Access’ permission, they can determine who else can see the folders and documents within the drawer. More information on Access Control can be found in 6 Access Control and Permissions on page 44.
3.11
Permissions
Whereas Access Control is about where a user or group is allowed to go in Document Manager, permissions focus on what a user or group can do.
Permissions are linked to Access Control in that if a user cannot see a certain drawer, folder or document in Document Manager, it means that the user does not have access to and will not be able to perform any actions in that drawer, folder or document.
Permissions can be set for users or groups at the system-wide (database) level, and also for drawers, folders, documents and annotations.
Consider a permission as the right to do something, for example, to delete a document. In order to have this right at any specific level in the Document Manager hierarchy of drawers, folders and documents, it is necessary to have the ‘Delete’ permission set in the Administration Module. If a user does not have the ‘Delete (Document)’ permission within a folder, the user cannot delete any documents within that folder. However, a user may be able to delete documents from a different folder IF they have the ‘Delete (Document)’ permission at the database, drawer and folder levels. More information on permissions can be found in 6 Access Control and Permissions on page 44.
3.12
References
In Document Manager, it is possible to have the same document referenced in more than one folder, or even in more than one drawer. This can be achieved by dragging the document from one folder to another and then selecting ‘Reference’ on the pop-up menu when prompted.
When the document is edited in one location, the changes in content will be reflected in the other. The index fields for each reference document can be entirely different, but the content of the referenced document remains the same.
It is possible to locate all references to a document using a feature in Document Manager called ‘Find References.’ When this is selected, Document Manager will list all the other references to the document.
References have an important role to play in the deletion and moving of documents. When
deleting or moving a document, it is also possible to delete or move the document’s reference. The storage of the document can be changed if the document is moved to another drawer, and the document can also be deleted if it is the last reference. When deleting a Document Manager document, if that document is a reference, only the reference is deleted. If it is the last reference of that document, a warning message will indicate that the last copy of that document is being deleted. For more information, refer to 11.14 Document References on page 109.
3.13
Auditing
This is one of the most important security features of Document Manager. Every time a user does anything to a document or folder in Document Manager, an internal audit record is created within the Document Manager database. The date, time, user identity, workstation name and action taken are recorded.
With the correct permissions, it is possible to view the Audit records for a particular document or folder. The Audit log displays a list of every transaction that has happened to the document or folder since it was created, including the transaction that the audit log is being viewed.
The System Administrator also has the ability to view Audit Records on a per-user basis to determine what documents a particular user has been looking at. Additionally, the System
Administrator can import a copy of the Audit records into Document Manager to enforce the ‘legal admissibility’ of the audit records by making sure that documents can never be modified or
3.14
Screen Scrape
‘Screen Scrape’ is a term used to describe Document Manager’s ability to read the contents of another application or system window and automate a search based on them.
The search is initiated by a user pressing a predefined key or combination known as a ‘hotkey’ – typically a combination of <ALT>, <CTRL>, < SHIFT> and one of the <function> keys. Document Manager then looks at the active program, and if it is recognized, reads the required fields and performs the folder or document search. The search results tab or window displays all folders or documents that relate to the active program’s window contents.
Screen scraping can be configured by the user or the System Administrator, and normally takes just minutes because no programming is involved. DOS Programs, Spreadsheets, Terminal Sessions and most Windows-based applications are suitable for performing screen scrapes. For more
information on screen scraping, refer to the Screen Scrape Guide.
3.15
‘Read-Only’ Documents
Read-only documents are documents that have been marked (either automatically or explicitly by a Document Manager user) to prevent further modification. To determine if a document is read-only, look at its ‘Status’ index field in the document list, or view its properties from the Document tab. A document flagged as read-only can still be opened (subject to access rights) with the associated application, but Document Manager opens a temporary copy of the document, thereby preventing any changes being made to the original. Each document type can have a default status assigned to it by the System Administrator (Read-Only or Read-Write). In most cases, documents will be
read-write. Audit Logs are always read-only documents.
•
In order for a user to change a document status to read-only, the permission ‘Set Read-Only’ is granted by the System Administrator. The same applies to changing a document status from read-only back to read-write.•
Read-only documents cannot be deleted or moved from one folder to another.•
A multi-page image document cannot have pages added or deleted if it is read-only.•
Copying a read-only document by reference causes the new reference to also be read-only.•
Copying a read-only document by making a new copy or creating a new version of the document will create a read-write document, thereby allowing changes to be made to the new document.3.16
Version Control
Document Manager provides version control, allowing a document to be saved as a major version or a minor version. Major document versions are numbered sequentially starting at 1. Minor
document versions are numbered by decimal point, for example, 3.1, 3.2, etc. If a document version is not to be changed, the ‘Read-Only’ setting can be used to prevent further changes, thereby forcing a new version to be created if changes are desired. A search can be run to list all the versions of a document in existence. For more information on Version Control, refer to 11.11 Version Control on page 94.
3.17
Document Manager integrates with MAPI-compliant mail systems to allow documents to be emailed from Document Manager. Users can email the actual document file or a Document Manager reference to the file. A reference is similar to a link and much smaller in file size than the actual document, however, it requires the recipient to be a Document Manager user.
A Web link (URL) to the document can be emailed if Document Manager Web is installed. More information on emailing documents can be found in 11.15 Emailing Documents on page 110.
3.18
Check Out/In
The ‘Check Out/Check In’ feature ensures that only one version of a document is maintained, which is useful if users work away from the office (and the Document Manager system) from time to time. If a user wants to work on a file away from the office, they can ‘Check Out’ a document. When a document is checked out, a copy of the document is saved on the user’s local disk, which he or she can work on later. Any other Document Manager user wishing to open the document while it is checked out will be informed that it is checked out and be given the option to open a read-only copy. When the user has finished working on the document, he or she can ‘Check In’ the
document, thus updating Document Manager with the document changes. Options are also given to check in as a new version, and to cancel the check-out.
System Administrators can set the requirement that all application documents must be checked out before they are edited. More information on checking documents out and in can be found in 11.10 Check Out/Check In Documents on page 91.
3.19
Workflow
Document Manager Workflow is a feature that assists in the processing of documents within an organisation. Workflow can automate daily tasks that involve the progression of documents through different stages of a business process and from person to person.
In Document Manager Workflow, a series of steps are defined for a Workflow Process. Examples of steps are ‘an invoice being scanned’ and ‘invoice approval’. For a Workflow Step to be performed on a document, certain conditions must be met, which are defined by the System Administrator. The conditions can be based on document types or index fields, such as document value or status. The completion of Workflow Steps can also be restricted to specific users.
When a Workflow Step is completed, it can be set to trigger automatic actions, for instance, sending notification emails or applying an annotation.
See the Workflow and Approvals Guide for more information on Workflow.
NOTE: To use the Document Manager Workflow feature, you need a Workflow license. Contact Document Logistix or your reseller for more information.
3.20
Web Access to Document Manager Documents
Document Manager is a Web server application that can enable access to Document Manager database(s) for both internal and external networks using standard Web browser technology. It is possible to restrict access at drawer, folder and document levels. Drawers can be ‘published’ to an intranet or the Internet using the Web Publishing tab in the Document Manager
Administration Module. This is set by the System Administrator. See the Document Manager Administration Guide for more information.
At folder and document level, access can be controlled by the administrator or a user that has a ‘Modify Access’ permission (set in the Administration Module).
Folder and document level access is set using the Access From index field in the Modify Folder Properties and Modify Document Properties dialog boxes:
•
DM Only: The folder or document can only be accessed from the Document Manager Desktop Client.•
DM and Internal Web: The folder or document can be accessed from the Document Manager Desktop Client and via an internal intranet using Document Manager Web.•
DM and World Wide Web: The folder or document can be accessed from the Document Manager Desktop Client and from the Internet using Document Manager Web.•
DM and Web Access: The folder or document can be accessed from the Document Manager Desktop Client and also from Document Manager Web via both an internal intranet and the InternetWhen creating a new folder or document, if the Access From field is left empty, it will inherit the setting from the parent folder or drawer.
Using these options, it is possible to enable a drawer to be accessible via the Web, but restrict access to certain folders or documents within it to Document Manager only.
3.21
COM API
Document Manager is an OLE Server application; the Document Manager functionality can be utilised directly from other programs that support OLE and scripting. This makes Document Manager an ideal candidate for system integration projects.
For further details about the COM API, refer to the Document Manager Administration Guide.
3.22
Document Retention
The Document Retention feature in Document Manager enables an organisation to specify Retention Policies for their documents. A Document Retention Policy is a set of guidelines
designed by an organisation to specify how long their documents need to be kept, as required by law and to protect business interests.
Typical types of information to be considered in a Retention Policy include Invoices, Contracts and other Financial Records, Emails, Letters, Business-Activity-Related documents, Personnel records, and so on.
See the Retention Policy Module Admin and User Guide for more information on setting up and implementing Document Retention Policies.
NOTE: To use the Document Retention feature, you need a license with the feature enabled. There are three types of Retention License: Basic, Moderate and Complex. Contact
4
Types of Users
A user is a person in the Document Manager system that has a username, password and specific access rights and permissions.
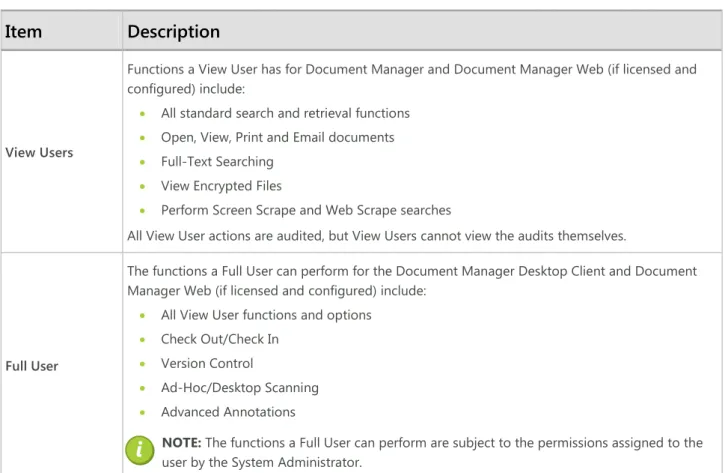
There are two types of users in Document Manager: View or Full Users. The functions of View and Full Users are listed in Table 1 below:
Item
Description
View Users
Functions a View User has for Document Manager and Document Manager Web (if licensed and configured) include:
• All standard search and retrieval functions
• Open, View, Print and Email documents
• Full-Text Searching
• View Encrypted Files
• Perform Screen Scrape and Web Scrape searches
All View User actions are audited, but View Users cannot view the audits themselves.
Full User
The functions a Full User can perform for the Document Manager Desktop Client and Document Manager Web (if licensed and configured) include:
• All View User functions and options
• Check Out/Check In
• Version Control
• Ad-Hoc/Desktop Scanning
• Advanced Annotations
NOTE: The functions a Full User can perform are subject to the permissions assigned to the user by the System Administrator.
Table 1: Functions Available to View and Full Users
A Named User (a user assigned a Named User license) cannot log in on more than one workstation simultaneously. If a user attempts to log in to Document Manager twice at two different
workstations, the user will be asked if he or she wants to delete the existing session.
The System Administrator has the ability to log a user out of Document Manager at any time. If you cannot log in to Document Manager, contact the local System Administrator.
5
Starting Document Manager
Document Manager has been designed to conform to Microsoft® Windows® user interface
standards and to be intuitive for those familiar with other Microsoft Windows applications.
In the example shown in the image below, Document Manager is connecting to a single database, provided as part of the Document Manager installation. It is possible to create multiple databases, in which case, a drop-down selection of the available databases will be presented.
To launch Document Manager:
1. Double-click the Document Manager icon ( ) on the Desktop; or click Start, then depending on your operating system, select All Programs or Programs, and select Document Logistix and then Document Manager. The Login dialog box displays:
NOTE: If there is more than one database available, the Database field will display. Select the required database from the Database drop-down list. The System Administrator may set a specific database as the default.
If your organisation uses Active Directory, the Realm drop-down list displays and contains the Active Directory domains selected by the administrator in the Active Directory Manager. NOTE: If you are unable to log in to Document Manager, you may not have the correct permissions. If you cannot log in, see your system administrator.
2. When starting Document Manager for the first time, enter the user name and password defined by the System Administrator, and click OK. The Document Manager Login Successful dialog box displays:
The purpose of the Document Manager LoginSuccessful dialog box is to indicate the last time the account was logged in to Document Manager. Confirm that the date and time shown are correct. Thedialog box can be disabled for each user by clicking on the File tab located in the upper left corner of the application, selecting User Settings, and then clearing Show welcome message when logging in on the General tab.
If last login date and time is not correct, it is possible that the password has been
compromised. If this is the case, IMMEDIATELY inform the local System Administrator. If you are not using Active Directory user credentials, it is also recommended that you
immediately change the password. To do this, click the File tab and select Change Password from the menu (this option is not available if you are an Active Directory user).
3. In the Document Manager Login Successful dialog box, click OK.
It may be that the local System Administrator has set the user account to require a password change (in the Administration Module). If so, the Enter New Password dialog box displays.
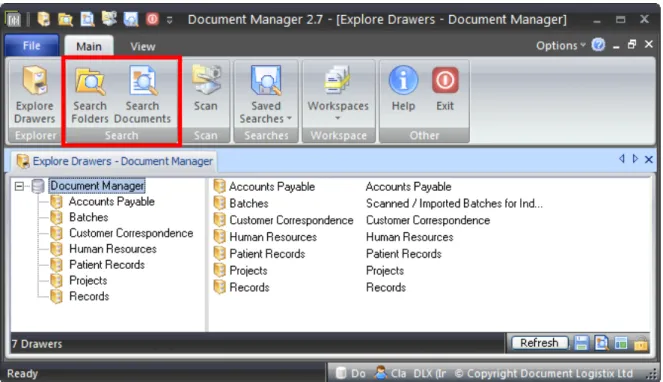
4. When asked for confirmation of the new password, type it in and click OK. The Document Manager application displays (see image below). If the drawers do not display, click the Explore Drawers button on the Main tab:
The main Document Manager Application screen is displayed with available functions on ribbon tabs, a Quick Access Toolbar (located in the upper left corner next to the icon) and the Application menu accessed from the File tab heading. In the above example, there are three tabs available (File, Main, and View) but others will display as different areas of the application are active (for instance when a folder is highlighted, a Folder tab will appear). On each tab, there is a ribbon that contains groups of controls, or buttons. The tab changes dynamically to display the available action buttons for the drawer, folder or document, reflecting what the user has
highlighted. Additionally, available functions can be accessed by right-clicking on an item such as a drawer, folder or document. (See 5.7 Pop-Up Menus on page 25.)
All aspects of the Document Manager user interface are covered in the following sections.
Icons are used to represent application-based documents; the actual icons used are determined by the application, for example, Microsoft® Office Word®, Microsoft® Office Excel®, etc.
5.1
Document Manager Views
Initially, the Document Manager view is displayed in a tabbed format. This means that when you change view, for example to open a folder or Workspace, the contents are displayed on a new tab:
Several tabs can be open at one time:
•
To move between tabs, simply click on the tab heading.You can customise the Document Manager appearance to display content in a tabbed view or you can choose to display in windows.
5.1.1
Changing Document Manager Views
To change Document Manager from a tabbed view to windows:
•
Click the View tab and clear the Tabbed View checkbox. Content is displayed in a window:To display the content in separate windows, click the icon in the top right of the screen.
If you want to return to viewing the content in tabs, select the Tabbed View checkbox again. Refer to 5.8.5 View Tab on page 32 for a description of the other options on the View tab.
5.2
Tool Tabs
There are two main tabs (Main and View) in the initial screen (see Figure 5 below) containing tools used in Document Manager. As the user navigates to other areas, additional tabs display the functions available. For instance, an additional tab displays when a user changes to a drawer, folder or document, depending on which is active. If a user highlights a document, the Document tab becomes available. Use the mouse pointer to click on a tab heading to move between the tabs.
Figure 5: Tabs Highlighted in the Document Manager Window
5.3
Ribbon
On every tab, there is a ribbon of functions available (see Figure 6 below). When the main window is resized, the groups of buttons collapse and become smaller.
5.4
Groups
On each ribbon, groups contain controls and buttons (for example, Search on the Main tab):
Figure 7: Ribbon Groups
5.5
Controls/Buttons
In each group, there are one or more controls, or buttons. A button will be highlighted when the mouse pointer hovers over the button or a user clicks on it (see Figure 8 below). Also, a tooltip displays when the mouse pointer hovers over a button.
Some buttons have a down arrow underneath the button’s text – this indicates there is a drop-down menu to make a selection from:
Figure 9: Drop-Down Menu
Sometimes buttons and other controls are disabled or not available, which may be due to the user’s permissions. If the item is greyed out, selecting or clicking it will not work.
5.6
Lists and Columns
Documents and folders are displayed in lists with columns for each of the index fields and for some additional information, for example, the date and time created. You can change the order of the columns displayed by clicking on the column name and dragging it to a new location. The width of columns can be adjusted by clicking and dragging the dividing lines between column headings. Once the columns have been set, ‘lock’ the positions by clicking the lock icon in the lower right corner of the screen ( ).
Use the scroll bars to scroll up, down, left or right to view the information displayed. To change the sort order on a list of items, click on the column header (such as ‘Customer Name’) to display information in ascending to descending order.
Lists can be filtered to reduce the number of items shown. See 12.3 Filtering Folder and Document Lists on page 127 for more on filtering lists.
5.7
Pop-Up Menus
To see the available functions for an object, right-click on it to display the pop-up menu. This applies to drawers, folders, documents, and so on. The items in the pop-up menu indicate what can be done with the object, for example, right-clicking on a document displays Open, Print, Email, and so on. You can also right-click in the right pane of the Document Manager explorer to display the pop-up menu.
If permission to perform one of the menu options has not been granted (for example, Delete), it will either appear disabled (greyed out) in the pop-up menu or not appear at all.
For a full listing of all of Document Manager’s pop-up menu items and descriptions, refer to Appendix A: Menu Definitions on page 206.
5.8
The Tool Tabs
There are four main tabs that contain the tools used within Document Manager.
5.8.1
Main Tab
When opened, Document Manager displays the Main tab (see Figure 10 below). If the mouse pointer hovers over or clicks on a button, the button is highlighted and a tooltip displays.
Figure 10: Main Tab
See Table 2 for a description of the buttons on the Main tab:
Group
Button
Description
Explorer Explore Drawers Displays the list of drawers.
Search Search Folders Opens the Search for Folder dialog box. Search Documents Opens the Search for Document dialog box.
Scan Scan Starts the Document Scanning Module.
Searches Saved Searches Opens the Saved Searches dialog box.
Workspace Workspace Opens the Workspaces dialog box.
Click the down arrow under the button to select from a list of saved workspaces.
Other Help Opens the Document Manager User Guide PDF file. Exit Exits Document Manager.
5.8.2
Drawer Tab
Once a drawer is selected in Document Manager, the middle tab changes to display the Drawer ribbon (see Figure 11 below). When the mouse pointer hovers over or clicks on a button, the button is highlighted and a tooltip displays.
Figure 11: Drawer Tab
See Table 3 for a description of the buttons on the Drawer tab:
Group
Button
Description
Folder New Folder Creates a new folder in the selected drawer.
Search Search Folders Opens the Search for Folder dialog box. Search Documents Opens the Search for Document dialog box
Properties Properties Opens the View Drawer dialog box and displays the selected drawer’s
properties.
Table 3: Drawer Tab Buttons
For more information about drawers, refer to 8 Drawers on page 51.
5.8.3
Folder Tab
When you have clicked on a folder in Document Manager, the middle tab changes to display the Folder ribbon (see Figure 12 below). When the mouse pointer hovers over or clicks on a button, the button is highlighted and a tooltip displays.
See Table 4 for a description of the buttons in the Folder tab:
Group
Button
Description
Folder
Open Opens the selected folder.
New Sub-Folder Creates a new sub-folder.
Delete Deletes the selected folder or sub-folder. Users are asked to confirm deletion.
Parent Folder This button is only available when you select a sub-folder. Click to view the contents of the sub-folder’s parent folder.
Document
New Creates a new document.
Import Imports a document from a hard drive or off the network.
Paste
Click the down arrow to select an option:
• Document – Pastes a full copy of the document into the selected folder or sub-folder.
• Document Reference – Pastes the document’s reference into the selected folder or sub-folder.
Properties
View Index Views the index fields of the folder or sub-folder. Users cannot make changes in this dialog box (to do this, see ‘Edit Index’ below).
Edit Index Click to modify the index fields of a folder or sub-folder.
Audit Trail Click to view the audit log of the selected folder or sub-folder.
Table 4: Folder Tab Buttons
For more information about folders, refer to section 10 Folders on page 54.
5.8.4
Document Tab
Once a document is selected, the middle tab changes to display the Document ribbon (see Figure 13 below). When the mouse pointer hovers over or clicks on a button, the button is highlighted and a tooltip displays.
The buttons that are displayed on the Document tab depend on your licensed features, the type of document selected (image or application document) and, if an application document is selected, whether it is checked out or not. See Table 5 for a description of the buttons in the Document tab:
Group
Button
Description
Document
New Creates a new document.
Open/View
Opens the selected document. Application documents will open in the related application; image documents will open in the Document Manager Image Viewer. If application documents are required to be checked out for the drawer, and the selected document is not checked out by you, the option changes to View because a read-only copy of the document will open.
Open Multiple
If the Application Document Preview feature is in use and you have selected multiple image documents, you can click this button to open the documents in Image Viewer at the same time.
Prints the selected document.
NOTE: If the ‘Application Document Preview’ license feature is enabled and a ‘redaction’ annotation has been added to an application document, the document cannot be printed in its original format unless the user has the ‘Hide Redaction’ or ‘Super Administrator’ permissions. If a user does not have these permissions, only the image generated for the document can be printed, with the redaction applied.
When one of these options is selected, the email system automatically opens and the name of the document is placed in the subject field of the email.
For Image Documents, the available options are:
• Email Native Document – If an image is stored in Document Manager in an image format other than TIF or PDF (for example PNG or JPG), you can use this option to email the image in its native format.
• Document as TIF – Attaches the document as a TIF image to the email. The email recipient can view the TIF file using an appropriate image-viewing tool.
• Document as PDF – Attaches the image document to the email as a PDF. Any annotations in the image document are removed from the document (except redactions) and the recipient will only view the document in its original state. For more information on annotations, see 15.6 The Annotation Tab Tools on page 187.
• Reference – Attaches a link to the document in the email, significantly reducing network overhead. (The email recipient must be a Document Manager user.)
• Zipped TIF – Compresses the TIF file(s) prior to emailing. If the image is already compressed, this will not make the files smaller.
• Zipped PDF – Compresses the PDF file(s) prior to emailing. If the image is already compressed, this will not make the files smaller.
• Advanced Options – Enables users to email a selection of pages, to save as a different format and to compress the emailed image document. If selected, the
Group
Button
Description
Document (continued)
Email (continued)
For Application Documents, the options are:
• Document – Attaches the application document to the email in its native format.
• Reference – Attaches a link to the application document in the email, significantly reducing network overhead. (The recipient must be a Document Manager user.)
• Zipped – Attaches a compressed version of the document to the email.
NOTE: If the ‘Application Document Preview’ feature is enabled and a redaction has been added to an application document, the document cannot be emailed in its original format unless the user has the ‘Hide Redaction’ or ‘Super
Administrator’ permissions.
Export
Exporting saves a copy of a document to a selected location outside of Document Manager. Different options are available for application documents and image documents.
For Image Documents, the options are:
• Export Native Document – If an image is stored in Document Manager in an image format other than TIF or PDF (for example PNG or JPG), you can use this option to export the image in its native format.
• Document as TIF – Converts the document to a TIF file and exports to the selected location.
• Document as PDF – Converts the document to a PDF file and exports to the selected location.
• Advanced Options– Enables users to export a selection of pages, to save as a different format and to compress the export image document. If selected, the
Export Pages dialog box is displayed.
For Application Documents, the following is displayed:
• Document – Exports a copy of a document without its index fields to the selected location.
NOTE: If the ‘Application Document Preview’ feature is enabled and a redaction has been added to an application document, the document cannot be exported in its original format unless the user has the ‘Hide Redaction’ or ‘Super
Administrator’ permissions.
Editing
Cut Cuts the selected document, ready for pasting in another location.
Copy Copies the selected document.
Paste
Select a paste option:
• Document – Pastes the document or a copy into the selected folder or sub-folder.
• Document Reference – Pastes the document’s reference into the selected folder or sub-folder.