Dell™ vRanger™ 7.1
User’s Guide
© 2014 Dell Inc. ALL RIGHTS RESERVED.
This guide contains proprietary information protected by copyright. The software described in this guide is furnished under a software license or nondisclosure agreement. This software may be used or copied only in accordance with the terms of the applicable agreement. No part of this guide may be reproduced or transmitted in any form or by any means, electronic or mechanical, including photocopying and recording for any purpose other than the purchaser’s personal use without the written permission of Dell Inc.
The information in this document is provided in connection with Dell products. No license, express or implied, by estoppel or otherwise, to any intellectual property right is granted by this document or in connection with the sale of Dell products. EXCEPT AS SET FORTH IN THE TERMS AND CONDITIONS AS SPECIFIED IN THE LICENSE AGREEMENT FOR THIS PRODUCT, DELL ASSUMES NO LIABILITY WHATSOEVER AND DISCLAIMS ANY EXPRESS, IMPLIED OR STATUTORY WARRANTY RELATING TO ITS PRODUCTS INCLUDING, BUT NOT LIMITED TO, THE IMPLIED WARRANTY OF MERCHANTABILITY, FITNESS FOR A PARTICULAR PURPOSE, OR NON-INFRINGEMENT. IN NO EVENT SHALL DELL BE LIABLE FOR ANY DIRECT, INDIRECT, CONSEQUENTIAL, PUNITIVE, SPECIAL OR INCIDENTAL DAMAGES (INCLUDING, WITHOUT LIMITATION, DAMAGES FOR LOSS OF PROFITS, BUSINESS INTERRUPTION OR LOSS OF INFORMATION) ARISING OUT OF THE USE OR INABILITY TO USE THIS DOCUMENT, EVEN IF DELL HAS BEEN ADVISED OF THE POSSIBILITY OF SUCH DAMAGES. Dell makes no representations or warranties with respect to the accuracy or completeness of the contents of this document and reserves the right to make changes to specifications and product descriptions at any time without notice. Dell does not make any commitment to update the information contained in this document.
If you have any questions regarding your potential use of this material, contact: Dell Inc.
Attn: LEGAL Dept 5 Polaris Way Aliso Viejo, CA 92656
Refer to our web site (software.dell.com) for regional and international office information.
Patents
Protected by U.S. Patents 8,046,550; 8,060,476; 8,135,930; 8,166,265; 8,335,902; and 8,429,649. Additional patents pending.
Trademarks
Dell, the Dell logo, NetVault, and vRanger are trademarks of Dell Inc. and/or its affiliates. Other trademarks and trade names may be used in this document to refer to either the entities claiming the marks and names or their products. Dell disclaims any proprietary interest in the marks and names of others.
vRanger User’s Guide Updated - July 2014 Software Version - 7.1 Legend
CAUTION: A CAUTION icon indicates potential damage to hardware or loss of data if instructions are not followed.
WARNING:A WARNING icon indicates a potential for property damage, personal injury, or death.
Contents
Introduction to this guide . . . 10
vRanger – at a glance . . . .10
Key benefits . . . .10
Major feature list . . . .11
Target audience . . . .12
Recommended additional reading . . . .12
vRanger overview . . . 13
Virtualization overview . . . .13
vRanger overview . . . .13
What is vRanger? . . . .13
How does it help? . . . .14
Installation overview . . . .14
Before installing . . . .14
Downloading an evaluation copy of vRanger . . . .14
Installing vRanger . . . .15
Configuration overview . . . .15
Add vCenters, clusters, or hosts . . . .15
Add repositories . . . .15
Deploy virtual appliances . . . .16
Add physical servers to inventory . . . .16
Schedule a backup job . . . .16
Schedule a replication job . . . .16
Configuring vRanger . . . 18
Configuration overview . . . .18
Roadmap for configuring vRanger through the Startup Wizard . . . .18
Launching the Startup Wizard . . . .19
Adding and selecting a license . . . .19
Process of adding vCenter and host information . . . .20
Adding Hyper-V System Center VMM, Cluster, and host information . . . .22
Selecting hosts for licenses . . . .23
Adding a physical machine . . . .24
Selecting physical machines for licenses . . . .25
Deploying and configuring the virtual appliance from the Startup Wizard . . . .25
Adding a repository . . . .26
Setting up the SMTP server . . . .28
Adding an email address . . . .28
Roadmap for manually configuring vRanger . . . .28
Adding a VirtualCenter . . . .29
Adding an ESX server . . . .29
Adding a Hyper-V System Center VMM, Cluster, or host . . . .30
Adding a physical server . . . .30
Configuring an SMTP server . . . .32
Configuring display language . . . .34
Configuring a virtual appliance . . . .34
Importing a license file . . . .34
Managing virtual machine host licensing . . . .35
Managing physical machine licensing . . . .36
Managing job configuration settings . . . .36
Enabling cataloging options . . . .37
Supplemental instructions – additional repository types . . . .38
Adding an NFS repository . . . .38
Adding an FTP repository . . . .39
Adding an SFTP repository . . . .40
Adding a NetVault SmartDisk repository . . . .41
Adding an EMC Data Domain Boost (DDB) repository . . . .42
Adding a Dell Rapid Data Access (RDA) repository . . . .44
Adding a Dell DR Series system as an RDA repository . . . .45
Configuring repository replication . . . .46
Removing a Dell Rapid Data Access (RDA) repository . . . .47
Adding a Dell DR Series System as a CIFS repository . . . .47
Adding a Dell DR Series System as a NFS Repository . . . .48
About the vRanger virtual appliance . . . .49
Virtual appliance overview . . . .49
The virtual appliance scratch disk . . . .50
Deploying the virtual appliance by using the Virtual Appliance Deployment Wizard . .52 About deploying multiple virtual appliances . . . .55
Changing the virtual appliance configuration . . . .55
Process of configuring virtual appliance networking . . . .56
Disabling DRS for the vRanger virtual appliance . . . .58
Using vRanger . . . 59
Interface overview . . . .59
My Inventory view . . . .61
My Inventory pane . . . .61
Working Inventory pane . . . .68
My Jobs view . . . .68
My Jobs pane . . . .69
Activity pane . . . .70
My Repositories view . . . .72
My Repositories pane . . . .73
Working Repository pane . . . .73
My Reports view . . . .74
My Reports toolbar . . . .75
Reports pane . . . .75
Backup . . . 77
Backup overview . . . .77
Virtual machine backup . . . .77
VMware backup transport options . . . .78
HotAdd . . . .78
SAN backups . . . .79
LAN . . . .80
Transport selection order - virtual machine backup . . . .80
Hyper-V backup transport options . . . .81
Physical backup transport options . . . .81
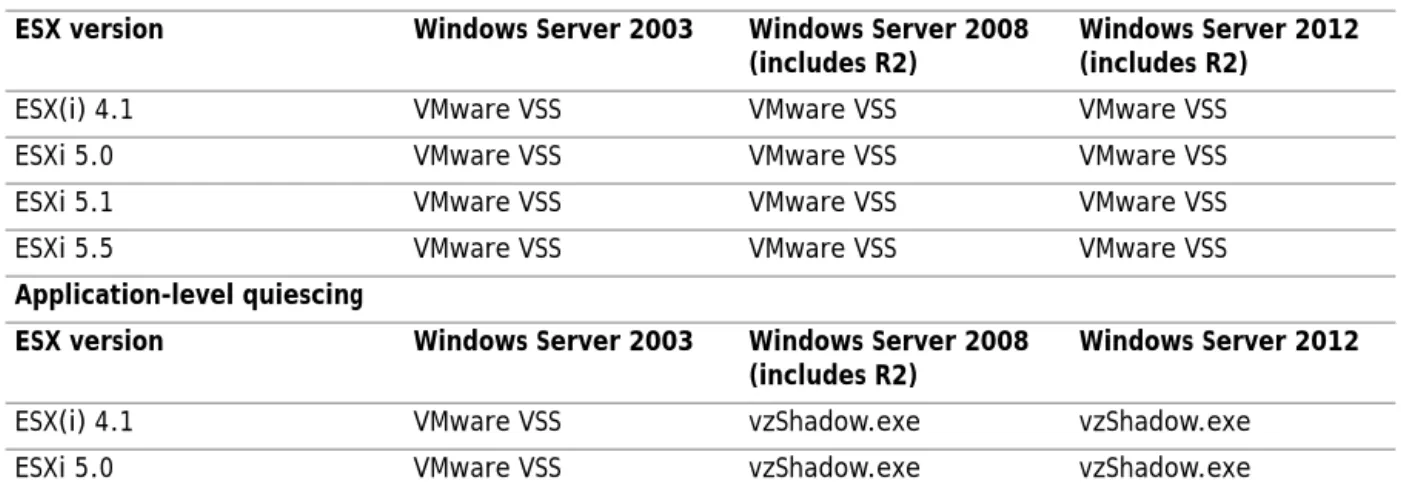
Determining application consistency . . . .82
Application consistency for virtual backups . . . .82
Application consistency for physical backups . . . .83
About retention policies and space-saving technologies . . . .84
Performing optional configurations . . . .85
Enabling or disabling VMware Changed Block Tracking . . . .86
Adding a custom backup group . . . .86
Configuring VSS tools for VMware virtual machines . . . .87
Configuring a backup job . . . .88
Selecting an inventory node . . . .89
Excluding virtual machines . . . .90
Including hard disks of physical or virtual machines . . . .90
Selecting a repository . . . .91
Selecting a backup data transport method for VMware machines . . . .92
Configuring backup options . . . .93
Selecting a Retention Policy . . . .94
Setting the recurrence schedule . . . .97
Configuring email notifications . . . .98
Starting the backup job . . . .99
Restore . . . .100
The vRanger restore process . . . 100
Full restore . . . 100
About restoring a file . . . 101
About Restore from Manifest . . . 101
Process of performing a full restore for virtual machines . . . 101
Launching the Restore Wizard . . . 102
Selecting a savepoint . . . 102
Selecting a destination . . . 102
Selecting a network . . . 103
Selecting a restore data transport method for VMware machines . . . 103
Configuring restore options . . . 105
Setting the recurrence schedule . . . 105
Configuring email notifications . . . 106
Starting the restore job . . . 107
Process of performing a full restore of a physical machine . . . 107
Creating the boot media . . . 108
Booting the target server . . . 109
Selecting a savepoint . . . 110
Naming the job . . . 110
Setting the recurrence schedule . . . 111
Configuring email notifications . . . 112
Starting the restore job . . . 113
About file-level restore - Windows . . . 113
Limitations and requirements . . . 113
Performing a file-level restore using Catalog Search . . . 114
Performing a manual file-level restore . . . 114
About performing a Linux file-level restore . . . 115
Linux FLR limitations . . . 115
Restoring from manifest . . . 116
Process of performing a full restore from manifest for virtual machines . . . 116
Process of performing a full restore from manifest for a physical machine . . . 122
Performing a file-level restore from manifest . . . 128
Replicate . . . .130
About replication . . . 130
How replication works . . . 131
Replication modes . . . 133
Replication with Changed Block Tracking . . . 133
Differential replication . . . 134
Hybrid replication . . . 134
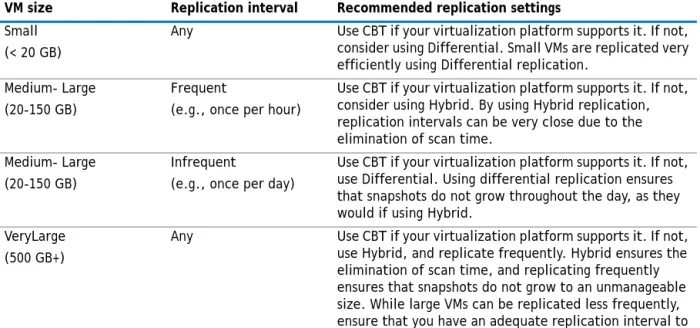
About choosing a replication method . . . 135
About configuring transport failover options . . . 135
Process of pre-seeding replication jobs . . . 136
Process of creating a replication job . . . 137
Selecting the source VM . . . 137
Selecting a target host . . . 137
Selecting the replication mode . . . 138
Selecting replication network mapping . . . 138
Selecting hard disks . . . 138
Selecting replication options . . . 138
Setting the recurrence schedule . . . 139
Configuring email notifications . . . 141
Starting the replication job . . . 141
About failover . . . 141
Performing Test Failover with networking disabled . . . 142
Performing Test Failover with networking enabled . . . 142
Performing a failover . . . 143
Roadmap for performing failback . . . 144
Reports . . . .146
About vRanger reports . . . 146
My Reports view . . . 146
My Reports pane . . . 146
Working Reports pane . . . 147
Generating a report using the Report Wizard . . . 147
Integrating vRanger . . . 153
Roadmap for performing vRanger sweep-to-tape using Dell™ NetVault™ Backup . . . . 153
Deduplication with NetVault SmartDisk and vRanger . . . 159
Data Domain and vRanger repositories . . . 160
Monitoring vRanger . . . 160
About event monitoring configurations . . . 160
Using the vRanger Console . . . .163
vRanger Console overview . . . 163
Configuring the vRanger Console . . . 163
vRanger vAPI Cmdlets . . . 164
Inventory management . . . 164
Configuration . . . 164
Job management . . . 164
Repositories . . . 165
Backup . . . 165
Restore . . . 165
Replication . . . 165
Cmdlet help . . . 165
vAPI Cmdlet details . . . .167
Add-BackupGroupEntity . . . 167
Add-BackupJobTemplate . . . 168
Add-CIFSRepository . . . 169
Add-DdbReplicationRepository . . . 170
Add-DdbRepository . . . 171
Add-EsxHost . . . 171
Add-FTPRepository . . . 172
Add-HypervCluster . . . 173
Add-HypervHost . . . 173
Add-HypervRestoreJobTemplate . . . 174
Add-NFSRepository . . . 176
Add-NVSDRepository . . . 177
Add-PhysicalMachine . . . 177
Add-RdaRepository . . . 178
Add-ReplicationJobTemplate . . . 179
Add-RestoreFromManifestJobTemplate . . . 180
Add-RestoreJobTemplate . . . 183
Add-SFTPRepository . . . 187
Add-VirtualAppforLinuxFLR . . . 188
Add-VirtualAppforLinuxFLRVA . . . 188
Add-VirtualCenter . . . 189
Disable-Job . . . 189
Dismount-LinuxVolume . . . 189
Enable-Job . . . 190
Get-BackupGroupEntity . . . 190
Get-CatalogSearchData . . . 191
Get-CatalogStatus . . . 191
Get-ConfigOption . . . 192
Get-Connection . . . 192
Get-CurrentTemplateVersionID . . . 193
Get-Datastore . . . 193
Get-GlobalTransportFailover . . . 194
Get-InventoryEntities . . . 194
Get-IsInventoryRefreshing . . . 194
Get-Job . . . 195
Get-JobTemplate . . . 196
Get-MonitorLog . . . 196
Get-Network . . . 197
Get-PhysicalMachineDiskMap . . . 197
Get-Repository . . . 197
Get-RepositoryJob . . . 198
Get-RepositorySavePoint . . . 198
Get-RestoreDiskMap . . . 199
Get-SavepointDisk . . . 199
Get-SavepointManifest . . . 199
Get-Savepoints . . . 200
Get-TransportFailover . . . 200
Get-VirtualApplianceConfig . . . 200
Get-VirtualApplianceDeploymentStatus . . . 201
Get-VirtualApplianceReconfigStatus . . . 201
Get-VirtualMachinesUnderInventory . . . 202
Get-VmDisk . . . 202
Get-VMDKVolume . . . 202
Install-VirtualAppliance . . . 203
Mount-LinuxVolume . . . 205
New-BackupFlag . . . 205
New-BackupGroupMember . . . 206
New-Daily Schedule . . . 207
New-EmailAddress . . . 207
New-IntervalSchedule . . . 207
New-MonthlySchedule . . . 208
New-ReplicationFlag . . . 209
New-RestoreFlag . . . 209
New-SMTPServer . . . 210
New-TransportConfiguration . . . 211
New-VirtualAppliance . . . 211
New-WeeklySchedule . . . 212
New-YearlySchedule . . . 212
Remove-BackupGroupEntity . . . 213
Remove-BackupGroupMember . . . 213
Remove-Catalog . . . 214
Remove-DdbStorageUnit . . . 214
Remove-JobTemplate . . . 214
Remove-LinuxVolume . . . 215
Remove-Repository . . . 215
Remove-SavePoint . . . 216
Remove-VirtualAppliance . . . 216
Remove-VirtualApplianceConfiguration . . . 216
Run-JobsNow . . . 217
Run-ReplicationFailover . . . 217
Run-ResumeReplicationFailover . . . 218
Run-TestReplicationFailover . . . 218
Set-Cataloging . . . 218
Set-CBTonVM . . . 219
Set-LinuxVolume . . . 219
Set-MountPath . . . 219
Set-Resources . . . 220
Stop-vRangerJob . . . 220
Update-BackupJobTemplate . . . 221
Update-GlobalTransportFailover . . . 222
Update-HypervRestoreJobTemplate . . . 222
Update-Inventory . . . 224
Update-ReplicationJobTemplate . . . 225
Update-RestoreJobTemplate . . . 226
Update-VirtualAppliance . . . 228
Update-VirtualApplianceConfiguration . . . 228
Using the VI editor . . . .230
VI editor overview . . . 230
Starting VI . . . 230
Changing modes . . . 230
Editing commands . . . 230
Moving the cursor . . . 231
Inserting text . . . 231
Deleting text . . . 231
Saving your changes . . . 232
About Dell . . . .233
Contacting Dell . . . 233
1
Introduction to this guide
• vRanger – at a glance• Key benefits
• Major feature list
• Target audience
• Recommended additional reading
vRanger – at a glance
vRanger is the market-leading backup, recovery, and backup management solution for virtual environments. Featuring a new platform technology, vRanger reduces the backup window, provides smarter backup options, and offers more scalability features while using fewer resources.
vRanger capabilities include:
• Performing incremental, differential, or full image backups of virtual machines. • Quickly restoring the entire virtual machine or just specific files.
• Managing disaster recovery strategies and protecting critical data in virtual environments. • Offering the ability to replicate virtual machines to more than one destination, thus letting users
accomplish multiple High Availability and Disaster Recovery objectives based on their specific needs.
Key benefits
• Exploits vSphere 5 performance and scalability enhancements
• Provides high-speed, resource-efficient backup, replication and recovery of virtual machine (VM) images • Provides high-speed backup and recovery of physical servers.
• Delivers up to 90 percent backup storage savings when paired with Dell™ NetVault™ SmartDisk - vRanger Edition
• Includes capability for distributed segment processing through DD Boost™ support for faster backups to EMC® Data Domain® systems
• Optionally deploys as a low-resource consumption vRanger Virtual Appliance (VA) for low-impact scalability
• Offers VA cluster support and easy VA deployment through a wizard • Improves VM backup and recovery performance with HotAdd support
• Optimizes use of critical resources in virtual environments, including hypervisor hosts, networks and storage
• Protects real-world VM deployments with multiple hosts and hundreds of VMs • Ensures archive integrity
• Simplifies portability with image backup files • Delivers proven reliability
• Provides unmatched performance and scalability • Comes with world-class service and support
Major feature list
• VMware ReadyTM Certified for vSphere 5 — Ensures reliable, safe, and scalable operation with vSphere 5.
• VMware ESX and ESXi Support — Provides a wide range of backup and recovery and disaster recovery (DR) capabilities for VMware virtual infrastructures.
• Microsoft Hyper-V Support — Protects and provides disaster recovery capabilities for Hyper-V virtual machines.
• Virtual Appliance (VA) Architecture — Through centralized and wizard-driven deployment and administration from the vRanger server, delivers highly scalable and cost-effective distributed data handling and throughput through VAs.
• Disk-to-Disk Backup and Deduplication — Offers a NetVault SmartDisk - vRanger Edition add-on for enterprise-class deduplication that reduces backup storage footprints by up to 90 percent.
• EMC Data Domain Boost Support — Includes distributed segment processing through DD Boost for significantly faster backups to Data Domain systems.
• VMware HotAdd Support — Performs LAN-free backups with vRanger installed inside a VM and from the vRanger VA. Additionally, HotAdd accelerates network backups of ESXi.
• Patented Active Block Mapping (ABM)— Eliminates inactive and white space blocks from protected Windows VMs to speed backup, replication, and recovery jobs as well as reduce network and storage requirements.
• Instant File-Level Recovery (FLR) for Windows and Linux — Lets you quickly restore a single file from a backup image in the repository through a one-step process.
• Native, Full Catalog Capability (Patent-Pending) — Provides a native, full catalog of every image in the backup repository, enabling immediate identification of available recovery positions, with one-click restore. Wildcard scanning feature quickly locates backup repository files to be restored.
• Advanced Encryption Standard (AES)-256 — Secures protected images block-by-block on the VMware host as they’re read so they’re also secure over the network and in the backup repository.
• Synthetic Recovery — Delivers single-pass restore, reading each required block only one time from multiple full, incremental, and differential backup images in the repository for the fastest, most efficient results.
• vMotion and Storage vMotion Support — vSphere 5 vMotion support ensures vRanger automatically protects VMware VMs as they move from one host to another, even when backup jobs are running. It also ensures vRanger follows VM storage disks when they are relocated to different data stores; locks VM storage disks when vRanger accesses the disks during a job.
• Migration for Hyper-V — The vRanger Migration feature assures Hyper-V servers remain protected while moving from one host to another within the same cluster, when a backup job is not in progress.
• Advanced Savepoint Management — Lets you manage and use multiple point-in-time copies of backup and replica images for precise image, file, and object restores.
• Dynamic Resource Management — Optimizes real-time use of critical resources; ensures efficiency and that jobs complete faster without exceeding resource capacity.
Target audience
This guide is intended for backup administrators and other technical personnel who are responsible for designing and implementing a backup strategy for the organization. A good understanding of the operating system (OS) on which vRanger is running is assumed.
Recommended additional reading
The following documentation is also available:• Dell™ vRanger™ Installation/Upgrade Guide – This guide details the system requirements for installing
and operating vRanger, and describes how to install and upgrade the vRanger application and components.
• Dell™ vRanger™ Integration Guide for EMC® Data Domain® Boost™ – This guide describes how to
configure vRanger to work with a Data Domain Boost repository to achieve source-side deduplication of backup data.
• Dell™ vRanger™ Integration Guide for Dell™ NetVault™ SmartDisk - vRanger™ Edition – This guide
describes how to configure vRanger to work with a NetVault SmartDisk -vRanger Edition repository to achieve deduplication of backup data.
• Dell™ vRanger™ Integration Guide for Dell™ DR4x00 Disk Backup Device – This guide describes how to
configure vRanger to work with a Dell DR4x00 appliance to achieve deduplication of backup data.
• Total Virtual Data Protection - Protecting virtualized applications with Dell™ vRanger™ and Dell
Recovery Manager™ – This guide describes how vRanger can work with Dell Recovery Manager products to protect key services such as Active Directory, Exchange, and SharePoint.
2
vRanger overview
• Virtualization overview• vRanger overview
• Installation overview
• Configuration overview
Virtualization overview
As companies grow, their technology needs change. These changes are often implemented within complex systems running business-critical applications. Usually there is an increased demand for hardware and software resources. To manage this demand, many companies establish virtual environments. Doing so can increase an organization’s agility and efficiency while lowering its costs.
Most companies have a number of specialized physical servers and workstations that are under used.
Virtualizing such an environment increases and balances utilization by consolidating the physical machines into a single physical host that runs multiple virtual machines (VMs).
vRanger overview
vRanger is a backup, recovery, and backup management solution for virtual and physical environments. Featuring a new platform technology, vRanger reduces the backup window, provides smarter backup options, and offers more scalability features while using fewer resources.
vRanger capabilities:
• Performs incremental, differential or full image backups of virtual and physical machines. • Quickly restores the entire machine or just specific files.
• Manages disaster recovery strategies and protects critical data in virtual and physical environments. • Replicates VMware virtual machines to more than one destination, letting users accomplish multiple HA
and DR objectives based on their specific needs.
What is vRanger?
vRanger is the next step in the evolution of the leading backup solution designed for the virtual infrastructure as well as physical machines. When protecting a VMware VM, vRanger captures the complete VM image (including the OS, patches, and applications) and transfers the archive (full, incremental, or differential) to a configured data repository. These image-level backups can be restored in a matter of minutes rather than the hours required by legacy file-level solutions.
vRanger was originally designed to integrate with VMware Virtual Infrastructure and vSphere at the API level, rather than through complicated scripting, and now also protects physical and Hyper-V virtual machines. For VMware servers, vRanger uses simplified vCenter and ESX Server integration to enumerate and display your virtual environment the way you are accustomed to seeing it. vRanger also tracks and adapts to vMotion activity to avoid disruption to scheduled jobs.
To protect Hyper-V VMs, vRanger deploys an agent to the cluster or host, from which all backup functions operate. Using the VSS writers found on every Hyper-V VM, the vRanger agent generates the backups and transfers them directly to the repository. The vRanger Migration function is comparable to VMware vMotion in that it lets you continue protecting a server even as it moves from host to host within a cluster.
Protecting a physical machine is possible with the vRanger physical backup client. Like the Hyper-V agent, it is installed on the physical machine you want to protect and communicates with the vRanger server, gathering information on the source server configuration, executing backup functions, and transmitting those backups to the repository through “direct-to-target” architecture.
How does it help?
Simply put, vRanger provides better data protection using fewer resources. vRanger’s image-level backups for VMware VMs allow for simple, portable archives that can be restored with a few clicks of the mouse. The improved File Level Recovery (FLR) engine lets you browse archives and recover files from archives instantly. The vRanger user interface lets you easily manage the protection of all VMware, Hyper-V, and physical servers from a central location.
The intelligent Resource Manager maximizes throughput and protects infrastructure performance, while incremental backups conserve storage space. With the vRanger direct-to-target architecture, expensive proxy servers are no longer required.
Installation overview
The installation of vRanger is a simple process requiring no additional components or configuration. vRanger can be installed on either a physical or virtual machine meeting the requirements specified in the Dell vRanger Installation and Upgrade Guide.
Before installing
vRanger can be installed in a variety of configurations depending on your environment. Some common configuration options include:
• Database Installation • Backup Architecture: • Network mode • Lan-Free (Traditional) • Lan-Free (HotAdd) • Virtual Appliance deployment
Before installing vRanger, review each of your architectural options, and decide on the best fit for your environment.
For more information on installing vRanger, refer to the Dell vRanger Pro Installation/Upgrade Guide.
Downloading an evaluation copy of vRanger
Evaluation versions of Dell products, including vRanger, are freely available from the Dell website. Evaluation versions are fully applications limited only by licensing.
IMPORTANT: Physical backups are only supported on Windows machines matching the list of supported operating systems. Refer to “System requirements and compatibility” in the Dell vRanger Pro
To download an evaluation copy of vRanger
1 From an internet connected PC, access http://software.dell.com/products/vranger/. 2 Click Download Free Trial. Register or log in as appropriate.
3 Accept the License Agreement. Click Submit.
4 Select vRanger x.x and save the file to the preferred location.
Installing vRanger
The installation of vRanger has several options. Unless you have a valid reason not to, Dell recommends to accept the default configuration wherever possible. Complete the steps in the following procedure to install vRanger.
To install vRanger
1 Launch the installer and accept the vRanger license. The install process does not continue until the license is accepted.
2 Choose an installation directory.
3 Enter the credentials under which the vRanger services should run. The credentials used need to have local administrator privileges on the vRanger machine.
4 Select the vRanger database. You may choose to install vRanger with a new instance of SQL Express or on an existing SQL server. You also need to configure DB credentials at this time.
5 The installation completes.
For more information on installing vRanger, see the Dell vRanger Pro Installation/Upgrade Guide.
Configuration overview
vRanger requires some basic configuration before data protection can begin. The bulk of this configuration is driven by the Startup Wizard which launches the first time the application is opened. For more information about configuring vRanger, see Configuring vRanger.
The primary configurations you need to make are described below.
Add vCenters, clusters, or hosts
Before you can begin backups, you must add one of the following to the vRanger inventory: one or more vCenters (or ESX(i) Servers); one or more Hyper-V clusters; or individual hosts not associated with a cluster or vCenter. To add a vCenter, you need to have credentials with administrator access to the vCenter, along with root-level credentials for each host managed by the vCenter. To add a Hyper-V cluster, you must have domain administrator privileges. You have the option to exclude hosts from the vRanger inventory, which also exclude them from licensing.
Add repositories
Repositories are where vRanger stores the savepoints created by each backup job. You can create a repository from a standard FTP, NFS, CIFS, or SFTP share. You may also deduplicate vRanger backups by sending them to a NetVault SmartDisk or Data Domain DD Boost repository. To add a repository, you need the name of the server and share, as well as an account with access to that share.
Deploy virtual appliances
vRanger uses a virtual appliance for replication to/from ESXi servers, for Linux FLR, and optionally for backups and restores. Before fully utilizing vRanger, you need to deploy and configure virtual appliances to your ESXi servers. For more information, see the Dell vRanger Pro Installation/Upgrade Guide.
Add physical servers to inventory
vRanger includes the ability to back up and restore physical servers. Before you can backup a physical server, you must add it to the vRanger inventory and supply credentials with Administrator access to the server
Schedule a backup job
With a vCenter and a Repository configured, the next step is to schedule a backup job. To schedule a backup job, follow the sequence below.
To schedule a backup job
1 Select an object to back up. You may select any vCenter object (VM, Host, Datacenter, and so on) or a physical server.
2 To start the Backup Wizard, do one of the following:
• Click the Add drop-down menu, and then click Backup Job.
• Right-click the object you want to back up, and then click Backup [selected object]. 3 Select the disks to include or skip.
4 Select the Repository to use.
5 Select your transport method (automatic or custom).
6 Select your backup options, such as compression or enabling guest quiescing.
7 Select your backup type (Incremental, Differential, or Full) and configure Retention Policies. 8 Schedule the backup job or set to run On Demand.
For more information about the Backup Wizard or available options, see Backup.
Schedule a replication job
With a vCenter and a virtual appliance or appliances (if necessary) configured, the next step is to configure a replication job. To schedule a replication job, follow the sequence below:
To schedule a replication job
1 Select a VM to replicate.
2 To start the Replication Job Wizard, do one of the following:
• Click the Add drop-down menu, and then click Replication Job.
• Right-click the VM you want to replicate, and then click Replicate [VM Name]. 3 Enter a name and description for the job.
4 Select a target host.
5 Select the type of replication: Differential or Hybrid Differential is the most common option.
7 Select the disk(s) to replicate. 8 Configure job options.
9 Configure the schedule for the replication job. 10 Configure email notifications.
3
Configuring vRanger
• Configuration overview• Roadmap for configuring vRanger through the Startup Wizard
• Roadmap for manually configuring vRanger
• Supplemental instructions – additional repository types
• About the vRanger virtual appliance
Configuration overview
Before you begin configuring vRanger, confirm that you have access to all user names, passwords, and root passwords for the ESX(i) hosts that you intend to use.
vRanger requires some basic configurations to ensure that the software functions properly. You complete the initial configuration through the Startup Wizard, which launches when you first install vRanger. If you would rather configure settings through the menu commands and icons on the main vRanger screen, you can do so. In either case, you can revise the settings at any time.
After completing the basic configuration process, you can use either the Startup Wizard or the Configuration Options dialog to manage your settings. Although the Configuration Options dialog offers some functionality that the Startup Wizard does not, you can use either method to manage host licensing or email server data. Only the Configuration Options dialog lets you manage resources on the task level. Given the role that tasks play in making backup and restore jobs, this resource is vital.
Roadmap for configuring vRanger through
the Startup Wizard
You must have an email SMTP server set up to enable notification during job creation. Later in this process, on the Email Notification Selection page, you have the option of choosing recipients. A plain text email is sent after the job completes. The notification includes the job results, if you select that option.
To configure vRanger though the Startup Wizard, complete the following tasks and processes: 1 Launching the Startup Wizard
2 Adding and selecting a license
3 Process of adding vCenter and host information
4 Adding Hyper-V System Center VMM, Cluster, and host information
5 Selecting hosts for licenses
6 Adding a physical machine
7 Selecting physical machines for licenses
8 Deploying and configuring the virtual appliance from the Startup Wizard
10 Setting up the SMTP server
Launching the Startup Wizard
Complete the following steps to launch open the Startup Wizard and begin configuring vRanger. This task is a step in the Roadmap for configuring vRanger through the Startup Wizard.
To launch the Startup Wizard
1 Do one of the following:
• If you have just installed the software, the Startup Wizard should automatically launch. • If you have not, click the Tools drop-down menu, and then click Startup Wizard.
The Startup Wizard launches. 2 Click Next.
Adding and selecting a license
On the Licenses page of the wizard, complete the following steps to select add and select a vRanger license. This procedure applies to adding a permanent license as well as a trial license.
This task is a step in the Roadmap for configuring vRanger through the Startup Wizard.
To add and select a license
1 Click Add New License. 2 Select the license.
3 Click Open. 4 Click Save. 5 Click Next.
Under Currently Installed Licenses, you see the type of license installed. If it is a trial license, it reads, License Type: Extended Trial and lists the number of days remaining in your extended trial period. Trial licenses applied display the word Trial next to the License Allowed and License Used count.
Removing an extended trial license
The extended trial license is automatically removed when the trial period has elapsed, but you may also remove it prior to the expiration of the trial period.
This task is a step in the Roadmap for configuring vRanger through the Startup Wizard.
To remove an extended trial license
1 In the main interface, click the Tools menu, and then click Options.
2 On the Configuration Options dialog box, under the Licensing node, click Product. 3 On the Product License page, click Remove Trial Extension.
WARNING: Adding a license with features or CPUs less than the current license could result in the loss of functionality, or in some hosts or machines becoming unlicensed.
NOTE: When applying an extended license over an existing or trial license, the highest license count is used.
4 In the Licensing window, click Yes to confirm.
5 Under Currently Installed Licenses, confirm that the primary license is being applied. 6 In the Virtual Machine Hosts and Physical Machines nodes, confirm your license allocation.
Process of adding vCenter and host information
The VirtualCenter and Host Information page displays. Before vRanger can add source objects to the My Inventory pane, you must configure a connection to a vCenter and/or an ESX(i) Server.To add vCenter and host information, complete the following tasks as necessary: 1 Adding a vCenter. Complete this task to add a vCenter and all associated hosts.
2 Entering host credentials. Complete this task to add credentials to hosts that appeared after adding a vCenter.
3 Adding hosts. Complete this task to add individual hosts not associated with a vCenter. This process is a step in the Roadmap for configuring vRanger through the Startup Wizard.
Adding a vCenter
Complete the following steps to add a vCenter to your vRanger configuration.
To add a vCenter
1 In the VirtualCenters section, click Add.
The Add VirtualCenter Credentials dialog box appears.
2 In the DNS Name or IP text box, enter the FQDN or IP address of the vCenter server.
3 In the User Name text box, enter the user name of an account with privileges on the vCenter server. For the required permissions for a vRanger vCenter account, see “Configuring vCenter permissions” in the “Before You Install” chapter of the vRanger Installation and Upgrade Guide.
4 In the User Password text box, enter the password for the account used above.
5 In the Port Number text box, enter the port to be used for communication. The default port is 443. 6 Click Connect.
The dialog box closes and the vCenter displays in the VirtualCenters section and on the VirtualCenter and Host Information page. The hosts managed by that vCenter display in the Hosts section.
Note that the hosts displayed show the icon . There are four key indicators shown in the icon: • The large gold key indicates that the host has been issued a vRanger license.
• The green dot indicates that the host has been assigned a backup license.
NOTE: The Remove Trial Extension button is available only when trial extension is present. When the trial extension is removed, the button is also removed.
NOTE: The user name for the vCenter credential should be entered in the “username@domain” format, rather than “domain\username”. In some cases, the domain may not be required. Avoid special characters in the user name.
If these credentials are changed in the future, you will need to restart the vRanger Service to recognize the changes.
• The blue dot indicates that the host has been assigned a replication license.
• The authentication method for the host is indicated by the icon superimposed on the host icon: • If the host is authenticated with vCenter credentials only, the vCenter icon appears
superimposed over the host icon: .
• If the host is authenticated with host credentials, a gold key is superimposed over the host icon: .
Entering host credentials
Complete the following steps to enter the credentials required to connect to the host or hosts.
To enter host credentials
1 In the Hosts section, select one or more hosts. To select all hosts, select the upper-most check box. 2 Click Edit.
The Host Connections dialog appears. If you have selected multiple hosts, the DNS Name or IP section displays “[multiple connections]”
3 In the User Name text box, enter an account for the host. You may use the root account if connections through the root are enabled, or a non-root account. If the account does not yet exist on the host, select Add user if user does not exist.
4 In the User Password text box, enter the password for the account used above.
5 In the Root Password text box, enter the root password for the selected hosts. If you hosts use different root passwords, you need to configure them in like groups based on the root password.
6 In the Port Number text box, enter the port to be used for communication. The default port is 22. 7 Click Connect. The icon next to the host changes to , showing that the vCenter icon has been
replaced with a key.
If there is an authentication problem, such as connections through the root account being disabled, the status icon displays an alarm:
If this happens, you need to edit the host connection to use a non-root user account. Make sure that the Add user if user does not exist option is selected.
8 When all connections have been made and verified, click Next.
Adding hosts
If you have hosts that are not managed by a vCenter, you can add them individually.
To add hosts
1 In the Host section, click Add.
2 In the DNS Name or IP text box, enter the FQDN or IP address of the Host.
3 In the User Name text box, enter an account for the host. You may use the root account if connections through the root are enabled, or a non-root account. If the account does not yet exist on the host, select Add user if user does not exist.
4 In the User Password text box, enter the password for the account used above.
WARNING: vCenter credentials are sufficient for operations that use only the vStorage API. You need to apply credentials to each host for backup and replication operations to use the Service Console.
5 In the Root Password text box, enter the password for the root account.
6 In the Port Number text box, enter the port to be used for communication. The default port is 22. 7 Click Connect. The Host displays in the Hosts section.
8 To continue in the wizard, click Next.
Adding Hyper-V System Center VMM, Cluster, and
host information
The Hyper-V Cluster and Host Information page of the Startup Wizard displays. Before vRanger can add source objects to the My Inventory pane, you must configure a connection to a Hyper-V System Center VMM, cluster, or host.
To add a Hyper-V ystem Center VMM, cluster or host, complete the following tasks as necessary: 1 Adding a Hyper-V System Center Virtual Machine Manager
2 Adding a Hyper-V Cluster
3 Adding hosts
This process is a step in the Roadmap for configuring vRanger through the Startup Wizard.
Adding a Hyper-V System Center Virtual Machine Manager
Complete the steps in the following procedure to add a Hyper-V cluster.
To add a Hyper-V System Center VMM
1 In the Hyper-V System Center Virtual Machine Managers section, click Add.
2 In the DNS Name or IP text box, enter the FQDN or IP address of the Hyper-V System Center VMM. 3 In the User Name text box, enter the user name of an account with domain administrator privileges on
the System Center VMM.
4 In the User Password text box, enter the password for the account used above.
5 If this is a new System Center VMM, or if you have removed the vRanger Hyper-V agent, select Install agent on host.
6 In the Port Number text box, enter the preferred port you want vRanger to use to communicate with the Hyper-V System Center VMM on the source server. This port must be open between vRanger and each Hyper-V server. The default port number is 8081.
7 Click Connect. 8 Click Next.
The Hyper-V System Center VMM displays in the Hyper-V System Center Virtual Machine Managers section. The Hosts managed by that System Center Virtual Machine Manager displays in the Hosts section.
Adding a Hyper-V Cluster
Complete the steps in the following procedure to add a Hyper-V cluster.
IMPORTANT: This port is configured during System Center VMM installation. If you chose a port number different from the default value, enter that value here.
To add a Hyper-V cluster
1 In the Hyper-V Cluster section, click Add.
2 In the DNS Name or IP text box, enter the FQDN or IP address of the Hyper-V cluster.
3 In the User Name text box, enter the user name of an account with domain administrator privileges on the cluster.
4 In the User Password text box, enter the password for the account used above.
5 If this is a new cluster, or if you have removed the vRanger Hyper-V agent, select Install agent on host. 6 In the Port Number text box, enter the preferred port you want vRanger to use to communicate with the
Hyper-V cluster on the source server. This port must be open between vRanger and each Hyper-V server. The default port number is 8081.
7 Click Connect. 8 Click Next.
The Hyper-V cluster displays in the Hyper-V Clusters section. The Hosts managed by that cluster displays in the Hosts section.
Adding hosts
If you have hosts that are not part of a cluster, you can add them individually.
To add hosts
1 In the Host section, click Add.
2 In the DNS Name or IP text box, enter the FQDN or IP address of the Host. 3 In the User Name text box, enter an account for the host.
4 In the User Password text, enter the password for the account used above.
5 If this is a new host, or if you have removed the vRanger Hyper-V agent, select Install agent on host. 6 In the Port Number text box, enter the preferred port you want vRanger to use to communicate with the
Hyper-V host on the source server. This port must be open between vRanger and each Hyper-V server. The default port number is 8081.
7 Click Connect.
The Host displays in the Hosts section.
Selecting hosts for licenses
The Host Licensing Information page displays. It displays total licensed sockets, used sockets, and the remaining days left in a trial period.
This task is a step in the Roadmap for configuring vRanger through the Startup Wizard.
To select hosts for licenses
1 View the CPUs Allowed value to confirm the number of sockets that are licensed for protection. The number of licenses currently allocated is shown in the CPUs Used column.
The Licensed Hosts section lists the managed hosts, the number of sockets for each host, and the licensed features for that host.
The CPUs column indicates the license “cost” of each host.
NOTE: VM licenses include all virtual machines. Licenses for both VMware and Hyper-V VMs are drawn from the same socket count.
2 In the Pro Backup or Replication column, select or deselect hosts until you have used all of the available licenses, or until all of your hosts are protected.
3 Click Save. 4 Click Next.
Adding a physical machine
The Physical Machine Information page displays. Before vRanger can add physical source objects to the My Inventory pane, you must configure a connection to a physical server.
This task is a step in the Roadmap for configuring vRanger through the Startup Wizard.
To add a physical machine
1 In the Physical Machines section, click Add.
2 n the DNS Name or IP text box, enter the FQDN or IP address of the server. 3 In the User Name text box, enter an account for the server.
4 In the User Password text box, enter the password for the account used above.
5 If this is a new server, or if you have removed the vRanger agent, select Install agent on machine. In the Agent Location text box, enter the preferred directory (on the physical machine) to which the physical client should be installed. The default installation location is:
C:\Program Files\Dell\vRangerPhysicalClient
6 In the Port Number text box, enter the preferred port for vRanger to use to communicate with the physical client on the source server. This port must be open between vRanger and each physical server. The default port number is 51000
7 Click Connect.
The server displays in the My Inventory pane. You may also create a Backup Group to combine multiple physical servers into one backup job. See the section Adding a custom backup group for more information.
Manually installing the physical client
vRanger requires a physical backup client to be installed on the source physical server. This is normally done when the source server is added to the vRanger inventory, but in some circumstances it may be necessary to install the client manually.
This task is a step in the Roadmap for configuring vRanger through the Startup Wizard.
To manually install the physical client
1 On the vRanger server, find the physical client installation file - vRangerPhysicalClient.exe. The file is located in the “Service” sub-directory of the vRanger installation folder. By default this is:
C:\Program Files\Dell\vRanger\Service
2 Copy the client to the preferred location on the source server
3 From the source server’s command line, run the vRangerPhysicalClient.exe command modified by the parameters below:
• USERNAME – This is required information. This is the username for an account with administrative privileges Log on as a service” rights on the source server.
• PASSWORD – This is required information. This is the password for the account used above. • DOMAIN – This is optional. If no value is entered, the account used above is considered a local
• INSTALL_DIR – This is optional. Default install directories are: C:\Program Files\Dell\vRangerPhysicalClient
• PORT – This is optional. The default port is 51000
Command examples
The examples below show the proper syntax for using the installer.
• To accept the defaults, you must only provide credentials for the source server:
Y5DQJHU3K\VLFDO&OLHQW H[H 86(51$0( DGPLQLVWUDWRU 3$66:25' 3DVVZRUG
• You may also use a network account:
Y5DQJHU3K\VLFDO&OLHQW H[H '20$,1 GHYHORSPHQW 86(51$0( XVHU
3$66:25' 3DVVZRUG
• To change the install location or port number, add that parameter with the preferred value:
Y5DQJHU3K\VLFDO&OLHQW H[H 86(51$0( DGPLQLVWUDWRU 3$66:25' 3DVVZRUG
,167$//B',5 F ?Y5DQJHU3K\VLFDO&OLHQW
Y5DQJHU3K\VLFDO&OLHQW H[H 86(51$0( DGPLQLVWUDWRU 3$66:25' 3DVVZRUG
3257
Selecting physical machines for licenses
Before you start this process, make sure that you have imported the license file and confirmed that it is adequate for managing the number of physical machines you want to protect. The Currently Installed Licenses section includes the total number of physical machine licenses available, and the number being used currently. These numbers increment and decrement based on the selections you make on this page.
This task is a step in the Roadmap for configuring vRanger through the Startup Wizard.
To select physical machines for licenses
1 In the Currently Installed Licenses section, view the Machines Allowed value to confirm the total number of physical machines licenses available The number of licenses currently allocated is shown in the Machines Used column.
2 The Licensed Physical Machine section lists the physical machines in vRanger’s inventory, and indicates whether each machine is licensed for backup
a In the Physical Backup column, select or deselect machines until you have used all of the available licenses, or until all of your machines are protected.
3 Click OK.
Deploying and configuring the virtual appliance from
the Startup Wizard
vRanger uses a virtual appliance (VA) for both Linux file-level recovery and for replication to and from VMware ESXi servers.
There are two ways to deploy and configure a VA: the Startup Wizard and the Tools menu.
If you do not want to complete the Virtual Appliance Information page of the Startup Wizard now, you may skip this step of the roadmap and continue with the Startup Wizard. You can access the Virtual Appliance
Configuration dialog at any time by way of the Options available from the Tools drop-down menu.
To complete the Virtual Appliance Information page of the Startup Wizard and deploy and configure a VA now, complete the following procedure.
This task is a step in the Roadmap for configuring vRanger through the Startup Wizard.
To deploy and configure the virtual appliance from the Startup Wizard
1 On the Virtual Appliance Information page of the Startup Wizard, launch the Virtual Appliance Deployment Wizard from the Startup Wizard by clicking Deploy Virtual Appliance.
2 Complete the deployment wizard by following the steps in Deploying the virtual appliance by using the Virtual Appliance Deployment Wizard.
3 To add a new virtual appliance configuration, click Add, and then complete the following steps: a In the Add Virtual Appliance Configuration dialog, select a virtual appliance from the inventory
tree.
b Under Virtual Appliance Properties, you do any of the following:
• Select Override IP Address, and then enter a new IP address in the IP Address text box. • Enter a root password for the VA in the Root Password text box.
• Select Use as default virtual appliance for cluster, to use this VA for all machines that are a part of the associated cluster.
c Click OK.
4 To configure an existing virtual appliance, select a VA from the list, and then click Edit. In the Modify Virtual Appliance Configuration dialog, you can edit any of the following settings:
• Virtual Appliance Properties • Virtual Appliance Options • Replication
• Scratch Disk • Password
• Linux File Level Restore
For more information, see Changing the virtual appliance configuration. 5 To delete a virtual appliance, do the following:
a Select a VA from the list. b Click Remove.
The Removing VA dialog appears. c Select the job you want to remove. d Click OK.
e In the Confirm Delete dialog, click OK.
If you want remove the entire VA rather than a single job, first select Delete the virtual appliance from the host, and then click OK.
6 Under Linux FLR Virtual Appliance, if you want to plan for Linux File Level Recovery, select the virtual appliance you want to use from the drop-down list.
7 Click Next.
Adding a repository
vRanger uses repositories to store backup archives. Repositories can be one of the following types: • CIFS
• FTP • SFTP
• NetVault SmartDisk
• EMC Data Domain Boost (DDB) • Dell Rapid Data Access (RDA)
The procedure below shows mounting a CIFS share to the My Repositories pane. The procedures for the other repository types are described in Supplemental instructions – additional repository types.
This task is a step in the Roadmap for configuring vRanger through the Startup Wizard.
To add a repository
1 Under Repositories, select Windows Share (CIFS). 2 Populate the Repository Name text box.
This value displays in the My Repositories pane. 3 Populate the Description text box.
4 Enter a username and password in the appropriate text boxes.
5 Select a Security Protocol from the drop-down: NTLM (Default), or NTLM v2
6 In the Server text box, type the UNC path to the preferred repository directory. Alternatively, you may enter a partial path and click Browse to find the target directory.
7 Select Encrypt all backups to this repository if you want these backups to be password-protected.
8 Enter a Password for the encrypted repository - confirm the password by re-entering it.
9 Click Save — the connection to the repository is tested and the repository is added to the My Repositories pane and the Repository Information dialog.
10 vRanger checks the configured repository location for existing manifest data to identify existing savepoints. If any are found, you are prompted to take one of three actions:
• Import as Read-Only – With this option, all savepoint data is imported into the vRanger database, but only for restores. You cannot back up to this repository.
• Import – All savepoint data is imported into the vRanger database. vRanger can use the repository for backups and restores. vRanger requires read and write access to the directory.
• Overwrite – The savepoint data is retained on the disk, but cannot be imported into vRanger. vRanger ignores the existing savepoint data and treats the repository as new.
11 Click Next.
NOTE: For more information on NetVault SmartDisk, see: http://software.dell.com/products/netvault-smartdisk/.
For more information on Data Domain’s DD Boost technology, see the Data Domain website:
http://www.datadomain.com/products/dd-boost.html. You may also refer to the Dell vRanger Installation and Upgrade Guide for supported versions of NetVault SmartDisk and Data Domain.
NOTE: You must enter a valid username and password before using the browse functionality.
WARNING: If you want to use the Encrypt all backups feature, make certain to retain the password you enter in the following steps. There is no back-door or admin-level password. If the password is unknown, the backups are not usable.
Setting up the SMTP server
On the Mail Server Information page, you can configure an SMTP server, Select one that does not require authentication so that there are no obstacle to email notification transmission.
This task is a step in the Roadmap for configuring vRanger through the Startup Wizard.
To set up the SMTP server
1 In the SMTP Server text box, enter the DNS name or IP of an SMTP server.
2 In the Port text box, enter the port to be used for communication. The default port is 25. 3 In the From Address text box, enter the email address that vRanger should use.
4 Click Send Test Email.
5 If preferred, select Do not send email notifications for successful jobs.
Adding an email address
Complete the following steps on the Mail Server Information page of the wizard to add an email address to the vRanger address book.
This task is a step in the Roadmap for configuring vRanger through the Startup Wizard.
To add an email address
1 To add recipients, click Add.
2 Populate the Name and Email Address text boxes.
3 Click OK to add the information to the Email Addresses list. 4 Repeat steps 1-3 to include additional contacts.
5 Click Finish.
Roadmap for manually configuring vRanger
The following instructions describe how to configure vRanger without using the Startup Wizard by manually adding the servers you want to protect. You can manually add VMware and Hyper-V virtual machines, physical machines, and repositories, as well as the configurations necessary for email notifications.The roadmap for manually configuring vRanger includes the following tasks: • Adding a VirtualCenter
• Adding an ESX server
• Adding a Hyper-V System Center VMM, Cluster, or host
• Adding a physical server
• Adding a repository
• Configuring an SMTP server
• Configuring display language
• Configuring a virtual appliance
• Importing a license file
• Managing virtual machine host licensing
• Managing physical machine licensing
• Managing job configuration settings
• Enabling cataloging options
Adding a VirtualCenter
Complete the steps in the following procedure to manually add a VMware VirtualCenter (vCenter) for vRanger backup.
This task is a step in Roadmap for manually configuring vRanger.
To add a VirtualCenter
1 On the My Inventory view, click the VMware tab. 2 Click the Add icon, and then click Virtual Center. The Add VirtualCenter Credentials dialog displays.
3 In the DNS Name or IP text box, enter the FQDN or IP address of the vCenter server.
4 In the User Name text box, enter the user name of an account with privileges on the vCenter server. See
Configuring vCenter permissions for the required permissions for a vRanger vCenter account.
5 In the User Password text box, enter the password for the account used above.
6 Click Connect.
vRanger attempts to connect to the vCenter using the current configuration. If it is successful, the vCenter displays in the My Inventory pane.
Adding an ESX server
Complete the steps in the following procedure to manually add a VMware ESX server to vRanger protection. This task is a step in Roadmap for manually configuring vRanger.
To add an ESX server
1 On the My Inventory view, click the VMware tab. 2 Click the Add icon, and then click ESX Host.
3 In the DNS Name or IP text box, enter the FQDN or IP address of the Host.
4 In the User Name text box, enter an account for the host. You may use the root account if connections through the root are enabled, or a non-root account. If the account does not yet exist on the host, select Add user if user does not exist.
NOTE: The user name for the vCenter credential should be entered in the “username@domain” format, rather than “domain\username”. In some cases, the domain name may not be required. Avoid special characters in the user name.
If these credentials are changed in the future, you will need to restart the vRanger Service to recognize the changes.
NOTE: Avoid special characters in the password.
NOTE: If the connection is unsuccessful, confirm that the configuration settings are correct and that the vCenter is visible to the computer where vRanger is installed.
5 In the User Password text box, enter the password for the account used above. 6 In the Root Password text box, enter the password for the root account. 7 Click Connect.
The host is added to the tree structure under the vCenter. Confirm this noting that a gold key icon displays adjacent to it in the My Inventory pane.
Adding a Hyper-V System Center VMM, Cluster, or
host
Complete the steps in the following procedure to manually add a Hyper-V System Center VMM, cluster, or host to vRanger protection.
This task is a step in Roadmap for manually configuring vRanger.
To add a Hyper-V System Center VMM, Cluster or host
1 On the My Inventory view, click the Hyper-V tab. 2 Click the Add icon, and then click one of the following:
• Hyper-V System Center VMM • Hyper-V Host
• Hyper-V Failover Cluster The Add Credentials dialog displays.
3 In the DNS Name or IP text box enter the FQDN or IP address of the Hyper-V System Center VMM, cluster, or host.
4 In the User Name text box, enter the user name of an account with domain administrator privileges on the System Center VMM, cluster, or host.
5 In the User Password text box, enter the password for the account used above.
6 If this is a new System Center VMM, cluster, or host, or if you have removed the vRanger Hyper-V agent, select Install agent on host.
7 In the Port Number text box, enter the preferred port you want vRanger to use to communicate with the Hyper-V server. This port must be open between vRanger and each Hyper-V server. The default port number is 8081.
8 Click Connect.
The System Center VMM, cluster, or host is added to the Hyper-V tab.
Adding a physical server
Complete the steps in the following procedure to manually add a physical server to vRanger protection. This task is a step in Roadmap for manually configuring vRanger.
To add a physical server
1 From the My Inventory view, click the Physical tab. 2 Click the Add icon, and then click Physical Machine.
The Add Physical Machine Credentials displays.
IMPORTANT: This port is configured during System Center VMM installation. If you chose a port number different from the default value, enter that value here.
3 In the DNS Name or IP text box, enter the FQDN or IP address of the server. 4 In the User Name text box, enter an account for the server.
5 In the User Password text box, enter the password for the account used above.
6 If this is a new server, or if you have removed the vRanger agent, select Install agent on machine. In the Agent Location text box, enter the preferred directory (on the physical machine) to which the physical client should be installed. The default installation location is:
For 64-bit servers: C:\Program Files\Dell\vRangerPhysicalClient
7 In the Port Number text box, enter the preferred port for vRanger to use to communicate with the physical client on the source server. This port must be open between vRanger and each physical server. The default port number is 51000
8 Click Connect.
The server displays in the My Inventory pane. You may also create a Backup Group to combine multiple physical servers into one backup job. See the section Adding a custom backup group for more
information.
Manually installing the physical client
vRanger requires a physical backup client to be installed on the source physical server. This is normally done when the source server is added to the vRanger inventory, but in some circumstances it may be necessary to install the client manually.
To manually install the physical client
1 On the vRanger server, find the physical client installation file - vRangerPhysicalClient.exe. The file is located in the “Service” sub-directory of the vRanger installation folder. By default this is:
C:\Program Files\Dell\vRanger\Service
2 Copy the client to the preferred location on the source server
3 From the source server’s command line, run the vRangerPhysicalClient.exe command modified by the parameters below:
• USERNAME – This is required information. This is the username for an account with administrative privileges Log on as a service” rights on the source server.
• PASSWORD – This is required information. This is the password for the account used above. • DOMAIN – This is optional. If no value is entered, the account used above is considered a local
account. If you use a network account, enter the domain for the account here. • INSTALL_DIR – This is optional. Default install directories are:
C:\Program Files\Dell\vRangerPhysicalClient • PORT – This is optional. The default port is 51000
Command examples
The examples below show the proper syntax for using the installer.
• To accept the defaults, you must only provide credentials for the source server:
Y5DQJHU3K\VLFDO&OLHQW H[H 86(51$0( DGPLQLVWUDWRU 3$66:25' 3DVVZRUG
• You may also use a network account:
Y5DQJHU3K\VLFDO&OLHQW H[H '20$,1 GHYHORSPHQW 86(51$0( XVHU
3$66:25' 3DVVZRUG
Y5DQJHU3K\VLFDO&OLHQW H[H 86(51$0( DGPLQLVWUDWRU 3$66:25' 3DVVZRUG ,167$//B',5 F ?Y5DQJHU3K\VLFDO&OLHQW
Y5DQJHU3K\VLFDO&OLHQW H[H 86(51$0( DGPLQLVWUDWRU 3$66:25' 3DVVZRUG
3257
Adding a repository
The following instructions describe how to add a CIFS repository to vRanger. For information about adding other types of repositories, see Supplemental instructions – additional repository types.
This task is a step in Roadmap for manually configuring vRanger.
To add a repository
1 To add repository, navigate to the My Repositories pane. Click to highlight the preferred repository type. 2 Right-click the node, select Add, and then click Windows Share CIFS.
3 On the Add Repository dialog, populate the text boxes described below: • Repository Name – Enter a name for the repository.
• Description – Optionally, describe the repository.
• User Name and User Password text boxes – Enter the credentials for accessing the CIFS share. • Select a Security Protocol from the drop-down: NTLM (Default), or NTLM v2.
• Server – Enter the path to the preferred directory. Alternatively, you may enter the server IP or DNS name and click Browse, then browse to the correct path.
4 Select Encrypt all backups to this repository if you want these backups to be password-protected. 5 Enter a Password for the encrypted repository — confirm the password by re-entering it.
6 Click Update — the connection to the repository is tested and the repository is added to the My Repositories pane and the Repository Information dialog.
7 Click OK.
Configuring an SMTP server
Complete the steps in the following procedure to manually configure an SMTP server for email notifications from vRanger.
This task is a step in Roadmap for manually configuring vRanger.
To configure an SMTP server
1 Click Tools, and then click Options.
2 Under the General node on the Configuration Options page, click Email Configuration. 3 Populate the SMTP Server text box.
NOTE: These instructions describe the process for adding a CIFS repository. The procedures for the other repository types are described in Supplemental Instructions – Additional Repository Types.
WARNING: Paths for CIFS repositories are case sensitive. When entering the path for a CIFS directory, ensure that the path is entered in the correct case.
WARNING: If you want to use the Encrypt all backups feature, make certain to retain the password you enter in the following steps. There is no back-door or admin-level password. If the password is unknown, the backups are not usable.