INSTALLATION MANUAL
For Grand Rib-3 / Multi Purpose / & Classic Rib Roofing Panels
Metal Roofing Source
TOLL FREE 1-877-833-3237
www.metalroofingsource.com
Grand Rib-3 / Multi-Purpose / Classic Rib
Metal Roofing Source Grand Rib-3 / Multi-Purpose / & Classic Rib
Grand Rib 3 panels are a strong, durable, economic, and attractive answer to the growing demand for the metal roofing needs of homes, businesses, and agricultural and utility buildings. Grand Rib panels provide a 36-inch coverage with ¾ inch ribs on nine-inch centers, and utilize an anti-siphoning channel to provide protection from severe weather conditions.The Galvalume finish is not only durable and cost effective, but offers the reflectivity which is so valuable for energy efficiency. The paint system employed on our product offers optimum exterior protection plus superior resistance to corrosion and ultraviolet radiation. Our painted panels carry a lifetime film integrity warranty, and are of the highest known quality in the industry.
INSTALLATION OF PANELS
ROOF PITCH
This style of metal roofing panels requires a certain degree of pitch to ensure proper water drainage. Florida Building Code allows a minimum pitch of 2/12 for Grand Rib-3 panels as long as lap screws and sealant are applied to the laps to prevent water from siphoning over the ribs (see Fig. 5 on p. 4). Lap screws and sealant are optional when the pitch is 3/12 or greater (3/12 pitch means that there is 3 inches of rise for every 12 inches running horizontally). As a general principle, the less steep the roof, and the more necessary also that sealant be used at all side-laps. Consult our representative for recommendations for your particular roof pitch, and about roofing options if you have less than a 3/12 pitch.
ROOF APPLICATION
Panel installation should begin at the gable end of the roof opposite the prevailing rain-bearing wind (this will provide added assurance against wind-driven rain being forced under the laps). Measure one panel width in from the roof edge. At this point chalk a line from ridge to eave. Place the leading edge of the first panel along this line. It is extremely important that this panel be laid square to the eave and ridge so that the remaining panels will line up square on the roof frame. It is wise to have a person at the eave and at the ridge to ensure that the proper panel coverage is being maintained across the roof. Also be sure that the panels are properly side-lapped (see fig. 7 on page 6). In applications where end-lapping is necessary, the upper panel on the slope should lap over the panel that is lower on the slope. Lower roof pitch requires a greater amount of panel overlap. All end-lap applications require two horizontal rows (across the panel) of butyl sealant tape and proper fastening to provide a maximum water seal. An overhang of 2 to 3 inches is recommended to provide a drip edge, while only 1 inch overhang is necessary where gutters are used. The open panel ribs at the eave can be sealed with inside closures.
TRIMMING AND CUTTING STEEL PANELS
Blade Cutting: Sometimes you can use a hand held grinder with an abrasive wheel attachment or a circular saw with a ferrous cutting blade. While they work fine, most panel manufacturers do not recommend cutting panels with any sort of abrasive wheel/blade because it allows for a place (the edges) where corrosion can start. (Regardless, you’re going to find a circular saw makes quick work of the job.)
When using a ferrous cutting blade on a circular saw, make sure you cut the panels from the underside because the saw guides will undoubtedly scratch the finish of the panels. They are available at most hardware stores
When using a blade cutting technique, always use protective eye wear!
Caution! Clean all metal particles off the roof to avoid oxidation stains.
A leaf blower works well for this.
ROOF PANELS AND SCREWS
Panel lengths should fall 2 to 3 inches short of the ridge when a vented ridge is desired, and should extend 2 to 3 inches past the eave to allow a sufficient drip edge (except as noted on pg. 3 concerning gutters). When a roof transition is involved, panels of the upper portion should be shortened to allow placement of the transition flashing. Our sales personnel are ready to assist customers with information specific to their particular roof. A specially-washered screw applied through the flat of the metal is the most recommended method used to attach roofing panels. 1-inch screws can be used if penetration of only ¾ 1-inch is either necessary or desired; otherwise, 1½ inch screws can be used. See page 6 for more information on screw spacing and ordering.
TRIM
The most common flashing for metal roofing is the ridge cap, which is used at the peak of a roof where two opposing roof slopes join. Other flashings include transition flashing, end wall and sidewall flashings, and valleys (see diagram on right for application). Eave flashings include gable flashing and eave trim, either of which are often applied above fascia trim. At the gable edge the use of gable trim adds to the appearance of the structure and seals the end panel, and sidewall flashing is used where the side of a panel butts up against an adjacent wall. In either case, the installer should be careful to seal between the gable rake or sidewall and panel with butyl sealant tape, and to fasten the rake every 6" to 12” up the slope of the roof with the appropriate screws. To prevent penetration of water, insects, and debris at the ridge, outside closures are inserted between the ridge cap and the top end of the panel. Screws are applied through the ridge cap, closure, and rib in at least every other rib of the panels. Self-drilling lap screws are used to attach ridge caps.
KEEP MATERIALS DRY!
The paint and finishes of panels and trim are designed to withstand severe rain and wet weather conditions. Neither paint, galvanized, nor Galvalume finishes, however, are designed to be in continuous contact with water for long periods of time. Damage will result if uninstalled panels or trim are allowed to remain wet in storage. Be sure to store material that will not be installed immediately in a dry location. Wet material should be air-dried and re-stacked if installation is not planned right away.
PANEL FASTENING OPTIONS
Grand Rib 3 style roofing can be applied over existing shingles provided the integrity of the roof decking and framing has been checked by a qualified party. The use of underlayment between the shingles and metal roof panels is a standard practice. Give our friendly sales staff a call if you have any questions. Grand Rib 3 style metal roofing can be separated from the moisture barrier by minimum, nominal 1"x3" yellow pine battens spaced on maximum 24” centers or according to ASCE calculations where applicable. Since direct contact between pressure-treated lumber and metal roofing must be avoided in order to prevent potential corrosion.
CAUTION: Battens or "purlins" as they are sometimes called must be fastened to the roof joist or trusses with the proper length and number of fasteners to prevent pullout.
Battens must be installed to support the entire width and length of ridge, eave, hip, valley, and gable-end trims.
For solid decking, at least 15/32-inch structural plywood supported on rafters at a maximum of 24" on center is required. If care is taken, metal roofing application can be aided by pre-drilling panels, allowing screws to go quickly and accurately into the desired spacing. Pre-drilling will work provided that pilot holes are placed accurately in the proper locations on panels. Purlin spacing must be uniform and carefully measured. For panel lap details, see
Figure 5 on page 4.
Figure 7Screws should be placed on both sides of the ribs at both eave and ridge.
POLICIES
Disclaimer: While we have made every attempt at accuracy in this manual, we are not responsible for typographic, printing, or technical errors.
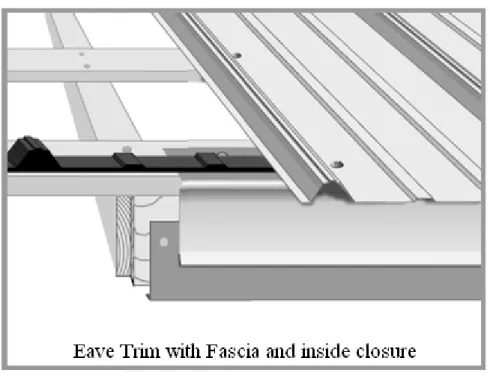
Figure 8 Drip edge gives a finished look along the drip eave of the house, as well as providing protection for the materials they cover. The drip edge should completely cover the top edge of the fascia. Inside closures, which seal off the open ribs of the panels, are optional.
Figure 9 Pre-formed valleys use a diverter to prevent water from rushing under panels on the opposite side while meanwhile channeling water off the roof. Expanding foam closures are often used to assure a good seal.
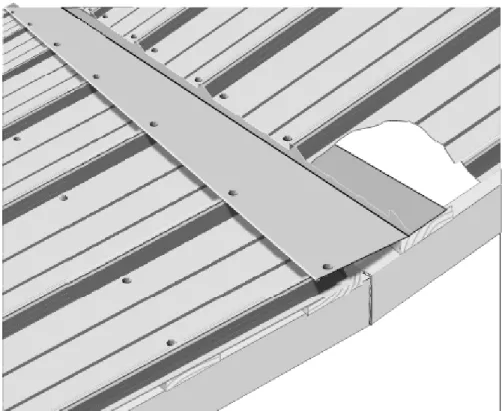
Figure 10 Gable flashing is used to trim the edge of the roofing panel at the gable end of the roof. It should match the eave drip that extends along the drip edge of the roof. If the panel is allowed to hang over the gable end, eave drip can be used instead. Butyl tape between the trim and panel eliminates leaks.
Figure 11 Sidewall flashing is applied when the side of the roof butts up against an adjacent wall. The wall-side of the flashing can either be covered over with siding or sealed with caulk. Butyl tape should be applied where the “foot” of the flashing attaches to the roof.
Figure 12 As with the ridge cap, the ENDWALL FLASHING above can be sealed using outside closures.
End-wall flashing is applied where the upward slope of a roof meets a wall. The wall side of the flashing can be covered with siding or counter-flashing, and outside closures are used to seal between the flashing and the panel.
TRANSITION FLASHING prevents leakage at the point where two different roof pitches meet. It is sealed on the lower side with outside closures, and can be sealed underneath the upper panels with inside closures.
The Ridge Cap is used to seal the point at which two upward slopes meet. This can be both along the ridge of the roof as well as a covering for a hip. Either woodgrip or selfdrilling lap TEK screws are applied through the ribs of the metal. Debris, insects, and blowing rain can find easy access under the ridge cap, so closures are often used to either completely or partially seal the opening. Closures under ridge caps come in 2 types: solid and vented. Solid closures (“Outside Closures”) are the same width as the panels. They lock together in a row placed directly under the screws that attach the ridge cap, and form a solid, water-tight, air-tight barrier. (See Figure 14 on opposite page). Profile Vent comes in 50 foot rolls (2 per package), is 3 inches wide, and forms a water-retardant, insect resistant barrier that allows hot air to escape from the attic, and is superior to many more elaborate and expensive vent systems.
Figure 15 Pipe Boots provide a watertight seal around roof vents and come in a variety of sizes. They seal with caulk and conform to the shape of the panel ribs.
Guide to Miscellaneous Accessories
Item Application
pipe boot Fits over vent and heat pipes. Available also in heat-resistant boots. retro-fit boot Fits around pipes with inaccessible tops (such as weatherheads). outside closures Seals under ridge caps and transition and endwall flashings. inside closures Seals under panels, particularly on the eave.
profile vent Vented closure material surpassing many other venting systems. universal closure Compressed adhesive foam expands to seal between valleys and panels. TurboShear HD The best tool for cutting metal roofing panels. Great for angle cuts. butyl tape General purpose low-cost sealant, used on panel laps and under trim. woodgrip screws Used in all applications attaching metal to wood. 1", 1½" sizes standard. TEK screws Self-drilling TEK screws for metal purlins. Lap TEK screws draw together


