Using and Administering
EZ Test Online 7.0
1
EZ Test™ Online for Windows and Macintosh
Windows is a trademark of Microsoft, Inc. Macintosh is a trademark of Apple, Inc.
If you are experiencing difficulties with this product, visit McGrawHill Higher Education Technical Support
http://www.mhhe.com/eztest/
or call the Help Desk at (800) 3315094
Table of Contents
Getting Started ... 5
EZ Test Online Workflow...5
System Requirements ...5
Getting Help & Support...5
Screen Sensitive Help... 5
Field Sensitive Help ... 5
User Guide Help ... 5
Exploring EZ Test Online Work Space...6
Title Area ... 6
EZ Test Online Toolbar ... 6
Course Management Toolbar ... 6
Test Management Toolbar ... 7
Buttons ... 7
Hypertext Links ... 7
Instructor Login ... 8
Register with EZ Test Online ...8
EZ Test Online Login...8
EZ Test Logout ...8
Manage Courses/Sections... 9
Update Instructor Information ...9
Add a Course/Section ...9
Delete a Course ...9
View/Change Course Settings... 10
Preview a Course... 10
Manage Roster ... 11
Change Student SelfRegistration Settings ... 12
Add Students ... 12
Import a Student Roster ... 14
View/Change Student Info... 14
Delete Students... 15
Deleting Specified Students ... 15
Deleting All Students... 16
Export Roster ... 16
Manage Gradebook... 18
View/Modify Gradebook Settings... 18
Download Gradebook... 19
Print Gradebook ... 20
Working with Tests ... 21
Create a New Test ... 21
Open a Test Bank ... 21
Select Questions... 23
Multiple Category Selection... 23
Import a Test... 24
Import an Exported EZ Test File... 24
Import Other Test Formats ... 24
Edit a Saved Test... 25
Show/Hide a Test... 26
Duplicate a Test ... 27
Preview a Course and Tests... 27
Global Test Question Definitions ... 30
Question Formatting... 31
Rich Text Editor Toolbar... 31
Edit Menu ... 31
View Menu ... 32
Object Menu ... 32
Format Menu ... 34
Table Menu... 35
Working with Text... 37
True/False Questions ... 38
Yes/No Questions ... 39
Ranking Questions... 40
Matching Questions... 41
Multiple Choice Questions... 42
Check All That Apply Questions ... 44
Survey Questions... 45
Essay Questions ... 47
Fill in the Blank Questions ... 48
Numeric Response Questions ... 49
Worksheet Questions ... 50
Worksheet Answer Types... 52
Section Break Questions ... 55
Short Answer Questions... 57
Using Random Variables... 58
Create the Question ... 58
Define the Variables... 59
Calculated Random Variables ... 61
Conditions... 61
Sample ... 61
Update the Variables... 61
Preview a Test Question ... 62
Import Questions from a Plain Text File ... 62
1 Convert Document to Plain Text... 63
2 Import the Questions... 63
Delete a Question ... 65
Edit Test Questions ... 65
Sort Questions ... 66
Categorize Questions... 68
Create a New Category ... 68
Assign Questions to a Category ... 69
Duplicate a Category... 69
Rename a Category ... 69
Delete a Category ... 69
Multimedia Library... 70
Add a Picture to Multimedia Library ... 70
Add a Print Resolution Picture to Multimedia Library... 71
Adding Multiple Pictures to Multimedia Library... 71
Remove a Picture from Multimedia Library ... 72
Add a Sound File to the Multimedia Library... 72
Remove a Sound File from the Multimedia Library... 72
Add a Video to the Multimedia Library ... 72
Remove a Video from the Multimedia Library ... 73
Add a Formula to the Multimedia Library ... 73
Print Preview of a Test ... 76
Text Settings & Layout ... 77
Save Your Test ... 80
Export for Online Courses (CMS) ... 81
Online Test Management ... 87
Question Pooling... 87
Online Settings... 88
Title... 88
Question Order ... 88
Presentation... 88
Time Limits ... 89
Point Awards... 90
Preassigned Points ... 90
Submissions ... 91
Results Reporting... 91
Score EMailing... 91
Anonymous... 92
Scoring & Reporting ... 92
Manual Scoring ... 92
Test Duration Info... 94
View Student Scores... 94
View Submission Data ... 96
Record Keeping ... 99
Completion Report ... 99
Clear Incompletes ... 99
Submit Incompletes... 99
Clear Access Records... 99
Erase All Submissions... 100
Erase Instructor Submissions ... 100
Sharing Tests ... 101
Copy Shared Tests ... 102
Share Tests with Colleagues ... 102
Add a Colleague ... 102
Export Archive... 103
EZ TEST ONLINE STUDENT HANDOUT 1 ... 104
Log In as Student ... 104
Register as Student... 104
View/Change Student Info... 104
EZ TEST ONLINE STUDENT HANDOUT 2 ... 105
Taking a Test Online ... 105
View My Grades... 106
GETTING STARTED
EZ Test Online Workflow
EZ Test Online allows you to upload your existing EZ Test exams so that your students can take them online. EZ Test Online automatically scores the exams and collects all the data for you. You and your students can view results immediately. You can even export the data for use with other popular gradebook software.
System Requirements
Windows Mac
Windows 2000 or better Minimum 256 MB main memory; 512 MB recommended 100 MB or better free hard disk space Microsoft Word 2000 or better Screen size: 1024 x 768 minimum Mac OS X 10.3.9 or better Minimum 256 MB main memory; 512 MB recommended 100 MB or better free hard disk space Microsoft Word X or better Safari 1.3 or better Screen size: 1024 x 768 minimum Students have lower minimum system requirements to take a test online using the EZ Test Online Web service. Please refer to the Student User Guide’s student system requirements.
Note: If you fail to see screens described in this help document, you may have a PopUp blocker turned on in your browser. Either select the setting to allow PopUp windows for this site or turn your PopUp blocker off completely.
Getting Help & Support
There are several methods of obtaining help while you are using EZ Test Online.
Screen Sensitive Help
You can access the Help window within EZ Test Online by clicking on the Help link in the upper right corner of the screen. This level of help provides you with the procedures to complete tasks on the related screen.
Example:
Field Sensitive Help
You can access help associated with particular information you
are entering by clicking on the name of the field in question.
User Guide Help
You can access this guide from anywhere within EZ Test by clicking on the Help link, then the Topics Example:
Exploring EZ Test Online Work Space
The EZ Test Online Work Space consists of the top title area, main toolbar, content area, and footer. These are described below.
Title Area
The title area displays the EZ Test Online logo, section title, Logout and Help links, and the McGraw Hill logo.
NOTE: Clicking on the EZ Test Online logo will always take you back to the EZ Test Online home page.
EZ Test Online Toolbar
The EZ Test Online toolbar located at the top of the screen and below the title area contains the main navigation for EZ Test Online. You will use the toolbar buttons to navigate EZ Test Online, manage and preview tests, manage your class roster, and manage the class gradebook. When you click on a button in the toolbar it will become grayed out, indicating that you are now in that part of the EZ Test Online program.
Course Management Toolbar
§ Tests – List of available tests for the current course (currently selected in image above) § Roster – Manage roster for the current course
§ Gradebook – Manage the gradebook for current course
§ Import – Import an EZ Test exam. You can also import an EZ Test Bank Archive Download, Blackboard 6 XML Archive, Exam View 4 XML files.
§ Sharing – Share course tests with other colleagues on your EZ Test system § Preview – Preview a test for the current course
§ Home – Takes you back to the EZ Test Online home page
Title area
Main toolbar
Content area
Test Management Toolbar
Once you have selected a test within the current course, the toolbar will change and contain the following options:
§ Menu – The drop down selection menu contains all of the Online Delivery options and Test Construction options for the currently selected test
§ Test Construction
· Select Questions from Banks – Adds questions from a test bank or previously saved tests
· Organize/Edit Questions – Provides options to sort questions and edit questions you have selected for your test
· Categorize Questions – Applies a category type to a question · Multimedia Content – Manages graphics, audio and formulae
allowing you to add, preview and delete
· Import from Text File – Brings in questions from a text file · Export to Print/CMS Formats – Opens the Publishing Options
screen to print your exam or export it to other popular Course Management System (CMS) formats
§ Online Delivery
· Question Pooling – Pools questions by selected question category type
· Online Settings – Test settings for selected test (default selection) · Scoring & Reporting – Manage test scores for selected test and
view statistical information
· Record Keeping – Manage scored data and submissions § Preview – Allows you to preview the current test. Preview will open in new window § Course – Takes you back to the Course Management screen for current course § Home – Takes you back to the EZ Test Online home page
Buttons
Depending on the EZ Test Online mode you are in, there will be different buttons available in the main content for selecting options and saving changes. If you are unsure what a button does, use the field sensitive Help link for that option, or see detailed information for that screen using the Help link in the top right of the Title area.
Hypertext Links
Hypertext links will be in blue and underlined, for example the Logout and Help links in the Title area are hypertext links. The courses and tests you add to your EZ Test Online account will also appear as hypertext links. So, any time you see blue underlined text, it is an active link to allow you to select something or to navigate to another section.
INSTRUCTOR LOGIN
Register with EZ Test Online
Instructors can register themselves for EZ Test Online by going towww.mhhe.com and click the Register link.
Enter all the required information into the online registration form pages.
After submitting your information, a McGrawHill customer support representative will contact you and/or your McGrawHill representative for verification. This usually happens within 48 hours.
Your account will then be enabled and the next time you log in atwww.mhhe.com, you will see a link to EZ Test Online.
EZ Test Online Login
After Logging into www.mhhe.com, click the EZ Test Online link. You will be taken to the EZ Test Online login page where you must sign in again for security purposes.
Note: The first time you sign in, you will need to read and accept the privacy agreement presented to you in order to use the EZ Test Online Service. By accepting the privacy agreement, you will be logged in and redirected to your new EZ Test Online course index.
EZ Test Logout
To log out of the EZ Test Online service, simply click the Logout link located on the righthand side of the Title area.
MANAGE COURSES/SECTIONS
The EZ Test Online home page is where you will add and delete courses/sections that you plan on delivering online exams for. You must add a course/section in order to import EZ Test exams or create new EZ Test exams for online test taking. Any previous courses you have added will be listed on this page when you login.
Update Instructor Information
The EZ Test Online home page is also where you access your instructor information. Use the “Update Instructor Information” link in the My Courses content area to the right of the screen. This is where you can change your name, email address, login password and time zone.
NOTE: Be sure to set your time zone so that EZ Test Online can correctly assign any times you set for specific EZ Test Online exams.
Add a Course/Section
To add a new course and/or section: 1. Click the Add button.
2. Enter the course name, e.g. MATH 101 – Introductory Algebra. 3. Enter the course section, e.g. #1.
4. Enter the day and time of the course, e.g. MWF 10:30.
5. Enter a custom title if you want an alternative title to replace the one that EZ Test Online automatically creates.
6. Click the Create button to create the course.
If you do not want to create a course at this time, click the Cancel button. You will be returned to the EZ Test Online home page.
Delete a Course
NOTE: Deleting a course will PERMANENTLY and IRREVOCABLY delete ALL of the course tests and submissions.
To delete a course you have created:
1. On the EZ Test Online home page, click the trash can icon next to the course you wish to delete. A dialogue box will appear, prompting you to verify that you wish to delete this course.
2. Click OK to delete this course and ALL of its tests and submissions.
3. Another dialogue box will appear, warning you that ALL of the course tests and submissions will be PERMANENTLY and IRREVOCABLY deleted.
4. Click OK if you wish to continue the course deletion process.
View/Change Course Settings
To view or change the settings such as the course name, times, or add a description for the course:
1. On the EZ Test Online home page, click the link to the course you wish to view/change. 2. On the Course Management page, click the Update Title, Description, etc. link located next
to the Course URL.
3. Modify any of the course settings you wish to change by entering your new information into the fields provided.
4. Click the Save Changes button to save any information you have entered or modified.
You will be returned to the Course Management page and the course title, if changed, will now reflect the changes you made.
Preview a Course
To preview the course page that your students will see once they have logged on:
1. Click the link to the course you wish to preview, on the EZ Test Online home page. This will take you to the Course Management page for the selected course.
2. Click the Preview button located in the EZ Test Online toolbar.
3. The Course preview page will open in a new browser window. This page provides the course title, link to the instructor’s email address, course description (if one was provided), and the list of available tests. See below.
MANAGE ROSTER
To access the student roster management screen for a particular course:
1. Click the link to the course you wish to preview, on the EZ Test Online home page. This will take you to the Course Management page for the selected course.
2. Click the Roster button located in the EZ Test Online toolbar. 3. The student roster for the selected course will appear.
4. If you have many students in your roster, you can use the NEXT and PREVIOUS buttons to page through the student listing.
Change Student SelfRegistration Settings
As an instructor, you have the ability to modify the Student SelfRegistration settings found at the top of the Roster screen. You have the following options available:
§ not permitted – Students will not be able to register themselves. You will be responsible for adding them to the roster.
§ always permitted – Students can register themselves for your EZ Test Online course at any time.
§ permitted until – Students can register themselves for your EZ Test Online course from now until the date you specify. Use the calendar popup button to easily select a cutoff date for your students to register themselves. Next, click Set button next to “permitted until” to select this option.
Note: You must select a date first and then click the Set button, otherwise the option will be reset to the default of "not permitted". The blue set button represents the current setting.
§ permitted between – Students can register themselves for your EZ Test Online course between two dates you specify. Use the calendar popup button to easily select a start and end date for your students to register themselves. Next, click the Set button next to “permitted between” to select this option.
Note: You must select the dates first and then select the radio button option, otherwise the option will be reset to the default of "not permitted". The blue set button represents the current setting.
A status of “open” or “closed” in red type will reflect the settings you have chosen.
Add Students
There are three ways you can add students to your course roster. You can add them manually one at a time, import an existing class roster, or allow student selfregistration.
Add Students Manually One at a Time
To add an individual student for your course:
1. Click the Add Student(s) button.
The Add Student(s) window will appear. 2. Enter the information for the student.
your students.
To change the default labels numbered #1 through #5:
a. Click on any of the field labels, e.g. #2. The Change Optional Information Labels window will appear:
b. Enter the new field labels you wish to use for storing the additional information. For example, you can use these optional fields to store the student’s school ID,
Blackboard® ID, WebCT® ID, or other demographic information.
c. Click the Save Changes button to save the new labels you entered. The optional fields will now have your new labels.
NOTE: These optional fields will not appear in your course unless you change the default labels. Also, if you decide to use these optional fields for a student, you should use them for all of your students.
4. Once you are finished entering the student’s information, click the Add button to add the student to your course roster.
NOTE: The students you add will not appear in the course roster until you have clicked the Done button.
5. You can continue adding another student or click the Done button to return to the Roster screen.
The student(s) you added now appear in the student roster list and are able to log in to take any test for this course.
Import a Student Roster
Instead of adding students one at a time to your course roster, you may want to import an existing class roster from another source.
To import a class roster from an external file:
1. Click the Add Students button.
The Add Student(s) window will appear.
2. Next, click the Browse… button to select the file you wish to import. You may import only tabdelimited data files. The field order for the data is as follows:
§ Full name (format: lastname, first) § id
§ password § email
§ optional field 1 § optional field 2 § optional field 3 § optional field 4 § optional field 5
If you were to view 3 students in the tabdelimited data format using a text editor, it would appear as:
jones, john jones pw123 [email protected] field1 field2 field3 field4 field5 quest, jim quest bandit [email protected] field1 field2 field3 field4 field5 smith, janet smith lion2 [email protected] field1 field2 field3 field4 field5
The spaces are tabs which tell EZ Test Online where the next field of data begins.
3. Once you’ve selected your data file, click the Upload button to upload your student roster file. The students in the uploaded file will be added to your course roster.
View/Change Student Info
To view or change a specific student’s information:
1. Select the course you wish to view or change student information for.
2. Click the Roster button located in the EZ Test Online toolbar. 3. Locate the name of the student you wish to view or change information for. 4. Click on the student’s name.
5. The selected student’s information will be displayed in the Edit Student window. 6. View and/or make any changes to the student.
7. Click the Update button to save any changes you made or click the Cancel button to close the Edit Student window without saving any of your changes.
Delete Students
Deleting Specified Students
To delete specific students from your course roster:
1. Select the course you wish to delete students from.
2. Click the Roster button located in the EZ Test Online toolbar. 3. Locate the student(s) you wish to delete in the student roster listing.
4. Click the checkbox next to the student(s) name.
5. Click the Delete Selected Students button at the bottom of
the student roster listing.
Note: Depending on the size of your student roster, you may need to use the scroll bar in the EZ Test Online screen to scroll down and see the Delete Selected Students button.
6. You will be prompted with a confirmation dialogue box to confirm your wish to delete the selected student(s).
7. By clicking OK, all the selected student(s) are deleted from the course roster.
Alternatively, you can click the name of the student you wish to delete. This will open the Edit Student window. Click the Delete button to delete the selected student. You will be prompted with a confirmation dialogue box.
Deleting All Students
To delete ALL students from a course roster:
1. Select the course you wish to delete students from.
2. Click the Roster button located in the EZ Test Online toolbar.
3. Click the Delete ALL Students button at the bottom of the
student roster listing.
Note: Depending on the size of your student roster, you may need to use the scroll bar in the EZ Test Online screen to scroll down and see the Delete ALL Students button.
4. You will be prompted with a confirmation dialogue box to confirm that you wish to delete ALL the students from the selected course.
Click OK to delete ALL students or click Cancel to cancel the deletion of ALL students.
Export Roster
EZ Test Online allows you to export your student roster for a course as a tabdelimited file. The tab delimited data format allows you to easily import the information into other programs.
To export your roster:
1. Select the course you wish to export the student roster from.
2. Click the Roster button located in the EZ Test Online toolbar.
3. Click the Export Roster button at the bottom of the student roster listing.
Note: Depending on the size of your student roster, you may need to use the scroll bar in the EZ Test Online screen to scroll down and see the Export Roster button.
spreadsheet file. (The dialogue box is for PC users only. Mac browsers will automatically save the file.)
4. Click the Save button to save the exported roster file to a location on your computer’s hard drive.
Note: The file that is downloaded is actually an HTML file that Excel imports as a table. To create a tab delimited file, you need to first open it in Excel and then use Excel to save the file as tabdelimited. It can then be imported into any program that will accept tabdelimited data.
Tip: Renaming the roster.xls file to better represent the course data will help you organize the roster files you export. For example, if you are exporting a roster from Biology 101 Section #1, you might rename the file Roster_Bio1011.xls. Also, be sure to save the file in a place you can easily find it after it has been saved to your computer’s hard drive.
MANAGE GRADEBOOK
The EZ Test Online Gradebook is a simple and easy way to view the results of your students’ online test submissions. You can even export the Gradebook to use with other gradebook software.
To access the EZ Test Online Gradebook for your course:
1. Select the course you wish to view the Gradebook for.
2. Click the Gradebook button in the EZ Test Online Toolbar.
3. The Gradebook screen will appear, displaying a list of the students in the roster for this course and their scores for each test you have created in columns to the right of their names.
View/Modify Gradebook Settings
You can change the order of each test column and how scores are displayed.
To view or change the Gradebook settings:
1. In the Gradebook view (shown above), click the test column title to access the Gradebook settings for the data column you wish to view or modify.
Columns represent tests given for the selected course. Clicking the test title gives you access to the Gradebook settings screen.
Each row contains test submission scores. Clicking the score will take you to the student’s submission for viewing or manual grading.
3. Use the Column Order dropdown menu to select the column position you want this test to appear in the Gradebook.
4. Use the Score Shown dropdown menu to select how scores are displayed in the Gradebook data columns. The two options available are Percentage and Raw Points.
Clicking the apply to all checkbox will apply this setting to all tests for the current course.
5. The Multiple Submissions dropdown menu allows you to set the way scores are displayed if there have been multiple submissions for a given test. There are three options.
§ Show Highest – displays the highest score of all the tests submitted. § Show Average – displays the average score of all the tests submitted. § Show Most Recent – displays the score for the most recent test submitted. Clicking the apply to all checkbox will apply this setting to all tests for the current course.
6. When you have finished adjusting the Gradebook settings, click the Save Changes button to save any settings you modified or click the Cancel button to exit without saving any of your changes.
Download Gradebook
You can download the Gradebook as a tabdelimited data file. The tabdelimited data format is a universal data format that can be imported into almost any other gradebook software or spreadsheet application.
To download your Gradebook data:
1. Access the Gradebook for the course you would like to download data from. 2. Click the Download button.
3. A dialogue box will appear (PC users only. Mac browsers will automatically save the file.), asking you if you wish to open or save the gradebook.xls file.
4. Click Save to save the gradebook.xls to your computer’s hard drive.
Note: The file that is downloaded is actually an HTML file that Excel imports as a table. To create a tab delimited file, you need to first open it in Excel and then use Excel to save the file as tabdelimited. It can then be imported into any program that will accept tabdelimited data.
Tip: Renaming the gradebook.xls file to better represent the course data will help you organize the gradebook data you download. For example, if you are exporting data from Biology 101 Section #1, you might rename the file Gbook_bio1011.xls. Also, be sure to save the file in a place you can easily find it after it has been saved to your computer’s hard drive.
Print Gradebook
To print a copy of the Gradebook for a selected course:
1. Simply click on the Print Version button provided on the main Gradebook screen. A new browser window will open containing a printable version of Gradebook. 2. Use your browser’s print button or select your browser’s File menu and select Print….
WORKING WITH TESTS
After selecting a course, the main List of Tests screen appears. This screen lists all of the tests you have saved for the currently selected course. There are two options for adding tests to your course. The first option and new in this version of EZ Test Online, is creating a new test using existing test question banks or by importing questions from an existing test or by authoring your own questions just as you would with the EZ Test desktop version. The second method is importing a test created with the EZ Test desktop application.
Create a New Test
To create a new test, you must first enter a title for the test in the New Test text field.
After you have entered the title of the test, click the New Test button.
The new test will appear in the list of tests below. This is an “empty” test and does not contain any questions at this time. To add questions to this test you can select questions from a Test Bank or an existing test or author your own questions.
Open a Test Bank
To select questions from a test bank to use in your newly created test:
1. Click the name of the test from the List of Tests screen. By default, EZ Test Online displays the Online Settings screen for the selected test.
2. From the Test Management drop down menu, select the “Select Questions from Banks” option.
The question selection screen will open and by default the McGrawHill Test Banks will be selected. The top portion of the screen is called the Source Frame and the lower part is called the Test Frame. The Source Frame displays the available test bank questions and the Test Frame displays the questions you have selected that are now in your test.
3. Click the folder icon or name of the test bank you would like to add questions from. From within a selected test banks subject there may be a few more subcategories of subjects to select from. Specific titles for a subject will be shown along with a book icon . Clicking on a specific title will display the chapters within the selected title . Selecting a chapter will reveal preauthored questions for that particular chapter for you to select from.
If questions have a Selection Title associated with them, clicking the “list by title” checkbox in the source frame will list questions by their selection title.
Source Frame
Test Frame
Select a different test bank
To select a different test bank or chapter, use the “Questions from” drop down select menu.
Select Questions
Once you have selected the test bank you wish to select questions from you can add questions to your test oneatatime or you can allow EZ Test Online to select a set of questions at random.
One at a time
1. Manually select questions for your test by clicking the button next to the question you wish to add to your test. Each time you click the Select button the question will appear in the test frame at the bottom of the screen.
2. To filter the questions by type, click the check box next to the question type you wish to filter the available questions by. This will make EZ Test Online show only those questions you have checked.
Random Questions
You can add randomly selected questions from a test bank or saved test to your test from the Select Questions screen.
1. To select random questions, type the number of questions you want to add to your test in the select box.
2. You can also choose to keep the randomly selected questions in the order they appear in the test bank or mix them up using the drop down select box in this area.
Multiple Category Selection
You can filter the questions EZ Test will display or allow you to randomly select from by checking the box(es) next to the question types available.
The example above will only display Odd Numbered Multiple Choice Questions.
Each selection in the Questions from: menu is the “container” of the items below it.
Import a Test
You can import a test that has been exported from EZ Test as a .zip file. You can also import an EZ Test Bank Archive Download, Blackboard 6 XML Archive, or Exam View 4 XML files. See step 3 in the Import Other Test Formats section below for more information regarding the file formats.
Import an Exported EZ Test File
When you have an EZ Test Online file ready to import, you can quickly import it using the Import EZ Test option available at the top of the List of Tests:
1. Click on the course you wish to import the test into.
2. From the List of Tests screen, click the Browse… button. (Choose.. button for Mac Users). 3. A Choose File dialogue box will open for you to locate your exported test on your computer’s
hard drive.
4. Select the file you plan on importing, and click the Open button.
5. Click the Import EZ Test button to import the test.
6. The test will appear in the List of Tests for you to deliver to your students online. It’s that easy!
Import Other Test Formats
Alternatively, you can import tests in other formats using the Import button in the Course Management Toolbar
1. Click the Import button in the Course Management Toolbar. The Import Tests screen appears.
2. Click Browse… (Choose... button for Mac Users) to locate the test file you wish to import. 3. Choose the file format. Click on the dropdown arrow and make your selection.
§ Choose EZ Test Online Exported Test to import a file exported from EZ Test Online. Typically this is a single test archive.
§ Choose EZ Test Online Sharing Archive to import an archive file exported from EZ Test Online containing multiple tests.
§ Choose EZ Test Bundler XML Archive to import a file created in XML. This format is used internally by McGrawHill.
§ Choose Blackboard 6 XML Archive to import a .zip file exported from Blackboard. The imported content will be available in the My Saved Tests folder within EZ Test. § Choose Exam View 4 XML File to import a .zip file exported from Exam View. The
imported content will be available in the My Saved Tests folder within EZ Test. § Choose Test Pilot Enterprise File to import a legacy file format from the
predecessor to EZ Test.
NOTE: Not all Blackboard and ExamView content may import directly into EZ Test Online. This is a new feature which will gradually be enhanced and provided via periodic EZ Test updates. EZ Test Online can import b90+ Blackboard 6 XML Archive files and Exam View 4 XML. Currently only multiple choice, true/false,
5. When finished, the test will appear in the List of Tests.
Edit a Saved Test
To edit a saved test, simply click on the test title in the List of Tests within the Course/Section your test was created.
The Online Settings screen will appear by default. To edit or organize questions within the test, select Organize/Edit Questions from the Test Management Toolbar Menu.
Click the icons to the left of the question to edit individual questions, change the question sequence, or remove the question form the test.
Moves the question to the first position in the list.
Moves the question up one position in the list. Moves the question to arbitrary position in the list. Moves the question down one position in the list.
Moves the question to the last position in the list.
Deletes the question from this test.
Duplicates the test question.
Opens a preview of the question in a new window.
Edits or formats the currently selected question.
To change the order of the questions, use the arrow icons or specify an arbitrary position for a question by clicking the arbitrary position icon . The Move dialogue box will open.
Select the new position number from the drop down menu and click “Move”. The question will be highlighted in dark gray and appear in its new position in the list of questions.
Show/Hide a Test
The EZ Test Online service allows you to show or hide course tests from students. This allows you to import and prepare tests ahead of time for later delivery or to hide an already taken test to reuse at a later date.
To show or hide a test:
1. Select the course you wish to show/hide a test for.
2. In the List of Tests screen, the current state of the test is represented by the blue shown or hidden button.
3. To change the shown/hidden status of a test, click the gray shown or hidden button. The new selection will change to blue.
Duplicate a Test
To duplicate an existing test:
1. Click the duplicate icon to the right of the test you wish to duplicate.
2. A new copy of your test will automatically be created in the List of Tests. EZ Test by default uses the same test title but adds the suffix “copy”.
You can now edit or modify the new copy without affecting the original test.
Preview a Course and Tests
To preview a course as it will appear when the student logs on to the Course URL:
1. Click the Preview button in the EZ Test Online toolbar while viewing the List of Tests screen. 2. A new window will appear showing the student view of the course.
3. To preview a test within the course, click on a test link in the course preview window.
Delete a Test
To delete an existing test from a course:
1. Select the course you wish to delete tests from.
2. From the List of Tests, click the trash can icon to the right of the test you wish to delete. 3. A confirmation dialogue box will appear.
Note: Deleting a test from one of your courses will also delete all of its student submissions. 4. Click OK to delete the test.
CREATE/EDIT TEST QUESTIONS
New to EZ Test Online 7.0 is the ability to create and edit your questions online. There are two methods of creating a new question within EZ Test Online. The first, outlined below, is accessed from outside of the question editing mode. In other words, if you are not editing a question directly and need to add a new question to your test, follow the instructions below. The second method is used while you are editing a question and is described in the Question Editing Navigation Bar section that follows.
Write your own questions
You must first have an existing test or a new empty test created before you can create new test questions.
1. From within the course/section your test resides, click the title of the test in the List of Tests screen that you wish to write a question for.
2. By default the Online Settings screen will appear. Select Organize/Edit Questionsfrom the Test Management Toolbar Menu.
3. Next, select the type of question you want to author from the New question drop down select menu and click the New button.
4. The Question Editing window opens with a new screen template with fields for the question type you selected.
5. Complete the fields on the screen. When you are finished, save your work by clicking any of the active navigation buttons at the top of the screen except for the Revert or Cancel buttons. The Revert button will revert the question to its original state and the Cancel button will cancel all edits and close the question editing window.
6. To return to the list of questions in your test, click the “List” button in the Question Editing Navigation bar.
Question Editing Navigation Bar
While you are creating new or editing existing test questions the Question Editing Navigation Bar will appear just above the question editing box. Within this bar the question number you are currently editing appears in the left side drop down menu.
Displays the current question number you are editing. Jump to another question by selecting it from this drop down menu.
Click Previous to view the question positioned before this one.
Click Next to advance to the next question in the sequence.
Click List to save the current question, close the window and return to the list of questions.
Click Revert to revert the question back to its original state before you began editing it.
Click Cancel to cancel all edits and exit Question Editing Window and return to the List of Questions
Click Preview to see how the question will look on screen or when printed.
Click New to save the current question and create a new question of the type selected in the question type drop down menu. The new question will be inserted into the test directly after the question you were editing.
Global Test Question Definitions
Question This is the trunk or entire test question. This is the initial text box in each question edit screen. Besides text, you can include pictures, special characters, random variables, and HTML formatting items using the Object menu or the toolbar in the Rich Text Editor. Followup Followup questions ask the student for elaboration on the original question. Example: If yes, why? Answer(s) Possible answers to the question. Explanation This option allows you to provide an explanation on the answer key. You may choose to include the correct answer and/or an optional explanation of the question and the intended student response. Optional hints This option allows you to provide the student with a hint to the answer. You can add multiple hints per question. The option to show/hide hints is available in the Online Settings menu. References Questions and Section Breaks can be tied together logically using references. Typically, this feature is used to allow a graphic or reading passage to precede a set of associated questions. EZ Test uses the reference field to maintain this association.§ Section Title is an alternative title to allow the question to be listed by this Selection Title when viewing the question from the Select Questions from Banks screen and the “list by title” option is checked in the source frame.
§ References should be a unique string of characters and placed in the Use as Reference field of the Section Break and each associated question’s Tie to Reference field. When EZ Test sorts or scrambles questions, it keeps questions with common references together preceded by the section break.
Note: When scrambling questions, section breaks which are references, yet have no questions in the test referencing them, will not be included when the test is previewed or saved.
§ Text Book Page(s) is an optional field that may be used to indicate on which textbook page(s), a particular question's subject matter is discussed. This field is only displayed in the answer key.
§ Long is an optional checkbox that allows you to specify that a question is permitted to span pages on output. That is, if you create a question that is longer than 1 printed page, this checkbox MUST be checked or else the output pagination will not be correct and may result in a question flowing off the page and loss of information on the test.
Question Formatting
EZ Test uses an intuitive, easytouse Rich Text Editor interface that is similar to popular word processing applications.
The new interface allows you to easily undo and redo changes; cut, copy and paste text; modify font, font size and font color; make your text bold, italic or underline; use superscript and subscripts; remove formatting; and insert images, equations, symbols, lines and tables.
Rich Text Editor Toolbar
Besides the toolbar functions, the pulldown menus provide additional options and display any keyboard shortcuts available.
Edit Menu
§ Undo (or Ctrl+Z) allows you to undo your last change.
§ Redo (or Ctrl+Y) allows you to redo a change that was undone. § Cut (or Ctrl+X) cuts any selected text to the clipboard.
§ Copy (or Ctrl+C) copies any selected text to the clipboard.
§ Paste (or Ctrl+V) pastes what is currently in the clipboard into the question editing screen at the cursor position. (NOTE: You can not paste images from Word documents or other programs into EZ Test.)
§ Paste Special… Depending on what type of text is currently in the clipboard, it allows you a few choices on how the text will be inserted. (NOTE: Even though you can select options, EZ Test automatically pastes text into your question based on the format it is currently within the clipboard. For example, if you copied text from a web page, it will automatically be pasted into EZ Test as “Styled HTML (inline)”. If the text in the clipboard is plain text, it will automatically be pasted into EZ Test as plain text.)
§ Spelling… (or F7) checks the spelling in the current question.
§ Check Spelling As You Type – this feature by default is set to on. Any misspelled words are underlined in red as you type. To turn this feature off, click the toolbar button or select this option from the Edit menu. By default EZ Test Online uses setup to use the U.S. English dictionary.
View Menu
§ Code vs. Question WYSIWYG view – To view the actual XHTML code behind what you are seeing select “Code” from the View drop down menu.
§ Browser View vs. Window View – Browser view is the default setting allowing you to edit your question within the EZ Test framework page. Window view opens the question editor in a new browser window.
§ Show Paragraph Markers – Provides visual feedback where paragraph and line breaks are within your question.
Object Menu
§ Insert Symbol... – Opens the insert symbol window to easily insert one of many special symbols.
Simply click on the symbol you wish to insert and click the OK button.
§ Insert Multimedia from Library – Opens the Insert Image window to select an image, formula or .mp3 sound file from the library to be inserted into your question.
You may also select an image not in your library, for example, from your hard drive by clicking the “Local Image” computer icon. Click the “Browse…” button, navigate to the image file location and select it to be added to your question. This image will automatically be imported to the Library for future use.
§ Insert New Picture from Hard Disk – Allows you to select an image from your computer’s hard disk to be inserted into your question and added to the Multimedia Library.
§ Insert New Formula – Opens the Equation Editor to create an equation to be inserted into your question and added to the Multimedia Library. For details on using the Equation Editor, see Creating a Formula in the Multimedia Library section of this User’s Guide or click the question mark icon in the top right of the Equation Editor toolbar.
§ Edit Existing Formula – Opens the Equation Editor to edit an existing formula. Select an existing formula in a question by clicking on it once and then select Edit Existing Formula from the Object pulldown menu to edit it.
§ Insert/Edit Hyperlink (or Ctrl +K) – Allows you to insert a hyperlink to link to another website or email address. This feature is intended for tests delivered via EZ Test Online. (NOTE: be sure to select “New Window” from the Target Frame dropdown select box. This will ensure that your student does not leave the Test Page by having the link open in a new browser window instead of within the test page).
§ Remove Hyperlink – Removes hyperlink from selected question text that has a hyperlink assigned to it.
Format Menu
§ Bold (or Ctrl+B) – Makes any nonbold text selection bold. Will also remove bold formatting from any selected bold text.
§ Italic (or Ctrl+I) – Makes any nonitalic text selection italic. Will also remove italic formatting from any selected italic text.
§ Underline (or Ctrl+U) – Makes any nonunderlined text selection underlined. Will also remove underline from any selected underlined text.
§ Color – Allows you to choose a color for any selected text. § Align Left (or Ctrl+L) – Left justifies current paragraph. § Align Center (or Ctrl+E) – Center justifies current paragraph § Align Right (or Ctrl+R) – Right justifies current paragraph
§ Remove Formatting (or Ctrl + Space) – Removes all formatting from any selected text. § Format Painter (or Ctrl+Shift+C) – Copies the format from any selected text block and
applies it to another text block. To use it, first select the text you wish to copy the format of. Click the Format Painter icon (or press Ctrl+Shift+C) and select the block of text you wish to apply the formatting to.
NOTE: The format painter only works within each of the question text fields. In other words, you can not select text in the Question text box field and apply its format to text in the Answer text field using the Format Painter tool.
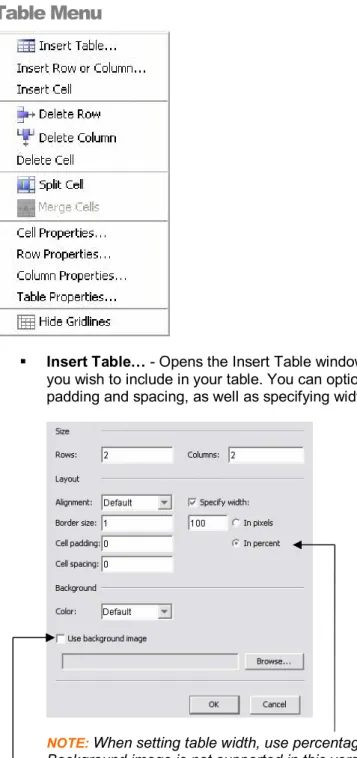
Table Menu
§ Insert Table… Opens the Insert Table window. Select the number of rows and columns you wish to include in your table. You can optionally change the alignment, border, cell padding and spacing, as well as specifying width and background color.
NOTE: When setting table width, use percentage for the best output. Background image is not supported in this version of EZ Test)
§ Insert Row or Column… Opens the Insert Row or Column window.
Enter the number of rows or columns you wish to insert. Select Row or Column and select insertion location, below the current selection or above the current selection.
§ Insert Cell – Inserts a table cell at the current cursor location. (Note: cursor must be inside a table cell for this option to be available.)
§ Delete Row – Deletes the row at the current table cell location. § Delete Column – Deletes the column at the current table cell location. § Delete Cell – Deletes the cell at the current table cell location.
§ Split Cell – Allows you to split a selected table cell into either a number of rows or columns.
§ Cell Properties… Allows you to set a variety of properties for the selected table cell such as alignment, width, height, row & column spans, text wrapping, and background color. (Note: when specifying widths and heights use percentages instead of pixels for the best test output. Use of a background image is not supported in this version of EZ Test.)
§ Row Properties… Allows you to set a variety of properties for the selected table row such as alignment, height, and background color. (Note: when specifying heights use percentages instead of pixels for the best test output. Use of a background image is not supported in this version of EZ Test.)
§ Column Properties… Allows you to set a variety of properties for the selected table column such as alignment, width, and background color. (Note: when specifying widths use
percentages instead of pixels for the best test output. Use of a background image is not supported in this version of EZ Test.)
§ Table Properties… Allows you to set a variety of properties for the selected table such as alignment, width, height, cell spacing & padding, border size and background color. (Note: when specifying widths and heights use percentages instead of pixels for the best test output. Use of a background image is not supported in this version of EZ Test.)
§ Show/Hide Gridlines – This feature is useful when you have tables that have border widths set to zero. It allows you to see where the column/row grid is in the table for editing
Working with Text
Entering text into the question fields using the Rich Text editor is as easy as using your word processor. However, there are few notable items to be aware of.
Line Break vs. Paragraph Break
By default when you press the enter key to create spacing between lines of text, the Rich Text Editor is inserting line breaks rather than paragraph breaks. To create a new “paragraph”, you need to type SHIFT+ENTER.
With this in mind, if you change the alignment of a block of text and you do not create a paragraph break using SHIFT+ ENTER, the alignment will affect both blocks of text.
Thus, to apply one alignment to one block of text and another alignment to another block of text, it will be necessary to use SHIFT+ENTER between those blocks of text.
Spacing Around Graphics
Sometimes when you insert a photo or graphic into your question, it may be too close to the question text. To provide more spacing above or below, insert blank lines as appropriate.
True/False Questions
1. Enter or edit the question text in the first text box under the question type heading.
2. Indicate the correct answer for this question by selecting True or False from the Answer is drop down select box in the top right of the question editing area.
3. When you are finished, save your work by clicking any of the active navigation buttons at the top of the screen except for the Revert or Cancel buttons. The Revert button will revert the question to its original state and the Cancel button will cancel all edits and close the question editing window.
Optional Steps
§ Enter the text for the explanation in the Explanation box.
§ If you wish to include a followup question, check the include this followup question checkbox and enter your followup question in the text box.
§ You can add hints for the students to view during the online exam. Enter the hint in the numbered text box. Click the Add hint icon to add additional hints.
§ Enter a Selection Title to allow the question to be listed by this Selection Title when viewing the question from the Select Questions from Banks screen and the “list by title” option is checked in the Source Frame.
§ If this question belongs under a Section Break heading containing instructions, enter the name of the Section Break reference in the Tie to Reference box.
§ If the answer is referenced within a textbook, enter the Textbook page(s) to which the question is referenced in the Textbook Page(s) text box.
§ If you are using Random Variables, enter the variable information by scrolling down and clicking the Random Variables button.
Yes/No Questions
1. Enter or edit the question text in the first text box under the question type heading.
2. Indicate the correct answer for this question by selecting Yes or No from the Answer is drop down select box in the top right of the question editing area.
3. When you are finished, save your work by clicking any of the active navigation buttons at the top of the screen except for the Revert or Cancel buttons. The Revert button will revert the question to its original state and the Cancel button will cancel all edits and close the question editing window.
Optional Steps
§ Enter the text for the explanation in the Explanation box.
§ If you wish to include a followup question, check the include this followup question checkbox and enter your followup question in the text box.
§ You can add hints for the students to view during the online exam. Enter the hint in the numbered text box. Click the Add hint icon to add additional hints.
§ Enter a Selection Title to allow the question to be listed by this Selection Title when viewing the question from the Select Questions from Banks screen and the “list by title” option is checked in the Source Frame.
§ If this question belongs under a Section Break heading containing instructions, enter the name of the Section Break reference in the Tie to Reference box.
§ If the answer is referenced within a textbook, enter the Textbook page(s) to which the question is referenced in the Textbook Page(s) text box.
§ If you are using Random Variables, enter the variable information by scrolling down and clicking the Random Variables button.
§ If you wish to add this question to a category, click the Categorize button at the bottom of the screen and select the category you wish to add the question to or create a new category.
Ranking Questions
1. Enter or edit the question text in the first text box under the question type heading.
2. Enter the choices for ordering in the correct sequence.
§ To edit a choice, enter the changes in the Answers choice box.
§ To add another choice, click the Add item icon , enter your text in the new choice text box that appears. Repeat these steps for as many additional choices as you want to add.
§ To delete a choice, click the delete item icon next to the choice.
3. When you are finished, save your work by clicking any of the active navigation buttons at the top of the screen except for the Revert or Cancel buttons. The Revert button will revert the question to its original state and the Cancel button will cancel all edits and close the question editing window.
Optional Steps
§ Enter the text for the explanation in the Explanation box.
§ You can add optional hints for the students to view during the online exam. Enter the hint in the numbered text box. Click the Add hint icon to add additional hints.
§ Enter a Selection Title to allow the question to be listed by this Selection Title when viewing the question from the Select Questions from Banks screen and the “list by title” option is checked in the Source Frame.
§ If this question belongs under a Section Break heading containing instructions, enter the name of the Section Break reference in the Tie to Reference box.
§ If the answer is referenced within a textbook, enter the Textbook page(s) to which the question is referenced in the Textbook Page(s) text box.
the screen and select the category you wish to add the question to or create a new category
Matching Questions
1. Enter or edit the question text in the first text box under the question type heading.
2. Enter the answers. Type the correct Choice and Match in each box.
§ You may also enter distractors (choices with no correct match).
NOTE: EZ Test automatically scrambles the choices and distractors when the test is generated.
§ To edit a choice, enter the changes in the choice box.
§ To add another choice, click the Add Pair icon , enter answers. § To delete a choice, click the delete item icon next to the choice.
3. When you are finished, save your work by clicking any of the active navigation buttons at the top of the screen except for the Revert or Cancel buttons. The Revert button will revert the question to its original state and the Cancel button will cancel all edits and close the question editing window.
Optional Steps
§ Enter the text for the explanation in the Explanation box.
§ If you wish to include a followup question, check the include this followup question checkbox and enter your followup question in the text box.