Data
Team
Scheduler
Click on Settings in the Scheduler menu, then Setup.
Figure 1 Scheduler Seƫngs
Setup Menu
Figure 2 Scheduler Setup
Enter the number of chairs your office uses. Each screen in the scheduler displays four columns (chairs). Detail readability requires four chairs be displayed at one time and is fixed. Changing the size of the scheduler requires changing the monitor resolution. Change screens to show additional chairs by clicking the right arrow at the top.
Scheduling increments of 10 or 15 minutes will show on the screen. Experience shows ten minute
increments provide more flexibility. NOTE: Changing the increment size after having scheduled appointments will cause discrepancies with the display.
Phone numbers can be included on scheduler printouts but more detail will show without them.
No Shows can be recorded automatically in the patient ledger by selecting Yes.
Automatic refresh updates each terminal to reflect the latest changes by other terminals.
Dentist times can be set to “block out” or to “allow scheduling”.
Column Headings
Figure 3 Column Headings
Total Chairs are displayed four at a time, regardless of the actual number of chairs. Doctor Colorsfacilitate identification in multiple doctor environments.
Doctor Screens simplify individual doctor’s scheduling by grouping their chairs on one screen. Appoint by Doctoron a particular computer displaying that doctor’s chairs.
NOTE: To print copies of the daily schedule, change the Print Order to show the chairs you want to
print.
Holidays/Events
Figure 4 Holidays/Events
Holidays/Eventsblocks scheduling for the selected parameter of time. Past times should be deleted or cleared by individually deleting or by purging. One-time, weekly and annual Holidays and Events can be set up. Holidays with changing dates (such as, Thanksgiving) must be entered as Once, whereas holidays such as Christmas where the date is always the same are Yearly.
Den
Ɵ
st Times
Dentist Times is usedwhen providers will not be available during customary hours or will be available outside of customary hours. Available for Scheduling is permitted by checking the appropriate box. No checkmark blocks scheduling.
Figure 5 DenƟst Times
NOTE: The option to schedule during a blocked out time is not available in Holidays/Events.
Purge Appointment Times
Figure 6 Purge Appointment Times
Purging past appointments periodically decreases the amount of overhead sorting through patients.
Select any date. NOTE: This process is irreversible, so make a saved copy of the files before proceeding.
Scheduling Appointments
Existing Patients are scheduled by clicking on the appointment beginning then ending time to open
the Browse Patient list. Select the patient to schedule. Select the treatment procedures from the treatment plan on the right. Highlight the procedure to be scheduled, click the arrow and the selected procedure will be moved into the appointment time. If the procedure is not in the treatment plan, use Insert to input procedures by code one at a time.
New Patients are scheduled by clicking Add Patient on the browse. Entering only the name does not
activate the Find Patient Appointment or add the name to the database. It is just a note on the daily schedule. To add the new patient to the database, click the Patient Info button and add details to the new patient’s record.
Scheduling by Procedure Code allows other program features to be activated, such as total production
booked, automatic recall, charging work from the scheduler, scheduled work email reminders, etc.
Figure 7 Scheduling by Procedure Code
Cut and Paste Appointments
To easily move an appointment from one time to another, right click the appointment and left click Cut. Move to the new appointment starting time, right click the time and left click Paste. This is convenient for recall as well as for changed appointments. Use the 6 Months Ahead button for Recall appointments. Or use Week-at-a-Glance to find an open time.
Edi
Ɵ
ng/Nota
Ɵ
ons for the Scheduler
Right click the appointment to display this screen: The first choices in Red move or change the entire appointment; those in blue annotate the existing appointment status by symbol; the remaining perform specific actions as later explained.
Figure 8 EdiƟng and NotaƟons on the Scheduler
To Edit the Scheduler right click the appointment and select “Change”.
Figure 9 Status Symbols
De
fi
ni
Ɵ
on of Symbols
for Marking Appointment StatusLM Left Message; X Confirmed; @ Arrived; NS No Show; CLN Cancel Late Notice; L Lab work;
NP New Patient
Only Lab work and New Patient can be used in conjunction with any of the other status symbols.
No Show and Cancel Late Notice initiate a prompt to move the appointment informaton to the
Scheduling Needed List. They can be set to automatically post a charge to the ledger for these
occurences, if so desired. These charges must be set in Settings>Fee Schedules>Edit>Master>Codes 2 (No Show) and 3 (Canceled Late Notice).
Speci
fi
c Ac
Ɵ
ons Enhancing Scheduler
. Figure 10 Scheduler Enhancements
Click Performed tocharge the entire appointment from the scheduler. Each procedure is transferred individually from the scheduler to the ledger including the default treatment notes. It turns the appointment grey indicating it has been charged and removes the procedures from the treatment plan. The procedures appear on the ledger exactly as entered when diagnosed. File insurance as usual. The procedure was entered into the computer one time only and has now been used in up to eight ways!
X-ray uses the path designated in Settings> System Settings> X-ray Software to take you to this
patient’s digital x-ray program as a convenience.
Phone Dialer dials either the primary or secondary telephone number. There must be a telephone
modem in the computer with a basic telephone line attached to the computer. Settings> System
Settings> Modem’s Communications Port allows the selection of the proper port setting. If a modem is properly installed on the computer, it will be displayed in the Device Manager under Computer
Bu
Ʃ
ons on the Scheduler
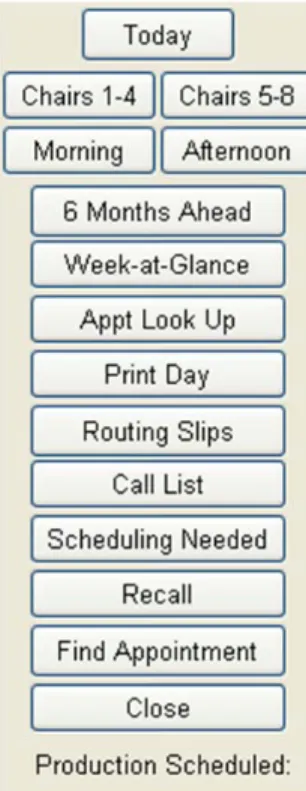
Most of the buttons are self-explanatory, such as viewing today’s appointments, chairs in groups of 4, morning, afternoon and 6 months ahead. Some may require further explanation.
Figure 11 Scheduler BuƩons
Week at a Glance
Figure 12 Week at a Glance
This useful tool is used to find open appointment times. Click on the desired time to move directly to that time slot in the scheduler.
Today button returns to today’s date from all locations. Chairs buttons allow easy navigation to four chairs at a time. Click buttons for morning and afternoon screens.
6 Months Ahead button facilitates cutting and pasting for six month recall.
Week at Glance shows empty available slots and takes you directly to them.
Locate Patient appointment by patient name or number. Prints daily schedule, routing slips and call list.
Scheduling Needed provides a list of patients who need appointments.
Access the recall system
Scheduling Needed
Cancellations and missed appointments or any appointment not rescheduled but simply deleted are major factors in losing patients from the practice. When not rescheduled, put the patient in Scheduling Needed.
Figure 13 Scheduling Needed
When deleting an appointment, the system asks to place it on the scheduling needing list. Yes takes all of the appointment information and stores it by the cancellation date. A key technique is to ask the patient if they mind being called to reschedule at the time they are cancelling. No Show patients need to be reappointed right away while they are feeling repentant!
Get permissionto call. Be sensitive to what may be bothering them and try to discern what it will take to get them rescheduled. This feature is a primary tool in fighting patient loss. Develop effective answers to their statements and write them down for use. An example: A patient is getting ready to walk out after recall visit. Say, “Ms. Jones we need to schedule your six month appointment”. She says, “Oh, I’ll just call.” Reply, “Let’s make one so you will at least have something to trade and maybe it will be just right”. These are called scripts and they state things a certain way to get a positive result. Script answersoften lead to the discovery of other problems that might be fixable.
NOTE: For a list of script examples, call Data Team. Some examples are in this manual’s Appendix.
Find Open Time
An easy way to find open appointment times is to select by date and chair. When a convenient date is found, click “Make Appt”. A rescheduled appointment will have the exact detail as before, including procedures. New appointments will need procedures to be added.
Rou
Ɵ
ng Slips
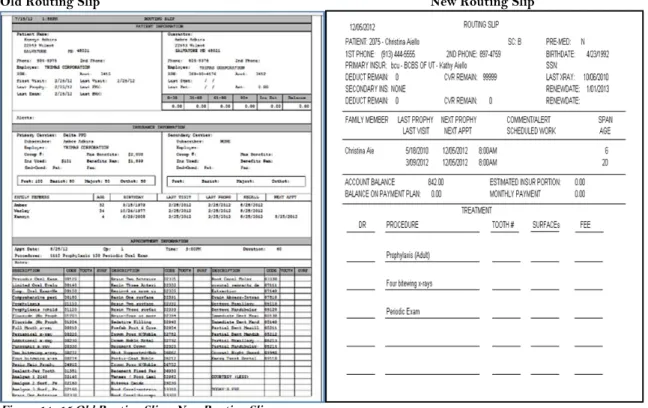
Routing Slips are a throwback to no computer and simpler computer days. But they do have value other than directing patient activity. They inform personnel in the operatory, not only what is going to be done today, but the status of the patient’s financial account, what other family members need to have done, what insurance they have, remaining benefits, etc.
Old Routing Slip New Routing Slip
Figure 14 -15 Old Routing Slip – New Routing Slip
There are two forms of Routing Slips with three selections as to what will be included. Select office preferences in Settings> Report Settings> Page Two
Find Scheduled Appointment
Select a patient from the patient browse to see all past (that have not been purged) and future appointments. Highlight and select the appointment to jump directly to that day and time in the Scheduler. Patients added simply as New Patients in the scheduler will not show up in this feature. They must be added to the actual database by entering them as patients through Patient Info when making the appointment.