OfficeConnect
®Network Storage Server 20 (3C19500)
Network Storage Server 40 (3C19501)
3Com Corporation ■ 5400 Bayfront Plaza ■ Santa Clara, California ■ 95052-8145 Copyright © 2000, 3Com Technologies. All rights reserved.
No part of this documentation may be reproduced in any form or by any means or used to make any derivative work (such as translation, transformation, or adaptation) without written permission from 3Com Technologies.
3Com Technologies reserves the right to revise this documentation and to make changes in content from time to time without obligation on the part of 3Com Technologies to provide notification of such revision or change.
3Com Technologies provides this documentation without warranty, term, or condition of any kind, either implied or expressed, including, but not limited to, the implied warranties, terms or conditions of merchantability, satisfactory quality, and fitness for a particular purpose. 3Com may make improvements or changes in the product(s) and/or the program(s) described in this documentation at any time.
If there is any software on removable media described in this documentation, it is furnished under a license agreement included with the product as a separate document, in the hard copy documentation, or on the removable media in a directory file named LICENSE.TXT or !LICENSE.TXT. If you are unable to locate a copy, please contact 3Com and a copy will be provided to you.
UNITED STATES GOVERNMENT LEGEND
If you are a United States government agency, then this documentation and the software described herein are provided to you subject to the following:
All technical data and computer software are commercial in nature and developed solely at private expense. Software is delivered as “Commercial Computer Software” as defined in DFARS 252.227-7014 (June 1995) or as a “commercial item” as defined in FAR 2.101(a) and as such is provided with only such rights as are provided in 3Com’s standard commercial license for the Software. Technical data is provided with limited rights only as provided in DFAR 252.227-7015 (Nov 1995) or FAR 52.227-14 (June 1987), whichever is applicable. You agree not to remove or deface any portion of any legend provided on any licensed program or documentation contained in, or delivered to you in conjunction with, this User Guide.
Unless otherwise indicated, 3Com registered trademarks are registered in the United States and may or may not be registered in other countries.
3Com and OfficeConnect are registered trademarks of 3Com Corporation. The 3Com logo is a trademark of 3Com Corporation.
Microsoft, Windows, and Windows NT are registered trademarks of Microsoft Corporation. Netscape Navigator is a registered trademark of Netscape Communications. Novell and NetWare are registered trademarks of Novell, Inc. UNIX is a registered trademark in the United States and other countries, licensed exclusively through X/Open Company, Ltd. All other company and product names may be trademarks of the respective companies with which they are associated.
Environmental Statements
It is the policy of 3Com Corporation to be environmentally- friendly in all operations. To uphold our policy, we are committed to:
■ Establishing environmental performance standards that comply with national legislation and regulations.
■ Conserving energy, materials and natural resources in all operations. ■ Reducing the waste generated by all operations. Ensuring that all waste
conforms to recognized environmental standards. Maximizing the recyclable and reusable content of all products.
■ Ensuring that all products can be recycled, reused and disposed of safely. ■ Ensuring that all products are labelled according to recognized environmental
standards.
■ Improving our environmental record on a continual basis. End of Life Statement
3Com processes allow for the recovery, reclamation and safe disposal of all end- of- life electronic components.
Regulated Materials Statement
3Com products do not contain any hazardous or ozone- depleting material.
Environmental Statement about the Documentation
The documentation for this product is printed on paper that comes from sustainable, managed forests; it is fully biodegradable and recyclable, and is completely chlorine-free. The varnish is environmentally-friendly, and the inks are vegetable-based with a low heavy-metal content.
C
ONTENTS
About this Guide 5Introducing the OfficeConnect Network Storage Server 7 Positioning the Network Storage Server 12
Choosing a Suitable Site 12
Stacking the Network Storage Server 12 Powering Up and Powering Down 14
Powering Up the Network Storage Server 14 Powering Down the Network Storage Server 14 Using the Network Storage Server 15
Who Can Access the Network Storage Server? 15 Accessing the Network Storage Server 15 Using the Administration System 16
The Administration System 16
Who Can Access the Administration System? 16 Accessing the Administration System 16 Administration System Features 17 Users and Shares 17
Configuration 20 Status 20 Commands 20 Help/Support 20
Failsafe Mode 21
Accessing the Failsafe Mode 21 Failsafe Mode Options 22 Replacing A Faulty Hard Disk 23
Hard Disk Safety Information 23 About the Hard Disk 23 Replacing the Hard Disk 24
Rebooting the Network Storage Server 26 IP Addressing 27
The Internet Protocol Suite 27
Managing the Network Storage Server over the Network 27 How does a Device Obtain an IP Address and Subnet Mask? 29 Troubleshooting 30
Spot Checks 30 Power LED is Off 30 Alert LEDs 30 LAN LEDs are Off 31 Network Appears Slow 31
Cannot Access Files on the Network Storage Server 32 Cannot Access the Administration System 32
Forgotten Administration System Password 32 Installation Problems 32
Frequently Asked Questions 34 Safety Information 36
Safety Information 36
Wichtige Sicherheitshinweise 36 Consignes importantes de sécurité 37 Technical Specifications 38 Standards 38 System Requirements 39 Ethernet Performance 39 Cable Specifications 39 Technical Support 40
Online Technical Services 40 World Wide Web Site 40
Support from Your Network Supplier 41 Support from 3Com 41
Returning Products for Repair 43 Glossary 44
3Com Corporation Limited Warranty 48 Regulatory Notices 51
A
BOUT
THIS
G
UIDE
This guide provides the information you need to use the two OfficeConnect® Network Storage Server models:
■ OfficeConnect Network Storage Server 20 (3C19500)
■ OfficeConnect Network Storage Server 40 (3C19501)
The OfficeConnect Network Storage Server is compatible with OfficeConnect Hubs and Switches.
The guide is intended for use by those responsible for installing and setting up network equipment; consequently, it assumes a basic working knowledge of LANs (Local Area Networks) and network storage systems.
If a release note is shipped with this OfficeConnect Network Storage Server and contains information that differs from the information in this guide, follow the information in the release note.
Most user guides and release notes are available in Adobe Acrobat Reader Portable Document Format (PDF) or HTML on the 3Com World Wide Web site:
http://www.3com.com
Naming Convention
Throughout this guide, the OfficeConnect Network Storage Server 20 and the OfficeConnect Network Storage Server 40 are referred to as “the Network Storage Server”.
This guide also makes reference to Category 3 and Category 5 Twisted Pair Cable. For convenience, these cables will be referred to as Twisted Pair Cable throughout this guide.
Icon Conventions
Table 1 lists the conventions that are used throughout this guide.
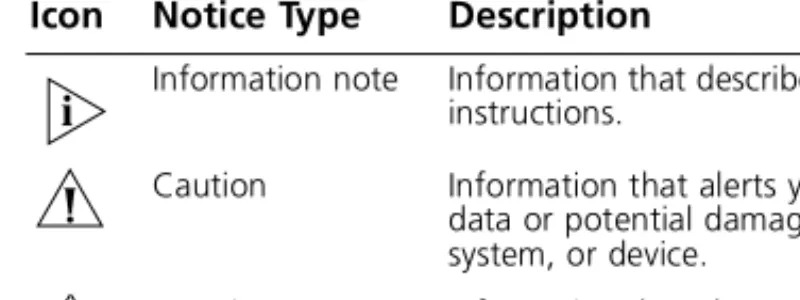
Table 1 Notice Icons .
Icon Notice Type Description
Information note Information that describes important features or instructions.
Caution Information that alerts you to potential loss of data or potential damage to an application, system, or device.
Warning Information that alerts you to potential personal injury.
Feedback about this User Guide
Your suggestions are very important to us. They will help make our documentation more useful to you. Please e-mail comments about this document to 3Com at:
Please include the following information when commenting:
■ Document title
■ Document part number (on the title page)
■ Page number (if appropriate) Example:
■ OfficeConnect Network Storage Server User Guide
■ Part Number DUA1950-0AAA01
■ Page 24
Do not use this e-mail address for technical support questions. For information about contacting Technical Support, see “Technical Support” on page 40.
Related Documentation
In addition to this guide, each OfficeConnect Network Storage Server document set includes one Quick Installation Guide. This poster contains the instructions you need to install and configure your Network Storage Server.
Year 2000 Compliance
For information on Year 2000 compliance and 3Com products, visit the 3Com Year 2000 Web page:
http://www.3com.com/products/yr2000.html
Product Registration
You can now register your OfficeConnect Network Storage Server on the 3Com web site and receive up-to-date information on your product:
http://support.3com.com/warrantyregistration/ register.pl
I
NTRODUCING
THE
O
FFICE
C
ONNECT
N
ETWORK
S
TORAGE
S
ERVER
Welcome to the world of networking with 3Com®. In the modern business environment, communication and sharing information is crucial. Computer networks have proved to be one of the fastest modes of communication but, until recently, only large businesses could afford the networking advantage. The OfficeConnect® product range from 3Com has changed all this, bringing networks to the small office.
The Network Storage Server is ideal for adding extra storage space to your network. It is compact and attractively designed for desktop use and can be used with other OfficeConnect products. These products form part of the OfficeConnect range which neatly stack together with the OfficeConnect stacking clip. The Network Storage Server provides you with a quick-to-install, efficient and inexpensive alternative to complex, more-expensive computer servers.
The Network Storage Server is an ideal solution for users and groups of people who simply require more storage space for their data and the ability to share data across the entire network quickly and easily.
The OfficeConnect Network Storage Server 20 (3C19500) has a Hard Disk capacity of 20 GB whereas the OfficeConnect Network Storage Server 40 (3C19501) has a Hard Disk capacity of 40 GB. This is the only difference between the two models.
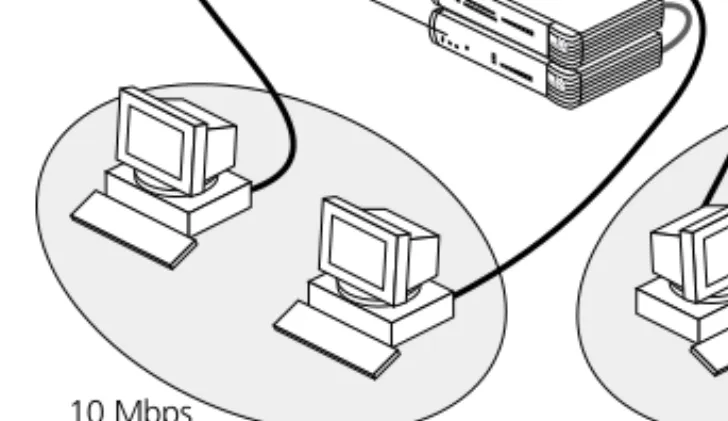
Figure 1 The Network Storage Server Operating in a Network
Figure 1 shows how a Network Storage Server adds extra storage space to your network. The workstations are connected to a Dual Speed OfficeConnect Hub to form a network. The Network Storage Server is then connected to the Hub with a Twisted Pair Cable to give all workstations access to the Network Storage Server. Dual Speed Hub 10 Mbps 100 Mbps Network Storage Server
Summary of Features
The Network Storage Server has the following features:
■ One auto-negotiating Ethernet or Fast Ethernet port so you can install the Network Storage Server in an Ethernet (10 Mbps) network, a Fast Ethernet (100 Mbps) network or a dual-speed (10 or 100 Mbps) network. This port can also operate in full or half duplex mode.
■ 20 GB or 40 GB of storage space.
■ LED status indicators on the front panel.
■ A Web-based Administration System that allows a Network Administrator to:
■ Configure and manage the Network Storage Server. ■ Create Users, Groups and Shares and impose security
restrictions on the Network Storage Server.
■ A Web-based Failsafe Mode that allows the Network Administrator to:
■ Upgrade its Operating System. ■ Run Hard Disk checks.
■ Reset the Unit back to its factory defaults.
■ An online help system that gives explanations and instructions on how to configure the Network Storage Server and use the Administration System.
■ A replaceable Hard Disk, in the unlikely event the Hard Disk should fail.
System Requirements
To install your Network Storage Server, refer to the “Quick Installation Guide” (DIA1950-0AAA0x) that accompanies this product. In summary, you will need:
■ A functioning Ethernet or Fast Ethernet network.
■ One spare Ethernet or Fast Ethernet port on your Hub or Switch for each Network Storage Server you wish to install.
■ An Operating System (Windows® 95, Windows 98 or Windows NT 4.0) with network support configured, running on your workstations.
■ Microsoft Internet Explorer 4.0 (or above) or Netscape Navigator 4.5 (or above) as your Web browser to access the Administration System.
The Network Storage Server — Front View
20% 40% 60% 80% 90%
Alert Power Disk Shutdown OfficeConnect Network Storage Server 20
95% Green = ON
Amber = Standby
Disk Space Used LAN
10 100 Activity
LAN Status LEDs
The Activity LED indicates t
The 10 Mbps and the 100 Mbps LEDs indicates the type of connection made.
here is an Ethernet or Fast Ethernet connection and packets are being transmitted or received.
Power LED Green
Amber
indicates that the power supply to the Network Storage Server is present.
indicates the unit has either been shut down or is in Failsafe Mode.
Disk LED Green
Flashes when there is Hard Disk activity.
Disk Space Used LEDs Green/Yellow/Amber
Indicates the amount of Hard Disk space used.
Alert LED Orange
Alerts you when there is a potential error.
Shutdown button
Allows the Network Storage Server to be powered down or restarted in Failsafe Mode.
The Network Storage Server — Rear View
Power Adapter SocketOnly use the 12V power adapter
that is supplied with this Network Storage Server. Do not use any other adapter.
(part number 3C16749)
Hard Disk Blanking Plate
The Hard Disk is fitted behind this blanking plate. Refer to the section on ‘Replacing A Faulty Hard Disk’, for more information.
12V DC 2A MAX
WARNHINWEIS: RJ-45-Port.
Hierbei handelt es sich um eine abgeschirmte RJ-45 Datenbuchse. Sie darf nicht als Telefonanschluß verwendet werden. Stecken Sie ausschließlich einen Datenstecker des Typs RJ-45 in diese Buchse.
AVERTISSEMENT: port de données RJ-45.
Il s'agit d'une prise de données RJ-45 blindée, qui ne peut pas être utilisée comme prise téléphonique. Raccordez uniquement un connecteur de données RJ-45 à cette prise.
LOCK
Ethernet/Fast Ethernet LAN Port
Use a Twisted Pair cable with RJ-45 connectors. You can connect the Network Storage Server to a Hub or a Switch that has a spare Ethernet or Fast Ethernet port. This port is capable of auto-negotiating for 10 Mbps or 100 Mbps operation and operates in full or half duplex mode.
Lock Slot
This slot allows you to fit a security lock (
ecure your Network Storage Server to a desk.
not included) and physically s
LAN
WARNING: RJ-45 port.
This is a shielded RJ-45 data socket. It cannot be used as a telephone socket. Only connect an RJ-45 data connector to this socket.
Please Handle With Care. This product is sensitive to mechanical shock. Do not subject this product to vibration,
or sudden movement. unnecessary transit
LED Functions
Table 2 explains how the LEDs on the front of the Network Storage Server function:
Table 2 The Network Storage Server LED Function Table
Color Appearance Meaning
Alert LED
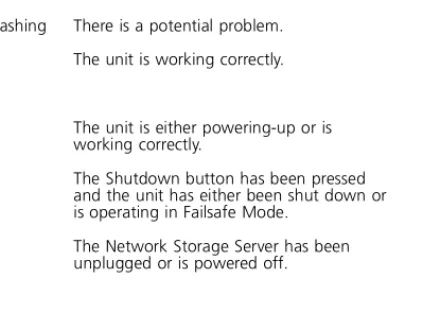
Orange On or Flashing There is a potential problem. None Off The unit is working correctly. Power LED
Green On The unit is either powering-up or is working correctly.
Amber On The Shutdown button has been pressed and the unit has either been shut down or is operating in Failsafe Mode.
None Off The Network Storage Server has been unplugged or is powered off. Disk LED
Green Flashing There is Hard Disk activity. None Off There is no Hard Disk activity.
Color Appearance Meaning
Activity LED
Green Flashing There is an Ethernet or Fast Ethernet connection and packets are being transmitted or received.
None Off There are no packets being transmitted or received.
10 LED
Yellow On There is a 10 Mbps Link enabled. None Off There is no 10 Mbps Link. 100 LED
Green On There is a 100 Mbps Link enabled. None Off There is no 100 Mbps Link. Disk Space Used LEDs
Green/Yellow/Amber Indicates the amount of Hard Disk space used.
If you suspect there may be a problem with the Network Storage Server, consult the “Troubleshooting” section on page 30.
P
OSITIONING
THE
N
ETWORK
S
TORAGE
S
ERVER
Choosing a Suitable Site
When you install your Network Storage Server, ensure:
■ It is out of direct sunlight and away from sources of heat.
■ Cabling is away from power lines, fluorescent lighting fixtures, and sources of electrical noise such as radios, transmitters and broadband amplifiers.
■ Water or moisture cannot enter the case of the unit.
■ Air flow around the unit and through the vents on the side of the case is not restricted. 3Com recommend you provide a minimum of 25 mm (1 in.) clearance.
■ Cabling is secure and not pulled taut.
CAUTION: Do not wall-mount the Network Storage Server and do not wall-mount stacked units.
CAUTION: The Network Storage Server is not a portable device and is sensitive to mechanical shock. Do not subject it to vibration, unnecessary transit or movement.
Stacking the Network Storage Server
Fitting the Rubber Feet
The four self-adhesive rubber feet prevent your Network Storage Server from moving around on your desk. Only stick the feet to the marked areas at each corner of the underside of your Network Storage Server if you intend to place the unit directly on top of the desk.
Fitting the Stacking Clip
The blue stacking clip allows you to stack your Network Storage Server with other OfficeConnect Units neatly and securely.
CAUTION: You can stack up to a maximum of four
OfficeConnect units. Smaller units must be stacked above larger units.
You must place the Network Storage Server at the bottom of the stack.
To fit the Stacking Clip:
1 Place your unit on a flat surface.
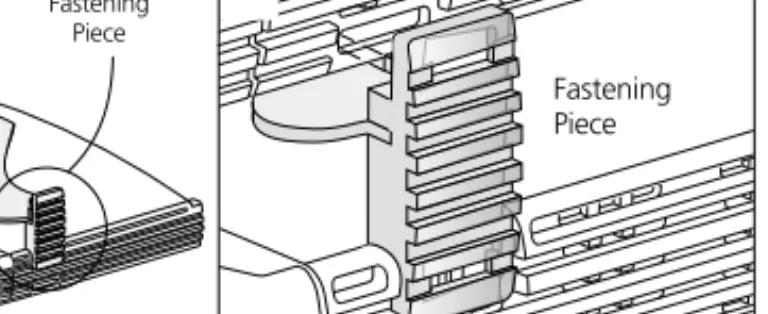
2 Position the clip across the top of the unit, as shown in Figure 2
(picture 1), ensuring that the longer sections of the fastening pieces are pointing downwards.
3 Align the fastening pieces over the slots found on each side of the unit.
4 Push the clip down gently to secure it, ensuring the fastening pieces snap into the slots on the unit.
Fitting Another Unit
To fit another unit:
1 Rest the second unit on top of the clip and align it with the front of the unit below.
2 Press down gently on the unit to secure it onto the clip, ensuring the fastening pieces fit into the slots on the unit below, as shown in Figure 2 (picture 2).
Figure 2 Stacking Units Together
Removing The Stacking Clip
To remove the Stacking Clip:
1 Remove the top unit together with the clip. If you hook a finger around one of the fastening pieces and then pull it gently out of the slot, the clip should come away with the upper unit attached to it.
2 Push the clip in the center, so it bends towards the base of the unit, and then separate once the clip is loose.
1 Fastening Piece 2 Fastening Piece
P
OWERING
U
P
AND
P
OWERING
D
OWN
Powering Up the Network Storage Server
To power up the Network Storage Server:
1 Attach the power adapter to the power adapter socket located in the back of the Network Storage Server.
2 Plug the other end into a power outlet.
When power is supplied, the LEDs on the front of the Network Storage Server will flicker for approximately two minutes while it performs a Power On Self Test (POST). The Network Storage Server will be ready to use when the Power LED is Green; the Disk LED has finished flickering and the Disk Space Used LEDs have stopped moving up the LED scale.
See the Network Storage Server LED Function table on page 11 for further LED information.
To power up the Network Storage Server into its Failsafe Mode, see the section about the “Failsafe Mode” on page 21.
Powering Down the Network Storage Server
To power down the Network Storage Server, press the Shutdown button on the front of the unit for between two and four seconds.
The Network Storage Server will take approximately one minute to shut down. As the Network Storage Server powers down, the Disk Space Used LEDs will go to the maximum point on its scale and then gradually move down the scale until full shut down. When the Power LED appears Amber and there are no Disk Space Used LEDs lit, the Network Storage Server has shut down.
U
SING
THE
N
ETWORK
S
TORAGE
S
ERVER
Who Can Access the Network Storage Server?
The Network Storage Server operates like a typical server as you can create directories and save, delete, move and copy data across the network with ease.
Anyone can access the Network Storage Server provided they are connected to the network. You can connect the Network Storage Server to your network and allow every User unrestricted access to the Public Share (or public directory) and the data stored in it. Network users can also create their own Shares (or directories) for their personal use.
Although anyone can access the Network Storage Server, you can restrict a User from accessing specific Shares (or directories) by setting access restrictions on them. To do this, you must create a Share on the Administration System and set access restrictions on it (see page 16 for more information).
Accessing the Network Storage Server
From the task bar at the bottom of your screen, select:
1 Start, Find and then Computer.
2 Enter the name of the Network Storage Server.
3 Click Find Now. An icon for the Network Storage Server should appear in the search window after a short while.
4 Double-click the Network Storage Server icon. A window will appear containing all the Shares stored on the Network Storage Server.
The Public Share is the default area on the Network Storage Server where all users have unrestricted access to the data stored. If other Shares have been created, they will appear here too. Access to these other Shares is determined by the Network Administrator.
3Com recommends you map a drive letter to the respective Share. Mapping a drive to the Share will allow you to access it quickly and reliably from Windows Explorer.
Mapping a Drive to a Share
From the task bar at the bottom of your screen, select:
1 Start, Find and then Computer.
2 Enter the name of the Network Storage Server.
3 Click Find Now. An icon for the Network Storage Server should appear in the search window after a short while.
4 Double-click the Network Storage Server icon. A window will appear containing the Shares.
5 Select a Share and click the right-hand button on your mouse.
6 Select Map Network Drive from the list.
7 Select an unused drive from the Drive list.
8 Ensure the Reconnect at logon check-box is turned on.
U
SING
THE
A
DMINISTRATION
S
YSTEM
The Administration System
The Administration System is a Web-based utility that allows a Network Administrator to configure the Network Storage Server and set up Shares, Users and Groups. The Administration System can also be used to configure the Network Storage Server itself, so that it functions efficiently within the network. The Network Administrator can access the Network Storage Server’s Failsafe Mode to upgrade its Operating System, run Hard Disk checks and reset the Unit back to its factory defaults. (See “Failsafe Mode” on page 21 for more information.)
This Administration System also contains a comprehensive online help system that gives explanations and instructions on
configuring the Network Storage Server and using the Administration System.
Who Can Access the Administration System?
Anyone using the Network Storage Server can access the Administration System, provided they have a Web browser installed on their PC and are connected to the network. However, their level of access and, therefore, the tasks they can carry out on the Administration System is determined by the access level assigned to them by the Network Administrator. When a User is created, the Network Administrator can assign additional managerial privileges that allow the User to create other Users, Groups and Shares; allocate disk space and impose security restrictions. A User without these privileges can only change their Login password when they access the
Administration System.
Accessing the Administration System
To access the Administration System:
1 Open your Web browser.
2 Enter the following URL into your Web browser:
http://<xyz>/
Where <xyz> is the IP address or the Host name of your Network Storage Server. The IP address and Hostname were assigned to your Network Storage Server when it was installed.
3 Press Return.
The Administration System’s Login screen will appear.
4 Click the Login button.
A dialogue box will appear prompting for a User Name and a Password.
5 Enter admin for the User Name.
6 Enter admin for the Password.
7 Click OK.
The Administration System’s Welcome Page is displayed on your screen (see Figure 3).
CAUTION: Always use this procedure to access the
Administration System. Do not bypass the logging-in procedure by creating a ‘bookmark’ to your Network Storage Server in your Web browser as this may prove unreliable.
For security reasons, 3Com recommends you change the Administration System’s default Password when your Network Storage Server has been configured correctly.
Figure 3 Administration System Welcome Page
Administration System Features
There are five main sections to the Administration System. These are:
■ Users and Shares ■ Configuration ■ Status
■ Commands
■ Help/Support
Each section can be accessed by selecting the appropriate link in
Users and Shares
Shares
A Share is a directory that can be accessed by multiple Users. When a Share is viewed in Windows Explorer, it will look just like any Windows folder. However, when viewed in the
Administration System, the Share will exhibit distinctive characteristics to help you distinguish it from others. You can control which Users access a Share by using access control rules. You only need to set up Users on the Network Storage Server if you want to control the User’s access to a specific Share.
Using Shares
The following examples show some likely scenarios about why
and how you would set up a Share.
You want every User to be able to access and modify files in a Share on the Network Storage Server.
Set up a public Share with full access, so that everyone can read and write to it.
The company stores information that all employees need to access regularly. This information is updated very rarely, if ever.
Set up a read only share. This will enable all staff to read the information, but will prevent any changes from being made to it.
The company has sensitive information that only a few employees in the company can view.
Establish a read only with password Share. This will ensure that people who do not know the password will not be able to view the information. People with the password will be able to view it but not change it.
Various employees in the company require different access to a Share. Some people need to be able to edit the Share; others only to read it and a small majority should not be able to view it at all.
For this configuration use of the depends on user Share is recommended. With this you can define Groups of Users who should be able to read and write to the Share; Groups for
read only access and Groups for no access. User accounts for the employees can be created and moved inside the Groups. Also individual User configuration can be carried out by specifying permissions for sole Users, instead of Groups.
Share Icons Explained
This section shows the icons most likely to be seen when creating a Share.
User
This symbol represents a User set up on the Network Storage Server.
A User can be assigned a specific amount of personal Hard Disk space so that only they may use it. Users can be combined to form a Group.
Group
This symbol represents a Group of Users set up on the Network Storage Server.
A Group is a quick and simple way for setting up multiple access rights for a cluster of Users for a specific Share.
Full Access
All Users have read and write access to this Share without needing a password. Any User can create, modify or delete any file or Share. Users do not need to be set up for this option. This option makes it easy to share information but provides minimal protection.
Read Only
All Users have read-only access to the files and directories in this Share without needing a password, but they cannot modify or delete any of them. Users do not need to be set up for this option.
Full Access with Password
This Share is protected by a password set by the Network Administrator. Any User who knows the password will obtain full read and write access. Users do not need to be set up for this option.
Read and Write Access to the Share
This symbol means the User will be granted read and write access to this Share.
Read-only Access to the Share
This symbol means the User will be granted read-only
access to this Share.
Read Only with Password
This Share is protected by a password set by the Network Administrator. Any User who knows the password will be able to obtain read-only access. Users do not need to be set up for this option.
Depends On User
Users are only allowed to access this type of Share if they are given permission to access it and can provide a valid password on connection.
If the User’s Windows Login name exists as a name on the Network Storage Server, they will connect as that User and must use the associated password.
However, if the User’s Windows Login name does not exist on the Network Storage Server, they will connect as the special User Everyone Else and can use the associated password whose default is admin. Users must be set up on the Network Storage Server to use this option.
No Access to Share
This symbol means the User will not be granted access to this Share.
Delete Button
If you need to delete a User, Group or a Share, simply click this button where appropriate.
Configuration
The Configuration section allows the Network Administrator to view and adjust the configuration settings of the Network Storage Server. Properties such as the IP characteristics, the Hostname and the Workgroup name can be redefined here, too.
Status
The Status section gives detailed information about the condition of the Network Storage Server. This section details:
■ General information about the Network Storage Server.
■ The amount of Hard Disk space used/available.
■ The PCs currently connected to the Network Storage Server.
■ Any Alerts and their descriptions.
Commands
The Commands section allows you to:
■ Shut down the Network Storage Server.
■ Save its configuration settings.
3Com recommends you make regular backups of your configuration settings as it may prove useful if you need to restore them at a later date.
Please note that you can perform these two commands in the Network Storage Server’s Failsafe Mode. For more information, see page 21.
You can restore your configuration settings by accessing the Network Storage Server’s Failsafe Mode. See page 21 for further details.
Help/Support
This Administration System contains a comprehensive online help system that gives explanations and instructions about configuring the Network Storage Server and the Administration System.
F
AILSAFE
M
ODE
The Network Storage Server has a Web-based feature called the Failsafe Mode that allows you to:
■ Upgrade the Operating System
■ Reset the administration password
■ Backup the current configuration settings
■ Restore the previous configuration settings
■ Run a Hard Disk check
■ Erase the Hard Disk
■ Restore the unit to its factory defaults
■ Save the system logs as a single file
■ Shutdown and restart the system
Figure 4 Failsafe Mode Welcome Screen
Accessing the Failsafe Mode
To access the Failsafe Mode:
1 Power down the Network Storage Server by pressing the Shutdown button on the front of the unit for between two and four seconds.
The Network Storage Server will take approximately one minute to shut down. As the Network Storage Server powers down, the Disk Space Used LEDs will go to the maximum point on its scale and then gradually move down the scale until full shut down. When the Power LED appears Amber and there are no Disk Space Used LEDs lit, the Network Storage Server has shut down.
2 Disconnect the power supply adapter from the unit only when the Network Storage Server has completely shut down.
3 Push and hold the Shutdown button, then reconnect the power supply adapter to the Network Storage Server to power it up. Keep the shutdown button pressed until the Power LED appears Amber (approximately 30 seconds).
4 Open your Web browser and enter the following URL into your Web browser:
http://<xyz>/failsafe.cgi
Where <xyz> is the IP address or the name of your Network Storage Server. The IP address and Hostname were assigned to your Network Storage Server when it was installed.
5 Press Return.
You should now be able to see and access the Failsafe Mode’s Welcome screen (see Figure 4). From here, simply click on one
Failsafe Mode Options
Upgrading the Operating System
You can download the latest version of the Operating System for the Network Storage Server from the following 3Com Website:
http://support.3com.com
When you have saved the new Operating System to your PC, you can upgrade it by selecting this option.
Resetting the Administration Password
If you forget your Login password to the Administration System, you can reset the password to its default setting by selecting this option.
Backing Up the Configuration Settings
You can create a backup of the configuration settings for the Network Storage Server. Creating regular backups will allow you to restore your settings at a later date, if necessary. The configuration settings includes information such as the IP address; the Network Storage Server name; the Workgroup name; all User account details; any Share details and access rights.
You cannot backup any data stored by a User on the Network Storage Server this way. To create a backup of the information stored on the Network Storage Server, please see the section “About the Hard Disk” on page 23.
Restoring the Previous Configuration Settings
You can restore your previous saved configuration settings by selecting this option.
Running A Hard Disk Check
If you suspect there might be a problem with the Hard Disk you can check it for errors. There are two types of scan available. A quick scan will only check the section on the Hard Disk that has information stored on it, and will take approximately two minutes. A thorough scan can take up to 30 minutes. If there are any errors on the Hard Disk, the Network Storage Server will attempt to repair them.
If the errors cannot be repaired, you might try erasing the entire Hard Disk. Alternatively, call the Technical Support centre at 3Com. See page 40 for contact details.
Erasing the Hard Disk
This feature will erase everything on the Hard Disk except the Operating System.
Resetting the Unit Back to its Factory Defaults
The Failsafe Mode has the facility to reset the Network Storage Server to its original factory defaults. From here, you can reset the system configuration; the system logs and the Operating System.
Saving the System Logs as a Single File
The Network Storage Server logs every operation performed on it. Saving the system logs as a single file is useful because it can be e-mailed to 3Com Technical Support for analysis as a .tgz file if a problem cannot be resolved.
Shutting Down and Restarting
When you have finished using the Failsafe Mode, select this option to restart the Network Storage Server and resume normal operation.
R
EPLACING
A F
AULTY
H
ARD
D
ISK
Hard Disk Safety Information
WARNING: Installation and removal of the Hard Disk must be carried out by qualified personnel only. This Hard Disk is not hot-swappable. Always make sure the Network Storage Server is powered down and disconnected from the mains before removing and installing the Hard Disk. For full safety instructions, see page 36.
AVERTISSEMENT: L'installation et la dépose du disque dur sont à effectuer uniquement par du personnel compétent. Ce disque dur n'est pas hot swappable (ne peut pas se brancher/débrancher à chaud). Vérifiez toujours que le serveur de programmes de mémoire sur réseau est mis hors tension et débranché de la prise secteur avant de retirer et d'installer le disque dur. Pour des explications complètes sur la sécurité, reportez-vous page 36. WARNHINWEIS: Der Ein- und Ausbau der Festplatte ist nur von ausgebildetem Personal auszuführen. Diese Festplatte darf nicht während des Betriebs ausgetauscht werden. Fahren Sie den Network Storage Server herunter und trennen Sie ihn von der Stromversorgung, bevor Sie die Festplatte entfernen
beziehungsweise installieren. Weitere Sicherheitsanweisungen finden Sie auf Seite 37.
CAUTION: A 20 GB Hard Disk will only work with the OfficeConnect Network Storage Server 20 (3C19500). A 40 GB Hard Disk will only work with the OfficeConnect Network Storage Server 40 (3C19501). The Hard Disks are not interchangeable.
If 3Com Technical Support cannot resolve your Hard Disk problem, you may have to purchase a replacement Hard Disk.
About the Hard Disk
The Network Storage Server has a removable Hard Disk that allows you to replace it in the unlikely event it should fail. 3Com recommends that you regularly backup the information on your Network Storage Server. There are two main areas to consider: the configuration settings of the Network Storage Server and the actual Hard Disk data saved by the Users and Groups.
Backing Up the Configuration Settings
You can backup the configuration settings in two ways. You can make a backup through the Commands section in the
Administration System. Alternatively, you can backup the configuration settings through the Network Storage Server’s Failsafe Mode. See page 21 for details on how to access the Failsafe Mode.
Backing Up the Data
You can backup the Users data by running a backup application such as Microsoft’s Windows Backup which is normally provided with Windows 95, Windows 98 and Windows NT 4.0 Operating Systems.
If you have not backed up your Network Storage Server data and the Hard Disk fails, you might try a specific data recovery agency to retrieve the data.
If you have problems with the Hard Disk that cannot be resolved in the “Troubleshooting” section on page 30, contact Technical Support. See page 40 for contact details.
Replacing the Hard Disk
Once you have received your new Hard Disk, you are ready to replace the faulty one. The Hard Disk arrives pre-imaged with the Operating System installed, so there is no need to format the Hard Disk after installation.
CAUTION: When you replace the Hard Disk, undo the screws that secure the blanking plate and the Hard Disk with a suitable tool. Keep the blanking plate and the screws in a safe place. After replacing the Hard Disk, replace the blanking plate and tighten the screws with a suitable tool.
Handling the Hard Disk
The Hard Disk can be easily damaged by electrostatic discharge. To prevent damage, observe the following:
■ Always wear an anti-static wristband connected to a suitable earth point.
■ Do not remove the Hard Disk from its packaging until you are ready to install it into the Network Storage Server.
■ Do not touch any of the pins, connections or components on the Hard Disk.
■ Handle the Hard Disk only by its edges and its supporting tray.
■ Always store or transport the Hard Disk in anti-static packaging.
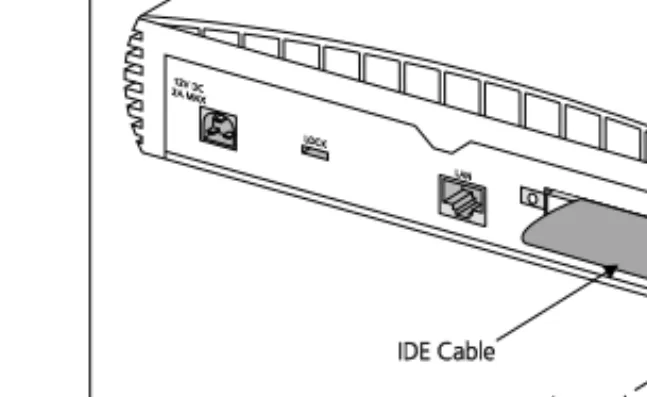
Removing the Faulty Hard Disk
When you remove the blanking plate on the Network Storage Server to replace the Hard Disk (see Figure 5), you will find that the Hard Disk is attached to a metal supporting tray. Also, the Hard Disk will have an IDE cable and an internal power supply connector connected to it. These connections must be removed before you remove the Hard Disk. Also, when you remove the Hard Disk, you must remove the supporting tray with it.
Figure 5 Rear of the Network Storage Server
To remove the Hard Disk:
1 Ensure that the Network Storage Server has been powered down and disconnected from the mains power supply. Ensure that you are wearing an anti-static wristband connected to a suitable earth point.
2 Ensure that the Twisted Pair cable has been disconnected from the LAN port on the Network Storage Server.
12V DC 2A M AX 12V DC 2A M AX LOCK LAN IDE Cable Internal Power Supply Connector Internal Power Supply Connector
3 Undo the two screws on the Network Storage Server’s blanking plate and remove it. Keep the blanking plate and the fixings in a safe place.
4 Disconnect the IDE cable and the internal power supply connector from the back of the Hard Disk.
5 Undo the four screws that secure the supportingtray and the Hard Disk to the Network Storage Server from the underside of the Network Storage Server.
6 Remove the supporting tray containing the Hard Disk from the Network Storage Server.
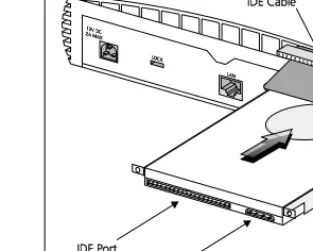
Inserting the New Hard Disk
To insert the new Hard Disk:
1 Ensure that the Network Storage Server has been powered down and disconnected from the mains power supply. Ensure that you are wearing an anti-static wristband connected to a suitable earth point.
2 Position the Hard Disk as shown in Figure 6.
3 Push the Hard Disk into the Network Storage Server.
4 Tighten the four screws that secure the supportingtray and the Hard Disk to the Network Storage Server on the underside of the Network Storage Server.
5 Reconnect the IDE cable and the internal power supply cable to the back of the Hard Disk.
6 Secure the blanking plate and the Hard Disk by first positioning the screws over the screw apertures and then tighten the two captive screws with a suitable tool screwdriver.
CAUTION: Keep the IDE cable and the internal power supply cable away from the Hard Disk as you insert it into the Network Storage Server (see Figure 6).
CAUTION: After replacing the Hard Disk, you must replace the blanking plate.
Figure 6 Inserting The Hard Disk
12V DC 2A M AX 12V DC 2A M AX LOCK LAN IDE Port
Internal Power Supply Socket IDE Cable Internal Power Supply Connector Internal Power Supply Connector
Rebooting the Network Storage Server
There are two ways to reboot your Network Storage Server. The method used to reboot the Network Storage Server depends on whether you have previously backed up your configuration settings or not. The configuration settings includes information such as the IP address; the Network Storage Server’s name; the Workgroup name; all User account details; Share details and access rights.
See page 21 for more details about backing up the configuration settings through the Network Storage Server’s Failsafe Mode.
Rebooting the Network Storage Server without
Restoring the Configuration Settings
If you have not backed up the configuration settings, you must completely re-install the Network Storage Server using the Discovery Application. To do this:
1 Reconnect the Twisted Pair cable between the LAN port on the Network Storage Server and the network device (Hub or Switch).
2 Power up the Network Storage Server by re-attaching the power adapter to the power adapter socket.
3 Install and configure the Network Storage Server. See the “Quick Installation Guide” (DIA1950-0AAA0x) that accompanies this User Guide for installation instructions.
Your Network Storage Server should now be ready to use.
Rebooting the Network Storage Server and Restoring
the Configuration Settings in Failsafe Mode
If you have backed up your configuration settings and wish to restore them on your Network Storage Server, you can reinstall them through the Failsafe Mode.
To reboot the Network Storage Server into its Failsafe Mode:
1 Reconnect the Twisted Pair cable between the LAN port on the Network Storage Server and the network device (Hub or Switch).
2 Push and hold the Shutdown button, then reconnect the power supply adapter to the Network Storage Server to power it up. Keep the shutdown button pressed until the Power LED appears Amber (approximately 30 seconds).
3 Open your Web browser.
4 Enter the following URL into your Web browser:
http://<xyz>/failsafe.cgi
Where <xyz> is the IP address or the name of your Network Storage Server. The IP address and Hostname were assigned to your Network Storage Server when it was installed.
5 Press Return.
6 Click Restoring the Previous Configuration Settings and follow the on-screen instructions.
7 Click the Shutting Down and Restarting option on the Failsafe Mode menu and follow the onscreen instructions to restart the Network Storage Server and resume operation.
IP A
DDRESSING
The Internet Protocol Suite
The Internet protocol suite consists of a well-defined set of communications protocols and several standard application protocols. Transmission Control Protocol/Internet Protocol (TCP/IP) is probably the most widely known and is a combination of two of the protocols (IP and TCP) working together. TCP/IP is an internationally adopted and supported networking standard that provides connectivity between equipment from many vendors over a wide variety of networking technologies.
Managing the Network Storage Server over the
Network
To manage a device over the network, the Network Storage Server must be correctly configured with the following IP information:
■ An IP address
■ A Subnet Mask
IP Addresses and Subnet Masks
Each device on your network must have a unique IP address to operate correctly. An IP address identifies the address of the device to which data is being sent and the address of the destination network. IP addresses have the format n.n.n.x where n is a decimal number between 0 and 255 and x is a number between 1 and 254 inclusive.
However, an IP Address alone is not enough to make your device operate. In addition to the IP address, you need to set a subnet mask. All networks are divided into smaller sub-networks and a subnet mask is a number that enables a device to identify the sub-network to which it is connected.
For your network to work correctly, all devices on the network must have:
■ The same sub-network address.
■ The same subnet mask.
The only value that will be different is the specific host device number. This value must always be unique.
An example IP address is ‘192.168.100.8’. However, the size of the network determines the structure of this IP Address. In using the Network Storage Server, you will probably only encounter two types of IP Address and subnet mask structures.
Type One
In a small network, the IP address of ‘192.168.100.8’ is split into two parts:
■ Part one (‘192.168.100’) identifies the network on which the device resides.
■ Part two (‘.8’) identifies the device within the network.
This type of IP Address operates on a subnet mask of ‘255.255.255.0’.
See Table 3 for an example about how a network with three PCs and a Network Storage Server might be configured.
Table 3 IP Addressing and Subnet Masking
Type Two
In larger networks, where there are more devices, the IP address of ‘192.168.100.8’ is, again, split into two parts but is structured differently:
■ Part one (‘192.168’) identifies the network on which the device resides.
■ Part two (‘.100.8’) identifies the device within the network.
This type of IP Address operates on a subnet mask of ‘255.255.0.0’.
See Table 4 for an example about how a network (only four PCs represented) and a Network Storage Server might be configured.
Table 4 IP Addressing and Subnet Masking
Device IP Address Subnet Mask
PC 1 192.168.100.8 255.255.255.0 PC 2 192.168.100.33 255.255.255.0 PC 3 192.168.100.188 255.255.255.0 Network Storage Server 192.168.100.72 255.255.255.0 192.168.100 .8 Network Address Device Number
Device IP Address Subnet Mask
PC 1 192.168.100.8 255.255.0.0 PC 2 192.168.201.30 255.255.0.0 PC 3 192.168.113.155 255.255.0.0 PC 4 192.168.002.230 255.255.0.0 Network Storage Server 192.168.002.72 255.255.0.0 192.168 .100.8 Network Address Device Number
How does a Device Obtain an IP Address and
Subnet Mask?
There are three different ways to obtain an IP address and the subnet mask. These are:
■ Dynamic Host Configuration Protocol (DHCP) Addressing
■ Static Addressing
■ Automatic Addressing (Auto-IP Addressing)
DHCP Addressing
If your network contains a DHCP server, the Network Storage Server will obtain an IP address and subnet mask automatically. DHCP assigns a temporary IP address and subnet mask which gets reallocated once you disconnect from the network. DHCP will work on any client Operating System such as Windows® 95, Windows 98 or Windows NT 4.0. Also, using DHCP means that the same IP address and subnet mask will never be duplicated for devices on the network. DHCP is particularly useful for networks with large numbers of users on them.
Static Addressing
You must enter an IP Address and the subnet mask manually on every device. Using a static IP and subnet mask means the address is permanently fixed.
Auto-IP Addressing
Network devices use automatic IP addressing if they are configured to acquire an address using DHCP but are unable to contact a DHCP server. Automatic IP addressing is a scheme where devices allocate themselves an IP address at random from the industry standard subnet of 169.254.x.x (with a subnet mask of 255.255.0.0). If two devices allocate themselves the same address, the conflict is detected and one of the devices allocates itself a new address.
Automatic IP addressing support was introduced by Microsoft in the Windows 98 operating system and is also supported in Windows 2000.
T
ROUBLESHOOTING
This chapter has been designed to help you detect and solve possible problems with the Network Storage Server. If you cannot find the solution to the problem in this chapter, please contact Technical Support (see page 40 for details).
This section uses the term ‘adapter’ when referring to network interface cards (NICs), network interface adapters or personal computer (PC) cards.
Spot Checks
If you have trouble making a connection between a PC and the Network Storage Server, the first precautionary check is to examine the connecting cables. It is quite possible that the cable might be:
■ Disconnected — check that the ends are securely connected between the computer, the Hub and the Network Storage Server.
■ The wrong type — one common mistake is to use telephone cables. Ensure you use straight-through Twisted Pair cables.
■ Broken — replace the cable with one you know to be working.
If the problem has not been resolved, make sure:
■ That all equipment is switched on.
■ The cable connections between the computer, the Hub and the Network Storage Server are in order.
■ The adapter card is correctly inserted into your computer.
■ The adapter card is correctly configured on your computer.
■ The adapter drivers are the latest version on your computer.
■ The Network Storage Server has been mapped to a local drive.
■ The device can actually be found by using the ’Find’ facility. Once you have made these checks, reboot the Network Storage Server. See page 14 for details.
Power LED is Off
If there is no power, check your power adapter connection. If there is still no power, you may have a faulty power adapter that needs replacing. If you need to replace it, make sure it is with the model manufactured by 3Com (part number 3C16749). Do not use any other power adapter with the Network Storage Server.
Alert LEDs
When the Alert LED is activated, there is a possible problem with the Network Storage Server. Check the Alert status, on the Status Section in the Administration System, to determine the problem. The Alert LED will flash when:
■ The Hard Disk is full. If this happens you will either have to add another Network Storage Server to your network or delete some of the data from the Hard Disk.
■ The Network Storage Server is too hot. If this happens, the Network Storage Server should automatically adjust its performance and cool down. Check the environmental surroundings, as the Network Storage Server is designed to operate at a maximum temperature of 40 °C. If it does not cool down after this, contact Technical Support.
The Alert LED will appear permanently on when there is a problem with the Hard Disk. The Alert LED will be accompanied by a sequence of LEDs lit on the Disk Space Used LEDs. If either of the Alerts below occur (see Figure 7 and Figure 8), contact Technical Support.
Figure 7 Hard Disk Failure
Figure 8 Incorrect Hard Disk Imaging
LAN LEDs are Off
The LAN LED(s) may be off because there is no equipment (cables or devices) connected to the LAN port or there is a problem with the connected equipment. Check:
■ The power supply is connected to the Network Storage Server, the Hubs and computers and check that their power is on.
■ The cable connection into the LAN port is secure. Also check that the connections between the Hub and the computers on the network are secure. If there is still a problem, replace the cable with a known working cable.
■ The cabling follows the correct specification. See “Ethernet Performance” on page 39 for more information.
■ The adapter is correctly installed and is not faulty. Refer to the User Guide that accompanies your adapter for more
information.
Network Appears Slow
If you experience a slow response time on the network, refer to the “Spot Checks” section on page 30. If this does not solve your problem, it is possible that:
■ The computer does not have enough processing or memory resources for the type of work the User wants to perform.
■ Other Users may also be opening, editing and saving Shared files on your computer.
■ There is a duplex mismatch. Check that the Network Storage Server’s Ethernet duplex status (located on the Status page in the Administration System) is the same as the Hub or Switch
20% 40% 60% 80% 90% Alert
95%
Disk Space Used
= ON
20% 40% 60% 80% 90% Alert
95%
Disk Space Used
Cannot Access Files on the Network Storage
Server
If the Network Storage Server can be seen on the network, but cannot be accessed, check that:
■ The computer has been mapped to the Network Storage Server.
■ The Share has been set up for sharing and is not password protected.
Cannot Access the Administration System
If this happens, check that:
■ The cables connecting the computer, the Hub or the Network Storage Server are not loose or damaged.
■ You are running Microsoft Internet Explorer 4.0 (or above) or Netscape Navigator 4.5 (or above) as your Web browser.
■ The IP Address is on the correct subnet by running the Discovery Application.
Forgotten Administration System Password
If you forget your Login password to the Administration System, you can reset the password to its default setting. Restart the Network Storage Server in Failsafe Mode and reset the password to admin. See the “Failsafe Mode” section on page 21 for further information.
Installation Problems
TCP/IP Protocol Required
If during installation, the Discovery Application displays an error message that reads TCP/IP Protocol Required, TCP/IP must be installed on your PC. To install TCP/IP, follow the instructions below.
From the task bar at the bottom of your screen, select:
1 Start, Settings and then Control Panel.
2 Double-click the Network icon from the Control Panel window.
3 Select the Configuration tab when the Network window opens.
4 Click Add.
5 Select Protocol from the list that appears in the window.
6 Click Add.
A window titled Select Network Protocol should appear. There are two lists inside this window.
7 Select Microsoft from the Manufacturers list.
8 Select TCP/IP from the Network Protocols list.
9 Click OK.
10 Select TCP/IP from the list on the Configuration tab.
11 Click OK.
If you need further information about setting up TCP/IP on your PC, refer to the ‘Using Your Network’ section contained in the OfficeConnect Network Assistant CD-ROM that accompanies this product.
No Servers Found
If during installation, the Discovery Application displays an error message that reads ‘No Server Found’, follow the procedure below to determine the possible cause.
1 Check that the PC running the Discovery Application has access to the network. Open Network Neighborhood and look for other computers.
2 Check the basic network requirements as described in the “Spot Checks” section on page 30.
3 Check that the Network Storage Server is fully powered up and that the LEDs are in normal status. See the section about the
“LED Functions” on page 11.
4 Check the Alert LED on the front of the Network Storage Server is not activated. See the section about the “Alert LEDs” on page 30.
5 Check that the LAN 10 Mbps or 100 Mbps Link Status LED is ON and the Hub or Switch at the other end of the cable indicates the same Link connection speed. If not, see the section called
“LAN LEDs are Off” on page 31.
6 Check that a Router is not installed between the PC running the Discovery Application and the Network Storage Server. Remove the Router if one is installed.
7 Restart the Network Storage Server and check the LEDs are in normal status. See the section about the “LED Functions” on page 11.
If the Discovery Application still cannot find the Network Storage Server, contact Technical Support.
Problems Running the OfficeConnect Server Discovery
Application
Users of Windows 95 and Windows NT, who have not upgraded from Internet Explorer Version 3, may encounter problems when running the OfficeConnect Server Discovery Application. These problems, if they occur, can be fixed by installing Internet Explorer Version 4 or later. Installing Netscape will not solve these problems.
Cannot Access the Failsafe Mode
If you cannot access the Failsafe Mode, check that:
■ The correct URL address has been entered into the Web browser. See page 21 for details.
■ The URL has been entered in lower case into the Web browser. The URL is case-sensitive and will not accept capital letters.
■ The Shutdown button has been pressed and held in as you power up the Network Storage Server. The Shutdown button should be depressed until the Power LED appears.
F
REQUENTLY
A
SKED
Q
UESTIONS
Q. Can I connect more than one Network Storage Server in the same network?
A. Yes. Provided you have a spare Ethernet or Fast Ethernet port on your Hub or Switch, you can connect as many Network Storage Servers as required.
Q. Can I connect Network Storage Servers together to increase storage capacity?
A. No. The Network Storage Server is designed to plug directly into a Hub or a Switch. However, the number of Network Storage Servers you can put on the network is unlimited, provided you have a spare port on your Hub or Switch for each one.
Q. Can I access the Administration System from any PC on the network?
A. Yes. Enter the Administration System, as described on
page 16, and Login as usual. The Network Storage Server will recognize your Login password and grant you access.
Q. Can Users access a mapped network drive on the Network Storage Sever across a router?
A. Yes, provided the drive has been mapped to the IP address of the Network Storage Server (e.g. \\192.168.1.21\Public). To do this, use Start, Find, Computer to find the Network Storage Server using its IP address (instead of its name) then map a drive to one of the Shares. For more information on mapping a drive, see page 15.
Q. Can the Network Storage Server’s Administration System be accessed remotely?
A. Yes, provided the IP address is entered as the URL in the Web Browser (e.g. http://192.168.1.21/).
Q. Who can access the Administration System?
A. Anyone using the Network Storage Server can access the Administration System, provided they have a Web browser installed on their PC and are connected to the network. See the “Administration System” section on page 16 for more
information.
Q. What happens if the Hard Disk on my Network Storage Server runs out of space?
A. If the Hard Disk on your Network Storage Server runs out of space, you must add another Network Storage Server to your network or remove some of the data from the Hard Disk.
Q. What happens if I forget my admin login password?
A. Reboot the Network Storage Server to Failsafe Mode and reset the password to its default setting. See page 21 for further details on the “Failsafe Mode”.
Q. Do I ever need to shutdown my Network Storage Server?
A. The only time you should shutdown your Network Storage Server is if you have to replace the Hard Disk or need to relocate the Unit.
Q. What happens to the network if I reboot the Network Storage Server?
A. The network remains unaffected, however, the files that Users may be working on at the time might get corrupted or lost.
Q. What happens to the data on the Network Storage Server if the Hard Disk fails? Is it backed-up anywhere?
A. If you have not backed up the data on your Hard Disk and it fails, you might want try and retrieve the data by using a specific
data recovery agency. 3Com recommends you make regular backups of the data. See page 23 for further information.
Q. What if the installation process goes wrong?
A. Try reinstalling the Network Storage Server using the OfficeConnect Server Discovery Application. See the “Quick Installation Guide” (DIA1950-0AAA0x) that accompanies this User Guide. If problems persist, see the “Troubleshooting”
section on page 30.
Q. Does the Network Storage Server permit long file names?
A. Yes, up to 249 characters.
Q. Can I partition a Network Storage Server’s Hard Disk?
A. No. A Hard Disk cannot be partitioned, however, a Share can be created for a User with access restrictions imposed on it.
Q. How much storage space does the Network Storage Server actually have?
A. Although the Network Storage Server has a 20 GB or 40 GB Hard Disk installed, the actual storage space might be marginally less than that specified as the Network Storage Server’s
configuration settings and Operating System are stored on the Hard Disk.
Q. Will the Network Storage Server operate as a stand-alone storage device?
A. Yes. Although the Network Storage Server is designed to be used across a network, it can also be used as a stand-alone storage device for your PC. To use it as a stand-alone, just connect a crossover cable between the Network Storage Server
Q. Why does Windows 95 report the Hard Disk capacity as 1.99 GB?
A. Disk ‘Properties’ reported from Windows Explorer are incorrect for larger hard drive storage. This is a known limitation of Windows 95 as it cannot detect hard disk storage greater than 2 GB.
Q. Why are the old Share names still visible in Network Neighborhood even though they have been modified of deleted?
A. This is due to the Windows machines not correctly refreshing the display in Network Neighborhood to show the changed state of the Share. In order to update the display, reboot your PC and the old Share name should disappear.
Q. Why do my Windows NT PCs appear to copy files quicker than Windows 95 or Windows 98 PCs?
A. Windows NT appears to make better use of a network’s capacity than Windows 95 or Windows 98, which explains why Windows NT is faster at file transfer.
Q. Why does the Network Storage Server take a long time to restart?
A. It is possible the Network Storage Server lost its power supply which resulted in the Unit being abnormally terminated. When the Network Storage Server reboots, it runs an extensive disk check to ensure that no data corruption occurred as a result of the power failure.