Water Leak Detection System
By: Ryan Hanson Senior ProjectElectrical Engineering Department California Polytechnic State University
San Luis Obispo 2017
Table of Contents
List of Tables………..………. iii
List of Figures………... iv
Abstract………... v
Chapter 1: Introduction……… 1
Chapter 2: Design Specifications………..………... 4
Chapter 3: System Design and Functional Decomposition……….……….... 7
Chapter 4: Project Planning……….... 12
Chapter 5: Design and Testing………17
Chapter 6: Conclusions and Recommendations..………48
References………... 49
Appendices Appendix A: Senior Project Analysis………... 51
List of Tables
Table 2-1: WLDS Requirements and Specifications ...5
Table 3-1: WLDS Functional Requirements ...7
Table 3-2: WLDS- 1ASLOBLO Fuse ...8
Table 3-3: WLDS - LED ...9
Table 3-4: WLDS - Power Module... 9
Table 3-5: WLDS - Water Sensor Module ... 9
Table 3-6: WLDS - Microprocessor Module...10
Table 3-7: WLDS - Actuator Module...10
Table 4-1: Deliverables Table………..14
Table 4-2: Estimated Project Costs ...14
Table 4-3: Winter 2017 Project Costs………..15
List of Figures
Figure 3-1: Level 0 Black Box Diagram... 7
Figure 3-2: Level 1 Block Diagram... 8
Figure 4-1: Project Gantt Chart……….12
Figure 4-2: Winter 2017 Project Gantt Chart………13
Figure 5-1: ALSROBOT Water Sensor………17
Figure 5-2: Arduino Microcontroller with Water Sensor Schematic………18
Figure 5-3: Serial Monitor Output of Water Sensor……….20
Figure 5-4: Pinout of XBeeS2C………21
Figure 5-5: Image of XBee USB Adapter………...22
Figure 5-6: XCTU Software Parameters………...23
Figure 5-7: Block Diagram of XBees in Transparent Mode……….24
Figure 5-8: Successful Communication Between Two XBees in AT Mode………24
Figure 5-9: Block Diagram of Arduinos Driving XBees………...25
Figure 5-10: Successful Communication Between Two XBees Using Arduino MCU………26
Figure 5-11: Serial Console of Router XBee………27
Figure 5-12: Serial Console of Coordinator XBee………...28
Figure 5-13: 12V DC Eco-Worthy Linear Actuator……….29
Figure 5-14: Control Relay Options……….30
Figure 5-15: 2-Channel Relay Terminals……….31
Figure 5-16: Complete Setup of Actuator Control Module……….32
Figure 5-17: Arduino GSM Shield 2………...33
Figure 5-18: Adafruit FONA 3G……….36
Figure 5-19: Arduino and GSM Shield Schematic………..39
Figure 5-20: SMS, Buzzer, XBee and Water Sensor Network………42
Abstract
The water supply shortage has increased in recent years due to overpopulation, climate change and obsolete water facilities, where deteriorated pipes cause most of the water leaks. The problem is not the size of the leak, but the time it takes to detect it. This paper presents the implementation of a system installed in the hydraulic facilities of a residence, to detect water leaks. The system consists of a water sensor installed by a water reservoir of interest, a
microprocessor to interpret the data and evaluate whether it is a water leak or not, an SMS alert message, and an electrical actuator to shut off the main water supply to avoid leakage.
Chapter 1: Introduction and Background
With the growth of the world population, the demand of fresh water has increased causing serious problems in the field of water supply. Therefore, control of water has become a considerable issue today. Scientists, technicians, politicians, and generally, many other
inhabitants of the planet become increasingly educated on the subject. The threat of pollution hovers over and limits water supplies. The shortage of this vital liquid requires great attention. The proportion of fresh water found in rivers, lakes, and underground sources comprise only 3% of the total amount of water on earth [2]. In addition, the water found needs treatment for human consumption, to eliminate particles and organism harmful to health, and ultimately must
distribute through pipes to homes safely [3].
This work focuses on the issue of distribution, more specifically, on the issue of “water leaks” in residential areas. Anyone who’s had a water heater, dishwasher or burst pipe disaster in their home knows how important early detection can be. Even those slow leaks that only cause mold damage require expenses to repair. The more water spilled (or splashed) the more money the repairs cost to residents. For this reason, it’s crucial to have some system installed in residences to detect water leaks.
The water detector electronic device is designed to detect the presence of water and provide an alert in time to allow the prevention of water damage. A common design includes a small cable or device that lies flat on a floor and relies on the electrical conductivity of water to decrease the resistance across two contacts. The device then sounds an audible alarm together with providing onward signaling in the presence of enough water to bridge the contacts. These provide usefulness in a normally occupied area near any infrastructure that has the potential to leak water, such as HVAC, water pipes, drain pipes, vending machines, dehumidifiers, or water tanks.
Water leak detection is an expression more commonly used for larger, integrated systems installed in modern buildings or those containing valuable artifacts, materials or other critical assets where early notification of a potentially damaging leak proves beneficial. Specifically, water leak detection has become a necessity in data centers, trading floors, banks, archives, and homes. The water leak detection industry, small yet specialized, has only a few manufacturers
operating world-wide [8]. The original application was in the void created by "computer room" floors in the days of large mainframe computer systems. These use a modular, raised floor based on structural "floor tile" usually 600 mm square and supported at the corners by pedestals [18]. The void created gave easy access and routing for the mass of power, networking and other interconnecting cables associated with larger computer systems - processors, drives, routers etc. mainframe computers also generated large amounts of heat so a void under the floor could also serve as a plenum to distribute and diffuse chilled air around the computer room. Chilled water pipes generally run through the void along with the drains for condensates associated with refrigeration plant. In addition, designers found the floor void a very convenient place to route other wet services feeding bathrooms, radiators and other facilities [15]. A leak occurring within a floor void would therefore go unnoticed until the hydrostatic head of pressure meant that the water found its way through to floors below where its dripping through the ceiling penetrates the joints and connectors of the power or network cabling and cause system failure from short circuits.
Current digital water leak detection systems can locate multiple water leaks to within 1 meter resolution over a complex network of cables running several kilometers [20]. This functionality reduces the downtime and potential damage caused by inaccurate reporting common with older analogue based systems [20].
The Z-Wave equipped Fibaro Flood Sensor ($59) includes a tilt sensor (so the user knows if someone moved it), temperature sensor, a siren, a light, a built-in Z-wave network range tester, and it can be wired or wireless. The company says it works with any professionally-installed alarm system, but the user can also set it up. With a Fibaro Relay installed, the sensor can also automatically shut off a solenoid valve. The Flood Sensor requires Fibaro’s Home Center 2 or another Z-Wave hub.
The Wally system doesn’t use Z-Wave or Bluetooth or Zigbee. It uses a proprietary wireless system that takes advantage of the copper wires in your walls and treats them like antennas for the system. The moisture sensor (which also detects temperature and humidity) helps with large water emergencies and also alerts the user about slowly developing moisture— the kind that can lead to mold damage. The user also needs the Wally hub and the sensor for this system. A customer can purchase the hub with six sensors for $299. Individually the sensors cost $35.
This paper presents the instrumentation of a Water Leak Detection System (WLDS), a simple but cost effective water detection system, implemented in residential areas and offers a detailed description of the system throughout the following chapters. The next chapter dives into the WLDS system specifications and customer needs.
Chapter 2: Design Specifications
Chapter 2 describes the thought process behind creating the WLDS, the customers likely to buy this product, and the design specifications of the product.
Customer Needs Assessment
Homeowners are the primary users of my product. When someone owns a house or, more
specifically, any piece of property, they don’t realize how much that item means to them until destroyed by water damage. My family just recently had a water leak from one of the toilets in the upstairs bathroom that ended up dripping through the ceiling down onto the ground floor guest bedroom. The whole ceiling required replacement and ended up costing my parents a fortune. Therefore, I decided to create a low-cost water leak detection system for home owners. The needs of the customer include affordability, easy maintenance, easy setup, and reliability. In the case with my parents, the decision to purchase a low-cost leak detection system like mine and install it before the leaks became a significant problem would halt any of their water problems. Easy maintenance means that the user can keep the system running without having to put much work into it. Easy setup means that the time it takes to install the system should take no longer than 1 hour. Finally, nobody wants to buy a system that works for a month and then breaks; the system must be reliable, continuously running without taking up too much power and function properly over extended periods of time.
Specifications and Requirements
The Water Leak Detection System offers a solution to the problem. Users need an affordable system that draws little power to ensure low running costs [9]. The system must also function accurately so that when the user becomes alerted of a leak, it identifies an actual leak and does not make an error within the sensor. It needs to be autonomous requiring no user input beyond the initial installation. By owning the WLDS, users do not have to worry about checking their water reservoir of interest for water leaks or the wasting of water.
The WLDS consists of an actuator installed in the main water pump of a residence, and a device based on sensors to detect leaks. A microcontroller processes the readings from the water sensor [17]. If an unusual flow of water, the system issues a warning by sending a short text message (SMS: Short Message Service) to the mobile phone of the user. Along with the text
that no further leakage occurs. The WLDS detects and eliminates a water leakage in a short time, because in most cases, the problem originates not from the leak itself, but the time to detect it.
The microcontroller deactivates the water pump, if the water sensor detects 20mL or more water leakage. ¼ mL of water equals approximately a drop of water from a faucet, so 20mL of water ensures no false alarm [9]. The actuator and water sensor used to deactivate the
water pump is small and light enough for any user to carry and install. The actuator can obtain power from a wall socket which negates the need for additional power [4]. The water sensor features battery powered hardware, allowing maximum mobility so that it may run for at least 30 hours. Ideally, installation only requires mounting the water sensor, installing the actuator into the water pump, and plugging in the motor to the nearest residential power outlet. Table 2-1 summarizes detailed marketing requirements as well as the engineering specifications of the proposed WLDS.
TABLE 2-1
WATER LEAK DETECTION SYSTEM REQUIREMENTS AND SPECIFICATION Marketing
Requirements
Engineering Specifications
Justification
2,5,7 Meets standards of International Protection code IP51
The unit sits in an outdoor setting exposed to various amounts of dust and condensation. This requires a level of weather resistance.
2,5,7 Meets NFPA 70 National Electric Code Safety Standards
Product uses electrical equipment. Meeting this standard keeps the user safe from electrical hazards.
2,5,7 This product meets Functional Safety Listed to applicable UL Standards and requirements by UL
Product meets UL Standards to keep user safe.
2,3,4 Deactivates the water pump if the water sensor senses more than 1.5 mL of water
¼ mL of water equals approximately a drop of water from a faucet, sink among other examples. Any more than 1.5 mL of water leaking/6 water droplets characterizes a leak.
1,5 All materials cost less than $100
The price ceiling keeps the system affordable.
input beyond initial installation pump system.
5,6,8 Battery powered actuator Mobile actuator incase users need to move to different location/pipe.
5,6 Actuator must run for at least 30 hours.
Actuator must be able to run continuously for at least 30 hours to ensure cost effectiveness for the user.
5,6 Battery powered water sensor A mobile sensor so the user doesn’t have to worry about plugging into a wall socket. 5,6 Water sensor must run for at
least 30 hours.
The sensors must run for an extended period before batteries need replacement.
1,3,5 Actuator consumes less than 500 mW during standby operation
During its inactive state, it uses minimal power to maintain efficient function.
5,6,8 Installation takes less than 1 hour for an untrained user
The device comes ready out of the box, requiring only that the user install the sensors, attach their actuator, and plug the device in. 5,6,8 Actuator and water sensor must
have dimensions smaller than 8”x5”x3”
This size restraint ensures the device places easily and does not require excessive space.
5,6,8 Actuator weighs less than 5 lbs. A user can more easily carry a lighter device. 5,6,8 Water sensor weighs less than 2
lbs.
Makes sensors light enough to place at user friendly locations
5,8 Speaker outputs warning beep no louder than 80 dB, and no quieter than 50 dB.
Typical alarm clocks are built between 50-100 dB. Warning sound must have dB in this range to hear from anywhere in house.
Marketing Requirements 1. Affordable
2. Autonomous
3. Low Power Consumption 4. Accurate Pump Control 5. Unobtrusive
6. Easy to Install 7.Weather Resistant 8.User Friendly
Chapter 3: System Design and Functional Decomposition
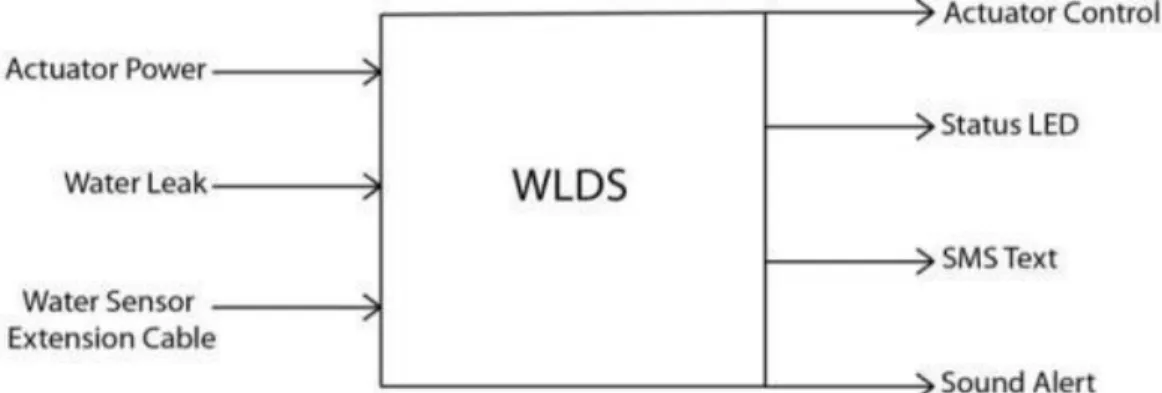
Chapter 3 will focus on the main design of the WLDS system and a functional breakdown of each component within the system. Figure 3-1 and Table 3-1 show the level 0 block diagram and the input signals of the WLDS system consecutively. The microcontroller within the WLDS relies on the data from the water sensor to accurately control the water pump. For simplicity and ease of use, the AC power source provides power to the fuse and actuator. The microcontroller then makes a decision based on the status of the sensor, and it outputs a signal to the actuator, sends a text alert to the user, and sounds an 80 dB alarm so the user can hear when home.Figure 3-1: Level 0 Block Diagram TABLE 3-1
LEVEL 0 WATER LEAK DETECTION SYSTEM FUNCTIONAL REQUIREMENTS
Module Water Leak Detection System
Inputs -Actuator Power
-Water Sensor: Sensitive to 1.5mL -Sensor Extension Cable: Extra sensing radius
Outputs -SMS alert text message
-Actuator Control: Shuts off main water pump when detected leak
-Status LED: Turns red when powered on
-Sound Alert: 80 dB alarm
Functionality Water sensor detects leak at water reservoir. Alerts the user via sms message and alarm. Actuator shuts off main water pump.
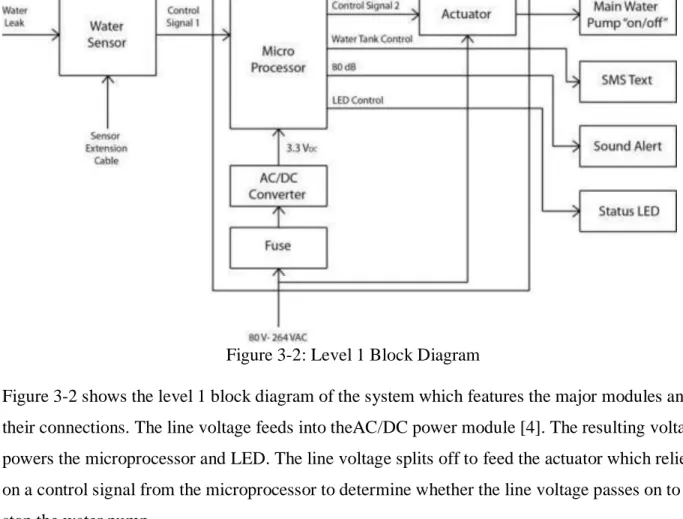
Figure 3-2: Level 1 Block Diagram
Figure 3-2 shows the level 1 block diagram of the system which features the major modules and their connections. The line voltage feeds into theAC/DC power module [4]. The resulting voltage powers the microprocessor and LED. The line voltage splits off to feed the actuator which relies on a control signal from the microprocessor to determine whether the line voltage passes on to stop the water pump.
TABLE 3-2
LEVEL 1 WLDS - 1A SLOBLO FUSE
Module -1A SLOBLO FUSE
Inputs -Power: ~80-264 VAC 50/60Hz
Outputs -Power: ~80-264 VAC 50/60Hz
Functionality -Protect the AC/DC converter from large
currents
Table 3-2 shows information about the 1A SLOBLO fuse. This fuse provides overcurrent protection for the AC/DC converter [2]. SLOBLO allows short surges of current through
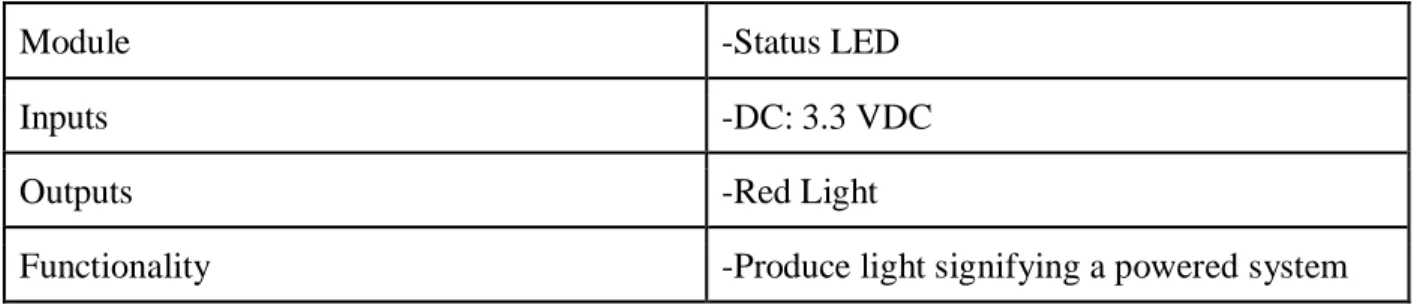
TABLE 3-3 LEVEL 1 WLDS - LED
Module -Status LED
Inputs -DC: 3.3 VDC
Outputs -Red Light
Functionality -Produce light signifying a powered system
Table 3-3 shows information regarding the LED. The LED uses the power output of the AC/DC converter to produce light, signifying power to the system.
TABLE 3-4
LEVEL 1 WLDS - POWER MODULE
Module -AC/DC Converter
Inputs -Power: ~80-264 VAC 50/60Hz
Outputs -DC: 3.3 VDC
Functionality -Rectify the AC signal and steps down the DC
voltage to 3.3V.
Table 3-4 shows information about the AC/DC Converter module. The AWPC accepts universal AC input such that the AWPC could be used anywhere regardless the available local residential AC input. In this module the system rectify the AC signal provided by an electricity company, then step down the DC voltage to 3.3V [6].
TABLE 3-5
LEVEL 1 WLDS - WATER SENSOR MODULE
Module -Water sensor
Inputs -Water Leak
-Sensor Extension Cable
Outputs -Control Signal 1: 3.3 VDC
Functionality -Constantly monitoring for water leak.
Table 3-5 shows the module for the Water Sensor. The module monitors a given area for a water leak. As an example, the sensor has an output signal of 3.3V which outputs a control signal to the microcontroller when the system detects a leak.
TABLE 3-6
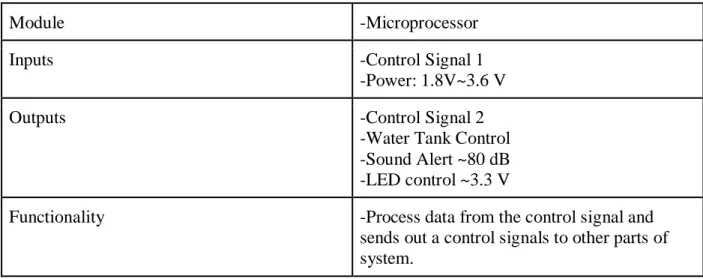
LEVEL 1 WLDS - MICROPROCESSOR MODULE
Module -Microprocessor
Inputs -Control Signal 1
-Power: 1.8V~3.6 V
Outputs -Control Signal 2
-Water Tank Control -Sound Alert ~80 dB -LED control ~3.3 V
Functionality -Process data from the control signal and
sends out a control signals to other parts of system.
Table 3-6 shows the input and output signals of the Microcontroller module. The microcontroller processes data acquired from the water sensor and sends an output signal to the actuator. The microprocessor also produces a sound alert and text alert, when it receives the input.
TABLE 3-7
LEVEL 1 WLDS - ACTUATOR MODULE
Module -ACTUATOR
Inputs -Power: ~80-264 VAC 50/60Hz
-Control Signal 2
Outputs -Main Water Pump “On/Off”
Functionality -Shut the main water pump off when control
signal is received.
Table 3-7 shows the input and output signals information of the actuator module. This module waits for the controls signal 2 to activate to stop (or deactivated to start) pumping water to into the user's home.
The WLDS modules building process is recorded below in Chapter 4, as well as the estimated and actual cost of the project.
Chapter 4: Project Planning
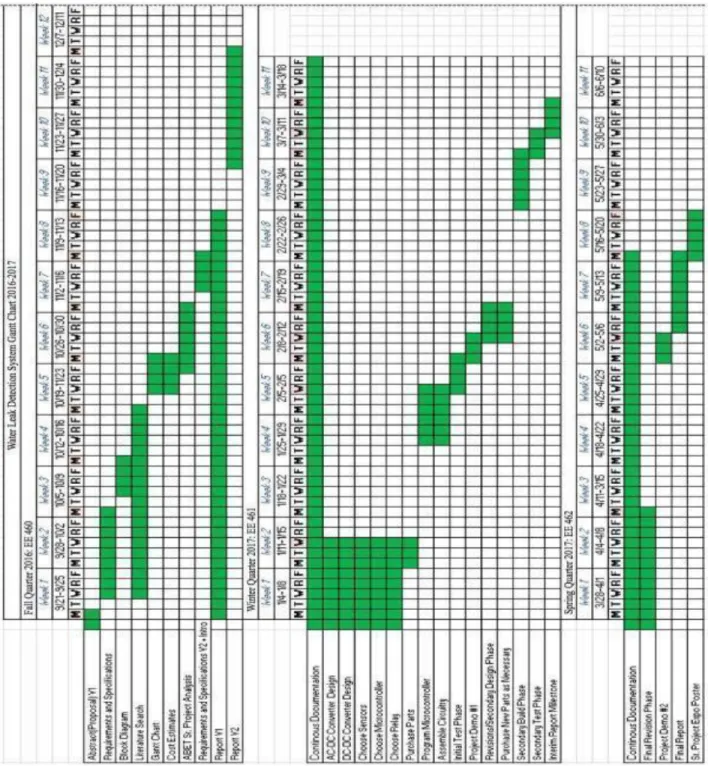
Chapter 4 includes the WLDS Gantt charts for Fall, Winter, and Spring Quarter. The major project milestones are within these Gantt charts. Along with the planning, this chapter includes cost estimates for each quarter and the actual cost at the end of the project.
Figure 4-1: Project Gant Chart
Figure 4-1 shows the scheduling for the major project milestones. This includes two designs and build iterations as well as a design review and time for ordered parts to arrive.
Figure 4-2: Winter 2017 Project Gantt Chart
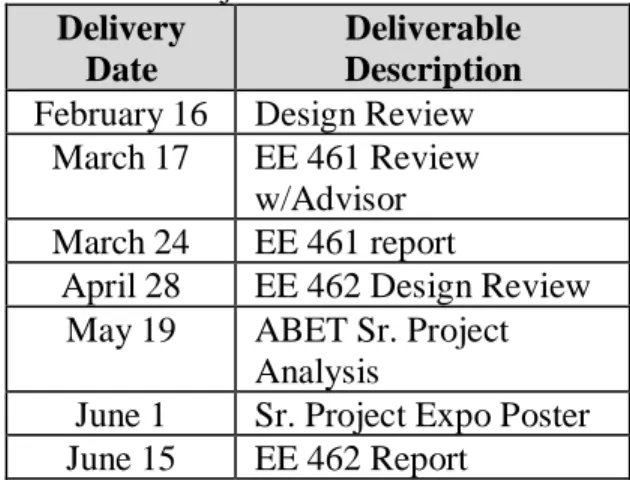
Figure 4-2 above shows certain project milestones completed by the end of winter quarter. TABLE 4-1
Project Deliverables Delivery
Date
Deliverable Description February 16 Design Review
March 17 EE 461 Review w/Advisor March 24 EE 461 report
April 28 EE 462 Design Review May 19 ABET Sr. Project
Analysis
June 1 Sr. Project Expo Poster June 15 EE 462 Report
Table 4-1 above shows the milestones completed for the WLDS throughout Fall, Winter, and Spring quarter.
TABLE 4-2
ESTIMATED PROJECT COSTS Cost Estimates
Item Cost
System Parts
Enclosure Material $40 Controller $15 Circuitry & Wires $30
Sensors $25 Subtotal $100 Testing Parts Water Pump $100 Tubing $20 Containers $20 Subtotal $140 Grand Total $240
Table 4-2 shows the anticipated cost estimates for the Water Leak Detection System. Simulating a water pump requires tubing and containers. Cost estimates include wires and circuit boards because the system requires wires to make connections between components and the circuit board to integrate the components. The section labeled other includes tools such as hot glue, and electric tape. And finally, the enclosure material serves as the material cost estimate for the box used to protect all the circuitry from the weather, dust, and water that may endanger the inner circuitry.
Assuming the average electrical engineer receives a pay between $25/hr to $35/hr and an estimated time of 200 hours to make the product, the labor costs range from $5000 to $7000. Using a most likely cost of $6000, the estimated labor cost equals the most likely cost.
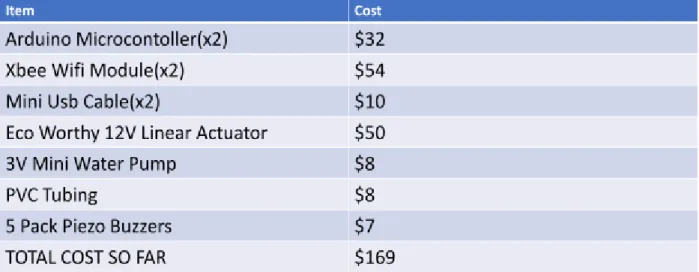
TABLE 4-3
WINTER 2017 PROJECT COSTS
TABLE 4-4
TOTAL PROJECT COSTS
Item Cost
Arduino Microcontroller(x2) $32
Xbee Wifi Module $54
Mini Usb Cable(x2) $10
Linear Actuator $20
Mini Water Pump $10
PVC Tubing $8
Piezo Buzzers $5
Circuitry and Wires $30
Water Sensor $10
SMS System $50
TOTAL COST $229
Table 4-4 above shows the cost breakdown of the project for Fall, Winter, and Spring Quarter.
Comparing tables 4-4 and 4-2 one will notice that the project only went over budget by 15%. The subsequent chapters include the bulk of the report which include design decisions, testing, results, and conclusions.
Chapter 5: System Design Decisions and Testing
Chapter 5 includes the bulk of the report and consists of the different modules for the WLDS. This includes design decisions and testing for the water sensor, XBee Wi-Fi modules, buzzer alarm, SMS alert system, and actuator control. This chapter also includes detailed explanations of each module and system schematics.
Module 1: Water Sensor Design
The liquid level sensor, built by ALSROBOT, displays the part number RB-02S048A. Amazon or EBay sell this part for under $2. It's very inexpensive. The sensor outputs an analog voltage proportional to the amount of liquid exposed to it. The sensor has a series of parallel wires across the board. These wires sense the liquid level that the board is exposed to. I simply connect the analog pin, represented by an S, to an analog pin on the Arduino board to read the analog value. The simplicity, cost, low power consumption and compatibility with the Arduino makes this water sensor the best decision for the project. The sensor operates on 5V and needs less than 20mA for operating power current, which means the Arduino can easily provide this (so no external power needed to power it). The liquid level sensor has 3 pins. It's very basic. Figure 5-1 below shows the pinout of the sensor [25].
Figure 5-1: ALSROBOT Water Sensor [25]
Two of the pins power the device, 1 connecting to the +5V of the Arduino and the other
connecting to the ground terminal of the Arduino. The other pin, with an S, stands for the signal pin. This pin outputs the analog voltage signal proportionate to the amount of water on the sensor covered with liquid. This pin connects to an analog pin on the Arduino board and monitors the value.
This value meets the sensitivity specification because an analog value of 600 equates to
approximately 6 droplets of water (1.5mL). After the LED worked with the Arduino for testing purposes, a buzzer alarm took its place. [25].
Figure 5-2: Arduino Microcontroller with Water Sensor Schematic [25]
The liquid level sensor board needs 5V of power from the 5V and GND pins on the Arduino. The signal pin (S) gets connected to an analog pin on the Arduino board. Here we connect it to analog pin A0. This allows the Arduino board to read the analog voltage value. The LED light has its anode terminal connected to digital pin D13 and its cathode.
Code
/*Code for Liquid Level Indicator Circuit Built with an Arduino*/
const int sensorPin= 0; //sensor pin connected to analog pin A0 const int ledPin= 13; //LED Pin connected to digital pin D13 int liquid_level;
void setup() {
Serial.begin(9600); //sets the baud rate for data transfer in bits/second pinMode(sensorPin, INPUT); //the liquid level sensor input to the arduino pinMode(ledPin, OUTPUT); //the LED output
}
void loop() {
Serial.println(liquid_level); //prints out liquid level sensor reading for debugging delay(2000); //delays 2 s if (liquid_level >= 600){ digitalWrite(ledPin, HIGH); Serial.println(“Buzzer Buzzing!”); } else { digitalWrite(ledPin, LOW); } }
The commented code above explains itself for the most part. The sensorPin initialized to 0 and LED to 13. The liquid level variable holds the value of the analog value output from the sensor, serving as the sensor reading representing how much water leaks on the sensor. The setup function sets the baud rate.
The loop function repeats over and over. It reads the value from the sensorPin and stores it in the variable liquid_level. The serial monitor prints this value for debugging purposes.
The analogRead function, the most important function for the module, reads the sensor pin and outputs a value anywhere from 0 to 1023, proportional to the voltage from the sensor. If the sensor is submerged in no liquid, the Arduino registers a 0 reading. If the sensor is fully
submerged in liquid, it registers a full reading of 1023. A reading of approximately 600 equates to 1.5mL of water. Thus, when the reading grows above 600, the LED/speaker turns on,
Testing Module 1:
Figure 5-3: Serial Monitor Output of Water Sensor
Figure 5-3 above shows the analog values of the water sensor outputted to the serial monitor of the Arduino. A droplet of water (.25mL) was put onto the sensor using a pipette and by the 6th drop (1.5mL), the analog value reached 600, thus activating the buzzer speaker. The water sensor outputs exactly as predicted and takes water as an input, converts it to a readable voltage, and turns on a buzzer speaker when the water content rises above threshold.
Module 2: XBee Radio Communication Design
Wi-Fi could work for my project but the power consumption is too high and the high data rate proves unnecessary. Bluetooth is useful for control but not applicable for sensor networks such as the WLDS. The XBee has a low data rate (250kbit/s), low power consumption, and is used to create mesh-type sensor networks making it the perfect fit for the WLDS. Each XBee device can communicate with one another, and through each other via a mesh network to devices out of range.
Figure 5-4: Pinout of XBee S2C [27]
The schematic above depicts the pinout of the XBee Radio Module. The main pins used for this project include the Data Out/in, Gnd, 5V, and one of the i/o pins which connects to the water sensor. The XBee, programmed through software called XTCU, allows users to directly assign the XBee parameters such as IP Address, sample rate, router/coordinator functionality.
ZigBee defines three different device types: coordinator, router, and end device. Coordinator
ZigBee networks always have a single coordinator device. The coordinator starts the network, selecting the channel and PAN ID. It also buffers wireless data packets for sleeping and end device children and distributes addresses, allowing routers and end devices to join the network. The coordinator manages the other functions that define the network, secure it, and keep it healthy. This device cannot sleep and must constantly run.
Router
A router equates to a full-featured ZigBee node. This device can join existing networks and send, receive, and route information. Routing involves acting as a messenger for communications between other devices too far apart to convey information individually.
Can buffer wireless data packets for sleeping end device children. Can allow other routers and end devices to join the network. A router cannot sleep and may have multiple router devices in a network [27].
End device
An end device describes essentially a reduced version of a router. This device can join existing networks and send and receive information, but cannot act as messenger between any other devices. Cannot allow other devices to join the network.
XBee features Transparent Mode (AT) or Application Program Interface Mode (API). The first mode makes sure the XBees function properly and work with XCTU software and a USB cable only. In transparent mode, if I sent a packet of data saying “Hello World” from the router XBee, the coordinator XBee should receive the information and display “Hello World” on its serial monitor. API mode utilizes the XBees’ data pins, allowing interfacing with a microcontroller. The WLDS utilizes API mode to transmit the analog data from the water sensor to a remote location via wireless communication [27].
The XBee transceivers have a 2mm pin spacing which does not interface with the standard 0.1 inch breadboard. There are several different breakout boards that bypass this spacing [27]. The various adapter boards also allow for connection through USB or serial to your computer. The breakout board used here has a UART to USB conversion circuit to connect the XBee to the computer and X-CTU software easily.
Figure 5-5: Image of XBee USB Adapter [27]
One can see from the image above that adapter has just the right number of pins to mount the XBee, solder points that make it easy to hook up the adapter to a breadboard, and most importantly a mini USB port used to connect the XBee directly to the computer to change parameters.
Testing Module 2: Connecting to and Using the XCTU Software
Figure 5-6: XTCU Software Parameters
The Figure above shows the configuration of two different XBees. Both XBees connect to the computer using the adapter shown in figure 5-5 and a USB to mini USB cable. The XBee in the top right corner with a C by it stands for coordinator XBee and the other with no letter stands for router XBee. Once one XBee initializes to the coordinator, all subsequent XBees connected automatically initialize as Routers unless changed within XTCU. Most of the XBEE parameters remain unchanged except for a few important ones.
The PAN ID allows the XBees to find one another remotely, so this number is the same for each XBee connection. The Channel Verification (JV) equals zero for the coordinator and one for the router. This parameter makes it easier for the router to find the coordinator, maintain connection while the coordinator remains powered on, and disables connection otherwise. Baud Rate equals 9600 and Sampling Rate equals 50ms [27].
Testing Module 2: AT Communication Between Two XBees Using Serial Communication
Figure 5-7: Block Diagram of XBees in Transparent Mode
The block diagram above depicts a simple connection between two XBees and a computer. The XBees use adapters to function properly with the computer via USB.
Figure 5-8: Successful Communication Between Two XBees in AT Mode
Figure 5-8 above shows the router XBee communicating with the coordinator XBee in AT mode. The green connection button in the image shows that the connection is open between the two XBees. In the router’s serial console (BLUE) I typed HELLO WORLD and as seen above, the Coordinator processed the information wirelessly and displayed the message received from the router in red.
Testing Module 2: AT Communication Between Two XBees With Two Arduino MCU’s
Figure 5-9: Block Diagram of Arduinos Driving XBees
Figure 5-9 shows the block diagram of two XBees in AT mode each connected to a MCU and this time the MCU connects to the computer via USB instead of the XBee. The difference
between this setup and the previous setup (Figure 5-7) is that instead of typing the message in via serial monitor and manually sending the message, this setup utilizes the Arduino MCU, crucial for the WLDS to work properly. The goal of this setup includes programming one Arduino to transmit a message and the other to receive and display the message wirelessly all through Code Composer Studio instead of XCTU software.
Code for Arduino w/XBee router void setup () { Serial.begin(9600); } void loop() { Serial.println("Hello World"); delay(5000); }
This code simply starts the serial monitor and prints “Hello World” to the screen every 5 seconds.
Code for Arduino w/XBee Coordinator void setup() { Serial.begin(9600); } void loop() { if (Serial.available()) { Serial.write(Serial.read()); } }
The code checks if the serial monitor’s availability. If available, the Coordinator XBee receives the message from the router XBee, sends it to the serial read port of the Arduino, and prints out “Hello World” wirelessly.
Figure 5-10: Successful Communication Between Two XBees Using Arduino MCU The figure above shows correct communication between XBees. First, the usbmodem numbers at the top of the two serial monitors differedfrom one another. This means that I have two
Arduinos plugged into my laptop, one running the Coordinator Code, and the other running the Router code. Usbmodem1421, the coordinator XBee, clearly receives “Hello World” from the router XBee every 5 seconds. Wireless communication is established between the two XBees using only the Arduino MCU, and now the router XBee can wirelessly transmit water sensor data to the coordinator XBee.
Testing Module 2: XBee Communication Using API Mode
API (Application Programming Interface) mode is a frame-based method for sending and receiving data to and from a radio's serial UART, an alternative to the default transparent mode [27].
The API allows the programmer the ability to:
-Change parameters without entering command mode (XBee only)
-View RSSI and source address on a packet by packet basis (XBee 802.15.4 only) -Receive packet delivery confirmation on every transmitted packet
The WLDS needs API mode to function properly, because it allows transmitting of data frames between the water sensor, Router XBee, and Coordinator XBee. The data below shows an example of the router sending a message to the coordinator in frame form, how to read the frames explained in the following passages [27].
The data below shows the frames received by the coordinator when the router sent the message “Hello” in packet form.
Figure 5-11: Serial Console of Router XBee
Figure 5-11 above shows a screenshot of the router XBee’s serial console. Seen above, packet zero, which translates in hex to “Hello”, transmits via mesh networking to the Coordinator XBee.
Figure 5-12: Serial Console of Coordinator XBee
As seen in the figure above, the coordinator XBee received the packet of data from the router XBee.
Receive Packet (API 1)
7E 00 11 90 00 13 A2 00 41 66 59 D2 81 3B 01 48 65 6C 6C 6F 37 Start delimiter: 7E
Length: 00 11 (17)
Frame type: 90 (Receive Packet)
64-bit source address: 00 13 A2 00 41 66 59 D2 16-bit source address: 81 3B
Receive options: 01 RF data: 48 65 6C 6C 6F Checksum: 37
The data above represents different information received by the Coordinator from the router. Each set of Bytes represent different parameters about the XBee. For this line of Bytes, the light blue set holds the highest precedence. This set represents the ASCII characters “H,e,l,l,o” in Hex starting with byte 48 and ending with byte 6F.
Module 3: Actuator Control
Figure 5-13: 12V DC Eco-Worthy Linear Actuator [28]
The figure above shows the actuator used to stop water flow when the WLDS detects a leak. The specs include an input voltage of 12V DC, a starting current of 0.8A, and max current of 3A. The actuator has a max load of 1500N/Push, a speed of 5.7mm/s, stoke length of 4 inches and duty cycle of 25%.
Testing Module 3: Actuator Control
A 2-channel relay utilizes communication between the Arduino Uno Microcontroller and the Eco-Worthy Actuator. The relays control the direction the actuator moves. They work by using current from the input source to activate an electromagnet, which pulls a switch that allows higher currents on the opposite side of the relay to flow.
Figure 5-14: Control Relay Options [28]
On the control side of the relays a GND pin, IN pins numbered from 1 to 8 depending on the relay model, and a VCC pin exist. The relays require power to stay activated,so a stable 5V power supply works. Otherwise the Arduino has trouble powering the higher channel relay modules. On the control side of the relay, 5V power supply connects to the VCC and GND pins. Next, the IN pin connects to the corresponding Arduino pin, then the relays activate once the IN pins connect to the GND pins. On the relay side, there exist three main parts of each relay, and three screw terminals [26].
Figure 5-15: 2-Channel Relay Terminals [28]
These terminals refer to the Normally Closed (NC) connection, the top one, the Common (COM) connection, the middle one, and the Normally Open (NO) connection on the bottom. If no
connections to the IN pin exist, then the relay connects between the NC and COM terminals. If the 5V power source connects to the IN pin, then the relay connects between the NC and COM terminals as well. Finally, the user connects the IN pin to the GND pin, the relay connects between the NO and COM terminals [26].
Figure 5-16: Complete Setup of Actuator Control Module [27]
Figure 5-16 above shows the complete setup of the actuator module. This tests the actuator and makes sure it functions properly. The code below controls the actuator using Arduino.
const int forwards = 7;
const int backwards = 6;//assign relay INx pin to arduino pin void setup() {
pinMode(forwards, OUTPUT);//set relay as an output pinMode(backwards, OUTPUT);//set relay as an output }
void loop() {
digitalWrite(forwards, LOW);
digitalWrite(backwards, HIGH); //Activate the relay one direction
delay(2000); // wait 2 seconds
digitalWrite(forwards, HIGH);
digitalWrite(backwards, HIGH); //Deactivate both relays to brake the motor delay(2000);// wait 2 seconds
digitalWrite(forwards, HIGH);
digitalWrite(forwards, HIGH);
digitalWrite(backwards, HIGH); //Deactivate both relays to brake the motor delay(2000);// wait 2 seconds
}
Module 4: Text Message Alert Module
GSM
GSM, an international standard for mobile telephones, stands for Global System for Mobile Communications, or also 2G.
To use GPRS for internet access, and for the Arduino to request or serve webpages, the user needs to obtain the Access Point Name (APN) and a username/password from the network operator.Among other things, GSM supports outgoing and incoming voice calls, Simple Message System (SMS or text messaging), and data communication (via GPRS) [28].
The Arduino GSM shield 2 acts like a GSM modem. From the mobile operator perspective, the Arduino GSM shield looks just like a mobile phone. From the Arduino perspective, the Arduino GSM shield 2 looks just like a modem.
GPRS
GPRS is a packet switching technology that stands for General Packet Radio Service. It can provide idealized data rates between 56-114 kbit per second. The user can also access the internet using the GSM shield. Like the Ethernet and WiFi libraries, the GSM library allows the Arduino to act as a client or server, using http calls to send and receive web pages [28].
Digital pins 2, 3 and 7 are reserved for communication between the Arduino and modem and cannot be used by one’s sketches. Software Serial library handles communication between the modem and Arduino on pins 2 and 3.Pin 7 is used for the modem reset. When the yellow status LED turns on, it means the modem is powered, and the user can try connecting to the network.
Testing Module 4: Modem and Network Connection
This sketch checks the modem's IMEI number. Modems have unique IME numbers, and they use the numbers to identify valid devices that can connect to a GSM network. Once the modem reads the number, the Arduino prints out the connected network carrier and the signal strength of the network over the serial port.
// import the GSM library #include <GSM.h> // PIN Number
#define PINNUMBER "" // initialize the library instance
GSM gsmAccess(true); // include a 'true' parameter for debug enabled GSMScanner scannerNetworks;
GSMModem modemTest; // Save data variables String IMEI = "";
// serial monitor result messages String errortext = "ERROR"; void setup()
{
// initialize serial communications Serial.begin(9600);
Serial.println("GSM networks scanner"); scannerNetworks.begin();
// connection state
boolean notConnected = true; // Start GSM shield
// If your SIM has PIN, pass it as a parameter of begin() in quotes while(notConnected) { if(gsmAccess.begin(PINNUMBER)==GSM_READY) notConnected = false; else { Serial.println("Not connected");
} }
// get modem parameters
// IMEI, modem unique identifier Serial.print("Modem IMEI: "); IMEI = modemTest.getIMEI(); IMEI.replace("\n","");
if(IMEI != NULL) Serial.println(IMEI); // currently connected carrier Serial.print("Current carrier: ");
Serial.println(scannerNetworks.getCurrentCarrier()); // returns strength and ber
// signal strength in 0-31 scale. 31 means power > 51dBm // BER, the Bit Error Rate. 0-7 scale. 99=not detectable Serial.print("Signal Strength: "); Serial.print(scannerNetworks.getSignalStrength()); Serial.println(" [0-31]"); } void loop() {
// scan for existing networks, displays a list of networks
Serial.println("Scanning available networks. May take some seconds."); Serial.println(scannerNetworks.readNetworks());
// currently connected carrier Serial.print("Current carrier: ");
Serial.println(scannerNetworks.getCurrentCarrier()); // returns strength and ber
// signal strength in 0-31 scale. 31 means power > 51dBm // BER, the Bit Error Rate. 0-7 scale. 99=not detectable Serial.print("Signal Strength: ");
Serial.print(scannerNetworks.getSignalStrength()); Serial.println(" [0-31]");
}
After double checking the circuitry and the placement of the sim card, the program would still not run correctly using the Arduino GSM. I spent countless hours troubleshooting, and finally solved the problem. I figured out the sim card and code functions properly. Instead, the cell phone providers around the area (San Luis Obispo) do not support 2g anymore and the Arduino gsm shield that I had purchased only works on a 2g network. I bought a new 3G shield and everything worked perfectly.
Module 4a: New 3G Text Message Alert Module:
Figure 5-18: Adafruit FONA 3G [28]
The figure above shows the important pinouts of the Adafruit FONA, used to send an automated text message alert when a leak is present.
Device Specs
● Quad-band 850MHz GSM, 900MHz EGSM, 1800MHz DCS, 1900MHz PCs - connect onto any global GSM network with any 2G or 3G SIM.
● American Version dual-band UMTS/HSDPA 850/1900MHz WCDMA + HSDPA
● Fully-integrated GPS (Qualcomm PM8015 GPS) controlled and query over the same serial port ● Make and receive voice calls using a headset or an external 8Ω speaker + electret microphone ● Send and receive SMS messages
● Send and receive GPRS data (TCP/IP, HTTP, etc.)
● AT command interface used with 300, 600, 1200, 4800, 9600, 19200, 38400, 57600, 115200, 230K, 461K, 961K, 3.2M, 3.7M and 4.0Mbps
● Native USB support - plug it into a computer an
Required accessories to make FONA 3G work
● Required Lipoly Battery - 500mAh or larger. I used a 3.7V 1200mAh battery. ● 3G mini sim card. At&t GO sim cards work great.
● MicroUSB cable for charging the battery and communicating with the module over USB ● External uFL GSM Antenna - this slim one works great (or, if the designer wants to us an SMA
antenna - a uFL to SMA adapter cable.)
● External Active GPS Antenna (needs a uFL to SMA adapter too) Below are the pinouts and a description on what each one does.
● JST 2-pin - the battery input connector. It works with any Lipoly batteries, but, since the charge rate equals 500mA (and the cellular module can spike high current draw), a
500mAh or 1200mAh batteries works best.
● MicroUSB connector - the LiPoly/LiIon battery charging port.
● Headset jack - the 'standard' TRRS 3.5mm phone headset jack with stereo earphone and mono microphone
● The GSM antenna plugs in up top. To use the module for any voice or data communications as well as some SIM commands, the user needs an antenna.
● The designer can either use a uFL GSM attena like this, or use a uFL to SMA adapter and then an SMA antenna
The most important pins are broken out at the bottom of the board. All of the following fall under 3-5V input safe.
● Vio - THE MOST IMPORTANT PIN! The designer MUST drive with an external voltage from 3V-5V to set the logic level converter. The converter also buffers the indicator LEDs so
NOTHING appears to work unless power reaches this pin! The user should set the voltage to whatever voltage the microcontroller uses for logic. A 5V micro (like Arduino) should have it set to 5V, a 3V logic micro should set it to 3V.
● Key – The power on/off indicator tied to the button in the top left. Tie this pin to ground for 3 to 5 seconds to turn the module on or off. It's not a level signal ("low means off, high means on") - instead the designer must pulse it for ~5 seconds to turn off/on. The module comes by default off. Tie this permanently to ground if the designer never wants the micro to turn off the FONA for power saving.
● 5V - The USB 5V from the microUSB connector when it’s in and powered. Good if the designer needs to know when the microUSB plugged in and/or want to recharge the battery from an external plug.
● PS - The Power Status pin. Low when the module has no power and high when the module has power. If using the Key button or pin, the designer monitors this pad to see when the modules booted up.
● NS – The Network Status pin. It lights up/blinks to signal the status of the module and tied to the Net LED so for more detail see the LEDs section below.
● Reset - Module hard reset pin. By default, it has a high pull-up (module not in reset). Toggle this pin low for 100ms to perform a hard reset.
● RX (in) & TX (out) - The module uses UART to send and receive commands and data. Auto-baud so whatever Auto-baud rate sent "AT" after reset or boot equals the Auto-baud rate used.
to the microcontroller
● CTSout - The hardware flow control pin. This pin determines when the FONA 3G's serial buffer becomes full and when to stop and start data transfer to the FONA 3G from the microcontroller ● DTR - The hardware flow control pin, used with the FONA 3G to hang up calls, control
data/command mode for TCP/IP, etc.
● RI – The Ring Indicator, basically the 'interrupt' out pin from the module. By default, high and designer can configure RI to go low when it receives a call. The designer can also configure RI to go low when an SMS received.
● SPK+ and - : Used toconnect an external 8 ohm speaker.
● MIC + and -: Used to connect an external electret microphone and to bias the mic with 2V. LEDS
● PWR – Green. Lit when the module booted and running
● NET – Red. The designer can use this for checking the current state without sending an AT command:
Always on - module running but hasn't made connection to the cellular network yet
800ms on, 800ms off - the module has contacted the cellular network and can send/receive voice and SMS
200ms on, 200ms off - Active GPRS data connection
By watching the blinks the designer can get a visual feedback on whats going on.
● Charging – Orange and next to the microUSB jack. Indicates onboard charging lipo charge. ● Done – Green and next to the JST jack. Indicates that the battery charging finished.
Figure 5-19: Arduino and GSM Shield Schematic
The figure above is the schematic of the Arduino, FONA GSM, and computer tied together. Wiring with Arduino Microcontroller
● Vio connects to 5V
● GND connects to GND
● Key connects to GND (always on)
● RX connects to digital 2 ● TX connects to digital 3 ● RST connects to digital 4 #include "Adafruit_FONA.h" #define FONA_RX 2 #define FONA_TX 3
#define FONA_RST 4 // a large buffer for replies char replybuffer[255];
// We default to using software serial. If the coder wants to use hardware serial // (because softserial isnt supported) comment out the following three lines // and uncomment the HardwareSerial line
#include <SoftwareSerial.h>
SoftwareSerial fonaSS = SoftwareSerial(FONA_TX, FONA_RX); SoftwareSerial *fonaSerial = &fonaSS;
//
// HardwareSerial *fonaSerial = &Serial1;
Adafruit_FONA fona = Adafruit_FONA(FONA_RST);
uint8_t readline(char *buff, uint8_t maxbuff, uint16_t timeout = 0); void setup() {
while (!Serial); Serial.begin(115200);
Serial.println(F("FONA SMS caller ID test"));
Serial.println(F("Initializing....(May take 3 seconds)")); // make it slow so its easy to read!
fonaSerial->begin(4800); if (! fona.begin(*fonaSerial)) {
Serial.println(F("Couldn't find FONA")); while(1);
}
Serial.println(F("FONA OK")); // Print SIM card IMEI number.
char imei[16] = {0}; // MUST use a 16 character buffer for IMEI! uint8_t imeiLen = fona.getIMEI(imei);
if (imeiLen > 0) {
Serial.print("SIM card IMEI: "); Serial.println(imei); }
Serial.println("FONA Ready"); }
char fonaInBuffer[64]; //for notifications from the FONA void loop() {
if (fona.available()) //any data available from the FONA? {
int slot = 0; //The slot number of the SMS int charCount = 0;
//Read the notification into fonaInBuffer do {
*bufPtr = fona.read(); Serial.write(*bufPtr); delay(1);
} while ((*bufPtr++ != '\n') && (fona.available()) && (++charCount < (sizeof(fonaInBuffer)-1)));
//Add a terminal NULL to the notification string *bufPtr = 0;
//Scan the notification string for an SMS received notification. // If it's an SMS message, we'll get the slot number in 'slot' if (1 == sscanf(fonaInBuffer, "+CMTI: \"SM\",%d", &slot)) { Serial.print("slot: "); Serial.println(slot);
char callerIDbuffer[32]; //we'll store the SMS sender number in here
// Retrieve SMS sender address/phone number. if (! fona.getSMSSender(slot, callerIDbuffer, 31)) { Serial.println("Didn't find SMS message in slot!"); }
Serial.print(F("FROM: ")); Serial.println(callerIDbuffer);
//Send back an automatic response Serial.println("Sending reponse...");
if (!fona.sendSMS(callerIDbuffer, "Hey, I got your text!")) { Serial.println(F("Failed"));
} else {
Serial.println(F("Sent!")); }
// delete the original msg after processed // otherwise, fill up all the slots
// SMS anymore not received anymore if (fona.deleteSMS(slot)) { Serial.println(F("OK!")); } else { Serial.println(F("Couldn't delete")); } } } }
The code above checks to see if the Fona can receive and send a text. After getting the Arduino and Fona to work together correctly, the next step was to put all the modules together and get a working system, shown in detail below.
Complete System:
The WLDS includes two main modules: Module 1 and Module 2. Module , the bulk of the system, consists of the water sensor, sms alert, buzzer alarm, and xbee router. Module 2 consists of the actuator, relay module, and xbee coordinator.
Figure 5-20: SMS, Buzzer, XBee, and Water Sensor Network
All the components in Module 1 can run off the 9V battery, but the Fona 3G requires extra amperage to run properly via the external LiPoly Battery. The water sensor continuously
monitors for water at a certain sensitivity between its conducting wires. When the sensor reaches that certain sensitivity, the Arduino sends a signal over to the Fona through serial interface,
which then sends a text using it’s 3G capabilities to the user, thus notifiying the user that he/she has a leak and should return home shortly. The XBee Router also takes in the analog data from the sensor and sends it via mesh networking to the XBee Coordinator, part of Module 2
described below.
Figure 5-21: Actuator Control
The figure above describes Module 2 of the WLDS. After Module 1 detects a leak, the XBee coordinator receives this data and processes the data via the Arduino MCU. When the sensor detects water, the Arduino sends a signal to the relay activating the actuator and shutting off the main power. Once the sensor detects no water, the actuator retracts inward simulating turning the water back on.
CODE FOR MODULE 1: #include "Adafruit_FONA.h" #define FONA_RX 9 #define FONA_TX 8 #define FONA_RST 4 #define FONA_RI 7
#define alarmPin A4 . // defines the input pin from the FONA
#define notifyPhoneA "16144609437" // tel number to notify goes here const int buzzer = 13;
const int threshold = 300; // threshold value for alarm state char replybuffer[255]; // large buffer for replies
// these variables change:
int sensorValue = 600; // variable to store the value read from the sensor pin int var = 0;
#include <SoftwareSerial.h>
SoftwareSerial fonaSS = SoftwareSerial(FONA_TX, FONA_RX); SoftwareSerial *fonaSerial = &fonaSS;
Adafruit_FONA fona = Adafruit_FONA(FONA_RST); void setup() { pinMode(FONA_RI, INPUT); pinMode(buzzer, OUTPUT); pinMode(FONA_RST, OUTPUT); digitalWrite(FONA_RST, LOW); delay(100); digitalWrite(FONA_RST, HIGH); while (!Serial); Serial.begin(115200);
Serial.println(F("FONA SMS Alarm Notification v1")); Serial.println(F("Initializing....(May take 3 seconds)")); fonaSerial->begin(4800);
if (! fona.begin(*fonaSerial)) {
Serial.println(F("Couldn't find FONA")); while (1);
} Serial.println(F("FONA OK")); while (1) { uint8_t n = fona.getNetworkStatus(); Serial.print(F("Network status ")); Serial.print(n); Serial.print(F(": ")); if (n == 0) Serial.println(F("Not registered")); if (n == 1) Serial.println(F("Registered (home)"));
if (n == 2) Serial.println(F("Not registered (searching)")); if (n == 3) Serial.println(F("Denied")); if (n == 4) Serial.println(F("Unknown")); if (n == 5) Serial.println(F("Registered roaming")); if (n == 1) break; delay(500); }
Serial.println("FONA operational and notification system ready"); digitalWrite(buzzer, HIGH);
delay(1000);
digitalWrite(buzzer, LOW); }
// put your main code here, to run repeatedly: void loop() {
// read the sensor and store it in the variable sensorValue: int sensorValue = analogRead(A4);
if (sensorValue > 36) { // if the sensor reading equals less than threshold var = 1; } else { var = 2; } switch (var) { case 1:
Serial.println(sensorValue); // displays sensor reading during alarming status Serial.println("ALARM DETECTED!"); // displays that alarm detected Serial.println("Sending first notification...");
Serial.println(notifyPhoneA); digitalWrite(buzzer, HIGH);
the main water pump");
delay(5000); // delay to check for alarm reset
break; case 2:
Serial.println("System armed - not alarming"); // displays armed status Serial.println(sensorValue);
digitalWrite(buzzer, LOW);// displays sensor reading during armed status delay(3000); // delay to rerun program if alarm not sounding
break; }
}
CODE FOR MODULE 2:
const int forwards = 6;
const int backwards = 5;//assign relay INx pin to arduino pin void setup(){
Serial.begin(9600);
pinMode(forwards, OUTPUT);//set relay as an output pinMode(backwards, OUTPUT);//set relay as an output }
void loop() {
if (Serial.available() >= 21) { // Make sure the frame all there if (Serial.read() == 0x7E) { // 7E =the start byte
for (int i = 1; i<19; i++) { // Skip ahead to the analog data byte discardByte = Serial.read();
}
int analogMSB = Serial.read(); // Read the first analog byte data int analogLSB = Serial.read(); // Read the second byte
int analogReading = (analogLSB + (analogMSB * 256)); Serial.print(analogReading); } } if(analogReading > 36) { digitalWrite(forwards, HIGH);
digitalWrite(backwards, LOW);//Activate the relay one direction, they must differ to move the motor delay(2000); // wait 2 seconds\
else{
digitalWrite(forwards, LOW);
digitalWrite(backwards, HIGH);//Activate the relay the other direction, they must differ to move the motor
delay(2000);// wait 2 seconds }
Chapter 6: Conclusions and Recommendations
The main goal of this project is to provide an autonomous system that prevents excessive water damage within a household. After working on this project, I better understand the
difficulties people face when trying to create a product from scratch. The WLDS detects a water leak anywhere the user chooses to put it and alerts the user with a text message, in case of house vacancy. The WLDS differentiates itself from many products on the market today, because when leakage occurs,not only does it alert the user with an alarm and text message, but it also powers an actuator installed at the main water pump which shuts off the main water preventing further leakage. This project is more proof of theory than application, because of time and money constraints. This means that I only created one sensor network and created communication between the sensor and actuator, but if I had more time, the creation of multiple around the house would increase the product efficiency. In addition, incorporating the actuator into the piping creates a better water shutoff network because it doesn’t shut off all the water in the house, instead, just where leakage occurs. All the specifications listed in Table 2-1 are met besides the price constraints. The prices of the components used in the project totaled $229, coming in 15% over budget. The final product met all performance requirements after testing, using water to simulate a leak. However, future improvements on the WLDS can still be made. Color coding the sensors would make it even more clear which one goes where. This implementation would make the installation process much easier for the customer by reducing the chances of incorrect installation. Water resistant packaging seems crucial to the product working correctly and meeting NFPA safety standards. Also, the XBee ADC pin can only reach 1.2V total, and the water sensor I used went up to 5V, so I spent too long troubleshooting this problem, before I realized the pin of the XBee malfunctioned instead of something wrong with my connections. To prevent this, incorporating a different Wi-Fi module into the system, or utilizing a simple voltage divider both fix the problem. Finally, the Arduino includes a low-power mode not utilized in this project. By changing the inputs of the sensors to interrupts, one could leave the microcontroller in low-power mode until it needs to perform an action. This could dramatically reduce its power usage.
References:
[1] TEXAS INSTRUMENTS INCORPORATED, 'DC-DC CONVERTER', 9 160 229, October 13, 2015.
[2] Hadipuro, 'Indonesia’s Water Supply Regulatory Framework: Between Commercialisation and Public Service?', Water-alternatives.org, 2010. [Online]. Available:
http://www.water-alternatives.org/index.php/allabs/111-a3-3-1/file. [Accessed: 17- Oct- 2016].
[3] Iec.ch, 'IEC - World Plugs: List view by location', 2016. [Online]. Available: http://www.iec.ch/worldplugs/list_bylocation.htm. [Accessed: 17- Oct- 2016].
[4] M. Rashid, Power electronics handbook. Burlington, MA: Butterworth-Heinemann, 2011.
[5] N. Sokal, K. Sum and D. Hamill, 'A capacitor-fed, voltage-step-down, single-phase, nonisolated rectifier', APEC '98 Thirteenth Annual Applied Power Electronics Conference and Exposition, vol. 1, 1998.
[6] R. Radzuan, M. Raop, M. Salleh, M. Hamzah and R. Zawawi, 'The designs of low power AC-DC converter for power electronics system applications', 2012 IEEE International Symposium on
Computer Applications and Industrial Electronics (ISCAIE), 2012. 42
[7] TEMCo, 'Float Switch Selection Guide', Temcoindustrialpower.com, 2015. [Online].
Available:http://www.temcoindustrialpower.com/product_selection.html?p=float_switch_selection_g u ide. [Accessed: 22- Oct- 2016].
[8] Weifeng Huang, Tao Zeng, Liping Ye and Zhen Li, 'A self-acting water pump control system for residential buildings based on resonance water level sensor', 2011 International Conference on Electric Information and Control Engineering, pp. 265-357, 2011.
[9] B. Popkin, K. D'Anci and I. Rosenberg, "Water, hydration, and health", Nutrition Reviews, vol. 68, no. 8, pp. 439-458, 2010
[10] Jong-Chull Shon, “Water level sensor,” US6810732 B2, 2 Nov., 2004.
[11] R. Ford and C. Coulston, Design for electrical and computer engineers. Boston: McGrawHill, 2008.
[12] "Mouser Electronics - Electronic Components Distributor", Mouser.com, 2016. [Online]. Available: http://www.mouser.com/. [Accessed: 20- Oct- 2016].
[13] "Arduino UNO," Arduino.org, 2016. [Online]. Available:
http://www.arduino.org/products/boards/arduino-uno. Accessed: Oct. 17, 2016.
[14] "Electronic & electronics components depot United States," 2016. [Online]. Available: https:// www.emartee.com. Accessed: Oct. 21, 2016.
New York: McGraw-Hill Companies, The, 1987.
[16] G. Martinsanz, "Sensors for fluid leak detection," Sensors, vol. 15, no. 2, pp. 3830–3833, Feb. 2015.
[17] Ghazarian, John, Ruggieri, Tom and Balaster, Ammon. (2009). “Secure Wireless Leak Detection System. World Intellectual Property Organization (WIPO)”, WO/2009/017512.
[18] Gray Douglas (GB).(2008). Water leak alarm for premises using acoustic signal sent from water meter. Intellectual Property Office. GB2447903 (A).
[19] Yi-Bong Lin, Imrich Chlamatac. (2001). “Wireless and Mobile Network Architectures”. Editorial Wiley. ISBN 0-471-39492-0.
[20] S. Ferdous Hoque, “Water Conservation in Urban Households : Roles of Prices, Policies and Technologies”, IWA Publishing, April 2014.
[21] [Online]. Available: http://www.coachfederation.org/files/includes/docs/168-Double-Figure-Increase-In-Productivity-(coaching-process).pdf. Accessed: Dec. 12, 2016.
[22] D. Tan, “8 Things You Should Know About Water & Semiconductors”, China Water
Risk. http://chinawaterrisk.org/resources/analysis-reviews/8-things-you-should-know-about-water-and-semiconductors/ July 11, 2013.
[23] W. DeOreo, “California Single Family Water Use Efficiency Study” The California Department of Water Resources.
http://www.irwd.com/images/pdf/save-water/CaSingleFamilyWaterUseEfficiencyStudyJune2011.pdf June 1, 2011.
[24] D. Meadows, “Leverage Points: Places To Intervene In A System”, Whole Earth Winter, 1997. [25] "
http://www.learningaboutelectronics.com/Articles/Arduino-liquid-level-indicator-circuit.php". Arduino.cc. N.p., 2017. Web. 29 May 2017.
[26] Belloc, Hilaire. On. Freeport, N.Y.: Books for Libraries Press, 1967. Print.
[27] "Exploring Xbees And XCTU https://www.sparkfun.com/products/11812". Learn.sparkfun.com. N.p., 2017. Web. 29 May 2017.
[28] Industries, Adafruit. "Adafruit Industries, Unique & Fun DIY Electronics And Kits". https://www.adafruit.com/product/3147. N.p., 2017. Web. 29 May 2017.
[29] Mao, Guoqiang, and Bariș Fidan. Localization Algorithms And Strategies For Wireless Sensor Networks. Hershey, PA: Information Science Reference, 2009. Print.
Appendix A: Senior Project Analysis
Project Title: Water Leak Detection SystemStudent’s Name: Ryan Hanson Advisor’s Name: Dr. Braun
● Summary of Functional Requirements
The Water Leak Detection System WLDS has a couple of main components. The water sensors,
the microcontroller, and the DC Motor. The Motor runs off line voltages between ~80-264 VAC. The sensors are battery powered as well as the microcontroller. A user installs the motor directly into the main water pump and places the microcontroller/water sensor system around the house where they feel a water reservoir needs monitoring. With no further actions necessary, the WLDS monitors the water reservoir for any leaks present and alerts the user when it finds one. Responding to the found leak, the motor shuts off the main water pump preventing any further leakage.
● Primary Constraints
There exist both monetary and location-based constraints associated with this project. The WLDS must function in various countries such as the U.S. which uses 110V or Indonesia which uses 220V. One must also keep in mind the various wall outlet types [3]. Making the system easy to install and independent of the users’ water system offers yet another challenge. This may require designing protection circuitry in case a user makes a mistake during installation. The water sensors must also meet NEMA standards.
Building a non-intrusive actuator system is also challenge. Non-intrusive systems exist, but they sell for a much greater price than intrusive systems, which indicates greater implementation difficulty. If this fails, I plan to relax my spec to an intrusive system. The power consumption of the WLDS also presents difficulty. The actuator operates off the electrical mains, but has a backup battery as well. The backup battery must last for at least 30 days, which sets a limit on the power consumption of the water sensor. I attempted to solve this problem firstly by optimizing the system to use a minimal amount of power. Because that didn’t meet the
specification, I moved onto a more expensive battery. The microcontroller deactivates the water pump if the water sensor detects 20mL or more water leakage. ¼ mL of water equals
approximately a drop of water from a faucet, so 20mL of water ensures no false alarm [9]. The actuator and water sensor used to deactivate the water pump is small and light enough for any user to carry and install. The actuator can obtain power from a wall socket which negates the need for additional power [4]. The water sensor features battery powered hardware, allowing maximum mobility so that it may run for at least 30 hours. Ideally, installation only requires mounting the water sensor, installing the actuator into the water pump, and plugging in the motor to the nearest residential power outlet. Table 2-1 summarizes detailed marketing requirements as well as the engineering specifications of the proposed WLDS.

![Figure 5-1: ALSROBOT Water Sensor [25]](https://thumb-us.123doks.com/thumbv2/123dok_us/9035876.2801393/22.918.197.738.579.758/figure-alsrobot-water-sensor.webp)
![Figure 5-2: Arduino Microcontroller with Water Sensor Schematic [25]](https://thumb-us.123doks.com/thumbv2/123dok_us/9035876.2801393/23.918.234.679.223.638/figure-arduino-microcontroller-water-sensor-schematic.webp)
